TryHackMe- Clocky

Hello folks,
This blog provides a walkthrough for a newly added machine on TryHackMe called “Clocky”. It has been classified as a Medium-level challenge. It will help you understand how to identify misconfigurations on Linux-based web servers using various penetration testing tools and techniques. Let’s proceed without any delay and begin the penetration process.
You can access the Clocky machine on TryHackMe by clicking here.
First, let’s start the machine by clicking “Start Machine”. We can start scanning the obtained IP using nmap with the help of the following command:

nmap -sC <Machine_IP>

1. nmap

We can see that 4 ports are open i.e. SSH (22) and others are HTTP ports- 80, 8000, and 8080. Also, we have robots.txt available here where 3 disallowed entries are present: *.sql, *.zip, and *.bak. Let’s confirm the same by visiting the robots.txt file using the following URL:

http://<Machine_IP>/robots.txt

We will find the above-mentioned disallowed entries with our first flag.

2. First flag

Now we can use gobuster to identify if there are any files available for these extensions on all HTTP ports. We will find that on port 8000, we have a file name index.zip using the following command:

gobuster dir –url http://<Machine_IP>:8000 -w /usr/share/wordlists/dirbuster/directory-list-2.3-medium.txt -x sql,bak,zip -t 50

Let’s download the file by visiting the URL on our browser. We need to decompress the file using the following command:

unzip index.zip

After decompressing the file, we will find 2 files; flag2.txt and app.py. We can first read the contents of the flag2.txt file to get our second flag.

3. flag2

The app.py file is a Python script. This file looks like the server-side code of the web application. After reading the code, we can understand that there are some web pages available on port 8080 such as /administrator, /password_reset, and /forgot_password which are related to authentication functionality.
Let’s explore the web pages one by one. If we go to /administrator page, we will find a login page that requires a username and password. The /forgot_password page requires us to provide a username for which the password reset token is generated whose algorithm is mentioned in the app.py file. From lines 96-98 of app.py, it is mentioned that the token is generated based on username and current date & time (including seconds as well.) To generate a token value, we have to write a code in Python.
After exploring, we wrote a code and uploaded it to our GitHub repository. In the script, we need to mention the username for which we want to generate the password reset token. In the app.py file, we found 4 usernames; clocky_user, administrator, jane, and clarice.
We have to run the script for all the users and after running it, we will find a token value that we can use to reset the password of the administrator user.

4 Got token

Now to reset the password, we need to visit the /password_reset webpage and there we need to provide a parameter called a token after that, we have to paste the obtained token value as follows:

http://<Machine_IP>:8080/password_reset?token=<Token_Value>

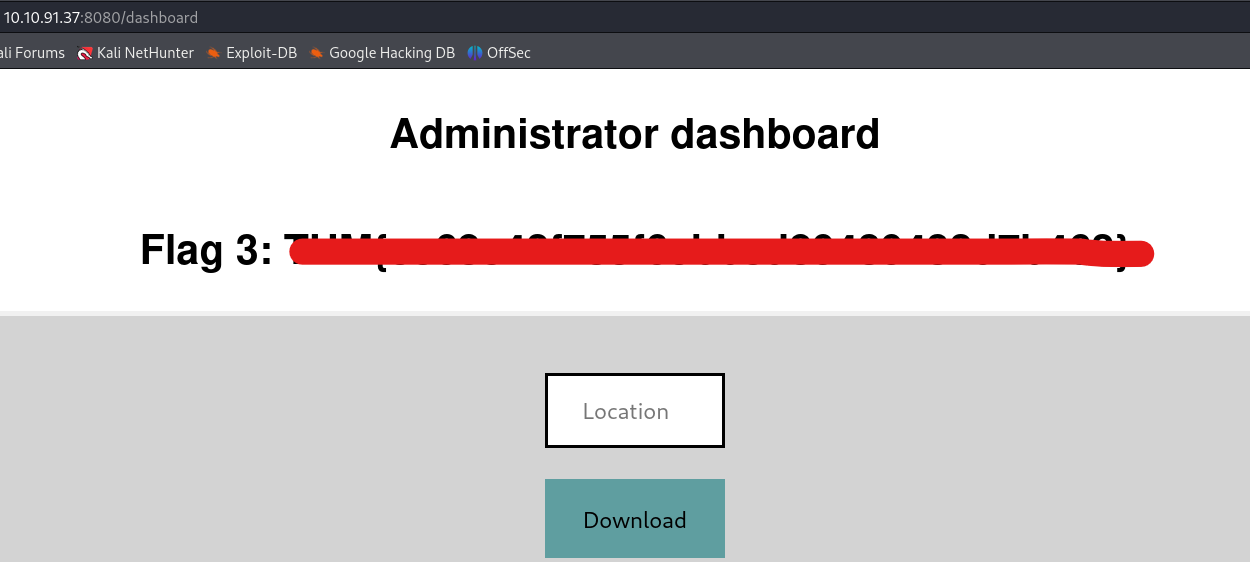
We will find that we can successfully reset the password of the administrator user. Now we can visit the /administrator webpage and finally log in as administrator users with the newly updated password. There we will find our third flag.

5. Flag3

Getting Foothold on Clocky

On the admin page, we have a functionality to download any file that is hosted on the web server but if we try to download any webpage using the following URL, we get an error saying “Action not permitted”:

http://localhost

We can bypass it by converting some characters to upper case. Also, we saw a database file in app.py named database.sql, so let’s try to download it by providing the following URL to the specified location:

http://Localhost/database.sql

We will find that the file is downloaded successfully. If we open the file we will find the fourth flag.

6. Flag4

If we further read the contents of the database.sql file, we will see that we have a password that we can try for different users to log in. Let’s create a wordlist for usernames and add the previously obtained usernames to the file. We can use this wordlist to perform a password-spraying attack with the help of the hydra tool using the following command:

hydra -L username.txt -p “Obtained_Password” ssh://<Machine_IP> -t 10

We will find that we obtained the SSH password for clarice user.

7. bruteforce

Let’s access the target machine using this credential pair with the help of the following command:

ssh clarice@<Machine_IP>

After logging in to the machine, we will find our fifth flag in the home directory of the clarice user.

Privilege Escalation on Clocky

To get root access to the machine, we have to find a way. If we check the contents of our home directory, we will find a folder named app under which we have an .env file. If we check the file, we will find the password for the MySQL database. So, let’s access the database using the following command:

mysql -u clocky_user -p

After running the above command, we will be asked to provide the obtained password. We successfully got access to the MySQL database. Now we can use the following commands to search for databases, tables, and their contents.

show databases;
use mysql;
select * from the user;

After running these commands we got some hashes but these hashes are not the exact password hash. We need to find a way to convert them. After a lot of research, we got to know about a way to get the password hashes of users on MySQL. We need to know the version of the MySQL server for this to work. We can check the same using the following command:

mysql -V

After running the above command, we can see that the version of MySQL is 8.0.34-0ubuntu0.20.04.1.
We found an article where the method to exploit the same is mentioned according to Mysql version 8. We can get the SHA256 hashes for all users using the following command:

SELECT `User`, CONCAT(‘$mysql’,LEFT(authentication_string,6),’*’,INSERT(HEX(SUBSTR(authentication_string,8)),41,0,’*’)) AS hash FROM mysql.user WHERE plugin = ‘caching_sha2_password’ AND authentication_string NOT LIKE ‘%INVALIDSALTANDPASSWORD%’ AND authentication_string !=”;

Now we need to copy each hash and provide the same to hashcat tool to crack them using the following command:

hashcat -m 7401 -a 0 hash.txt /usr/share/wordlists/rockyou.txt -O –session hash.txt

Here the hash mode is MySQL SHA256 hash. After a few minutes, we will find that one of the provided hash is cracked and we can see the clear text password using the following command:

hashcat -m 7401 –show hash.txt

8. roots password

Finally, let’s try this password for the root user and we will find that we are successfully logged in as root user. Now we can read the contents of sixth flag and solve the CTF.

In this machine, we understood the MySQL-related vulnerabilities and used many penetration testing tools like nmap, gobuster, hydra, and hashcat. We hope that the concepts and techniques discussed in this blog have been clear to you.
You can check out our other blogs on TryHackMe rooms here.

Happy Pentesting!!!
Team CyberiumX

Certified Ethical Hacker (CEHv13) Practical Exam

Hello Folks!

In this blog post, we’ll discuss about Certified Ethical Hacker (CEHv13) Practical exam. We will focus on essential tools, techniques, and strategies to help you successfully navigate the practical exam. After reading this blog, you won’t need additional resources. We’ll provide comprehensive explanations to ensure clarity on every aspect.

Let’s initiate the process to begin the 6-hour exam. Once your exam environment is fully set up, proceed with the following steps:

  • Use Nmap to find all the live devices in different subnets.
  • Write down the IP addresses of the devices that are turned on.
  • Then, use Nmap again to find out which services and ports are open on each device.
  • You can also use Nmap to figure out what operating system each device is using.
  • Note down these details next to the corresponding IP addresses.
  • Once you have this information, you can start working on the questions given to you for the exam and use this information when required.
  • Now let’s discuss the topics and required tools with commands that you should know for the exam.

Important topics and tools for the CEHv13 practical exam

1. Scanning using Nmap
  • Host discovery
  • nmap -PS -sn 192.168.0.0/24
  • nmap -PR -sn 192.168.0.0/24
  • TCP Port scanning
  • nmap -sS 192.168.0.10
  • nmap -sT 192.168.0.10
  • nmap -p21,22,80 192.168.0.10
  • nmap -p- -sS 192.168.0.10
  • UDP Port scanning
  • nmap -sU 192.168.0.10
  • Service version detection
  • nmap -sV 192.168.0.10
  • Operating System detection
  • nmap -O 192.168.0.10
  • Vulnerability scanning using scripts
  • nmap -sC 192.168.0.10 (We can use this for getting FQDN)
  • nmap –script=smb-enum-* -p21 192.168.0.10
2. Enumeration
  • Hydra tool for Brute-forcing
  • hydra -L username.txt -P password.txt 192.168.0.10 <Protocol_Name> -t 10
  • hydra -L username.txt -P password.txt 192.168.0.10 -s <Port_number> <Protocol_Name>
  • hydra -l username -P password.txt 192.168.0.10 -s <Port_number> <Protocol_Name>
  • FTP Enumeration
  • Brute-forcing Credentials using Hydra
  • To connect to FTP server-> ftp 192.168.0.10
  • To download files from the FTP server-> get flag.txt
  • To upload files to the FTP server-> put file.txt
  • SMB Enumeration
  • Brute-forcing Credentials using Hydra
  • nmap -p 445 –script=smb-enum-shares 192.168.0.10
  • nmap -p 445 –script=smb-enum-users –script-args smbusername=username,smbpassword=password 192.168.0.10
  • nmap -p 445 –script=smb-enum-groups –script-args smbusername=username,smbpassword=password 192.168.0.10
  • To list shares available on the SMB server using anonymous user-> smbclient -L //192.168.0.10
  • To list shares available on the SMB server using anonymous user-> smbclient //192.168.0.10/sharename
  • To list shares available on the SMB server using a username-> smbclient -L //192.168.0.10 -U username
  • To connect to any share of SMB server using a username-> smbclient //192.168.0.10/sharename -U username
  • To download files from the FTP server-> get flag.txt
  • To upload files to the FTP server-> put file.txt
  • RDP Enumeration
  • Brute-forcing credentials using Hydra
  • Metasploit Framework module to identify RDP service running on which machine- auxiliary/scanner/rdp/rdp_scanner
  • To access the windows machine-> xfreerdp /u:username /p:password /v:192.168.0.10:3389
  • SSH Enumeration
  • Brute-forcing Credentials using Hydra
  • To access the machine using SSH protocol-> ssh username@192.168.0.10 -p 22
3. Vulnerability Assessment
  • Nessus
  • On Windows, open the browser and type https://localhost:8834
  • Login to Nessus using default credentials- admin:password
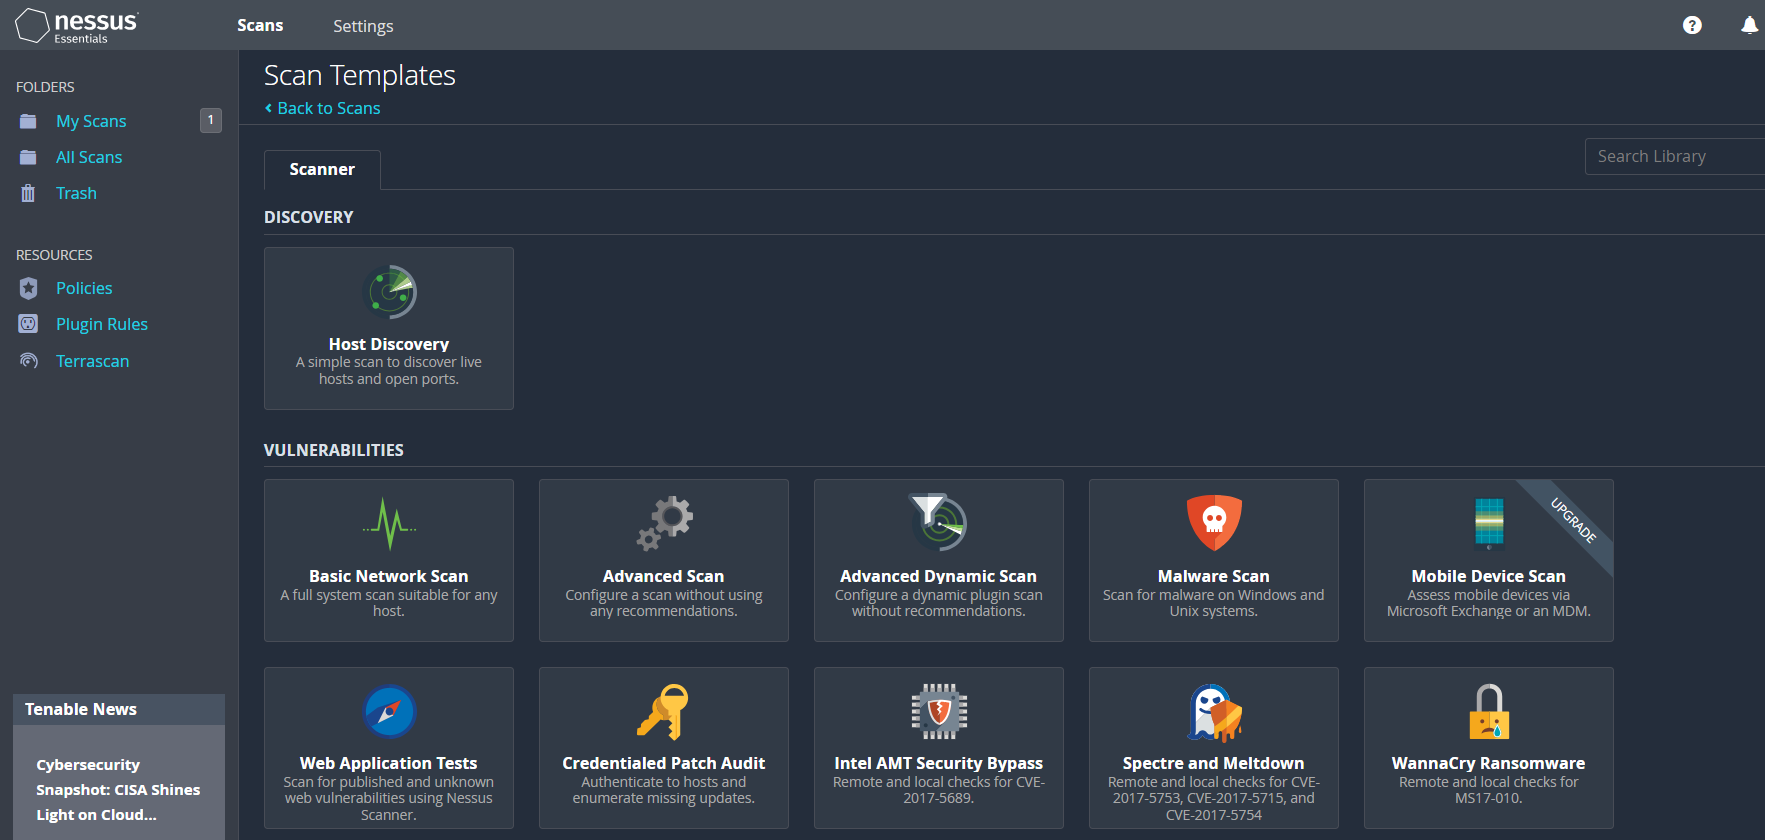
  • New Scan > Basic Network Scan

1. Nessus scan templates

  • Provide name and target IP address then finally save and launch the scan.
4. Sniffing/Packet Analysis using Wireshark
  • Filters
  • http.request.method==post
  • http.request.method==get
  • Stream– To see the whole conversation
  • Right-click the request and then select Follow > TCP Stream
  • Red will be the request that we sent to the server and Blue will be the response we receive from the server.
  • We can toggle between different streams using the Stream option followed by a number in the right-hand bottom of the window.
  • Extracting Files from the packet capture
  • Go to File > Export Objects > Select a protocol using which the file was transferred (HTTP).
  • Now sort the results and try to get some file types we can save on our machine.
  • Finding Comments
  • pkt_comment contains “searchString”
  • To find DoS/DDoS attack (sort by packets in IPv4 based on the number of Packets transferred)
  • Statistics > Conversations > IPv4 > Packets
  • Sort the results by Bytes/Packets
  • Checking communications of IoT devices
  • Search MQTT on the Wireshark filter.
5. Steganography
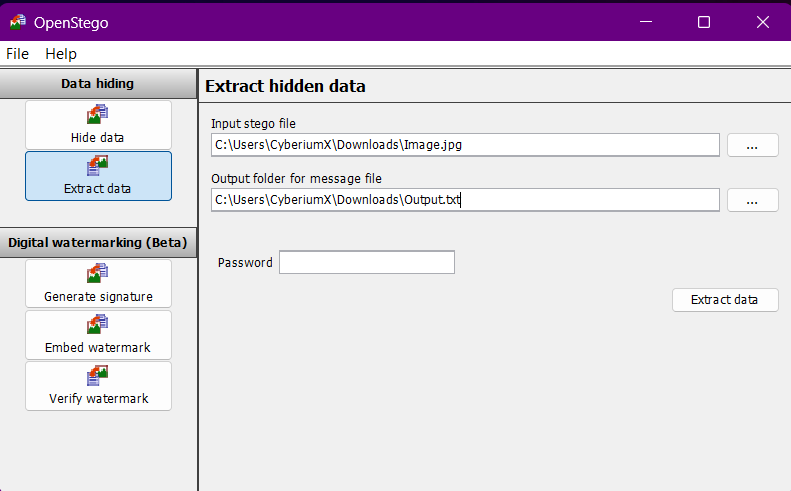
  • OpenStego– Used to hide and extract data behind images.
  • Select Extract -> Choose the image -> Provide an Output file -> Provide the password

2. OpenStego

  • Snow– Used to hide and extract data behind a txt file in the form of whitespaces.
  • To hide the data in txt file-> .\SNOW.EXE -C -m “Hello! Welcome to CyberiumX.” -p “passwd123” ‘.\cyberiumx.txt’ file.txt
  • To extract the hidden data from txt file-> .\SNOW.EXE -C -p “passwd123” file.txt cyberiumx.txt
  • Covert_tcp– Used to hide and extract data in TCP headers
  • To compile covert_tcp.c file-> cc -o covert_tcp covert_tcp.c
  • Sender machine-> ./covert_tcp -source <IP> -dest <IP> -source_port <port> -dest_port <port> -file <txt file name>
  • Eg-> ./covert_tcp -source 192.168.0.10 -dest 192.168.0.20 -source_port 9999 -dest_port 8888 -file source.txt
  • Receiver machine-> ./covert_tcp -source <IP> -source_port <port> -server -file <txt file name>
  • Eg-> ./covert_tcp -source 192.168.0.10 -source_port 8888 -server -file destination.txt
6. Web Application attacks
  • SQL Injection using SQLmap
  • To enumerate database names-> sqlmap –url http://192.168.0.10/?id=2 –dbs
  • Save the GET/POST request in a file from Burp Suite. Right-click on the request > Save item > Select location and save the file (req.txt).
  • To list database name-> sqlmap -r req.txt –dbs
  • To list tables of single database-> sqlmap -r req.txt -D <database name> –tables
  • To list all columns of a database table-> sqlmap -r req.txt -D <database name> -T <table name> –columns
  • To dump the data from database’s table-> sqlmap -r req.txt –D <database name> -T <table name> –dump
  • WordPress website enumeration using wpscan
  • To enumerate username from WordPress websites-> wpscan –url http://192.168.0.10 –enumerate u
  • To Brute-force password of user-> wpscan –url http://192.168.0.10 -U username -P password.txt
  • Directory Bursting using Gobuster
  • gobuster dir -u http://192.168.0.10 -w /usr/share/wordlists/dirb/common.txt -x txt -t 40
7. Android attacks
  • ADB (Android Debug Bridge) tool
  • To connect with Android device-> adb connect 192.168.0.10:5555
  • To list the connected devices running in the same network-> adb devices
  • To get the shell of the remote device-> adb shell
  • In a separate Linux shell, use the following command to upload a file on an Android device-> adb push demo.txt /sdcard/Download
  • To download a file from an Android device-> adb pull /sdcard/Download/contacts.vcf .
8. Cryptography
  • sha384sum tool
  • sha384sum file.txt
  • Online websites to crack non-salted hashes
  • CrackStation (https://crackstation.net/)
  • Hashes (https://hashes.com/en/decrypt/hash)
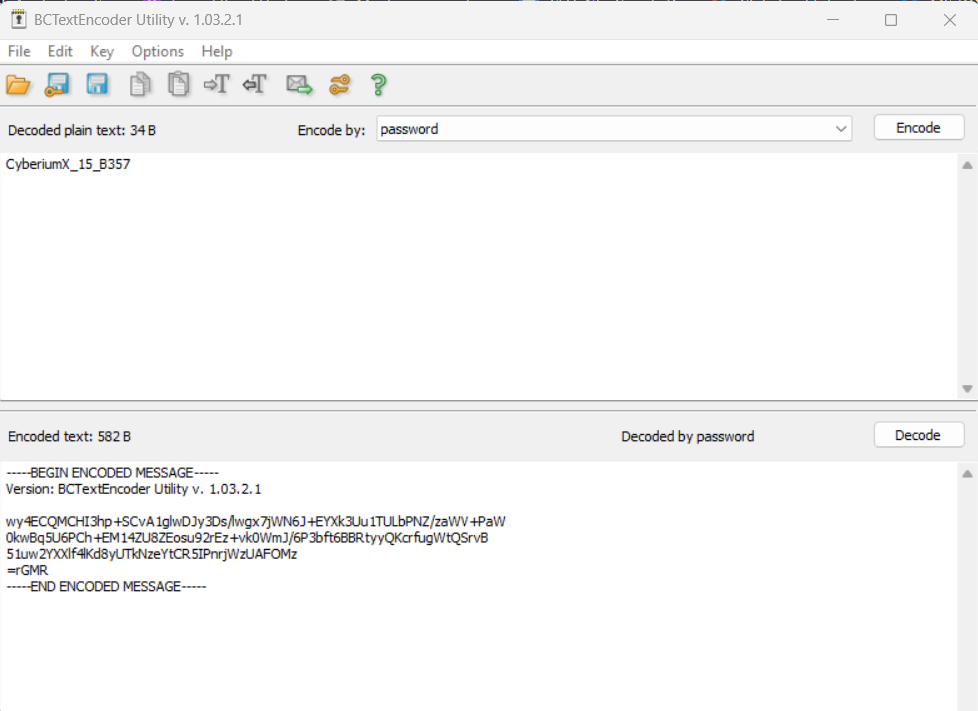
  • BCTextEncoder– To encode/decode the data
  • Paste the encoded text -> Click on Decode -> Provide the password

3.


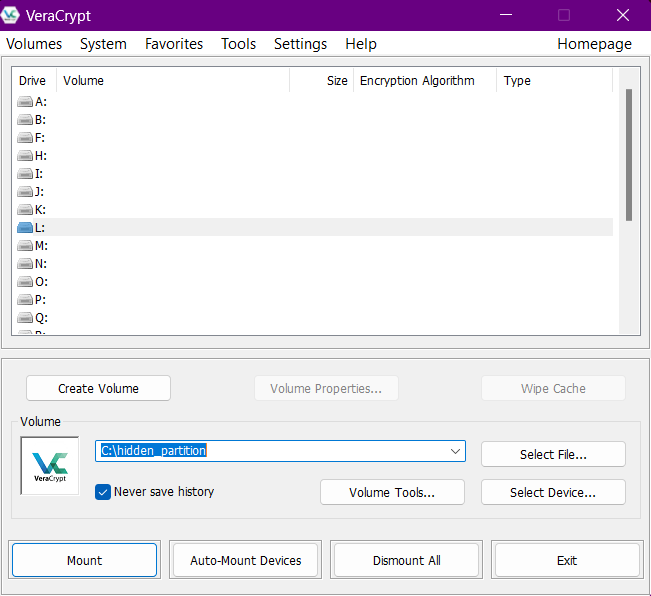
  • Veracrypt– To encrypt/decrypt files in/from partitions.
  • Select the file that has the hidden file system -> Select any drive letter -> Click Mount -> Provide the password
  • It will create a new drive where we will find the hidden content.

4. Veracrypt


9. Privilege Escalation
  • Insecure file/directory permission
  • To find the file containing the flag value-> find / -type f -name flag.txt 2>/dev/null
  • Run the ls -l command on the file to check the permission
  • Sudo Privileges
  • Command to check sudo privileges-> sudo -l
  • If you get any binary after running the above command then search the binary on GTFOBins (https://gtfobins.github.io/)
10. Wireless Attacks
  • Wi-Fi password cracking of WPA/WPA2/WPA3
  • aircrack-ng -w password.txt hashfile.cap
11. Malware Attacks:
  • Remote Access Trojan
  • From the Nmap result, look for default malware ports like 5552 (njRAT), 5110 (ProRAT), 6703 (Theef), and 9871 (Theef).
  • Now to connect with these ports, we require any one of the above-mentioned RAT software which you will find on the Windows machine.
  • Malware Analysis
  • Use DIE (Detect It Easy) and IDA pro tool to get the Entry point address of the malicious file.
  • Use DIE tool to get the version and hash of different components of the malicious file.

CEHv13 Practical Questions

Let’s explore the types of questions that might be presented in the CEH practical exam. Please keep in mind that while these questions are indicative, the actual exam may have different questions. However, having a good grasp of the tools and techniques outlined above will greatly enhance your chances of success.

  • Extract sensitive files hidden in an image file.
  • Get the severity score of a vulnerability.
  • Get remote access on an Android device and download files.
  • Brute-force SMB & FTP credentials and access them to download files.
  • Perform Nmap scan to identify web servers
  • Find FQDN of Domain Controller (Remember the machine on which you will find LDAP port open will be the Domain Controller).
  • Access the Linux machine using SSH and perform privilege escalation to read root files.
  • Access the volume encrypted by VeraCrypt.
  • Use BCTextEncoder to decode the flag.
  • Crack the hash.
  • Perform Malware analysis
  • From packet capture, identify a device IP that performed a DoS/DDoS attack and identify the packet size of any specific message.
  • Crack the password of the wireless network.
  • Access the machine using RAT.
  • Perform SQL injection to access database entries
  • Access sensitive files hosted on Web servers.

That covers everything required for participating in the CEH practical exam. We trust that the blog provided valuable information, and we extend our best wishes for your certification exam.

If you want to appear in Certified in Cybersecurity certification by (ISC)2 then you can visit our blog where we discussed how you can register and book your free slot for the CC exam and what you need to prepare for the CC exam.

Happy Pentesting!
Team CyberiumX